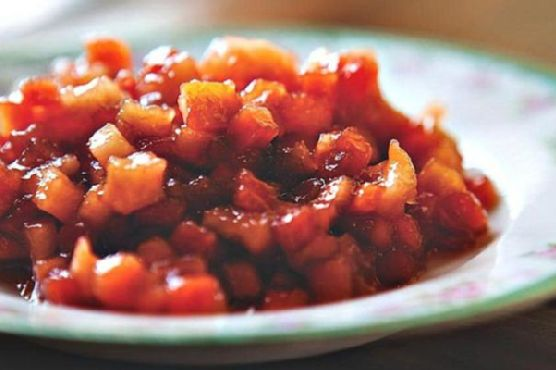
Fall Fruit Compote | Made by Meaghan Moineau

Fall Fruit Compote

Intro

There’s something magical about fall—the crisp air, the vibrant colors, and the comforting aroma of spices and fruits mingling together. Growing up, fall was always my favorite season. I remember sitting in my grandmother’s cozy kitchen, the windows fogging up as she cooked her famous fruit compote. The sweet and tangy smell would waft through the house, inviting everyone to gather around the table. Her secret? A touch of apple cider vinegar that added just the right amount of zing. Now, I carry on her tradition with my own version of this delightful Fall Fruit Compote, and I can’t wait to share it with you!

Why You’ll Love It

This Fall Fruit Compote is a hug in a bowl. Whether you’re serving it up as a side dish, a topping for potato latkes, or simply enjoying it on its own, this recipe is sure to warm your heart and soul. Here’s why you’ll absolutely love it:

  • Easy to Make: With just a few simple steps, you can have this delicious compote ready in no time.
  • Versatile: Serve it warm or cold, with breakfast or dessert—it complements any meal!
  • Full of Fall Flavors: The combination of apples, pears, and cinnamon captures the essence of autumn in every bite.
  • Customizable: Easily adjust the sweetness or tweak the spices to suit your taste.

Ingredients

  • 1 tablespoon butter
  • 2 cups diced honeycrisp apples
  • 1 cup diced pears
  • 1/2 cup dried cherries
  • 1 tablespoon apple cider vinegar
  • 1 cup apple juice, plus more as needed
  • 1/4 cup brown sugar
  • 1 cinnamon stick

Instructions

  1. Melt the butter in a medium saucepan over high heat.
  2. Add the diced apples, pears, cherries, vinegar, apple juice, brown sugar, and cinnamon stick.
  3. Cook for 5 minutes, stirring occasionally.
  4. Lower the heat to medium and cook for a few minutes more, until the fruit is tender and the liquid has boiled away.
  5. If necessary, add a bit more apple juice to keep the fruit from scorching.
  6. Remove the cinnamon stick and serve warm, ideally with potato latkes or your favorite dish.

Tips

Here are a few tips to ensure your compote turns out perfectly:

  • Choose the Right Apples: Honeycrisp apples are ideal for this recipe as they hold their shape well and add a natural sweetness.
  • Monitor the Liquid: Keep an eye on the liquid level to prevent the fruit from burning. Add more apple juice as needed.
  • Adjust Sweetness: Feel free to add more or less brown sugar based on your preference.

Variations & Substitutions

One of the best things about this compote is its adaptability. Here are some variations and substitutions you might consider:

  • Fruit Variations: Swap out the pears for peaches or add cranberries for a tart twist.
  • Sugar Alternatives: Use maple syrup or honey instead of brown sugar for a different sweetness profile.
  • Spice It Up: Add a pinch of nutmeg or cloves for extra warmth.

Storage

This delicious compote can be stored in an airtight container in the refrigerator for up to a week. Reheat gently on the stove or in the microwave before serving. You can also freeze it for up to three months—just thaw and warm it before enjoying.

FAQ

Can I use fresh cherries instead of dried?

Yes, fresh cherries can be used, though they will add more moisture to the compote. You might need to reduce the amount of apple juice slightly to compensate.

Is there a way to make this recipe vegan?

Absolutely! Simply substitute the butter with a plant-based alternative, such as coconut oil or vegan butter, and you’re good to go.

Can I make this compote in advance?

Definitely! This compote tastes even better the next day, as the flavors have more time to meld together. Just store it in the fridge and reheat when you’re ready to serve.

Nutrition

This Fall Fruit Compote is not only delicious but also packed with nutrients. Apples and pears are high in fiber and vitamin C, while cherries add antioxidants. While it does include sugar, you can easily adjust the amount to fit your dietary needs.

Conclusion

There you have it—a warm, comforting dish that captures the essence of fall in every bite. Whether you’re gathering with family or simply indulging in a cozy night at home, this Fall Fruit Compote is sure to be a hit. I hope it brings as much joy to your table as it does to mine. Happy cooking!

Related update: Fall Fruit Compote

Related update: Zabaglione with Roasted Plums

Summer Fruit Sangria | Made by Meaghan Moineau

Summer Fruit Sangria: A Refreshing Delight for Warm Days

Intro

There’s something magical about the long, sun-drenched days of summer that calls for a refreshing, fruity drink in hand. For me, nothing captures the essence of summer more than a chilled glass of homemade sangria. I vividly remember the first time I tasted this delightful concoction. It was a balmy afternoon at my grandmother’s house, where the garden was in full bloom, and the air smelled of sweet blossoms. She poured me a glass of her special summer fruit sangria, brimming with vibrant colors and flavors. That moment, with its playful mix of citrus and berries, became a cherished memory, a taste of joy and sunshine. Today, I’m excited to share with you this beloved recipe, hoping it brings as much happiness to your table as it has to mine.

Why You’ll Love It

Summer Fruit Sangria is the quintessential drink for any warm-weather gathering. Here’s why you’ll fall head over heels for this delightful beverage:

  • Easy to Make: With just a handful of ingredients and simple steps, it’s a breeze to prepare.
  • Vibrant and Refreshing: The combination of juicy fruits and rich red wine creates an irresistible, refreshing blend.
  • Perfect for Entertaining: Whether you’re hosting a backyard BBQ or a casual get-together, sangria is always a crowd-pleaser.
  • Customizable: You can tailor it to your taste with different fruits and spirits.
  • Make-Ahead: Prepare it the day before, letting the flavors meld beautifully overnight.

Ingredients

  • 1 bottle of dry red table wine
  • 1/4 cup brandy
  • 1/4 cup triple sec
  • 1/2 cup orange juice
  • 1/4 cup simple syrup
  • 2 ripe peaches, sliced
  • 1 orange, sliced
  • 1 cup raspberries
  • 1 cup blueberries
  • Ice, for serving

Instructions

  1. In a large jug or beverage container, combine the bottle of dry red table wine, brandy, and triple sec.
  2. Add the orange juice and simple syrup, stirring gently to blend.
  3. Introduce the sliced peaches, orange, raspberries, and blueberries into the mixture. Stir well to ensure the fruit is evenly distributed.
  4. Cover the jug and refrigerate for at least 24 hours. This resting time allows the flavors to meld and develop beautifully.
  5. When ready to serve, give the sangria a gentle stir and pour it over ice in individual glasses.

Tips

For the best sangria experience, keep these tips in mind:

  • Choose a wine you enjoy drinking on its own; its flavor will be prominent in the sangria.
  • For a less sweet version, reduce the amount of simple syrup or omit it entirely.
  • Use ripe, in-season fruits for the best flavor and juiciness.
  • Chill your wine and fruit beforehand to speed up the refrigeration process.

Variations & Substitutions

One of the joys of making sangria is its versatility. Here are some variations and substitutions to consider:

  • Fruits: Try adding strawberries, cherries, or pineapple for a tropical twist.
  • Wine: Swap the red wine for a white wine or rosé for a lighter version.
  • Spirits: Replace brandy with rum or vodka for a different kick.
  • Sparkling Sangria: Just before serving, top each glass with a splash of club soda or sparkling water for some fizz.

Storage

Sangria is best enjoyed within a couple of days. Store any leftovers in the refrigerator, covered. Be sure to remove any ice before storing to prevent dilution. The flavors will continue to develop, but the freshness of the fruit is best within the first couple of days.

FAQ

Can I use frozen fruit in sangria?

Yes, frozen fruit can be a convenient and budget-friendly option. It can also help chill the sangria, eliminating the need for extra ice. Just be aware that frozen fruit may release more juice, slightly altering the flavor balance.

What type of wine is best for sangria?

Opt for a dry red wine like a Cabernet Sauvignon, Merlot, or Tempranillo. These wines offer a rich flavor that complements the sweetness of the fruit and other ingredients. However, feel free to experiment with your favorite variety.

Can sangria be made non-alcoholic?

Absolutely! Substitute the wine with a combination of grape juice and cranberry juice, and leave out the spirits. You can still enjoy the fruity, refreshing essence of sangria without the alcohol.

Nutrition

While sangria is a delightful treat, it’s essential to enjoy it in moderation. The nutritional content will vary based on the specific ingredients and quantities used. Typically, a serving of sangria contains around 150-200 calories, depending on the sweetness and type of wine. Remember, the addition of fruits contributes vitamins and antioxidants, making it a slightly healthier indulgence.

Conclusion

Summer Fruit Sangria is more than just a beverage; it’s a celebration of summer’s bounty, a nod to carefree days, and the joy of sharing moments with loved ones. Whether you’re sipping it by the pool or serving it at a festive gathering, this sangria will surely bring smiles and sunshine to your day. So, gather your ingredients, embrace the simplicity of the process, and let the flavors transport you to a summer paradise. Cheers to good times and great company!

Related update: Summer Fruit Sangria

Related update: Lemon Drop Jello Shots

Related update: Spiced Apple Cider

Mexi-Chicken Roll Ups | Made by Meaghan Moineau

Mexi-Chicken Roll Ups

Intro

Welcome to a journey of flavors that dance right off the plate into your heart. Mexi-Chicken Roll Ups have been a beloved staple in my family for years. I remember the first time I tasted this dish at my grandmother’s house; the warmth of the kitchen, the sizzle of chicken in the oven, and the aromatic scent of cilantro and cumin wafting through the air. It was a chilly Sunday afternoon, and we gathered around the table, eagerly awaiting the feast. From that day on, this recipe has been a cherished family tradition, and I’m thrilled to share it with you today.

Why You’ll Love It

Mexi-Chicken Roll Ups are more than just a meal; they’re an experience. This dish is perfect for any occasion, whether it’s a family dinner, a potluck, or even a casual weeknight meal. Here’s why you’ll fall in love with it:

  • Flavorful and Satisfying: The combination of tender chicken, creamy sauce, and crunchy tortilla topping provides a delightful contrast in textures and flavors.
  • Easy to Make: With simple steps and readily available ingredients, this recipe is straightforward and foolproof.
  • Customizable: You can easily tweak the ingredients to suit your tastes or dietary needs.

Ingredients

  • 8 oz cream cheese
  • 1 cup salsa verde
  • 1 bunch cilantro, chopped
  • 1 tsp cumin
  • 1 tsp garlic powder
  • 4 chicken breasts
  • 1 cup fresh spinach
  • 1 cup shredded pepper jack cheese
  • 1 cup crushed tortilla chips

Instructions

  1. Preheat your oven to 350°F (175°C).
  2. Flatten out the chicken breasts to about 1/4″ thickness using a meat mallet or a rolling pin between sheets of wax paper.
  3. In a blender or food processor, combine cream cheese, salsa verde, chopped cilantro, cumin, and garlic powder to form a smooth sauce.
  4. Spread a generous spoonful of the sauce across each chicken breast.
  5. Top each breast with a layer of fresh spinach leaves and then sprinkle with shredded pepper jack cheese.
  6. Carefully roll each chicken breast closed. Secure with toothpicks if necessary.
  7. Place the crushed tortilla chips in a shallow dish and roll each chicken breast in the chips to coat evenly.
  8. Arrange the roll-ups in a baking dish, cover with foil, and bake for 30 to 35 minutes or until the chicken is cooked through and no longer pink in the center.
  9. Remove the foil for the last 5 minutes of baking to allow the tortilla chips to become crispy.
  10. Let cool slightly before serving. Enjoy!

Tips

  • For easier rolling, ensure your chicken breasts are thin and even. This will also help them cook more uniformly.
  • To save time, use pre-shredded cheese and pre-washed spinach.
  • If you don’t have a meat mallet, you can use a heavy skillet to flatten the chicken.

Variations & Substitutions

This recipe is incredibly versatile. Here are a few ideas to make it your own:

  • Cheese: Substitute pepper jack with cheddar or mozzarella for a different flavor profile.
  • Spiciness: Add chopped jalapeños to the cream cheese mixture for extra heat.
  • Herbs: Swap cilantro with parsley if you’re not a fan of its distinctive taste.

Storage

Leftover Mexi-Chicken Roll Ups can be stored in an airtight container in the refrigerator for up to 3 days. To reheat, place in the oven at 300°F (150°C) until warmed through. You can also freeze the roll-ups before baking. Simply thaw in the refrigerator overnight before cooking.

FAQ

Can I use a different type of meat?

Absolutely! This recipe works well with turkey or pork tenderloin. Adjust the cooking time as needed to ensure the meat is fully cooked.

What can I serve with Mexi-Chicken Roll Ups?

These roll-ups pair wonderfully with a side of Spanish rice, black beans, or a simple green salad. You can also serve them with guacamole or sour cream for dipping.

Is there a vegetarian option?

To make this dish vegetarian, substitute the chicken with large portobello mushrooms or zucchini slices. Adjust the baking time accordingly.

Nutrition

Each serving of Mexi-Chicken Roll Ups is packed with protein and flavor. While exact values depend on portion sizes, a typical serving provides approximately:

  • Calories: 450
  • Protein: 35g
  • Carbohydrates: 15g
  • Fat: 28g
  • Fiber: 3g

Conclusion

Mexi-Chicken Roll Ups are a delightful way to bring a taste of Mexican-inspired cuisine into your home. Whether you’re hosting a dinner party or looking for a comforting family meal, this dish is sure to impress. The combination of creamy, spicy, and crunchy elements will make it a favorite for years to come. I hope you enjoy making and eating this dish as much as my family has throughout the years. Bon appétit!

Related update: Mexi-Chicken Roll Ups

Avocado Nests | Made by Meaghan Moineau

Avocado Nests: A Delightful and Nutritious Breakfast

Intro

Growing up, Sunday mornings were always special in our household. My grandmother had a knack for turning simple ingredients into something extraordinary, and her Avocado Nests were no exception. The vibrant green of the avocado paired with the golden hue of hash browns and the savory goodness of bacon and eggs was a sight to behold. It was a dish that brought the family together, and to this day, it evokes cherished memories of laughter and love shared around the breakfast table.

Why You’ll Love It

This Avocado Nests recipe is more than just a feast for the eyes. It combines the creamy richness of avocados with the satisfying crunch of hash browns and the savory flavor of bacon, creating a harmonious blend of textures and tastes. The addition of deviled eggs brings an unexpected twist, elevating this dish to a new level of deliciousness. Whether you’re preparing a cozy breakfast for your family or impressing guests at brunch, Avocado Nests are sure to delight everyone at the table.

Ingredients

  • 2 ripe avocados
  • 4 hardboiled eggs
  • 2 cups frozen hash browns
  • 4 slices bacon
  • 2 tablespoons mayonaise (or cream cheese)
  • Salt and pepper to taste

Instructions

  1. Cook the frozen hash browns according to the package directions until they are golden and crispy. Set aside.
  2. Cut the bacon slices into thin strips and cook them in a skillet over medium heat until crispy, or bake them in the oven at 400°F (200°C) for about 15 minutes. Drain on a paper towel.
  3. To make the deviled eggs, carefully peel the hardboiled eggs and slice them in half lengthwise. Remove the yolks and place them in a bowl. Mix the yolks with mayonaise or cream cheese until smooth, then season with salt and pepper. Spoon or pipe the mixture back into the egg white halves.
  4. Cut the avocados in half lengthwise, remove the seeds, and gently peel the skin.
  5. On a serving plate, create a bed of hash browns and sprinkle the cooked bacon strips over them.
  6. Carefully place the deviled eggs into the seed cavity of each avocado half.
  7. Rest the filled avocado halves on the bed of hash browns and bacon, and serve immediately.

Tips

For the best results, use ripe but firm avocados to ensure they hold their shape. If you prefer a smokier flavor, consider using smoked bacon. Use a piping bag for a neater presentation of the deviled egg filling. To save time, you can prepare the deviled eggs and cook the bacon the night before.

Variations & Substitutions

Feel free to customize the Avocado Nests to suit your taste. For a vegetarian version, omit the bacon and add sautéed mushrooms or roasted bell peppers. If you’re looking to cut down on carbs, you can substitute the hash browns with a bed of fresh arugula or mixed greens. For a spicier kick, add a dash of hot sauce or a sprinkle of cayenne pepper to the deviled egg mixture.

Storage

Avocado Nests are best enjoyed fresh, but if you have leftovers, store them in an airtight container in the refrigerator for up to two days. To prevent the avocados from browning, you can brush them with a little lemon juice before storing. Reheat the hash browns and bacon in a skillet to restore their crispiness before serving.

FAQ

Can I make the deviled eggs in advance?

Yes, you can prepare the deviled eggs up to two days ahead of time. Store them in an airtight container in the refrigerator until you’re ready to assemble the dish.

What can I use instead of mayonnaise for the deviled eggs?

If you’re not a fan of mayonnaise, cream cheese or Greek yogurt are excellent substitutes that will provide a similar creamy texture.

Nutrition

While it’s difficult to provide precise nutritional information without exact measurements, Avocado Nests are generally a good source of healthy fats from the avocados, protein from the eggs, and essential nutrients from the bacon and hash browns. For those watching their calorie intake, consider using turkey bacon and reducing the amount of hash browns.

Conclusion

Avocado Nests are a delightful way to elevate your breakfast or brunch game. With their eye-catching presentation and mouthwatering flavors, they are sure to become a favorite in your household, just as they have in mine. I hope this recipe brings as much joy to your table as it has to ours. Enjoy these little nests of goodness and the memories they create with your loved ones.

Related update: Avocado Nests

Related update: Mexi-Chicken Roll Ups

Avocado Chicken Salad | Made by Meaghan Moineau

Avocado Chicken Salad: A Fresh and Flavorful Delight

Intro

There’s something undeniably nostalgic about a well-crafted salad. As a child, I fondly remember summer afternoons at my grandmother’s house, where the scent of fresh herbs from her garden filled the air. She would often prepare a simple yet delightful chicken salad, serving it with a smile that made every bite taste like home. Inspired by those cherished memories, I’ve crafted this Avocado Chicken Salad that combines the creamy richness of avocado with succulent chicken, topped with a zesty and refreshing dressing. It’s a dish that brings back those warm, comforting moments with every mouthful.

Why You’ll Love It

This Avocado Chicken Salad is more than just a meal; it’s a symphony of flavors and textures that will tantalize your taste buds. Here’s why you’ll fall in love with it:

  • Fresh and Nutritious: Packed with healthy fats from avocados and lean protein from chicken, this salad is a nutritious powerhouse.
  • Quick and Easy: With simple ingredients and straightforward steps, you can whip up this delicious salad in no time.
  • Customizable: Whether you’re serving it as a light lunch or a hearty dinner, this salad can be easily adjusted to fit your preferences.
  • Great for Meal Prep: Prepare it in advance for a convenient grab-and-go meal during the busy week.

Ingredients

  • 2 ripe avocados, cut into cubes
  • 1 cup cherry tomatoes, halved
  • 2 tablespoons extra virgin olive oil
  • Juice of 2 limes
  • 3 tablespoons mayonnaise
  • 1 teaspoon black pepper, plus more to taste
  • 4 cups shredded mixed salad greens
  • 2 skinless, boneless chicken breasts
  • Salt, to taste

Instructions

  1. Season the chicken breasts with a pinch of salt and pepper. Place in a pot of boiling water and cook until fully cooked through, about 15-20 minutes. Remove from water, let cool, then cut into cubes. Set aside.
  2. In a large bowl, place the shredded mixed salad greens. Drizzle with olive oil and lime juice, tossing well to coat the leaves evenly.
  3. Divide the dressed salad greens into two serving bowls.
  4. Evenly distribute the cubed avocados, cubed chicken, and halved cherry tomatoes on top of the salad in each bowl.
  5. Drizzle the mayonnaise over the top, and finish with a dash of black pepper.
  6. Serve immediately and enjoy the fresh, vibrant flavors!

Tips

For the best results, use ripe avocados that yield slightly to gentle pressure. If you’re making this salad ahead of time, prepare the ingredients separately and combine them just before serving to maintain the freshness and texture of the salad.

Variations & Substitutions

Feel free to get creative with this salad! Here are some variations and substitutions you might consider:

  • Add Crunch: Toss in some roasted nuts or seeds for an added crunch and a boost in nutrition.
  • Herbal Twist: Fresh herbs like cilantro or basil can elevate the flavors of the salad.
  • Protein Alternatives: For a different protein source, substitute the chicken with grilled shrimp or chickpeas for a vegetarian option.
  • Dairy-Free Option: Swap mayonnaise with a dairy-free yogurt or avocado-based dressing.

Storage

To store, keep the salad components separate in airtight containers in the refrigerator for up to 3 days. Assemble the salad just before serving to ensure the flavors remain vibrant and the ingredients stay fresh.

FAQ

Can I use leftover chicken for this salad?

Absolutely! Using leftover roasted or grilled chicken is a great way to save time and reduce waste. Just ensure the chicken is well-seasoned to enhance the overall flavor of the salad.

What can I do to prevent the avocados from browning?

To keep avocados from browning, squeeze a little extra lime juice over them. The acidity in the lime juice will slow down the oxidation process, keeping your avocados looking fresh and green.

Nutrition

This Avocado Chicken Salad is not only delicious but also nutritious. Each serving is packed with healthy fats, lean protein, and a variety of vitamins and minerals from the fresh vegetables. It’s a wholesome, balanced meal that will keep you energized and satisfied.

Conclusion

There you have it, a delightful Avocado Chicken Salad that’s both a treat for the taste buds and a nod to the comforting salads from my childhood. Whether you’re enjoying it on a sunny afternoon or packing it for a nutritious lunch, this salad is sure to become a favorite in your culinary repertoire. So gather your ingredients, take a trip down memory lane, and savor the simple pleasures of this fresh and flavorful dish. Bon appétit!

Related update: Avocado Chicken Salad

Crab Cake Stuffed Shrimp | Made by Meaghan Moineau

Crab Cake Stuffed Shrimp

Intro

There’s something truly magical about the combination of crab cakes and shrimp. It takes me back to summer evenings spent by the coastline, where the air was tinged with the saltiness of the sea and the gentle hum of waves provided the perfect backdrop to our family gatherings. My grandmother, ever the culinary wizard, would whip up this dish that was both an indulgence and a comfort. Her Crab Cake Stuffed Shrimp was the star of many a festive table, and today, I am thrilled to share her recipe with you. This delightful appetizer is sure to impress your guests, bringing a touch of the ocean’s bounty to your dining table.

Why You’ll Love It

This Crab Cake Stuffed Shrimp recipe is the perfect blend of elegance and comfort, making it ideal for both special occasions and casual gatherings. Here’s why you’ll fall in love with it:

  • Flavor-Packed: Each bite is a burst of rich, savory flavors with a hint of spice.
  • Textural Delight: The tender shrimp combined with the crispy crab cake offers a satisfying texture contrast.
  • Impressive Presentation: This dish looks as good as it tastes, making it a show-stopper on any table.
  • Make Ahead: The crab mixture can be prepared in advance, allowing you more time to enjoy with guests.
  • Customizable: Easily adjust the spice level or add your personal touch with various substitutions.

Ingredients

  • 10 tablespoons unsalted butter, divided
  • 1 onion, finely chopped
  • 1 green bell pepper, finely chopped
  • 1 red bell pepper, finely chopped
  • 1/4 cup dry white wine
  • 2 cloves garlic, minced
  • 1 pound crab meat
  • 1/2 cup round buttery crackers, crushed
  • 1/2 cup panko bread crumbs
  • 1/2 teaspoon red ground pepper
  • 1 teaspoon Old Bay seasoning
  • Salt and black ground pepper to taste
  • 16 large shrimp, peeled and deveined
  • Optional: Lemon wedges for serving

Instructions

  1. Line a baking sheet with parchment paper.
  2. In a skillet, melt 5 tablespoons of butter over medium heat. Add the onion and sauté until translucent.
  3. Add the green and red bell peppers, remaining 5 tablespoons of butter, white wine, and garlic. Cook until the vegetables are tender, about 4 minutes.
  4. In a large bowl, combine the crab meat, onion mixture, crushed crackers, panko bread crumbs, red pepper, Old Bay seasoning, salt, and black pepper. Stir to combine.
  5. Cover the crab mixture and refrigerate for at least 1 hour, or up to 24 hours for enhanced flavor.
  6. Preheat your oven to 350 degrees Fahrenheit.
  7. Using a sharp knife, butterfly each shrimp starting at the tail end, and place them on the prepared baking sheet, pressing gently to flatten.
  8. Form about 3 tablespoons of the crab mixture into a ball and place it on top of each shrimp, pressing the shrimp tail over the crab.
  9. Repeat with the remaining shrimp and crab mixture.
  10. Bake in the preheated oven for 10 to 15 minutes until the shrimp are cooked through and the tops are lightly golden.
  11. Optional: Squeeze fresh lemon juice over the cooked appetizers for a zesty finish.
  12. Serve immediately to enjoy the best taste and texture.

Tips

  • Choose Fresh Ingredients: Use the freshest crab meat and shrimp for the best flavor.
  • Chill the Mixture: Refrigerating the crab mixture helps it hold together better when forming the balls.
  • Don’t Overstuff: Be gentle when wrapping the shrimp around the crab mixture to prevent tearing.

Variations & Substitutions

Feel free to make this recipe your own by experimenting with these variations and substitutions:

  • Spicy Twist: Add more red pepper or a dash of cayenne for extra heat.
  • Herbal Infusion: Mix in some fresh herbs like parsley or chives for an aromatic touch.
  • Cheesy Delight: Fold in some grated Parmesan cheese into the crab mixture for a rich flavor.
  • Alternative Meats: Swap crab meat for chopped lobster or scallops for a different take.

Storage

If you have leftovers (which is rare because they’re so delicious!), store them in an airtight container in the refrigerator for up to 2 days. Reheat in a preheated oven at 350 degrees Fahrenheit until warmed through for best results. Avoid microwaving as it may make the shrimp rubbery.

FAQ

Can I use frozen shrimp?

Yes, you can use frozen shrimp, but make sure to thaw them completely and pat them dry before using to prevent excess moisture from affecting the texture of the dish.

What can I serve with Crab Cake Stuffed Shrimp?

This dish pairs beautifully with a fresh green salad, roasted vegetables, or a light pasta dish. You can also serve it as an appetizer with a dipping sauce like aioli or cocktail sauce.

How do I know when the shrimp are cooked?

The shrimp are done when they turn opaque and pink, and the crab mixture on top is lightly golden. Be careful not to overcook them to maintain a juicy texture.

Nutrition

This dish is a delightful indulgence, rich in protein from the crab and shrimp. While exact nutritional information will vary based on specific ingredients used, it is a good source of omega-3 fatty acids, vitamins, and minerals. For those watching their sodium intake, consider adjusting the amount of Old Bay seasoning and salt.

Conclusion

Crab Cake Stuffed Shrimp is more than just a recipe; it’s a celebration of flavors that brings happiness to the table. Whether you’re recreating cherished family memories or starting new traditions, this dish is bound to be a hit. Share it with loved ones, and let the taste of the sea make your culinary experience unforgettable. Happy cooking!

Related update: Crab Cake Stuffed Shrimp

Related update: Tuna Mexi Melts

Creamy White Chili | Made by Meaghan Moineau

Creamy White Chili

Intro

There’s something magical about the chill of autumn that beckons the comforting warmth of a hearty chili. Growing up, the first signs of fall meant gathering around the kitchen with my family, eagerly awaiting my grandmother’s famous chili. But one chilly evening, she surprised us with a new twist—a creamy white chili that instantly became a family favorite. The aroma of onions and garlic sizzling in olive oil would fill the house, signaling that something wonderful was on its way. This creamy white chili is a delightful departure from the traditional tomato-based chili, offering a rich and satisfying experience. Today, I’m excited to share this cherished recipe with you.

Why You’ll Love It

This creamy white chili is a comforting bowl of goodness that’s perfect for any occasion. Here are a few reasons why you’ll fall in love with it:

  • Rich and Creamy: The combination of sour cream and heavy whipping cream gives this chili a luxuriously smooth texture.
  • Flavorful and Satisfying: Packed with tender chicken, hearty beans, and a blend of spices, each spoonful is a burst of flavor.
  • Easy to Make: With just a few simple steps, this dish comes together quickly, making it perfect for busy weeknights.
  • Customizable: Easily adjust the heat level or make substitutions to suit your dietary needs and preferences.

Ingredients

  • 2 tablespoons olive oil
  • 1 pound chicken, cubed
  • 1 onion, chopped
  • 2 cloves garlic, minced
  • 2 cans (15 ounces each) great northern beans, drained and rinsed
  • 2 cups canned chicken broth
  • 2 cans (4 ounces each) green chilies, chopped
  • 1 teaspoon cumin
  • 1 teaspoon oregano
  • Salt to taste
  • Black pepper to taste
  • 1 cup sour cream
  • 1/2 cup heavy whipping cream
  • 1 cup shredded cheddar cheese

Instructions

  1. In a heavy saucepan, heat the olive oil over medium heat. Add the chicken, onion, and garlic. Sauté until the chicken is cooked through and the onions are translucent.
  2. Add the chicken broth, great northern beans, green chilies, cumin, oregano, salt, and black pepper to the saucepan. Stir to combine.
  3. Reduce the heat to low and let the chili simmer for about 20 minutes, allowing the flavors to meld together.
  4. Remove the saucepan from the heat and stir in the sour cream and heavy whipping cream until well combined.
  5. Top each serving with shredded cheddar cheese before serving.

Tips

  • For added flavor, try using rotisserie chicken instead of cubed chicken breast.
  • If you prefer a spicier chili, add a pinch of cayenne pepper or a diced jalapeño.
  • For a thicker consistency, mash some of the beans before adding them to the pot.

Variations & Substitutions

Make this creamy white chili your own with these variations and substitutions:

  • Vegetarian Option: Replace the chicken with extra beans or tofu, and use vegetable broth instead of chicken broth.
  • Dairy-Free: Substitute coconut milk or an unsweetened non-dairy creamer for the heavy whipping cream, and use a dairy-free yogurt or sour cream alternative.
  • Cheese Swap: Try using Monterey Jack or Pepper Jack cheese for a different flavor profile.

Storage

Store any leftover creamy white chili in an airtight container in the refrigerator for up to 3 days. To reheat, warm gently on the stovetop over low heat, stirring occasionally. You may need to add a splash of broth or water to achieve the desired consistency.

FAQ

Can I make this chili in a slow cooker?

Yes, you can! Simply sauté the chicken, onion, and garlic in a skillet before transferring them to a slow cooker. Add the remaining ingredients, except for the sour cream, heavy whipping cream, and cheddar cheese. Cook on low for 4-6 hours. Stir in the creams before serving and top with cheese.

Can I freeze creamy white chili?

While you can freeze this chili, the texture may change slightly due to the dairy content. If you do choose to freeze it, let the chili cool completely, then transfer it to a freezer-safe container. Freeze for up to 3 months. Thaw in the refrigerator overnight before reheating.

Nutrition

While I don’t have the exact nutritional breakdown for this dish, it’s worth noting that this recipe is rich in protein from the chicken and beans. The use of sour cream and heavy whipping cream contributes to its calorie and fat content, so consider portion sizes accordingly.

Conclusion

This creamy white chili is more than just a meal; it’s a cozy experience that brings people together. Whether you’re serving it at a family gathering or enjoying a quiet night in, each bowl is a reminder of the warmth and love that comes from sharing a homemade meal. So, gather your ingredients, invite your loved ones, and savor the comforting flavors of this delightful dish. I hope it becomes a cherished recipe in your kitchen, just as it has in mine.

Related update: Creamy White Chili

Related update: German Goulash

Related update: Asparagus and Pea Soup: Real Convenience Food

Thai Cucumber Salad (By Roz) | Made by Meaghan Moineau

Thai Cucumber Salad (By Roz)

Intro

Welcome to my kitchen! Today, I’m thrilled to share with you a recipe that’s close to my heart: Thai Cucumber Salad. This dish takes me back to my travels through Thailand’s vibrant markets, where the air was filled with the tantalizing aromas of fresh herbs and spices. I remember the friendly locals teaching me the art of balancing flavors, a skill essential to Thai cuisine. This salad is a celebration of those cherished memories, and I’m excited to bring a taste of Thailand to your home.

Why You’ll Love It

If you’re a fan of dishes that are quick, easy, and bursting with flavor, this Thai Cucumber Salad is for you. It perfectly balances sweet, spicy, tangy, and savory elements, making it a refreshing side dish or a light main course. This salad is not only delicious but also incredibly versatile, allowing you to customize it to your taste preferences. Plus, it’s a great way to impress friends and family with a dish that’s both simple and exotic.

Ingredients

  • Cilantro
  • Canned cucumbers
  • Jalapeno pepper
  • Lime juice
  • Lime zest
  • Red white onions
  • Red pepper flakes
  • Rice wine vinegar
  • Dry unsalted chopped roasted peanuts
  • Salt
  • Coconut oil
  • Sesame oil
  • Soy sauce
  • Sugar
  • Thai garlic chili pepper sauce
  • White pepper

Instructions

  1. Blend all the dressing ingredients together: lime juice, lime zest, rice wine vinegar, coconut oil, sesame oil, soy sauce, sugar, Thai garlic chili pepper sauce, and a pinch of white pepper.
  2. Mix in all of the chopped vegetables: canned cucumbers, jalapeno pepper, red white onions, and cilantro.
  3. Add in the dry unsalted chopped roasted peanuts, if desired, for a delightful crunch.
  4. Taste and adjust the flavors, adding more lime, sugar, soy sauce, or chili sauce as preferred, embracing the true Thai way of flavor balancing.
  5. Garnish each plate with fresh cilantro leaves and sliced limes.
  6. Serve with a platter of add-ins such as lime slices, red pepper flakes, chopped cilantro, chopped peanuts, Thai sweet chili sauce, sugar, and salt, allowing your guests to customize their salad.

Tips

For the best flavor, prepare the salad fresh. However, you can blend the dressing in advance and store it in the refrigerator for up to a week. This way, you can whip up the salad in no time whenever you’re ready to serve. If you prefer a milder salad, remove the seeds from the jalapeno before chopping. Remember, the key to a great Thai salad is balancing the flavors to suit your palate, so don’t hesitate to taste and adjust as you go.

Variations & Substitutions

This salad is wonderfully adaptable. You can substitute fresh cucumbers for canned ones if you prefer more crunch. For a nut-free version, simply omit the peanuts or replace them with toasted sunflower seeds. If you like more heat, swap the jalapeno for a spicier chili pepper or increase the amount of Thai garlic chili pepper sauce. For a touch of sweetness, add sliced mango or pineapple to the salad.

Storage

While this salad is best enjoyed fresh, you can store any leftovers in an airtight container in the refrigerator for up to two days. Keep the dressing separate if you plan to store it longer, as the vegetables may become soggy if left dressed for too long.

FAQ

Can I use fresh cucumbers instead of canned?

Absolutely! Fresh cucumbers will add a nice crunch to the salad. Just make sure to slice them thinly for the best texture.

Is there a way to make the salad less spicy?

Yes, if you prefer a milder salad, you can reduce or omit the jalapeno pepper and Thai garlic chili pepper sauce. Removing the seeds from the jalapeno also helps reduce the heat.

Can I make this salad vegan?

This salad is already vegan! Just ensure that the soy sauce you use is vegan-friendly, as some brands may contain animal products or by-products.

Nutrition

This Thai Cucumber Salad is a light and healthy dish. It’s low in calories and rich in vitamins from the fresh vegetables and herbs. The peanuts provide a source of healthy fats and protein, making it a nutritious choice that fits well into a balanced diet.

Conclusion

Thank you for joining me on this culinary journey to Thailand with my Thai Cucumber Salad. It’s a dish that embodies the vibrant flavors and spirit of Thai cuisine, bringing a touch of exotic flair to your table. I hope you enjoy making it as much as I do and that it becomes a beloved recipe in your kitchen. Whether you serve it as a refreshing side dish or a light meal, this salad is sure to impress and delight. Happy cooking!

Related update: Thai Cucumber Salad (By Roz)

Related update: Dairy Free Chicken Salad

Fluffy frittata with spinach | Made by Meaghan Moineau

Fluffy Frittata with Spinach

Intro

There’s something magical about the aroma of a freshly made frittata wafting through the kitchen. It takes me back to Sunday mornings at my grandmother’s house, where the sizzle of garlic and the sight of her expertly whisked eggs made breakfast feel like an event. Among her many beloved recipes, her fluffy spinach frittata was always my favorite. Today, I’m excited to share a version of her classic dish that’s not only nostalgic but also incredibly easy to prepare. Whether you’re hosting a brunch or simply treating yourself to a hearty breakfast, this frittata is bound to become your new go-to recipe.

Why You’ll Love It

This fluffy spinach frittata is everything you want in a breakfast dish: quick to make, absolutely delicious, and packed with nutritious ingredients. The combination of fresh spinach and creamy ricotta cheese makes it light yet satisfying, while the hint of garlic and nutmeg adds depth to its flavor. Perfect for both novice and seasoned cooks, this frittata is a testament to the fact that simplicity often leads to the most delightful outcomes.

Ingredients

  • 4 large eggs, separated
  • 1 clove garlic, minced
  • 1/4 teaspoon ground pepper
  • 1/8 teaspoon nutmeg
  • 2 tablespoons olive oil
  • 1/4 cup grated parmesan cheese
  • 1/2 cup ricotta cheese
  • 1/2 teaspoon salt
  • 1 cup fresh spinach (or 1/2 cup dry frozen spinach, thawed and drained)

Instructions

  1. Preheat your oven to 200°C (392°F).
  2. In a medium oven-proof skillet, heat the olive oil over medium heat. Add the minced garlic and cook until softened and fragrant, about 1 minute.
  3. In a large glass or metal bowl, beat the egg whites until stiff peaks form. This will ensure your frittata turns out perfectly fluffy.
  4. In another bowl, beat the egg yolks and stir in the spinach and ricotta cheese. Season the mixture with salt, ground pepper, and nutmeg.
  5. Gently fold the beaten egg whites into the yolk mixture, taking care not to deflate the whites.
  6. Pour the egg mixture into the hot skillet with the garlic. Cook over medium heat until the edges are just set, approximately 2 minutes.
  7. Transfer the skillet to the preheated oven and bake until the frittata is golden and fluffy, about 15 minutes.
  8. Sprinkle the grated parmesan cheese over the top of the frittata and bake for an additional 2 minutes, or until the cheese is melted and bubbly.
  9. Remove from the oven and let it cool slightly before cutting into wedges. Serve immediately for best results.

Tips

For the fluffiest frittata, ensure that the egg whites are beaten to stiff peaks before folding them into the yolk mixture. When folding, use a gentle hand to maintain the airy texture. Preheating the oven and using an oven-proof skillet will help the frittata cook evenly and achieve a beautiful golden color.

Variations & Substitutions

If you’re looking to customize this frittata, consider adding sautéed mushrooms, sun-dried tomatoes, or bell peppers for added flavor and texture. For a bit of heat, a pinch of red pepper flakes can do wonders. If you’re out of fresh spinach, frozen spinach works well, just be sure to thaw and drain it thoroughly. Additionally, feta or goat cheese can be used in place of ricotta for a different cheese profile.

Storage

Leftover frittata can be stored in an airtight container in the refrigerator for up to 3 days. To reheat, place a slice in a skillet over low heat until warmed through, or use a microwave for a quicker option. While it can be frozen, note that the texture may change slightly upon thawing.

FAQ

Can I make this frittata ahead of time?

Yes, this frittata can be made a day in advance. Simply store it in the refrigerator and reheat it in the oven at a low temperature before serving to maintain its texture.

Is it possible to make this frittata dairy-free?

Definitely! You can substitute the ricotta cheese with a dairy-free cheese alternative and use nutritional yeast instead of parmesan for a similar cheesy flavor without the dairy.

Nutrition

This frittata is a great source of protein and packed with vitamins from the spinach. Each serving contains approximately 250 calories, 18 grams of protein, and 5 grams of carbohydrates. It’s a nutritious way to start your day!

Conclusion

This fluffy spinach frittata is a delightful dish that’s sure to become a staple in your breakfast or brunch repertoire. Its simplicity and versatility make it an ideal choice for any occasion. Whether you’re reminiscing about family breakfasts or creating new traditions, this frittata brings warmth and comfort to your table. I hope you enjoy making and sharing this recipe as much as I have over the years. Bon appétit!

Related update: Fluffy frittata with spinach

Related update: Overnight Oatmeal

Related update: BBQ Mac and Cheese

Creamy Cauliflower Chowder | Made by Meaghan Moineau

Creamy Cauliflower Chowder

Intro

There’s something magical about a bowl of steaming chowder on a chilly day. It transports me back to my grandmother’s kitchen, where the aroma of her cooking filled the air, bringing warmth and comfort. Her creamy cauliflower chowder was a family favorite, an irresistible blend of flavors that nourished both body and soul. Today, I’m sharing my version of this classic recipe with you, in hopes that it becomes a staple in your home as well.

Why You’ll Love It

This creamy cauliflower chowder is the epitome of comfort food. It’s rich, flavorful, and incredibly satisfying. Whether you’re looking for a hearty lunch or a cozy dinner, this chowder will not disappoint. Here are a few reasons why you’ll fall in love with it:

  • Simple Ingredients: With everyday ingredients you probably already have in your kitchen, this chowder is easy to whip up on a whim.
  • Rich and Creamy: The combination of cauliflower, cheddar, and parmesan creates a velvety texture that’s hard to resist.
  • Customizable: You can easily adjust the flavors and toppings to suit your preferences.
  • Comforting and Satisfying: It’s perfect for those days when you need a little extra warmth and comfort.

Ingredients

  • 2 tablespoons butter
  • 1 head cauliflower, chopped
  • 1 cup cheddar cheese, shredded
  • 2 teaspoons chicken bouillon
  • 1/2 cup cooked bacon, crumbled
  • 1/2 cup croutons
  • 2 tablespoons flour
  • 3 cloves garlic, minced
  • 1 teaspoon ground mustard
  • 4 cups milk, divided
  • 1 onion, chopped
  • 1/2 teaspoon paprika
  • 1/2 cup parmesan cheese, grated
  • Salt, to taste

Instructions

  1. Add butter, garlic, onion, and cauliflower to a large pot and sauté for 5 minutes until the cauliflower starts to brown.
  2. Add flour, chicken bouillon, ground mustard, paprika, and salt. Mix well to combine.
  3. Pour in 2 cups of milk and stir until everything is well incorporated. Reduce heat and bring the mixture to a boil, simmering for about 10 minutes until the cauliflower is soft.
  4. Carefully transfer the mixture to a blender and blend until smooth. (Alternatively, use an immersion blender directly in the pot.)
  5. Transfer the blended mixture back to the pot and add the remaining milk. Stir well to combine.
  6. Add parmesan cheese and cheddar cheese, stirring continuously until the cheese is melted and the chowder is heated through.
  7. Serve the chowder in bowls, topped with crumbled bacon, croutons, and extra cheese if desired.

Tips

  • Blending: Always let the mixture cool slightly before blending to avoid any accidents.
  • Consistency: If you prefer a thicker chowder, reduce the amount of milk or add a bit more flour.
  • Toppings: Don’t be shy with the toppings; they add wonderful texture and flavor.

Variations & Substitutions

This chowder is highly adaptable to your taste and dietary needs:

  • Vegetarian Version: Use vegetable bouillon instead of chicken bouillon and skip the bacon.
  • Dairy-Free: Substitute the milk with almond or oat milk, and use nutritional yeast instead of cheese.
  • Spicy Twist: Add a pinch of cayenne pepper or a few dashes of hot sauce for some heat.

Storage

Store any leftover chowder in an airtight container in the refrigerator for up to 3 days. To reheat, simply warm it in a pot over medium heat, stirring occasionally. If the chowder thickens too much, add a splash of milk or water to reach your desired consistency.

FAQ

Can I freeze creamy cauliflower chowder?

Yes, you can freeze this chowder. Allow it to cool completely before transferring to a freezer-safe container. Freeze for up to 3 months. Thaw in the refrigerator overnight before reheating.

How can I make this chowder gluten-free?

To make this chowder gluten-free, simply replace the flour with a gluten-free all-purpose flour blend or cornstarch. This will help maintain the creamy texture without the gluten.

What can I serve with this cauliflower chowder?

This chowder pairs wonderfully with a fresh green salad or a slice of crusty bread for dipping. You could also serve it in a bread bowl for a fun and hearty presentation.

Nutrition

This creamy cauliflower chowder is a rich source of calcium and vitamins. Cauliflower is low in calories but high in fiber, vitamin C, and other essential nutrients. Keep in mind that the cheese and bacon add richness and indulgence, so enjoy this dish as a delightful treat!

Conclusion

There you have it, a delightful creamy cauliflower chowder that’s sure to warm your heart and soul. Whether you’re making it for a cozy family dinner or a special occasion, this chowder is sure to impress. I hope it brings as much joy to your table as it has to mine. Enjoy every spoonful!

Related update: Creamy Cauliflower Chowder

Related update: Monastery soup

Easy Cheesy Scrambled Eggs | Made by Meaghan Moineau

Easy Cheesy Scrambled Eggs

Intro

There’s something incredibly comforting about waking up to the smell of freshly cooked eggs. As a child, Sunday mornings meant gathering around the kitchen table with my family, eagerly awaiting my mom’s special breakfast creation: her famous cheesy scrambled eggs. The aroma of sizzling eggs mixed with melting cheese wafting through the house was the perfect way to start a lazy weekend morning. Now, as an adult, I’ve carried on the tradition, and I’m thrilled to share my version of this timeless recipe with you. It’s simple, quick, and above all, delicious!

Why You’ll Love It

This recipe for Easy Cheesy Scrambled Eggs is perfect for both novice cooks and seasoned chefs looking for a quick breakfast fix. Here’s why you’ll love it:

  • Quick and Easy: This recipe takes less than 10 minutes from start to finish, making it ideal for busy mornings.
  • Creamy and Cheesy: The combination of eggs and cheese creates a rich, velvety texture that’s hard to resist.
  • Customizable: Easily adaptable to your taste, you can add your favorite ingredients or adjust the seasonings as you like.
  • Family-Friendly: It’s a hit with kids and adults alike, perfect for breakfast or a quick meal anytime.

Ingredients

  • 4 large eggs
  • 1/4 cup milk (or cream for extra richness)
  • Salt and pepper to taste
  • 1/2 cup shredded jack cheese

Instructions

  1. In a medium bowl, whisk together the eggs, milk, salt, and pepper until well combined.
  2. Heat a nonstick skillet over medium heat. Pour in the egg mixture.
  3. As the eggs begin to set, gently stir them with a spatula, lifting and folding the eggs from the bottom of the pan.
  4. When the eggs are almost fully cooked but still slightly runny, sprinkle the shredded jack cheese over the top.
  5. Continue to cook for another 1-2 minutes, stirring occasionally, until the cheese is melted and the eggs are fully cooked.
  6. Remove from heat and serve immediately, either on its own, over toast, or wrapped in a tortilla.

Tips

  • For fluffier eggs, beat the eggs vigorously to incorporate more air.
  • Use a rubber spatula to gently fold the eggs, preventing them from breaking apart.
  • Cook the eggs on medium heat to ensure even cooking without drying them out.
  • For a touch of freshness, sprinkle chopped chives or parsley over the finished dish.

Variations & Substitutions

One of the best things about scrambled eggs is their versatility. Here are a few ideas to change things up:

  • Cheese Options: Swap out the jack cheese for cheddar, mozzarella, or your personal favorite.
  • Add Veggies: Incorporate diced bell peppers, onions, or tomatoes for added nutrients and flavor.
  • Spice It Up: Add a pinch of cayenne pepper or a splash of hot sauce for a bit of heat.
  • Herbs: Mix in fresh herbs like basil or dill for an aromatic twist.
  • Dairy-Free: Use a plant-based milk alternative and skip the cheese for a dairy-free version.

Storage

Scrambled eggs are best enjoyed fresh, but if you have leftovers, they can be stored in an airtight container in the refrigerator for up to 2 days. To reheat, use a microwave or gently warm them in a skillet over low heat, adding a splash of milk to restore moisture.

FAQ

Can I make scrambled eggs without milk?

Yes, you can make scrambled eggs without milk. The milk is added to make the eggs creamier, but it’s not essential. Simply whisk the eggs with salt and pepper, and cook as directed.

How do I prevent scrambled eggs from becoming rubbery?

The key to avoiding rubbery eggs is to cook them over medium heat and remove them from the heat while they are still slightly runny. The residual heat will finish cooking them to perfection.

What can I serve with cheesy scrambled eggs?

Cheesy scrambled eggs pair well with a variety of sides. Consider serving them with toast, a fresh salad, crispy bacon, or avocado slices for a well-rounded meal.

Nutrition

This recipe serves approximately two people. A single serving of these Easy Cheesy Scrambled Eggs contains approximately:

  • Calories: 250
  • Protein: 18g
  • Fat: 20g
  • Carbohydrates: 2g
  • Fiber: 0g
  • Sugar: 1g

Note: Nutritional values are approximate and can vary based on exact ingredients and quantities used.

Conclusion

Whether you’re preparing breakfast for your family or treating yourself to a comforting meal, these Easy Cheesy Scrambled Eggs are bound to become a staple in your kitchen. With their creamy texture and rich flavor, they offer a delightful start to any day. Feel free to get creative with your additions and make this recipe your own. Happy cooking!

Related update: Easy Cheesy Scrambled Eggs

Related update: Zucchini & Basil Frittata

The Secret to Easy Skillet Filet Mignon Steak Tacos | Made by Meaghan Moineau

The Secret to Easy Skillet Filet Mignon Steak Tacos

Intro

There’s something magical about a warm, cozy evening spent around the kitchen table with family and friends. Growing up, my mother used to make the most delightful tacos, and they were always the highlight of our gatherings. The aroma of sizzling steak and freshly heated tortillas would fill the house, drawing everyone to the kitchen. Inspired by those cherished family moments, I’ve crafted a recipe for easy skillet filet mignon steak tacos that brings a touch of elegance to the classic taco night.

This dish combines the luxury of filet mignon with the comforting flavors of traditional tacos. You’ll find that this recipe is not only easy to make but also incredibly satisfying, perfect for a cozy dinner or a festive gathering.

Why You’ll Love It

These filet mignon steak tacos are a delightful fusion of simplicity and sophistication. Here’s why they’ll become a favorite in your household:

  • Quick and Easy: With just a few steps, you can whip up a gourmet meal in under 30 minutes.
  • Flavorful and Tender: The filet mignon is cooked to perfection, offering a tender and juicy bite every time.
  • Customizable: Whether you prefer your tacos loaded or simple, you can easily adjust the toppings to suit your taste.
  • Perfect for Any Occasion: Whether it’s a weeknight dinner or a special event, these tacos are sure to impress.

Ingredients

  • Sour cream
  • Olive oil (extra virgin)
  • Filet mignon steaks
  • Guacamole
  • Cracked black pepper
  • Shredded cheddar cheese
  • White corn tortillas

Instructions

  1. Heat the skillet on medium to low heat.
  2. Rub the steaks with olive oil and season with cracked black pepper.
  3. Slowly cook the filets until they have reached your desired specifications. For medium doneness, cook for about 7 minutes on each side.
  4. Remove the filets from the heat and slice thinly and lengthwise.
  5. Use a clean skillet over medium heat to warm up the corn tortillas.
  6. Top the tortillas with steak, guacamole, sour cream, and shredded cheese.

Tips

To ensure your steak is perfectly cooked, use a meat thermometer. For medium doneness, aim for an internal temperature of 145°F (63°C). Let the steak rest for a few minutes before slicing to retain its juices.

Always warm your tortillas before serving. This not only enhances their flavor but also makes them more pliable, preventing them from breaking when you fold them.

Variations & Substitutions

Feel free to experiment with different toppings like fresh cilantro, diced tomatoes, or pickled onions for added flavor. If you prefer a different cheese, try using Monterey Jack or queso fresco for a unique twist.

If filet mignon isn’t available, you can substitute with sirloin or ribeye, although the cooking times may vary slightly.

Storage

Store any leftover steak in an airtight container in the refrigerator for up to 3 days. Reheat gently in a skillet to avoid overcooking. The tortillas and toppings should be stored separately to maintain freshness.

FAQ

Can I use a different type of tortilla?

Absolutely! While white corn tortillas provide a traditional touch, flour tortillas or even whole wheat options can be used as well. Just keep in mind the flavor and texture differences.

How can I make these tacos spicier?

Add a kick to your tacos by incorporating sliced jalapeños, a sprinkle of cayenne pepper, or a spicy salsa as a topping. Adjust the spice level to suit your taste preferences.

Nutrition

Each serving of these tacos is a balanced blend of protein, healthy fats, and carbs. The filet mignon offers a rich source of protein, while the olive oil provides heart-healthy fats. Remember to enjoy in moderation, especially if you’re watching your calorie intake.

Conclusion

These easy skillet filet mignon steak tacos are a delightful way to elevate your taco night with minimal effort. Whether you’re reminiscing about family gatherings or creating new memories, this recipe is sure to become a favorite. Enjoy the rich flavors and tender textures with each bite, and don’t forget to share the love with those around your table. Happy cooking!

Related update: The Secret to Easy Skillet Filet Mignon Steak Tacos

Related update: Pasta with Peas and Italian Sausage

Neoguri (Spicy Seafood Ramen) | Made by Meaghan Moineau

Neoguri (Spicy Seafood Ramen) Recipe

Intro

When I was a child, my family would often gather around the kitchen table on chilly evenings, excitedly waiting for a steaming bowl of my grandmother’s homemade ramen. The rich, savory aroma would fill the room, making our mouths water in anticipation. My grandmother, originally from a small coastal town in Korea, had a knack for turning simple ingredients into a feast for the senses. Among her creations, her spicy seafood ramen was legendary—the perfect blend of heat, umami, and comfort. Even now, the taste of spicy seafood ramen takes me back to those cherished family memories, and I’m thrilled to share a version of this recipe with you today. Let’s dive into creating a delicious bowl of Neoguri (Spicy Seafood Ramen) that warms the heart and soul.

Why You’ll Love It

This Neoguri (Spicy Seafood Ramen) recipe is more than just a quick meal; it’s a culinary experience. Here’s why you’ll adore it:

  • Quick and Easy: With just a few ingredients and simple steps, you can whip up a satisfying meal in under 20 minutes.
  • Rich in Flavor: The combination of spicy broth, seafood, and umami-packed seaweed creates a depth of flavor that’s hard to beat.
  • Customizable: This recipe is versatile and can be adjusted to suit your taste preferences or dietary needs.
  • Comforting: Perfect for a cozy night in, this ramen is sure to warm you up from the inside out.

Ingredients

  • 1 egg
  • 1 cup mussels (fresh or frozen)
  • 1 pack Neoguri ramen
  • 1 green scallion
  • 1 sheet seaweed (gim)

Instructions

  1. Bring a pot of water to a boil. Add mussels and sauce packets from the Neoguri ramen package into the boiling water. Allow it to boil for about 5 minutes to cook the mussels and deepen the broth. If using fresh mussels, wait until they open and discard any that remain closed.
  2. Include the noodles in the boiling pot and cook for 2 to 3 minutes, or until they reach your desired texture.
  3. In a small bowl, beat the egg. Gradually add the beaten egg into the pot while stirring the noodles in a circular motion for even, flaky egg drops. For a poached egg, carefully add the egg off to the side of the pot.
  4. While the noodles are cooking, thinly slice the green scallion and gim (seaweed) sheet.
  5. Transfer the cooked ramen to a serving bowl and garnish with the sliced scallions and seaweed. Serve hot and enjoy!

Tips

  • For extra heat, add a dash of chili flakes or Sriracha to the broth.
  • If you prefer a milder flavor, use only half of the Neoguri ramen sauce packet.
  • Ensure mussels are thoroughly cleaned and de-bearded before cooking to avoid any grit in your broth.
  • Use a high-quality seaweed sheet for the best flavor and texture.

Variations & Substitutions

This recipe is wonderfully adaptable. Here are some ideas to make it your own:

  • Vegetarian Option: Skip the mussels and add tofu or mushrooms for a protein boost while keeping it vegetarian.
  • Extra Veggies: Add sliced carrots, bok choy, or bean sprouts for added nutrients and texture.
  • Seafood Mix: Use a mix of seafood like shrimp, clams, and squid along with the mussels for a more diverse taste.
  • Noodle Swap: If you can’t find Neoguri ramen, any instant ramen with a spicy flavor profile will work in a pinch.

Storage

For the best taste and texture, it’s best to enjoy Neoguri (Spicy Seafood Ramen) fresh. However, if you have leftovers, store them in an airtight container in the refrigerator for up to two days. When reheating, add a splash of water or broth to loosen the noodles and ensure even warming. Be cautious, as the seafood flavor may intensify over time.

FAQ

Can I use frozen mussels instead of fresh?

Yes, frozen mussels are a convenient option and work well in this recipe. Just make sure to thaw them before adding them to the boiling water.

Is it possible to make this ramen less spicy?

Absolutely! You can control the spice level by using only half of the sauce packet or adding more water to dilute the broth. Adjust the spice to your preference.

Nutrition

This Neoguri (Spicy Seafood Ramen) offers a balanced meal with protein from mussels and egg, carbohydrates from noodles, and nutrients from scallions and seaweed. Mussels are a great source of omega-3 fatty acids, while seaweed provides iodine, an essential mineral. Adjust portion sizes to fit your dietary needs.

Conclusion

There’s something incredibly comforting about a bowl of steaming Neoguri (Spicy Seafood Ramen). It’s more than just a meal; it’s a connection to cherished memories and a celebration of flavors. This recipe brings warmth and satisfaction to any table, from its spicy seafood broth to the tender noodles and vibrant garnishes. I hope this dish becomes a beloved staple in your kitchen, just as it has been in mine. Enjoy the delightful complexity of flavors with each spoonful and share the joy with others around you. Happy cooking!

Related update: Neoguri (Spicy Seafood Ramen)

Related update: Turkey BLT with Creamy Dijon Mustard

Grilled Portabella and Poblano Tacos | Made by Meaghan Moineau

Grilled Portabella and Poblano Tacos

Intro

There’s something magical about the aroma of fresh ingredients sizzling on a grill. Every time I make these grilled portabella and poblano tacos, I’m transported back to a summer evening at my grandmother’s house. She would fire up the grill, and we’d gather around, eagerly awaiting the feast to come. The smoky scent of chiles and mushrooms would fill the air, mixing with laughter and stories shared as we enjoyed each other’s company. This recipe is a tribute to those cherished memories, and I hope it brings the same joy and warmth to your table as it always has to mine.

Why You’ll Love It

These grilled portabella and poblano tacos are a delightful twist on classic taco fare. They’re perfect for vegetarians and meat-lovers alike, offering a robust and smoky flavor that’s entirely satisfying. The combination of earthy portabellas and spicy poblanos, complemented by the freshness of pico de gallo and creamy guacamole, creates a symphony of tastes and textures. Plus, they’re easy to customize, making them a hit for family dinners or casual gatherings with friends.

Ingredients

  • Canola oil
  • Chipotle powder
  • Cilantro, chopped
  • Cilantro sprigs for garnish
  • Corn tortillas
  • 2 cloves garlic, minced
  • Guacamole
  • 2 tablespoons lime juice
  • Lime wedges for serving
  • Olive oil
  • 1 whole poblano chile
  • 2 whole portabella mushrooms
  • 1 red onion, roughly chopped
  • 2 diced roma tomatoes
  • Salt
  • Salt and pepper
  • Shredded cheddar cheese

Instructions

  1. Preheat a lightly oiled grill on medium-high heat.
  2. While the grill is heating up, prepare the pico de gallo. In a small mixing bowl, combine tomatoes, onion, cilantro, garlic, salt, and lime juice. Set aside.
  3. Next, prepare the grilled portabella filling. Remove the stems from the portabellas, and discard. Using a spoon, scrape out the dark gills from the underside of the mushroom caps.
  4. Lightly brush the portabellas and the onions on both sides with canola oil, and sprinkle generously with salt and pepper.
  5. Arrange the mushrooms, onion, and poblano on the hot grill, and cook for 5-6 minutes per side or until the mushrooms are softened and the onion is lightly charred. Remove from heat and transfer to a cutting board.
  6. Remove the stem and seeds from the poblano, and discard. Cut the poblano and the portabellas into thin strips, and roughly chop the onion. Transfer to a mixing bowl and toss with lime juice and chipotle powder until well coated.
  7. To assemble, arrange 2 tortillas per plate, and divide the mushroom filling evenly between them.
  8. Serve with pico de gallo and bowls of the different toppings so that everyone can garnish their tacos as they please.

Tips

  • Make sure your grill is preheated to ensure a good sear on the vegetables.
  • For a spicier kick, leave a few seeds in the poblano before grilling.
  • Use fresh tortillas if possible; they really make a difference in flavor and texture.

Variations & Substitutions

If you want to switch things up, try using different types of mushrooms like cremini or shiitake for a different flavor profile. You can also substitute the poblano with bell peppers for a milder taste. For a vegan version, skip the cheese or use a plant-based alternative.

Storage

These tacos are best enjoyed fresh, but if you have leftovers, store the grilled vegetable mixture in an airtight container in the refrigerator for up to 3 days. Reheat gently on the stovetop or in the microwave before serving. Assemble the tacos just before eating to keep the tortillas from becoming soggy.

FAQ

Can I make these tacos in advance?

Yes, you can prepare the pico de gallo and grill the vegetables ahead of time. Store them separately in the fridge and assemble the tacos just before serving for the best texture and flavor.

What can I serve with these tacos?

These tacos pair well with a side of Mexican rice, refried beans, or a light salad. A refreshing beverage like a margarita or agua fresca can also complement the meal beautifully.

Nutrition

While the exact nutritional content will vary based on specific brands and quantities used, these tacos are a great source of vitamins and fiber, thanks to the vegetables. They’re also relatively low in calories and can be made even healthier by using whole wheat tortillas and reducing the cheese.

Conclusion

Grilled portabella and poblano tacos are a delightful way to enjoy the vibrant flavors of summer grilling. Whether you’re recreating cherished family memories or starting new traditions, these tacos are sure to become a favorite. Gather your loved ones, fire up the grill, and savor the rich, smoky flavors of this delicious and versatile dish. Enjoy!

Related update: Grilled Portabella and Poblano Tacos

Related update: Baked Chicken Thighs with Satay Sauce and Tomato Salad

Peppermint Patties | Made by Meaghan Moineau

Peppermint Patties: A Refreshing Homemade Delight

Intro

There’s something magical about biting into a cool, minty peppermint patty. For me, it takes me back to snowy winter days spent with my grandmother in her cozy kitchen. She would always have a batch of homemade peppermint patties on hand, especially during the festive season. The invigorating taste of peppermint combined with smooth chocolate was the perfect treat after a day of building snowmen and sipping hot cocoa. Today, I’m excited to share this cherished recipe with you, so you can create your own delicious memories.

Why You’ll Love It

This peppermint patty recipe is a classic treat that brings a burst of refreshing flavor with every bite. Here’s why you’ll fall in love with these delightful candies:

  • Easy to Make: With just a few simple steps, you can whip up a batch of peppermint patties that rival any store-bought version.
  • Perfect for Gifting: These patties make a wonderful homemade gift for friends and family, especially during the holidays.
  • Refreshing and Delicious: The combination of creamy mint filling and rich chocolate coating is simply irresistible.
  • Customizable: You can easily adjust the recipe to suit your taste preferences or dietary needs.

Ingredients

  • Butter
  • Confectioners sugar
  • Evaporated milk
  • Peppermint extract
  • Semi-sweet chocolate chips
  • Shortening
  • Vanilla extract

Instructions

  1. In a bowl, combine confectioners sugar, softened butter, peppermint extract, and vanilla extract. Mix until smooth.
  2. Gradually add evaporated milk, stirring continuously until a dough-like consistency forms.
  3. Roll the mixture into 1-inch balls and place them onto cookie sheets lined with waxed paper.
  4. Chill the balls in the refrigerator for about 20 minutes to firm them up.
  5. After chilling, gently flatten each ball with the bottom of a glass to about 1/4 inch thick. Return them to the refrigerator for another 20-30 minutes.
  6. In a microwave-safe bowl, melt the shortening and semi-sweet chocolate chips on high for about 1 minute. Stir until smooth.
  7. Dip each peppermint patty into the melted chocolate, ensuring it is evenly coated, and place them back on the waxed paper-lined sheets to harden.

Tips

  • Ensure your butter is at room temperature to make mixing easier.
  • If the dough is too sticky, add a little more confectioners sugar to achieve the desired consistency.
  • Use a fork to dip the patties into the chocolate for easier handling and to allow excess chocolate to drip off.
  • For an extra touch, sprinkle crushed peppermint candies on top before the chocolate hardens.

Variations & Substitutions

Feel free to get creative with this recipe. Here are some ideas to consider:

  • Dark Chocolate: Swap semi-sweet chocolate chips for dark chocolate to create a richer flavor.
  • White Chocolate: Use white chocolate for a sweeter, creamier coating.
  • Dairy-Free: Substitute regular butter and milk with dairy-free alternatives for a vegan version.
  • Mint Varieties: Try using different mint extracts, such as spearmint, for a unique twist.

Storage

Store your peppermint patties in an airtight container in the refrigerator. They should stay fresh for up to two weeks. For longer storage, you can freeze them for up to three months. Just be sure to separate layers with waxed paper to prevent sticking.

FAQ

Can I use fresh mint leaves instead of peppermint extract?

While fresh mint leaves can provide a natural flavor, they may not be concentrated enough for this recipe. If you prefer using fresh mint, make sure to finely chop the leaves and steep them in a bit of milk to infuse the flavor before adding to the mixture.

What if I don’t have a microwave to melt the chocolate?

No worries! You can melt the chocolate and shortening using a double boiler on the stove. Simply place a heat-safe bowl over a pot of simmering water, ensuring the bottom of the bowl doesn’t touch the water, and stir until melted.

Are there any toppings I can add to the patties?

Absolutely! You can sprinkle crushed peppermint candies, sea salt, or even drizzle white chocolate over the top for added texture and flavor.

Nutrition

While these peppermint patties are a delightful treat, it’s important to enjoy them in moderation. Here’s a rough estimate of the nutritional content per patty:

  • Calories: 120
  • Total Fat: 6g
  • Saturated Fat: 3.5g
  • Cholesterol: 5mg
  • Sodium: 2mg
  • Total Carbohydrates: 16g
  • Dietary Fiber: 1g
  • Sugars: 14g
  • Protein: 1g

Conclusion

Making homemade peppermint patties is a rewarding experience that brings joy to both the creator and the lucky recipients. The combination of refreshing mint and rich chocolate is unbeatable, making it a perfect treat for any occasion. Whether you’re gifting them during the holidays or savoring them as a personal indulgence, these peppermint patties are sure to delight. Enjoy creating these little bites of happiness, and may they become a cherished part of your culinary traditions, just as they are in mine.

Related update: Peppermint Patties

Related update: Thick, Fudgy, One Bowl Brownies

How to Make Easy Cheesy Garlic Bread | Made by Meaghan Moineau

How to Make Easy Cheesy Garlic Bread

Intro

If there’s one dish that can transport me back to my childhood kitchen, it’s cheesy garlic bread. I vividly remember the aroma wafting through the house as my mom prepared this delicious treat for family dinners. We’d gather around the table, eagerly waiting for the hot, bubbly bread to make its way out of the oven. This easy cheesy garlic bread recipe has been a staple in our family, and I’m excited to share it with you. It’s simple, comforting, and perfect for any occasion.

Why You’ll Love It

This cheesy garlic bread is the perfect blend of crispy, cheesy, and garlicky goodness. Whether you’re serving it as an appetizer or a side dish, it’s bound to be a hit. Here’s why you’ll fall head over heels for this recipe:

  • Quick and Easy: With just a few ingredients and minimal prep time, you can have this savory treat ready in about 20 minutes.
  • Customizable: You can easily tweak the recipe to suit your taste preferences or dietary needs.
  • Family-Friendly: It’s a hit with kids and adults alike, making it a great option for family dinners or gatherings.
  • Flavorful: The combination of garlic, cheese, and fresh parsley creates an irresistible flavor profile.

Ingredients

  • 1 loaf of French white bread (Vienna)
  • 1/4 cup butter
  • 1/4 cup extra virgin olive oil
  • 3 cloves garlic, minced
  • 2 tablespoons fresh parsley, chopped
  • 1 cup mixed mozzarella and cheddar cheese, shredded
  • 1/4 cup Parmigiano Reggiano, grated

Instructions

  1. Preheat your oven to 350°F (175°C).
  2. Cut the loaf of bread into two halves lengthwise.
  3. In a small pan over medium heat, melt the butter and combine it with the olive oil, minced garlic, and chopped parsley. Stir frequently until the garlic is fragrant, about 2-3 minutes. Be careful not to burn the garlic.
  4. Brush the butter-garlic mixture over the cut sides of the bread halves, ensuring an even coating.
  5. In a bowl, mix together the mozzarella, cheddar, and Parmigiano Reggiano cheeses until well combined.
  6. Evenly distribute the cheese mixture over the garlic-buttered bread halves, covering them completely.
  7. Place the bread on a baking sheet and bake in the preheated oven for 10 minutes or until the cheese is bubbly and golden brown.
  8. Remove from the oven and allow to cool slightly before slicing and serving. Enjoy!

Tips

Here are some helpful tips to ensure your cheesy garlic bread turns out perfectly every time:

  • Use Fresh Ingredients: Fresh garlic and parsley will provide the best flavor. Avoid using pre-minced garlic if possible.
  • Watch the Garlic: Garlic can quickly go from fragrant to burnt, so keep a close eye on it while melting the butter.
  • Serve Warm: This bread is best enjoyed fresh out of the oven when the cheese is still gooey and the bread is crispy.

Variations & Substitutions

Feel free to get creative with this recipe! Here are a few variations and substitutions you might consider:

  • Herbs: Add a sprinkle of Italian seasoning or dried oregano for extra flavor.
  • Spicy Kick: For those who love a little heat, add a pinch of red pepper flakes to the butter mixture.
  • Vegan Option: Substitute the cheeses with your favorite vegan cheese blend and use vegan butter.
  • Different Bread: Try using ciabatta or sourdough for a different texture and flavor profile.

Storage

If you have leftovers (which might be unlikely!), you can store them in an airtight container in the refrigerator for up to 3 days. To reheat, place the bread in a preheated oven at 350°F (175°C) for 5-7 minutes, or until warmed through and the cheese is melty again.

FAQ

Can I make this bread ahead of time?

Yes, you can prepare the bread up to the point of baking and store it covered in the refrigerator for up to 24 hours. When you’re ready to serve, simply bake as directed, adding a couple of minutes to the baking time if needed.

Can I freeze cheesy garlic bread?

While it’s best enjoyed fresh, you can freeze the prepared bread before baking. Wrap it tightly in plastic wrap and aluminum foil, then freeze for up to 2 months. Bake from frozen, adding additional time as necessary until the cheese is bubbly and golden.

Nutrition

While I don’t have exact nutritional information for this recipe, it’s important to note that cheesy garlic bread is a treat best enjoyed in moderation. If you’re looking to reduce calories or fat, consider using less cheese or opting for a whole-grain bread option.

Conclusion

This easy cheesy garlic bread is a comforting and delicious addition to any meal. Whether you’re serving it as a side dish for pasta night or as a snack for game day, it’s sure to be a crowd-pleaser. I hope this recipe brings as much joy to your table as it has to mine. Enjoy the cheesy, garlicky goodness, and don’t be surprised if it becomes a regular request from family and friends!

Related update: How to Make Easy Cheesy Garlic Bread

Related update: Yorkshire Pudding

Fettuccine With Bacon Mushroom and Peas | Made by Meaghan Moineau

Fettuccine With Bacon, Mushroom, and Peas

Intro

There’s something magical about a steaming plate of pasta that transcends the ordinary. It has this incredible ability to transport us back in time, to moments filled with laughter, love, and the comforting aroma of a home-cooked meal. I remember the first time I tasted this delightful combination of fettuccine with bacon, mushroom, and peas. It was a chilly evening, and I was at my grandmother’s house. She had a knack for creating dishes that were simple yet bursting with flavor. This dish quickly became a family favorite, and every bite feels like a warm hug from her. Today, I’m thrilled to share this recipe with you, hoping it brings the same warmth and joy to your table.

Why You’ll Love It

This Fettuccine with Bacon, Mushroom, and Peas is a delightful blend of textures and flavors. It’s creamy, savory, and oh-so-satisfying! The smoky bacon, earthy mushrooms, and vibrant peas all come together in a luscious cream sauce that clings to every strand of fettuccine. Perfect for a weeknight dinner or a special occasion, this dish is quick to prepare and utterly comforting. Plus, it’s a versatile recipe that invites customization to suit your taste preferences.

Ingredients

  • Bacon
  • Cheese
  • Canned condensed cream of mushroom
  • Dried basil
  • Fettuccine
  • Black ground pepper
  • Canned mushroom
  • Dried oregano powder
  • Frozen green peas

Instructions

  1. Bring a large pot of water to boil over high heat and add a generous pinch of salt. Add the fettuccine and cook for about 9 minutes or until al dente.
  2. While the pasta is cooking, heat a pan over medium-high heat and brown the bacon. Once crispy, remove the bacon and drain it on paper towels. Set aside.
  3. Pour the excess oil out of the pan, leaving just a touch for flavor. Sauté the canned mushrooms for about a minute.
  4. Add the canned condensed cream of mushroom and a can of water to the pan. Stir well to combine.
  5. Season with ground black pepper, dried oregano, and/or basil, if desired. Bring the sauce to a gentle boil.
  6. Add the frozen green peas and a modest amount of grated cheese. Taste the sauce before adding more cheese, as the cream of mushroom can be quite salty.
  7. Once the pasta is cooked, drain it and add it to the sauce. Mix well to ensure each strand is coated.
  8. Crumble the cooked bacon and add it to the pasta. Give everything a good mix, then serve immediately. Enjoy!

Tips

For the best results, use high-quality bacon and freshly grated cheese. This enhances the flavor of the dish significantly. If you find the sauce too thick, add a splash of pasta water to reach your desired consistency. Be cautious with the salt as the bacon and cream of mushroom already contribute to the dish’s saltiness.

Variations & Substitutions

You can easily adapt this recipe to suit your dietary needs or preferences. For a vegetarian version, omit the bacon and add extra mushrooms or some sautéed spinach. If you’re not a fan of peas, substitute them with chopped asparagus or broccoli. You can also experiment with different types of cheese, such as Parmesan or Asiago, for a unique flavor profile.

Storage

This pasta dish is best enjoyed fresh, but leftovers can be stored in an airtight container in the refrigerator for up to 3 days. To reheat, gently warm it on the stovetop over low heat, adding a splash of milk or cream to bring back the creaminess. Avoid microwaving, as it may dry out the pasta.

FAQ

Can I use fresh mushrooms instead of canned?

Absolutely! Fresh mushrooms will add a wonderful texture and flavor. Simply slice them and sauté them in the pan before adding the cream of mushroom soup.

What type of cheese works best in this recipe?

A sharp cheddar or Parmesan cheese complements the flavors beautifully. However, feel free to use your favorite cheese or a blend to suit your taste.

Is it possible to make this dish gluten-free?

Yes, you can use gluten-free fettuccine to make this dish gluten-free. Ensure that any canned ingredients and seasonings are also certified gluten-free.

Nutrition

While it’s important to enjoy indulgent meals in moderation, this recipe offers a balance of protein from the bacon, fiber from the peas, and satisfying carbs from the pasta. Remember to consider portion control, especially if you’re watching your caloric intake.

Conclusion

Fettuccine with Bacon, Mushroom, and Peas is more than just a meal; it’s an experience. It’s a dish that brings people together, creates cherished memories, and satisfies the soul. Whether you’re cooking for loved ones or simply treating yourself, this recipe promises warmth and comfort in every bite. I hope this dish becomes a beloved part of your culinary repertoire, just as it has in my family. Happy cooking!

Related update: Fettuccine With Bacon Mushroom and Peas

Related update: Smoky Chicken Tacos

Lasagne Roll Ups | Made by Meaghan Moineau

Lasagne Roll Ups: A Comforting Twist on a Classic

Intro

There’s something truly magical about the aroma of lasagne baking in the oven, wafting through the house and drawing everyone to the kitchen. Growing up, Sunday afternoons at my grandmother’s were always marked by the warmth of her kitchen and the heartiness of her meals. Her lasagne was a staple, a dish that brought our family together, layered with love and tradition. Today, I’m excited to share my own twist on this beloved classic: Lasagne Roll Ups. They maintain all the comforting flavors of traditional lasagne but with a fun and modern presentation that’s perfect for family dinners or an impressive dish for guests.

Why You’ll Love It

Lasagne Roll Ups are not only delicious but offer a delightful experience in both cooking and eating. Here’s why you’ll love this recipe:

  • Easy to Serve: Each roll is a perfect, tidy portion, making serving a breeze.
  • Rich in Flavor: With fresh basil, nutmeg, and a hint of lemon, these roll-ups are bursting with layers of flavor.
  • Customizable: You can easily adapt the recipe to suit dietary needs or preferences.
  • Make-Ahead Friendly: Prepare them in advance and simply bake before serving.
  • Kid-Friendly: The fun roll-up style is sure to be a hit with the little ones.

Ingredients

  • Fresh finely-chopped basil leaves
  • Red thinly-sliced bell peppers
  • Black pepper
  • Chicken broth
  • Dried thyme
  • Garlic cloves
  • Fresh lemon juice
  • Nutmeg
  • Olive oil
  • Finely-chopped onion
  • Parmesan cheese
  • Dry lasagne pasta sheets
  • Red dried pepper flakes
  • Ricotta cheese
  • Salt
  • Shredded mozzarella cheese
  • Frozen packet spinach, thawed and drained
  • Unsalted butter

Instructions

  1. In a skillet, cook the garlic, onion, red pepper flakes, thyme, and salt and pepper to taste in the olive oil over moderately-low heat, stirring, until the onion is softened.
  2. Reserve 3 tablespoons of the onion mixture in a bowl. To the onions in the skillet, add the bell peppers and chicken broth, and simmer the mixture, covered, for 10 minutes, or until the peppers are very soft.
  3. In a blender, puree the mixture until smooth, return it to the skillet, and swirl in the unsalted butter. Stir in the basil and fresh lemon juice.
  4. Cook the lasagne noodles according to package directions, rinse with cold water, and drain.
  5. Preheat the oven to 375 degrees Fahrenheit.
  6. In a bowl with the reserved cooked onions, combine 1/4 cup Parmesan cheese, mozzarella, ricotta, freshly grated nutmeg to taste, spinach, and salt and pepper. Mix well.
  7. Spoon 1 cup of sauce into an ungreased 9- by 9- by 2-inch baking pan. Spread 3 tablespoons of filling on each noodle, roll up as for a jelly roll, and place seam-side down in the pan. Repeat until all the noodles are used.
  8. Top with remaining sauce, cover with foil, and bake for 25 minutes. Uncover, sprinkle with remaining Parmesan cheese, and bake uncovered until golden, about 5 more minutes.

Tips

For the best results, keep these tips in mind:

  • Ensure the spinach is thoroughly drained to prevent watery filling.
  • For ease of rolling, do not overfill the lasagne sheets.
  • Freshly grating nutmeg adds a depth of flavor that pre-ground can’t match.
  • Allow the roll-ups to rest for a few minutes before serving to help them set and enhance the flavors.

Variations & Substitutions

Lasagne Roll Ups are versatile, and you can easily tweak the recipe to fit your needs:

  • Vegetarian: Substitute chicken broth with vegetable broth.
  • Gluten-Free: Use gluten-free lasagne noodles.
  • Meat Lovers: Add cooked ground beef or sausage to the filling for a heartier dish.
  • Cheese Variations: Try using a blend of cheeses such as provolone or fontina for a different flavor profile.

Storage

Store any leftovers in an airtight container in the refrigerator for up to 3 days. To freeze, place the roll-ups in a single layer in a freezer-safe dish and cover tightly. They can be frozen for up to 3 months. To reheat, thaw in the refrigerator overnight and bake at 350 degrees Fahrenheit until heated through.

FAQ

Can I make Lasagne Roll Ups ahead of time?

Absolutely! You can assemble the roll-ups a day in advance and store them in the refrigerator. When ready to serve, simply bake them as per the instructions. They also freeze well, making them a great option for meal prep.

What can I serve with Lasagne Roll Ups?

Lasagne Roll Ups are quite filling on their own, but they pair beautifully with a simple green salad or garlic bread for a complete meal. For something lighter, consider serving them alongside steamed vegetables or a fresh tomato salad.

How can I prevent the noodles from sticking together?

After cooking the noodles, rinse them under cold water and toss them with a small amount of olive oil to prevent sticking. This will make handling and rolling them much easier.

Nutrition

While the exact nutritional content can vary based on specific ingredients and quantities used, each serving of Lasagne Roll Ups typically provides a balanced mix of carbohydrates, proteins, and fats, with plenty of calcium and vitamin-rich spinach. It’s a hearty meal that satisfies without being overly indulgent.

Conclusion

Lasagne Roll Ups are more than just a meal; they’re an experience that brings the nostalgia of family gatherings to your table with a fresh twist. Whether you’re serving them up for a busy weeknight dinner or a special occasion, these roll-ups are sure to impress and satisfy. I hope this recipe becomes a beloved addition to your culinary repertoire. Enjoy the warmth, flavor, and joy that each bite brings!

Related update: Lasagne Roll Ups

Related update: Steak with lemon and capers

No-Bake Fudge Brandy Brownies | Made by Meaghan Moineau

“`html

No-Bake Fudge Brandy Brownies

Intro

I still remember the first time I tasted these luxurious no-bake fudge brandy brownies. It was at a family gathering during the summer when my grandmother decided to introduce us to her secret recipe. The blend of rich chocolate, a hint of brandy, and the crunch from walnuts was a revelation. She shared the story of how she stumbled upon this recipe during her travels in Europe, and how it became a family favorite. Since then, these brownies have been a staple at our gatherings, and I am thrilled to share this delightful dessert with you.

Why You’ll Love It

These no-bake fudge brandy brownies are a perfect blend of easy preparation and decadent taste. Here’s why you will fall in love with them:

  • Quick to Make: With no baking required, you can whip these up in no time.
  • Rich and Decadent: The combination of chocolate, condensed milk, and brandy creates a fudgy, indulgent treat.
  • Customizable: You can easily adjust the ingredients to suit your taste preferences.
  • Perfect for Any Occasion: Whether it’s a casual get-together or a formal dinner, these brownies are sure to impress.

Ingredients

  • 1 cup brandy
  • 1/2 cup butter
  • 1 can condensed milk
  • 2 cups Oreo crumbs (set aside a tablespoon or two for garnish)
  • 1 teaspoon vanilla extract
  • 1 cup walnuts, chopped

Instructions

  1. In a pan, melt chocolate morsels and butter on low heat for about a minute or until completely melted. Stir occasionally. Remove from heat.
  2. In a large bowl, mix Oreo crumbs (set aside a tablespoon or two) and walnuts.
  3. Add condensed milk, vanilla extract, and chocolate mixture to the bowl. Mix well.
  4. Add brandy and mix thoroughly. For an extra kick, consider adding another half a tablespoon of brandy.
  5. Line your container with foil or grease it with butter and sugar. Press the mixture firmly onto the bottom of the container.
  6. Garnish with reserved Oreo crumbs on top.
  7. Refrigerate for about two hours before serving. Enjoy!

Tips

To ensure your brownies have the perfect texture, make sure your chocolate mixture is fully melted and smooth before mixing it with the other ingredients. For a nuttier flavor, toast the walnuts lightly before adding them to the mix.

Variations & Substitutions

Feel free to get creative with this recipe:

  • Alcohol-Free: Substitute the brandy with orange juice or milk for a non-alcoholic version.
  • Nut-Free: Omit the walnuts if you have a nut allergy, or replace them with dried fruit for a chewy texture.
  • Different Cookies: Swap Oreo crumbs for graham crackers or digestive biscuits for a different base flavor.

Storage

Store these brownies in an airtight container in the refrigerator for up to one week. You can also freeze them for up to three months. Simply thaw them in the fridge overnight before serving.

FAQ

Can I use a different type of alcohol?

Absolutely! Feel free to experiment with different spirits. Rum or whiskey can also add a unique flavor to these brownies.

What can I use instead of foil to line my container?

You can use parchment paper or a silicone baking mat as alternatives to foil. They work just as well and make it easy to remove the brownies from the container cleanly.

Do I have to use Oreo crumbs for the base?

Not at all! While Oreo crumbs add a delicious chocolatey flavor, you can use any cookie crumbs you prefer, such as graham crackers or vanilla wafers.

Nutrition

While these brownies are a treat and should be enjoyed in moderation, they are a good source of energy due to the combination of fats and sugars. If you’re looking to make them a bit healthier, consider reducing the amount of butter or using a low-fat alternative.

Conclusion

These no-bake fudge brandy brownies are a testament to the fact that delicious desserts don’t have to be complicated. They’re a perfect way to indulge your sweet tooth while impressing your family and friends. I hope this recipe brings you as much joy and warmth as it has brought to my family over the years. Happy no-baking!

“`

Related update: No-Bake Fudge Brandy Brownies

Related update: 10 Minute Brownies

Blast Of Color Mexican Stuffed Bell Peppers | Made by Meaghan Moineau

Blast Of Color Mexican Stuffed Bell Peppers

Intro

There’s something magical about the vibrant colors of fresh vegetables, especially when they’re stuffed with a delicious mix of spices and wholesome ingredients. Our Blast Of Color Mexican Stuffed Bell Peppers bring a rainbow of flavors to your table, reminiscent of the lively street markets of Mexico. As a child, I remember accompanying my grandmother to those bustling markets. The air was filled with the aroma of spices and roasted vegetables, and my eyes were captivated by the vivid displays of fresh produce. These stuffed peppers are a tribute to those cherished days, a perfect blend of tradition and modern convenience.

Why You’ll Love It

This recipe is not only visually stunning but also incredibly satisfying. Here’s why you’ll fall head over heels for these Mexican Stuffed Bell Peppers:

  • Nutritious and Balanced: Packed with protein from chicken and black beans, fiber from brown rice, and vitamins from fresh vegetables.
  • Easy to Prepare: With a few simple steps, you can create a dish that feels gourmet yet is perfect for a weeknight dinner.
  • Customizable: Easily adapt the recipe to fit your dietary needs or personal preferences.
  • Great for Meal Prep: These peppers can be made ahead and stored for quick lunches or dinners throughout the week.

Ingredients

  • 6 large bell peppers (any color)
  • 1 cup black beans, drained and rinsed
  • 1 cup shredded rotisserie chicken breast
  • 1 can (4 oz) fire roasted green diced chiles
  • 1 tablespoon chili seasoning
  • 1 cup cooked brown rice
  • 1 cup frozen corn kernels, thawed
  • 2 cloves garlic, minced
  • 1 cup low-fat shredded cheddar cheese, divided
  • 1/2 cup red onion, diced
  • 1 roma tomato, diced
  • 1/3 cup sour light cream

Instructions

  1. Preheat your oven to 400 degrees Fahrenheit (200 degrees Celsius).
  2. In a large bowl, combine the cooked brown rice, shredded chicken, thawed corn, diced tomato, diced onion, black beans, 1/2 cup of the shredded cheddar cheese, minced garlic, fire roasted green chiles, and chili seasoning. Mix well.
  3. Prepare a baking dish by lining it with foil and spraying it with cooking spray.
  4. Slice the tops off the bell peppers and remove the seeds and membranes. Stuff each bell pepper with the chicken mixture, pressing firmly to fill the cavity and mounding the mixture on top.
  5. Place the stuffed peppers in the prepared baking dish. Top each pepper with an additional 1/2 tablespoon of cheese.
  6. Bake in the preheated oven for 30 to 40 minutes, or until the peppers are just tender.
  7. Remove from the oven and top each pepper with 1/2 tablespoon of sour cream before serving.

Tips

  • If the tops of the peppers brown too quickly in the oven, cover them loosely with foil.
  • For an extra kick, consider adding a dash of hot sauce or a sprinkle of cayenne pepper to the filling mixture.
  • Ensure your rice is cool before mixing it with other ingredients to prevent the cheese from melting prematurely.

Variations & Substitutions

  • Vegetarian Option: Omit the chicken and add extra black beans or some cooked quinoa for added protein.
  • Cheese Substitute: Use a dairy-free cheese to make this recipe lactose-intolerant friendly.
  • Different Grains: Swap out brown rice for quinoa or farro for a different texture and flavor.

Storage

These stuffed peppers can be stored in an airtight container in the refrigerator for up to 3 days. To reheat, simply place them in a microwave-safe dish and heat for 2-3 minutes, or until warmed through. You can also freeze them for up to 2 months; thaw in the refrigerator overnight before reheating.

FAQ

Can I use fresh chiles instead of canned?

Absolutely! If you prefer using fresh chiles, simply roast them until charred, peel off the skin, and dice them before adding to the mixture.

Can I make these peppers spicier?

Yes, you can adjust the spice level to your liking by adding more chili seasoning or incorporating chopped jalapeños into the stuffing mix.

Is there a way to reduce the sodium content?

To reduce sodium, use low-sodium black beans and chicken, and opt for a no-salt-added chili seasoning. You can also rinse the canned beans to remove some of the sodium.

Nutrition

Each serving of these Mexican Stuffed Bell Peppers is approximately 250 calories, with 30g of protein, 10g of fat, and 20g of carbohydrates. They are a rich source of fiber, vitamins A and C, and calcium, making them a nutritious option for any meal.

Conclusion

Our Blast Of Color Mexican Stuffed Bell Peppers are a delightful way to bring vibrant flavors and colors to your dinner table. Whether you’re reminiscing about family traditions or simply looking for a delicious meal to share with loved ones, these peppers will not disappoint. We hope you enjoy making and savoring this recipe as much as we do. Happy cooking!

Related Recipes

Also try: Blast Of Color Mexican Stuffed Bell Peppers

Also try: Beans With Smoked Pork Hock