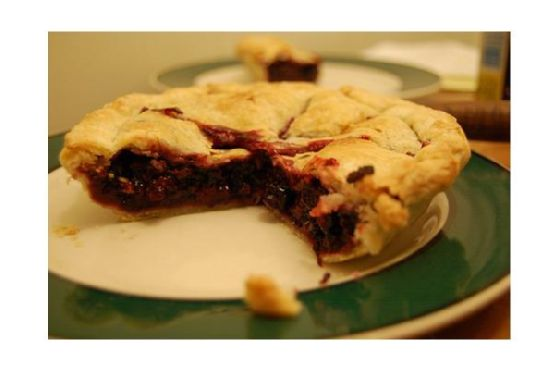
Blackberry Pie With Lemon Verbena Whip Cream
Intro
There’s something magical about the scent of a freshly baked pie wafting through the house. It brings back memories of summer afternoons spent at my grandmother’s kitchen, where the air was always filled with the sweet aroma of baked fruits and spices. Her blackberry pie was a family favorite, and over the years, I’ve added my own twist to it: a delightfully refreshing lemon verbena whip cream. This combination creates a delicious harmony of flavors, celebrating the tartness of blackberries with the gentle citrus notes of lemon verbena.
Why You’ll Love It
This blackberry pie with lemon verbena whip cream is a perfect dessert for any occasion, whether it’s a family gathering or a cozy weekend treat. Here’s why you’ll love it:
- Flavorful Harmony: The tartness of blackberries complements the sweet and fragrant lemon verbena whip cream, creating a perfect balance of flavors.
- Easy to Make: With simple, straightforward steps, this pie is accessible to both novice and experienced bakers.
- Versatile: This pie is perfect for any occasion, from summer picnics to holiday dinners.
- Nostalgic: It evokes the warmth and comfort of homemade desserts, bringing back cherished memories of family and tradition.
Ingredients
- Fresh defrosted blackberries
- Butter
- Cinnamon
- Pastry
- Flour
- Lemon verbena leaves
- Nutmeg
- Sugar
- Fresh whipping cream
Instructions
- Preheat your oven to 450°F (232°C). Chill a mixing bowl in the freezer to prepare for the whip cream.
- Line a 9-inch pie pan with half of the pastry. Cover it and place it in the refrigerator to chill while you prepare the filling.
- In another mixing bowl, combine the blackberries, flour, cinnamon, nutmeg, and sugar. Stir gently until the blackberries are evenly coated.
- Spoon the blackberry mixture into the chilled pie shell. Cover it with the remaining pastry, crimping the edges to seal.
- Cut steam vents in the top crust to allow steam to escape during baking.
- Bake the pie in the preheated oven for 15 minutes, then reduce the oven temperature to 350°F (177°C) and continue baking for an additional 34 to 40 minutes, or until the crust is golden brown.
- While the pie is baking, prepare the lemon verbena whip cream. In a small saucepan, combine the cream and three lemon verbena leaves. Heat over medium-high heat until the cream is just simmering, then remove from heat and let steep for 5 minutes.
- Pour the cream and verbena leaves into a glass container and chill in the refrigerator for 20 minutes. Remove the verbena leaves from the cream.
- Pour the chilled cream into the mixing bowl you prepared earlier. Whip using an electric mixer until soft peaks form, adding sugar to taste.
- Once the pie has cooled slightly, serve slices with a generous dollop of lemon verbena-infused whip cream on the side.
Tips
- Ensure your blackberries are fully defrosted and drained to prevent excess moisture in the pie.
- Chill your pastry before baking to help maintain its shape and avoid a soggy crust.
- Taste your whipped cream as you add sugar to achieve your preferred level of sweetness.
Variations & Substitutions
If you want to experiment with this recipe, here are some variations and substitutions you can try:
- Fruits: Swap blackberries with raspberries or a mix of berries for a different flavor profile.
- Herbs: If lemon verbena is unavailable, try using lemon zest or mint for a refreshing twist.
- Crust: Use a graham cracker crust for a different texture and flavor.
Storage
Store any leftover pie in an airtight container in the refrigerator for up to three days. The lemon verbena whip cream should be stored separately in the refrigerator and is best used within two days. For longer storage, you can freeze the pie (without the whip cream) for up to two months. Thaw it in the refrigerator before serving.
FAQ
Can I use frozen blackberries?
Yes, you can use frozen blackberries if fresh ones are not available. Just make sure to defrost and drain them thoroughly to avoid excess moisture in your pie.
What can I use instead of lemon verbena?
If lemon verbena is hard to find, you can substitute it with lemon zest or a few mint leaves to infuse a similar refreshing flavor into your whipped cream.
How do I know when the pie is done?
The pie is done when the crust is golden brown and the filling is bubbling. If you’re unsure, insert a skewer to test if the filling has thickened.
Nutrition
This recipe is a delightful treat, but remember to enjoy it in moderation. The nutritional value will vary based on the size of the slices and the amount of whipped cream used. A typical serving with a dollop of whip cream contains approximately:
- Calories: 350
- Fat: 18g
- Carbohydrates: 45g
- Protein: 4g
Conclusion
This blackberry pie with lemon verbena whip cream is not just a dessert; it’s a celebration of flavors and memories. Whether you’re reliving the nostalgia of family gatherings or creating new traditions, this pie is sure to bring joy and warmth to your table. The balance of tart berries and fragrant whipped cream is a delightful treat for any palate. So gather your loved ones, serve up a slice, and enjoy the sweet taste of cherished memories and new beginnings.
Related update: Blackberry Pie With Lemon Verbena Whip Cream
Related update: Vanilla Pound Cake