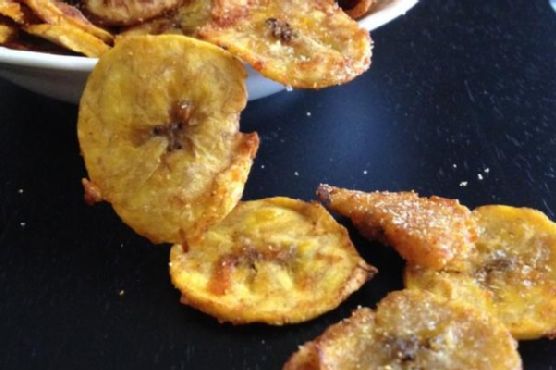
Garlic & Spice Plantain Chips | Made by Meaghan Moineau
Title: Crispy and Flavorful: Garlic & Spice Plantain Chips for Every OccasionDescription: Discover the irresistible blend of spices in our Garlic & Spice Plantain Chips recipe. With just a few simple ingredients and steps, you can create a delicious and nostalgic appetizer that brings a taste of home to any gathering.
---
Garlic & Spice Plantain Chips: A Nostalgic Crunch at Your Fingertips
When it comes to comfort food, few things compare to the crisp, aromatic delight of plantain chips. Growing up in a bustling household, plantain chips held a special place in our family gatherings. I vividly remember my grandmother's kitchen, filled with the inviting aroma of spices, as she skillfully prepared these chips with love. This Garlic & Spice Plantain Chips recipe not only brings those cherished memories to life but also adds a modern twist with its bold flavors.
Ingredients:
- 2 large plantains- 2 tablespoons olive oil
- 1 teaspoon garlic powder
- 1 teaspoon paprika
- 1/2 teaspoon cumin
- 1/4 teaspoon cayenne pepper (adjust to taste)
- 1/2 teaspoon salt
Instructions:
1. Preheat the Oven: Begin by preheating your oven to 400°F (200°C). Line a baking sheet with parchment paper or silicone mats to prevent sticking.2. Prepare the Plantains: Cut off both ends of the plantains. Make a lengthwise slit along the skin and peel it off. Slice each plantain into thin, even pieces. Don't worry if they aren't perfect; rustic is charming!
3. Season the Slices: In a medium-sized bowl, toss the plantain slices with olive oil, garlic powder, paprika, cumin, cayenne pepper, and salt. Stir well to ensure each slice is coated with the flavorful mix.
4. Bake to Perfection: Arrange the seasoned plantain slices in a single layer on the prepared baking sheets. Bake for 15-20 minutes, flipping them at the 8- or 9-minute mark for even crispiness. For optimal results, swap the baking sheets between the top and bottom racks halfway through the baking time.
5. Golden Goodness: Remove the chips from the oven once the edges turn a lovely golden brown. Allow them to cool slightly before serving.
A Taste of Home
Every bite of these plantain chips transports me back to my grandmother's kitchen, where laughter echoed and stories were shared over bowls of crispy snacks. Her gentle hands would guide mine as we sliced plantains together, teaching me not just a recipe, but a tradition. These moments, filled with warmth and love, are what make food truly special.
Difficulty Rating: 3/10
This recipe is straightforward and ideal for cooks of all skill levels. The hardest part might be peeling and slicing the plantains, but the reward is well worth it.
Perfect for Any Occasion
Classified as an appetizer, these Garlic & Spice Plantain Chips are perfect for any gathering—whether as a side dish at a family dinner or a snack at a lively party. Their nostalgic flavor and crunchy texture make them an irresistible treat that everyone will love.
Explore the magic of simple, flavorful ingredients and create your own cherished memories with this delightful recipe. Enjoy the journey of taste and tradition with every crunch!