Cajun Potato Wedges | Made by Meaghan Moineau

Cajun Potato Wedges | Made by Meaghan Moineau

Title: Crispy Cajun Potato Wedges: A Hearty Side with a Dash of Nostalgia
Description: Dive into the world of bold flavors with our Cajun Potato Wedges recipe. Perfectly seasoned and oven-baked to crispy perfection, this dish is a delightful journey down memory lane. Whether served as a tempting appetizer or a satisfying side dish, these wedges promise to be a hit at any gathering.

---


When it comes to comfort food, there's something undeniably satisfying about the humble potato. Its versatility and heartiness have made it a staple in kitchens around the globe. Among the myriad ways to prepare potatoes, Cajun Potato Wedges stand out with their robust flavors and crispy texture. But beyond the spices and the crunch, this dish holds a special place in my heart, evoking fond memories of Sunday afternoons at my grandmother's house.


A Walk Down Memory Lane

Every Sunday, our family would gather at Grandma's cozy home, the air thick with the aroma of her delicious cooking. Among the many dishes that graced her table, her Cajun Potato Wedges were always my favorite. As a child, I would watch in awe as she skillfully sliced the russet potatoes into perfect wedges, her hands moving with the practiced ease of someone who had done this a thousand times before.


While the potatoes baked, she'd regale us with stories of her youth, tales rich with laughter and life lessons. The kitchen, warm and inviting, was the heart of our family, where we shared not just meals but also moments of joy and connection. The spicy aroma of cayenne pepper, garlic powder, and paprika would fill the room, mingling with the sound of our chatter and laughter.


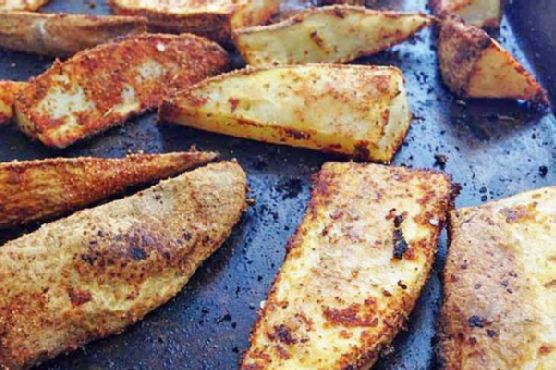
The Recipe: Cajun Potato Wedges

*Ingredients:*


- 4 russet potatoes


- 2 tablespoons olive oil


- 1 teaspoon cayenne pepper


- 1 teaspoon garlic powder


- 1 teaspoon onion powder


- 1 teaspoon paprika


- 1 teaspoon Italian seasoning


- 1 teaspoon salt


- 1/2 teaspoon pepper


*Instructions:*


1. Preheat your oven to 425 degrees Fahrenheit.


2. Slice the potatoes into ½-inch thick wedges, ensuring each piece is about half the length of the potato.


3. In a small bowl, create your spice mixture by combining cayenne pepper, garlic powder, onion powder, paprika, Italian seasoning, salt, and pepper.


4. Spray a cookie sheet with olive oil cooking spray. Arrange the potato wedges on the sheet and toss them with olive oil to ensure an even coating.


5. Sprinkle the spice mixture generously over the potatoes and toss them again to distribute the seasoning evenly.


6. Bake the wedges for 25 minutes, then flip them over and bake for an additional 5 minutes to achieve that perfect crispy finish.


Difficulty: 3/10
Category: Appetizer

These Cajun Potato Wedges are more than just a side dish; they are a testament to the power of food to bring people together. Each bite carries the warmth of family gatherings and the joy of shared stories. Whether you're preparing them for a casual get-together or a special occasion, these wedges are sure to be a crowd-pleaser, evoking smiles and perhaps even a sense of nostalgia.


So, next time you're in the mood for something flavorful and comforting, give this recipe a try. Who knows, it might just become a cherished tradition in your family too.

Read more about Appetizers

Read more about Main Dishes

Read more about Desserts

Avocado, Corn, Tomato and Tortilla Soup | Made by Meaghan Moineau

Avocado, Corn, Tomato and Tortilla Soup | Made by Meaghan Moineau

Title: A Taste of Togetherness: Avocado, Corn, Tomato, and Tortilla Soup
Description: Dive into the comforting flavors of our Avocado, Corn, Tomato, and Tortilla Soup, a simple yet delightful main dish that brings warmth and nostalgia to your table. With fresh ingredients and a heartwarming backstory, this recipe is perfect for family gatherings or a quiet evening at home.

---


When the days grow shorter and the air crisper, my family and I find ourselves naturally gravitating towards the kitchen, seeking out dishes that warm the soul and ignite cherished memories. One such recipe that stands out in my mind is the Avocado, Corn, Tomato, and Tortilla Soup—a dish that has become a staple in our family gatherings.


Ingredients:

- 4 cups chicken stock


- Salt and black pepper, to taste


- 1 cup frozen corn kernels


- 1 red onion, thinly sliced


- 1 cup cooked shredded chicken


- Juice of 1 lime


- 2 avocados, diced


- 3 roma tomatoes, diced


- 1/4 cup whole cilantro leaves


- Tortilla chips, for garnish


Instructions:

1. In a small saucepan, bring the chicken stock to a simmer over medium heat. Season with salt and pepper to taste.


2. Stir in the corn and onion, cooking for about 1 minute to soften.


3. Add the shredded chicken to the saucepan and bring the mixture back to a boil.


4. Stir in the lime juice, then remove the saucepan from the heat.


5. Divide the diced avocado, roma tomatoes, and cilantro leaves between two soup bowls.


6. Ladle the hot stock over the ingredients in the bowls, ensuring the solids are equally divided.


7. Garnish each bowl with a generous handful of tortilla chips and enjoy.


A Nostalgic Family Memory:

Growing up, the kitchen was always the heart of our home. I vividly recall the first time my grandmother introduced me to this colorful and fragrant soup. It was a chilly autumn evening, and we were gathered in her cozy kitchen, the windows fogged with warmth and the aroma of simmering stock filling the air.


As she guided me through the recipe, step by step, my grandmother shared stories of her childhood in Mexico, where fresh ingredients were always at the forefront of her family's meals. The vibrant colors of the avocados, tomatoes, and cilantro reminded her of the lively markets she frequented with her mother. With each spoonful of soup, I felt a connection to my heritage, a sense of belonging that transcended generations.


This dish has become more than just a meal; it's a cherished tradition, a reminder of the love and stories passed down through the years. Every time I prepare this soup, I am transported back to that evening, surrounded by family, laughter, and the comforting embrace of a shared meal.


Difficulty Rating: 4/10
Classification: Main Dish

This Avocado, Corn, Tomato, and Tortilla Soup is not only a simple and quick recipe but also a vessel for family memories and traditions. Whether you're hosting a gathering or enjoying a quiet night in, this soup offers a taste of togetherness that warms both the body and soul.

Read more about Appetizers

Read more about Main Dishes

Read more about Desserts

Savory Olive & Goat Cheese Palmiers | Made by Meaghan Moineau

Savory Olive & Goat Cheese Palmiers | Made by Meaghan Moineau

Title: Elegant Entertaining Made Easy: Savory Olive & Goat Cheese Palmiers
Description: Discover the perfect appetizer to impress your guests with our Savory Olive & Goat Cheese Palmiers. This simple yet sophisticated recipe combines the rich flavors of goat cheese and olive tapenade with the buttery flakiness of puff pastry. Easy to make and even easier to enjoy, this dish will become a staple for your gatherings.

---


When I think back to family gatherings during my childhood, I can almost smell the mouth-watering aroma of freshly baked pastries wafting through my grandmother's cozy kitchen. The heart of our family home, it was a place where culinary magic happened and where my love for cooking first took root. Amongst the many delightful treats she prepared, one in particular stands out in my memory: her Savory Olive & Goat Cheese Palmiers.


Every holiday season, our extended family would gather, and my grandmother would set the table with an array of delicious appetizers. The palmiers were always the star of the show. Their golden, flaky exterior and the rich, savory filling made them irresistible. As a child, I would eagerly await my turn to help in the kitchen, watching in awe as my grandmother expertly rolled the pastry with her delicate hands, imparting not only her culinary skills but also her warmth and love into each creation.


Ingredients:

- Coarse salt


- Goat cheese


- Cooked olive tapenade


- Pine nuts


- Cooked puff pastry dough


Instructions:

1. Allow the puff pastry dough to thaw according to the package directions.


2. Lightly flour a flat work surface. Place one sheet of the dough on top of the other on the floured surface, and gently roll it out to a 9x12-inch shape that is about 1/4-inch thick. (You could use each sheet of dough individually, if you prefer.)


3. Spread the olive tapenade over the dough, followed by the crumbled goat cheese. Top with the toasted pine nuts.


4. Start by rolling the short ends of the dough toward each other until they meet in the middle.


5. Tightly wrap the rolled dough in plastic wrap and refrigerate for about 30 minutes.


6. Preheat your oven to 425 degrees F.


7. Line a baking sheet with parchment or a silicone baking mat.


8. Unwrap the dough and use a serrated knife to slice the rolled dough into 1/4-inch slices, and put them on the baking sheet about 2 inches apart.


9. Sprinkle the tops with the coarse salt and bake for 12-14 minutes, or until they are just lightly golden.


10. Serve warm.


Difficulty Rating: 4/10
Classification: Appetizer

These Savory Olive & Goat Cheese Palmiers are the epitome of elegance and flavor, making them the perfect appetizer for any celebration. The ease of preparation belies their impressive presentation, allowing you to focus on spending quality time with loved ones. Whether you are hosting a sophisticated dinner party or a casual get-together, these palmiers are sure to delight your guests and create cherished memories for years to come.

Read more about Appetizers

Read more about Main Dishes

Read more about Desserts

Peanut Butter Banana French Toast | Made by Meaghan Moineau

Peanut Butter Banana French Toast | Made by Meaghan Moineau

Title: Nostalgic Mornings: The Irresistible Charm of Peanut Butter Banana French Toast
Description:

Discover the magic of Peanut Butter Banana French Toast, a delightful breakfast dish that's sure to evoke cherished family memories. This easy-to-follow recipe combines the creamy richness of peanut butter and bananas with the warm, aromatic spices of nutmeg and cinnamon, creating a symphony of flavors that will transport you back to simpler times. Perfect for a cozy morning or a special brunch, this dish is both a treat for the taste buds and a trip down memory lane.


---


Peanut Butter Banana French Toast: A Journey Back Home


There's something inherently comforting about the aroma of French toast sizzling on a skillet. For me, it's a scent that instantly transports me back to Saturday mornings at my grandmother's house. Her kitchen was a symphony of delightful aromas, the air filled with the warm, sweet smell of cinnamon and the subtle hint of nutmeg. These mornings were the highlight of my childhood weekends, and the star of the show was always her Peanut Butter Banana French Toast.


Ingredients:

- Bread (preferably thick slices like brioche or challah)

- Peanut butter


- 1/2 banana, sliced


- 1 whole egg


- A splash of orange juice


- A pinch of ground nutmeg


- A pinch of ground cinnamon


- A dash of cayenne pepper


- Maple syrup (for serving)


- Confectioners' sugar (optional, for garnish)


- Additional banana slices (for garnish)


Instructions:

1. Prepare the Sandwich: Start by spreading a generous layer of peanut butter on one slice of bread. Arrange banana slices over the peanut butter, then top with another slice of bread to create a sandwich.
2. Create the Egg Mixture: In a shallow bowl, whisk together the egg, a splash of orange juice, ground nutmeg, ground cinnamon, and a dash of cayenne pepper. This mixture will add a delightful depth of flavor to your French toast.
3. Dip the Sandwich: Heat a skillet over medium heat and add a tablespoon of butter. Dip the prepared sandwich into the egg mixture, ensuring both sides are well-coated.
4. Cook to Perfection: Place the sandwich in the hot skillet. Cook for about one minute on each side, or until the bread is golden brown and the peanut butter begins to melt.
5. Serve and Enjoy: Transfer the French toast to a plate. Ladle with maple syrup, sprinkle with confectioners' sugar, and garnish with additional banana slices for an extra touch of sweetness.

A Trip Down Memory Lane


Every bite of this Peanut Butter Banana French Toast brings back vivid memories of laughter-filled mornings with my family. My grandmother, the orchestrator of these culinary symphonies, would hum softly as she cooked, the very embodiment of love and warmth. Her kitchen was more than just a place to prepare meals; it was a sanctuary where stories were shared, and bonds were strengthened. This dish, with its creamy peanut butter and sweet banana, remains a beloved heirloom of those mornings, a recipe passed down through the generations, each bite a comforting reminder of home.


Difficulty: 3/10


This recipe is delightfully simple and perfect for cooks of all levels, making it an excellent choice for a relaxed weekend breakfast or a nostalgic brunch gathering.


Classification: Main Dish


While traditionally considered a breakfast item, this Peanut Butter Banana French Toast is hearty enough to be enjoyed as a main dish, offering a perfect balance of sweet and savory flavors that satisfy any time of day.


---


Indulge in this heartwarming dish, and let it become a cherished part of your family's weekend tradition, just as it was in mine.

Read more about Appetizers

Read more about Main Dishes

Read more about Desserts

The Secret to Easy Skillet Filet Mignon Steak Tacos | Made by Meaghan Moineau

The Secret to Easy Skillet Filet Mignon Steak Tacos | Made by Meaghan Moineau

Title: Unlocking the Flavor: Easy Skillet Filet Mignon Steak Tacos
Description: Dive into the culinary delight of Skillet Filet Mignon Steak Tacos, a dish that combines the gourmet essence of filet mignon with the casual comfort of tacos. This recipe offers a flavor-packed experience that is simple to prepare, making it perfect for any occasion. With easy-to-follow instructions, this dish will become a favorite in your household. Relish the nostalgia of family gatherings filled with laughter and the aroma of sizzling steak.

---


The Secret to Easy Skillet Filet Mignon Steak Tacos


In the heart of every family kitchen, there are recipes that evoke cherished memories. For me, this recipe for Skillet Filet Mignon Steak Tacos transports me back to summer evenings spent with my family. The sizzle of the steak in the skillet would fill our home with an irresistible aroma, setting the stage for an evening of laughter and storytelling around the dinner table.


Ingredients:

- 2 filet mignon steaks

- Olive oil extra virgin, for rubbing


- Cracked black pepper, to taste


- Sour cream


- Guacamole


- Shredded cheddar cheese


- White corn tortillas


Instructions:

1. Begin by heating a skillet on medium to low heat. While the skillet warms up, take the filet mignon steaks and rub them generously with extra virgin olive oil. Season with cracked black pepper to your liking.

2. Place the steaks in the skillet and let them cook slowly, ensuring they reach your desired level of doneness. For a perfectly medium steak, cook for about 7 minutes on each side. Remember, patience is key to achieving that tender, juicy texture.


3. Once the filets are cooked to perfection, remove them from the heat and let them rest for a few minutes. Then, slice them thinly and lengthwise to prepare for taco assembly.


4. In a clean skillet over medium heat, warm up the white corn tortillas. This step is crucial for bringing out their natural flavor and making them pliable for folding.


5. Now comes the fun part—assembling your tacos! Top each warm tortilla with slices of the tender filet mignon, a dollop of creamy guacamole, a spoonful of sour cream, and a sprinkle of shredded cheddar cheese. The combination of these ingredients creates a symphony of flavors and textures.


A Nostalgic Family Memory:

I vividly recall the first time we made these tacos as a family. It was a warm summer evening, and my dad had just returned from a fishing trip with the biggest smile on his face. Although no fish made it to the table that night, he insisted on cooking these steak tacos. We gathered around the kitchen island, chatting and laughing as we each took turns slicing the steaks and warming the tortillas. It was a simple meal, but it brought us closer, reminding us that the best moments in life are often shared over a delicious meal.

Difficulty Rating: 3/10

This recipe is straightforward and perfect for cooks of all skill levels, making it an ideal choice for a relaxed family dinner or a small gathering with friends.

Classification: Main Dish

These Skillet Filet Mignon Steak Tacos serve as an impressive main dish, combining elegance and ease in every bite.

---


Whether you're creating new memories or reminiscing about past family gatherings, these Skillet Filet Mignon Steak Tacos offer a delicious journey of flavors that will surely become a staple in your culinary repertoire. Enjoy the simplicity and savor the taste of this delightful dish!

Read more about Appetizers

Read more about Main Dishes

Read more about Desserts

Authentic Mexican Wedding Cookies | Made by Meaghan Moineau

Authentic Mexican Wedding Cookies | Made by Meaghan Moineau

Title: Savoring Tradition: Authentic Mexican Wedding Cookies
Description: Discover the sweet allure of Authentic Mexican Wedding Cookies with this easy-to-follow recipe that brings generations of tradition to your kitchen. Delve into the rich flavors of butter, pecans, and cinnamon, and be transported to cherished family gatherings where these delightful treats were always the star of the dessert table.

---


There’s something inherently magical about recipes that have stood the test of time, their aromas and flavors weaving through the tapestry of family memories. Authentic Mexican Wedding Cookies, with their delicate crumble and sugary coating, are one such timeless treat. These cookies, also known as polvorones, have been a beloved staple at celebrations in my family, their presence as comforting as a grandmother’s hug.


Ingredients:

- 1 cup butter, softened


- 2 cups powdered sugar, divided


- 2 teaspoons vanilla extract


- 2 cups all-purpose flour


- 1 cup pecans, finely chopped


- 1 teaspoon ground cinnamon


Instructions:

1. In a large bowl, use an electric mixer to beat the butter until light and fluffy.


2. Add 1/2 cup of powdered sugar and vanilla extract; continue beating until well blended.


3. Gradually beat in the flour, followed by the chopped pecans.


4. Divide the dough in half, forming each half into a ball. Wrap each ball in plastic wrap and chill for about 30 minutes.


5. Preheat your oven to 350°F (175°C).


6. In a pie dish, whisk together the remaining 1 1/2 cups of powdered sugar and the ground cinnamon. Set this cinnamon sugar mixture aside.


7. With half of the chilled dough, roll portions of dough (about 2 teaspoons each) between your palms to form balls. Place them on a large baking sheet, leaving about 1/2 inch between each ball.


8. Bake for 18 minutes, or until the cookies are golden brown on the bottom and just pale golden on top.


9. Allow the cookies to cool on the baking sheet for 5 minutes. While still warm, gently toss them in the cinnamon sugar to coat completely.


10. Transfer the coated cookies to a rack to cool completely. Repeat the process with the remaining dough.


11. Sift any remaining cinnamon sugar over the cooled cookies before serving.


A Family Memory:

These cookies always remind me of my grandmother's kitchen, bustling and warm during family gatherings. I remember one particular afternoon when I was about eight years old. The kitchen was filled with laughter and the rich scent of roasted pecans. My grandmother, with flour-dusted hands, showed me how to carefully roll the dough into perfect little balls. As the cookies baked, their aroma mingled with the cinnamon in the air, creating a scent that felt like home.


After they came out of the oven, she let me help coat them in the cinnamon sugar, warning me not to eat too many at once. Of course, I sneaked a few extra when she wasn't looking, savoring the sweet, nutty flavor. To this day, those cookies are more than just a dessert; they are a bridge to my heritage, a taste of love and tradition.


Difficulty: 4/10
Classification: Dessert

Embrace the simplicity and nostalgic charm of these Authentic Mexican Wedding Cookies. Whether you're a seasoned baker or new to the kitchen, this recipe promises to be a rewarding journey into culinary tradition. With each bite, you’ll find yourself part of a story that has been lovingly passed down through generations.

Read more about Appetizers

Read more about Main Dishes

Read more about Desserts

Four-Berry Blast Fruit Smoothie | Made by Meaghan Moineau

Four-Berry Blast Fruit Smoothie | Made by Meaghan Moineau

Title: A Sip of Summer: The Four-Berry Blast Fruit Smoothie
Description: Dive into the vibrant world of berries with our delightful Four-Berry Blast Fruit Smoothie, a refreshing treat bursting with flavor and nostalgia. Perfect as a dessert or a revitalizing snack, this smoothie is an easy and delicious way to enjoy the bounty of summer all year round.

---


As the sun dipped below the horizon, casting a golden hue over our backyard, my family would gather on the porch, laughter mingling with the scent of blooming flowers. These were the moments I cherished most—a time when the simple joys of life resonated most deeply. My grandmother, a culinary magician in her own right, always had a way of bringing us together with her culinary creations, and one such masterpiece was her Four-Berry Blast Fruit Smoothie.


This recipe was a family favorite, crafted and perfected over the years. The first time I tasted it, I was a child, eagerly watching as my grandmother's hands moved deftly, tossing frozen blackberries, blueberries, raspberries, and strawberries into the blender. The air was filled with the sweet, tangy aroma of berries—a scent that still transports me back to those cherished evenings.


What made this smoothie truly special was the addition of lemonade concentrate, a secret ingredient that my grandmother insisted was the key to its refreshing zing. As she blended in the whole milk, sugar, and a hint of vanilla extract, I would stand by her side, mesmerized by the whirring sounds of the blender as it transformed the ingredients into a vibrant, purple elixir.


Once the smoothie was ready, my grandmother would pour it into tall glasses, the rich color contrasting beautifully against the glass. We'd each take a sip, smiles spreading across our faces as the flavors burst forth—a harmonious blend of sweet and tart, creamy and smooth. The Four-Berry Blast Fruit Smoothie wasn't just a drink; it was a sip of summer, a reminder of sun-drenched days and warm family gatherings.


Now, as an adult, I've carried on the tradition, whipping up this delightful smoothie whenever I crave a taste of those nostalgic days. It's incredibly easy to make, with a difficulty rating of just 2 out of 10, making it a perfect choice for a quick and satisfying dessert. Each sip is a gateway to fond memories, a testament to the enduring power of food to connect us to our past.


Four-Berry Blast Fruit Smoothie Recipe

*Ingredients:*


- 1 cup frozen blackberries


- 1 cup frozen blueberries


- 1/2 cup lemonade concentrate


- 1 cup frozen unsweetened raspberries


- 1 cup frozen unsweetened strawberries


- 2 tablespoons sugar


- 1 teaspoon vanilla extract


- 1 cup whole milk


*Instructions:*


1. Place the frozen blackberries, blueberries, and lemonade concentrate into a blender. Pulse a few times to combine.


2. Add the frozen raspberries and pulse 2-3 times.


3. Add the frozen strawberries and pulse again.


4. Once all berries are added, blend on high until smooth.


5. Serve immediately and enjoy a taste of summer nostalgia.


Whether you're savoring it on a sunny porch or in the comfort of your home, the Four-Berry Blast Fruit Smoothie is a delicious reminder that the best recipes are those that come with a story—a legacy of love and laughter that transcends time.

Read more about Appetizers

Read more about Main Dishes

Read more about Desserts

Hot Cocaccino | Made by Meaghan Moineau

Hot Cocaccino | Made by Meaghan Moineau

Title: "Hot Cocaccino: A Heartwarming Cup of Memories and Delight"
Description: Dive into the warmth of a deliciously indulgent Hot Cocaccino, a beverage that combines the rich flavors of cocoa and coffee. Perfect for cozy evenings and chilly winter days, this delightful drink is more than just a treat—it's a trip down memory lane.

---


If you're anything like me, the onset of cooler weather means it's time to dust off those cherished warm beverage recipes. Today, I want to share a special concoction that's been a family favorite for generations: the Hot Cocaccino. This delightful drink, with its rich blend of cocoa and coffee, is not only a perfect comfort on a cold day but also a heartwarming reminder of family gatherings and cherished moments.


Ingredients:

- 1 packet of cocoa mix


- 1 cup of milk


- 1/2 cup of light half and half


- 1 tablespoon of instant coffee


- Mini marshmallows


- Chocolate syrup


- Whipped cream


- Sprinkles or a dash of cocoa powder


Instructions:

1. In a medium saucepan, heat the milk and light half and half until very hot, but make sure it doesn’t boil.


2. Remove the saucepan from heat and stir in the hot cocoa mix and instant coffee until well combined.


3. Pour the mixture into mugs or cups, leaving some space at the top for the toppings.


4. Top each serving with a handful of mini marshmallows.


5. Drizzle chocolate syrup over the marshmallows for an extra touch of sweetness.


6. Add a generous dollop of whipped cream on top.


7. Finish with a sprinkle of colorful sprinkles or a dash of cocoa powder for that festive look.


A Nostalgic Journey:

Every sip of this Hot Cocaccino takes me back to winter evenings at my grandmother's house. Her living room was always filled with the faint scent of pine from the Christmas tree, twinkling lights casting a warm glow on our faces. After a long day of sledding with my cousins, we would gather around the fireplace, warming our hands on mugs filled with this comforting beverage.


My grandmother had a knack for turning simple ingredients into something magical. She would tell us stories of how her mother used to make a similar drink during the holidays, using whatever ingredients were available at the time. It was her way of keeping family traditions alive, and now, it’s mine. Each cup of Hot Cocaccino I make is a tribute to those cozy nights and the love that went into every pot.


Difficulty Rating: 3/10
Classification: Dessert

This recipe is not only easy to make but also a wonderful way to create new memories while honoring the old ones. Whether you’re looking to impress guests or just want to indulge yourself, the Hot Cocaccino is a must-try. So, cozy up, take a sip, and let the warmth of this delightful drink transport you back to simpler, happier times.

Read more about Appetizers

Read more about Main Dishes

Read more about Desserts

HomeMade Hashbrowns with Spinach and Carrots | Made by Meaghan Moineau

HomeMade Hashbrowns with Spinach and Carrots | Made by Meaghan Moineau

Title: A Nostalgic Twist on a Classic: Homemade Hashbrowns with Spinach and Carrots


Description:

Dive into the comforting embrace of homemade hashbrowns, enhanced with the vibrant flavors of spinach and carrots. Perfect as an appetizer or a hearty main dish, this recipe brings back cherished family memories with every bite.

---


There’s something profoundly comforting about the sizzle of hashbrowns hitting a hot pan. The aroma alone evokes memories of Sunday brunches spent with family, where laughter was as abundant as the delicious food on the table. This recipe for Homemade Hashbrowns with Spinach and Carrots is not just a delightful twist on a classic; it's a journey back to those cherished moments.


Ingredients:

- 2 large potatoes, grated

- 1 cup fresh spinach leaves, chopped


- 1 medium onion, finely chopped


- 1 carrot, grated


- 1/2 teaspoon red chilli powder


- 2 tablespoons cornflour


- Salt, to taste


- Oil, for shallow frying


Instructions:

1. In a large bowl, combine the grated potatoes, chopped spinach, finely chopped onion, and grated carrot. Add 1/2 teaspoon of salt and mix well to ensure all the ingredients are well incorporated.

2. Squeeze the veggie mixture gently to remove all excess moisture. This step is crucial for achieving crispy hashbrowns.


3. Add red chilli powder and cornflour to the mixture. Adjust the salt by tasting, ensuring a perfect balance of flavors.


4. Form the mixture into small patties, pressing them firmly to hold their shape.


5. Heat oil in a pan over medium-high heat for shallow frying. Carefully place the patties into the hot pan, allowing them to brown for a few minutes on each side.


6. Once both sides are browned, reduce the heat to medium. Continue cooking until the hashbrowns are cooked through and crispy.


7. Serve hot and enjoy!


---


A Family Memory:


As a child, Sunday mornings were my favorite. The kitchen would come alive with the sounds and smells of breakfast being prepared. My grandmother was the mastermind behind these culinary experiences, and her hashbrowns were legendary. She would always add a little something extra to her recipes—whether it was a handful of fresh spinach from her garden or a dash of spice—which made each bite memorable.


One particular Sunday, I remember standing on a stool beside her, watching as she expertly mixed the ingredients and formed perfect patties. She handed me a small piece of dough, encouraging me to make my own. My creation was a lopsided attempt, but she placed it in the pan with the same care as the others.


Years later, I find myself recreating those mornings in my own kitchen. Each time I make these hashbrowns, I'm reminded of her gentle guidance and the warmth of family gatherings. It’s a simple dish, yet it carries the weight of tradition and the joy of shared meals.


Difficulty Rating: 4/10


This recipe is straightforward and perfect for both novice and seasoned cooks who appreciate the simplicity of a well-made dish.


Classification: Appetizer/Main Dish


Whether served as a starter or the main event, these hashbrowns with spinach and carrots are sure to become a beloved addition to your culinary repertoire. Enjoy them as a standalone dish or pair them with your favorite breakfast accompaniments.

Read more about Appetizers

Read more about Main Dishes

Read more about Desserts

Stuffed Chicken Breast | Made by Meaghan Moineau

Stuffed Chicken Breast | Made by Meaghan Moineau

Title: A Taste of Home: Cream Cheese and Green Onion Stuffed Chicken Breasts
Description: Discover the joy of cooking with our Stuffed Chicken Breast recipe, featuring a delectable blend of cream cheese and green onions. This easy-to-follow dish transports you back to cherished family gatherings and promises to delight your taste buds. Rated 3/10 in difficulty, it's the perfect main dish for any occasion.

---


Growing up, the kitchen was always the heart of our family home. Every Sunday, the tantalizing aroma of my mom's cooking would waft through the house, drawing us all together. One of her signature dishes was the Stuffed Chicken Breast, a recipe passed down from my grandmother. It was a family favorite, and each bite was infused with the warmth and love of countless shared meals.


Ingredients:

- Skinless, boneless chicken breasts


- Cream cheese


- Green onions, finely chopped


- Your favorite chicken seasoning


- Olive oil-based cooking spray


Instructions:

1. Begin by washing and patting dry the chicken breasts. My grandmother would always say that the secret to a great dish is in the preparation—handle each ingredient with care.


2. Carefully cut each chicken breast lengthwise, ensuring you don't cut all the way through. This was always my favorite part as a kid, watching my mom skillfully create pockets in the chicken for the delicious filling.


3. In a small bowl, mix together the cream cheese and chopped green onions. This creamy concoction brings back memories of laughter and storytelling around the kitchen counter as we prepared the filling.


4. Generously stuff each chicken breast with the cream cheese mixture, pressing firmly to close. I remember my mom teaching me to be patient and precise—skills that have served me well beyond the kitchen.


5. Once stuffed, spray the chicken breasts with olive oil-based cooking spray. This step ensures a beautiful, golden-brown exterior. My mom's kitchen always had an olive oil sprayer handy, a little trick she learned from her mother.


6. Now, rub the chicken with your favorite seasoning. This is where you can make the recipe your own. I still use the same blend my grandmother did—a mix of garlic powder, paprika, salt, and pepper. The smell of it brings me back to those cherished Sundays.


7. Bake the chicken in a preheated oven at 375°F (190°C) for about 25-30 minutes, or until the chicken is cooked through and the cheese is melted and bubbly.


Memories on a Plate:

As the chicken bakes, the house is filled with the comforting aroma of a meal that has stood the test of time. Sitting down to eat, I'm reminded of our family gathered around the table, sharing stories and laughter. Each bite of the Stuffed Chicken Breast is a trip down memory lane—a reminder of the love and joy that comes from sharing food with those you care about.


Difficulty and Classification:

With a difficulty rating of 3/10, this Stuffed Chicken Breast recipe is both simple and satisfying, making it an ideal main dish for any occasion. Whether you're cooking for family or friends, this dish is sure to become a beloved staple in your kitchen, just as it has been in mine.


So, gather your ingredients, and embark on a culinary journey that celebrates tradition, family, and the timeless pleasure of a home-cooked meal.

Read more about Appetizers

Read more about Main Dishes

Read more about Desserts

Roasted Beet and Radicchio Salad | Made by Meaghan Moineau

Roasted Beet and Radicchio Salad | Made by Meaghan Moineau

Title: A Taste of Tradition: Roasted Beet and Radicchio Salad


Description:

Explore the vibrant flavors and rich memories intertwined in our Roasted Beet and Radicchio Salad. This delightful dish combines earthy beets, crispy radicchio, and a tangy vinaigrette, topped with creamy queso fresco. Perfect as an appetizer with a difficulty rating of 4/10, it’s an easy yet impressive addition to any meal.

---


As the cool autumn breeze swept through the trees, painting the landscape with hues of gold and crimson, my family gathered in our cozy kitchen, a tradition that marked the heart of the harvest season. The star of our fall feasts often came in the form of a humble yet exquisite dish: the Roasted Beet and Radicchio Salad. The sight of vibrant beets roasting in the oven, their aroma mingling with the crisp scent of fresh radicchio, always signaled warmth and togetherness.


Ingredients:

- Beets

- Olive oil


- Radicchio


- Red onion


- Radishes


- Fresh mint leaves


- Queso fresco


- Red wine vinegar


- Honey


- Garlic clove


- Salt


- Pepper


Instructions:

1. Preheat your oven to 400°F. Trim the beets and place them in a baking dish. Drizzle with 1 tablespoon of olive oil, cover, and roast for 30-35 minutes, or until they are fork-tender.
2. Prepare the radicchio by cutting it into quarters, removing the core, and slicing into thin strips. Soak the radicchio in a bowl of ice water for 20-30 minutes to mellow its bitterness.
3. Slice the red onion and radishes very thinly. These add a crisp texture and peppery flavor that complement the earthy beets beautifully.
4. Whisk together 3 tablespoons of olive oil, red wine vinegar, honey, minced garlic, salt, and pepper in a small bowl, creating a simple yet flavorful vinaigrette.
5. Peel the cooled beets and cut them into thin wedges. Toss them with the radicchio, onions, radishes, and fresh mint in the vinaigrette.
6. Top your salad with crumbled queso fresco, adding a creamy and slightly tangy finish. Serve immediately to enjoy the fresh, vibrant flavors.

A Nostalgic Touch:

Every autumn, as we prepared this salad, my grandmother would regale us with tales of her childhood. She spoke of her mother’s bustling kitchen, the air filled with laughter and the scent of roasting beets. "It was a time when life was simpler," she’d say, her eyes twinkling with fondness. As we savored each bite of the salad, it was as if we were sharing not just a meal, but a piece of our family's history.

Difficulty Rating: 4/10

Classification: Appetizer


This Roasted Beet and Radicchio Salad is more than just a dish; it’s a cherished tradition, a blend of flavors that echo the love and warmth of family gatherings. Whether you’re looking to recreate a piece of nostalgia or introduce a new classic to your table, this salad is sure to delight both the eyes and the palate.

Read more about Appetizers

Read more about Main Dishes

Read more about Desserts

Coconut-Almond Crusted Tilapia | Made by Meaghan Moineau

Coconut-Almond Crusted Tilapia | Made by Meaghan Moineau

Title: Savor the Islands: Coconut-Almond Crusted Tilapia Recipe

Description: Dive into a culinary escape with our Coconut-Almond Crusted Tilapia, a dish that brings the tropical flavors of the islands right to your kitchen. This delightful main dish is not only simple to prepare but also offers a flavorful experience that will make your taste buds dance. Join us as we explore this recipe's step-by-step guide and share a heartwarming family memory that makes this dish truly special.


---


Coconut-Almond Crusted Tilapia: A Taste of the Tropics


There's something magical about the blend of coconut and almond that transports me back to my grandmother's cozy kitchen. Her little island home always bustled with the scents of tropical spices and fresh seafood, creating a warm haven of delectable aromas. Among her plethora of cherished recipes, the Coconut-Almond Crusted Tilapia stood out as a favorite for our family gatherings.


Ingredients:


- 4 white tilapia fillets


- 1 lemon, halved


- 1/2 cup coconut milk


- 1/2 cup almond flour


- 1/2 cup unsweetened shredded coconut


- Salt, to taste


- Black pepper, to taste


- 1/2 tsp ground ginger


- 1/2 tsp dried mint


- Oil for frying


Instructions:


1. Prep the Fish: Start by patting the tilapia fillets dry with paper towels. Sprinkle both sides of each fillet with a generous pinch of salt and black pepper.
2. Marinate: Squeeze the juice from half a lemon over the fillets and drizzle with coconut milk. Turn the fillets to ensure they're well-coated. Allow them to marinate at room temperature for 15 minutes.
3. Prepare the Breading: In a shallow bowl, combine almond flour, shredded coconut, a touch more salt and pepper, ground ginger, and dried mint. Mix well to create a fragrant breading mixture.
4. Cook the Fish: Heat oil in a large skillet over medium heat. Carefully lay the marinated fillets into the skillet. Cook until both sides are golden brown and the fish flakes easily with a fork—about 3-5 minutes per side for thin fillets, longer for thicker cuts.
5. Drain and Serve: Transfer the cooked fish to a stack of paper towels to drain and cool slightly. Serve immediately for best results, ideally alongside our Tropical Sweets & Reds Mash.

A Nostalgic Family Memory


Every summer, our family would gather at my grandmother's home, nestled by the sea. The highlight of these gatherings was always her Coconut-Almond Crusted Tilapia. I remember as a child, eagerly watching her in the kitchen, fascinated by how she gracefully turned simple ingredients into a meal that united us all. Each bite of the crispy, flavorful fish was a reminder of love, laughter, and shared moments—a tradition I now carry on in my own kitchen.


Difficulty Rating: 4/10


This delightful dish is relatively easy to prepare, making it perfect for both weeknight dinners and special occasions. With minimal ingredients and straightforward instructions, even novice cooks can successfully recreate this island-inspired delight.


Classification: Main Dish


Whether you're hosting a dinner party or looking for a new family favorite, this Coconut-Almond Crusted Tilapia is sure to impress. Pair it with a light salad or our Tropical Sweets & Reds Mash for a complete meal that celebrates the flavors of the tropics.


---


Bring a touch of island magic to your table with this Coconut-Almond Crusted Tilapia. It's more than just a dish—it's a journey to the heart of family traditions and the vibrant flavors of the sea.

Read more about Appetizers

Read more about Main Dishes

Read more about Desserts

Overnight Oatmeal | Made by Meaghan Moineau

Overnight Oatmeal | Made by Meaghan Moineau

Title: Waking Up to Warmth: The Joy of Overnight Oatmeal and Family Memories
Description: Discover the heartwarming simplicity of overnight oatmeal, a dish that cooks itself while you dream. This easy, nostalgic recipe combines dried cranberries, figs, and creamy half-and-half with hearty steel-cut oats to create a breakfast that feels like a warm hug. Perfect for busy mornings, this recipe will fill your home with comforting aromas and your heart with cherished memories.

---


Overnight Oatmeal: A Bowl of Memories and Morning Comfort

There’s something magical about waking up to the inviting aroma of a delicious breakfast ready to enjoy. Overnight oatmeal, with its rich blend of dried cranberries, figs, and creamy half-and-half, is more than just a meal—it's a memory. This recipe is simple enough for beginners and offers a delightful way to start your day. Rated at a mere 2 out of 10 in difficulty, this dish is classified as a Main Dish, making it an effortless yet satisfying breakfast option.


Ingredients:

- 1 cup dried cranberries


- 1 cup dried figs, chopped


- 2 cups half-and-half


- 1 cup steel-cut oats


- 4 cups water


Instructions:

1. In a crock-pot, combine all ingredients and set to low heat.


2. Cover and let cook for 8 to 9 hours.


3. Stir and remove to serving bowls.


This method works best if started before you go to bed. By morning, your oatmeal will be warm, creamy, and ready to serve, yielding four hearty servings.


A Nostalgic Family Memory

Growing up, breakfast was a cherished ritual in our household. I vividly remember the first time my grandmother introduced us to overnight oatmeal during one of our annual family reunions. Nestled in her cozy kitchen, she shared stories of how her own mother would prepare this simple yet nourishing meal. As she spoke, the crock-pot quietly worked its magic, filling the air with the warm, sweet scent of oats mingling with fruits.


Each morning of that reunion was a delightful surprise, waking up to the comforting smell of oatmeal that promised a day filled with laughter and love. We would gather around the table, bowls in hand, and delight in the creamy texture of the oats, the tangy burst of cranberries, and the subtle sweetness of figs. It was more than just breakfast; it was a time capsule that connected us across generations.


The beauty of this overnight oatmeal lies not only in its simplicity but in its ability to create a sense of nostalgia and togetherness. It’s a reminder that the best memories are often made around the breakfast table, where stories are shared, and bonds are strengthened.


Conclusion

In the hustle and bustle of modern life, it's comforting to know that some things remain timeless. Overnight oatmeal is one such treasure—easy to prepare, rich in flavor, and full of nostalgia. Whether you're looking to relive cherished family memories or create new ones with your own children, this recipe offers a heartwarming start to your day. So, set your crock-pot tonight and wake up to a bowl of comfort and joy.

Read more about Appetizers

Read more about Main Dishes

Read more about Desserts

Vegan Peanut Butter Chocolate Fudge | Made by Meaghan Moineau

Vegan Peanut Butter Chocolate Fudge | Made by Meaghan Moineau

Title: Indulge in Nostalgia with This Vegan Peanut Butter Chocolate Fudge
Description: Dive into a world of rich, creamy, and decadent flavors with our Vegan Peanut Butter Chocolate Fudge recipe. Perfect for those who crave a deliciously sweet treat without compromising on health, this dessert combines the classic flavors of peanut butter and chocolate with a nostalgic family twist. Easy to make and impossible to resist, this fudge is sure to become a staple in your vegan dessert repertoire.

---


A Nostalgic Bite: Family Memories Wrapped in Chocolate and Peanut Butter

Growing up, my grandmother's house was a treasure trove of delightful aromas and comforting treats. One of my fondest memories was the annual summer family reunions, where the kitchen would buzz with the laughter of cousins and the sound of clinking pots and pans. Amidst the chaos, my grandmother would always have a special treat waiting for us: her famous peanut butter chocolate fudge.


This fudge was a testament to her love and creativity, bringing together the timeless combination of chocolate and peanut butter that we all adored. She would enlist my help, and I remember vividly the joy of mixing ingredients by her side, sneaking little tastes when I thought she wasn't looking. The fudge, rich and velvety, would be the highlight of our dessert table, disappearing almost as quickly as it was laid out.


Inspired by those cherished memories, I've crafted a vegan version of this beloved treat, adding a modern twist with wholesome ingredients that don't compromise on flavor. This Vegan Peanut Butter Chocolate Fudge is a tribute not only to my grandmother's culinary genius but also to the warm, joyful moments we shared as a family.


Ingredients:

- 1 cup coconut butter


- 1 cup peanut butter


- 2 ripe bananas


- 1/2 cup cocoa powder


- 1/4 cup agave nectar


- 1 teaspoon vanilla extract


Instructions:

1. In a food processor, combine all the ingredients until smooth.


2. Carefully fold the mixture into a flat, sealable container.


3. Freeze for 1 hour or refrigerate overnight to set.


4. Optional: To make your own coconut butter, pulse shredded coconut in a food processor until smooth (about 8-12 minutes).


Difficulty Rating: 3/10

This recipe is as simple as it is delicious, perfect for novice cooks and seasoned chefs alike. With minimal steps and ingredients, it's an easy dessert that delivers maximum flavor with minimal effort.


Classification: Dessert

Whether you're looking for a sweet treat to end a meal or a nostalgic snack to enjoy with a cup of tea, this Vegan Peanut Butter Chocolate Fudge is the perfect dessert for any occasion.


Final Thoughts:

Recreating this fudge has not only allowed me to indulge in a delicious treat but also to revisit the cherished moments of my childhood. I hope this recipe brings a touch of nostalgia and joy to your kitchen, just as it has to mine. Enjoy every bite and the memories it inspires!

Read more about Appetizers

Read more about Main Dishes

Read more about Desserts

Chimichurri | Made by Meaghan Moineau

Chimichurri | Made by Meaghan Moineau

Title: A Taste of Tradition: The Vibrant Chimichurri Sauce
Description: Dive into the rich, flavorful world of Chimichurri, a sauce that brings vibrant color and zest to any dish. Perfect for steak, pork, or chicken, this easy-to-make condiment is sure to elevate your culinary creations. With ingredients like capers, cilantro, and red wine vinegar, Chimichurri is not just a sauce but a piece of culinary heritage that connects us to cherished family memories.

---


There’s something magical about the aroma of fresh herbs mingling with garlic and vinegar, creating a symphony of flavors that dance across your palate. This magic is Chimichurri—a bright, herbaceous sauce that brings a touch of South American flair to your dining table. Today, I want to share not only a recipe but a slice of my family's history, deeply intertwined with this vibrant concoction.


The Recipe: A Simple Symphony of Flavors
Creating Chimichurri is a straightforward process, making it accessible even to novice cooks. The ingredients are simple: capers, cilantro, garlic cloves, fresh ground black pepper, olive oil, parsley, red pepper flakes, red wine vinegar, and salt. Here’s how to bring them together:

1. In a medium mixing bowl, combine parsley, cilantro, and garlic. These three ingredients form the aromatic backbone of the sauce.


2. Add red wine vinegar, salt, red pepper flakes, and a generous amount of black pepper. Stir these into the herb mixture, allowing the heat and acidity to meld with the fresh greens.


3. Gradually pour in the olive oil, stirring to create a lush, emulsified sauce.


4. Allow the mixture to rest for 30 minutes. This crucial step lets the flavors deepen and meld into a cohesive whole.


Whether drizzled over a juicy steak, a succulent piece of pork, or a tender chicken breast, Chimichurri promises to transform your dish into a memorable experience.


Family Memories: A Connection to the Past

In our family, Chimichurri is more than just a sauce. It’s a bridge to our roots and a nostalgic reminder of long summer evenings spent in my grandmother’s backyard. Her garden was a treasure trove of fresh herbs, and the scent of freshly harvested parsley and cilantro would fill the air as we gathered around her tiny kitchen table.


I remember my grandmother, a woman of few words but abundant warmth, teaching me how to make Chimichurri. Her hands worked with the confidence of someone who had repeated the process countless times. As she mixed the ingredients, she’d share stories of her childhood in Argentina, where this sauce was a staple at every family gathering.


Making Chimichurri became a ritual for us, a way to honor our heritage and keep her stories alive. Each time I prepare this sauce, I’m transported back to those cherished moments, surrounded by family, laughter, and the irresistible aroma of fresh herbs.


Difficulty: 2/10 – Easy

With its simple steps and readily available ingredients, Chimichurri is an easy yet impressive addition to any cook’s repertoire. It’s classified as an appetizer, but its versatility extends far beyond, enhancing main dishes with its vibrant flavors.


Conclusion

Chimichurri is more than just a condiment; it’s a celebration of family, tradition, and the joy of sharing meals with loved ones. Easy to make and delightful to taste, this sauce is sure to become a staple in your kitchen, just as it has in mine. Whether you’re honoring family traditions or starting new ones, Chimichurri is a delicious way to connect with the past and savor the present.

Read more about Appetizers

Read more about Main Dishes

Read more about Desserts

Raw Carrot Cake | Made by Meaghan Moineau

Raw Carrot Cake | Made by Meaghan Moineau

Title: "A Wholesome Delight: Unveiling the Raw Carrot Cake of Memories"
Description: Dive into the aromatic world of our Raw Carrot Cake, where nostalgia meets a modern twist. With a medley of natural ingredients and warm spices, this dessert is both a healthy delight and a sentimental journey. Perfect for gatherings or a cozy afternoon indulgence, this recipe is sure to be a cherished addition to your collection.

---


A Wholesome Delight: Unveiling the Raw Carrot Cake of Memories


In the heart of every cherished family recipe lies a story that weaves together flavors and memories. Our Raw Carrot Cake is no exception. A dessert that is as rich in history as it is in taste, this cake brings together the vibrant sweetness of carrots and the wholesome goodness of dried fruits and nuts.


A Walk Down Memory Lane


I remember the first time I encountered this delightful creation. It was a cool autumn afternoon at my grandmother's house, the air filled with the fragrance of spices and laughter. My grandmother, with her gentle hands and warm smile, introduced me to her "surprise cake." As children, my siblings and I would gather around her kitchen, eagerly awaiting the moment when the mysterious dessert would be revealed.


"Is it really cake if it’s not baked?" we would ask, our young minds puzzled by the concept. With a twinkle in her eye, Grandma would assure us that this was, indeed, a cake—a special one that didn't need an oven to shine.


Ingredients that Speak of Comfort


- Carrots: The star of the show, bringing natural sweetness and moisture.
- Raisins & Dried Apricots: Offering a chewy texture and a burst of fruity flavor.
- Mixed Peel: Adding a zesty twist that complements the sweetness.
- Date Purée: Acting as a natural sweetener while binding the ingredients together.
- Almond Flour & Desiccated Coconut: Providing a nutty, rich base that forms the cake’s structure.
- Spices: Ginger, cinnamon, and cloves—each adding warmth and depth to the cake.

Crafting the Perfect Raw Carrot Cake


1. Blend Away: Start by pulsing the carrots, raisins, date purée, and spices in a blender until they form a cohesive mixture.
2. Mix in the Magic: Add chopped apricots and mixed peel, pulsing a couple of times for even distribution.
3. Form the Foundation: Transfer the mixture into a large bowl, incorporating almond flour and desiccated coconut. Mix until well combined.
4. Shape and Set: Press the mixture into a large cake pan and refrigerate uncovered until it sets.
5. Finishing Touches: Once set, cut into bite-sized squares and frost with whipped cream, or roll into balls and dust with desiccated coconut for a delightful treat.

Difficulty Rating: 4/10


This recipe is straightforward and requires no baking, making it accessible even for novice chefs. The most challenging aspect might be waiting for the cake to set in the refrigerator!


Classification: Dessert


Perfect as a sweet finale to a meal or as a indulgent snack, this Raw Carrot Cake is a versatile addition to any dessert table.


---


Every time I make this cake, it feels like a warm hug from the past, reminding me of those carefree days in my grandmother's kitchen. Whether you’re creating new memories with your loved ones or simply indulging in a moment of nostalgia, this Raw Carrot Cake is sure to bring joy and warmth to your heart and home.

Read more about Appetizers

Read more about Main Dishes

Read more about Desserts

Barbecued Shrimp & Grits | Made by Meaghan Moineau

Barbecued Shrimp & Grits | Made by Meaghan Moineau

Savoring Southern Comfort: Barbecued Shrimp & Grits


A Nostalgic Twist on a Southern Classic


Introduction


There’s something undeniably heartwarming about the rich, savory flavors of Southern cuisine. Among the myriad of dishes that capture the essence of Southern hospitality, Barbecued Shrimp & Grits stands out as a true classic. This dish not only tantalizes the taste buds with its delightful combination of textures and flavors but also evokes cherished memories of family gatherings and warm summer evenings. Today, I’m sharing a treasured recipe that brings together the smoky goodness of bacon, the creamy comfort of grits, and the tangy kick of barbecue sauce. Let’s dive into this delectable journey!


Ingredients


- Bacon


- Barbecue sauce


- Butter


- Garlic cloves


- Grits


- Raw shrimp


- Salt


- Scallions


- Sharp cheddar cheese


- Water


Instructions


1. Prepare the Bacon: Fry bacon until crisp, crumble, and set aside. The aroma of sizzling bacon is just the beginning of our culinary adventure.
2. Prep the Shrimp: Peel and devein the shrimp. For that smoky, char-grilled flavor, skewer and grill them for 2-3 minutes on each side, or until they turn a lovely shade of pink. Alternatively, you can fry them over medium heat for about 5-8 minutes total, until perfectly cooked.
3. Sauté the Garlic: In 1 tablespoon of butter, sauté minced garlic until fragrant. This will infuse the dish with a subtle, yet robust flavor.
4. Cook the Grits: Bring water to a boil and stir in the grits. Cover and let them cook for 5 minutes before reducing the heat to low. Stir in sharp cheddar cheese, the remaining butter, sautéed garlic, and a pinch of salt to create a creamy, dreamy base.
5. Toss the Shrimp: Coat the cooked shrimp in your favorite barbecue sauce for that signature tangy and sweet glaze.
6. Assemble the Dish: In a bowl, layer the creamy grits, barbecue shrimp, crispy bacon, and freshly sliced scallions. Serve it piping hot, with an optional drizzle of extra barbecue sauce for added flair.

Family Memory


Every summer, our family would gather at my grandparent’s old farmhouse, a place where time seemed to stand still amidst the rolling hills and sprawling oak trees. My grandmother, a true Southern belle, would prepare her famous Shrimp & Grits, a dish that was as much a part of our family tradition as the laughter and stories shared around the table.


I remember the anticipation building as the aroma of bacon and garlic wafted through the screen doors, signaling the feast that awaited us. My cousins and I would scamper around the porch, while the adults chattered and clinked glasses of sweet tea. As we finally settled down to eat, the first bite of creamy grits paired with the tangy barbecue shrimp would silence the room, if only momentarily, as we all savored the comforting flavors.


Even now, each time I prepare this dish, I’m transported back to those sun-drenched afternoons, surrounded by family, love, and the unmistakable taste of home.


Difficulty Rating


Difficulty: 5/10

This dish is perfect for home cooks looking to impress with minimal effort. It requires basic cooking techniques and simple ingredients that come together beautifully.


Classification


Category: Main Dish

Barbecued Shrimp & Grits is a hearty and satisfying main course that pays homage to the rich culinary heritage of the South. Whether you’re sharing it with family or enjoying a cozy dinner for two, this dish is sure to become a beloved favorite.


Conclusion


Barbecued Shrimp & Grits is more than just a meal; it's a celebration of flavors and memories that bring people together. I encourage you to try this recipe and create your own cherished moments with family and friends. After all, food is not just about nourishment, but also about creating connections and savoring life’s simple pleasures.

Read more about Appetizers

Read more about Main Dishes

Read more about Desserts

Lusciously Lemony Lentil Soup | Made by Meaghan Moineau

Lusciously Lemony Lentil Soup | Made by Meaghan Moineau

Title: Unveiling Comfort: Lusciously Lemony Lentil Soup
Description: Dive into a heartwarming culinary journey with our Lusciously Lemony Lentil Soup—a dish that's as nourishing as it is delicious. Infused with the zesty brightness of lemon and the warmth of cumin, this soup is perfect for those who crave a comforting yet refreshing meal. Whether you're a kitchen novice or a seasoned chef, this recipe is your ticket to creating a soul-soothing masterpiece.

---


In the hustle and bustle of modern life, few things offer the same solace as a warm bowl of soup. Today, we're exploring a family favorite that has graced our table for generations: Lusciously Lemony Lentil Soup. This dish not only warms the body but also the heart, being steeped in nostalgia and love.


A Whiff of Tradition

I remember the first time I tasted this soup. It was a chilly autumn evening at my grandmother's house, where the scent of cumin and lemon wafted through the air, mingling with the laughter and chatter of family. My grandmother, a culinary maestro in her own right, stirred the pot with a gentle hand, regaling us with tales of her own childhood.


She often spoke of how this simple yet flavorful dish brought her family together during lean times. The hearty lentils combined with aromatic spices and a bright hit of lemon provided a nourishing meal that was both economical and satisfying. It was, she said, a testament to the power of simplicity and the joy of shared meals.


Crafting the Soup: Step by Step

*Ingredients:*


- 2 tablespoons olive oil


- 1 large onion, chopped


- 3 cloves garlic, minced


- 2 tablespoons tomato paste


- 1 teaspoon cumin


- Salt and pepper, to taste


- 1/2 teaspoon chili powder


- 6 cups chicken or vegetable broth


- 3 carrots, diced


- 2 cups cooked lentils (or dried lentils, rinsed)


- 1/4 cup fresh lemon juice


- 1/4 cup chopped cilantro


*Instructions:*


1. Sauté the Aromatics: Heat the olive oil over medium-high heat. When the oil is hot, add the onion and garlic. Cook until they are soft and translucent, about 5 minutes.
2. Introduce the Spices: Stir in the tomato paste, cumin, salt, pepper, and chili powder. Cook for about 2 minutes until the spices are fragrant and well-integrated.
3. Simmer to Perfection: Pour in the broth, then add the diced carrots. Cover and let it simmer on medium-low heat until the carrots are tender, approximately 15 minutes.
4. Blend and Brighten: Add the cooked lentils and heat through. For a velvety texture, blend the soup using an emulsifier directly in the pot or transfer it in batches to a blender. Stir in the lemon juice and cilantro. Season with additional salt if needed.
5. Serve and Savor: Ladle the soup into bowls, garnish with extra cilantro if desired, and enjoy the comforting warmth.
A Dish to Cherish

This Lusciously Lemony Lentil Soup is not just a meal; it’s a cherished memory, a piece of family history served in a bowl. The lemon adds a zesty twist that elevates the earthiness of the lentils, while the spices create a rich, aromatic depth.


Difficulty Rating: 4/10

Classified as a Main Dish, this recipe is accessible to cooks of all levels, offering a perfect balance of ease and flavor. It’s an invitation to slow down, gather loved ones, and celebrate the timeless tradition of home-cooked meals. As you savor each spoonful, may this soup bring you as much joy and warmth as it has to our family over the years.

Read more about Appetizers

Read more about Main Dishes

Read more about Desserts

Honey Ginger Lemon Iced Tea | Made by Meaghan Moineau

Honey Ginger Lemon Iced Tea | Made by Meaghan Moineau

Title: Refreshing Nostalgia: Honey Ginger Lemon Iced Tea
Description: Dive into a world of flavors with our Honey Ginger Lemon Iced Tea, a refreshing beverage that bridges past and present. Infused with the warmth of ginger, the zest of lemon, and the sweetness of honey, this drink is perfect for hot summer days or cozy afternoons. Discover the simple pleasures of this delightful recipe and a heartwarming family memory that makes it even more special.

---


A Sip of Summer Memories: Honey Ginger Lemon Iced Tea

As the golden rays of the sun linger longer and the days grow warmer, there's nothing quite like a refreshing iced tea to quench your thirst and refresh your spirit. Our Honey Ginger Lemon Iced Tea is not just a drink; it's a journey through time, evoking cherished memories of sun-soaked days and family gatherings.


Ingredients:

- Fresh ginger


- One green tea bag


- Canned honey


- Freshly squeezed lemon juice


- Fresh mint leaves


Instructions:

1. Begin by bringing 1-2 cups of water to a gentle boil. Once ready, steep your green tea bag and let the rich flavors infuse. Once brewed, place the tea in the fridge to cool.


2. While the tea is chilling, take fresh ginger and blend it smoothly. Run the blended ginger through a sieve to extract just the juice, capturing its bold, spicy essence.


3. In a jug filled with ice, combine the cooled tea, ginger juice, a generous splash of lemon juice, and a drizzle of canned honey. Stir well to blend these vibrant flavors.


4. Add fresh mint leaves for an aromatic touch. Serve cold, and enjoy a sip of refreshing nostalgia.


Difficulty Rating: 3/10
Classification: Appetizer
A Nostalgic Family Memory:

Growing up, summers at my grandmother's house were a tapestry of vibrant colors and comforting aromas. Each afternoon, as the sun began its slow descent, she would prepare her signature iced tea—a concoction that seemed to capture the very essence of summer.


I remember sitting on the porch, a gentle breeze rustling through the trees, as Grandma served her Honey Ginger Lemon Iced Tea. Its taste was a delightful balance of sweetness and spice, with a hint of tartness from the lemons she handpicked from her garden. The mint leaves, freshly plucked, added an invigorating fragrance that lingered in the warm air.


Grandma would tell stories of her own childhood, of summers spent in the countryside, where time moved slower and life was simpler. As we listened, sipping our tea, it felt as though we were connected across generations, sharing more than just a family recipe but a slice of our heritage.


To this day, each time I prepare this iced tea, I am transported back to those sunny afternoons, enveloped in the warmth of family and the joy of simple pleasures. May this Honey Ginger Lemon Iced Tea bring you the same delight and nostalgia it has given me.


---


Conclusion:

Whether you're hosting a summer gathering or simply enjoying a quiet moment on your own, our Honey Ginger Lemon Iced Tea is sure to delight your taste buds and warm your heart. Its simple preparation and delightful flavors make it a perfect addition to any occasion. So, gather your ingredients, brew a batch, and take a sip down memory lane.

Read more about Appetizers

Read more about Main Dishes

Read more about Desserts

Roasted Fingerling Potatoes and Brussels Sprouts | Made by Meaghan Moineau

Roasted Fingerling Potatoes and Brussels Sprouts | Made by Meaghan Moineau

Title: "Family Gatherings and Flavorful Roasts: The Magic of Roasted Fingerling Potatoes and Brussels Sprouts"
Description: Discover the heartwarming flavors of Roasted Fingerling Potatoes and Brussels Sprouts, a dish that brings families together with its savory aroma and rich taste. Infused with crispy bacon, aromatic rosemary, and perfectly roasted vegetables, this recipe is a nostalgic journey back to family gatherings and cherished memories. Ideal as a main dish, it’s a simple yet impressive addition to any occasion.

---


A Nostalgic Family Favorite: Roasted Fingerling Potatoes and Brussels Sprouts

There's something truly magical about the aroma of a hearty roast wafting through the house. It’s a scent that immediately transports me back to my grandmother's kitchen, where family gatherings were a cacophony of laughter, storytelling, and the irresistible fragrance of roasting vegetables. One dish that always stood out was her Roasted Fingerling Potatoes and Brussels Sprouts, a delightful blend of crispy textures and savory flavors.


Ingredients:

- 1 pound fingerling potatoes, halved


- 1 pound Brussels sprouts, trimmed and halved


- 6 slices of bacon, chopped


- Several cloves of garlic, peeled and smashed


- 1 red onion, sliced


- A drizzle of olive oil


- Several sprigs of fresh rosemary


- A sprinkle of sea salt


Instructions:

1. Preheat the oven to 400°F (200°C).


2. In a large roasting pan, combine the fingerling potatoes, Brussels sprouts, bacon, garlic, and red onion.


3. Drizzle with olive oil and toss to ensure everything is evenly coated.


4. Tuck in the rosemary sprigs among the vegetables and sprinkle with sea salt for added flavor.


5. Roast in the preheated oven for 60-75 minutes, stirring halfway through to ensure even cooking and browning.


6. Serve hot and enjoy with family and friends.


As a child, I remember eagerly awaiting the moment when the kitchen timer would finally go off. My siblings and I would gather around the table, our eyes wide in anticipation as my grandmother brought out the beautifully roasted dish. Each bite was a symphony of flavors—the earthiness of the potatoes, the slight bitterness of the Brussels sprouts countered by the savory bacon, and the aromatic hints of rosemary and garlic.


This dish was a staple at our family gatherings, a testament to how simple ingredients can create something truly special. It was more than just a meal; it was a reminder of the love and warmth that defined our family. The laughter and stories shared around the dinner table remain some of my most treasured memories.


Difficulty Rating: 3/10
Classification: Main Dish

Whether you're looking to create new memories with your loved ones or simply enjoy a comforting, flavorful meal, this Roasted Fingerling Potatoes and Brussels Sprouts recipe is perfect for any occasion. Its simplicity makes it accessible for cooks of all skill levels, while its rich, rustic flavors are sure to delight everyone at the table.

Read more about Appetizers

Read more about Main Dishes

Read more about Desserts