Sardine Croquettes (Croquetas De Sardinas) | Made by Meaghan Moineau

Sardine Croquettes (Croquetas De Sardinas) | Made by Meaghan Moineau

Title: "Sardine Croquettes: A Taste of Tradition with a Modern Twist"
Description: Dive into the delightful world of Sardine Croquettes, or Croquetas De Sardinas, where the classic flavors of canned sardines and cassava meet the modern convenience of a quick and easy recipe. Perfect as an appetizer, these croquettes are crispy on the outside and tender on the inside, offering a taste of nostalgia with every bite.

---


As the aroma of sizzling Sardine Croquettes wafts through my kitchen, I'm instantly transported back to my grandmother's cozy dining room. The memory is as vivid as the flavors dancing on my palate. I recall sitting at her rustic wooden table, eagerly watching her skillfully prepare her famous croquetas. It was a family tradition to gather every weekend, sharing stories and laughter over a platter of these golden delights.


My grandmother's version was simple yet exquisite, a recipe passed down through generations. She would always remind me, with a twinkle in her eye, that the secret ingredient was love. Today, as I recreate this dish, I feel a deep connection to my roots and a sense of nostalgia that warms my heart.


Ingredients:

- 1 can of sardines

- 1 pack of frozen cassava (yuca)


- 1/2 cup parmesan cheese


- 2 egg yolks


- 2 egg whites


- 1 teaspoon baking powder


- 1 cup plain bread crumbs


- 1/4 cup chopped cilantro


- Oil for frying


- Salt & pepper to taste


Instructions:

1. Prepare the Cassava: In a pot with salted water, cook the frozen cassava until fork-tender. This is a significant time-saver and ensures perfect results every time.
2. Mash and Mix: Once the cassava is thoroughly cooked, mash it until smooth. Add in the canned sardines, parmesan cheese, egg yolks, baking powder, chopped cilantro, and season with salt and pepper. Mix until well combined.
3. Form the Croquettes: Preheat oil in a frying pan. With wet hands, start forming balls with the sardine batter. Dip each ball in the egg whites, then roll it in the bread crumbs to coat evenly. Continue until all the batter is used.
4. Fry to Perfection: Carefully place the croquettes in the hot oil, frying them until they are golden brown on all sides. Once done, let them rest on a double-lined paper towel to remove any excess oil.
5. Serve: These croquettes are best enjoyed fresh, served with a side of ketchup or your favorite dipping sauce.

Difficulty Rating: 5/10


Classification: Appetizer


This dish is not just a culinary delight but a bridge to cherished memories. Whether you're crafting a new tradition or revisiting a beloved recipe, Sardine Croquettes bring a taste of history to your table. Their crispy exterior and flavorful interior make them an irresistible appetizer that promises to be a hit at any gathering. So go ahead, indulge in this family favorite and create your own stories around the table.


Bon Appétit!

Read more about Appetizers

Read more about Main Dishes

Read more about Desserts

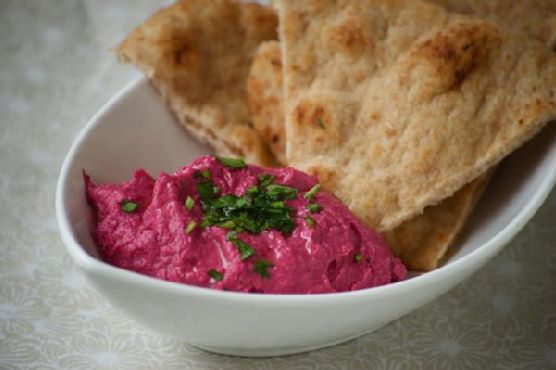
Roasted Beet Hummus | Made by Meaghan Moineau

Roasted Beet Hummus | Made by Meaghan Moineau

Title: A Vibrant Twist on a Classic: Roasted Beet Hummus
Description: Dive into the colorful world of roasted beet hummus, a delightful fusion of flavors that will elevate your appetizer game. This easy-to-make dish combines earthy beets with the creamy texture of traditional hummus, creating a visually stunning and deliciously nutritious treat. Join us as we explore how this vibrant dish became a beloved family favorite, and learn how you can bring this healthy appetizer to your own table.

---


Hummus has been a staple in my family's kitchen for as long as I can remember. Every family gathering, big or small, featured a bowl of this creamy, luscious dip. The traditional hummus, while delicious, took a vibrant turn one summer when my grandmother decided to add roasted beets to the mix. Little did we know, this experiment would become a cherished family tradition.


The summer of the beet hummus was one I’ll never forget. It was a particularly hot July, and my grandparents had invited the whole family over for a weekend barbecue. As we sat around the old wooden table in their backyard, my grandmother emerged from the kitchen with a bowl of hummus that was a vivid shade of magenta. Our eyes widened at the sight, curiosity piqued by this colorful concoction.


As we dipped warm pita bread into the hummus, the combination of flavors was unlike anything we had experienced before. The earthiness of the beets melded perfectly with the creamy chickpeas and tahini, while a hint of garlic and cumin added depth. A squeeze of fresh lemon juice provided a touch of brightness, making each bite refreshing yet satisfying.


From that day forward, roasted beet hummus became a staple at our family gatherings. Its vibrant color and unique flavor always sparked conversations and brought smiles to our faces. It was a dish that not only tasted wonderful but also held the power to bring us together, reminding us of that long, laughter-filled summer afternoon.


Recipe for Roasted Beet Hummus:
Ingredients:

- 2 medium-sized red roasted beets


- 1 can (15 oz) cooked chickpeas, drained and rinsed


- 2 cloves garlic, minced


- 1 teaspoon ground cumin


- Juice of 1 lemon


- 3 tablespoons olive oil (plus more as needed)


- 1 teaspoon salt (or to taste)


- 3 tablespoons tahini sesame seed paste


Instructions:

1. Begin by roasting your beets until they are tender. Once cooled, peel and chop them into smaller pieces.


2. Place the roasted beets, garlic, cumin, lemon juice, salt, and tahini in a food processor or blender. Pulse until well blended and smooth.


3. Add the cooked chickpeas and olive oil to the processor. Pulse until the mixture is just incorporated. If needed, add more olive oil to reach your desired consistency.


4. Taste and adjust seasoning as needed. If you prefer a thinner hummus, gradually add more olive oil while blending.


5. Serve your roasted beet hummus with warm pita or flatbread and enjoy the burst of flavors.


Difficulty Rating: 3/10
Classification: Appetizer

Roasted beet hummus is not only a feast for the eyes but also a nutritious and flavorful appetizer that’s easy to prepare. It's perfect for any gathering and is sure to become a favorite in your home, just as it did in ours. Whether you’re a seasoned cook or a kitchen novice, this dish is a delightful way to bring people together and create lasting memories.

Read more about Appetizers

Read more about Main Dishes

Read more about Desserts

Lemon Chickpea & Tomato Stew | Made by Meaghan Moineau

Lemon Chickpea & Tomato Stew | Made by Meaghan Moineau

Delightful Comfort: Lemon Chickpea & Tomato Stew
Description:

Indulge in the heartwarming flavors of our Lemon Chickpea & Tomato Stew, a dish that combines the vibrant essence of fresh ingredients with the nostalgia of cherished family gatherings. This stew, lovingly crafted with aromatic herbs and zesty lemon, offers a delightful culinary experience that transports you back to cozy family dinners. Perfect as a main dish, it pairs wonderfully with warm crusty bread, making it a comforting choice for any occasion.


---


A Nostalgic Journey Through Flavor

The aroma of lemon zest mingling with garlic and oregano wafting through the kitchen instantly takes me back to my grandmother's cozy home on a chilly autumn evening. She would often prepare her signature Lemon Chickpea & Tomato Stew, a dish that became a staple at our family gatherings. As the stew simmered gently on the stove, we would gather around the kitchen table, the warmth of the oven-dried tomatoes and the subtle heat of the jalapeño chili creating an inviting atmosphere.


I remember my grandmother recounting tales of her own childhood, how this dish was a symbol of love and togetherness in her home. The tangy burst of fresh lemon zest combined with the hearty chickpeas and rich chicken broth created a symphony of flavors that brought comfort to the soul. Each spoonful was a reminder of the love and laughter shared around the table, a tradition I now carry forward with my own family.


---


Lemon Chickpea & Tomato Stew Recipe
Ingredients:

- Olive oil


- 1 shallot, finely chopped


- 2 garlic cloves, minced


- 1 canned chickpeas, drained and rinsed


- 1 jalapeño chili, sliced


- 1/2 teaspoon dried oregano


- 1 bay leaf, broken


- 1/4 teaspoon crushed red pepper


- Salt & pepper to taste


- 4 cups chicken broth


- Zest and juice of 1 fresh lemon


- 1/2 cup dried oven tomatoes


- 2 cups fresh spinach, loosely packed


Instructions:

1. In a large saucepan, heat the olive oil over medium heat. Add the shallot and garlic, cooking until soft, about 5 minutes.


2. Stir in the chickpeas, jalapeño chili, oregano, bay leaf, and crushed red pepper. Season with salt and pepper. Cook, stirring frequently, until the herbs are fragrant and the chickpeas are hot and starting to brown, about 5-7 minutes.


3. Pour in the chicken broth, lemon zest, and lemon juice. Bring to a boil, then reduce the heat and simmer until the broth is reduced by half, about 20 minutes.


4. Stir in the dried oven tomatoes, garlic, and spinach. Simmer for an additional 5 minutes.


5. Remove the bay leaf, adjust seasoning with salt and pepper, and serve hot with warm crusty bread.


Difficulty Rating: 4/10
Classification: Main Dish

This Lemon Chickpea & Tomato Stew is not just a meal; it's a heartfelt tribute to family traditions and the joy of sharing a delicious dish with loved ones. Its simple preparation and rich flavor profile make it an ideal choice for any home cook looking to create lasting memories around the dinner table. Enjoy this delightful stew and let it become a cherished part of your own family gatherings.

Read more about Appetizers

Read more about Main Dishes

Read more about Desserts