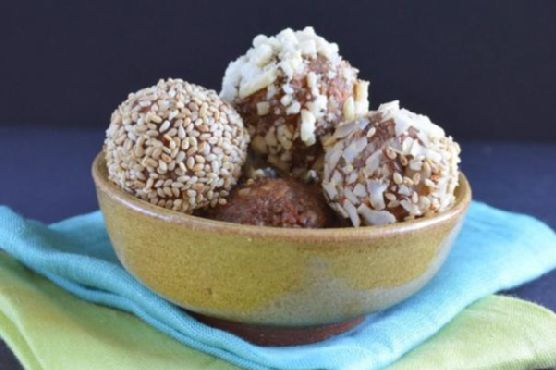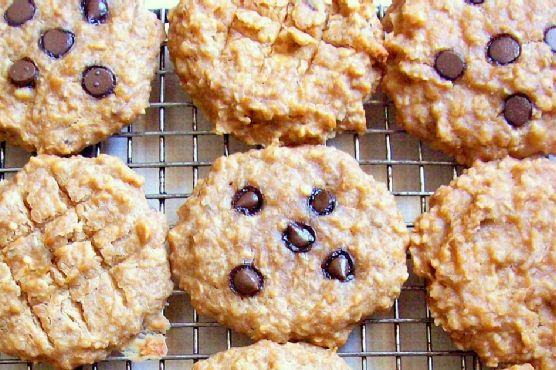
Watching What I Eat: Peanut Butter Banana Oat Breakfast Cookies with Carob / Chocolate Chips
Intro
Welcome to a delightful journey of taste and nostalgia with our Peanut Butter Banana Oat Breakfast Cookies with Carob / Chocolate Chips. Growing up, Saturday mornings were my sanctuary. I’d wake up to the sweet aroma of freshly baked cookies wafting from the kitchen, where my grandmother orchestrated her baking magic. These cookies capture the essence of those cherished mornings, combining wholesome ingredients with a touch of indulgence. Whether you’re looking for a healthy breakfast option or a comforting snack, these cookies will transport you back to simpler times with every bite.
Why You’ll Love It
These breakfast cookies are not just delicious; they are a perfect blend of nutrition and nostalgia. Here’s why you’ll fall in love with them:
- They are packed with wholesome ingredients, providing a great start to your day.
- The combination of peanut butter and banana is a timeless classic that delivers a rich, satisfying flavor.
- Carob or chocolate chips add a touch of indulgence, making these cookies a delightful treat.
- They are easy to make and perfect for meal prep, saving you time on busy mornings.
- They’re versatile and can be customized to suit your taste or dietary preferences.
Ingredients
- 2 ripe bananas, mashed
- 1/4 cup butter flavor shortening
- 1/2 cup chocolate or carob chips
- 1/2 cup creamy peanut butter
- 1/4 cup chopped nuts (your choice)
- 1 cup oatmeal
- 1/4 cup unsweetened applesauce
- 1 teaspoon vanilla extract
- 1/2 cup vanilla protein powder
Instructions
- Preheat your oven to 350 degrees Fahrenheit.
- In a large bowl, mix the mashed bananas and peanut butter until completely combined.
- Add the applesauce, vanilla protein powder, and vanilla extract to the mixture. Mix again until fully combined.
- Add the oatmeal and nuts to the banana mixture and combine thoroughly. If desired, add carob or chocolate chips at this stage to mix them throughout the dough.
- Let the dough rest for 10 minutes.
- Drop spoonfuls of cookie dough onto a parchment-lined baking sheet, flattening them into circles. If you prefer, add carob or chocolate chips on top of the cookies now.
- Bake for 20-30 minutes, depending on your preference for a softer or crispier cookie. Aim for a golden brown finish.
- Remove from the oven and let them rest on the cookie sheet for 5 minutes before transferring them to a cooling rack.
- If you like traditional fork marks, use a pizza cutter or sharp knife to score the tops while they’re still warm.
- Once completely cool, store in a covered container. Enjoy with a cup of tea or coffee!
Tips
Here are some handy tips to ensure your cookies turn out perfectly every time:
- Use ripe bananas for a naturally sweet flavor.
- If the dough feels too sticky, add a bit more oatmeal to achieve the right consistency.
- For an even bake, make sure the cookies are of uniform size and thickness.
- Experiment with baking times to find your preferred level of cookie softness or crispiness.
Variations & Substitutions
Make these cookies your own with these variations and substitutions:
- Nut-Free: Omit the nuts or replace them with sunflower seeds for a nut-free version.
- Gluten-Free: Use gluten-free oats and ensure all other ingredients are gluten-free.
- Vegan: Replace butter flavor shortening with coconut oil and ensure your chocolate chips are vegan.
- Sugar-Free: Use sugar-free chocolate chips or carob chips to lower the sugar content.
Storage
Store your peanut butter banana oat breakfast cookies in an airtight container at room temperature for up to 5 days. For longer storage, keep them in the refrigerator for up to two weeks or freeze them for up to three months. Thaw frozen cookies at room temperature before enjoying.
FAQ
Can I use almond butter instead of peanut butter?
Absolutely! Almond butter is a great alternative and will add a slightly different flavor profile to the cookies. Just ensure it’s creamy for the best texture.
What can I use instead of vanilla protein powder?
If you don’t have vanilla protein powder, you can substitute it with an equal amount of oat flour or almond flour. You might want to add a bit more vanilla extract to maintain the flavor.
Nutrition
Each cookie is approximately 150 calories, with 8g of fat, 18g of carbohydrates, and 5g of protein. These values may vary based on specific brands and measurements used.
Conclusion
These Peanut Butter Banana Oat Breakfast Cookies with Carob / Chocolate Chips are more than just a treat; they’re a connection to cherished memories and a step towards a healthier lifestyle. Whether you’re rushing out the door or enjoying a leisurely morning, these cookies are a perfect companion. I hope they bring joy to your mornings as much as they do to mine. Happy baking!
Related update: Watching What I Eat: Peanut Butter Banana Oat Breakfast Cookies with Carob / Chocolate Chips
Related update: 5-Minute Blueberry Chia Jam