Chicken Lo Mein | Made by Meaghan Moineau

Chicken Lo Mein: A Delightful Homemade Classic

Intro

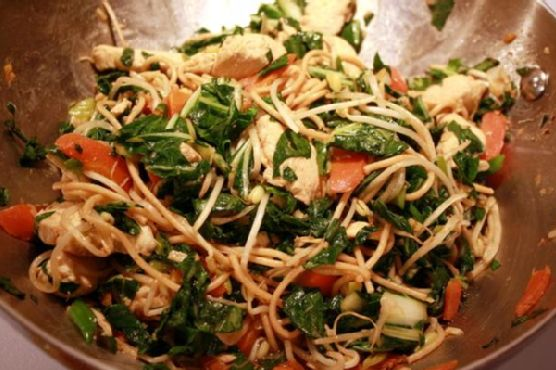
Growing up, one of my fondest memories is gathering around the kitchen table with my family every Friday night for our traditional takeout meal. Among the array of dishes, chicken lo mein was always the first to disappear. The way the flavors melded together in a harmonious blend of savory and slightly sweet was pure magic. Eventually, I set out to recreate this beloved dish at home, giving it my own twist while keeping it true to the flavors I cherished. Today, I’m excited to share with you this recipe for Chicken Lo Mein, a delightful dish that has become a staple in my home, brimming with vibrant vegetables and succulent chicken. Let’s dive into how you can bring this classic into your own kitchen.

Why You’ll Love It

This Chicken Lo Mein recipe is a perfect balance of taste and simplicity, making it an ideal choice for both busy weeknights and weekend feasts. Here are some reasons you’ll fall in love with this dish:

  • Quick and Easy: From start to finish, this dish comes together in just about 20 minutes, making it a lifesaver on hectic days.
  • Flavorful: The aromatic combination of ginger and garlic sets the stage for a deliciously savory dish that’s complemented by the gentle sweetness of sautéed vegetables.
  • Customizable: This recipe is highly adaptable to whatever you have on hand or prefer, making it perfect for using up leftover vegetables or trying new ingredients.
  • Healthier Takeout: With low sodium options and fresh ingredients, you can enjoy a meal that’s not only tasty but also better for you.

Ingredients

  • 1 tablespoon peanut oil
  • 1 tablespoon fresh ginger, minced
  • 2 cloves garlic, minced
  • 1 pound skinless boneless chicken breast, thinly sliced
  • 1 large carrot, julienned
  • 1 cup mushrooms, sliced
  • 1 cup bok choy, chopped
  • 1 cup bean sprouts
  • 4 scallions, sliced
  • 1 cup low sodium chicken broth
  • 2 tablespoons low sodium soy sauce
  • 8 ounces cooked spaghetti

Instructions

  1. In a large nonstick skillet, heat the peanut oil over medium heat.
  2. Add the minced ginger and garlic, cooking for about 1 minute until fragrant.
  3. Increase the heat to medium-high and add the sliced chicken and julienned carrot to the skillet. Cook, stirring occasionally, until the chicken is lightly browned, about 2-3 minutes.
  4. Add the sliced mushrooms, chopped bok choy, bean sprouts, and scallions to the skillet. Cook, stirring constantly, until the carrot is tender-crisp and the vegetables are just beginning to soften, about 3 minutes.
  5. Pour in the chicken broth and soy sauce, stirring well to combine with the chicken and vegetables.
  6. Finally, stir in the cooked spaghetti, tossing everything together to ensure the noodles are well-coated and heated through, about 1 minute.
  7. Serve immediately, garnished with extra scallions if desired.

Tips

  • Prep in Advance: Have all your ingredients chopped and ready to go before you start cooking. This will make the process seamless and stress-free.
  • Cooking Noodles: Cook the spaghetti just until al dente, as it will continue to cook a bit when you toss it with the hot ingredients.
  • High Heat: Stir-frying typically requires high heat. Make sure your pan is hot enough to quickly sear the chicken and vegetables.

Variations & Substitutions

This Chicken Lo Mein is wonderfully flexible. Here are some ideas to make it your own:

  • Vegetable Swaps: Feel free to add or substitute with bell peppers, snap peas, or broccoli for more variety.
  • Protein Options: You can replace the chicken with shrimp, beef, or tofu for a different protein source.
  • Noodle Alternatives: Try using rice noodles, udon, or whole wheat spaghetti for a different texture or dietary preference.

Storage

Leftover Chicken Lo Mein can be stored in an airtight container in the refrigerator for up to 3 days. To reheat, simply warm it in a skillet over medium heat, adding a splash of broth or water to loosen the noodles if necessary. Avoid microwaving as it can make the chicken rubbery and the noodles mushy.

FAQ

Can I make this dish vegetarian?

Absolutely! To make a vegetarian version, simply omit the chicken and replace the chicken broth with vegetable broth. You can add more vegetables or use tofu as a protein substitute.

What can I serve with Chicken Lo Mein?

Chicken Lo Mein is a complete meal on its own, but you can complement it with a side of egg rolls, dumplings, or a simple Asian cucumber salad for added freshness.

Is it okay to use pre-cooked chicken?

Yes, you can use pre-cooked chicken if you have leftovers or want to save time. Simply add the cooked chicken towards the end of the cooking process when you add the noodles to avoid overcooking.

Nutrition

While nutritional values can vary, a typical serving of Chicken Lo Mein is a good source of protein and provides essential vitamins and minerals from the vegetables. Opting for low sodium broth and soy sauce helps keep the sodium content in check, making this a healthier alternative to traditional takeout.

Conclusion

This Chicken Lo Mein recipe is a wonderful way to savor the delicious flavors of a beloved takeout dish while making it at home with wholesome ingredients. It’s quick, easy, and packed with flavor, ensuring it becomes a favorite in your kitchen just as it has in mine. So gather your ingredients, fire up the skillet, and enjoy the comforting taste of homemade Chicken Lo Mein. Whether it’s for a family dinner or a solo meal indulgence, this dish promises satisfaction in every bite.

Related update: Chicken Lo Mein

Related update: Indian Butter Chicken

Italian Tomato and Mozzarella Caprese | Made by Meaghan Moineau

Italian Tomato and Mozzarella Caprese

Intro

There’s something truly magical about the simplicity of Italian cuisine. The first time I tasted a Caprese salad was during a family trip to the Amalfi Coast. We were dining al fresco at a quaint little restaurant with views of the sparkling Mediterranean Sea. The sun was setting, casting a golden hue over everything, and the air was rich with the scent of fresh basil and ripe tomatoes. Every bite of that Caprese was an explosion of freshness and flavor, and I’ve been in love with this dish ever since.

Why You’ll Love It

The Italian Tomato and Mozzarella Caprese is a celebration of fresh, high-quality ingredients. It’s a dish that requires minimal preparation but delivers maximum flavor. This easy-to-make salad is perfect for any occasion, whether you’re hosting a summer barbecue, looking for a quick appetizer, or simply craving a taste of Italy. The combination of juicy vine-ripened tomatoes, creamy mozzarella, and fragrant basil, all drizzled with balsamic vinegar and olive oil, is nothing short of divine.

Ingredients

  • Fluid balsamic vinegar
  • Black pepper
  • Fresh basil leaves
  • Kosher salt
  • Olive oil
  • Dry sprinkle of oregano leaves
  • Fresh whole-milk mozzarella
  • Vine-ripened tomatoes

Instructions

  1. On a large platter, arrange sliced tomatoes and drizzle with balsamic vinegar.
  2. Place one basil leaf on top of each tomato slice.
  3. Slice mozzarella and place on top of basil leaves.
  4. Sprinkle oregano, salt, and black pepper on cheese and drizzle with the olive oil.

This recipe yields 4 servings.

Tips

To make the most of your Caprese salad, ensure that your ingredients are as fresh as possible. Look for bright red, firm tomatoes and fresh mozzarella that is soft and slightly springy to the touch. Use high-quality olive oil and balsamic vinegar to enhance the flavors. Remember, the key to a perfect Caprese is balance, so adjust the seasoning to your taste.

Variations & Substitutions

While the classic Caprese is delightful on its own, there are several ways you can mix things up:

  • Avocado: Add slices of ripe avocado for a creamy twist.
  • Pesto: Drizzle a little pesto over the top for an extra burst of basil flavor.
  • Prosciutto: For a heartier salad, add thin slices of prosciutto.
  • Buffalo Mozzarella: Substitute traditional mozzarella with buffalo mozzarella for a richer taste.

Storage

Caprese salad is best enjoyed fresh. However, if you have leftovers, store them in an airtight container in the refrigerator for up to 24 hours. Note that the tomatoes may release some juice, which can affect the texture of the salad. It’s a dish that shines in its freshness, so try to prepare only as much as you plan to eat.

FAQ

Can I make Caprese salad ahead of time?

While it’s best to assemble the salad just before serving, you can prepare the individual components a few hours ahead. Slice the tomatoes and mozzarella and store them separately in the refrigerator. Assemble the salad when you’re ready to serve.

What can I serve with Caprese salad?

Caprese salad is wonderfully versatile and can be served alongside grilled meats, pasta dishes, or crusty bread. It’s also a great addition to a charcuterie board.

Is Caprese salad healthy?

Yes, Caprese salad is a healthy choice. It’s packed with nutrients from the tomatoes and basil, and the mozzarella provides protein and calcium. Just be mindful of the olive oil and cheese if you’re watching your calorie intake.

Nutrition

Each serving of Caprese salad contains approximately:

  • Calories: 250
  • Protein: 12g
  • Fat: 20g
  • Carbohydrates: 8g
  • Fiber: 2g
  • Sugar: 6g

Conclusion

The Italian Tomato and Mozzarella Caprese is more than just a salad; it’s a tribute to the beauty of simple, fresh ingredients. Whether you’re reminiscing about a past Italian getaway or just looking to bring a taste of Italy to your table, this Caprese salad is sure to delight your taste buds. Enjoy each layer, each flavor, and let it transport you to a sun-drenched terrace overlooking the Mediterranean. Buon appetito!

Related update: Italian Tomato and Mozzarella Caprese

Related update: Arame Edamame Cucumber Salad

Related update: Agedashi Tofu

Linguine with Prawns, Fresh Tomatoes and Spinach | Made by Meaghan Moineau

Linguine with Prawns, Fresh Tomatoes, and Spinach

Intro

Every time I prepare this delightful dish of Linguine with Prawns, Fresh Tomatoes, and Spinach, I’m transported back to the heartwarming summer evenings spent at my grandmother’s seaside cottage. The aroma of fresh tomatoes simmering with garlic and herbs would waft through the air, mingling with the salty sea breeze. My grandmother, with her apron dusted with flour, would beckon us to the table with a warm smile, serving up plates of her lovingly prepared pasta. This recipe is a tribute to those cherished memories, and I’m thrilled to share it with you.

Why You’ll Love It

This dish is a celebration of fresh, vibrant flavors and simple ingredients that come together to create a symphony of taste and texture. The juicy prawns add a delightful sweetness, complemented by the rich, buttery sauce that clings to every strand of linguine. The fresh tomatoes provide a burst of acidity, while the spinach gives it a nutritious punch. It’s a versatile recipe that’s easy enough for a weeknight meal but elegant enough to impress guests at a dinner party.

Ingredients

  • 300g fresh baby spinach, stems removed
  • 400g linguine (or fettuccine)
  • 2 garlic cloves, minced
  • 3 tablespoons olive oil
  • 2 tablespoons freshly chopped parsley
  • 400g fresh prawns, peeled and deveined
  • Salt and pepper to taste
  • 4 fresh tomatoes, chopped
  • 2 tablespoons unsalted butter
  • 1/3 cup white wine

Instructions

  1. Cook the linguine according to package directions until al dente. Drain and set aside.
  2. In a large skillet over medium heat, melt the butter with the olive oil.
  3. Add the chopped tomatoes, parsley, and garlic to the skillet. Sauté until the tomatoes are slightly tender, about 3-4 minutes.
  4. Add the spinach and white wine to the skillet, and cook until the spinach is wilted.
  5. Add the prawns to the skillet and sauté until they turn pink, about 3-5 minutes.
  6. Season with salt and pepper to taste.
  7. Add the cooked linguine to the skillet, tossing to coat the pasta in the sauce.
  8. Serve hot, garnished with additional parsley if desired.

Tips

For the best results, use the freshest ingredients you can find. Fresh prawns and ripe tomatoes will make a significant difference in flavor. Also, remember to not overcook the prawns as they can become tough and chewy. If you prefer a spicier kick, consider adding a pinch of red pepper flakes when sautéing the garlic and tomatoes. This dish is best served immediately, as the pasta can absorb the sauce and become dry if left for too long.

Variations & Substitutions

If you’re looking to switch things up, consider these variations:

  • Vegetarian Option: Omit the prawns and add more vegetables like zucchini or bell peppers for a vegetarian version.
  • Whole Wheat Pasta: Substitute regular linguine with whole wheat pasta for a healthier option.
  • Cheese Lover’s Delight: Sprinkle some grated Parmesan cheese over the dish just before serving for an added layer of flavor.

Storage

While this dish is best enjoyed fresh, you can store leftovers in an airtight container in the refrigerator for up to 2 days. To reheat, add a splash of water or white wine to the pasta and warm it gently in a skillet over low heat. This will help to prevent the pasta from drying out.

FAQ

Can I use frozen prawns?

Yes, you can use frozen prawns if fresh ones are not available. Just make sure to thaw them completely and pat them dry with paper towels before cooking to remove excess moisture.

What type of white wine should I use?

A dry white wine, such as Sauvignon Blanc or Pinot Grigio, pairs beautifully with this dish. Avoid sweet wines as they can alter the flavor profile of the sauce.

Nutrition

This dish is a good source of protein and vitamins, thanks to the prawns and spinach. It provides a balanced meal with carbohydrates from the pasta and healthy fats from the olive oil. However, if you’re watching your calorie intake, consider reducing the amount of butter used.

Conclusion

Incorporating the essence of seaside dining, this Linguine with Prawns, Fresh Tomatoes, and Spinach is a dish that brings the comforting flavors of a coastal Italian meal to your kitchen. It’s not just a recipe, but a journey back to cherished memories, and an opportunity to create new ones with your loved ones. Whether you’re serving it for a special occasion or simply indulging in a delicious homemade meal, this dish is sure to become a favorite in your culinary repertoire. Enjoy the delightful blend of flavors and happy cooking!

Related update: Linguine with Prawns, Fresh Tomatoes and Spinach

Related update: Lamb & Sweet Potato Pot Pie

Arame Edamame Cucumber Salad | Made by Meaghan Moineau

Arame Edamame Cucumber Salad

Intro

There’s something magical about revisiting childhood flavors, those that transport us back to simpler times and cherished memories. For me, that magic is encapsulated in the crisp, refreshing taste of cucumbers. Growing up, my grandmother would prepare a cucumber salad every summer, using fresh vegetables from her garden. I remember sitting on her porch, the sun casting warm rays on our faces as we savored each bite. Inspired by those days, I’ve created an Arame Edamame Cucumber Salad that combines the nostalgia of my grandmother’s recipe with vibrant, Asian-inspired flavors.

Why You’ll Love It

This Arame Edamame Cucumber Salad is not only delicious but also incredibly nutritious. It’s packed with protein-rich edamame, the unique flavor of arame, and the cool crunch of cucumber. The dressing, a delightful mix of olive oil, rice vinegar, sesame oil, and soy sauce, adds a tangy and savory finish. Whether you’re looking for a light lunch or a side dish that will impress family and friends, this salad is a versatile choice. Plus, it’s vegan, gluten-free, and can be prepared in under 20 minutes.

Ingredients

  • 1 cucumber, finely sliced
  • 1 cup edamame, shelled
  • 1 tablespoon extra virgin olive oil
  • 1 tablespoon rice vinegar
  • 1 teaspoon sesame oil
  • 1 tablespoon soy sauce
  • 1/4 cup arame

Instructions

  1. Add 2 cups of water to the arame and let it soak for 5 minutes. After soaking, drain and set aside.
  2. Bring a pot of salted water to a boil and add the edamame. Boil for roughly 5 minutes or until tender. Drain and cool.
  3. Finely slice the cucumber. For best results, use a mandolin to achieve uniform slices.
  4. In a small jar, combine the extra virgin olive oil, rice vinegar, sesame oil, and soy sauce. Cover the jar and shake well to create the dressing.
  5. In a large bowl, combine the cucumber, edamame, and arame. Pour the dressing over the mixture and toss to coat evenly.

Tips

For a salad that’s truly refreshing, ensure your cucumbers are chilled before slicing. If you’re in a hurry, you can soak the arame in warm water to speed up the process. When preparing the dressing, feel free to adjust the soy sauce to taste, especially if you prefer a less salty flavor.

Variations & Substitutions

If you’re looking to add a bit of spice to your salad, consider adding a pinch of red pepper flakes to the dressing. You can also substitute tamari for soy sauce for a gluten-free option. For an added crunch, sprinkle toasted sesame seeds or sliced almonds over the salad just before serving.

Storage

This salad is best enjoyed fresh, but it can be stored in an airtight container in the refrigerator for up to 2 days. If you’re planning to make it ahead of time, consider keeping the dressing separate and combining it with the salad just before serving to maintain the crispness of the cucumber.

FAQ

Can I use frozen edamame for this salad?

Absolutely! Frozen edamame works perfectly in this recipe. Just make sure to boil it until tender and then cool before adding to the salad.

What is arame, and where can I find it?

Arame is a type of seaweed commonly used in Japanese cuisine. It has a mild, slightly sweet flavor and is typically sold dried. You can find it in health food stores or Asian markets, or you can order it online.

Is there a substitute for arame if I can’t find it?

If you can’t find arame, you can substitute it with another type of seaweed such as wakame or hijiki. Just be sure to adjust the soaking time according to the type of seaweed you’re using.

Nutrition

This salad is a nutritious powerhouse. It’s high in protein, thanks to the edamame, and low in calories. The seaweed adds a dose of iodine and other essential minerals, while the cucumber provides hydration and fiber. The oils in the dressing offer healthy fats, making this salad a balanced and wholesome choice.

Conclusion

The Arame Edamame Cucumber Salad is a delightful fusion of flavors and textures that celebrates both tradition and innovation. It’s a simple yet elegant dish that brings together the best of fresh, healthy ingredients. Whether you’re reminiscing about summer days on the porch or simply looking for a new go-to salad, this recipe is sure to become a favorite. Enjoy every crisp, delicious bite!

Related update: Arame Edamame Cucumber Salad

Red, White, and Blue Fruit Salsa | Made by Meaghan Moineau

Red, White, and Blue Fruit Salsa

Intro

There’s something undeniably nostalgic about summer gatherings. The aroma of freshly cut grass, children playing in the backyard, and the delightful chatter of family and friends create an atmosphere that’s hard to beat. One of my fondest memories is of July 4th celebrations at my grandmother’s house. The highlight for me was always the vibrant and refreshing fruit salsa she would make. Her recipe has been passed down to me, and today, I’m thrilled to share this Red, White, and Blue Fruit Salsa with you. It’s a dish that not only celebrates the colors of our flag but also captures the essence of those cherished summer days.

Why You’ll Love It

This Red, White, and Blue Fruit Salsa is a perfect blend of sweet and tangy flavors that will have your taste buds dancing. It’s incredibly easy to make, requiring just a handful of ingredients and minimal preparation time. Whether you’re hosting a summer barbecue, a patriotic holiday party, or simply craving a light and refreshing snack, this salsa is sure to impress. Plus, it’s a healthy alternative to traditional chips and dip, making it a hit with health-conscious guests.

Ingredients

  • 1 cup blueberries
  • 1 cup diced strawberries
  • 1/2 cup sweetened shredded coconut
  • 2 tablespoons lime juice
  • 2 tablespoons strawberry jam
  • Freedom Chips (to serve)

Instructions

  1. In a medium-sized bowl, combine the blueberries, diced strawberries, and sweetened shredded coconut. Gently mix them to ensure an even distribution.
  2. Add the lime juice and strawberry jam to the berry mixture. Stir well until all the ingredients are thoroughly combined.
  3. Cover the bowl with plastic wrap or a lid and refrigerate for at least an hour. This allows the flavors to meld together beautifully.
  4. Once chilled, serve the fruit salsa as an appetizer with Freedom Chips. Enjoy the burst of flavors and the delightful crunch of the chips.

Tips

For the best results, use fresh and ripe berries. Their natural sweetness will enhance the overall flavor of the salsa. If you want to add a bit of spice, consider sprinkling a pinch of chili powder or cayenne pepper into the mix for a subtle kick. Always taste the salsa before serving, as you may want to adjust the lime juice or jam to suit your personal preference.

Variations & Substitutions

Feel free to get creative with this recipe! You can substitute raspberries or blackberries for the blueberries if you prefer a different berry flavor. If you’re not a fan of coconut, try using finely chopped mint leaves instead for a refreshing twist. For a healthier option, use unsweetened shredded coconut. You can also experiment with different jams, such as raspberry or apricot, to change up the flavor profile.

Storage

Store any leftover salsa in an airtight container in the refrigerator for up to three days. Keep in mind that the berries might release some juice over time, so give the salsa a good stir before serving again. Unfortunately, this salsa does not freeze well due to the high water content of the fruit.

FAQ

Can I make this salsa ahead of time?

Absolutely! In fact, making it a day ahead can enhance the flavors even more. Just be sure to store it in the refrigerator and give it a good stir before serving.

What are Freedom Chips?

Freedom Chips are simply tortilla chips, but with a playful and patriotic twist. You can use any brand or make your own at home by cutting tortillas into your desired shape and baking or frying them until crispy.

Is there a way to make this salsa more savory?

Yes! You can add diced avocado, chopped cilantro, or a small amount of finely diced red onion to introduce savory elements to the salsa. These additions will complement the sweetness of the berries beautifully.

Nutrition

This fruit salsa is a nutritious choice, packed with vitamins and antioxidants from the fresh berries. It’s low in calories and contains healthy fats from the coconut. While the exact nutritional content will vary based on portion sizes, you can generally expect a serving to be low in fat and high in vitamin C, making it a guilt-free treat.

Conclusion

Red, White, and Blue Fruit Salsa is more than just a dish; it’s a celebration of summer and all the vibrant flavors it brings. Whether you’re reminiscing about past family gatherings or creating new memories, this salsa is sure to be a hit. Its simplicity, flexibility, and delightful taste make it a must-try for any occasion. So gather your loved ones, prepare this refreshing salsa, and let the festivities begin!

Related update: Red, White, and Blue Fruit Salsa

Related update: Italian Tomato and Mozzarella Caprese

Salmon with roasted vegetables | Made by Meaghan Moineau

Salmon with Roasted Vegetables

Intro

There’s something magical about the aroma of roasted vegetables mingling with the rich, savory scent of salmon in the oven. It takes me back to my grandmother’s kitchen, where Sunday dinners were a cherished ritual. I remember sitting at the wooden table, my feet barely touching the floor, eagerly waiting for the feast to arrive. The combination of tender salmon and perfectly roasted vegetables was always the highlight of the meal. Today, I’m thrilled to share a recipe that brings those fond memories to life with a modern twist.

Why You’ll Love It

This recipe is a delightful symphony of flavors and textures. The salmon is tender and flaky, while the roasted vegetables offer a satisfying crunch. It’s a wholesome, nutritious meal that’s as easy to prepare as it is delicious to eat. Perfect for busy weeknights or a special weekend dinner, this dish will quickly become a favorite in your household.

Ingredients

  • 2 salmon fillets
  • 2 medium potatoes, roughly diced
  • 2 parsnips, roughly diced
  • 2 carrots, roughly diced
  • 1 large onion, cut into wedges
  • 1 cup cherry tomatoes
  • 3 tablespoons olive oil
  • Juice of 1 lemon
  • Salt
  • Freshly ground black pepper
  • Pinch of paprika
  • 2 sprigs fresh rosemary
  • 2 sprigs fresh thyme

Instructions

  1. Preheat your oven to 200°C (400°F).
  2. Season the salmon fillets with salt, pepper, and a pinch of paprika. Set aside.
  3. In a large roasting tray, combine the diced potatoes, parsnips, and carrots.
  4. Drizzle the olive oil over the vegetables and season with salt and pepper. Toss to coat evenly.
  5. Roast the vegetables in the oven for 15 minutes.
  6. Add the onion wedges to the tray and roast for an additional 10-15 minutes.
  7. Place the salmon fillets and cherry tomatoes between the roasted vegetables in the tray.
  8. Drizzle the lemon juice over everything and sprinkle with rosemary and thyme.
  9. Season lightly with salt and pepper.
  10. Roast for another 10-15 minutes, or until the salmon is cooked through and the vegetables are tender.
  11. Serve hot, accompanied by a fresh green salad.

Tips

For the best results, ensure that your salmon fillets are of even thickness so they cook evenly. It’s also important to give the vegetables enough space on the tray to roast rather than steam, which helps them become perfectly crispy. Don’t skip the fresh herbs—they add a wonderful aroma and flavor that dried herbs can’t quite replicate.

Variations & Substitutions

Feel free to experiment with different vegetables such as bell peppers or zucchini. If you don’t have fresh rosemary or thyme, you can use dried herbs, but reduce the quantity by half as dried herbs are more concentrated. For a zesty kick, add some lemon zest along with the juice. If you’re looking for a heartier dish, serve it over a bed of quinoa or brown rice.

Storage

Store any leftovers in an airtight container in the refrigerator for up to three days. To reheat, place the salmon and vegetables in a preheated oven at 180°C (350°F) for about 10 minutes, or until warmed through. You can also use a microwave, but be careful not to overcook the salmon.

FAQ

Can I use frozen salmon for this recipe?

Yes, you can use frozen salmon, but make sure to thaw it completely before cooking. This will ensure it cooks evenly with the vegetables.

What can I serve with this dish?

This salmon and roasted vegetable dish pairs wonderfully with a simple green salad, crusty bread, or a light quinoa salad. A glass of chilled white wine also complements the flavors beautifully.

Nutrition

This meal is packed with protein, healthy fats, and a variety of vitamins and minerals from the vegetables. It’s a balanced dish that fits well into a healthy diet. Each serving provides approximately 450 calories, 30g of protein, and a good dose of omega-3 fatty acids.

Conclusion

This Salmon with Roasted Vegetables recipe is a delightful reminder of how comforting and satisfying a home-cooked meal can be. Whether you’re cooking for family, friends, or just yourself, this dish is sure to please and impress. Embrace the simplicity and let the oven do the work, bringing flavors together in a way that only roasting can achieve. Enjoy this taste of nostalgia and make new memories with every bite.

Related update: Salmon with roasted vegetables

Related update: Siew Mai

Fresh Peach With Goat Cheese Side Salad | Made by Meaghan Moineau

Fresh Peach With Goat Cheese Side Salad

Intro

There’s something uniquely magical about the late summer months when peaches are at their peak. I remember as a child, eagerly visiting the local farmer’s market with my grandmother, who knew every vendor by name. The sweet fragrance of ripe peaches would envelop us as we wandered past the stands, sampling slices offered with a smile. Those warm afternoons spent in her sun-dappled kitchen inspired this Fresh Peach With Goat Cheese Side Salad recipe, which captures the essence of those cherished moments. This salad is a celebration of simplicity, where fresh ingredients shine in perfect harmony.

Why You’ll Love It

This Fresh Peach With Goat Cheese Side Salad is a delightful blend of sweet, tangy, and savory flavors that will captivate your taste buds. It’s a breeze to prepare, making it an ideal choice for busy weeknights or as a refreshing addition to your weekend brunch spread. The combination of juicy peaches, creamy goat cheese, and fragrant basil leaves drizzled with honey is both elegant and comforting. Whether you’re a seasoned chef or a kitchen newbie, this recipe is sure to impress with its vibrant colors and irresistible flavors.

Ingredients

  • 2 ripe peaches, sliced
  • 2 tablespoons honey
  • A pinch of salt
  • 1/4 cup fresh basil leaves, torn
  • 1/3 cup crumbled goat cheese

Instructions

  1. Place the sliced peaches in a medium-sized bowl.
  2. Drizzle the honey over the peaches and gently toss to coat them evenly.
  3. Sprinkle a pinch of salt over the honey-coated peaches.
  4. Gently fold in the torn basil leaves and crumbled goat cheese, mixing until well combined.
  5. Transfer the salad to a serving dish and enjoy immediately or chill for a few minutes to allow the flavors to meld.

Tips

For the best results, choose peaches that are ripe but still firm enough to hold their shape when sliced. If your peaches are very juicy, you might want to reduce the amount of honey to prevent the salad from becoming too sweet. Fresh basil adds a wonderful aroma, but you can also experiment with mint leaves for a refreshing twist. Remember, the quality of the ingredients is key—opt for a high-quality goat cheese to enhance the salad’s creamy texture.

Variations & Substitutions

This salad is wonderfully versatile, allowing you to tailor it to your taste preferences or dietary needs. If you’re not a fan of goat cheese, feta cheese makes an excellent substitute with its crumbly texture and tangy flavor. You can also swap out honey for agave syrup for a vegan-friendly option. For a heartier version, consider adding a handful of arugula or mixed greens to transform this side dish into a light main course. Feel free to add a sprinkle of toasted nuts, such as almonds or walnuts, for an added crunch.

Storage

While this salad is best enjoyed fresh, you can prepare it a few hours in advance if needed. Store it in an airtight container in the refrigerator for up to 24 hours. If you’re planning to make it ahead, consider adding the goat cheese just before serving to maintain its creamy texture. Be mindful that the peaches will release their juices over time, which may affect the salad’s consistency.

FAQ

Can I use canned peaches for this salad?

While fresh peaches are recommended for their flavor and texture, you can use canned peaches in a pinch. Be sure to drain them thoroughly and adjust the honey accordingly, as canned peaches are often packed in syrup.

Can I prepare this salad in advance for a party?

Yes, you can prepare the ingredients a few hours in advance and store them separately. Simply combine the peaches, honey, basil, and goat cheese just before serving to ensure the salad remains fresh and vibrant.

What can I serve with this salad?

This Fresh Peach With Goat Cheese Side Salad pairs beautifully with grilled chicken or fish, providing a delightful contrast of flavors. It’s also an excellent complement to a charcuterie board or as a refreshing side dish for a summer barbecue.

Nutrition

This salad is a nutritious option, featuring the natural sweetness of peaches, the protein-rich creaminess of goat cheese, and the antioxidant properties of fresh basil. Each serving is approximately 250 calories, making it a light yet satisfying addition to any meal. The honey provides a natural energy boost, while the peaches offer vitamins A and C, contributing to a balanced diet.

Conclusion

This Fresh Peach With Goat Cheese Side Salad is a testament to the beauty of simplicity, allowing each ingredient to shine through with every bite. It’s a dish that evokes nostalgia, celebrates the bounty of the season, and brings people together around the table. Whether you’re serving it to family, friends, or simply enjoying it yourself, this salad is sure to become a beloved favorite in your culinary repertoire. So, gather your ingredients, savor the process, and indulge in this delightful taste of summer.

Related update: Fresh Peach With Goat Cheese Side Salad

Related update: Arame Edamame Cucumber Salad

Chicken Farfalle with Low-Fat Alfredo Sauce | Made by Meaghan Moineau

Chicken Farfalle with Low-Fat Alfredo Sauce

Intro

There’s something magical about the aroma of a homemade meal wafting through the kitchen. I remember the first time I attempted to make a pasta dish from scratch. It was a rainy Sunday afternoon, and I was determined to recreate a dish I had once enjoyed at a small Italian bistro. With a little experimentation and a lot of love, I came up with this delightful Chicken Farfalle with Low-Fat Alfredo Sauce. It’s a recipe that has since become a family favorite, bringing a sense of warmth and nostalgia to our dining table.

Why You’ll Love It

This Chicken Farfalle with Low-Fat Alfredo Sauce is a lighter take on a classic comfort dish. You’ll love it because it’s:

  • Healthier: By using skim milk and a moderate amount of butter, we cut down on the calories without compromising on flavor.
  • Rich and Creamy: The sauce is delightfully rich, thanks to the addition of Parmesan cheese and a hint of white wine.
  • Versatile: You can easily adapt it to suit your tastes and dietary needs.
  • Quick and Easy: Perfect for a weeknight dinner, this recipe comes together in just about 30 minutes.

Ingredients

  • 2 boneless chicken breasts
  • 8 oz farfalle pasta
  • 2 tablespoons butter
  • 2 tablespoons flour
  • 2 cups skim milk
  • 1 teaspoon salt
  • 1/2 teaspoon black pepper
  • 1 teaspoon garlic powder
  • 1 lemon, juiced
  • 1/4 cup white wine
  • 1/2 cup grated Parmesan cheese

Instructions

  1. Season the boneless chicken breasts with salt and pepper. In a skillet, heat a little olive oil over medium heat. Sauté the chicken until fully cooked, about 6-7 minutes per side. Remove from skillet and set aside to rest.
  2. Meanwhile, bring a large pot of salted water to a boil. Cook the farfalle pasta according to package instructions until al dente. Drain and set aside.
  3. In a saucepan over medium heat, melt the butter. Add the flour and stir to form a roux, cooking for about 1 minute.
  4. Gradually whisk in the skim milk, ensuring there are no lumps. Add the salt, pepper, garlic powder, lemon juice, and white wine. Bring the mixture to a boil, whisking constantly.
  5. Reduce the heat and let the sauce simmer for about 5 minutes, allowing it to thicken. Stir in the Parmesan cheese until melted and smooth.
  6. Cut the cooked chicken into bite-sized pieces. In a large sauté pan, combine the pasta, chicken, and the Alfredo sauce. Toss everything together over medium heat until well combined.
  7. Serve hot, garnished with extra Parmesan cheese and a sprinkle of black pepper, if desired.

Tips

  • Whisking is Key: To achieve a smooth sauce, whisk continuously when adding the milk to the roux.
  • Adjust Seasoning: Taste your sauce before combining it with pasta and chicken. Adjust salt, pepper, or lemon juice to your liking.
  • Extra Sauce: This recipe makes more sauce than needed, which is perfect for those who love a creamy dish. Store any leftover sauce for future use!

Variations & Substitutions

There are several ways to tailor this dish to your preferences:

  • Vegetarian Option: Replace the chicken with sautéed mushrooms or roasted vegetables for a vegetarian twist.
  • Dairy-Free: Use a plant-based milk and nutritional yeast in place of Parmesan for a dairy-free version.
  • Gluten-Free: Opt for gluten-free pasta and use a gluten-free flour blend for the sauce.

Storage

Leftover Chicken Farfalle can be stored in an airtight container in the refrigerator for up to 3 days. To reheat, gently warm in a saucepan over low heat, adding a splash of milk if the sauce has thickened too much.

FAQ

Can I use a different type of pasta?

Absolutely! While farfalle is a fun and visually appealing choice, feel free to use any pasta you have on hand—penne, fettuccine, or even spaghetti would work beautifully.

What can I use instead of white wine?

If you prefer not to use wine, you can substitute it with chicken broth or simply omit it. The wine adds depth to the sauce, but the dish will still be delicious without it.

How can I make my sauce thicker?

If your sauce isn’t as thick as you’d like, let it simmer a bit longer, or add a slurry made from 1 teaspoon of cornstarch mixed with water. Add it gradually until the desired consistency is reached.

Nutrition

This recipe is a lighter version of traditional Alfredo pasta, but nutritional values can vary based on the exact ingredients and quantities used. On average, a serving provides approximately:

  • Calories: 450
  • Protein: 30g
  • Carbohydrates: 50g
  • Fat: 15g

Conclusion

Chicken Farfalle with Low-Fat Alfredo Sauce is a comforting dish that brings a touch of Italy to your home. Whether you’re hosting a dinner party or enjoying a quiet night in, this recipe is sure to impress. The creamy sauce paired with tender chicken and perfectly cooked pasta makes it a meal worth savoring. Enjoy the process of making it, and don’t forget to share the love—and maybe a little extra sauce—with those around you!

Related update: Chicken Farfalle with Low-Fat Alfredo Sauce

Related update: Easy Slow Cooker Whole Chicken With Rosemary

Green Monster Ice Pops | Made by Meaghan Moineau

Green Monster Ice Pops: A Refreshing Summer Treat

Intro

There’s something magical about the first taste of an ice pop on a sweltering summer day. Growing up, my siblings and I would race to the ice cream truck, clutching our allowance tightly. Yet, there was a special kind of joy in making our own frozen treats at home. We’d gather in the kitchen, blending various fruits and juices, eager to see what delicious concoction we’d create. Today, I bring you a healthier twist on those childhood favorites with my Green Monster Ice Pops. Packed with nutritious ingredients, they’re as delightful as they are refreshing.

Why You’ll Love It

These Green Monster Ice Pops are not only a delicious way to cool down but also a sneaky way to pack in some greens. With the creaminess of avocado and the natural sweetness of mango and banana, these ice pops are a hit with both kids and adults alike. Whether you’re looking for a post-workout snack or a guilt-free dessert, these ice pops are sure to satisfy. Plus, they’re a fantastic way to use up any ripe fruit you have on hand!

Ingredients

  • Unsweetened almond milk
  • 1 ripe avocado, peeled and pitted
  • 1 cup baby spinach
  • 1 banana
  • 1 tablespoon honey
  • 1 cup fresh mango, diced

Instructions

  1. Place all ingredients into a blender and mix well until smooth and creamy.
  2. Taste the smoothie. If you find that it is not sweet enough, add 1 to 2 tablespoons of maple syrup or honey and blend again.
  3. Pour the smoothie mixture into the ice pop molds.
  4. Insert a wooden popsicle stick into each mold, leaving about a quarter of the stick above the mold.
  5. Place the molds into the freezer for 2-3 hours to let them freeze completely before serving.

Tips

For the creamiest texture, make sure your avocado is perfectly ripe. You can also soak your wooden sticks in water for about 10 minutes before inserting them into the molds to prevent them from floating up. If you’re in a hurry, refrigerate the smoothie mix for an hour before pouring it into the molds to reduce the freezing time.

Variations & Substitutions

Feel free to customize these ice pops to suit your taste! You can substitute the almond milk with coconut milk for a tropical twist. If avocados aren’t your thing, a half cup of Greek yogurt can provide similar creaminess. For an extra nutrient boost, toss in a tablespoon of chia seeds or flaxseeds.

Storage

Once frozen, you can remove the ice pops from the molds and store them in a resealable plastic bag or airtight container in the freezer. They’ll last for up to two weeks, though they’re so delicious they might not last that long!

FAQ

Can I use frozen spinach instead of fresh?

Yes, you can use frozen spinach. Just be sure to thaw and drain it thoroughly before blending to avoid excess water in your mixture.

What if I don’t have ice pop molds?

No worries! You can use small paper cups as an alternative. Simply cover them with foil and insert the popsicle stick through the foil. Once frozen, peel away the paper cup to enjoy your ice pop.

Nutrition

These ice pops are not only refreshing but also packed with nutrients. The avocado provides healthy fats, while spinach adds a dose of iron and fiber. Each pop contains approximately 120 calories, 5g of fat, 20g of carbohydrates, and 2g of protein, making them a balanced treat.

Conclusion

Green Monster Ice Pops are more than just a summer treat; they’re a delightful way to indulge in nostalgia while still honoring a healthy lifestyle. Whether you’re enjoying them by the poolside or serving them at a backyard barbecue, these pops are sure to be a hit. Gather your ingredients, blend away, and relish the vibrant flavors of summer with every bite!

Related update: Green Monster Ice Pops

Related update: Dump Cake

Moroccan Carrot Soup | Made by Meaghan Moineau

Moroccan Carrot Soup

Intro

There’s something magical about the aroma of spices wafting through the house, evoking memories of family gatherings and warmth. One of my fondest memories is of my grandmother, bustling about her kitchen, preparing her famous Moroccan Carrot Soup. This was a staple at our family dinners, and I remember sitting at the kitchen table, eagerly awaiting my bowl. The vibrant color, the creamy texture, and the perfect blend of spices made it irresistible. Today, I’m excited to share this cherished recipe with you, hoping it brings as much warmth and joy to your home as it does to mine.

Why You’ll Love It

This Moroccan Carrot Soup is a delightful blend of flavors and textures that will captivate your senses. It’s both vibrant and comforting, making it perfect for any season. The sweetness of the carrots is beautifully balanced by the aromatic spices, creating a harmony that is both exotic and familiar. Whether you’re serving it as a starter or enjoying it as a light meal, this soup is sure to become a favorite in your household.

Ingredients

  • 2 tablespoons butter
  • 1 yellow onion, chopped
  • 6 large carrots, peeled and sliced
  • 4 cups low sodium chicken stock
  • 1 teaspoon cumin seeds
  • 1 tablespoon honey
  • 2 tablespoons fresh lemon juice
  • 1/4 teaspoon allspice
  • Salt and pepper, to taste
  • Sour plain yogurt, for serving

Instructions

  1. Melt butter in a large saucepan over medium-high heat.
  2. Add onion and sauté for 2 minutes until translucent.
  3. Mix in carrots and chicken stock. Bring to a boil.
  4. Reduce heat, cover, and simmer until carrots are very tender, about 20 minutes.
  5. Meanwhile, stir cumin seeds in a small skillet over medium-high heat until fragrant, about 4-5 minutes. Finely grind in a spice mill.
  6. Remove soup from heat. Puree in batches in a blender until smooth.
  7. Return the soup to the saucepan. Whisk in honey, lemon juice, and allspice.
  8. Season with salt and pepper to taste.
  9. Ladle soup into bowls. Sprinkle with toasted cumin or mix cumin with sour cream and dollop on top. Serve and enjoy!

Tips

To ensure your soup is as smooth as possible, take your time to puree it thoroughly. If you prefer a slightly chunky texture, you can blend only half of the soup and mix it with the unblended portion. For an extra kick, consider adding a pinch of cayenne pepper when seasoning with salt and pepper.

Variations & Substitutions

If you’re looking to make this recipe vegetarian, simply substitute the chicken stock with vegetable broth. For a vegan option, replace the butter with olive oil and omit the yogurt topping. You can also experiment with different spices like ginger or coriander to give the soup a unique twist.

Storage

This Moroccan Carrot Soup stores well and can be refrigerated in an airtight container for up to four days. For longer storage, consider freezing it in individual portions for up to three months. Simply thaw overnight in the fridge and reheat on the stove before serving.

FAQ

Can I use pre-ground cumin instead of cumin seeds?

Yes, you can use pre-ground cumin if that’s what you have on hand. However, toasting and grinding whole cumin seeds will provide a fresher, more robust flavor that enhances the soup’s aromatic qualities.

Is this soup suitable for freezing?

Absolutely! This soup freezes well. Allow it to cool completely before transferring to freezer-safe containers. When you’re ready to enjoy it, thaw in the refrigerator and reheat on the stove until warmed through.

Can I add other vegetables to the soup?

Feel free to add other vegetables like sweet potatoes or parsnips for added depth and nutrition. Just ensure that they are cooked until tender before blending.

Conclusion

There’s nothing quite like a bowl of Moroccan Carrot Soup to bring comfort and a touch of exotic flavor to your table. Whether you’re reminiscing about family meals or creating new memories with loved ones, this soup is sure to become a beloved recipe in your collection. I hope you enjoy making it as much as I do, and that it fills your home with warmth and happiness.

Related update: Moroccan Carrot Soup

Related update: Chili and Garlic Spiced Beef and Broccoli Stir Fry

Related update: Best Potato Cheese Soup in a bread bowl

Mixed Berry Yogurt with Almonds | Made by Meaghan Moineau

Mixed Berry Yogurt with Almonds

Intro

There’s something undeniably comforting about a morning routine, and for me, it often involves a peaceful moment by the window, a favorite book in hand, and a bowl of my beloved Mixed Berry Yogurt with Almonds. This recipe takes me back to my childhood summers spent at my grandmother’s house, where the mornings were filled with the sweet aroma of berries picked fresh from her garden. Today, I’ve found a way to capture that nostalgia in a simple, yet satisfying, dish that is perfect for breakfast or a healthy snack.

Why You’ll Love It

This Mixed Berry Yogurt with Almonds is more than just a treat for the taste buds; it’s a symphony of textures and flavors that delight the senses. You’ll love the way the creamy yogurt pairs with the juicy berries, while the crunch of whole almonds and whole oats adds a satisfying bite. It’s a nutrient-rich meal, packed with antioxidants, protein, and healthy fats, to keep you fueled and satisfied.

Ingredients

  • 1 cup frozen mixed berries
  • 1/2 cup whole oats
  • 1 cup plain Greek yogurt
  • 1/4 cup whole almonds

Instructions

  1. Begin by toasting the whole almonds in a skillet over medium heat until they are golden brown and aromatic, about 5 minutes. Set aside to cool.
  2. In a large glass cup or bowl, start layering the ingredients. First, place a layer of Greek yogurt at the bottom.
  3. Add a layer of whole oats over the yogurt for that hearty texture.
  4. Scatter a portion of the frozen mixed berries over the oats. The berries will slightly thaw and release their juices, making the dish deliciously sweet and colorful.
  5. Repeat the layers until all ingredients are used, finishing with a generous layer of Greek yogurt on top.
  6. Top with the toasted almonds just before serving to maintain their crunch.

Tips

To enhance the flavor of this dish, consider adding a pinch of cinnamon or a drizzle of honey between the layers. For the best texture, use thick Greek yogurt, which will hold up nicely against the juicy berries. If you prefer a softer crunch, you can soak the oats in a bit of milk or yogurt overnight.

Variations & Substitutions

This breakfast lends itself to endless variations. If you’re in the mood for something more decadent, especially if serving this as a dessert, use a creamier vanilla yogurt. You can also drizzle a bit of maple syrup on top of the yogurt for added sweetness. Any kind of nut will do, and toasting them will bring out their maximum crunch and flavor. If you don’t have berries on hand, this works well with just about any fruit. Try sliced bananas, peaches, or even a tropical mix with mango and pineapple for a summery twist.

Storage

This dish is best enjoyed fresh, but you can prepare it in advance. Store the yogurt, oats, and berries layered in an airtight container in the refrigerator for up to 3 days. Add the toasted almonds just before serving to maintain their crunch and prevent them from becoming soggy.

FAQ

Can I use fresh berries instead of frozen?

Absolutely! Fresh berries are a wonderful substitute and can add a lovely burst of flavor and freshness to your dish. Just be sure to rinse them thoroughly before use.

What can I use instead of Greek yogurt?

If Greek yogurt isn’t your preference, you can use regular yogurt, dairy-free yogurt, or even cottage cheese for a different texture. Just keep in mind that the consistency and taste will vary slightly depending on your choice.

Nutrition

This dish is not only delicious but also packed with health benefits. The mixed berries provide a rich source of antioxidants, the Greek yogurt offers a high protein content, and the almonds and oats add healthy fats and fiber, making it a well-rounded meal to start your day.

Conclusion

Mixed Berry Yogurt with Almonds is a delightful way to savor the simple pleasures of a well-balanced meal. Whether you enjoy it as a quick breakfast, a refreshing snack, or a light dessert, it’s a versatile recipe you’ll return to time and again. As you dig into your bowl, I hope you’re reminded of your own cherished memories, just as I am of those sunlit mornings at my grandmother’s table. Enjoy every spoonful!

Related update: Mixed Berry Yogurt with Almonds

Avocado Chicken Salad | Made by Meaghan Moineau

Avocado Chicken Salad

Intro

There’s something incredibly comforting about a hearty salad that satisfies both the taste buds and the soul. This Avocado Chicken Salad is more than just a meal; it’s a journey back to my grandmother’s sunny kitchen, where the aroma of freshly cooked chicken and the zest of lime filled the air. I remember sitting at her wooden table, the afternoon sun streaming through the windows, eagerly awaiting the delightful concoction she would prepare. With each bite, I felt wrapped in warmth and love. This recipe is my attempt to recreate that magic and share it with you.

Why You’ll Love It

This Avocado Chicken Salad is a delightful blend of flavors and textures that will leave you craving more. Here’s why you’ll love it:

  • Quick and Easy: This recipe is perfect for a busy weekday lunch or a light dinner. It comes together in under 30 minutes!
  • Healthy and Nutritious: Packed with protein from the chicken and healthy fats from the avocado, it’s a balanced meal that supports a healthy lifestyle.
  • Flavorful: The combination of creamy avocado, tender chicken, and fresh lime juice creates a refreshing and satisfying dish.
  • Versatile: It’s perfect on its own, or you can serve it with crusty bread or in a wrap for a more filling option.

Ingredients

  • 2 ripe avocados
  • 1 cup cherry tomatoes
  • 2 tablespoons extra virgin olive oil
  • 2 limes, juiced
  • 2 tablespoons mayonnaise
  • Black pepper to taste
  • 4 cups shredded mixed salad greens
  • 1 skinless boneless chicken breast

Instructions

  1. Season the chicken breast with a little salt and pepper.
  2. Place the chicken in a pot of boiling water and cook until done, approximately 12-15 minutes.
  3. Remove the chicken from the water and allow it to cool, then cut into cubes and set aside.
  4. Cut the avocados into cubes.
  5. In a large bowl, combine the mixed salad greens with olive oil and lime juice. Toss well.
  6. Divide the mixed salad into two serving bowls.
  7. Evenly distribute the avocado cubes, chicken, and cherry tomatoes over the salad in each bowl.
  8. Drizzle mayonnaise and sprinkle a dash of black pepper over the salad.
  9. Serve immediately and enjoy!

Tips

  • Ripe Avocados: Make sure to use ripe avocados for the best texture. They should yield slightly when pressed.
  • Perfectly Cooked Chicken: To ensure the chicken is cooked perfectly, use a meat thermometer. The internal temperature should reach 165°F (74°C).
  • Fresh Ingredients: Use fresh lime juice and high-quality olive oil for the best flavors.

Variations & Substitutions

This salad is wonderfully versatile. Here are some ideas to make it your own:

  • Spicy Kick: Add a pinch of cayenne pepper or some sliced jalapeños for a spicy version.
  • Herbs: Fresh herbs like cilantro or basil can add an extra layer of flavor.
  • Vegan Option: Replace chicken with chickpeas and use vegan mayonnaise to make it plant-based.
  • Cheesy Delight: Sprinkle some feta or goat cheese for added creaminess.

Storage

This salad is best enjoyed fresh. However, if you have leftovers, store them in an airtight container in the refrigerator for up to two days. Keep the salad dressing separate if possible to prevent the greens from becoming soggy.

FAQ

Can I use grilled chicken instead of boiled?

Absolutely! Grilled chicken adds a smoky flavor to the salad and works perfectly. Just ensure it’s cooked through and cooled before cutting into cubes.

What can I use instead of mayonnaise?

If you’re not a fan of mayonnaise, you can substitute it with Greek yogurt or a light vinaigrette for a different but equally delicious taste.

Nutrition

This Avocado Chicken Salad is not only delicious but also nutritious. It’s high in protein and healthy fats, making it a great option for a balanced meal. Avocados are a great source of vitamins C, E, K, and B-6, as well as riboflavin, niacin, folate, pantothenic acid, magnesium, and potassium. Remember, nutritional values can vary based on the specific ingredients and quantities used.

Conclusion

This Avocado Chicken Salad is a celebration of fresh, wholesome ingredients and simple preparation. It’s a dish that brings a touch of nostalgia and comfort with every bite. Whether you’re enjoying it for lunch, dinner, or a gathering with friends, it’s sure to impress with its vibrant flavors and satisfying texture. I hope it becomes a cherished favorite in your home, just as it is in mine. Enjoy your culinary journey!

Related update: Avocado Chicken Salad

Related update: Best Baked Macaroni and Cheese

Spicy Black-Eyed Pea Curry with Swiss Chard and Roasted Eggplant | Made by Meaghan Moineau

Spicy Black-Eyed Pea Curry with Swiss Chard and Roasted Eggplant

Intro

There’s a certain magic that happens in the kitchen when the aroma of spices fills the air, reminiscent of home-cooked meals that warm the heart and soul. I remember the first time I encountered black-eyed peas in a dish. It was at a family gathering during the holidays, where each dish had its own story and tradition. My grandmother, with her gentle hands and warm smile, would serve a spicy black-eyed pea curry that quickly became the centerpiece of our gatherings. Her secret? A generous helping of roasted eggplant and leafy greens that made the dish as hearty as it was flavorful. Inspired by those cherished moments, I’ve recreated this Spicy Black-Eyed Pea Curry with Swiss Chard and Roasted Eggplant, a dish that’s both comforting and nourishing, perfect for sharing with loved ones.

Why You’ll Love It

This curry is a delightful fusion of flavors and textures. The creamy black-eyed peas intertwine with the smoky, tender roasted eggplant, while the Swiss chard adds a burst of color and nutrition. The medley of spices, including curry powder, garam masala, and cumin, creates a rich, aromatic base that elevates the humble ingredients into a memorable meal. Whether you’re a seasoned cook or a beginner looking to explore new flavors, this recipe is both accessible and rewarding. It’s a versatile dish that can be enjoyed on its own or paired with rice or bread for a complete meal.

Ingredients

  • 1 cup cooked dried black-eyed peas
  • 1 tablespoon curry powder
  • 1 teaspoon garam masala
  • 1 eggplant, preferably Italian globe
  • 1 teaspoon ground coriander
  • 1 teaspoon ground cumin
  • 1/2 teaspoon ground mustard powder
  • Juice of 1 lemon
  • 2 tablespoons olive oil
  • 2-3 red or green chilies, finely chopped
  • Sea salt to taste
  • 2 shallots, finely chopped
  • 2 cups Swiss chard, trimmed and chopped
  • 1 large tomato, chopped
  • 1/2 cup water, plus more as needed

Instructions

  1. Rinse the black-eyed peas and soak them in several inches of water for 6 hours or overnight. Drain and rinse again. Transfer to a large saucepan, cover with fresh water, and bring to a boil. Reduce heat to medium-low, cover, and simmer for 40 to 60 minutes until the peas are tender but not falling apart. Drain and set aside.
  2. To prepare the eggplant, cut off the stem and bottom edge, then halve it lengthwise. Score the flesh into a diagonal pattern, being careful not to cut through the skin. Sprinkle with salt and let it sit for 40 minutes. Rinse and squeeze out excess water.
  3. Brush the eggplant with olive oil and place it in a roasting pan. Bake in a preheated 400°F oven until the flesh appears collapsed and wrinkly, about 30-40 minutes. Remove from heat, let cool for 10 minutes, then scoop out the flesh. If too watery, drain using a strainer. Set aside.
  4. In the same saucepan used for the black-eyed peas, heat the olive oil over medium heat. Add shallots and chilies, sautéing for 2-3 minutes.
  5. Add curry powder, garam masala, ground coriander, cumin, and mustard powder. Stir for another minute until fragrant.
  6. Add the chopped tomato and cook for a few more minutes. Then, add the roasted eggplant and cooked black-eyed peas, stirring frequently.
  7. Pour a few tablespoons of water into the pan. Gradually add Swiss chard, allowing it to wilt before adding more. Add more water as necessary to maintain desired consistency.
  8. Stir in the lemon juice and salt to taste. Remove from heat, cover, and let the curry sit for a few minutes before serving.

Tips

For best results, ensure the black-eyed peas are cooked perfectly tender but not mushy. The eggplant’s roasting time may vary depending on its size; keep an eye on it to achieve the desired texture. Adjust the level of spice by adding more or fewer chilies, based on your heat preference.

Variations & Substitutions

Feel free to experiment with different greens such as spinach or kale if Swiss chard is unavailable. For an added protein boost, consider tossing in some cooked chickpeas. If you prefer a milder curry, use less curry powder and add a dollop of coconut milk for creaminess.

Storage

Store any leftovers in an airtight container in the refrigerator for up to 3 days. This curry also freezes well; simply thaw and reheat on the stove over low heat, adding a splash of water if needed to reach the desired consistency.

FAQ

Can I use canned black-eyed peas for this recipe?

Yes, you can use canned black-eyed peas if you’re short on time. Just be sure to rinse and drain them thoroughly before adding them to the dish.

What other vegetables can I add to this curry?

Feel free to add other vegetables such as bell peppers, zucchini, or carrots. Just be sure to adjust the cooking time accordingly so that all the vegetables are tender.

Is this recipe vegan?

Yes, this Spicy Black-Eyed Pea Curry with Swiss Chard and Roasted Eggplant is entirely vegan, making it a delicious choice for those following a plant-based diet.

Nutrition

This curry is a nutritious powerhouse, rich in fiber, vitamins, and minerals. Black-eyed peas are an excellent source of protein and iron, while Swiss chard provides vitamins A, C, and K. Eggplant adds antioxidants and dietary fiber, making this dish both wholesome and satisfying.

Conclusion

Embark on a culinary adventure with this Spicy Black-Eyed Pea Curry with Swiss Chard and Roasted Eggplant. It’s a dish that brings warmth to the table and joy to those who share it. Whether you’re reminiscing about childhood memories or creating new ones, this curry is sure to become a beloved staple in your kitchen. Enjoy the rich tapestry of flavors and the simplicity of ingredients that come together in this heartwarming meal. Happy cooking!

Related update: Spicy Black-Eyed Pea Curry with Swiss Chard and Roasted Eggplant

Related update: Pork Menudo

Pear Salad With Walnuts and Blue Cheese | Made by Meaghan Moineau

Pear Salad With Walnuts and Blue Cheese

Intro

There’s something inherently magical about the crispness of autumn, the way the air turns cooler, and the leaves transform into a symphony of warm hues. As a child, this season always meant family gatherings where we would indulge in hearty meals that celebrated the bounty of the harvest. One dish that has always stood out in my memory is my grandmother’s pear salad. It was a delightful mix of sweet and savory, with juicy pears, crunchy walnuts, and the bold flavor of blue cheese. This salad was more than just food; it was a celebration of the season’s best offerings, a dish that brought everyone together, and left you feeling warm and content. Today, I’m thrilled to share this beloved recipe with you, hoping it brings the same warmth to your table as it has to ours.

Why You’ll Love It

This pear salad with walnuts and blue cheese is a perfect blend of flavors and textures. Here’s why you’ll fall in love with it:

  • Balance of Flavors: The sweetness of pears complements the tangy blue cheese, while the walnuts add a savory crunch.
  • Healthy and Nourishing: Packed with vitamins, antioxidants, and healthy fats, this salad is as nutritious as it is delicious.
  • Quick and Easy: With minimal prep time, this salad is perfect for a quick meal or a stunning appetizer.
  • Visually Stunning: The vibrant colors of the salad leaves, pears, and cheese make this dish as beautiful as it is tasty.

Ingredients

  • 4 ripe pears
  • 1 cup crumbled blue cheese
  • 1/4 cup finely chopped chives
  • 6 cups mixed salad leaves (such as curly endive)
  • 2 tablespoons lemon juice
  • 3 tablespoons safflower oil
  • 1 tablespoon walnut oil
  • 1 cup walnuts, toasted and roughly chopped

Instructions

  1. Prepare the pears by cutting the base so they stand straight. This not only makes for an appealing presentation but also ensures the pear remains stable in the bowl.
  2. Arrange one pear and a generous handful of mixed salad leaves in individual serving bowls.
  3. Add a scattering of chopped celery to each bowl for added crunch.
  4. In a separate bowl, whisk together the lemon juice, safflower oil, and walnut oil to create the dressing. Drizzle the dressing over each salad.
  5. Finish by sprinkling the crumbled blue cheese and toasted walnuts evenly over each salad.
  6. Serve immediately and enjoy the delightful flavors of autumn.

Tips

For the best experience, ensure your pears are ripe but still firm to the touch. This will give you the perfect balance of sweetness and crunch. Toasting the walnuts enhances their flavor, so don’t skip this step! If you prefer a milder cheese, consider using gorgonzola instead of blue cheese.

Variations & Substitutions

  • Cheese: Swap blue cheese for feta or goat cheese for a different flavor profile.
  • Nuts: Pecans or almonds can be used as alternatives to walnuts for some variety.
  • Extra Add-ins: Add dried cranberries or pomegranate seeds for a touch of sweetness and color.
  • Dressing: A honey-mustard vinaigrette can be a delightful alternative to the walnut oil dressing.

Storage

This salad is best enjoyed fresh. However, if you need to prepare it in advance, keep the dressing separate and add it just before serving to prevent the salad leaves from wilting. Store any leftovers in an airtight container in the refrigerator for up to a day.

FAQ

Can I use canned pears instead of fresh ones?

While fresh pears offer the best texture and flavor, you can use canned pears in a pinch. Just ensure they are well-drained and not overly sweetened.

What can I use if I’m allergic to nuts?

If you have a nut allergy, try substituting the walnuts with sunflower seeds or pumpkin seeds for an added crunch without the risk.

How can I make this salad vegan?

To make this salad vegan, simply omit the cheese or use a vegan cheese alternative. Ensure the dressing is also free from animal products, perhaps using a balsamic vinaigrette instead.

Nutrition

Each serving of this pear salad is approximately 250 calories, with 18 grams of healthy fats, 5 grams of protein, and 20 grams of carbohydrates. It is a good source of fiber, vitamin C, and antioxidants, making it a nutritious choice for any meal.

Conclusion

This pear salad with walnuts and blue cheese is a tribute to the flavors of fall, a dish that is as nourishing as it is delectable. Whether you’re serving it as a starter at a dinner party or enjoying it as a light lunch, it’s sure to impress with its complex flavors and beautiful presentation. I hope this recipe becomes a staple in your home, just as it has in mine, creating new memories and bringing joy to your dining table.

Related update: Pear Salad With Walnuts and Blue Cheese

Related update: Japanese Gyoza Pot Stickers

Related update: Thai Cucumber Salad (By Roz)

Swiss Chard Wraps | Made by Meaghan Moineau

Swiss Chard Wraps

Intro

There’s something magical about the simplicity and freshness of handmade wraps, especially when they bring back memories of sunny days spent in the garden with my grandmother. As a child, I would watch her transform vibrant, crisp produce into delightful meals, and her swiss chard wraps always stood out as a favorite. The rich greens of the chard leaves, paired with the vibrant colors of fresh vegetables, made each bite a burst of flavor and nostalgia. Today, I want to share with you this cherished recipe, hoping it brings as much joy to your table as it always has to mine.

Why You’ll Love It

These Swiss Chard Wraps are not only visually stunning but also packed with nutrients and flavor. The combination of fresh vegetables with a hint of spicy peanut vinaigrette makes them a delightful and healthy option for lunch or dinner. They are perfect for those who are looking for a gluten-free and vegan-friendly meal that doesn’t compromise on taste. Whether you’re serving them as a side to your favorite protein or enjoying them on their own, these wraps are sure to satisfy.

Ingredients

  • Dried swiss chard leaves
  • Orange cauliflower
  • Olive oil
  • Garlic
  • Salt
  • Fresh basil
  • Zucchini
  • Red bell pepper
  • Avocado
  • Trader Joe’s spicy peanut vinaigrette

Instructions

  1. Chop off the stems of the swiss chard at the point where it meets the leaf. You could stem the swiss chard entirely, but I like leaving a bit of stem with the leaves to give better structure to the wraps.
  2. Chop the cauliflower into small pieces and pulse them in a food processor until it looks like rice. I usually pulse the cauliflower florets and the stalk together.
  3. Place the olive oil in a sauté pan over medium-high heat. Once the pan is hot, add the garlic and let it fry for about a minute or two, or until the garlic starts to brown.
  4. Add the pulsed cauliflower rice and cook it for about 2-3 minutes. The cauliflower should turn into a vibrant yellow-orange color when it is cooked.
  5. Add a pinch of salt and chopped basil to the cauliflower and stir.
  6. Spiralize the zucchini with Blade B to create zucchini noodles. If you do not have a spiralizer, just create zucchini ribbons with a vegetable peeler.
  7. To assemble the wraps, place a large leaf flat down. Add a bit of sautéed cauliflower, zucchini noodles, red pepper, and avocado along the swiss chard stalk.
  8. Drizzle a bit of vinaigrette on top of the vegetables and wrap everything up.
  9. Enjoy these wraps as a side to your favorite protein! Feel free to dip these wraps in more sauce.
  10. These wraps are best consumed when they are freshly made. Refrigerate any leftovers in an airtight container.

Tips

For the best results, ensure your swiss chard leaves are fresh and dry. This will make them easier to work with and keep your wraps from becoming soggy. Be gentle when wrapping to avoid tearing the leaves, and feel free to secure them with toothpicks if needed.

Variations & Substitutions

If swiss chard isn’t available, you can substitute with large kale or cabbage leaves. For those who enjoy a bit more heat, consider adding sliced jalapeños or a sprinkle of chili flakes. The vinaigrette can also be swapped out for your favorite dressing if you prefer a different flavor profile.

Storage

These wraps are best enjoyed fresh, but if you have leftovers, store them in an airtight container in the refrigerator for up to two days. When ready to eat, let them sit at room temperature for a few minutes for the best texture.

FAQ

Can I prepare the ingredients ahead of time?

Yes, you can prepare the cauliflower rice and chop the vegetables ahead of time. Store them in separate containers in the fridge to keep everything fresh. Assemble the wraps just before serving for the best results.

What can I serve with these wraps?

These wraps pair beautifully with grilled chicken or tofu for added protein. A side of quinoa or a light soup would also complement the meal nicely.

Are these wraps suitable for meal prep?

While these wraps are best consumed fresh, you can prepare the components in advance and assemble them when you’re ready to eat. This will help maintain their texture and flavor.

Nutrition

Each wrap is packed with vitamins and minerals from the fresh vegetables, providing a healthy dose of fiber, antioxidants, and healthy fats, particularly from the avocado and olive oil. It’s a low-calorie meal that’s both satisfying and nourishing.

Conclusion

Swiss Chard Wraps are a delightful way to enjoy a fresh, nutritious meal that’s easy to prepare and full of flavor. I hope this recipe brings a touch of sunshine to your kitchen and inspires you to get creative with your wraps. Whether you’re reminiscing about gardening days gone by or creating new memories with your loved ones, these wraps are sure to become a favorite in your home. Enjoy every bite!

Related update: Swiss Chard Wraps

Related update: Cajun Potato Wedges

Chicken Suya | Made by Meaghan Moineau

Deliciously Spiced Chicken Suya: A Taste of West Africa

Intro

Chicken Suya is a delightful and spicy grilled chicken recipe originating from West Africa, particularly Nigeria. This dish holds a special place in my heart, as it reminds me of warm summer evenings in Lagos, where the aroma of sizzling suya from roadside vendors filled the air. As a child, my family and I would often take strolls through the bustling city streets, stopping to indulge in this delectable treat. The succulent, spicy flavor of Chicken Suya has been a cherished part of my culinary journey, and I’m thrilled to share this recipe with you.

Why You’ll Love It

There are countless reasons to fall in love with Chicken Suya. Here are just a few:

  • Bold Flavors: The suya spice blend is a powerhouse of taste, combining ground peanuts, ginger, garlic, and chili powder to create a savory and slightly spicy profile that is utterly irresistible.
  • Simple Ingredients: Despite its complex flavor, Chicken Suya requires only a handful of ingredients that you likely already have in your pantry.
  • Versatile Dish: This dish can serve as a main course, appetizer, or even a snack. It’s perfect for gatherings, barbecues, or a cozy night in.
  • Healthy and Satisfying: Grilling the chicken keeps it lean, while the spices provide a burst of nutrition and taste.

Ingredients

  • 2-3 tablespoons suya spice
  • 1 whole chicken, cut into parts
  • 1 teaspoon chili powder
  • 2 tablespoons groundnut oil (or any cooking oil)
  • 2 seasoning cubes
  • 1 onion, sliced
  • 2 tomatoes, sliced
  • Salt to taste

Instructions

  1. Preheat your oven to 500°F (260°C).
  2. Wash the chicken pieces thoroughly and pat them dry with a paper towel.
  3. In a large bowl, combine the suya spice, chili powder, seasoning cubes, and salt. Mix well.
  4. Add the chicken to the bowl, ensuring that each piece is generously coated with the spice mixture.
  5. Drizzle the groundnut oil over the seasoned chicken and give it a good mix to ensure even distribution.
  6. Arrange the chicken pieces on a baking sheet lined with aluminum foil.
  7. Place the baking sheet in the preheated oven and grill for 40 minutes. Be sure to check the chicken occasionally, flipping it to ensure it cooks evenly on both sides.
  8. Once the chicken is cooked through and has a beautiful char, remove it from the oven.
  9. Serve hot, garnished with sliced onions, tomatoes, and an extra sprinkle of suya spice for added flavor.

Tips

  • For an authentic taste, try using a grill instead of an oven. The smoky flavor from the charcoal enhances the suya’s taste.
  • If you prefer a milder heat, adjust the amount of chili powder to suit your taste.
  • Rest the chicken for a few minutes after grilling to allow the juices to redistribute, ensuring a moist and flavorful bite.

Variations & Substitutions

If you’re looking to shake things up, consider these variations:

  • Protein Swap: While chicken is traditional, you can use beef, goat meat, or even tofu for a vegetarian option.
  • Nut-Free: If you have a peanut allergy, substitute the suya spice with a nut-free spice blend.
  • Additional Veggies: Add bell peppers or mushrooms to the grill for an extra layer of flavor and texture.

Storage

Leftover Chicken Suya can be stored in an airtight container in the refrigerator for up to 3 days. To reheat, place the chicken in a preheated oven at 350°F (175°C) for about 10 minutes or until warmed through. You can also freeze the cooked chicken for up to 2 months. Thaw overnight in the refrigerator before reheating.

FAQ

Can I prepare the suya spice blend at home?

Absolutely! To make your own suya spice blend, you can combine roasted peanuts, ground ginger, garlic powder, onion powder, paprika, and chili powder. Blend them together until you reach a fine consistency. Store in an airtight jar for future use.

How can I make my Chicken Suya extra crispy?

For an extra crispy texture, finish the grilled chicken under the broiler for a few minutes. Keep a close eye on it to prevent burning, and you’ll achieve a delightful crunch.

Nutrition

Chicken Suya is a nutritious option rich in protein and flavor. While exact nutritional values depend on portion sizes, a typical serving provides:

  • Calories: Approximately 250-300 per serving
  • Protein: 25-30g
  • Fat: 15-20g
  • Carbohydrates: 5-10g

It’s a great choice for those looking to maintain a balanced diet without sacrificing taste.

Conclusion

Chicken Suya is more than just a meal; it’s a culinary experience that transports you to the vibrant streets of West Africa. With its bold flavors and tantalizing aroma, it’s sure to become a favorite in your household. Whether you’re hosting a gathering or enjoying a quiet dinner at home, this dish promises to deliver satisfaction with every bite. I hope you enjoy making and eating this Chicken Suya as much as I do. Bon appétit!

Related update: Chicken Suya

Related update: Rotisserie Chicken and Bean Tostadas

Guacamole | Made by Meaghan Moineau

The Best Homemade Guacamole

Intro

There’s nothing quite like the taste of fresh guacamole. I remember the first time I tried it at a family gathering when I was a child. The creamy texture combined with a hint of spice and citrusy notes was unlike anything I’d tasted before. My uncle, who had just returned from a trip to Mexico, made a batch for us, and since then, guacamole has been a staple at all our family gatherings. Today, I’ll share with you my take on this classic recipe, inspired by that nostalgic experience.

Why You’ll Love It

This guacamole recipe is perfect for any occasion. Whether you’re hosting a party, enjoying a quiet night in, or looking for a healthy snack, this guacamole will be your go-to. The creamy texture of the avocados paired with the freshness of herbs like cilantro, basil, and oregano creates a perfect balance of flavors. Plus, it’s quick and easy to make!

Ingredients

  • 3 ripe Haas avocados
  • 1/4 cup finely chopped onion
  • 1 jalapeño pepper, seeded and minced
  • 2 tablespoons fresh cilantro, chopped
  • 1/2 teaspoon salt
  • 1/4 teaspoon black pepper
  • 2 tablespoons fresh lime juice
  • 1 tablespoon fresh basil, chopped
  • 1 tablespoon fresh oregano, chopped

Instructions

  1. Cut the avocados in half lengthwise. Remove the pit by driving a chef’s knife into it and twisting gently to loosen.
  2. Scoop the avocado flesh out of the skin and into a mixing bowl.
  3. Using a fork, mash the avocado to your desired consistency.
  4. Add the chopped onion, jalapeño, cilantro, basil, and oregano to the mashed avocado.
  5. Mix until all the ingredients are well incorporated.
  6. Season the guacamole with salt, black pepper, and lime juice to taste.
  7. Serve immediately or chill for a more pronounced flavor.
  8. If not serving immediately, store in the refrigerator with plastic film wrap pressed onto the surface of the guacamole to prevent browning.

Tips

When choosing avocados, look for ones that are slightly soft to the touch but not mushy. A ripe avocado will yield gently to pressure. To prevent the guacamole from turning brown, ensure the plastic wrap is touching the entire surface of the guacamole. This minimizes air contact, which causes oxidation.

Variations & Substitutions

Feel free to customize your guacamole. For a spicier kick, leave the seeds in the jalapeño or add a dash of cayenne pepper. If you’re not a fan of cilantro, you can omit it or replace it with parsley. For a twist, try adding diced tomatoes or roasted corn for extra texture and flavor.

Storage

Store leftover guacamole in an airtight container in the refrigerator. Press a piece of plastic wrap directly onto the surface before sealing to keep it fresh for up to two days. Remember, the sooner you enjoy it, the better it tastes!

FAQ

Can I make guacamole in advance?

Yes, you can prepare guacamole a few hours in advance. Just make sure to store it with plastic wrap pressed against the surface to prevent browning. The lime juice also helps preserve its vibrant color.

What can I serve with guacamole?

Guacamole is incredibly versatile. Serve it with tortilla chips, as a topping for tacos, or alongside grilled chicken or fish. It’s also a great addition to sandwiches and burgers for an extra burst of flavor.

Nutrition

Avocados are packed with healthy fats, fiber, and essential nutrients. This guacamole recipe is not only delicious but also offers a good source of vitamins C, E, K, and B-6, as well as potassium and folate. Enjoy it as a healthy snack or as part of a balanced meal.

Conclusion

Whether you’re a long-time fan of guacamole or trying it for the first time, this recipe is sure to become a favorite. Its simplicity and freshness make it a standout dish that’s perfect for any occasion. So gather your ingredients and enjoy a taste of this classic, nostalgic treat. Remember, the best dishes are those shared with family and friends. Happy guacamole making!

Related update: Guacamole

Broccolini Quinoa Pilaf | Made by Meaghan Moineau

Broccolini Quinoa Pilaf

Intro

There’s something incredibly comforting about dishes that marry simplicity with wholesome flavors. Growing up, my grandmother’s kitchen was a haven of delightful aromas and hearty meals. One of my all-time favorites was her pilaf, a dish that brought the family together around the dining table. Inspired by those cherished memories, I’ve crafted a modern twist on a classic with this Broccolini Quinoa Pilaf. It’s a recipe that not only pays homage to my grandmother’s culinary legacy but also brings a fresh, nutritious element to the table.

Why You’ll Love It

This Broccolini Quinoa Pilaf is a delightful fusion of textures and flavors. You’ll love how the nutty quinoa pairs with the tender-crisp broccolini, creating a satisfying bite with every forkful. The addition of garlic and onions offers a savory depth, while the walnuts add a pleasant crunch. It’s a dish that’s not only nutritious but also visually appealing, perfect for a weeknight dinner or a special gathering.

Ingredients

  • 1 bunch broccolini, trimmed
  • 1 garlic clove, minced
  • 2 tablespoons olive oil
  • 1 medium onion, diced
  • 1 cup quinoa, rinsed
  • 2 cups vegetable broth
  • 1/2 cup walnuts, roughly chopped
  • Salt and pepper, to taste

Instructions

  1. In a large pan with a lid, heat olive oil over medium-high heat.
  2. Add onions and cook for 1 minute.
  3. Add garlic and cook until onions are translucent and garlic is fragrant.
  4. Add quinoa to the pan, stir to combine.
  5. Slowly add in the broth and bring to a boil.
  6. Cover and reduce heat to low, cook for 15 minutes.
  7. In the last 2-3 minutes of cooking, add in broccolini on top of the quinoa (do not stir) and cover.
  8. Uncover and toss broccolini and quinoa together.
  9. Season to taste with salt and pepper. Add walnuts and serve hot.

Tips

For the best results, ensure that you rinse the quinoa well before cooking to remove any bitterness. Also, make sure to monitor the broccolini and add it in the last few minutes to maintain its vibrant color and crispness. If you like a bit of heat, consider adding a pinch of red pepper flakes along with the garlic.

Variations & Substitutions

This recipe is incredibly versatile. You can substitute broccolini with regular broccoli or even asparagus based on what’s available. If you’re looking for a protein boost, consider adding chickpeas or grilled chicken. For a nut-free version, you can replace walnuts with pumpkin seeds or omit them altogether.

Storage

Store any leftovers in an airtight container in the refrigerator for up to 3 days. This pilaf reheats well, making it a great option for meal prep. Simply warm it up on the stove or in the microwave, adding a splash of broth or water to bring back its moisture.

FAQ

Can I use frozen broccolini?

Yes, you can use frozen broccolini if fresh is not available. Just be sure to thaw and drain it well before adding it to the pilaf to avoid excess moisture.

Is this dish suitable for a gluten-free diet?

Absolutely! Quinoa is naturally gluten-free, making this pilaf a perfect option for those following a gluten-free diet.

What can I serve with Broccolini Quinoa Pilaf?

This pilaf pairs wonderfully with grilled proteins like chicken, fish, or tofu. You can also serve it alongside a fresh salad for a complete and balanced meal.

Nutrition

This Broccolini Quinoa Pilaf is a nutritious dish that offers a good balance of macronutrients. It’s high in protein and fiber thanks to the quinoa and broccolini, while the walnuts provide healthy fats. It’s a great option for those looking to enjoy a wholesome and satisfying meal.

Conclusion

Broccolini Quinoa Pilaf is more than just a meal; it’s a connection to memories of family gatherings and love shared over a table. It’s a dish that brings warmth, nourishment, and a touch of nostalgia with every bite. Whether you’re making it for a busy weeknight or a leisurely weekend dinner, this recipe is sure to become a beloved staple in your culinary repertoire. Enjoy!

Related update: Broccolini Quinoa Pilaf

Related update: Fall Fruit Compote

Related update: Skillet Chili Mac

Amaranth and Roast Veggie Salad | Made by Meaghan Moineau

Amaranth and Roast Veggie Salad

Intro

There’s something magical about family gatherings, where the kitchen becomes a hub of activity, and the aroma of delicious dishes wafts through the air. I vividly remember one summer evening when my grandmother introduced us to a unique and delightful salad that quickly became a family favorite. Her secret? A generous helping of amaranth paired with roasted vegetables. Today, I’m excited to share this heartfelt recipe with you: Amaranth and Roast Veggie Salad. It’s a dish that not only fills the belly but also warms the soul, much like those cherished family moments.

Why You’ll Love It

This Amaranth and Roast Veggie Salad is a perfect blend of textures and flavors. The nutty amaranth pairs beautifully with the sweetness of roasted vegetables and the fresh peppery bite of rocket leaves. This salad is not only delicious but also packed with nutrients, making it an ideal choice for a healthy meal. Whether you’re looking for a satisfying lunch, a vibrant side dish, or a contribution to a potluck, this salad fits the bill. Plus, it’s vegan and gluten-free, catering to a wide range of dietary preferences.

Ingredients

  • 1 cup amaranth
  • 2 tablespoons basil-infused olive oil
  • 1 bell pepper
  • 1 cup diced pumpkin
  • 1 red onion
  • Handful of rocket leaves
  • 1 teaspoon herbal salt
  • 1 punnet baby tomatoes

Instructions

  1. Cook the amaranth with about a cup of water in a saucepan. Bring it to a boil, then reduce the heat and simmer until the water is absorbed and the amaranth reaches a sticky consistency. This usually takes about 15-20 minutes.
  2. Preheat your oven to 200°C (392°F).
  3. Roughly cut the onion into chunks.
  4. Place the diced pumpkin and onion chunks onto a tinfoil-lined baking tray.
  5. Drizzle the basil-infused olive oil over the vegetables and sprinkle them with herbal salt and a pinch of pepper.
  6. Roast the vegetables in the oven for about 30 minutes, or until the edges of the pumpkin become crispy. Stir occasionally to ensure even roasting.
  7. About 5 minutes before the veggies are done, add the baby tomatoes to the tray, allowing them to roast until just blistered.
  8. Once the veggies are roasted, remove them from the oven and combine them with the cooked amaranth in a large bowl.
  9. Gently tear a few rocket leaves and add them to the bowl.
  10. Toss everything together until well mixed. Serve the salad warm and enjoy!

Tips

To make the most of this recipe, consider these helpful tips:

  • Make sure to rinse the amaranth thoroughly before cooking to remove any bitterness.
  • If you prefer a little more crunch, add some toasted nuts or seeds like sunflower or pumpkin seeds.
  • For an extra burst of flavor, try adding a splash of balsamic vinegar or a squeeze of lemon juice just before serving.

Variations & Substitutions

This recipe is versatile and can be adapted to suit your taste preferences or the ingredients you have on hand.

  • Grains: If you don’t have amaranth, quinoa or couscous can be great substitutes.
  • Vegetables: Feel free to add other vegetables like zucchini or sweet potatoes for variety.
  • Herbs: If basil-infused olive oil isn’t available, use regular olive oil with a handful of fresh basil leaves instead.

Storage

This salad is best enjoyed fresh, but it can be stored in an airtight container in the refrigerator for up to 3 days. If you plan to store it, wait to add the rocket leaves until just before serving to keep them from wilting.

FAQ

Can I make this salad ahead of time?

Yes, you can prepare the components of the salad ahead of time. Cook the amaranth and roast the vegetables a day in advance, then store them separately in the fridge. Assemble the salad with fresh rocket leaves just before serving.

Is amaranth gluten-free?

Yes, amaranth is naturally gluten-free, which makes it a fantastic choice for those following a gluten-free diet. It’s also rich in protein and fiber, adding nutritional value to the salad.

Can I use canned tomatoes instead of fresh?

While fresh baby tomatoes are recommended for their vibrant flavor and texture, you can use canned diced tomatoes in a pinch. Drain them well and add them to the salad at the end.

Nutrition

This Amaranth and Roast Veggie Salad is a nutritious meal option. It’s high in protein and fiber from amaranth, packed with vitamins from the vegetables, and offers healthy fats from the olive oil. Each serving provides essential nutrients that support overall health and wellness.

Conclusion

There you have it, a warm and hearty Amaranth and Roast Veggie Salad that’s sure to impress your taste buds and nourish your body. This recipe combines the simplicity of wholesome ingredients with the vibrant flavors of roasted vegetables, making it a delightful addition to any meal. Whether you’re reminiscing about family gatherings or creating new memories, this salad is a perfect companion. Enjoy it with loved ones, and don’t forget to share your own twists and variations in the comments below!

Related update: Amaranth and Roast Veggie Salad

Related update: Chicken Parmesan Patty- Eat As A Burger OR On Pasta

Related update: Pear Salad With Walnuts and Blue Cheese

Roasted Red Pepper & Tomato Salsa | Made by Meaghan Moineau

Roasted Red Pepper & Tomato Salsa

Intro

There’s something truly special about making salsa from scratch, especially when it’s a vibrant, flavor-packed Roasted Red Pepper & Tomato Salsa. This recipe takes me back to sunny afternoons at my grandmother’s house, where she would whip up her legendary salsa for our family gatherings. I remember the smell of roasting peppers wafting through the kitchen and the laughter of my cousins as we devoured bowls of the salsa with crispy corn chips. Today, I’m excited to share this cherished recipe with you, bringing a taste of my family’s tradition into your home.

Why You’ll Love It

This Roasted Red Pepper & Tomato Salsa is a game-changer for your appetizer spread. It’s not just about the bold flavors of roasted peppers and tomatoes, but also the delightful hint of smokiness and the fresh kick from cilantro and lime juice. This salsa is perfect for any occasion, whether you’re hosting a summer barbecue, enjoying a cozy night in, or just want to elevate your snack game. Plus, it’s naturally vegan and gluten-free, making it a crowd-pleaser for all your guests.

Ingredients

  • Fresh cilantro
  • Cumin
  • Garlic
  • Jalapeno pepper
  • Lime (juice)
  • Olive oil
  • Onion
  • Red bell pepper
  • Smoked salt (I used sea salt)
  • Tomatoes

Instructions

  1. Preheat your oven to broil.
  2. Cut the tomatoes in half and the onions in quarters. Arrange them on a tin-foil lined baking sheet.
  3. Add the red bell pepper, whole garlic cloves (with skin), and jalapeno pepper to the baking sheet.
  4. Drizzle the vegetables with a bit of olive oil and sprinkle with salt.
  5. Broil for 10 minutes, or until the skin on the tomatoes and peppers begins to char.
  6. Allow the vegetables to cool for 5 minutes.
  7. Remove the skins from the tomatoes, pepper, and garlic.
  8. Place all the vegetables (except for the cilantro and lime) into a food processor.
  9. Pulse 2-4 times, ensuring the salsa remains a bit chunky.
  10. Transfer the mixture to a bowl and toss with fresh cilantro and lime juice.
  11. Add cumin and salt to taste.
  12. Serve with corn chips or toasted pita chips.

Tips

To make the most of this salsa, choose ripe tomatoes and a vibrant red bell pepper. The quality of your produce will significantly impact the flavor. If you prefer a milder salsa, remove the seeds from the jalapeno pepper before roasting. When broiling, keep an eye on your vegetables to avoid burning; a slight char is all you need for that smoky flavor.

Variations & Substitutions

This recipe is incredibly versatile. If you want to add a bit more heat, consider adding a serrano pepper or two. For a sweeter twist, try incorporating roasted corn kernels or diced mango. If cilantro isn’t to your taste, fresh parsley can be a great substitute, bringing a different but equally fresh flavor to the salsa.

Storage

Store any leftover salsa in an airtight container in the refrigerator for up to 5 days. The flavors will meld and deepen over time, making it even more delicious the next day. Just give it a good stir before serving.

FAQ

Can I freeze this salsa?

Yes, you can freeze this salsa! Place the salsa in a freezer-safe container, leaving some room for expansion, and freeze for up to 3 months. Thaw overnight in the refrigerator before serving. Keep in mind that the texture may change slightly after freezing, but the flavor will remain delightful.

Can I make this salsa ahead of time?

Absolutely! This salsa can be made a day or two in advance. Store it in the refrigerator, and the flavors will continue to develop, making it even more flavorful when you’re ready to serve.

What can I serve with this salsa besides chips?

This salsa is incredibly versatile and pairs well with many dishes. Try it as a topping for grilled chicken or fish, mix it into a taco filling, or use it as a flavorful addition to scrambled eggs or an omelet. The possibilities are endless!

Nutrition

This salsa is not only delicious but also a healthy option. Packed with vitamins from the fresh vegetables, it’s low in calories and fat. The olive oil adds a touch of healthy fats, and the spices provide additional health benefits, making this salsa a guilt-free indulgence.

Conclusion

Roasted Red Pepper & Tomato Salsa is a delightful addition to any meal or gathering, bringing a burst of flavor and a touch of nostalgia to your table. Whether you’re a salsa aficionado or trying your hand at making salsa from scratch for the first time, this recipe is sure to please. Gather your ingredients, fire up your broiler, and enjoy the process of creating this vibrant, flavorful salsa that will have everyone coming back for more. Enjoy!

Related update: Roasted Red Pepper & Tomato Salsa