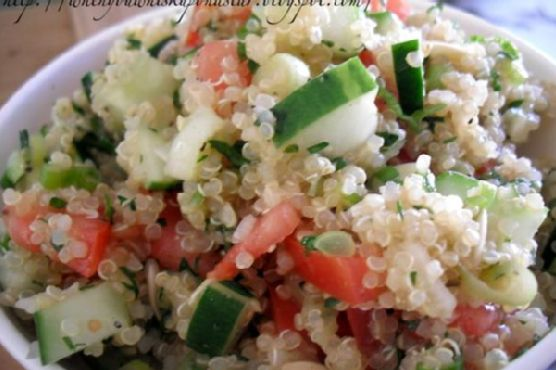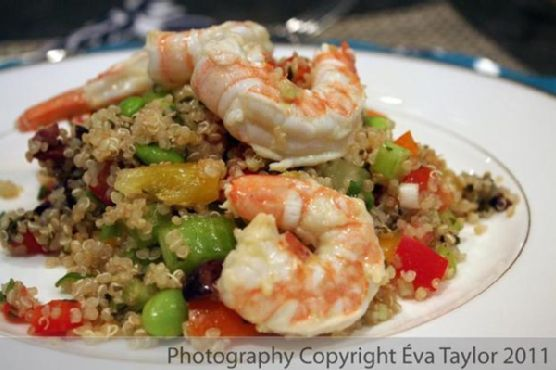
Quinoa Tabouli with Lemon Garlic Grilled Shrimp
Intro
There’s something truly magical about a dish that not only tastes delicious but also evokes cherished memories. For me, Quinoa Tabouli with Lemon Garlic Grilled Shrimp is a dish that brings back the warm, sun-soaked afternoons spent at my grandmother’s garden. As kids, my cousins and I would run around, our hands sticky from picking ripe tomatoes and fresh herbs. The aroma of lemon and garlic wafting from the outdoor grill would signal that it was time to gather around the table. Today, I am thrilled to share this delightful recipe with you, hoping it brings as much joy to your table as it has to mine.
Why You’ll Love It
This Quinoa Tabouli with Lemon Garlic Grilled Shrimp is a vibrant, fresh, and nourishing dish that works perfectly as a light lunch or a satisfying dinner. It’s packed with colorful vegetables, fragrant herbs, and succulent shrimp, making every bite an explosion of flavor. Not only is it delicious, but it’s also a healthy option that’s gluten-free and full of protein. Whether you’re preparing it for a family meal or a gathering with friends, this dish is sure to impress with its visual appeal and mouth-watering taste.
Ingredients
- 1 cup quinoa
- 2 cups water
- 1/2 teaspoon sea salt
- 2 celery stalks, diced
- 1 each of yellow, red, and orange peppers, diced
- 4 green onions, sliced
- 1/2 cup sun-dried olives, chopped
- 1 vine-ripened tomato, diced
- 1 cup frozen corn, thawed
- 1 bunch fresh parsley, finely chopped
- 1/4 cup mint leaves, finely chopped
- 3 cloves garlic, minced
- 1/4 cup lemon juice
- 1/2 teaspoon sea salt (for dressing)
- Grilled shrimp, seasoned to taste
Instructions
- Add 1/2 teaspoon of sea salt to the water and bring it to a boil.
- Toast the quinoa in a dry pan for a couple of minutes, moving it around so it doesn’t burn. Once you hear it pop, count to 5 and remove it immediately.
- Add the quinoa to the boiling water and cook for 12 minutes on a soft boil, or until all the water is absorbed.
- While the quinoa is cooking, combine the minced garlic with the lemon juice and allow it to sit.
- Remove the quinoa from the heat and add the lemon juice and garlic mixture. Mix well and let it absorb and cool.
- Chop all the vegetables into similar-sized pieces, about 1/4 inch dice.
- Finely chop the parsley and mint.
- Once the quinoa has cooled, combine it with the chopped vegetables, herbs, and sun-dried olives. Mix everything together well.
- Serve the quinoa tabouli topped with the grilled shrimp.
Tips
Toasting the quinoa before boiling enhances its nutty flavor, so don’t skip this step! Make sure to chop the vegetables into similar-sized pieces for a uniform texture. Allowing the garlic to marinate in lemon juice softens its raw edge, blending seamlessly into the dish.
Variations & Substitutions
If you prefer a vegetarian version, simply omit the shrimp or replace it with grilled halloumi or tofu for a similar protein boost. For an extra burst of flavor, try adding a sprinkle of toasted pine nuts or a handful of pomegranate seeds. If you don’t have sun-dried olives, regular black olives will also work well in this recipe.
Storage
Store any leftovers in an airtight container in the refrigerator for up to three days. The flavors will continue to meld, making the dish even more delicious the next day. If you’re planning to store it longer than a day, consider keeping the shrimp separate to maintain its optimal texture when reheated.
FAQ
Can I make this dish ahead of time?
Absolutely! In fact, making it a few hours ahead allows the flavors to develop even more. Just keep the shrimp separate until you’re ready to serve.
What can I serve with Quinoa Tabouli?
This dish is quite versatile and pairs well with a variety of sides. Try serving it alongside a fresh green salad, some warm pita bread, or a dollop of hummus for a complete meal.
Is this recipe gluten-free?
Yes, quinoa is naturally gluten-free, making this dish a great option for those with gluten sensitivities or allergies.
Nutrition
This recipe is not only delicious but also nutritious. It’s high in protein from both the quinoa and shrimp, packed with fiber from the vegetables, and rich in vitamins and minerals. It’s a healthy choice for anyone looking to enjoy a balanced, satisfying meal.
Conclusion
Quinoa Tabouli with Lemon Garlic Grilled Shrimp is a dish that brings together vibrant flavors and wholesome ingredients to create a meal that’s both nourishing and delightful. Whether you’re enjoying it on a cozy weeknight or sharing it at a festive gathering, it’s sure to be a hit. I hope this recipe becomes a cherished part of your culinary repertoire, bringing a bit of sunshine and warmth to your dining table.
Related update: Quinoa Tabouli with Lemon Garlic Grilled Shrimp
Related update: Mushroom Crepes with Vegetarian Sauce