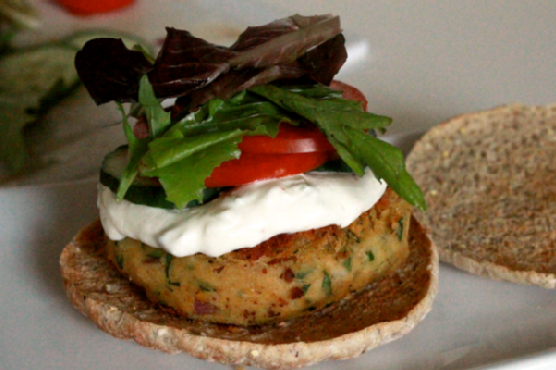
Falafel Burger | Made by Meaghan Moineau
Title: "Savory Nostalgia: Crafting the Perfect Falafel Burger"Description: Dive into the flavors of the Mediterranean with this Falafel Burger recipe, a delightful fusion of tradition and innovation. With simple ingredients and straightforward instructions, this dish promises to be a crowd-pleaser at any gathering. Join us as we share not only the recipe but also a cherished family memory that makes this dish truly special.
---
Falafel Burger: A Taste of Tradition and Innovation
As the aroma of sizzling chickpea patties fills the kitchen, I am instantly transported back to a warm summer evening at my grandmother's house. Our family would gather in her garden, the air rich with laughter and the scent of blooming jasmine. It was on one such evening that I first experienced the magic of falafel, a dish that would become a cherished part of our family traditions.
Fast forward a few years, and I found myself yearning to recreate that memory in a modern twist with the Falafel Burger. A perfect blend of tradition and contemporary flavors, this dish is an homage to those unforgettable summer nights.
Ingredients
- 1 can of chickpeas, drained and patted dry
- 2 tablespoons tahini
- 1 tablespoon sriracha sauce
- 2 cloves garlic
- A handful of fresh parsley
- 1/2 red onion, diced
- Peanut oil, for frying
- 1 cucumber, sliced
- 1 tomato, sliced
- Hamburger buns
- Tzatziki sauce
Instructions
1. Prepare the Chickpeas: Begin by patting the chickpeas dry with a paper towel. This step is crucial for achieving the perfect texture in your patties.
2. Puree the Base: Place the chickpeas and garlic into a food processor. Puree until smooth, ensuring no chunks remain for a consistent patty.
3. Incorporate the Flavors: Using your clean hands, mix in the tahini, sriracha, fresh parsley, and diced red onion into the chickpea mixture. The combination of these ingredients brings a balance of spice, freshness, and creamy texture.
4. Shape the Patties: Form the mixture into four equal patties. Set aside while you prepare your skillet.
5. Cook to Perfection: Heat peanut oil in a large skillet over medium heat. Once the oil begins to shimmer, carefully add the patties. Cook for three minutes on each side, or until they achieve a golden-brown crust.
6. Assemble the Burger: Remove the patties from the skillet and place each one in a hamburger bun. Top with two slices of tomato, two slices of cucumber, and a generous dollop of tzatziki sauce.
7. Serve Immediately: For the best texture and flavor, serve the burgers immediately while they’re hot and crisp.
A Family Memory
Every bite of this Falafel Burger takes me back to my grandmother's garden, where the simple joy of sharing food brought our family closer. The recipe has evolved, yet the essence remains the same—a celebration of flavor and family.
Difficulty: 4/10
Classification: Main Dish
This Falafel Burger is more than just a meal; it's a connection to the past and a promise of new memories to come. Whether you’re an experienced cook or a beginner, this recipe is both accessible and rewarding. Enjoy crafting these flavorful patties and perhaps, like me, you'll find yourself cherishing the memories they create.
---
Ready to bring a slice of Mediterranean tradition to your table? Try this Falafel Burger recipe today and let it become part of your family's culinary story.