Asian Shrimp Stir-Fry | Made by Meaghan Moineau

Asian Shrimp Stir-Fry | Made by Meaghan Moineau

Sizzling Asian Shrimp Stir-Fry: A Family Favorite with a Nostalgic Twist


Description

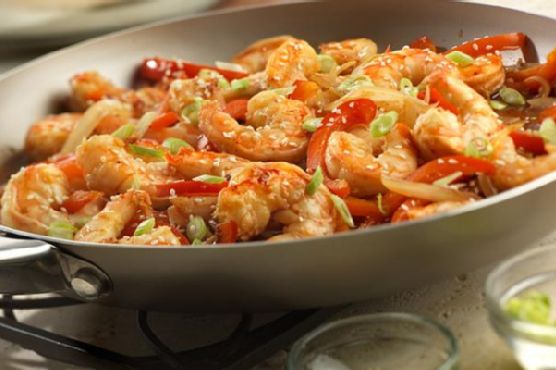
Dive into the vibrant flavors of Asia with our Asian Shrimp Stir-Fry. This quick and easy dish combines succulent shrimp with colorful vegetables, all wrapped in a savory sauce that bursts with umami. Perfect for busy weeknights, this stir-fry is not only a feast for the taste buds but also a walk down memory lane. Rated 4 out of 10 in difficulty, it's an ideal main dish that will have your family asking for seconds.

A Trip Down Memory Lane

Growing up, Sunday dinners at my grandmother's house were a cherished tradition. The aroma of sizzling garlic and ginger wafting through the air was our signal to gather around the kitchen, eagerly anticipating the culinary magic that was about to unfold. My grandmother, with her well-worn apron and twinkling eyes, would expertly toss shrimp and vibrant vegetables in her trusty skillet, weaving love and laughter into every dish she made.

Her Asian Shrimp Stir-Fry was always the star of the meal. The sound of the shrimp hitting the hot pan was like music, a rhythmic reminder of the warmth and comfort of family gatherings. As we sat around the table, sharing stories and savoring each bite, the stir-fry became more than just a dish; it was a vessel of connection, binding generations together with its rich flavors and cherished memories.


Ingredients


- 2 tablespoons canola oil


- 1 pound shrimp, peeled and deveined


- 1 red bell pepper, thinly sliced


- 1 yellow onion, thinly sliced


- 3 cloves garlic, minced


- 1 tablespoon fresh ginger root, grated


- 1/2 teaspoon crushed red pepper


- 1/4 cup flavor concentrated seafood broth


- 2 tablespoons soy sauce


- 1 teaspoon sugar


- 1 tablespoon water


- 1 teaspoon sesame oil


- 1 tablespoon sesame seeds


- 2 green onions, sliced


Instructions


1. Prepare the Skillet:

Heat the canola oil in a 12-inch skillet over medium-high heat. Once the oil is hot, add the shrimp and stir-fry for 3 minutes, or until they are cooked through and pink. Remove the shrimp from the skillet and set aside.


2. Sauté the Vegetables:

Add the red bell pepper and yellow onion to the same skillet. Stir-fry for 2 minutes, or until the vegetables are tender-crisp yet vibrant.


3. Infuse with Flavor:

Add the minced garlic, grated ginger root, and crushed red pepper to the skillet. Stir-fry for 30 seconds, allowing the fragrant aromas to permeate the kitchen.


4. Combine and Simmer:

Return the shrimp to the skillet. Stir in the concentrated seafood broth, soy sauce, sugar, and water. Cook for 1 minute, ensuring the mixture is hot and well-incorporated.


5. Finish with Flair:

Remove the skillet from the heat and stir in the sesame oil for a nutty finish. Sprinkle the shrimp mixture with sesame seeds and sliced green onions for garnish.


A Dish to Remember

This Asian Shrimp Stir-Fry is more than just a meal; it's a cherished family memory, reimagined. With its bright colors and rich flavors, it captures the essence of those Sunday dinners, inviting you to create your own memories around the table. Whether you're cooking for family or friends, this dish promises to bring joy, warmth, and a touch of nostalgia to your dining experience.

Difficulty: 4/10

Classification: Main Dish


So why not gather your loved ones, roll up your sleeves, and recreate this beloved family favorite? After all, the best meals are those shared with the ones you cherish most.

Read more about Appetizers

Read more about Main Dishes

Read more about Desserts

The Secret to Easy Skillet Filet Mignon Steak Tacos | Made by Meaghan Moineau

The Secret to Easy Skillet Filet Mignon Steak Tacos | Made by Meaghan Moineau

Title: Unveiling the Secret to Easy Skillet Filet Mignon Steak Tacos: A Culinary Masterpiece
Description: Dive into the exquisite world of gourmet tacos with our Easy Skillet Filet Mignon Steak Tacos recipe. Perfectly seasoned and cooked filet mignon pairs beautifully with creamy guacamole, tangy sour cream, and sharp cheddar cheese, all nestled in warm white corn tortillas. This dish is not just a meal; it's an experience that will transport you back to cherished family gatherings. Easy to prepare yet sophisticated in flavor, these tacos are the perfect main dish for any occasion.

---


Who doesn't love tacos? They are versatile, flavorful, and bring people together in a way that few other foods can. But when you elevate the humble taco with luxury ingredients like filet mignon, you create something truly special. This recipe for Easy Skillet Filet Mignon Steak Tacos not only satisfies your cravings but also evokes heartwarming memories of family gatherings.


A Nostalgic Trip Down Memory Lane

Growing up, Sunday dinners were a sacred ritual in my family. My grandmother would spend the entire afternoon preparing a feast that would bring us all together. One of her most beloved dishes was her special steak tacos. I can still remember the aroma of sizzling steak filling the kitchen, mingling with the warmth of laughter and stories shared around the dinner table.


My grandmother had a knack for turning a simple meal into a grand celebration. Her tacos, much like these Easy Skillet Filet Mignon Steak Tacos, were more than just food; they were a symbol of love and togetherness. Every bite was a reminder of those cherished moments spent with family, making memories that would last a lifetime.


Ingredients:

- 2 filet mignon steaks


- Olive oil extra virgin


- Cracked black pepper


- White corn tortillas


- Guacamole


- Sour cream


- Shredded cheddar cheese


Instructions:
1. Prepare the Skillet: Heat a skillet over medium to low heat. This gentle heat ensures the steaks cook evenly without losing their tenderness.
2. Season the Steaks: Rub the filet mignon steaks with extra virgin olive oil and season generously with cracked black pepper. This simple seasoning allows the natural flavors of the steak to shine.
3. Cook the Steaks: Place the steaks in the heated skillet. For medium doneness, cook each side for about 7 minutes, adjusting as necessary for your preferred level of doneness. The key is to cook them slowly to maintain their juicy tenderness.
4. Slice the Steaks: Once cooked to perfection, remove the steaks from the heat and let them rest for a few minutes. Then, slice them thinly and lengthwise for easy taco assembly.
5. Warm the Tortillas: In a clean skillet over medium heat, warm the white corn tortillas until they're soft and pliable.
6. Assemble the Tacos: Generously top each tortilla with slices of steak. Add dollops of guacamole and sour cream, then sprinkle with shredded cheddar cheese for that perfect cheesy finish.
A Delicious Main Dish

These Easy Skillet Filet Mignon Steak Tacos are more than just a meal; they're an invitation to gather around the table, share stories, and create new memories. Rated at a difficulty level of 4 out of 10, this dish is accessible to both seasoned cooks and kitchen novices alike. Perfect as a main dish, it's sure to impress your family and friends with its gourmet appeal and nostalgic charm.


As you savor each bite, may you be reminded of the simple joys of life and the power of food to bring us together. Enjoy!

Read more about Appetizers

Read more about Main Dishes

Read more about Desserts

Pear and Walnut Coffee Cake | Made by Meaghan Moineau

Pear and Walnut Coffee Cake | Made by Meaghan Moineau

Title: "A Slice of Comfort: Pear and Walnut Coffee Cake Recipe"
Description:

Discover the heartwarming flavors of our Pear and Walnut Coffee Cake. This delightful dessert combines the sweet juiciness of pears with the nutty crunch of walnuts, all wrapped in a spiced crumble topping. Perfect for family gatherings, this cake is sure to evoke nostalgic memories and create new ones. Follow our step-by-step guide to baking a cake that will fill your home with warmth and joy.


---


A Slice of Comfort: Pear and Walnut Coffee Cake Recipe


There's something magical about the aroma of freshly baked cake wafting through the house—a scent that carries you back to simpler times. For my family, the Pear and Walnut Coffee Cake has always been more than just a dessert. It's a cherished tradition, a symbol of togetherness, and a reminder of delightful afternoons spent in my grandmother's cozy kitchen.


Ingredients:


- Topping:

- ½ cup brown sugar


- ½ cup all-purpose flour


- 1 tablespoon wheat germ


- ½ cup walnuts, finely chopped


- ½ teaspoon ground cinnamon


- ¼ teaspoon ground ginger


- ¼ teaspoon ground cardamom


- ¼ teaspoon ground allspice


- ¼ cup diced unsalted butter


- Cake:

- 1 cup diced pears, tossed with juice of 1 lemon


- 1 cup unsalted butter, softened


- 1 cup brown sugar


- 2 teaspoons lemon zest


- 2 large eggs


- 1 teaspoon vanilla extract


- 2 cups all-purpose flour


- 1 teaspoon baking powder


- ½ teaspoon baking soda


- ½ teaspoon kosher salt


- 1 cup sour cream


Instructions:


1. Prepare the Topping:

- In a food processor, combine the brown sugar, flour, wheat germ, walnuts, cinnamon, ginger, cardamom, allspice, and butter. Pulse until the mixture becomes crumbly. Cover and refrigerate to keep cold.


2. Prepare the Pan:

- Grease a 10-inch springform pan with butter. Lightly dust with flour, tapping out any excess. Set aside.


3. Cake Batter:

- Using an electric mixer, beat the butter, brown sugar, and lemon zest until light and fluffy, about 3-5 minutes.


- Add the eggs, one at a time, mixing well after each addition. Stir in the vanilla extract.


4. Combine Dry Ingredients:

- In a separate bowl, whisk together the flour, baking powder, baking soda, and salt.


5. Mix the Batter:

- Alternately add the dry ingredients and sour cream to the butter-sugar mixture, beginning and ending with the dry ingredients. Mix until just combined.


6. Assemble the Cake:

- Pour the batter into the prepared pan. Arrange the lemon-tossed pears on top of the batter. Sprinkle the cold crumble topping evenly over the pears.


7. Bake:

- Preheat your oven to 350°F (175°C). Bake the cake for 40-50 minutes, or until a tester inserted into the center comes out clean.


8. Cool and Serve:

- Remove from the oven and allow the cake to cool in the pan for at least 20-25 minutes before serving. Enjoy a warm slice with your favorite cup of coffee or tea.


A Nostalgic Family Memory


As a child, the kitchen was the heart of my grandmother's home. Every autumn, we'd gather around her kitchen table, eager to help prepare the Pear and Walnut Coffee Cake. I can still see her gentle hands guiding mine as we arranged the sliced pears on the batter, her stories of past family gatherings weaving a tapestry of love and laughter. That cake was always the centerpiece of our holiday table, its aromatic spices and tender crumb bringing smiles and warmth to our family, year after year.


Rating and Classification


- Difficulty: 6/10
- Classification: Dessert

Baking this cake is a delightful experience, filled with the sweet anticipation of creating something truly special. Whether you're continuing a family tradition or starting a new one, the Pear and Walnut Coffee Cake is sure to become a favorite in your home. Enjoy every slice, and may it bring as much joy to your family as it has to mine.

Read more about Appetizers

Read more about Main Dishes

Read more about Desserts

Luscious Lemon Soufflé Pudding | Made by Meaghan Moineau

Luscious Lemon Soufflé Pudding | Made by Meaghan Moineau

Luscious Lemon Soufflé Pudding: A Sweet Trip Down Memory Lane


Description: Dive into the zesty delight of our Luscious Lemon Soufflé Pudding—a dessert that marries the airy lightness of a soufflé with the comforting richness of a pudding. Perfect for any occasion, this recipe is not just a treat for your taste buds but also a delightful journey into cherished family memories.

---


Ingredients


- Unsalted butter, for greasing


- 1 cup sugar (remove 2 tablespoons for later)


- Cream of tartar


- 3 large eggs, separated


- 1/4 cup all-purpose flour


- 1/2 cup fresh lemon juice


- Zest of 1 lemon


- 1/8 teaspoon salt


- 1 teaspoon vanilla extract


- 1 cup low-fat milk


- Powdered sugar, for dusting


Instructions


1. Preheat & Prep: Preheat your oven to 325°F (170°C). Generously butter 6 individual ramekins or Pyrex bowls.
2. Sugar & Eggs: Set aside 2 tablespoons of sugar. Separate the eggs, placing the yolks in a large mixing bowl and the whites in a separate bowl (preferably plastic or metal).
3. Cream the Butter: Cream the butter with the remaining sugar until fluffy. Beat in the yolks one at a time until well blended.
4. Add Flavors: Mix in the vanilla extract and lemon zest. Add the flour and salt, mixing just until combined.
5. Liquid Ingredients: With the mixer on low, gradually add the milk and lemon juice. The mixture will be quite liquid.
6. Whip the Whites: Using clean beaters, beat the egg whites with the cream of tartar until foamy. Gradually add the reserved 2 tablespoons of sugar, continuing to beat until stiff peaks form.
7. Combine: Gently fold the beaten egg whites into the yolk mixture until just incorporated and smooth.
8. Fill & Bake: Ladle the mixture into the prepared ramekins, filling almost to the top. Place the ramekins in a large baking pan, adding hot water to the pan until it reaches halfway up the sides of the ramekins.
9. Bake: Carefully place the baking pan in the oven and bake for 40-45 minutes until the tops are puffed and golden brown.
10. Cool & Serve: Remove from the oven, carefully taking the ramekins out of the water bath. Let them cool slightly before serving. Sprinkle with powdered sugar or add a dollop of whipped cream for an extra touch.

---


Difficulty Rating


Difficulty: 6/10
Classification: Dessert

---


A Nostalgic Tale


As I prepare this delightful Luscious Lemon Soufflé Pudding, I'm transported back to my grandmother's cozy kitchen. Every Sunday afternoon, the citrusy aroma of fresh lemons would fill the air as my grandmother and I embarked on our weekly baking ritual. She would tell stories of her own childhood, weaving tales as vibrant as the lemon zest we grated together.


The soufflé would rise with an almost magical grace, much like the laughter and love that filled the room. Each spoonful was a taste of sunshine, echoing the warmth of those cherished moments. Even now, as I continue this tradition with my own family, I smile at the thought of my grandmother's gentle guidance, a timeless recipe passed down through generations.


---


Creating this Luscious Lemon Soufflé Pudding is more than just making a dessert; it's about reliving memories and crafting new ones. Whether it's a family gathering or a quiet afternoon treat, this soufflé pudding promises an experience as sweet and uplifting as the dessert itself.

Read more about Appetizers

Read more about Main Dishes

Read more about Desserts

Fall Apple Yeast Bread | Made by Meaghan Moineau

Fall Apple Yeast Bread | Made by Meaghan Moineau

Title: "Savor the Season: Baking Fall Apple Yeast Bread"
Description: Dive into the warmth of autumn with our Fall Apple Yeast Bread recipe. This delightful dessert marries the comforting flavors of apple cider, cinnamon, and honey, enveloping them in a soft, golden crust. Perfect for cozy gatherings or a nostalgic trip down memory lane, this bread is a seasonal favorite that brings family and friends together.

---


As the leaves turn golden and the air carries a crispness that only autumn can bring, my kitchen transforms into a hub of warmth and aroma. Fall Apple Yeast Bread, a cherished family tradition, plays a starring role in this seasonal symphony. This recipe, a treasure passed down through generations, not only fills our home with the scent of apples and cinnamon but also with cherished memories of family gatherings.


A Nostalgic Family Tradition

Growing up, the arrival of fall was heralded by the scent of this bread baking in my grandmother's kitchen. I remember her bustling around, her apron dusted with flour and a twinkle in her eye as she taught me the secrets of our family recipe. We would sip apple cider, our laughter mingling with the hum of the oven, as she regaled me with stories of her childhood. The bread, with its sweet, spiced aroma, was more than just a dessert; it was a testament to our heritage, a link to the past, and a promise for the future.


Ingredients:

- Apple cider


- Apples


- Dried/instant yeast


- Eggs


- Flour


- Ground cinnamon


- Orange zest


- Powdered sugar


- Runny honey


- Salt


- Sugar


- Vanilla extract


- Vegetable oil


- Water


Instructions:

1. Start by mixing warm water with oil, honey, and yeast. Let it foam for 10 minutes.


2. Add the rest of the dough ingredients and knead until you have a soft, smooth, and elastic dough (about 8-10 minutes).


3. Place the dough in an oiled bowl, cover, and let it rise for 2 hours until puffy and nearly doubled in size.


4. Grease a 9-inch round cake pan.


5. Toss apple chunks with sugar, cinnamon, and rum.


6. Gently deflate the dough and flatten it into a rough rectangle.


7. Spread half the apple chunks in the center of the dough, fold over, and seal.


8. Spread remaining apple chunks, fold again, and seal.


9. Cut the dough into 16 pieces, tuck in apple chunks, and arrange in the pan.


10. Cover and let it rise for 1-1.5 hours.


11. Preheat oven to 325°F and bake for 55 minutes.


12. Whisk cider and powdered sugar, brush over cooled bread.


Difficulty Rating: 7/10
Classification: Dessert

The process of making this bread is a labor of love. While the steps may seem daunting, the reward is a beautifully golden loaf, bursting with the flavors of fall. The warm, spiced sweetness of the bread is perfect for those cozy family gatherings or as a special treat on a chilly afternoon.


Every time I bake this bread, I'm reminded of the laughter and love that filled my grandmother's kitchen. It's a tradition I now share with my children, hoping to pass on not just a recipe, but a legacy of warmth, family, and the simple joy of baking together. So, gather your loved ones, roll up your sleeves, and let the magic of Fall Apple Yeast Bread fill your home and heart this season.

Read more about Appetizers

Read more about Main Dishes

Read more about Desserts

Peanut Butter Banana French Toast | Made by Meaghan Moineau

Peanut Butter Banana French Toast | Made by Meaghan Moineau

Title: Nostalgic Mornings: The Irresistible Charm of Peanut Butter Banana French Toast
Description:

Discover the magic of Peanut Butter Banana French Toast, a delightful breakfast dish that's sure to evoke cherished family memories. This easy-to-follow recipe combines the creamy richness of peanut butter and bananas with the warm, aromatic spices of nutmeg and cinnamon, creating a symphony of flavors that will transport you back to simpler times. Perfect for a cozy morning or a special brunch, this dish is both a treat for the taste buds and a trip down memory lane.


---


Peanut Butter Banana French Toast: A Journey Back Home


There's something inherently comforting about the aroma of French toast sizzling on a skillet. For me, it's a scent that instantly transports me back to Saturday mornings at my grandmother's house. Her kitchen was a symphony of delightful aromas, the air filled with the warm, sweet smell of cinnamon and the subtle hint of nutmeg. These mornings were the highlight of my childhood weekends, and the star of the show was always her Peanut Butter Banana French Toast.


Ingredients:

- Bread (preferably thick slices like brioche or challah)

- Peanut butter


- 1/2 banana, sliced


- 1 whole egg


- A splash of orange juice


- A pinch of ground nutmeg


- A pinch of ground cinnamon


- A dash of cayenne pepper


- Maple syrup (for serving)


- Confectioners' sugar (optional, for garnish)


- Additional banana slices (for garnish)


Instructions:

1. Prepare the Sandwich: Start by spreading a generous layer of peanut butter on one slice of bread. Arrange banana slices over the peanut butter, then top with another slice of bread to create a sandwich.
2. Create the Egg Mixture: In a shallow bowl, whisk together the egg, a splash of orange juice, ground nutmeg, ground cinnamon, and a dash of cayenne pepper. This mixture will add a delightful depth of flavor to your French toast.
3. Dip the Sandwich: Heat a skillet over medium heat and add a tablespoon of butter. Dip the prepared sandwich into the egg mixture, ensuring both sides are well-coated.
4. Cook to Perfection: Place the sandwich in the hot skillet. Cook for about one minute on each side, or until the bread is golden brown and the peanut butter begins to melt.
5. Serve and Enjoy: Transfer the French toast to a plate. Ladle with maple syrup, sprinkle with confectioners' sugar, and garnish with additional banana slices for an extra touch of sweetness.

A Trip Down Memory Lane


Every bite of this Peanut Butter Banana French Toast brings back vivid memories of laughter-filled mornings with my family. My grandmother, the orchestrator of these culinary symphonies, would hum softly as she cooked, the very embodiment of love and warmth. Her kitchen was more than just a place to prepare meals; it was a sanctuary where stories were shared, and bonds were strengthened. This dish, with its creamy peanut butter and sweet banana, remains a beloved heirloom of those mornings, a recipe passed down through the generations, each bite a comforting reminder of home.


Difficulty: 3/10


This recipe is delightfully simple and perfect for cooks of all levels, making it an excellent choice for a relaxed weekend breakfast or a nostalgic brunch gathering.


Classification: Main Dish


While traditionally considered a breakfast item, this Peanut Butter Banana French Toast is hearty enough to be enjoyed as a main dish, offering a perfect balance of sweet and savory flavors that satisfy any time of day.


---


Indulge in this heartwarming dish, and let it become a cherished part of your family's weekend tradition, just as it was in mine.

Read more about Appetizers

Read more about Main Dishes

Read more about Desserts

The Secret to Easy Skillet Filet Mignon Steak Tacos | Made by Meaghan Moineau

The Secret to Easy Skillet Filet Mignon Steak Tacos | Made by Meaghan Moineau

Title: Unlocking the Flavor: Easy Skillet Filet Mignon Steak Tacos
Description: Dive into the culinary delight of Skillet Filet Mignon Steak Tacos, a dish that combines the gourmet essence of filet mignon with the casual comfort of tacos. This recipe offers a flavor-packed experience that is simple to prepare, making it perfect for any occasion. With easy-to-follow instructions, this dish will become a favorite in your household. Relish the nostalgia of family gatherings filled with laughter and the aroma of sizzling steak.

---


The Secret to Easy Skillet Filet Mignon Steak Tacos


In the heart of every family kitchen, there are recipes that evoke cherished memories. For me, this recipe for Skillet Filet Mignon Steak Tacos transports me back to summer evenings spent with my family. The sizzle of the steak in the skillet would fill our home with an irresistible aroma, setting the stage for an evening of laughter and storytelling around the dinner table.


Ingredients:

- 2 filet mignon steaks

- Olive oil extra virgin, for rubbing


- Cracked black pepper, to taste


- Sour cream


- Guacamole


- Shredded cheddar cheese


- White corn tortillas


Instructions:

1. Begin by heating a skillet on medium to low heat. While the skillet warms up, take the filet mignon steaks and rub them generously with extra virgin olive oil. Season with cracked black pepper to your liking.

2. Place the steaks in the skillet and let them cook slowly, ensuring they reach your desired level of doneness. For a perfectly medium steak, cook for about 7 minutes on each side. Remember, patience is key to achieving that tender, juicy texture.


3. Once the filets are cooked to perfection, remove them from the heat and let them rest for a few minutes. Then, slice them thinly and lengthwise to prepare for taco assembly.


4. In a clean skillet over medium heat, warm up the white corn tortillas. This step is crucial for bringing out their natural flavor and making them pliable for folding.


5. Now comes the fun part—assembling your tacos! Top each warm tortilla with slices of the tender filet mignon, a dollop of creamy guacamole, a spoonful of sour cream, and a sprinkle of shredded cheddar cheese. The combination of these ingredients creates a symphony of flavors and textures.


A Nostalgic Family Memory:

I vividly recall the first time we made these tacos as a family. It was a warm summer evening, and my dad had just returned from a fishing trip with the biggest smile on his face. Although no fish made it to the table that night, he insisted on cooking these steak tacos. We gathered around the kitchen island, chatting and laughing as we each took turns slicing the steaks and warming the tortillas. It was a simple meal, but it brought us closer, reminding us that the best moments in life are often shared over a delicious meal.

Difficulty Rating: 3/10

This recipe is straightforward and perfect for cooks of all skill levels, making it an ideal choice for a relaxed family dinner or a small gathering with friends.

Classification: Main Dish

These Skillet Filet Mignon Steak Tacos serve as an impressive main dish, combining elegance and ease in every bite.

---


Whether you're creating new memories or reminiscing about past family gatherings, these Skillet Filet Mignon Steak Tacos offer a delicious journey of flavors that will surely become a staple in your culinary repertoire. Enjoy the simplicity and savor the taste of this delightful dish!

Read more about Appetizers

Read more about Main Dishes

Read more about Desserts

Authentic Mexican Wedding Cookies | Made by Meaghan Moineau

Authentic Mexican Wedding Cookies | Made by Meaghan Moineau

Title: Savoring Tradition: Authentic Mexican Wedding Cookies
Description: Discover the sweet allure of Authentic Mexican Wedding Cookies with this easy-to-follow recipe that brings generations of tradition to your kitchen. Delve into the rich flavors of butter, pecans, and cinnamon, and be transported to cherished family gatherings where these delightful treats were always the star of the dessert table.

---


There’s something inherently magical about recipes that have stood the test of time, their aromas and flavors weaving through the tapestry of family memories. Authentic Mexican Wedding Cookies, with their delicate crumble and sugary coating, are one such timeless treat. These cookies, also known as polvorones, have been a beloved staple at celebrations in my family, their presence as comforting as a grandmother’s hug.


Ingredients:

- 1 cup butter, softened


- 2 cups powdered sugar, divided


- 2 teaspoons vanilla extract


- 2 cups all-purpose flour


- 1 cup pecans, finely chopped


- 1 teaspoon ground cinnamon


Instructions:

1. In a large bowl, use an electric mixer to beat the butter until light and fluffy.


2. Add 1/2 cup of powdered sugar and vanilla extract; continue beating until well blended.


3. Gradually beat in the flour, followed by the chopped pecans.


4. Divide the dough in half, forming each half into a ball. Wrap each ball in plastic wrap and chill for about 30 minutes.


5. Preheat your oven to 350°F (175°C).


6. In a pie dish, whisk together the remaining 1 1/2 cups of powdered sugar and the ground cinnamon. Set this cinnamon sugar mixture aside.


7. With half of the chilled dough, roll portions of dough (about 2 teaspoons each) between your palms to form balls. Place them on a large baking sheet, leaving about 1/2 inch between each ball.


8. Bake for 18 minutes, or until the cookies are golden brown on the bottom and just pale golden on top.


9. Allow the cookies to cool on the baking sheet for 5 minutes. While still warm, gently toss them in the cinnamon sugar to coat completely.


10. Transfer the coated cookies to a rack to cool completely. Repeat the process with the remaining dough.


11. Sift any remaining cinnamon sugar over the cooled cookies before serving.


A Family Memory:

These cookies always remind me of my grandmother's kitchen, bustling and warm during family gatherings. I remember one particular afternoon when I was about eight years old. The kitchen was filled with laughter and the rich scent of roasted pecans. My grandmother, with flour-dusted hands, showed me how to carefully roll the dough into perfect little balls. As the cookies baked, their aroma mingled with the cinnamon in the air, creating a scent that felt like home.


After they came out of the oven, she let me help coat them in the cinnamon sugar, warning me not to eat too many at once. Of course, I sneaked a few extra when she wasn't looking, savoring the sweet, nutty flavor. To this day, those cookies are more than just a dessert; they are a bridge to my heritage, a taste of love and tradition.


Difficulty: 4/10
Classification: Dessert

Embrace the simplicity and nostalgic charm of these Authentic Mexican Wedding Cookies. Whether you're a seasoned baker or new to the kitchen, this recipe promises to be a rewarding journey into culinary tradition. With each bite, you’ll find yourself part of a story that has been lovingly passed down through generations.

Read more about Appetizers

Read more about Main Dishes

Read more about Desserts

Creamed Sweet Onion with Butter Basil Biscuits | Made by Meaghan Moineau

Creamed Sweet Onion with Butter Basil Biscuits | Made by Meaghan Moineau

Title: Comfort in a Dish: Creamed Sweet Onion with Butter Basil Biscuits
Description: Dive into the heartwarming flavors of Creamed Sweet Onion with Butter Basil Biscuits, a dish that effortlessly combines sweet, savory, and aromatic elements. This culinary delight is more than just a recipe; it's a journey back to nostalgic family gatherings, filled with laughter and love. Perfect as a main dish, this recipe rates a 6 out of 10 on the difficulty scale, making it ideal for an adventurous home cook ready to impress.

---


When I think of comfort food, my mind drifts to the cozy kitchen of my grandmother's house, where the air was always filled with the mouthwatering aroma of something delicious baking in the oven. One dish that stands out in my memory is her Creamed Sweet Onion with Butter Basil Biscuits. This was not just a meal; it was an experience that brought our family together, filling the room with warmth and joy.


A Nostalgic Family Memory

Every Sunday, our family would gather at Grandma's for a feast. The highlight was always her creamed sweet onions, crowned with biscuits that were buttery, flaky, and infused with the fresh scent of basil. As a child, I would watch her with eager eyes, perched on a stool by the kitchen counter. She would smile and hand me a small piece of dough to roll out, making me feel like her special little helper.


The best part was when the dish finally came out of the oven, golden biscuits bubbling over the creamy onion mixture, filling the room with an irresistible aroma. Grandma would serve it with a proud smile, and we'd all indulge in this comforting dish, paired with stories and laughter that echoed through the ages.


Recipe: Creamed Sweet Onion with Butter Basil Biscuits
Ingredients:

*For the Creamed Sweet Onion:*


- 4 large sweet onions, thinly sliced


- 6 slices of bacon


- 2 tbsp olive oil


- 2 sprigs fresh thyme


- 1 cup chicken broth


- 1/2 cup white wine


- 3 tbsp butter


- 2 tbsp flour


- 1 cup half and half


- A pinch of nutmeg


- Salt and pepper to taste


*For the Butter Basil Biscuits:*


- 2 cups all-purpose flour


- 1 tbsp baking powder


- 1/2 tsp salt


- 1/2 cup unsalted butter, cold and cubed


- 1/4 cup fresh basil, finely chopped


- 3/4 cup half and half


Instructions:
1. Prepare the Onion Mixture:

- Preheat your oven to 450°F (232°C).


- In a heavy-bottom pot, fry the bacon over medium heat until crispy. Remove and let it cool on a plate lined with paper towels.


- Spoon off the excess bacon grease, leaving about 2 tablespoons in the pot.


- Add olive oil to the pot to prevent burning, and toss in the sliced onions. Sauté for 2-3 minutes.


- Pour in the chicken broth and add the thyme sprigs. Bring the mixture to a boil, then reduce the heat to simmer, covering the pot for 5 minutes.


- Once the onions are tender, add the white wine and continue to boil until the liquid reduces by half, about 10 minutes.


- In a small saucepan, melt 3 tablespoons of butter over medium heat. Whisk in 2 tablespoons of flour to form a paste, then gradually whisk in the half and half until combined.


- Remove from heat and add to the onion mixture, stirring until thickened. Season with nutmeg, salt, and pepper. Set aside.


2. Prepare the Biscuits:

- In a large mixing bowl, sift together the flour, baking powder, and salt.


- Add the cold, cubed butter and chopped basil. Using a pastry blender or two knives, cut the butter into the dry mixture until it resembles coarse meal.


- Make a well in the center and pour in the half and half. Stir until the dough just comes together.


- Turn the dough onto a well-floured surface and flatten it to about 1-inch thickness. Using a 2-inch biscuit cutter, cut out 12 biscuits.


3. Assemble and Bake:

- Spoon the onion mixture into 4 ramekins. Top each with an uncooked biscuit.


- Place in the preheated oven and bake for 15 minutes until the biscuits are golden brown.


- Remove from the oven and let cool for ten minutes before serving.


Conclusion:

This dish, with its layers of flavors and textures, is more than just a culinary creation; it's a tribute to cherished memories and family bonds. Whether you're recreating a nostalgic family recipe or starting a new tradition, Creamed Sweet Onion with Butter Basil Biscuits is a comforting embrace in every bite. Enjoy this dish as the main attraction in your next family gathering and relish the shared joy that comes with it.

Read more about Appetizers

Read more about Main Dishes

Read more about Desserts

Four-Berry Blast Fruit Smoothie | Made by Meaghan Moineau

Four-Berry Blast Fruit Smoothie | Made by Meaghan Moineau

Title: A Sip of Summer: The Four-Berry Blast Fruit Smoothie
Description: Dive into the vibrant world of berries with our delightful Four-Berry Blast Fruit Smoothie, a refreshing treat bursting with flavor and nostalgia. Perfect as a dessert or a revitalizing snack, this smoothie is an easy and delicious way to enjoy the bounty of summer all year round.

---


As the sun dipped below the horizon, casting a golden hue over our backyard, my family would gather on the porch, laughter mingling with the scent of blooming flowers. These were the moments I cherished most—a time when the simple joys of life resonated most deeply. My grandmother, a culinary magician in her own right, always had a way of bringing us together with her culinary creations, and one such masterpiece was her Four-Berry Blast Fruit Smoothie.


This recipe was a family favorite, crafted and perfected over the years. The first time I tasted it, I was a child, eagerly watching as my grandmother's hands moved deftly, tossing frozen blackberries, blueberries, raspberries, and strawberries into the blender. The air was filled with the sweet, tangy aroma of berries—a scent that still transports me back to those cherished evenings.


What made this smoothie truly special was the addition of lemonade concentrate, a secret ingredient that my grandmother insisted was the key to its refreshing zing. As she blended in the whole milk, sugar, and a hint of vanilla extract, I would stand by her side, mesmerized by the whirring sounds of the blender as it transformed the ingredients into a vibrant, purple elixir.


Once the smoothie was ready, my grandmother would pour it into tall glasses, the rich color contrasting beautifully against the glass. We'd each take a sip, smiles spreading across our faces as the flavors burst forth—a harmonious blend of sweet and tart, creamy and smooth. The Four-Berry Blast Fruit Smoothie wasn't just a drink; it was a sip of summer, a reminder of sun-drenched days and warm family gatherings.


Now, as an adult, I've carried on the tradition, whipping up this delightful smoothie whenever I crave a taste of those nostalgic days. It's incredibly easy to make, with a difficulty rating of just 2 out of 10, making it a perfect choice for a quick and satisfying dessert. Each sip is a gateway to fond memories, a testament to the enduring power of food to connect us to our past.


Four-Berry Blast Fruit Smoothie Recipe

*Ingredients:*


- 1 cup frozen blackberries


- 1 cup frozen blueberries


- 1/2 cup lemonade concentrate


- 1 cup frozen unsweetened raspberries


- 1 cup frozen unsweetened strawberries


- 2 tablespoons sugar


- 1 teaspoon vanilla extract


- 1 cup whole milk


*Instructions:*


1. Place the frozen blackberries, blueberries, and lemonade concentrate into a blender. Pulse a few times to combine.


2. Add the frozen raspberries and pulse 2-3 times.


3. Add the frozen strawberries and pulse again.


4. Once all berries are added, blend on high until smooth.


5. Serve immediately and enjoy a taste of summer nostalgia.


Whether you're savoring it on a sunny porch or in the comfort of your home, the Four-Berry Blast Fruit Smoothie is a delicious reminder that the best recipes are those that come with a story—a legacy of love and laughter that transcends time.

Read more about Appetizers

Read more about Main Dishes

Read more about Desserts

Dutch Oven Paella | Made by Meaghan Moineau

Dutch Oven Paella | Made by Meaghan Moineau

Savoring Tradition: A Family Feast with Dutch Oven Paella


Description

Dive into the rich tapestry of flavors and family traditions with our Dutch Oven Paella recipe. This aromatic dish, brimming with succulent shrimp, savory chorizo, and tender chicken, encapsulates the warmth and comfort of cherished family gatherings. Perfectly balanced with saffron-infused arborio rice and vibrant vegetables, our paella transforms any meal into a celebration. Whether you're a seasoned cook or a kitchen novice, this main dish offers a delightful culinary adventure with a touch of nostalgia.

---


Ingredients

- Shrimp

- Salt and pepper


- Extra virgin olive oil


- Garlic cloves


- Lean, skinless, boneless chicken thighs


- Spanish chorizo sausage


- Red bell pepper


- Onion


- Diced canned tomatoes


- Arborio rice


- Low sodium chicken broth


- Dry white wine


- Saffron threads


- Bay leaf


- Frozen artichoke hearts


- Frozen peas


- Fresh flat-leaf parsley


- Lemon wedges


Instructions


1. Prepare Shrimp: In a medium bowl, toss shrimp with 1 teaspoon minced garlic, 1 tablespoon olive oil, 1/4 teaspoon salt, and 1/4 teaspoon pepper. Refrigerate until needed.
2. Season Chicken: Season chicken thighs with salt and pepper, then set aside.
3. Cook Vegetables: Heat 2 teaspoons of oil in a large Dutch oven over medium-high heat until shimmering. Add bell pepper, cooking and stirring occasionally until skins blister and brown, about 3-4 minutes. Remove and set aside.
4. Brown Chicken: Add 1 tablespoon more oil to the pot. Add chicken thighs and brown well, flipping once, about 3 minutes per side. Remove chicken to a bowl.
5. Cook Sausage: Reduce heat to medium, add sausage, and cook for 4-5 minutes, stirring frequently, until browned and fat starts to render. Add to bowl with chicken.
6. Sauté Aromatics: At medium heat, add enough oil to equal 2 tablespoons. Add onion, cooking and stirring frequently until tender, about 3 minutes. Add remaining garlic, cook for 1 minute.
7. Add Tomatoes and Rice: Add tomatoes, cooking and stirring until they thicken and darken slightly, about 3 minutes. Add rice, cook and stir for about 2 minutes.
8. Combine Ingredients: Add broth, wine, saffron, bay leaf, and 1/2 teaspoon salt to the pot. Return chicken and sausage to the pot.
9. Bake: Increase heat to medium-high, bring to a boil, stirring often. Cover pot and place in the oven. Bake for 15 minutes.
10. Add Final Ingredients: Remove pot from oven, nestle artichoke hearts into the rice, sprinkle shrimp over the top, then add peas and bell pepper strips. Cover and return to the oven for another 10 minutes or until shrimp are opaque.
11. Create Soccarat: Remove pot from oven, place on stove over medium-high heat, cook for 5 minutes to achieve a browned rice crust, rotating pot halfway through.
12. Rest and Serve: Remove from heat, let the paella rest, covered, for 5 minutes. Sprinkle with fresh parsley and serve with lemon wedges.

---


A Nostalgic Family Tradition


Growing up, paella was more than a meal; it was a family event. I vividly recall the bustling kitchen sounds, the clatter of pans, and the warm, enticing aroma that filled our home. My grandmother, the culinary matriarch, would orchestrate this feast with precision and love, her eyes dancing as she stirred the vibrant mix of ingredients in her cherished Dutch oven.


Every family gathering was a tapestry of stories and laughter, woven together by the promise of paella. As the dish simmered to perfection, we would gather around the table, sharing tales of past adventures and dreams for the future. The striking colors of the saffron-infused rice, adorned with shrimp and vegetables, mirrored the vibrant personalities of our family.


This dish is not just a recipe; it is a vessel of cherished memories, a reminder of the warmth and unity of family. Every time I prepare Dutch Oven Paella, I am transported back to those joyful gatherings, savoring not just the flavors, but the legacy of love and tradition.


Difficulty Rating

7 out of 10

Classification

Main Dish

Indulge in the flavors of tradition with our Dutch Oven Paella, a dish that promises to create not just a meal, but a memory.

Read more about Appetizers

Read more about Main Dishes

Read more about Desserts

Hot Cocaccino | Made by Meaghan Moineau

Hot Cocaccino | Made by Meaghan Moineau

Title: "Hot Cocaccino: A Heartwarming Cup of Memories and Delight"
Description: Dive into the warmth of a deliciously indulgent Hot Cocaccino, a beverage that combines the rich flavors of cocoa and coffee. Perfect for cozy evenings and chilly winter days, this delightful drink is more than just a treat—it's a trip down memory lane.

---


If you're anything like me, the onset of cooler weather means it's time to dust off those cherished warm beverage recipes. Today, I want to share a special concoction that's been a family favorite for generations: the Hot Cocaccino. This delightful drink, with its rich blend of cocoa and coffee, is not only a perfect comfort on a cold day but also a heartwarming reminder of family gatherings and cherished moments.


Ingredients:

- 1 packet of cocoa mix


- 1 cup of milk


- 1/2 cup of light half and half


- 1 tablespoon of instant coffee


- Mini marshmallows


- Chocolate syrup


- Whipped cream


- Sprinkles or a dash of cocoa powder


Instructions:

1. In a medium saucepan, heat the milk and light half and half until very hot, but make sure it doesn’t boil.


2. Remove the saucepan from heat and stir in the hot cocoa mix and instant coffee until well combined.


3. Pour the mixture into mugs or cups, leaving some space at the top for the toppings.


4. Top each serving with a handful of mini marshmallows.


5. Drizzle chocolate syrup over the marshmallows for an extra touch of sweetness.


6. Add a generous dollop of whipped cream on top.


7. Finish with a sprinkle of colorful sprinkles or a dash of cocoa powder for that festive look.


A Nostalgic Journey:

Every sip of this Hot Cocaccino takes me back to winter evenings at my grandmother's house. Her living room was always filled with the faint scent of pine from the Christmas tree, twinkling lights casting a warm glow on our faces. After a long day of sledding with my cousins, we would gather around the fireplace, warming our hands on mugs filled with this comforting beverage.


My grandmother had a knack for turning simple ingredients into something magical. She would tell us stories of how her mother used to make a similar drink during the holidays, using whatever ingredients were available at the time. It was her way of keeping family traditions alive, and now, it’s mine. Each cup of Hot Cocaccino I make is a tribute to those cozy nights and the love that went into every pot.


Difficulty Rating: 3/10
Classification: Dessert

This recipe is not only easy to make but also a wonderful way to create new memories while honoring the old ones. Whether you’re looking to impress guests or just want to indulge yourself, the Hot Cocaccino is a must-try. So, cozy up, take a sip, and let the warmth of this delightful drink transport you back to simpler, happier times.

Read more about Appetizers

Read more about Main Dishes

Read more about Desserts

HomeMade Hashbrowns with Spinach and Carrots | Made by Meaghan Moineau

HomeMade Hashbrowns with Spinach and Carrots | Made by Meaghan Moineau

Title: A Nostalgic Twist on a Classic: Homemade Hashbrowns with Spinach and Carrots


Description:

Dive into the comforting embrace of homemade hashbrowns, enhanced with the vibrant flavors of spinach and carrots. Perfect as an appetizer or a hearty main dish, this recipe brings back cherished family memories with every bite.

---


There’s something profoundly comforting about the sizzle of hashbrowns hitting a hot pan. The aroma alone evokes memories of Sunday brunches spent with family, where laughter was as abundant as the delicious food on the table. This recipe for Homemade Hashbrowns with Spinach and Carrots is not just a delightful twist on a classic; it's a journey back to those cherished moments.


Ingredients:

- 2 large potatoes, grated

- 1 cup fresh spinach leaves, chopped


- 1 medium onion, finely chopped


- 1 carrot, grated


- 1/2 teaspoon red chilli powder


- 2 tablespoons cornflour


- Salt, to taste


- Oil, for shallow frying


Instructions:

1. In a large bowl, combine the grated potatoes, chopped spinach, finely chopped onion, and grated carrot. Add 1/2 teaspoon of salt and mix well to ensure all the ingredients are well incorporated.

2. Squeeze the veggie mixture gently to remove all excess moisture. This step is crucial for achieving crispy hashbrowns.


3. Add red chilli powder and cornflour to the mixture. Adjust the salt by tasting, ensuring a perfect balance of flavors.


4. Form the mixture into small patties, pressing them firmly to hold their shape.


5. Heat oil in a pan over medium-high heat for shallow frying. Carefully place the patties into the hot pan, allowing them to brown for a few minutes on each side.


6. Once both sides are browned, reduce the heat to medium. Continue cooking until the hashbrowns are cooked through and crispy.


7. Serve hot and enjoy!


---


A Family Memory:


As a child, Sunday mornings were my favorite. The kitchen would come alive with the sounds and smells of breakfast being prepared. My grandmother was the mastermind behind these culinary experiences, and her hashbrowns were legendary. She would always add a little something extra to her recipes—whether it was a handful of fresh spinach from her garden or a dash of spice—which made each bite memorable.


One particular Sunday, I remember standing on a stool beside her, watching as she expertly mixed the ingredients and formed perfect patties. She handed me a small piece of dough, encouraging me to make my own. My creation was a lopsided attempt, but she placed it in the pan with the same care as the others.


Years later, I find myself recreating those mornings in my own kitchen. Each time I make these hashbrowns, I'm reminded of her gentle guidance and the warmth of family gatherings. It’s a simple dish, yet it carries the weight of tradition and the joy of shared meals.


Difficulty Rating: 4/10


This recipe is straightforward and perfect for both novice and seasoned cooks who appreciate the simplicity of a well-made dish.


Classification: Appetizer/Main Dish


Whether served as a starter or the main event, these hashbrowns with spinach and carrots are sure to become a beloved addition to your culinary repertoire. Enjoy them as a standalone dish or pair them with your favorite breakfast accompaniments.

Read more about Appetizers

Read more about Main Dishes

Read more about Desserts

Moroccan Chicken Pitas | Made by Meaghan Moineau

Moroccan Chicken Pitas | Made by Meaghan Moineau

Title: A Taste of Tradition: Moroccan Chicken Pitas
Description: Embark on a flavorful journey with our Moroccan Chicken Pitas, a recipe steeped in rich spices and cherished family memories. Discover how to create this enticing main dish that marries the vibrant flavors of Morocco with a personal touch of nostalgia.

---


A Culinary Adventure: Moroccan Chicken Pitas


When the aroma of paprika, coriander, and cinnamon fills the kitchen, it takes me back to sunny afternoons at my grandmother's house. Our family would gather around the backyard grill, eagerly awaiting the delicious spread that promised to transport us to the bustling souks of Marrakesh. Today, I'm thrilled to share with you our cherished family recipe for Moroccan Chicken Pitas—a dish that's as heartwarming as it is flavorful.


Ingredients:


- For the Chicken:

- Skinless boneless chicken breasts


- 1 teaspoon paprika


- 1 teaspoon coriander


- 1/2 teaspoon cinnamon


- 1 teaspoon cumin


- 1/4 teaspoon cayenne pepper


- 2 cloves garlic, minced


- 1 teaspoon ginger, grated


- Salt to taste


- 2 tablespoons olive oil


- Fresh Italian parsley, finely chopped


- For the Tabbouleh:

- 1 cup cooked quinoa


- 1 can diced petite tomatoes, drained


- 1 yellow onion, diced


- Juice of 1 lemon


- 1/2 cup diced Medjool dates


- 2 tablespoons olive oil


- Sea salt to taste


- For the Yogurt Sauce:

- 1 cup Greek yogurt


- 1/2 cucumber, diced


- Fresh mint, chopped


- Juice of 1 lemon


- Additional:

- Pita bread, halved and split open


Instructions:


1. Prepare the Chicken:

Combine paprika, coriander, cinnamon, cumin, cayenne pepper, garlic, ginger, and salt in a bowl. Mix well to create a fragrant spice blend. Place chicken breasts on a cutting board and pound to about 1/2 inch thick using a meat mallet. Generously rub the spice mixture over all sides of the chicken breasts. Cover and refrigerate for at least an hour to allow the flavors to meld.


2. Make the Tabbouleh:

In a large bowl, combine cooked quinoa, diced tomatoes, onion, lemon juice, Medjool dates, olive oil, and sea salt. Stir well to integrate all the ingredients. Adjust salt and oil to your liking. Cover and chill in the refrigerator while the chicken marinates.


3. Prepare the Yogurt Sauce:

In a separate bowl, combine Greek yogurt, diced cucumber, mint, and lemon juice. Stir to combine and refrigerate until ready to serve.


4. Grill the Chicken:

Preheat your grill to medium heat. Grill the marinated chicken breasts until fully cooked, about 16 minutes, ensuring some crispy edges form for added flavor. Once cooked, let them rest for a few minutes before slicing.


5. Assemble the Pitas:

Take the halved pita bread and fill each with slices of grilled chicken, a generous helping of tabbouleh, and a dollop of the refreshing yogurt sauce.


Nostalgic Family Story:


This dish always reminds me of family gatherings at my grandmother's home. She had a magical way of bringing everyone together with her cooking. I vividly remember my cousins and I playing in the garden while the adults chatted around the grill. The smell of the spices wafted through the air, creating an atmosphere of warmth and anticipation. My grandmother would always remind us that food is not just about nourishment—it's about connection and creating memories. These Moroccan Chicken Pitas are more than just a recipe; they are a piece of our family's history, a tradition we continue to savor and celebrate.


Recipe Difficulty: 6/10


Classification: Main Dish

---


Whether you're introducing your family to the vibrant flavors of Morocco or simply looking to add a new favorite to your meal rotation, these Moroccan Chicken Pitas promise an unforgettable dining experience. Enjoy the journey and create your own cherished memories with every bite.

Read more about Appetizers

Read more about Main Dishes

Read more about Desserts

Overnight Oatmeal | Made by Meaghan Moineau

Overnight Oatmeal | Made by Meaghan Moineau

Title: Waking Up to Warmth: The Joy of Overnight Oatmeal and Family Memories
Description: Discover the heartwarming simplicity of overnight oatmeal, a dish that cooks itself while you dream. This easy, nostalgic recipe combines dried cranberries, figs, and creamy half-and-half with hearty steel-cut oats to create a breakfast that feels like a warm hug. Perfect for busy mornings, this recipe will fill your home with comforting aromas and your heart with cherished memories.

---


Overnight Oatmeal: A Bowl of Memories and Morning Comfort

There’s something magical about waking up to the inviting aroma of a delicious breakfast ready to enjoy. Overnight oatmeal, with its rich blend of dried cranberries, figs, and creamy half-and-half, is more than just a meal—it's a memory. This recipe is simple enough for beginners and offers a delightful way to start your day. Rated at a mere 2 out of 10 in difficulty, this dish is classified as a Main Dish, making it an effortless yet satisfying breakfast option.


Ingredients:

- 1 cup dried cranberries


- 1 cup dried figs, chopped


- 2 cups half-and-half


- 1 cup steel-cut oats


- 4 cups water


Instructions:

1. In a crock-pot, combine all ingredients and set to low heat.


2. Cover and let cook for 8 to 9 hours.


3. Stir and remove to serving bowls.


This method works best if started before you go to bed. By morning, your oatmeal will be warm, creamy, and ready to serve, yielding four hearty servings.


A Nostalgic Family Memory

Growing up, breakfast was a cherished ritual in our household. I vividly remember the first time my grandmother introduced us to overnight oatmeal during one of our annual family reunions. Nestled in her cozy kitchen, she shared stories of how her own mother would prepare this simple yet nourishing meal. As she spoke, the crock-pot quietly worked its magic, filling the air with the warm, sweet scent of oats mingling with fruits.


Each morning of that reunion was a delightful surprise, waking up to the comforting smell of oatmeal that promised a day filled with laughter and love. We would gather around the table, bowls in hand, and delight in the creamy texture of the oats, the tangy burst of cranberries, and the subtle sweetness of figs. It was more than just breakfast; it was a time capsule that connected us across generations.


The beauty of this overnight oatmeal lies not only in its simplicity but in its ability to create a sense of nostalgia and togetherness. It’s a reminder that the best memories are often made around the breakfast table, where stories are shared, and bonds are strengthened.


Conclusion

In the hustle and bustle of modern life, it's comforting to know that some things remain timeless. Overnight oatmeal is one such treasure—easy to prepare, rich in flavor, and full of nostalgia. Whether you're looking to relive cherished family memories or create new ones with your own children, this recipe offers a heartwarming start to your day. So, set your crock-pot tonight and wake up to a bowl of comfort and joy.

Read more about Appetizers

Read more about Main Dishes

Read more about Desserts

Baharat Panko Crusted Albacore Tuna | Made by Meaghan Moineau

Baharat Panko Crusted Albacore Tuna | Made by Meaghan Moineau

Title: "A Taste of Tradition: Baharat Panko Crusted Albacore Tuna"
Description: Dive into the delightful fusion of flavors with Baharat Panko Crusted Albacore Tuna, a dish that marries the spicy warmth of Middle Eastern spices with the delicate freshness of albacore tuna. This recipe not only tantalizes the taste buds but also evokes cherished family memories of culinary traditions passed down through generations. Perfect as an appetizer or a main dish, this recipe is a 6 out of 10 in difficulty, making it an exciting challenge for home cooks.

---


A Taste of Tradition: Baharat Panko Crusted Albacore Tuna

Cooking has always been more than just a culinary exercise for my family—it's a way of preserving stories, traditions, and the essence of who we are. Growing up, the kitchen was the beating heart of our home. The gentle sizzle of oil, the rhythmic chopping of vegetables, and the aromatic symphony of spices were the background music to our family saga.


One dish that particularly stands out is the Baharat Panko Crusted Albacore Tuna. A creation born from the confluence of our diverse heritage, it has become a beloved staple at family gatherings. The combination of the exotic Baharat spice mix and the crispy panko crust always transports me back to those carefree days in my grandmother's kitchen.


Ingredients:

- Sashimi-grade albacore tuna


- Flour


- Coconut milk


- Wedge of lemon


- Panko


- Baharat spice mix


- Fleur de sel


- Black bell pepper


Instructions:

1. Begin by very gently cutting the albacore tuna in half, lengthwise, to ensure it fits comfortably in your pan. Remember, the key is not to push the knife through but to let it glide, using your free hand to stabilize the fish.


2. In a bowl, whisk together the coconut milk and lemon juice. This mixture will provide a subtle, tangy undertone that complements the spicy baharat.


3. In a separate bowl, mix the panko, baharat, fleur de sel, and pepper. This blend will give the tuna its signature crispy crust.


4. Place the flour in a third bowl, ready for dredging.


5. Season the tuna with fleur de sel and pepper, enhancing its natural flavors.


6. Dredge the seasoned tuna in flour, ensuring it's evenly coated.


7. Dip the floured tuna into the coconut milk and lemon mixture, allowing any excess to drip off.


8. Finally, coat the tuna finely with the panko mixture, pressing gently to ensure an even crust.


9. Heat oil in a pan over medium-high heat, and sear each side of the tuna until the panko turns golden brown. For a rare finish, a minute per side is all you need.


10. Once seared, place the tuna on a paper towel to absorb any excess oil and let it set for a few minutes.


Nostalgic Story:

Every bite of this dish takes me back to a particular summer evening when my grandmother first introduced us to it. We were gathered around the long oak table in her sun-dappled dining room, the air rich with laughter and the scent of spices. She recounted stories of her childhood in the Middle East, where Baharat was a staple in her family's kitchen. As we savored the crispy, succulent tuna, it felt like we were participating in a cherished ritual, connecting with our roots through taste and tradition.


Difficulty and Classification:

This recipe is rated a 6 out of 10 in difficulty. It requires some precision and care, especially when handling the delicate tuna and achieving the perfect sear. However, it is well worth the effort. Whether served as a sophisticated appetizer or a standout main dish, Baharat Panko Crusted Albacore Tuna is sure to impress and evoke a sense of nostalgia and warmth at any table.


Embrace the flavors, the memories, and the joy of sharing this dish with those you love. Happy cooking!

Read more about Appetizers

Read more about Main Dishes

Read more about Desserts

Vegan Peanut Butter Chocolate Fudge | Made by Meaghan Moineau

Vegan Peanut Butter Chocolate Fudge | Made by Meaghan Moineau

Title: Indulge in Nostalgia with This Vegan Peanut Butter Chocolate Fudge
Description: Dive into a world of rich, creamy, and decadent flavors with our Vegan Peanut Butter Chocolate Fudge recipe. Perfect for those who crave a deliciously sweet treat without compromising on health, this dessert combines the classic flavors of peanut butter and chocolate with a nostalgic family twist. Easy to make and impossible to resist, this fudge is sure to become a staple in your vegan dessert repertoire.

---


A Nostalgic Bite: Family Memories Wrapped in Chocolate and Peanut Butter

Growing up, my grandmother's house was a treasure trove of delightful aromas and comforting treats. One of my fondest memories was the annual summer family reunions, where the kitchen would buzz with the laughter of cousins and the sound of clinking pots and pans. Amidst the chaos, my grandmother would always have a special treat waiting for us: her famous peanut butter chocolate fudge.


This fudge was a testament to her love and creativity, bringing together the timeless combination of chocolate and peanut butter that we all adored. She would enlist my help, and I remember vividly the joy of mixing ingredients by her side, sneaking little tastes when I thought she wasn't looking. The fudge, rich and velvety, would be the highlight of our dessert table, disappearing almost as quickly as it was laid out.


Inspired by those cherished memories, I've crafted a vegan version of this beloved treat, adding a modern twist with wholesome ingredients that don't compromise on flavor. This Vegan Peanut Butter Chocolate Fudge is a tribute not only to my grandmother's culinary genius but also to the warm, joyful moments we shared as a family.


Ingredients:

- 1 cup coconut butter


- 1 cup peanut butter


- 2 ripe bananas


- 1/2 cup cocoa powder


- 1/4 cup agave nectar


- 1 teaspoon vanilla extract


Instructions:

1. In a food processor, combine all the ingredients until smooth.


2. Carefully fold the mixture into a flat, sealable container.


3. Freeze for 1 hour or refrigerate overnight to set.


4. Optional: To make your own coconut butter, pulse shredded coconut in a food processor until smooth (about 8-12 minutes).


Difficulty Rating: 3/10

This recipe is as simple as it is delicious, perfect for novice cooks and seasoned chefs alike. With minimal steps and ingredients, it's an easy dessert that delivers maximum flavor with minimal effort.


Classification: Dessert

Whether you're looking for a sweet treat to end a meal or a nostalgic snack to enjoy with a cup of tea, this Vegan Peanut Butter Chocolate Fudge is the perfect dessert for any occasion.


Final Thoughts:

Recreating this fudge has not only allowed me to indulge in a delicious treat but also to revisit the cherished moments of my childhood. I hope this recipe brings a touch of nostalgia and joy to your kitchen, just as it has to mine. Enjoy every bite and the memories it inspires!

Read more about Appetizers

Read more about Main Dishes

Read more about Desserts

Lusciously Lemony Lentil Soup | Made by Meaghan Moineau

Lusciously Lemony Lentil Soup | Made by Meaghan Moineau

Title: Unveiling Comfort: Lusciously Lemony Lentil Soup
Description: Dive into a heartwarming culinary journey with our Lusciously Lemony Lentil Soup—a dish that's as nourishing as it is delicious. Infused with the zesty brightness of lemon and the warmth of cumin, this soup is perfect for those who crave a comforting yet refreshing meal. Whether you're a kitchen novice or a seasoned chef, this recipe is your ticket to creating a soul-soothing masterpiece.

---


In the hustle and bustle of modern life, few things offer the same solace as a warm bowl of soup. Today, we're exploring a family favorite that has graced our table for generations: Lusciously Lemony Lentil Soup. This dish not only warms the body but also the heart, being steeped in nostalgia and love.


A Whiff of Tradition

I remember the first time I tasted this soup. It was a chilly autumn evening at my grandmother's house, where the scent of cumin and lemon wafted through the air, mingling with the laughter and chatter of family. My grandmother, a culinary maestro in her own right, stirred the pot with a gentle hand, regaling us with tales of her own childhood.


She often spoke of how this simple yet flavorful dish brought her family together during lean times. The hearty lentils combined with aromatic spices and a bright hit of lemon provided a nourishing meal that was both economical and satisfying. It was, she said, a testament to the power of simplicity and the joy of shared meals.


Crafting the Soup: Step by Step

*Ingredients:*


- 2 tablespoons olive oil


- 1 large onion, chopped


- 3 cloves garlic, minced


- 2 tablespoons tomato paste


- 1 teaspoon cumin


- Salt and pepper, to taste


- 1/2 teaspoon chili powder


- 6 cups chicken or vegetable broth


- 3 carrots, diced


- 2 cups cooked lentils (or dried lentils, rinsed)


- 1/4 cup fresh lemon juice


- 1/4 cup chopped cilantro


*Instructions:*


1. Sauté the Aromatics: Heat the olive oil over medium-high heat. When the oil is hot, add the onion and garlic. Cook until they are soft and translucent, about 5 minutes.
2. Introduce the Spices: Stir in the tomato paste, cumin, salt, pepper, and chili powder. Cook for about 2 minutes until the spices are fragrant and well-integrated.
3. Simmer to Perfection: Pour in the broth, then add the diced carrots. Cover and let it simmer on medium-low heat until the carrots are tender, approximately 15 minutes.
4. Blend and Brighten: Add the cooked lentils and heat through. For a velvety texture, blend the soup using an emulsifier directly in the pot or transfer it in batches to a blender. Stir in the lemon juice and cilantro. Season with additional salt if needed.
5. Serve and Savor: Ladle the soup into bowls, garnish with extra cilantro if desired, and enjoy the comforting warmth.
A Dish to Cherish

This Lusciously Lemony Lentil Soup is not just a meal; it’s a cherished memory, a piece of family history served in a bowl. The lemon adds a zesty twist that elevates the earthiness of the lentils, while the spices create a rich, aromatic depth.


Difficulty Rating: 4/10

Classified as a Main Dish, this recipe is accessible to cooks of all levels, offering a perfect balance of ease and flavor. It’s an invitation to slow down, gather loved ones, and celebrate the timeless tradition of home-cooked meals. As you savor each spoonful, may this soup bring you as much joy and warmth as it has to our family over the years.

Read more about Appetizers

Read more about Main Dishes

Read more about Desserts

Honey Ginger Lemon Iced Tea | Made by Meaghan Moineau

Honey Ginger Lemon Iced Tea | Made by Meaghan Moineau

Title: Refreshing Nostalgia: Honey Ginger Lemon Iced Tea
Description: Dive into a world of flavors with our Honey Ginger Lemon Iced Tea, a refreshing beverage that bridges past and present. Infused with the warmth of ginger, the zest of lemon, and the sweetness of honey, this drink is perfect for hot summer days or cozy afternoons. Discover the simple pleasures of this delightful recipe and a heartwarming family memory that makes it even more special.

---


A Sip of Summer Memories: Honey Ginger Lemon Iced Tea

As the golden rays of the sun linger longer and the days grow warmer, there's nothing quite like a refreshing iced tea to quench your thirst and refresh your spirit. Our Honey Ginger Lemon Iced Tea is not just a drink; it's a journey through time, evoking cherished memories of sun-soaked days and family gatherings.


Ingredients:

- Fresh ginger


- One green tea bag


- Canned honey


- Freshly squeezed lemon juice


- Fresh mint leaves


Instructions:

1. Begin by bringing 1-2 cups of water to a gentle boil. Once ready, steep your green tea bag and let the rich flavors infuse. Once brewed, place the tea in the fridge to cool.


2. While the tea is chilling, take fresh ginger and blend it smoothly. Run the blended ginger through a sieve to extract just the juice, capturing its bold, spicy essence.


3. In a jug filled with ice, combine the cooled tea, ginger juice, a generous splash of lemon juice, and a drizzle of canned honey. Stir well to blend these vibrant flavors.


4. Add fresh mint leaves for an aromatic touch. Serve cold, and enjoy a sip of refreshing nostalgia.


Difficulty Rating: 3/10
Classification: Appetizer
A Nostalgic Family Memory:

Growing up, summers at my grandmother's house were a tapestry of vibrant colors and comforting aromas. Each afternoon, as the sun began its slow descent, she would prepare her signature iced tea—a concoction that seemed to capture the very essence of summer.


I remember sitting on the porch, a gentle breeze rustling through the trees, as Grandma served her Honey Ginger Lemon Iced Tea. Its taste was a delightful balance of sweetness and spice, with a hint of tartness from the lemons she handpicked from her garden. The mint leaves, freshly plucked, added an invigorating fragrance that lingered in the warm air.


Grandma would tell stories of her own childhood, of summers spent in the countryside, where time moved slower and life was simpler. As we listened, sipping our tea, it felt as though we were connected across generations, sharing more than just a family recipe but a slice of our heritage.


To this day, each time I prepare this iced tea, I am transported back to those sunny afternoons, enveloped in the warmth of family and the joy of simple pleasures. May this Honey Ginger Lemon Iced Tea bring you the same delight and nostalgia it has given me.


---


Conclusion:

Whether you're hosting a summer gathering or simply enjoying a quiet moment on your own, our Honey Ginger Lemon Iced Tea is sure to delight your taste buds and warm your heart. Its simple preparation and delightful flavors make it a perfect addition to any occasion. So, gather your ingredients, brew a batch, and take a sip down memory lane.

Read more about Appetizers

Read more about Main Dishes

Read more about Desserts

Roasted Fingerling Potatoes and Brussels Sprouts | Made by Meaghan Moineau

Roasted Fingerling Potatoes and Brussels Sprouts | Made by Meaghan Moineau

Title: "Family Gatherings and Flavorful Roasts: The Magic of Roasted Fingerling Potatoes and Brussels Sprouts"
Description: Discover the heartwarming flavors of Roasted Fingerling Potatoes and Brussels Sprouts, a dish that brings families together with its savory aroma and rich taste. Infused with crispy bacon, aromatic rosemary, and perfectly roasted vegetables, this recipe is a nostalgic journey back to family gatherings and cherished memories. Ideal as a main dish, it’s a simple yet impressive addition to any occasion.

---


A Nostalgic Family Favorite: Roasted Fingerling Potatoes and Brussels Sprouts

There's something truly magical about the aroma of a hearty roast wafting through the house. It’s a scent that immediately transports me back to my grandmother's kitchen, where family gatherings were a cacophony of laughter, storytelling, and the irresistible fragrance of roasting vegetables. One dish that always stood out was her Roasted Fingerling Potatoes and Brussels Sprouts, a delightful blend of crispy textures and savory flavors.


Ingredients:

- 1 pound fingerling potatoes, halved


- 1 pound Brussels sprouts, trimmed and halved


- 6 slices of bacon, chopped


- Several cloves of garlic, peeled and smashed


- 1 red onion, sliced


- A drizzle of olive oil


- Several sprigs of fresh rosemary


- A sprinkle of sea salt


Instructions:

1. Preheat the oven to 400°F (200°C).


2. In a large roasting pan, combine the fingerling potatoes, Brussels sprouts, bacon, garlic, and red onion.


3. Drizzle with olive oil and toss to ensure everything is evenly coated.


4. Tuck in the rosemary sprigs among the vegetables and sprinkle with sea salt for added flavor.


5. Roast in the preheated oven for 60-75 minutes, stirring halfway through to ensure even cooking and browning.


6. Serve hot and enjoy with family and friends.


As a child, I remember eagerly awaiting the moment when the kitchen timer would finally go off. My siblings and I would gather around the table, our eyes wide in anticipation as my grandmother brought out the beautifully roasted dish. Each bite was a symphony of flavors—the earthiness of the potatoes, the slight bitterness of the Brussels sprouts countered by the savory bacon, and the aromatic hints of rosemary and garlic.


This dish was a staple at our family gatherings, a testament to how simple ingredients can create something truly special. It was more than just a meal; it was a reminder of the love and warmth that defined our family. The laughter and stories shared around the dinner table remain some of my most treasured memories.


Difficulty Rating: 3/10
Classification: Main Dish

Whether you're looking to create new memories with your loved ones or simply enjoy a comforting, flavorful meal, this Roasted Fingerling Potatoes and Brussels Sprouts recipe is perfect for any occasion. Its simplicity makes it accessible for cooks of all skill levels, while its rich, rustic flavors are sure to delight everyone at the table.

Read more about Appetizers

Read more about Main Dishes

Read more about Desserts