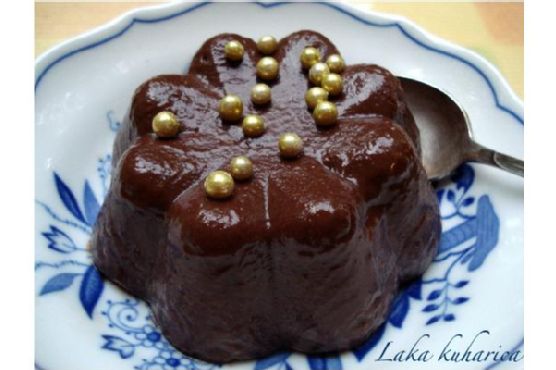
Bittersweet chocolate pudding | Made by Meaghan Moineau
Title: Nostalgic Delights: The Bittersweet Chocolate Pudding That Transports You Back in TimeDescription: Dive into the heartwarming world of bittersweet chocolate pudding, a dessert that not only tantalizes your taste buds but also evokes cherished family memories. Discover how this simple yet decadent treat, crafted from cocoa powder, cornstarch, and more, can become a staple in your family gatherings. Rated as a 4 out of 10 on the difficulty scale, this dessert is perfect for both novice cooks and seasoned chefs seeking a touch of nostalgia.
---
Nostalgic Delights: The Bittersweet Chocolate Pudding That Transports You Back in Time
There's something incredibly comforting about a rich, velvety bowl of bittersweet chocolate pudding. For many, it's more than just a dessert; it's a portal to cherished family memories and the warmth of home. As the aroma of cocoa and vanilla fills the kitchen, I'm instantly transported back to my grandmother's cozy kitchen, where the magic of pudding-making unfolded.
A Family Tradition
Every Sunday, after a hearty family dinner, my grandmother would bring out her well-worn saucepan, a trusted companion in countless culinary adventures. The recipe was simple—cocoa powder, cornstarch, egg, milk, salt, sugar, unsalted butter, and vanilla extract—but the result was nothing short of magical. As children, my siblings and I would gather around the stove, watching in awe as she expertly whisked the ingredients together.
The moment the milk mixture hit the saucepan, a sense of anticipation filled the air. We knew that soon, the kitchen would be filled with the intoxicating scent of chocolate. The gentle bubbling and thickening of the mixture were signals that the pudding was close to perfection. Once the butter and vanilla were stirred in, the mixture was lovingly poured into molds, each rinsed with cold water to ensure a smooth release.
The Art of Waiting
Chilling the pudding was perhaps the hardest part. As it rested in the refrigerator, we would impatiently count down the minutes, eagerly awaiting the moment we could indulge. But my grandmother always reminded us that patience was a virtue, especially when it came to creating something truly special.
A Bite of Bliss
Finally, the moment would arrive. The pudding, now perfectly set, was gracefully released from its mold onto a plate. The first spoonful was always the best—rich, creamy, and with just the right amount of bittersweet chocolate flavor. It was more than just a dessert; it was a taste of love, crafted with care and shared with family.
Crafting Your Own Memories
Creating your own bittersweet chocolate pudding is a rewarding experience, rated as a 4 out of 10 in difficulty. Whether you're a novice or an experienced cook, this dessert offers a delightful challenge and the opportunity to make your own cherished memories. Simply follow these steps:
1. In a medium saucepan, whisk together the cornstarch, cocoa powder, sugar, and salt.
2. In a separate bowl, combine the milk and egg.
3. Gradually pour the milk mixture into the saucepan, whisking until thoroughly mixed.
4. Heat the mixture over medium heat, stirring constantly until it boils. Cook for 1 minute, then remove from heat.
5. Stir in butter and vanilla extract.
6. Pour the pudding into molds rinsed with cold water and chill until set.
A Sweet Conclusion
Bittersweet chocolate pudding is more than just a dessert—it's an invitation to pause, savor, and celebrate the simple joys of life. Whether you enjoy it alone or share it with loved ones, this pudding is a testament to the power of food to create and evoke precious memories. So, gather your ingredients, embrace the process, and let this delightful dish transport you back to simpler times.