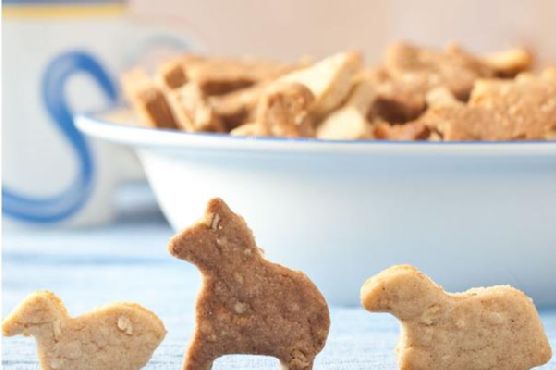
Homemade Animal Crackers | Made by Meaghan Moineau
**Title: "Nostalgia in Every Bite: The Delightful Joy of Homemade Animal Crackers"**
**Description: Discover the charm of baking your own animal crackers with this easy-to-follow recipe. Infused with warm spices like cinnamon and allspice, and a hint of cocoa, these crackers are a delightful treat that bring back fond family memories. Perfect for a nostalgic dessert or a whimsical snack, this recipe will transport you back to simpler times.**
---
**The Allure of Homemade Animal Crackers: A Journey Through Time**
As the aroma of cinnamon and allspice wafts through the kitchen, I'm instantly transported back to my grandmother's cozy farmhouse, where the scent of freshly baked treats was as much a part of the home as the laughter that filled the air. Among her many specialties, her homemade animal crackers were a beloved treat that turned ordinary afternoons into magical adventures.
These charming crackers, with their whimsical shapes and delightful flavors, were more than just a dessert; they were a gateway to cherished memories. As a child, I would eagerly watch my grandmother expertly roll out the dough, her hands deftly crafting each animal with a cookie cutter. It was a ritual that promised both deliciousness and delight, a tradition I now carry on in my own kitchen.
**A Recipe for Nostalgia: Homemade Animal Crackers**
**Ingredients:**
- 1 cup butter
- 1 cup brown sugar
- 1 egg
- 1 teaspoon vanilla extract
- 1 teaspoon cinnamon
- 1/2 teaspoon allspice
- 1/2 teaspoon salt
- 1 teaspoon baking powder
- 1/2 cup oats
- 2 cups flour (substitute cocoa powder for a portion to taste)
**Instructions:**
1. Begin by creaming together the butter and brown sugar until light and fluffy.
2. Add in the egg and vanilla, mixing well to combine.
3. Incorporate the cinnamon, allspice, and salt, blending the spices thoroughly.
4. Mix in the baking powder, oats, and flour. If using cocoa powder, substitute a portion of the flour with it, adjusting to your preference for a touch of chocolatey goodness.
5. Form the dough into a ball, wrap it, and store it in the fridge for at least one hour, or overnight, to let the flavors meld.
6. When ready to bake, preheat your oven to 350 degrees. Roll out the dough to 1/4" thickness, cut out animal shapes, and place them on a parchment-lined baking sheet.
7. Bake for 5-7 minutes, or until the edges are lightly golden. Let cool before enjoying.
**A Taste of Simplicity and Joy**
Making these animal crackers is a delightful experience that brings a sense of calm and joy, much like revisiting a cherished storybook from childhood. As I carefully cut out the animal shapes, I am reminded of the afternoons spent in my grandmother’s kitchen, the warmth of her smile, and the comforting sweetness of those homemade treats.
**Difficulty Rating: 4/10**
These animal crackers are simple to make, perfect for bakers of all skill levels, and can be classified as a **Dessert**. Whether you’re baking as a family activity or indulging in a solo culinary adventure, these crackers promise both deliciousness and a nostalgic trip down memory lane.
---
**Conclusion:**
Homemade animal crackers are more than just a delightful treat; they are a bridge to the past, a recipe that carries with it the warmth of family traditions and the simplicity of childhood joys. So, roll up your sleeves, gather your ingredients, and embark on a baking journey that promises not only a scrumptious outcome but also a heart filled with fond memories.