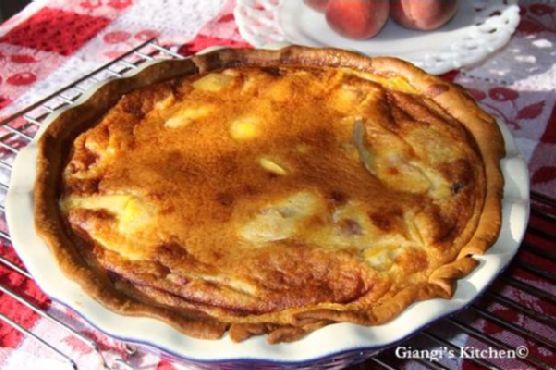
Peach Pie | Made by Meaghan Moineau
Title: A Slice of Nostalgia: The Timeless Charm of Homemade Peach Pie
Description: Dive into the comforting embrace of a homemade Peach Pie, a dessert that weaves together family memories and the sweet taste of summer. With a rich almond twist and the golden allure of fresh peaches, this pie is more than just a treat—it's a heartfelt journey back to simpler times.
---
A Journey Through Time with Peach Pie
There’s something undeniably magical about the aroma of a peach pie wafting through the house. It’s a scent that instantly transports me back to sunny afternoons in my grandmother’s kitchen, where the world seemed to slow down just enough for us to savor every moment. Her kitchen was a haven of warmth and love, a place where the simplest ingredients transformed into stories and traditions.
One of my favorite memories is the summer we spent harvesting peaches from the orchard behind her house. I was no more than eight, and my tiny hands could barely grasp the weight of the ripe, juicy peaches. Yet, the thrill of plucking each fruit directly from the tree was unmatched. Those peaches, with their sun-kissed skins and sweet fragrance, would soon find their way into my grandmother’s legendary Peach Pie.
This pie was always the highlight of our family gatherings. The key to her unforgettable recipe lay in the unexpected addition of almond paste, which added a nutty depth that perfectly complemented the peaches’ natural sweetness. As she prepared the pie, I’d watch, entranced, as she expertly mixed the brown sugar and heavy cream, folding in the vanilla extract with a grace that only comes from years of practice.
---
Recipe: Peach Pie
Ingredients:
- Almond paste- 1 cup brown sugar- 2 brown eggs
- 1 cup heavy cream
- 1 pastry crust
- 4 cups cut up peaches
- 1 teaspoon vanilla extract
Instructions:
1. Preheat the oven to 350°F (175°C).2. Place the pastry dough in a 9-inch round pie plate. Lightly poke the pastry with a fork and prebake for 8 minutes.3. Remove from the oven and set aside to cool slightly.
4. In a large bowl, whisk together the eggs, almond paste, heavy cream, brown sugar, and vanilla extract until smooth.
5. Arrange the cut-up peaches evenly in the prebaked pastry shell.
6. Pour the egg mixture over the peaches, ensuring they are well-covered.
7. Bake in the oven for 45 minutes or until the middle is firm and set.
---
Difficulty: 4/10
Classification: Dessert
---
The first bite of this pie is always a revelation—a burst of juicy peaches enveloped in a creamy, nutty custard, all cradled within a flaky pastry crust. It’s a reminder that the best desserts are those that connect us to our past, evoking memories of laughter-filled kitchens and the love shared around a family table.
Every time I make this Peach Pie, I’m reminded of those cherished moments with my grandmother, her hands guiding mine as we rolled out dough and filled the house with laughter. It’s a tradition I now pass down to my own children, ensuring that our family’s love for this timeless dessert continues for generations to come.
So, gather your loved ones and embark on your own nostalgic journey with this delightful Peach Pie. It’s more than just a dessert; it’s a piece of history, a slice of love, and a lasting legacy.