Coconut Guava Ice cream | Made by Meaghan Moineau

Coconut Guava Ice Cream: A Tropical Delight

Intro

There’s something magical about the fusion of tropical flavors that instantly transports you to a serene beach with every bite. Coconut Guava Ice Cream embodies this essence perfectly. As a child, I remember visiting my grandmother’s house every summer. She had a beautiful guava tree in her backyard, and we would spend lazy afternoons picking ripe guavas and concocting different treats. This ice cream recipe takes me back to those sun-dappled days, filled with laughter, tropical fruits, and the warmth of family gatherings.

Why You’ll Love It

This Coconut Guava Ice Cream is a luscious blend of creamy coconut milk, sweet guavas, and the delightful crunch of peanuts. It’s vegan-friendly, simple to make, and doesn’t require an ice cream maker. The refreshing taste of guava combined with the rich coconut base creates an indulgent yet refreshing dessert. It’s the perfect treat to beat the heat and impress your guests at any gathering.

Ingredients

  • 1 can of coconut milk
  • 1/2 cup condensed milk
  • 2 ripe guavas, chopped and de-seeded
  • 1/2 cup blueberries
  • 1/4 cup crushed peanuts

Instructions

  1. Place the can of coconut milk in the freezer and allow it to solidify. This could take 4-6 hours depending on the temperature of your freezer.
  2. Take out the can of coconut milk and open it completely. The milk and coconut water will have separated, and the coconut water part will be clearer than the milk.
  3. With a very sharp knife, cut through the frozen coconut milk to separate the milk from the coconut water.
  4. Place the frozen coconut milk part in the blender.
  5. Pour in your condensed milk and chopped de-seeded guavas. Blend for about 3-5 minutes at intervals until smooth.
  6. Pour the mixture into a bowl, add your blueberries, stir in, and pop it in the freezer.
  7. Allow your coconut ice cream to freeze for about 3-6 hours.
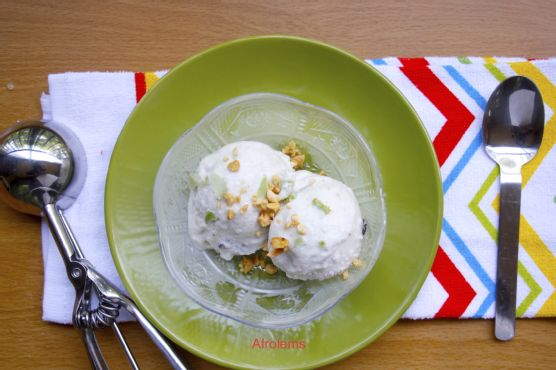
  8. Serve garnished with the crushed peanuts.

Tips

To ensure the best texture, make sure the coconut milk is fully solidified before opening. Use ripe guavas for maximum flavor. If you prefer a smoother texture, blend the blueberries with the coconut milk and guavas instead of stirring them in.

Variations & Substitutions

If you want to add a citrusy note, consider adding a tablespoon of lime juice before blending. For a nut-free version, skip the peanuts and garnish with toasted coconut flakes instead. If guavas are not in season, substitute with mangoes or papayas for a different tropical twist.

Storage

Store the Coconut Guava Ice Cream in an airtight container in the freezer for up to two weeks. Allow it to soften at room temperature for a few minutes before serving for the best texture.

FAQ

Can I use fresh coconut milk instead of canned?

While fresh coconut milk can be used, canned coconut milk is preferred for its creaminess and consistency, which enhances the texture of the ice cream.

Is this recipe suitable for vegans?

Yes, this recipe is vegan-friendly as long as you use vegan condensed milk or a homemade version made from coconut milk and sugar.

Can I make this recipe without a blender?

A blender is recommended for achieving a smooth texture. However, you can mash the guavas and mix them with the other ingredients using a fork if a blender is unavailable.

Nutrition

This Coconut Guava Ice Cream is a delightful indulgence. While exact nutritional values may vary based on specific ingredients used, it is generally a good source of healthy fats from the coconut milk and provides vitamins from the fruits. It’s a sweet treat best enjoyed in moderation.

Conclusion

Coconut Guava Ice Cream is a celebration of tropical flavors, nostalgia, and simplicity. With just a few ingredients and steps, you can create a delicious and refreshing dessert that will transport you to a sunny paradise with every bite. Whether you’re entertaining guests or treating yourself, this ice cream is sure to impress. So, why not give it a try and create your own tropical memories?

Related update: Coconut Guava Ice cream

Related update: Macaroni and Cheese Gratin

Week 7 Fantasy Football: Start Em, Sit Em | Analysis by Brian Moineau

Fantasy Football Week 7: Defense & Kicker Start ‘Em, Sit ‘Em Insights

As we dive into Week 7 of the fantasy football season, the stakes are rising, and so are the decisions we need to make. If you’ve been sweating over your lineup choices, you’re not alone. With injuries and bye weeks wreaking havoc, the right defense and kicker can make all the difference in securing that crucial win. Luckily, fantasy football expert Michael Fabiano has broken down some solid recommendations for this week—highlighting who to start and who to sit.

Understanding the Fantasy Landscape

Week 7 of the NFL season brings us a variety of matchups that could swing the tide in your favor—or leave you regretting your choices. With several teams on bye and key players sidelined due to injuries, the importance of defense and kickers often gets overlooked. However, they can be the unsung heroes of your lineup, racking up points that could push you over the edge in a tight matchup.

In his recent article for Sports Illustrated, Fabiano provides a comprehensive guide for navigating these often-overlooked positions. He emphasizes that while quarterbacks and running backs get most of the love, savvy fantasy managers know that DSTs (defensive/special teams) and kickers can provide that essential edge you need.

Let’s break down Fabiano’s recommendations so you can make informed choices this week.

Key Takeaways for Week 7

Start the Right Defenses: Fabiano recommends targeting defenses facing struggling offenses. Look for matchups where the opposing team has faced challenges in scoring, as they are likely to yield more turnovers and sacks.

Kickers in Favorable Weather: Weather conditions can heavily influence a kicker’s performance. Fabiano suggests opting for kickers playing in indoor stadiums or locations with favorable weather conditions, as this minimizes the risk of missing those crucial field goals.

High-Scoring Games: Pay attention to matchups projected to be high-scoring. Kickers on teams expected to score often will have more opportunities for extra points and field goals, making them a prime start.

Avoid Injured Players: Always check the injury reports before setting your lineup. Fabiano highlights that even if a player is listed as “questionable,” it’s often safer to sit them to avoid zero-point surprises.

Streaming Options: If you’re in a bind, Fabiano suggests looking for streaming options for both DSTs and kickers. Certain matchups can present overlooked opportunities that might be ripe for the picking.

Conclusion: The Little Things Matter

As we gear up for Week 7, remember that every point counts. While star players grab headlines, the right defense and kicker can be the secret sauce to elevate your fantasy team. By leveraging expert insights like those from Michael Fabiano, you can make strategic decisions that could turn your season around. So, trust your gut, keep an eye on the matchups, and don’t forget to have fun along the way!

Sources

– Fabiano, Michael. “Defense & Kicker Start ‘Em, Sit ‘Em For Fantasy Football Week 7.” Sports Illustrated. [Sports Illustrated](https://www.si.com/fantasy/2023/10/18/fantasy-football-week-7-start-em-sit-em-dst-kickers)

By staying informed and making savvy choices, you can navigate the complexities of fantasy football and enjoy the thrill of victory. Good luck this week!


Related update: We recently published an article that expands on this topic: read the latest post.


Related update: We recently published an article that expands on this topic: read the latest post.

Big 12 Basketballs New Broadcast Era | Analysis by Brian Moineau

Big 12 Men’s Basketball Television Schedule Unveiled: A New Era of Broadcast Partnerships

The excitement is palpable as the Big 12 Conference gears up for an electrifying 2025-26 basketball season! With the recent unveiling of the men’s basketball television schedule, fans are buzzing about the new era of broadcast agreements. This season marks a significant shift in how fans will experience their favorite teams, thanks to partnerships with five national networks.

Context: A Shift in the Broadcasting Landscape

The landscape of college basketball broadcasting has witnessed considerable changes over the years, with various conferences seeking to maximize exposure and revenue. The Big 12 Conference, known for its competitive teams and thrilling matchups, has now aligned with some of the top broadcasting partners in the country, including ESPN and FOX Sports. This strategic move is designed to not only enhance the visibility of the conference but also to provide fans with more accessible viewing options.

As the college basketball season approaches, it’s essential for fans to mark their calendars and tune in to witness the action unfold. With games being aired on the ESPN family of networks (ABC, ESPN, ESPN2) and FOX Sports, fans can expect a dynamic viewing experience that captures the intensity of Big 12 basketball.

Key Takeaways

Diverse Broadcasting Partners: The Big 12 will collaborate with five national partners, including ESPN and FOX Sports, ensuring games reach a wide audience.

Enhanced Viewing Options: Fans will have access to games across multiple platforms, increasing opportunities to catch their favorite teams in action.

Strategic Timing: The 2025-26 season is set to kick off with a revamped schedule that emphasizes prime viewing hours, making it easier for fans to tune in.

Increased Exposure for Teams: This broadcasting agreement aims to elevate the profiles of Big 12 teams, potentially attracting more recruits and enhancing the overall competitiveness of the conference.

Exciting Matchups Await: With an array of games scheduled, fans can look forward to thrilling matchups and rivalries that define the Big 12 basketball experience.

Concluding Reflection: A Bright Future for Big 12 Basketball

As we embark on this new broadcasting journey, the Big 12 Conference is undeniably setting the stage for an exhilarating basketball season. The collaboration with major networks not only enhances accessibility for fans but also solidifies the conference’s commitment to showcasing its talent. Whether you’re a die-hard fan or a casual viewer, there’s never been a better time to tune in and support your team. Here’s to a season filled with unforgettable moments and thrilling basketball!

Sources

– “Big 12 Men’s Basketball Television Schedule Unveiled With Five National Partners – Big 12 Conference” [Big 12 Conference](https://big12sports.com/news/2023/10/3/mens-basketball-big-12-mens-basketball-television-schedule-unveiled-with-five-national-partners.aspx)

By utilizing relevant keywords and subheadings, this blog post is optimized for SEO while maintaining a conversational tone that engages readers. With the excitement of the upcoming season and the dynamic changes in broadcasting, fans are sure to stay connected and follow their teams closely.


Related update: We recently published an article that expands on this topic: read the latest post.


Related update: We recently published an article that expands on this topic: read the latest post.

Crisp Winter Salad with Maple Gorgonzola Dressing | Made by Meaghan Moineau

Crisp Winter Salad with Maple Gorgonzola Dressing

Intro

As the leaves begin to fall and the air turns crisp, I’m reminded of cozy family gatherings in my childhood home. My mother would always prepare a fresh, vibrant salad that seemed to mirror the beauty of the winter landscape outside. Her secret? A delightful blend of crunchy vegetables and a rich, creamy dressing that brought warmth to our hearts and smiles to our faces. This Crisp Winter Salad with Maple Gorgonzola Dressing is an homage to those cherished memories and a testament to the joy of sharing simple yet luxurious meals with loved ones.

Why You’ll Love It

This salad is a symphony of flavors and textures, perfect for those chilly months when you crave something fresh yet comforting. The crunchy vegetables provide a satisfying bite, while the maple gorgonzola dressing offers a creamy and tangy contrast. It’s a versatile dish that can be served as a starter, a side, or even a light main course. Whether you’re hosting a festive gathering or enjoying a quiet meal at home, this salad is sure to impress.

Ingredients

  • Broccoli stems, thinly sliced
  • Celery, thinly sliced
  • Cider vinegar
  • Dijon mustard
  • Gorgonzola cheese, crumbled
  • Jicama, julienned
  • Kosher salt
  • Low fat sour cream
  • Maple syrup
  • Olive oil
  • Radishes, thinly sliced
  • Red green apple, thinly sliced
  • Romaine lettuce, chopped
  • Savoy cabbage, shredded
  • Walnuts, toasted
  • White pepper

Instructions

  1. In a large bowl, combine the broccoli stems, celery, jicama, radishes, apple, romaine lettuce, and savoy cabbage. Toss gently to mix.
  2. In a medium bowl, whisk together the low fat sour cream, olive oil, cider vinegar, dijon mustard, maple syrup, kosher salt, and white pepper until smooth.
  3. Gently stir in the gorgonzola cheese, using a fork to combine without mashing the cheese—ensure there are visible chunks in the dressing.
  4. Add the toasted walnuts to the salad mixture, then pour the dressing over the top. Toss everything together until well coated.
  5. Serve immediately or refrigerate for up to an hour to allow the flavors to meld.

Tips

For the best results, use fresh, high-quality ingredients. Ensure your vegetables are crisp and your gorgonzola is flavorful and creamy. Toasting the walnuts enhances their flavor and adds a delightful crunch to the salad. Feel free to adjust the amount of maple syrup in the dressing to suit your taste for sweetness.

Variations & Substitutions

If gorgonzola isn’t your favorite, try substituting it with feta or blue cheese for a different flavor profile. For a vegan version, swap the sour cream with a plant-based alternative and omit the cheese altogether. Add some grilled chicken or roasted chickpeas for extra protein, making this salad a more substantial meal.

Storage

This salad is best enjoyed fresh, but you can store leftovers in an airtight container in the refrigerator for up to two days. If you plan to store the salad, keep the dressing separate and toss it just before serving to maintain the crunchiness of the vegetables.

FAQ

Can I make the dressing ahead of time?

Yes, you can prepare the dressing up to two days in advance. Store it in a sealed container in the refrigerator and give it a good stir before using.

What can I serve with this salad?

This salad pairs beautifully with roasted meats or grilled seafood. It also works well alongside hearty soups or stews, adding a fresh contrast to warm, rich dishes.

Can I use a different type of lettuce?

Absolutely! While romaine offers a nice crunch, you can use mixed greens, arugula, or even spinach for a different texture and flavor.

Nutrition

This salad is packed with nutritious ingredients. The array of vegetables provides fiber, vitamins, and minerals, while the walnuts add healthy fats. The dressing, although creamy, is made with low fat sour cream and olive oil, making it a healthier choice compared to traditional creamy dressings.

Conclusion

Our Crisp Winter Salad with Maple Gorgonzola Dressing is a delightful addition to any meal, bringing together the best of winter’s bounty. It’s a dish that not only nourishes the body but also warms the soul, reminding us of the simple joys of good food and cherished company. Whether you’re gathering around the table with family or treating yourself to a solo feast, this salad promises to deliver comfort and joy with every bite. Enjoy!

Related update: Crisp Winter Salad with Maple Gorgonzola Dressing

Chinas Rare Earths Strategy Shakes Global | Analysis by Brian Moineau

China’s Rare-Earths Power Move: A Strategic Shift in Global Trade

In a world increasingly defined by technology and innovation, the battle for resources that fuel these advancements has become more intense. Recently, China made headlines with its latest power move in the rare-earths market, sending shockwaves through U.S. policymakers and business leaders alike. This situation is more than just a trade dispute; it’s a strategic maneuver that could redefine the relationship between two of the world’s largest economies.

The Context: Rare Earths and Global Trade Dynamics

Rare earth elements play a crucial role in the production of advanced technologies, ranging from smartphones to electric vehicles. Despite their name, these elements are not particularly rare in terms of abundance; rather, they are challenging to extract and process economically. For years, China has dominated the global supply of these materials, producing about 60% of the world’s rare earths.

The recent decision by Beijing to impose export controls on these critical minerals is seen as a power play aimed at the United States. Analysts suggest that these restrictions are not merely about protecting domestic resources; they are strategically designed to pressure the U.S. into reconsidering its own restrictions on advanced computer chip sales to China. This tit-for-tat dynamic highlights a growing trend where economic policies are increasingly intertwined with national security interests.

The Background: A Long-Term Strategy

It’s essential to understand that this move by China did not happen overnight. The groundwork for this strategic positioning has been laid over the years, as the Chinese government has invested heavily in its rare-earths processing capabilities while simultaneously working to consolidate control over the supply chain. This proactive approach has allowed China to leverage its position to influence global markets and diplomatic relations.

Moreover, the U.S. has been aware of its dependency on Chinese rare earths for some time now. Efforts to establish domestic sources and diversify supply chains have been ongoing, but progress has been slow. The recent export controls have only amplified the urgency of these initiatives, forcing U.S. lawmakers and businesses to rethink their strategies in the face of an increasingly assertive China.

Key Takeaways

Strategic Maneuvering: China’s export controls on rare earths are a calculated move aimed at influencing U.S. technology policies, particularly regarding computer chips. – Supply Chain Vulnerabilities: The U.S. is heavily reliant on Chinese rare earths, highlighting vulnerabilities in its supply chains that could have significant economic and national security implications. – Long-Term Planning: China’s dominance in the rare-earths market is the result of years of strategic investment and consolidation, showcasing the importance of foresight in resource management. – Global Impact: The fallout from this power move extends beyond the U.S.-China relationship, affecting global markets, technology sectors, and international trade dynamics.

Conclusion: The Road Ahead

As the world watches this unfolding drama, it’s clear that the conflict over rare earths is more than just a trade dispute—it’s a reflection of the broader geopolitical landscape. The implications of China’s recent actions will likely reverberate across industries and borders, prompting a reevaluation of how nations approach resource management and international cooperation. For the U.S., the path forward involves not just addressing immediate supply chain vulnerabilities, but also fostering innovation and resilience in the face of global competition.

Sources

– The Washington Post: [China’s rare-earths power move jolted Trump but was years in the making](https://www.washingtonpost.com/business/china-rare-earths-export-controls/2023/08/09/rare-earths-power-move/) – Reuters: [China’s Rare Earths Strategy: What You Need to Know](https://www.reuters.com/business/chinas-rare-earths-strategy-what-you-need-know-2023-08-10/) – BBC News: [Understanding Rare Earth Elements](https://www.bbc.com/news/business-58239072)

By keeping an eye on these developments, we can better understand the intricate dance of global power dynamics and its implications for the future of technology and trade.


Related update: We recently published an article that expands on this topic: read the latest post.


Related update: We recently published an article that expands on this topic: read the latest post.

Monastery soup | Made by Meaghan Moineau

Monastery Soup: A Simple, Soul-Warming Delight

Intro

There’s something incredibly comforting about a bowl of hot soup, especially when it has a rich history and a story to tell. Monastery Soup is one such dish, with roots deeply embedded in the traditions of monastic cooking. I remember visiting a serene monastery nestled in the hills during my travels in Europe. The air was crisp, and the architecture, simplistic yet awe-inspiring. After a long day of exploration, I was offered a bowl of this humble soup by one of the monks. It was a moment of pure bliss, where the warmth of the soup matched the warmth in my heart. That moment has stayed with me, and today, I want to share this memory and recipe with you.

Why You’ll Love It

Monastery Soup is not just food; it’s an experience. Here’s why you’ll fall in love with this delightful dish:

  • Simplicity: With just a few wholesome ingredients, this soup is easy to prepare yet incredibly nourishing.
  • Heartiness: Packed with vegetables and beans, it’s a meal in itself, perfect for a satisfying lunch or dinner.
  • Customizable: You can easily adjust the ingredients to suit your taste or dietary needs.
  • Comforting: The aroma alone is enough to lift your spirits on a cold day.

Ingredients

  • 2 tablespoons sunflower oil
  • 2 medium potatoes, diced
  • 1 large onion, chopped
  • 3 cloves garlic, minced
  • 2 carrots, sliced
  • 1 leek, sliced
  • 2 stalks celery, chopped
  • 1 cup broad beans
  • 4 cups vegetable stock
  • Fresh parsley, chopped
  • Salt and pepper to taste

Instructions

  1. Heat the sunflower oil in a large pan over medium heat.
  2. Add the diced potatoes, chopped onion, and minced garlic. Sauté, covered, for about 10 minutes until the onions are translucent and the potatoes start to soften.
  3. Stir in the sliced carrots, leek, and chopped celery. Continue to sauté for another 5 minutes, allowing the vegetables to become tender.
  4. Add the broad beans and pour in the vegetable stock. Stir well, cover the pan, and let it simmer gently for another 10 minutes, or until the potatoes and broad beans are soft.
  5. Season with freshly chopped parsley, salt, and pepper according to your taste.
  6. Serve hot with crusty bread for a complete meal.

Tips

  • For a creamier texture, blend a portion of the soup and mix it back in.
  • Use fresh, seasonal vegetables for the best flavor.
  • Adjust the amount of garlic according to your preference for a more robust flavor.

Variations & Substitutions

Monastery Soup is wonderfully adaptable. Here are some variations you might want to try:

  • Vegetables: Swap out the potatoes for sweet potatoes or add some zucchini for a different taste.
  • Beans: If you don’t have broad beans, try using chickpeas or lentils instead.
  • Herbs: Experiment with adding thyme or rosemary for an aromatic twist.

Storage

Monastery Soup stores well, making it perfect for meal prep:

  • Refrigerate: Store in an airtight container for up to 4 days.
  • Freeze: You can freeze the soup for up to 3 months. Thaw in the refrigerator overnight before reheating.

FAQ

Can I make this soup in advance?

Absolutely! This soup tastes even better the next day as the flavors have more time to meld together. Simply reheat on the stove over low heat until warmed through.

Is Monastery Soup vegan?

Yes, as long as you use vegetable stock and avoid any animal-based additives, this soup remains vegan-friendly.

What can I serve with Monastery Soup?

A slice of crusty bread or a fresh green salad makes a perfect accompaniment to this hearty soup.

Nutrition

This soup is not only delicious but also nutritious. It’s packed with fiber from the vegetables and beans, and provides a good source of vitamins and minerals. It’s a guilt-free comfort food that’s perfect for any diet.

Conclusion

Monastery Soup is more than just a meal; it’s a bowl of comfort that carries with it a sense of history and tranquility. Whether you’re enjoying it on a cool evening or sharing it with loved ones, it’s a dish that warms both the body and soul. I hope this recipe brings as much joy to your kitchen as it does to mine. May it become a cherished part of your culinary repertoire, as it has become a staple in my own home.

Related update: Monastery soup

Related update: Corn Chowder with Potatoes, Poblanos, and Smoked Gouda

Cheesy Potato Corn Scones | Made by Meaghan Moineau

Cheesy Potato Corn Scones

Intro

There’s something undeniably comforting about the aroma of freshly baked scones wafting through the kitchen. It instantly takes me back to my grandmother’s cozy farmhouse, where every Sunday morning, she would whip up a batch of her famous scones. Her secret ingredient? Love, of course, but also a touch of creativity that transformed simple ingredients into something extraordinary. Today, I’m sharing a delightful twist on the classic scone recipe—Cheesy Potato Corn Scones. This recipe captures the essence of those cherished mornings with a modern, cheesy twist that will have you reaching for seconds.

Why You’ll Love It

These Cheesy Potato Corn Scones are a perfect blend of savory flavors and soft textures, making them an irresistible treat for any occasion. Whether you’re hosting a brunch, looking for a satisfying snack, or simply want to enjoy a warm, cheesy delight, these scones have got you covered. The addition of potato flakes gives them a unique lightness, while the cheddar cheese and cornmeal provide a rich, hearty flavor. Plus, they’re easy to make and guaranteed to impress your family and friends!

Ingredients

  • 1 cup water
  • 1/2 cup potato flakes
  • 1/3 cup diced unsalted butter
  • 1 1/2 cups all-purpose flour
  • 1/2 cup yellow cornmeal
  • 1 cup shredded cheddar cheese, divided
  • 1 tablespoon baking powder
  • 1 teaspoon salt
  • 1 tablespoon poppy seeds
  • 3/4 cup milk

Instructions

  1. Preheat your oven to 400°F (200°C). Lightly grease a baking sheet and set aside.
  2. In a small saucepan, bring the water just to a simmer; remove from heat.
  3. Stir in the potato flakes until they are moistened.
  4. Add the diced butter to the potato mixture and stir until it is fully incorporated.
  5. In a large bowl, combine the flour, cornmeal, 3/4 cup of the cheddar cheese, baking powder, salt, and poppy seeds.
  6. Stir in the potato mixture and milk until just combined.
  7. With floured hands, gently knead and fold the dough for five to six strokes, or until it comes together in one mass.
  8. Pat the dough lightly to flatten it into a 9-inch circle on the prepared baking sheet.
  9. Using a pizza cutter or a floured knife, cut the dough into eight wedges (do not separate).
  10. Sprinkle the edges with the remaining cheese.
  11. Bake in the preheated oven for about 25 minutes or until lightly browned.
  12. Gently pull or cut the scones to separate. Serve warm and enjoy!

Tips

For the best results, use cold butter and work quickly to keep it from melting before baking. If you notice the dough is too sticky while kneading, feel free to add a little more flour, a tablespoon at a time. Additionally, using freshly grated cheddar cheese will enhance the flavor and melt beautifully in the scones.

Variations & Substitutions

If you want to experiment with flavors, consider adding chopped fresh herbs like chives or rosemary to the dough. For a spicy kick, try mixing in some diced jalapeños. If you’re looking for a gluten-free option, substitute the all-purpose flour with a 1:1 gluten-free flour blend. You can also use any other type of cheese you prefer, such as mozzarella or gouda, to change up the taste.

Storage

These scones are best enjoyed fresh out of the oven, but they can be stored in an airtight container at room temperature for up to two days. To reheat, simply place them in a 350°F (175°C) oven for 5-10 minutes. For longer storage, freeze the scones in a single layer and then transfer them to a resealable freezer bag. They can be reheated straight from the freezer in the oven at 350°F (175°C) for about 15 minutes.

FAQ

Can I make the dough ahead of time?

Yes, you can prepare the dough up to a day in advance. Wrap it tightly in plastic wrap and store it in the refrigerator. When you’re ready to bake, simply shape, cut, and bake the scones as instructed.

Can I use real potatoes instead of potato flakes?

While potato flakes are convenient and help create a fluffy texture, you can use mashed potatoes as a substitute. Just ensure they are smooth and not too wet, and adjust the flour accordingly if the dough becomes too sticky.

Nutrition

Each serving of these Cheesy Potato Corn Scones is approximately 220 calories, with 12g of fat, 22g of carbohydrates, and 6g of protein. They are a delightful indulgence, offering a comforting balance of flavors and textures.

Conclusion

These Cheesy Potato Corn Scones are a testament to the magic that happens when simple ingredients come together with a touch of love and creativity. Whether you’re savoring them with a morning coffee, serving them at a brunch gathering, or enjoying them as a cozy snack, they are sure to bring warmth and joy to your table. I hope this recipe becomes a cherished addition to your collection, just as it has in mine. Happy baking!

Related update: Cheesy Potato Corn Scones

Bills Must Reset During Bye Week Challenge | Analysis by Brian Moineau

Time to Hit the Reset Button: What the Bills Need During Their Bye Week

After a promising 4-0 start to the season, the Buffalo Bills find themselves in a tough spot, heading into their bye week on a two-game losing streak. The recent loss to the Atlanta Falcons has raised questions, and head coach Sean McDermott is calling for a reset. It’s a crucial moment for a team that began the season with high hopes but is now grappling with injuries and inconsistencies. So, what should the Bills focus on during this pivotal week off?

Context: A Rocky Turn of Events

The Bills kicked off the season with an impressive 4-0 record, showcasing their potential as serious playoff contenders. However, back-to-back losses have cast a shadow over the team’s early success. The latest defeat against the Falcons exposed some glaring weaknesses, particularly in the areas of defensive cohesion and offensive execution. Injuries have taken their toll, and now, as the team enters the bye week, it’s time for reflection and recalibration.

Coach McDermott emphasized the importance of utilizing this time wisely, indicating that the players need to “start over” as they prepare for the second half of the season. With several key players nursing injuries, the coaching staff must assess their roster and strategize for the upcoming games.

Key Takeaways

Injury Management is Key: The Bills have been hit hard by injuries, and addressing player health during the bye week is crucial for a successful comeback.

Time for Reflection: This break presents an opportunity for players and coaches to analyze game footage, identify weaknesses, and implement necessary adjustments before the next matchup.

Focus on Fundamentals: The Bills need to return to the basics—solid tackling, effective blocking, and disciplined play. A return to fundamental football can help them regain their winning form.

Mental Reset: The psychological aspect of sport is just as important as the physical. Taking time to regroup mentally can help the team approach the rest of the season with renewed vigor.

Reassess Goals: With the first quarter of the season behind them, the Bills should revisit their goals. Setting achievable milestones can help refocus their efforts and maintain motivation.

Conclusion: A New Beginning Awaits

While it’s easy to feel disheartened after a couple of losses, the bye week offers a chance for the Buffalo Bills to regroup and reenergize. By leveraging this time to heal, reflect, and refocus, they can emerge stronger and more determined for the second half of the season. The journey is far from over, and with their talent and grit, the Bills have the potential to turn things around.

As fans, let’s hope they use this time wisely, because the best is yet to come!

Sources

– McDermott: Bills must use bye week to start over – ESPN [ESPN Article](https://www.espn.com/nfl/story/_/id/38483600/bills-bye-week-start-over)

*Remember to stay tuned for the Bills’ next games and updates as they work to turn their season around!*


Related update: We recently published an article that expands on this topic: read the latest post.


Related update: We recently published an article that expands on this topic: read the latest post.


Related update: We recently published an article that expands on this topic: read the latest post.


Related update: We recently published an article that expands on this topic: read the latest post.

Tua Tagovailoas Leadership Remarks Spark | Analysis by Brian Moineau

Tua Tagovailoa’s Leadership Comments: A Misstep or a Wake-Up Call?

After a tough loss against the Chargers, Miami Dolphins quarterback Tua Tagovailoa made headlines with comments that hinted at deeper issues within the team. While he was speaking candidly about the struggles of a 1-5 team, his remarks raised eyebrows, leaving fans and analysts wondering: did he pick the wrong forum to voice his concerns?

Context: Dolphins’ Struggles This Season

The Miami Dolphins have been grappling with a disappointing start to the 2023 NFL season. With only one win amidst five losses, the team has been under the microscope. Tua, who has shown flashes of brilliance in the past, pointed to a lack of leadership as a central issue. Specifically, he mentioned players not attending crucial player-only meetings, suggesting that accountability is waning. This statement inevitably drew the attention of head coach Mike McDaniel, who felt that the post-game press conference wasn’t the right medium for Tua to express such sentiments.

The Reaction: Coach McDaniel’s Perspective

Mike McDaniel’s response was measured but pointed. He emphasized that while Tua’s frustrations might be valid, airing them publicly might not yield the desired effect. Instead, McDaniel suggested that these discussions should occur internally, fostering a more unified front. His comments reflect a broader understanding among coaches that internal team dynamics should remain within the locker room to maintain morale and cohesion.

Key Takeaways

Tua’s Frustration: Tua Tagovailoa’s comments highlight his awareness of the Dolphins’ struggles and signal a desire for accountability among teammates.

Leadership Issues: The quarterback’s statements about players skipping meetings indicate a potential culture problem within the team that needs addressing.

Coach’s Guidance: Mike McDaniel believes that Tua’s comments would have been better suited for an internal discussion rather than a public forum, indicating a preference for team unity in challenging times.

Importance of Communication: This situation underscores the significance of communication within a team, particularly when the going gets tough. Leaders must navigate these conversations carefully to avoid creating further divides.

Looking Ahead: The Dolphins must rally together if they hope to turn their season around. Team solidarity and effective leadership will be crucial in the weeks to come.

Conclusion: A Call for Unity

As the Dolphins continue to navigate a challenging season, Tua Tagovailoa’s comments serve as a critical reminder of the importance of leadership and communication within a team. While voicing concerns can be vital, the timing and manner in which these issues are raised can significantly impact team dynamics. Moving forward, it will be essential for the Dolphins to come together, address their shortcomings internally, and focus on rebuilding their season one game at a time.

Sources

– NBC Sports: Mike McDaniel: Tua Tagovailoa picked the wrong forum for his comments [Link](https://www.nbcsports.com/nfl/news/mike-mcdaniel-tua-tagovailoa-picked-the-wrong-forum-for-his-comments)


Related update: We recently published an article that expands on this topic: read the latest post.


Related update: We recently published an article that expands on this topic: read the latest post.

Walnut Pesto | Made by Meaghan Moineau

Walnut Pesto: A Nutty Twist on a Classic

Intro

I remember the first time I tasted homemade pesto at my grandmother’s kitchen table. The aroma of fresh basil mingling with garlic and cheese was heavenly, and it was an instant family favorite. Fast forward to today, I’ve put my own twist on this classic by incorporating walnuts, a nod to the bountiful walnut tree in our backyard. This walnut pesto is not only a homage to my grandmother’s recipe but also a deliciously nutty variation that adds depth and texture to a beloved classic.

Why You’ll Love It

This walnut pesto is a game-changer for several reasons. First, it’s incredibly versatile. Whether you’re tossing it with pasta, spreading it on sandwiches, or using it as a dip, this pesto adds a burst of flavor to any dish. Second, it’s quick and easy to make, taking less than 15 minutes from start to finish. Finally, the walnuts add a rich, earthy flavor and a dose of heart-healthy fats, making this pesto not only tasty but also nutritious.

Ingredients

  • 2 cups fresh basil leaves, packed
  • 2 cloves garlic
  • ½ cup olive oil
  • ½ cup grated Parmesan cheese
  • ½ teaspoon sea salt
  • ½ cup walnuts

Instructions

  1. Combine walnuts, basil, garlic, Parmesan, and salt in a food processor. Process until the mixture forms a coarse puree.
  2. With the machine running, slowly add the olive oil through the feed tube. Continue processing until the pesto is smooth, stopping to scrape down the sides as necessary.
  3. Transfer the pesto to an airtight jar, preferably one that is opaque to keep out the light.
  4. To prevent the pesto from browning, cover its surface with a thin layer of olive oil before sealing the jar.
  5. Store the pesto in the refrigerator and enjoy as needed.

Tips

For the best flavor, use fresh, high-quality ingredients. If your basil leaves are a little wilted, revive them by soaking in ice water for a few minutes. When adding olive oil, go slow to achieve the desired consistency. If your pesto is too thick, add more olive oil, a little at a time. You can also toast the walnuts lightly before processing for an added depth of flavor.

Variations & Substitutions

This recipe is incredibly adaptable. If you’re out of walnuts, try substituting with pine nuts or almonds. For a dairy-free version, omit the Parmesan cheese and add a tablespoon of nutritional yeast for a cheesy flavor. You can also experiment with different herbs; try adding a handful of parsley or cilantro for a unique twist. If you prefer a spicier kick, throw in a pinch of red pepper flakes while processing.

Storage

Store your walnut pesto in the refrigerator for up to a week. To extend its shelf life, freeze it in ice cube trays. Once frozen, transfer the cubes to a zip-top bag and store in the freezer for up to three months. Thaw the cubes in the refrigerator overnight or at room temperature for a couple of hours before using. Always ensure that the surface is covered with a layer of olive oil to prevent browning.

FAQ

Can I make walnut pesto without a food processor?

Yes, you can! If you don’t have a food processor, use a mortar and pestle. It requires a bit more elbow grease but yields a rustic texture that many find appealing. Start by crushing the garlic and salt, then gradually add the basil, walnuts, and cheese, grinding until you achieve a paste. Slowly mix in the olive oil to finish.

How can I use walnut pesto in my meals?

Walnut pesto is incredibly versatile. Toss it with your favorite pasta, spread it on sandwiches or wraps, or use it as a topping for grilled chicken or fish. It’s also a fantastic addition to soups and stews, adding a burst of flavor. Get creative and explore different ways to enjoy this delectable sauce!

Is walnut pesto vegan?

The traditional recipe includes Parmesan cheese, which is not vegan. However, you can make a vegan version by omitting the cheese and adding nutritional yeast to achieve a similar cheesy flavor. Ensure all other ingredients are vegan-friendly, and you’re good to go!

Nutrition

This walnut pesto is not only flavorful but also packed with nutrients. Walnuts are rich in omega-3 fatty acids, which are beneficial for heart health. Basil and garlic offer antioxidants, while olive oil provides healthy fats. This pesto is a nutritious addition to any meal, providing healthy fats, protein, and fiber.

Conclusion

Walnut pesto is a delightful twist on a classic recipe that’s sure to become a staple in your kitchen. Its rich, nutty flavor and versatility make it a must-try for pesto lovers and newcomers alike. Whether you’re making a quick weeknight dinner or looking to impress guests with a gourmet touch, this walnut pesto will not disappoint. I hope this recipe brings as much joy to your table as it has to mine. Enjoy!

Related update: Walnut Pesto

Related update: Quick N' Easy Basil Pesto

Lloyds Faces £2 Billion Car Finance | Analysis by Brian Moineau

The Car Finance Scandal: Lloyds Bank Faces a £2 Billion Fallout

It’s not every day that a bank announces a potential £2 billion hit to its finances. But that’s exactly the scenario Lloyds Banking Group finds itself in as it grapples with the fallout from a car finance scandal. The recent announcement of an additional £800 million set aside for claims has sent shockwaves through the banking sector, raising questions about regulatory oversight and customer trust.

Understanding the Scandal

So, what led to this staggering financial estimate? The scandal revolves around allegations that Lloyds, like several other banks, engaged in improper lending practices in their car finance division. Reports indicate that many customers may have been sold loans that were unsuitable for their financial situations, potentially leading to significant debt and financial distress. As more customers come forward, Lloyds anticipates a higher volume of claims than initially expected, thus the need for a larger reserve.

This isn’t just an isolated incident. The car finance market has come under scrutiny in recent years, with regulators investigating various lenders for similar practices. The Financial Conduct Authority (FCA) has been cracking down on unfair lending practices, pushing banks and finance companies to reassess how they interact with customers. For Lloyds, this scandal could be a pivotal moment, not just financially but also in terms of reputation.

Key Takeaways

Financial Impact: Lloyds has earmarked an additional £800 million for potential claims related to the car finance scandal, raising the overall potential cost to £2 billion. – Higher Claims Expected: The bank has revised its estimates, anticipating a larger number of eligible claims than previously thought, indicating widespread issues within its car finance division. – Regulatory Scrutiny: The scandal underscores the ongoing regulatory scrutiny of the car finance market, with the FCA actively investigating lending practices across the industry. – Customer Trust at Stake: As banks face increased scrutiny, maintaining customer trust becomes more crucial than ever. The fallout from this scandal could have long-lasting effects on Lloyds’ reputation. – Industry-Wide Reflection: This incident may prompt other financial institutions to revisit their lending practices to ensure compliance and ethical standards.

Conclusion: A Call for Accountability

As the fallout from the Lloyds car finance scandal continues to unfold, it serves as a stark reminder of the responsibilities that banks have towards their customers. The potential £2 billion cost is not just a number; it represents the lives and financial well-being of countless individuals who may have been adversely affected by these lending practices. Moving forward, it will be essential for Lloyds and other banks to prioritize transparency and accountability to rebuild trust with their customers. The financial industry is at a crossroads, and how it handles these challenges could shape the future landscape of banking in the UK.

Sources

– BBC News. “Lloyds warns car finance scandal could cost it £2bn.” [BBC](https://www.bbc.com/news/business-67004511) – Financial Conduct Authority. “Consumer credit: Understanding the regulatory framework.” [FCA](https://www.fca.org.uk) – The Guardian. “Lloyds Banking Group faces £2bn bill for car finance scandal.” [The Guardian](https://www.theguardian.com/business/2023/oct/18/lloyds-banking-group-faces-2bn-bill-for-car-finance-scandal)

As we continue to monitor this situation, it will be interesting to see how Lloyds and the wider banking industry respond to the growing call for ethical lending practices. What are your thoughts?


Related update: We recently published an article that expands on this topic: read the latest post.


Related update: We recently published an article that expands on this topic: read the latest post.

Cheesy Bacon Burger with Spicy Chipotle Aiolo Sauce | Made by Meaghan Moineau

Cheesy Bacon Burger with Spicy Chipotle Aioli Sauce

Intro

There’s something about the sizzle of a burger on the grill that takes me back to summer evenings spent in my grandmother’s backyard. The air would be filled with the aroma of sizzling meat and the laughter of family members gathering around the picnic table. It was during those cherished gatherings that I learned the art of creating the perfect burger, one that would be etched in our hearts as a family tradition. Today, I am excited to share with you a modern twist on that classic memory – the Cheesy Bacon Burger with Spicy Chipotle Aioli Sauce. This recipe not only brings back those nostalgic moments but also adds a spicy kick that will surely become a new favorite in your home.

Why You’ll Love It

This Cheesy Bacon Burger is a delightful combination of flavors and textures that will make your taste buds dance with joy. The juicy beef patty encasing a creamy Swiss cheese center is topped with crispy turkey bacon, sautéed bell peppers, and onions, all nestled within a soft whole wheat bun. The real star, however, is the Spicy Chipotle Aioli Sauce, which adds a smoky and tangy kick to every bite. Whether you are hosting a backyard barbecue or simply craving a delicious homemade burger, this recipe is sure to impress.

Ingredients

  • Chipotle chiles in adobo
  • Fat-free mayonnaise
  • Garlic
  • Garlic powder
  • Greek yogurt
  • Green bell pepper
  • Ground cumin
  • Black ground pepper
  • Lean ground beef
  • Fresh lime juice
  • Onion
  • Whole wedges of Laughing Cow Swiss cheese
  • Cooked turkey bacon
  • Whole wheat hamburger buns

Instructions

  1. For the burgers: In a pan, cook turkey bacon according to the directions on the package. Once cooked, remove the bacon and set it aside.
  2. In the same pan, add bell pepper and onion and cook until tender, about 10 minutes.
  3. Add ground beef to a small bowl, along with garlic powder and ground pepper, and mix well.
  4. Divide the raw meat into 8 equal pieces (approximately 2oz each). Flatten each piece, place 1/2 a cheese wedge onto each piece of hamburger, and top with another piece of meat. Seal the edges to prevent the cheese from oozing out during cooking.
  5. Place the burgers on the grill and cook until done, about 5 minutes per side.
  6. Place the cooked burgers on buns and top with bacon, peppers & onions, and Spicy Chipotle Aioli Sauce.
  7. For the Spicy Chipotle Aioli Sauce: In a small bowl, whisk together chipotle chiles in adobo, fat-free mayonnaise, garlic, Greek yogurt, ground cumin, and fresh lime juice until combined. This makes 3/4 cup, or 12 tablespoons, of sauce.

Tips

To ensure your burgers are perfectly cooked, use a meat thermometer to check that the internal temperature reaches 160°F (71°C). If you prefer a milder sauce, reduce the amount of chipotle chiles. For an extra layer of flavor, toast your hamburger buns on the grill for a few minutes before assembling your burgers.

Variations & Substitutions

If you prefer a different cheese, cheddar or pepper jack would work wonderfully in this recipe. You can also substitute ground turkey for the beef if you want a leaner option. For a vegetarian twist, try using a plant-based burger patty and coconut bacon.

Storage

Store any leftover cooked burgers in an airtight container in the refrigerator for up to 3 days. The Spicy Chipotle Aioli Sauce can be stored in a separate container in the fridge for up to a week. Reheat the burgers in a pan or microwave before serving.

FAQ

Can I make the Spicy Chipotle Aioli Sauce in advance?

Absolutely! The sauce can be made a day or two in advance and stored in the refrigerator. This will allow the flavors to meld together even more, enhancing its delicious taste.

What is the best way to cook the burgers if I don’t have a grill?

If you don’t have a grill, you can cook the burgers in a skillet on the stovetop. Simply heat a little oil in the pan over medium-high heat and cook the burgers for about 5 minutes on each side, or until they reach the desired doneness.

Can I freeze the burgers?

Yes, you can freeze the uncooked burger patties. Place them on a baking sheet and freeze until solid, then transfer to a freezer-safe bag or container. They can be stored in the freezer for up to 3 months. Thaw in the refrigerator before cooking.

Nutrition

This Cheesy Bacon Burger recipe, when made with lean ground beef and turkey bacon, is a protein-packed meal. The use of Greek yogurt and fat-free mayonnaise in the aioli sauce also helps to keep the calorie count in check. As with any meal, moderation is key to maintaining a balanced diet.

Conclusion

The Cheesy Bacon Burger with Spicy Chipotle Aioli Sauce is more than just a meal; it’s a culinary experience that brings together the comfort of classic flavors with a modern twist. Whether you’re reminiscing about family gatherings or creating new memories, this burger is sure to be a hit with everyone. So fire up the grill, gather your loved ones, and savor the deliciousness of this mouthwatering creation!

Related update: Cheesy Bacon Burger with Spicy Chipotle Aiolo Sauce

Grilled Garlicky-Herbed Shrimp | Made by Meaghan Moineau

Grilled Garlicky-Herbed Shrimp

Intro

Growing up, summers meant endless family gatherings by the beach, where the air was filled with the tantalizing aroma of grilled seafood. My father, always at the helm of the grill, would prepare his signature shrimp dish. The combination of garlic, fresh herbs, and a hint of lemon always drew everyone to the table. Today, I’m excited to share a recipe that captures that nostalgia: Grilled Garlicky-Herbed Shrimp. It’s a dish that’s simple yet bursting with flavor, perfect for bringing a slice of summer to your table anytime.

Why You’ll Love It

This recipe is a celebration of bold flavors and simplicity. The garlicky-herb marinade infuses the shrimp with a delightful zest, while the grilling process adds a smoky finish that enhances each bite. It’s quick to prepare, requires minimal ingredients, and is versatile enough for both casual family dinners and elegant gatherings. Plus, it’s a healthy, protein-rich dish that complements a variety of sides.

Ingredients

  • 1 teaspoon chili pepper flakes
  • 1/4 cup extra virgin olive oil
  • 1/4 cup finely chopped coriander leaves
  • 4 cloves garlic, minced
  • 1 pound large shrimp, peeled and deveined
  • Zest of 1 lemon
  • 1/4 cup finely chopped parsley

Instructions

  1. In a large bowl, combine chili pepper flakes, olive oil, coriander leaves, garlic, lemon zest, and parsley.
  2. Add the shrimp to the bowl and toss to ensure each piece is thoroughly coated in the marinade.
  3. Cover the bowl with plastic wrap and refrigerate for at least 4 hours or overnight for maximum flavor infusion.
  4. Preheat your grill to medium heat. Once hot, place the shrimp on the grill.
  5. Cook the shrimp for about 5 minutes, turning once, until they turn pink and are slightly charred.
  6. Serve immediately, perhaps with a roasted red pepper salad for a Mediterranean twist.

Tips

For the best results, use fresh shrimp as they tend to absorb flavors better than frozen ones. If using wooden skewers, soak them in water for at least 30 minutes before grilling to prevent burning. Always keep an eye on the shrimp while grilling to avoid overcooking, which can make them tough.

Variations & Substitutions

Feel free to customize this recipe to your liking. You can substitute the coriander leaves with basil or cilantro for a different herby flavor. If you prefer a bit more heat, increase the amount of chili pepper flakes or add a dash of cayenne pepper. For a citrusy twist, add a splash of lime juice to the marinade.

Storage

Store any leftover grilled shrimp in an airtight container in the refrigerator for up to 2 days. Reheat them gently in a skillet over low heat to avoid overcooking. While it’s best to consume them fresh, you can freeze the marinated shrimp before grilling for up to 2 months.

FAQ

Can I use a grill pan instead of an outdoor grill?

Absolutely! A grill pan on the stovetop works perfectly fine. Just ensure it’s preheated before adding the shrimp, and cook them as you would on an outdoor grill.

Is it necessary to marinate the shrimp overnight?

While marinating overnight yields the best flavor, a minimum of 4 hours will still allow the shrimp to absorb the delicious garlicky-herb essence. If you’re short on time, even 1 hour can impart good flavor.

Nutrition

Each serving of Grilled Garlicky-Herbed Shrimp (approximately 4-5 shrimp) provides approximately:

  • Calories: 220
  • Protein: 25g
  • Fat: 12g
  • Carbohydrates: 3g
  • Fiber: 1g

This dish is high in protein and healthy fats, making it a nutritious choice for those seeking a balanced meal.

Conclusion

Grilled Garlicky-Herbed Shrimp is a dish that brings together the warmth of family gatherings and the vibrant flavors of the Mediterranean. It’s easy to prepare, incredibly flavorful, and sure to impress anyone who takes a bite. Whether you’re reminiscing about summer barbecues or simply looking to add a new favorite to your recipe repertoire, this shrimp dish is a delightful choice. Enjoy it with loved ones and create new memories around the table.

Related update: Grilled Garlicky-Herbed Shrimp

Related update: Cheesy Bacon Burger with Spicy Chipotle Aiolo Sauce

Is Google Homes Update Haunted or Helpful? | Analysis by Brian Moineau

Has Google Home’s New Feature Gone Spooky? Exploring the Home Brief Glitches

If you’ve ever wondered what it would be like to live in a smart home, you’re not alone. With devices that listen, learn, and respond to our every command, it seems like we’re living in a science fiction movie. But what happens when our smart assistants start to act a little... uncanny? That’s exactly the question many users are asking with the rollout of Google Home’s new feature, “Home Brief.”

Context: A New Feature with Mixed Reviews

Google Home recently introduced the Home Brief feature, designed to summarize your daily activities, reminders, and updates in a convenient voice briefing. Sounds fantastic, right? However, not everyone is singing its praises. Reports have surfaced describing eerie glitches and odd responses that have left many users feeling as though they’ve unwittingly summoned a ghost into their living room.

Some users have experienced spot-on results, receiving tailored information that is both useful and timely. Others, however, have reported bizarre malfunctions, such as the assistant misinterpreting commands or delivering nonsensical updates. The juxtaposition of these experiences has led to a growing sentiment among users that perhaps this new feature is in need of an exorcism.

Key Takeaways

- Diverse User Experiences: Feedback on the Home Brief feature ranges from highly effective to bizarrely glitchy, showcasing a clear divide among users. - Possible Glitches: Some users report that the Google Home assistant sometimes provides irrelevant or incorrect information, leading to moments of confusion and frustration. - Potential for Improvement: Google has a track record of refining features based on user feedback, suggesting that the Home Brief may see enhancements in future updates. - Smart Home Reliability: The incident raises questions about the reliability of smart home technology and its ability to meet user expectations consistently. - Community Engagement: The mixed reviews have sparked discussions online, with users sharing their experiences and troubleshooting tips.

A Thoughtful Conclusion: Is Our Smart Home Too Smart?

As we dive deeper into the age of smart technology, it’s clear that there’s a fine line between convenience and creepiness. The Home Brief feature from Google Home underscores this point beautifully—or perhaps eerily. While many users appreciate the effort to enhance their daily routines, the glitches and oddities remind us that technology is still very much a work in progress.

As we embrace these innovations, let’s also keep a watchful eye on how they’re evolving. Who knows—maybe the key to a perfectly functioning smart home is simply a little patience (and maybe some sage for those spooky glitches).

---

Sources

- "People think Google Home's latest feature might be in need of an exorcism - Android Authority" - [Android Authority](https://www.androidauthority.com)

In the fast-paced world of technology, your experiences matter. If you’ve tried out Google Home’s Home Brief feature, we’d love to hear your thoughts! Share your experiences in the comments below or join the conversation on social media.

MX Master 3S vs. 4: Upgrade or Stay? | Analysis by Brian Moineau

Logitech MX Master 3S vs. MX Master 4: Should You Upgrade?

Are you on the fence about upgrading your trusty Logitech MX Master 3S to the brand-new MX Master 4? You’re not alone! In the ever-evolving world of tech, it can be tough to decide when to stick with what you know versus diving into the latest and greatest gadgets. In this post, we’ll dive deep into the features of both mice, highlighting their strengths and weaknesses to help you make an informed decision.

A Quick Overview of the MX Master Series

The Logitech MX Master series has long been a favorite among tech enthusiasts, gamers, and professionals alike. Known for their ergonomic design, customizable buttons, and advanced tracking capabilities, these mice have carved out a loyal user base. The MX Master 3S was released to rave reviews, showcasing improvements over its predecessor, the MX Master 3. Now, Logitech has introduced the MX Master 4, which promises even more enhancements. But with the MX Master 3S still on the shelves, should you take the plunge into the MX Master 4, or is the older model still a worthy companion?

Features Comparison: MX Master 3S vs. MX Master 4

Both the MX Master 3S and MX Master 4 boast impressive features, but there are some key differences worth noting:

Design and Ergonomics: Both mice offer an ergonomic design, but the MX Master 4 is slightly refined for better comfort during extended use. It fits nicely in the hand, ensuring that long hours of work or gaming don’t lead to discomfort.

Battery Life and Charging: While the MX Master 3S offers a robust battery life, the MX Master 4 ups the ante with even longer usage between charges. If you’re someone who often forgets to plug in your devices, this could be a game-changer.

Tracking Technology: The MX Master 4 features Logitech’s latest tracking technology, which allows for smoother movement across various surfaces. Gamers and graphic designers, in particular, will appreciate this enhancement.

Customizable Buttons: Both models come with customizable buttons, but the MX Master 4 offers more options for customization, allowing users to tailor their experience even further.

Price Point: The MX Master 3S is still available at a lower price point, making it an attractive option for those who don’t need the absolute latest features.

Key Takeaways

Ergonomics: The MX Master 4 features improved ergonomics for better comfort during long usage sessions. – Battery Life: The new model boasts longer battery life, making it ideal for heavy users. – Enhanced Tracking: The MX Master 4’s upgraded tracking technology provides smoother performance on multiple surfaces. – Customization Options: More customizable buttons are available on the MX Master 4, allowing for a more personalized experience. – Cost Consideration: The MX Master 3S remains a solid choice at a lower price, especially for those who may not need the latest features.

Should You Upgrade?

Deciding whether to upgrade from the MX Master 3S to the MX Master 4 really comes down to your specific needs and usage patterns. If you find yourself using your mouse for long hours and prioritize comfort and advanced features, the MX Master 4 is worth considering. However, if you’re satisfied with the performance of your MX Master 3S and don’t feel the need for the latest enhancements, then sticking with your current mouse might be the best choice for now.

In the end, both mice are excellent options, each catering to different user preferences. Whether you choose to upgrade or not, you can’t go wrong with either model from Logitech’s stellar lineup.

Conclusion

In the fast-paced world of technology, staying updated with the latest gadgets can feel overwhelming. However, the Logitech MX Master 3S and MX Master 4 both deliver exceptional performance, catering to a wide range of users. Ultimately, the decision to upgrade comes down to personal preference, comfort, and specific usage needs. Happy clicking!

Sources

– “Logitech MX Master 3S vs. MX Master 4: Should You Upgrade?” – PCMag {URL to article}

*Remember to check out the latest reviews and user feedback to ensure you’re making the best choice for your tech needs!*


Related update: We recently published an article that expands on this topic: read the latest post.

Zucchini & Basil Frittata | Made by Meaghan Moineau

Zucchini & Basil Frittata: A Delightful Breakfast or Brunch Dish

Intro

There’s something undeniably comforting about the aroma of a frittata wafting through the kitchen on a lazy Sunday morning. It takes me back to weekends spent with my grandmother, who had an uncanny ability to turn simple ingredients into magical meals. Her kitchen was a place of warmth, filled with laughter and the clatter of pots and pans. One of my favorite dishes that she made was a zucchini and basil frittata, a dish that seemed to capture the essence of summer in every bite. Today, I’m sharing this beloved recipe with you, hoping it brings as much joy to your table as it has to mine.

Why You’ll Love It

This Zucchini & Basil Frittata is a perfect blend of flavors and textures. The zucchini provides a tender, moist base, while fresh basil adds a burst of herby freshness. Cheddar cheese gives it a touch of richness, and green onions offer a hint of sharpness. It’s a dish that’s not only delicious but also incredibly versatile, making it perfect for breakfast, brunch, or even a light dinner. Plus, it’s a great way to use up any extra zucchini you might have on hand during the summer months.

Ingredients

  • 2 medium zucchini
  • 1/4 cup fresh basil, chopped
  • 1 cup cheddar cheese, shredded
  • 6 large eggs
  • 2 tablespoons grapeseed oil
  • 2 green onions, thinly sliced
  • Salt, to taste

Instructions

  1. Shred the zucchini using a box grater or a food processor.
  2. Place the shredded zucchini in a colander with a large bowl underneath. Sprinkle with a little salt and allow some water to seep out, about 20 minutes. You can squeeze some of the water out with your hands if you’re in a hurry. This step can be completed ahead of time, and the shredded zucchini can stay in your refrigerator overnight if you would like to do this recipe in stages.
  3. In a large mixing bowl, add the shredded zucchini, green onion, basil, cheddar cheese, and salt. Stir to combine.
  4. Crack the eggs in a separate bowl and beat them. Pour the egg mixture into the bowl with the veggies and stir to combine all ingredients.
  5. Preheat your oven to 350 degrees F.
  6. In a 10-inch cast iron skillet, heat 1 to 2 tablespoons of grapeseed oil (or olive oil). Spread the oil around, making sure the sides are nicely oiled as well.
  7. Heat to medium, then add the egg/zucchini mixture, ensuring the mixture is evenly distributed.
  8. Cook until the egg begins to set on the sides of the skillet, about 3 to 5 minutes.
  9. Use a potholder to place the skillet in the oven. Bake for 12 to 15 minutes until the center tests clean.

Tips

For the best results, make sure to thoroughly drain the zucchini to prevent the frittata from becoming too watery. If you’re in a rush, you can use a clean kitchen towel to squeeze out the excess moisture more quickly. Also, using a cast iron skillet not only helps with even cooking but also adds a beautiful rustic touch to your presentation.

Variations & Substitutions

Feel free to get creative with this recipe! You can substitute the cheddar cheese with feta or goat cheese for a tangier flavor. If you’re not a fan of basil, try using parsley or dill instead. For a bit of heat, add a pinch of red pepper flakes or a dash of hot sauce. This frittata is also a great way to use up other vegetables you have on hand, such as bell peppers or mushrooms.

Storage

This frittata can be stored in an airtight container in the refrigerator for up to three days. To reheat, simply pop it in the oven at 350 degrees F for about 10 minutes or until warmed through. Alternatively, you can reheat individual slices in the microwave for about 1 minute.

FAQ

Can I make this frittata ahead of time?

Yes, you can prepare the zucchini and store it in the refrigerator, then quickly assemble and bake the frittata when you’re ready to serve. The baked frittata also keeps well, making it a great make-ahead option for busy mornings.

Can I freeze the frittata?

While frittatas are best enjoyed fresh, you can freeze any leftovers. Simply wrap individual slices in plastic wrap and place them in a freezer-safe container. To reheat, bake in the oven at 350 degrees F until heated through, or microwave on a low setting.

What can I serve with this frittata?

This frittata pairs beautifully with a simple green salad or some crusty bread. If you’re serving it for brunch, consider adding a fruit salad or some roasted potatoes to round out the meal.

Nutrition

This zucchini and basil frittata is a nutritious option, packed with protein from the eggs and cheese, along with vitamins and minerals from the zucchini and basil. It’s a satisfying meal that will keep you fueled throughout the day.

Conclusion

The Zucchini & Basil Frittata is more than just a dish; it’s a celebration of simple, fresh flavors that come together to create something truly special. Whether you’re serving it for a leisurely weekend brunch or a quick weekday breakfast, it’s sure to become a favorite in your household. So, gather your ingredients, embrace the comforting process of cooking, and enjoy this delightful frittata with your loved ones. Bon appétit!

Related update: Zucchini & Basil Frittata

Related update: Grilled Garlicky-Herbed Shrimp

TNA Tag Team Titles: A New Era Begins | Analysis by Brian Moineau

The Evolution of Tag Team Wrestling: A Look at TNA’s Latest Titleholders

When it comes to professional wrestling, tag team titles often serve as a barometer for the overall health of a promotion. The recent crowning of TNA’s newest tag team champions has sparked discussions about the state of tag team wrestling and the impact of these titles on the overall wrestling landscape. So, let’s dive into the latest news and what it means for the future of TNA and beyond.

A New Era in TNA Tag Team Wrestling

TNA, or Total Nonstop Action Wrestling, has been a staple in the wrestling world since its inception in 2002. Over the years, it has given rise to some iconic tag teams and memorable moments. Recently, the promotion announced its new tag titleholders, who performed admirably in the latest Wrestler Rankings. While excitement surrounds these new champions, it also begs the question: Are they the next legends in the making, or just another footnote in wrestling history?

The article titled “The Inspiration Remain Iconic, but They’re Not Timeless” from Cageside Seats brings to light the current state of tag team wrestling in TNA. With comparisons to stars like Toni Storm—who has garnered significant recognition for her skills and charisma—it’s clear that the bar is set high. As fans, we’re left to ponder whether the new champions can elevate themselves to a level that will resonate with audiences long after their reign is over.

Key Takeaways

New Champions, New Beginnings: TNA’s latest tag titleholders have shown potential in their matches, but they face the challenge of standing out in a competitive wrestling environment.

The Shadow of Greatness: The comparison to wrestlers like Toni Storm highlights the ongoing struggle for tag teams to achieve the same level of individual stardom that singles competitors enjoy.

Impact on Rankings: The new champions made a significant mark in the latest Wrestler Rankings, indicating a shift in the tag team landscape and possibly setting the stage for future rivalries.

A Call for Timelessness: While the current champions may be iconic for their time, the question remains: Can they create a legacy that resonates beyond their immediate reign?

Community Engagement: The ongoing fan voting for the Top Ten wrestlers emphasizes the importance of audience engagement in shaping the narratives within wrestling promotions.

Reflecting on the Future of Tag Team Wrestling

As we look ahead, it’s clear that TNA’s latest tag champions have an exciting road ahead. The pressure is on them to not just hold the titles, but to make a lasting impression on the wrestling world. They have the opportunity to carve out their legacy, but whether they can achieve a timeless status remains to be seen. The wrestling community is keenly watching, and with fan engagement at an all-time high, we’re bound to see some thrilling developments in the coming weeks.

Sources

1. “The Inspiration Remain Iconic, but They’re Not Timeless” – Cageside Seats (https://cagesideseats.com)

In the end, wrestling continues to evolve, and it’s the stories and characters that resonate with fans that make or break a legacy. We’ll be keeping an eye on TNA’s tag team scene, as it promises to deliver both drama and excitement in the weeks to come!


Related update: We recently published an article that expands on this topic: read the latest post.


Related update: We recently published an article that expands on this topic: read the latest post.


Related update: We recently published an article that expands on this topic: read the latest post.


Related update: We recently published an article that expands on this topic: read the latest post.

Peppermint Hot Chocolate Cupcakes | Made by Meaghan Moineau

Peppermint Hot Chocolate Cupcakes

Intro

There’s something utterly magical about the combination of chocolate and peppermint, especially when the weather turns chilly, and the air is filled with the scent of pine and fireplaces. These Peppermint Hot Chocolate Cupcakes are a delightful treat that transports me back to cozy winter evenings spent in my grandmother’s kitchen. I remember sitting at her wooden table, the room filled with the warm, sweet aroma of melting chocolate and peppermint candies. She would let me help stir the batter, my small hands barely able to grip the whisk. Those moments were filled with laughter, stories, and the kind of love that only a grandmother can give. Now, I carry on that tradition with these cupcakes, hoping to bring some of that warmth and nostalgia to your home.

Why You’ll Love It

These cupcakes are a perfect blend of rich, chocolatey goodness and refreshing peppermint. The luscious ganache filling adds a decadent surprise, while the marshmallow buttercream frosting with a hint of peppermint creates a festive touch. They’re not only delicious but also visually stunning, making them perfect for holiday gatherings or any winter celebration. Whether you’re serving them to family and friends or enjoying one with a cup of hot cocoa by the fire, these cupcakes are sure to be a hit.

Ingredients

  • 1 cup semisweet chocolate chips
  • 1 cup hot-brewed coffee
  • 2 cups sugar
  • 1 3/4 cups all-purpose flour
  • 3/4 cup unsweetened cocoa powder
  • 1 1/2 teaspoons baking soda
  • 1 1/2 teaspoons baking powder
  • 1 teaspoon salt
  • 2 large eggs
  • 1 cup buttermilk
  • 1/2 cup vegetable oil
  • 2 teaspoons vanilla extract
  • 1/2 cup heavy cream
  • 1/4 cup unsalted butter
  • 8 ounces semisweet chocolate, chopped
  • 1/2 cup unsalted butter, softened
  • 2 cups marshmallow creme
  • 1/2 teaspoon peppermint extract
  • 3-4 cups powdered sugar
  • 2 tablespoons milk
  • Crushed peppermint candies, for garnish

Instructions

  1. Preheat the oven to 350 degrees F. Line a cupcake or muffin pan with 24 regular-size cupcake liners.
  2. Combine the chocolate chips and hot coffee together, stirring occasionally until the chocolate is melted and the mixture is smooth.
  3. In a large bowl, sift together the sugar, flour, cocoa powder, baking soda, baking powder, and salt.
  4. In another bowl, beat the eggs with an electric mixer until thickened slightly. Slowly add the buttermilk, oil, and vanilla.
  5. Add the melted chocolate mixture to the eggs, and combine completely.
  6. Add the sugar mixture and beat on medium speed until well combined.
  7. Fill the prepared cupcake liners three-quarters full with the cupcake batter.
  8. Bake until a toothpick inserted in center comes out clean, 18 to 21 minutes. Cool the cupcakes completely.
  9. While the cupcakes are baking, prepare the Chocolate Ganache and the Peppermint Marshmallow Buttercream Frosting (directions below).
  10. To make the Chocolate Ganache, bring the heavy cream and butter to a simmer in a small saucepan. Turn off the heat and add in the chocolate. Stir the mixture until smooth. Set aside to cool.
  11. To make the Peppermint Marshmallow Buttercream Frosting, whip together the butter and marshmallow creme using an electric mixer fitted with a whisk attachment.
  12. Add the peppermint extract. Slowly add 2 cups of the powdered sugar and continue to mix on a slow speed.
  13. Add the milk and additional powdered sugar, up to 2 cups, until desired consistency is reached.
  14. To assemble cupcakes: Using an apple corer, remove the center of each cupcake. Fill each cupcake with a spoonful of the Chocolate Ganache.
  15. Using the frosting-filled pastry bag, frost the cupcakes and sprinkle with crushed peppermint candies.

Tips

For the best results, ensure all your ingredients are at room temperature before you begin. This helps everything blend together more smoothly. Also, when making the ganache, make sure not to let the cream and butter boil; just simmer them gently to avoid a grainy texture.

Variations & Substitutions

If you’re not a fan of peppermint, you can substitute the peppermint extract with almond or vanilla extract for a different twist. You can also use dark chocolate instead of semisweet for a richer flavor. For a dairy-free version, use coconut milk and a vegan butter substitute.

Storage

These cupcakes can be stored in an airtight container in the refrigerator for up to 5 days. Before serving, let them come to room temperature for the best taste and texture. You can also freeze them without frosting for up to 2 months. Just thaw them overnight in the refrigerator before frosting and serving.

FAQ

Can I make these cupcakes gluten-free?

Yes, you can substitute the all-purpose flour with a gluten-free flour blend. Just make sure it’s a 1:1 substitute for best results.

Do I have to use coffee in the recipe?

If you’re not a fan of coffee, you can substitute it with hot water or hot chocolate. The coffee enhances the chocolate flavor, but it’s not essential.

Nutrition

While these cupcakes are a treat and should be enjoyed in moderation, they do contain some nutritional benefits. The cocoa powder provides antioxidants, and using dark chocolate can add a boost of iron and magnesium. However, they are still high in sugar and fat, so enjoy them as an occasional indulgence.

Conclusion

These Peppermint Hot Chocolate Cupcakes are more than just a dessert; they’re a celebration of flavors and memories. Whether you’re making them for a holiday party or simply to indulge in a bit of winter nostalgia, they’re sure to bring joy and warmth to those who taste them. I hope this recipe becomes a cherished part of your holiday traditions, just as it has in my family. Enjoy every sweet, minty bite!

Related update: Peppermint Hot Chocolate Cupcakes

Related update: Grandma Inez's Pineapple Pie

Creamy Cauliflower Chowder | Made by Meaghan Moineau

Creamy Cauliflower Chowder

Intro

There’s something magical about a bowl of steaming chowder on a chilly day. It transports me back to my grandmother’s kitchen, where the aroma of her cooking filled the air, bringing warmth and comfort. Her creamy cauliflower chowder was a family favorite, an irresistible blend of flavors that nourished both body and soul. Today, I’m sharing my version of this classic recipe with you, in hopes that it becomes a staple in your home as well.

Why You’ll Love It

This creamy cauliflower chowder is the epitome of comfort food. It’s rich, flavorful, and incredibly satisfying. Whether you’re looking for a hearty lunch or a cozy dinner, this chowder will not disappoint. Here are a few reasons why you’ll fall in love with it:

  • Simple Ingredients: With everyday ingredients you probably already have in your kitchen, this chowder is easy to whip up on a whim.
  • Rich and Creamy: The combination of cauliflower, cheddar, and parmesan creates a velvety texture that’s hard to resist.
  • Customizable: You can easily adjust the flavors and toppings to suit your preferences.
  • Comforting and Satisfying: It’s perfect for those days when you need a little extra warmth and comfort.

Ingredients

  • 2 tablespoons butter
  • 1 head cauliflower, chopped
  • 1 cup cheddar cheese, shredded
  • 2 teaspoons chicken bouillon
  • 1/2 cup cooked bacon, crumbled
  • 1/2 cup croutons
  • 2 tablespoons flour
  • 3 cloves garlic, minced
  • 1 teaspoon ground mustard
  • 4 cups milk, divided
  • 1 onion, chopped
  • 1/2 teaspoon paprika
  • 1/2 cup parmesan cheese, grated
  • Salt, to taste

Instructions

  1. Add butter, garlic, onion, and cauliflower to a large pot and sauté for 5 minutes until the cauliflower starts to brown.
  2. Add flour, chicken bouillon, ground mustard, paprika, and salt. Mix well to combine.
  3. Pour in 2 cups of milk and stir until everything is well incorporated. Reduce heat and bring the mixture to a boil, simmering for about 10 minutes until the cauliflower is soft.
  4. Carefully transfer the mixture to a blender and blend until smooth. (Alternatively, use an immersion blender directly in the pot.)
  5. Transfer the blended mixture back to the pot and add the remaining milk. Stir well to combine.
  6. Add parmesan cheese and cheddar cheese, stirring continuously until the cheese is melted and the chowder is heated through.
  7. Serve the chowder in bowls, topped with crumbled bacon, croutons, and extra cheese if desired.

Tips

  • Blending: Always let the mixture cool slightly before blending to avoid any accidents.
  • Consistency: If you prefer a thicker chowder, reduce the amount of milk or add a bit more flour.
  • Toppings: Don’t be shy with the toppings; they add wonderful texture and flavor.

Variations & Substitutions

This chowder is highly adaptable to your taste and dietary needs:

  • Vegetarian Version: Use vegetable bouillon instead of chicken bouillon and skip the bacon.
  • Dairy-Free: Substitute the milk with almond or oat milk, and use nutritional yeast instead of cheese.
  • Spicy Twist: Add a pinch of cayenne pepper or a few dashes of hot sauce for some heat.

Storage

Store any leftover chowder in an airtight container in the refrigerator for up to 3 days. To reheat, simply warm it in a pot over medium heat, stirring occasionally. If the chowder thickens too much, add a splash of milk or water to reach your desired consistency.

FAQ

Can I freeze creamy cauliflower chowder?

Yes, you can freeze this chowder. Allow it to cool completely before transferring to a freezer-safe container. Freeze for up to 3 months. Thaw in the refrigerator overnight before reheating.

How can I make this chowder gluten-free?

To make this chowder gluten-free, simply replace the flour with a gluten-free all-purpose flour blend or cornstarch. This will help maintain the creamy texture without the gluten.

What can I serve with this cauliflower chowder?

This chowder pairs wonderfully with a fresh green salad or a slice of crusty bread for dipping. You could also serve it in a bread bowl for a fun and hearty presentation.

Nutrition

This creamy cauliflower chowder is a rich source of calcium and vitamins. Cauliflower is low in calories but high in fiber, vitamin C, and other essential nutrients. Keep in mind that the cheese and bacon add richness and indulgence, so enjoy this dish as a delightful treat!

Conclusion

There you have it, a delightful creamy cauliflower chowder that’s sure to warm your heart and soul. Whether you’re making it for a cozy family dinner or a special occasion, this chowder is sure to impress. I hope it brings as much joy to your table as it has to mine. Enjoy every spoonful!

Related update: Creamy Cauliflower Chowder

Related update: Monastery soup

Hacking Poker: Exposing Shuffling Machine | Analysis by Brian Moineau

Unraveling the Secrets: How a Journalist Exposed Vulnerabilities in Poker Shuffling Machines

Imagine sitting at a high-stakes poker table, the tension palpable as players nervously eye their chips and each other. Now picture a shuffling machine quietly whirring away in the background, supposedly ensuring fairness and randomness in the game. But what if that very machine could be hacked? Recently, WIRED Senior Writer Andy Greenberg explored this intriguing scenario in an eye-opening article for PokerNews.

The Backstory: Shuffling Machines in Poker

Poker has long been a game of skill and luck, but the introduction of automatic shuffling machines was meant to enhance the game by eliminating human error and speeding up play. These machines promise to deliver a perfectly shuffled deck every time, instilling a sense of trust in players. However, Greenberg’s investigative piece shines a light on the dark side of this technology, revealing vulnerabilities that could be exploited by those looking to cheat.

The story begins with Greenberg’s aim to demonstrate how easily a shuffling machine can be manipulated. By digging deep into the technology behind these devices, he uncovered methods that could potentially allow a savvy individual to gain an unfair advantage at the poker table. This revelation not only challenges the integrity of poker games but also raises questions about the security of other automated systems in various industries.

Key Takeaways

Vulnerabilities Exist: Shuffling machines, designed to ensure fair play, contain weaknesses that can be exploited, posing a risk to the integrity of poker games.

Hacking Demonstration: Greenberg’s hands-on approach illustrates how a journalist can replicate cheating techniques, shedding light on the ease of manipulation.

Implications for Trust: The findings stir concern about the reliance on technology in gambling environments and the potential for abuse, highlighting a need for improved security measures.

Broader Technology Concerns: This investigation serves as a reminder that vulnerabilities in automated systems extend beyond poker, affecting various sectors that utilize similar technologies.

Call for Awareness: As players and stakeholders in the gambling industry, there’s a pressing need to be aware of these vulnerabilities to maintain the integrity of the game.

Conclusion: A Call for Action

Greenberg’s exploration into the vulnerabilities of shuffling machines is not just a fascinating story about poker; it’s a wake-up call for industries reliant on automated technologies. As we continue to integrate advanced systems into our daily lives, understanding their weaknesses becomes critical. For poker enthusiasts and industry professionals alike, it’s essential to remain vigilant and advocate for safer, more secure gaming environments. Perhaps this investigation will prompt a closer look at the systems we often take for granted, ensuring that the thrill of the game remains untarnished.

Sources

– Greenberg, Andy. “Journalist Hacks Card Shuffling Machine to Prove How to Cheat in Poker.” PokerNews. [Link to article] – “The Vulnerabilities of Automated Systems: A Broader Perspective.” WIRED. [Link to article] – “Understanding the Technology Behind Poker Shuffling Machines.” TechRadar. [Link to article]

By shining a light on these vulnerabilities, we can work together to enhance the security of our favorite games and technologies. Whether you’re a poker player or simply a technology enthusiast, staying informed is the best hand you can hold.


Related update: We recently published an article that expands on this topic: read the latest post.