I Like My Peas with Pancetta | Made by Meaghan Moineau

I Like My Peas with Pancetta | Made by Meaghan Moineau

Title: "I Like My Peas with Pancetta: A Hearty Family Tradition"


Description:

Discover the heartwarming flavors of our family favorite, "I Like My Peas with Pancetta." This delightful dish, rich in history and taste, brings together sweet peas, savory pancetta, and vibrant cherry tomatoes in a symphony of flavors. Perfect as a comforting appetizer or a light main dish, it marries simplicity with elegance in every bite. Join us as we dive into this cherished recipe and the nostalgic memories that make it special.

---


A Family Tradition: More Than Just Peas and Pancetta


As the aroma of pancetta gently sizzling in a skillet fills the kitchen, I am instantly transported back to my grandmother's house on a sunny Sunday afternoon. The clatter of pots and pans, mingled with laughter and storytelling, was the soundtrack of my childhood. This dish, "I Like My Peas with Pancetta," was always a family staple, lovingly prepared by my grandmother, whose culinary skills were as legendary as her warm heart.


Growing up, I would watch her move gracefully around the kitchen, her hands deftly chopping onions and crushing garlic, as she narrated tales of her youth in Italy. She would often recount how the recipe was passed down from her mother, who made it during the harvest season when peas were at their sweetest. It was a simple yet profoundly satisfying dish that celebrated the bounty of the season and the joy of family gatherings.


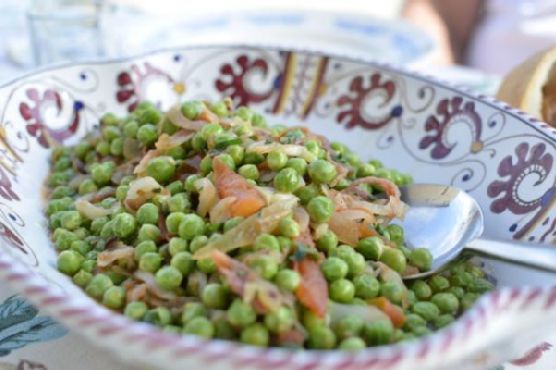
Recipe: "I Like My Peas with Pancetta"


Ingredients:

- Sweet fresh green peas


- Guanciale (or pancetta)


- 1 onion, finely chopped


- 2 cloves of garlic, minced


- A handful of cherry tomatoes, halved


- 1 spoonful of red wine vinegar


- Fresh parsley, chopped


- Salt & pepper to taste


- Extra virgin olive oil


Instructions:
1. Prepare the Ingredients: Begin by bringing a medium pot of water to a boil. Meanwhile, in a medium skillet over medium-low heat, slowly render down the pancetta for 4-5 minutes. Be careful not to let it brown or become crispy. Adjust the heat if necessary.
2. Sauté the Aromatics: Add the minced garlic and finely chopped onion to the pancetta, sautéing them together for 5-6 minutes. (For a vegetarian version, simply sauté the onions and garlic in olive oil, omitting the pancetta.)
3. Add the Tomatoes: When the onions and garlic are almost ready, add the halved cherry tomatoes to the skillet.
4. Blanch the Peas: At the same time, toss the sweet peas into the boiling water and blanch for 2-3 minutes. They should be about half-cooked.
5. Combine and Cook: Strain the peas and immediately add them to the skillet with the pancetta and vegetables, along with a spoonful of the pea-water. Allow everything to cook until the peas are fully cooked but still have a slight bite. Season with salt and pepper to taste.
6. Finish with Freshness: Just before serving, toss in the fresh parsley and drizzle with a generous amount of extra virgin olive oil.

A Taste of Nostalgia


Every spoonful of this dish is a trip down memory lane, a reminder of the warmth and love that filled my grandmother's kitchen. It's a dish that not only satisfies the palate but also nourishes the soul, reminding us of the importance of family traditions and the simple joys of sharing a meal with loved ones.


Difficulty Rating: 3/10


"I Like My Peas with Pancetta" is a straightforward recipe, perfect for cooks of all levels. With minimal preparation and simple ingredients, it's a dish that allows the natural flavors to shine, making it an easy yet elegant addition to any meal.


Classification: Appetizer or Light Main Dish


Whether served as a delightful appetizer or a light main course, this recipe is sure to become a beloved part of your family tradition, just as it has been in mine. Enjoy every bite, and perhaps, create your own cherished memories around the table.

Read more about Appetizers

Read more about Main Dishes

Read more about Desserts

Blackened Cajun Chicken | Made by Meaghan Moineau

Blackened Cajun Chicken | Made by Meaghan Moineau

Spicing Up Family Gatherings: A Nostalgic Journey with Blackened Cajun Chicken


Description:

Discover the rich flavors and cherished memories behind our Blackened Cajun Chicken recipe. This main dish, rated a 6 out of 10 in difficulty, combines aromatic spices with tender chicken, creating a culinary masterpiece that is perfect for any family gathering. Join us as we delve into the heartwarming story that makes this dish a family favorite, and learn how to recreate it in your own kitchen.

---


A Trip Down Memory Lane


In the heart of our family kitchen, the aroma of spices would dance through the air, signaling the start of our cherished Sunday gatherings. My grandmother, the culinary matriarch of our family, had a talent for transforming simple ingredients into unforgettable meals. Her Blackened Cajun Chicken was no exception.


Every Sunday, as the sun began to set, our family would gather around the large oak table that had witnessed countless memories. The table, with its worn edges and a few inevitable scratches, was a symbol of unity. It was here that stories were shared, laughter echoed, and bonds were strengthened. The centerpiece of these gatherings was always my grandmother’s Blackened Cajun Chicken, a dish that encapsulated the spirit of our family.


The Secret to Flavorful Memories


The magic of this recipe lies in the carefully curated blend of spices. Each ingredient plays a crucial role in creating the symphony of flavors that define this dish. The combination of bay leaves, black pepper, brown sugar, cayenne pepper, dried rosemary, dried thyme, dry mustard, garlic powder, ground cumin, onion powder, paprika, and salt creates a seasoning mix that not only enhances the chicken but also tells a story of tradition and love.


Ingredients:

- Bay leaves

- Black pepper


- Brown sugar


- Cayenne pepper


- Dried rosemary


- Dried thyme


- Dry mustard


- Garlic powder


- Ground cumin


- Onion powder


- Paprika


- Salt


- Chicken


Instructions:

1. Prepare the Seasoning Mix: In a bowl, combine all the seasonings. This mix is enough for two chickens and can be made ahead and stored in an airtight container until needed.
2. Season the Chicken: Place the chicken in a 13- by 9- by 2-inch baking pan. Rub it generously with half of the seasoning mixture. Cover the pan and refrigerate overnight to let the flavors meld.
3. Grilling the Chicken: Preheat your grill and set it to medium heat. Grill the chicken, covered, over medium coals for 30 to 45 minutes, turning once, until the juices run clear. This process ensures the chicken is succulent and infused with the rich flavors of the spices.

A Culinary Legacy


As the years went by, the tradition of preparing Blackened Cajun Chicken was passed down to me. Each time I recreate this dish, I am transported back to those cherished Sunday evenings, surrounded by family and the warmth of shared stories. Today, I invite you to bring this tradition into your home and create your own memories with each flavorful bite.


Conclusion


Blackened Cajun Chicken is more than just a meal; it's a celebration of family, history, and the joy of cooking. Whether you're a seasoned chef or a novice in the kitchen, this recipe offers an opportunity to connect with loved ones over a dish that is as rich in flavor as it is in nostalgia. So, fire up the grill, gather your family, and create a legacy of your own with this timeless recipe.

Read more about Appetizers

Read more about Main Dishes

Read more about Desserts

Wildwood Ovens Bourbon Apple Glazed Cedar Plank Salmon | Made by Meaghan Moineau

Wildwood Ovens Bourbon Apple Glazed Cedar Plank Salmon | Made by Meaghan Moineau

Savory Memories: Wildwood Ovens Bourbon Apple Glazed Cedar Plank Salmon


Description

Discover the exquisite flavors of the Wildwood Ovens Bourbon Apple Glazed Cedar Plank Salmon—a dish that combines the sweetness of apple juice and brown sugar with the robust taste of bourbon whiskey. This recipe captures the essence of outdoor cooking, perfect for those who love a hint of nostalgia in their culinary adventures. Rated 7 out of 10 in difficulty, this main dish is ideal for impressing guests at your next gathering.

---


Ingredients

- Cedar plank

- Salmon filet


- 1 cup apple juice


- ½ cup brown sugar


- 2 cloves garlic, minced


- ¼ cup bourbon whiskey


- 1 tsp kosher salt


- 1 tsp freshly cracked black pepper


- Olive oil for brushing


Instructions


1. Prepare the Cedar Plank: Begin by soaking the cedar plank in water for at least 2 hours. This step is crucial to prevent the wood from burning and to infuse the salmon with a subtle smoky flavor.
2. Prepare the Salmon: Rinse the salmon under cold water and pat dry with paper towels. Season both sides with kosher salt and freshly cracked black pepper. Brush the skin side with olive oil to prevent sticking.
3. Make the Apple Bourbon Glaze:

- Place a medium saucepan over medium-high heat and carefully add the bourbon whiskey.


- Use caution, as the alcohol can ignite; never pour directly from the bottle.


- Once the alcohol is reduced to a small amount, add the apple juice, brown sugar, and minced garlic.


- Continue to cook over medium-high heat until the mixture reduces to about a third of its original volume, achieving a texture slightly thinner than syrup.


4. Cook the Salmon:

- Place the seasoned salmon on the cedar plank, skin side down.


- Set the cedar plank on a medium-high grill, or in a wood-fired oven pre-heated to 500°F, near the fire.


- Use a probe thermometer to check the internal temperature of the salmon after 10 minutes, and every 5 minutes thereafter.


- Once the salmon reaches an internal temperature of at least 100°F, begin brushing on the apple glaze. Repeat this step every few minutes.


- Cook until the salmon reaches desired doneness, typically around 145°F for medium-rare.


A Nostalgic Touch


Growing up, family gatherings were always centered around the grill in our backyard. My grandfather was the grill master, and his cedar plank salmon was legendary. I remember the anticipation as the smoke billowed, and the sweet aroma of the apple bourbon glaze filled the air. It was more than just a meal; it was a celebration of family and tradition.


One summer evening, as the sun dipped below the horizon, we gathered around the picnic table, eager to taste the masterpiece. My grandfather, with his usual twinkle in his eye, would recount stories of his own childhood, weaving tales that made us laugh and appreciate each bite even more. This recipe is a tribute to those cherished memories, a reminder of the love and warmth that food can bring.


Conclusion


The Wildwood Ovens Bourbon Apple Glazed Cedar Plank Salmon is more than just a dish; it's a culinary journey that captures the essence of family, tradition, and the joy of cooking. Whether you're a seasoned chef or an adventurous home cook, this recipe promises a delightful experience that will transport you to a place of nostalgia and flavor.


---


Try this recipe at your next gathering and create your own memories around the table. Let the flavors of bourbon and apple take you back to simpler times, and may your kitchen be filled with the warmth of family and the joy of good food.

Read more about Appetizers

Read more about Main Dishes

Read more about Desserts

Pasta e Fagioli (Pasta and Beans) | Made by Meaghan Moineau

Pasta e Fagioli (Pasta and Beans) | Made by Meaghan Moineau

Title: A Hearty Hug in a Bowl: The Comforting Magic of Pasta e Fagioli
Description: Dive into the heartwarming world of Pasta e Fagioli, a classic Italian dish that wraps you in warmth and nostalgia. Discover the simple, yet flavorful recipe that has been a cherished family tradition, bringing loved ones together around the dinner table.

---


Pasta e Fagioli: A Timeless Italian Classic

There's something undeniably comforting about a bowl of Pasta e Fagioli. As the leaves begin to turn and the air grows crisp, this hearty dish becomes a staple in my kitchen—a recipe passed down through generations, each spoonful steeped in love and tradition. Today, I'll share not only the recipe but also a treasured family memory that makes this dish so special.


Ingredients:

- 2 tablespoons olive oil


- 1 cup diced onion


- 2 cups diced tomatoes (or marinara sauce)


- 1 garlic clove, minced


- 4 cups low sodium vegetable stock


- 2 cups water


- 1 teaspoon salt


- 1/2 teaspoon black pepper


- 1/4 teaspoon red pepper flakes


- 1 cup elbow macaroni


- 1 can (15 oz) cannellini beans, drained and rinsed


- 1/4 cup fresh parsley, chopped


- Parmesan cheese, for serving


- Additional parsley for garnish


Instructions:

1. In a large stock pan over medium-high heat, add the olive oil and diced onion. Sauté until the onion becomes tender and translucent, about 3 minutes.


2. Stir in the diced tomatoes and minced garlic. Cook for 1-2 minutes, ensuring the garlic doesn't burn.


3. Pour in the vegetable stock and water, then season with salt, black pepper, and red pepper flakes. Bring to a gentle boil.


4. Add the elbow macaroni, reduce the heat, and let it cook until it's about 3/4 of the way done (still slightly firm).


5. Stir in the cannellini beans and continue cooking until the pasta is fully cooked, approximately 10-15 minutes.


6. Fold in the fresh parsley towards the end of the cooking time. Adjust seasoning to taste.


7. Serve in individual bowls, garnished with extra parsley and a generous sprinkle of Parmesan cheese.


Nostalgic Memory:

The aroma of Pasta e Fagioli always transports me back to my grandmother's cozy kitchen, where laughter and love filled the air as much as the smell of simmering soup did. Every autumn, our family would gather at her house for Sunday dinner—a tradition that felt like an unspoken promise of warmth and togetherness. I remember sitting around the long wooden table, my grandmother proudly ladling “pasta fazool” into each bowl, her eyes twinkling as she recounted tales from her childhood in Italy. These stories, woven into the fabric of our family history, served as the perfect seasoning for our meal. This dish was not just sustenance; it was a celebration of heritage, a reminder of where we came from, and a testament to the simple joy of sharing a meal with loved ones.


Difficulty Rating: 4/10
Category: Main Dish

Pasta e Fagioli is an uncomplicated, yet deeply satisfying dish. Its simplicity is part of its charm, making it an accessible recipe for both novice and seasoned cooks alike. As you prepare it, I hope you find as much warmth and connection in this dish as our family has over the years. Buon appetito!

Read more about Appetizers

Read more about Main Dishes

Read more about Desserts

Cheesy Chicken Enchilada Quinoa Casserole | Made by Meaghan Moineau

Cheesy Chicken Enchilada Quinoa Casserole | Made by Meaghan Moineau

Title: Savor the Memories: How Cheesy Chicken Enchilada Quinoa Casserole Became a Family Favorite
Description: Dive into the flavors of our Cheesy Chicken Enchilada Quinoa Casserole, a delightful main dish that brings comfort and nostalgia to your dining table. This easy-to-follow recipe combines the heartiness of quinoa and chicken with the zest of enchilada sauce and spices, creating a meal that is as memorable as it is delicious. Gather around, as we share a cherished family story that makes this dish even more special.

---


There’s something magical about the aroma of a sizzling casserole wafting through the house. It has a way of drawing family members to the kitchen, eyes wide with anticipation and mouths watering in delight. For my family, the Cheesy Chicken Enchilada Quinoa Casserole has been that trademark dish, one that not only satisfies our cravings but also brings us closer together.


The story of how this dish became a staple in our household begins with a family reunion at my grandmother’s old country home. It was a tumultuous time—the kind where every room buzzed with laughter, children played hide and seek in the garden, and the adults gathered around the kitchen, catching up over steaming mugs of coffee. It was during this reunion that my aunt introduced us to her latest culinary creation—a dish she dubbed the Cheesy Chicken Enchilada Quinoa Casserole.


As she pulled the casserole dish from the oven, the golden-brown top layer of cheese bubbled and hissed, releasing a symphony of scents that hinted at the adventure of flavors beneath. It was a simple yet effective recipe—a blend of cooked quinoa, shredded chicken, and canned black beans, all enveloped in a luscious verde enchilada sauce. The addition of spices like cumin, chili powder, and both black and white pepper gave it a subtle kick, while the fresh toppings of avocado, Roma tomatoes, and cilantro brought a refreshing finish.


We gathered around the dining table, plates in hand, eager to taste the dish that had been the talk of the afternoon. As the first forkful hit my tongue, I was enveloped in a warm, cheesy embrace, the tang of tomatoes mingling with the smoky cumin and the slight heat of chili. Each bite was a revelation, a harmonious blend of textures and flavors that felt both exotic and comfortingly familiar.


That day, the Cheesy Chicken Enchilada Quinoa Casserole became more than just a meal—it became a family tradition. It’s a dish that reminds us of those special gatherings, of the laughter shared, and of the simple joy of being together. Now, whenever we whip up this casserole, it’s not just about feeding our bodies but nourishing our souls, evoking memories of home and togetherness.


Difficulty Level: 4/10 - This dish is quite simple to prepare, making it perfect for both beginner and experienced cooks looking for a quick, satisfying meal.
Classification: Main Dish

Whether you’re looking to create new memories or revisit old ones, this Cheesy Chicken Enchilada Quinoa Casserole is sure to become a cherished part of your family’s culinary repertoire. So, gather your loved ones, set the table, and let the magic of this dish bring everyone together, one delicious bite at a time.

Read more about Appetizers

Read more about Main Dishes

Read more about Desserts

Cod with tomatoes, olives and polenta | Made by Meaghan Moineau

Cod with tomatoes, olives and polenta | Made by Meaghan Moineau

Title: Savoring Tradition: Cod with Tomatoes, Olives, and Polenta - A Heartfelt Italian Feast
Description: Dive into the flavors of the Mediterranean with our Cod with Tomatoes, Olives, and Polenta recipe. This main dish, rated at a moderate difficulty of 5/10, combines the fresh taste of cod with the tangy depth of olives and tomatoes, all served alongside creamy polenta. It's a nostalgic culinary journey that warms the soul and brings back cherished family memories.

---


A Culinary Journey Through Time: Cod with Tomatoes, Olives, and Polenta

In the heart of our family kitchen, the aroma of cod simmering with ripe tomatoes and briny olives was synonymous with Sunday gatherings. This dish, steeped in tradition and rich in flavor, was a staple at our family table. It was a recipe passed down from my Nonna, a cherished family heirloom that we lovingly recreated, preserving its authenticity with each preparation.


Ingredients:

- Fresh cod fillets


- Black olives


- Tomatoes


- Dry white wine


- Fresh parsley


- Olive oil


- Fresh and dry oregano


- Corn flour


- Instant corn polenta


- Salt


- White pepper


- Water


Instructions:
1. Prepare the Cod: If your fillets are frozen, be sure to thaw them beforehand. In a shallow dish, mix corn flour with a pinch of salt and white pepper. Dredge each fillet through the seasoned flour, coating evenly.
2. Sauté the Fillets: Heat olive oil in a large skillet over medium heat. Sauté the fillets, allowing them to cook for about 3 minutes on each side until they develop a golden crust. Once done, sprinkle the fillets with a splash of dry white wine, letting it sizzle and infuse the fish with its delicate aroma.
3. Create the Sauce: Add chopped tomatoes and black olives to the skillet, letting them mingle with the fish. Cook this vibrant mixture for about 5 minutes, until the tomatoes soften and release their juices.
4. Finish with Herbs: Before serving, garnish the fillets with freshly chopped parsley and a sprinkle of oregano, both dry and fresh, to elevate the dish with their fragrant essence.
5. Craft the Polenta: In a separate pot, bring water to a boil. Add a dash of white wine, a sprinkle of salt, and a hint of dry oregano. Gradually stir in the instant polenta, whisking continuously for about 5 minutes until it thickens to your desired consistency. If the mixture becomes too thick, add a bit more boiling water.
6. Serve: Allow the polenta to cool slightly before serving it alongside the cod, ensuring each bite is a comforting blend of flavors.
A Taste of Nostalgia:

This dish is more than just a meal; it's a portal to cherished memories. I remember standing on a stool beside my mother, my small hands eager to help as she expertly coated the cod in flour, her eyes twinkling with the joy of passing down our family tradition. The kitchen was filled with laughter and stories of my grandparents' adventures in the Italian countryside, where this recipe was born.


As the sun dipped below the horizon, our family gathered around the table, the comforting warmth of this dish uniting us. Each bite was a celebration of our heritage, a reminder of the love and labor that went into creating this masterpiece.


Difficulty: 5/10
Classification: Main Dish

---


Whether you're recreating this dish for a special occasion or a cozy family dinner, our Cod with Tomatoes, Olives, and Polenta is a delightful reminder of the simple pleasures of life. It's a taste of nostalgia, a journey through tradition, and a testament to the power of food to bring families together. Enjoy this recipe, and may it become a beloved part of your own culinary story.

Read more about Appetizers

Read more about Main Dishes

Read more about Desserts

Rack of Lamb With Parsley | Made by Meaghan Moineau

Rack of Lamb With Parsley | Made by Meaghan Moineau

Title: A Nostalgic Feast: Rack of Lamb with Parsley and Family Memories
Description: Dive into the rich flavors of our Rack of Lamb with Parsley recipe—a main dish destined to become a family favorite. Discover the warmth of shared memories and how this dish brings culinary delight to the table. Rated 6/10 in difficulty, it's a perfectly elegant addition to any dinner menu, ideal for both seasoned cooks and adventurous beginners.

---


When I think of home-cooked meals that bring the family together, my mind inevitably drifts to the aroma of a perfectly roasted Rack of Lamb with Parsley. This dish has been a staple in our family’s culinary repertoire for generations, and each time I prepare it, I am reminded of my grandmother's kitchen, where the warmth of the oven was only surpassed by her welcoming smile.


Ingredients:

- 1 rack of lamb


- 2 tablespoons peanut oil


- Salt and freshly ground pepper to taste


- 2 tablespoons Dijon mustard


- 2 slices white bread, crumbled


- 1 bunch fresh parsley, chopped


- 1 green garlic clove, minced


- 1 shallot, finely chopped


- 1 teaspoon herbes de Provence


- 2 tablespoons unsalted butter, melted


Instructions:

1. Preheat your oven to 400°F (200°C). Brush the rack with peanut oil, and sprinkle it generously with salt and freshly ground pepper.


2. Place the rack in a roasting pan and roast it in the preheated oven for 12 minutes. This initial roasting sets the stage for a beautifully tender lamb.


3. Remove the meat from the oven, and coat it evenly with Dijon mustard. Lower the oven temperature to 350°F (175°C) to ensure a delicate finish.


4. In a medium bowl, combine the bread crumbs, parsley, shallot, garlic, herbes de Provence, and melted butter. This mixture will form a flavorful crust that elevates the lamb to new heights.


5. Spread the bread crumb mixture over the top of the rack, pressing gently to adhere.


6. Return the rack to the 350°F oven, and roast for an additional 15 minutes. The result is a medium-rare lamb rack, with a crust that is both crispy and fragrant.


7. Remove the rack from the oven and let it rest for 10 minutes before carving it into chops.


This dish was the centerpiece of many family gatherings at my grandmother’s house. I remember the anticipation as the aroma filled the room, signaling that dinner was almost ready. My grandmother would regale us with stories from her youth, her voice as comforting as the meal she was preparing. There was something magical about how this simple yet elegant dish could transform an ordinary evening into a cherished memory.


Difficulty Rating: 6/10
Classification: Main Dish

There’s a certain art to preparing a rack of lamb, and while it may seem daunting at first, with a little patience and practice, it becomes a rewarding experience. Whether you’re hosting a dinner party or simply want to treat your family to something special, this Rack of Lamb with Parsley is sure to impress. As you carve into the tender meat and savor the herbaceous crust, you’re not just serving a meal—you’re creating memories that will be cherished for years to come.

Read more about Appetizers

Read more about Main Dishes

Read more about Desserts

Baked Chicken Thighs with Satay Sauce and Tomato Salad | Made by Meaghan Moineau

Baked Chicken Thighs with Satay Sauce and Tomato Salad | Made by Meaghan Moineau

A Taste of Nostalgia: Baked Chicken Thighs with Satay Sauce and Tomato Salad


Rediscovering Family Traditions Through Flavorful Journeys


In today’s fast-paced world, where culinary trends come and go, it’s comforting to return to the dishes that have stood the test of time. One such dish that brings a wave of nostalgia and familial warmth is Baked Chicken Thighs with Satay Sauce and Tomato Salad. This recipe is not just a feast for the taste buds but a heartwarming journey back to simpler times when family gatherings were the highlight of the week.


A Culinary Walk Down Memory Lane


Growing up, weekends were always a special time in our household. It was a tradition to gather at my grandmother's house where the aroma of spices and roasting chicken filled the air, promising an evening of laughter, stories, and delicious food. She had a magical touch with her Baked Chicken Thighs with Satay Sauce, a recipe that has been passed down through generations.


I remember the kitchen bustling with activity as everyone chipped in, from my grandfather carefully preparing the marinade with just the right amount of ginger and garlic to my mother artfully arranging the tomato salad. The real magic happened when my grandmother, with her seasoned hands, coated the chicken thighs with the marinade. The anticipation only grew as the chicken baked to perfection, filling the house with the scent of toasted sesame and savory satay.


Ingredients


For the Chicken:

- Chicken thighs

- Salt and pepper


- Cayenne pepper


- Light soy sauce


- Apple cider vinegar


- Peanut butter


- Sesame oil


- Satay sauce


- Walnuts


- Ginger


- Garlic


- Water


- Honey


For the Tomato Salad:

- Diced tomatoes

- Celery leaves


- Mirin


- Olive oil


Instructions


1. Prepare the Marinade: In a large bowl, mix the salt, pepper, cayenne pepper, light soy sauce, apple cider vinegar, peanut butter, sesame oil, satay sauce, walnuts, ginger, garlic, water, and honey. Stir until you achieve a smooth consistency.
2. Marinate the Chicken: Evenly coat the chicken thighs with the marinade. Allow the chicken to rest for at least 15 minutes, but for the best results, let it marinate overnight in the refrigerator.
3. Bake the Chicken: Preheat your oven to 180°C (356°F). Arrange the marinated chicken thighs on a baking rack placed over a baking pan. Cover the pan with foil to lock in moisture and bake for 45 minutes to one hour until the chicken is tender and cooked through.
4. Prepare the Tomato Salad: In a separate bowl, combine diced tomatoes, celery leaves, mirin, and olive oil. Toss gently to mix.
5. Serve and Enjoy: Once the chicken is done, serve hot alongside the fresh tomato salad. Savor each bite and enjoy a dish that’s as much about the flavors as it is about family memories.

A Dish to Cherish


This recipe, steeped in family tradition, is rated a 5 out of 10 on the difficulty scale, making it accessible for both novice and experienced home cooks. As a Main Dish, it promises to be the centerpiece of any meal, bringing together the richness of baked chicken and the freshness of a vibrant tomato salad.

A Lasting Legacy


Every time I prepare this dish, I’m transported back to those cherished weekends. It’s more than just a recipe; it’s a celebration of family, tradition, and love. Whether you’re cooking for your own family or hosting a gathering of friends, Baked Chicken Thighs with Satay Sauce and Tomato Salad is sure to create new memories while honoring the old. So, gather your loved ones, roll up your sleeves, and let’s take a delicious trip down memory lane together.

Read more about Appetizers

Read more about Main Dishes

Read more about Desserts

Pear and Pesto Crostini | Made by Meaghan Moineau

Pear and Pesto Crostini | Made by Meaghan Moineau

Title: A Taste of Nostalgia: Savory Pear and Pesto Crostini
Description: Dive into the mouthwatering world of Pear and Pesto Crostini, a delectable appetizer that brings together the rich flavors of fresh basil pesto and the sweet juiciness of Bosc pears. Perfect for nostalgic family gatherings or a sophisticated soirée, this recipe is sure to become a cherished favorite.

---


There's something timeless about the smell of fresh basil and garlic wafting through the kitchen. It takes me back to Sunday afternoons spent in my grandmother's sunlit kitchen, where the family gathered around the rustic wooden table, eagerly awaiting a spread of delightful appetizers. Among her many culinary treasures, the Pear and Pesto Crostini held a special place in our hearts.


The magic begins with a simple loaf of French bread. Preheat your oven to 400 degrees and slice the loaf into elegant 1/2-inch-thick rounds. A gentle brush of your best olive oil transforms these humble slices into golden vessels of flavor. As they toast to a deep golden brown in the oven, the anticipation builds.


Meanwhile, the heart of this dish—the vibrant pesto—is crafted. In a dance of flavors, fresh basil leaves, a clove of garlic, pine nuts, and tangy Pecorino Romano cheese come together in a food processor. The transformation is magical, as the ingredients are pulsed into a coarse texture, reminiscent of coarse sand. A drizzle of olive oil brings it all together, creating a pesto that is as fragrant as it is flavorful. Taste, and season with salt and pepper until it sings in harmony.


As the bread cools, I remember the laughter and stories shared in my grandmother's kitchen. We would gather around, eager to top each crostini with a dollop of the green gold pesto, and a slice of sweet Bosc pear. The combination of savory and sweet, crunchy and creamy, was a revelation that delighted our taste buds and hearts alike.


This appetizer, with a difficulty rating of 3 out of 10, is not only simple to prepare but also a stunning addition to any gathering. Whether you're hosting a casual brunch or an elegant dinner party, Pear and Pesto Crostini is sure to impress. It's a dish that invites conversation, evokes memories, and creates new ones with each bite.


So, gather your loved ones, and let the aroma of fresh pesto fill your home. Create a new tradition with this exquisite appetizer, and savor the flavors of nostalgia with each delightful bite.

Read more about Appetizers

Read more about Main Dishes

Read more about Desserts

How to Make Easy Cheesy Garlic Bread | Made by Meaghan Moineau

How to Make Easy Cheesy Garlic Bread | Made by Meaghan Moineau

Title: A Slice of Comfort: How to Make Easy Cheesy Garlic Bread
Description: Dive into a warm, cheesy delight with our Easy Cheesy Garlic Bread recipe. Perfect for any occasion, this appetizer is rich in flavor and nostalgia. Learn how to transform simple ingredients into a crowd-pleasing favorite that will bring a smile to every face at the table.

---


There's something undeniably comforting about the aroma of freshly baked bread wafting through the house. It takes me back to Sunday afternoons at my grandmother's kitchen table, where the centerpiece was always a basket of her famous cheesy garlic bread. As a child, I would eagerly watch as she prepared this golden, gooey delight, her hands moving with the practiced ease of someone who had done this a thousand times before. Now, I’m delighted to share this beloved recipe with you, bringing a piece of my family’s tradition into your home.


Ingredients:

- 1 loaf of French white bread (preferably Vienna)

- 1/4 cup butter


- 2 tablespoons extra virgin olive oil


- 4 cloves garlic, minced


- 2 tablespoons fresh parsley, chopped


- 1 cup mixed mozzarella and cheddar cheese


- 1/4 cup Parmigiano Reggiano, grated


Instructions:


1. Prepare the Oven: Preheat your oven to 350°F (175°C). This temperature is ideal for melting the cheese and toasting the bread perfectly.
2. Slice the Bread: Take your loaf of French white bread and cut it into two halves lengthwise. This will allow for even distribution of the delicious toppings.
3. Make the Garlic Butter: In a small pan over medium heat, melt the butter and mix it with the olive oil. Add the minced garlic and chopped parsley, stirring until the garlic is fragrant and lightly golden.
4. Brush on the Flavor: Use a pastry brush to generously spread the butter garlic mixture over each half of the bread. Ensure every inch is covered to infuse the bread with flavor.
5. Cheese it Up: Mix the mozzarella, cheddar, and Parmigiano Reggiano cheeses together until well combined. Cover each half of the loaf with this cheese mixture, pressing it gently into the bread.
6. Bake to Perfection: Place the cheese-covered bread halves on a baking sheet and put them in the preheated oven. Bake for about 10 minutes, or until the cheese is bubbly and starts to turn a golden brown.
7. Cool and Serve: Once baked to perfection, remove the bread from the oven and allow it to cool for a few minutes. Slice and serve as a mouthwatering appetizer or a delightful side dish.

Difficulty: 3/10


Classification: Appetizer

This Easy Cheesy Garlic Bread is a simple yet delectable recipe that will surely become a staple in your home. Whether you're hosting a family gathering or enjoying a quiet night in, this dish embodies warmth and togetherness. As you savor each bite, I hope you too will create cherished memories around the table, just as I did with my family. Enjoy!

Read more about Appetizers

Read more about Main Dishes

Read more about Desserts

Roasted Beet Hummus | Made by Meaghan Moineau

Roasted Beet Hummus | Made by Meaghan Moineau

Title: A Vibrant Twist on a Classic: Roasted Beet Hummus
Description: Dive into the colorful world of roasted beet hummus, a delightful fusion of flavors that will elevate your appetizer game. This easy-to-make dish combines earthy beets with the creamy texture of traditional hummus, creating a visually stunning and deliciously nutritious treat. Join us as we explore how this vibrant dish became a beloved family favorite, and learn how you can bring this healthy appetizer to your own table.

---


Hummus has been a staple in my family's kitchen for as long as I can remember. Every family gathering, big or small, featured a bowl of this creamy, luscious dip. The traditional hummus, while delicious, took a vibrant turn one summer when my grandmother decided to add roasted beets to the mix. Little did we know, this experiment would become a cherished family tradition.


The summer of the beet hummus was one I’ll never forget. It was a particularly hot July, and my grandparents had invited the whole family over for a weekend barbecue. As we sat around the old wooden table in their backyard, my grandmother emerged from the kitchen with a bowl of hummus that was a vivid shade of magenta. Our eyes widened at the sight, curiosity piqued by this colorful concoction.


As we dipped warm pita bread into the hummus, the combination of flavors was unlike anything we had experienced before. The earthiness of the beets melded perfectly with the creamy chickpeas and tahini, while a hint of garlic and cumin added depth. A squeeze of fresh lemon juice provided a touch of brightness, making each bite refreshing yet satisfying.


From that day forward, roasted beet hummus became a staple at our family gatherings. Its vibrant color and unique flavor always sparked conversations and brought smiles to our faces. It was a dish that not only tasted wonderful but also held the power to bring us together, reminding us of that long, laughter-filled summer afternoon.


Recipe for Roasted Beet Hummus:
Ingredients:

- 2 medium-sized red roasted beets


- 1 can (15 oz) cooked chickpeas, drained and rinsed


- 2 cloves garlic, minced


- 1 teaspoon ground cumin


- Juice of 1 lemon


- 3 tablespoons olive oil (plus more as needed)


- 1 teaspoon salt (or to taste)


- 3 tablespoons tahini sesame seed paste


Instructions:

1. Begin by roasting your beets until they are tender. Once cooled, peel and chop them into smaller pieces.


2. Place the roasted beets, garlic, cumin, lemon juice, salt, and tahini in a food processor or blender. Pulse until well blended and smooth.


3. Add the cooked chickpeas and olive oil to the processor. Pulse until the mixture is just incorporated. If needed, add more olive oil to reach your desired consistency.


4. Taste and adjust seasoning as needed. If you prefer a thinner hummus, gradually add more olive oil while blending.


5. Serve your roasted beet hummus with warm pita or flatbread and enjoy the burst of flavors.


Difficulty Rating: 3/10
Classification: Appetizer

Roasted beet hummus is not only a feast for the eyes but also a nutritious and flavorful appetizer that’s easy to prepare. It's perfect for any gathering and is sure to become a favorite in your home, just as it did in ours. Whether you’re a seasoned cook or a kitchen novice, this dish is a delightful way to bring people together and create lasting memories.

Read more about Appetizers

Read more about Main Dishes

Read more about Desserts

Roasted Endive Salad With Prosciutto, Figs and Pistachios | Made by Meaghan Moineau

Roasted Endive Salad With Prosciutto, Figs and Pistachios | Made by Meaghan Moineau

A Taste of Nostalgia: Roasted Endive Salad With Prosciutto, Figs, and Pistachios


An Ode to Family Gatherings and Flavorful Traditions


Description: Dive into the harmonious blend of flavors in our Roasted Endive Salad with Prosciutto, Figs, and Pistachios. This dish brings together the crisp texture of roasted red and green endive, the rich saltiness of prosciutto, the sweet chewiness of figs, and the crunchy delight of pistachios, all drizzled with a touch of honey. Perfect as an appetizer, this recipe is a testament to how simple ingredients can transform into an unforgettable culinary experience.
Difficulty: 5/10
Category: Appetizer

---


A Culinary Journey Down Memory Lane


Growing up, family gatherings were the highlight of every season. Whether it was a holiday celebration or a simple weekend get-together, the kitchen was always bustling with activity. My grandmother, the heart and soul of our family, had a knack for turning ordinary ingredients into extraordinary dishes. One of her signature creations was the Roasted Endive Salad, a dish that never failed to bring a smile to our faces.


I remember one particular autumn afternoon, the air crisp and leaves painting the ground in hues of gold and crimson. My cousins and I would play outside, our laughter echoing through the trees, while the aroma of roasting endive wafted from the kitchen window. The anticipation of savoring that first bite was almost as delightful as the dish itself.


My grandmother would meticulously prepare the endives, her hands moving with the grace and precision that only years of practice could bring. She'd roast them to perfection, their edges turning a beautiful golden brown. Meanwhile, the prosciutto sizzled in the skillet, its savory scent mingling with the sweet fragrance of dried figs.


When the time came to sit around the table, the Roasted Endive Salad was always a centerpiece. Each bite was a symphony of flavors—the bitterness of the endive balanced by the sweetness of figs, the crunch of pistachios, and the delicate saltiness of prosciutto, all enveloped in the warm embrace of honey.


The Recipe


Ingredients:

- Red and green endive


- Olive oil


- Prosciutto


- Dried figs


- Pistachio nuts


- Honey


Instructions:

1. Preheat your oven (*ding, this is a great toaster oven candidate) to 350°F. Line a rimmed baking sheet with aluminum foil.


2. Wash the endive and remove any unsightly outer leaves. Slice each endive head in half from the stem to the tip.


3. Arrange the endive cut side up on the foil-lined baking sheet. Coat generously with olive oil.


4. Bake at 350°F for 30 minutes, or until the outer edges are golden brown.


5. Meanwhile, fry the prosciutto in a skillet until crispy. Drain onto paper towels, then crumble and set aside.


6. When the endive is done roasting, arrange three pieces on a plate alongside a handful of sliced dried figs and pistachio nuts.


7. Drizzle a spoonful of honey over the plate, then sprinkle the endive with about 1/4th of the crumbled prosciutto.


Conclusion


This Roasted Endive Salad with Prosciutto, Figs, and Pistachios is more than just a dish—it's a bridge to cherished memories and a testament to the power of simple, quality ingredients. Whether you're recreating a family tradition or starting a new one, may each bite bring warmth and joy to your table, just as it has to mine.

Read more about Appetizers

Read more about Main Dishes

Read more about Desserts

Palak-tofu (bean curd) | Made by Meaghan Moineau

Palak-tofu (bean curd) | Made by Meaghan Moineau

A Culinary Journey: Embracing Comfort with Palak-Tofu Delight


Discover the Heartwarming Recipe that Combines Tradition and Taste


Description: Dive into the comforting embrace of Palak-Tofu, a rich and flavorful dish that brings together the nutritional goodness of spinach and the delightful texture of tofu. This recipe not only tantalizes your taste buds but also carries the warmth of cherished family memories. Rated 6/10 on the difficulty scale, this main dish is perfect for those looking to explore a classic Indian delicacy with a modern twist.

---


A Nostalgic Journey into the Heart of Indian Cuisine


Growing up, Sundays were synonymous with family gatherings at my grandmother's house. The kitchen would come alive with the aroma of spices, laughter, and the warmth of togetherness. Among the array of delectable dishes, her Palak-Tofu was an all-time favorite. The vibrant green of the spinach, combined with the creamy texture of tofu, was a sight to behold and a treat to savor.


My grandmother would often recount stories of her childhood, where fresh spinach was handpicked from her family’s garden. As she lovingly prepared the dish, she would tell us how each ingredient was chosen with care, much like the love she poured into her cooking. This recipe is a tribute to her legacy, a reminder of the simple joys of life, and the magic that unfolds when tradition meets the table.


Ingredients:


- 1 block of tofu


- 2 cups of palak (spinach)


- 2 tablespoons of oil


- 1 tablespoon of butter


- 1 teaspoon of coriander powder


- 1 teaspoon of cumin seeds


- 1 teaspoon of garam masala


- 1 tablespoon of ginger-garlic paste


- 2 green chillies, finely chopped


- 2 tablespoons of kasuri methi (dried fenugreek leaves)


- 1 cup of cream or milk


- 2 onions, finely chopped


- 2 tomatoes, chopped


- 1/2 teaspoon of turmeric


- Salt to taste


Instructions:


1. Sauté the Onions: Heat 1 tablespoon of oil in a pan. Add the onions and sauté until they turn golden brown.
2. Aromatic Base: Stir in the ginger-garlic paste and sauté for a minute. Add the green chillies and chopped tomatoes, and sauté until the tomatoes soften.
3. Wilt the Palak: Add the washed, uncut palak to the mixture and sauté for about 5 minutes until the leaves wilt. Remove from heat and allow it to cool.
4. Create the Palak Paste: Once cooled, grind the mixture to a coarse paste in a blender. Set aside.
5. Prepare the Tofu: In the same pan, add another tablespoon of oil and sauté the tofu cubes with a pinch of salt and turmeric for about 2 minutes. Remove from the pan and set aside.
6. Cook the Palak: Return the coarse palak paste to the pan, add salt to taste along with coriander powder, and let it cook on a low flame for 10 minutes.
7. Combine and Season: Add the sautéed tofu cubes into the pan, mixing well. Crush the kasuri methi between your palms and stir it into the mixture.
8. Creamy Finish: Pour in the milk or cream, mix well, and cover the pan. Let it simmer on a low flame for 5 minutes.
9. Final Touch: Drop in the butter for added creaminess and finish with a sprinkle of garam masala.
10. Serve: Serve hot with roti or paratha, and let the flavors take you on a nostalgic culinary journey.

---


The Palak-Tofu recipe is more than just a dish; it's a passage through time, connecting us to our roots and the love that binds families together. Whether you're a seasoned cook or a culinary explorer, this dish promises a heartwarming experience that lingers long after the meal is over. Enjoy every bite as you create new memories with your loved ones.

Read more about Appetizers

Read more about Main Dishes

Read more about Desserts

Spicy Cilantro Pesto | Made by Meaghan Moineau

Spicy Cilantro Pesto | Made by Meaghan Moineau

Title: A Zesty Twist on Tradition: Spicy Cilantro Pesto Recipe
Description: Dive into the vibrant flavors of our Spicy Cilantro Pesto, a modern twist on a classic favorite. This cilantro-based pesto, enriched with a hint of chili, is sure to awaken your taste buds. Perfect as an appetizer or a vibrant addition to your main dishes, this recipe is easy to make and packed with flavor.

---


A Zesty Twist on Tradition: Spicy Cilantro Pesto Recipe


If you've ever found yourself yearning for a dish that combines the freshness of herbs with a hint of heat, our Spicy Cilantro Pesto is exactly what you need. This versatile recipe brings a contemporary twist to the traditional basil pesto, infusing it with the lively flavors of cilantro and a subtle kick of chili. Whether you're a culinary novice or a seasoned chef, this dish is simple to prepare and offers an explosion of flavor with every bite.


Ingredients:

- Fresh cilantro

- 2 cloves garlic


- 1 teaspoon mild chili powder


- 1/4 cup pepitas (pumpkin seeds)


- 1/2 cup olive oil


- Sea salt to taste


Instructions:

1. Begin by placing fresh cilantro in a food processor. Pulse until finely chopped.

2. Add garlic, sea salt, pepitas, and mild chili powder to the processor. Chop until well blended.


3. Using an attachment for adding liquids, slowly incorporate olive oil drop by drop while the food processor is running. This will form a thick, aromatic paste.


4. Once combined, scoop the vibrant green pesto into pint jars.


5. Store in the refrigerator for regular use or freeze for long-term storage.


Nostalgic Family Memory:


This Spicy Cilantro Pesto always takes me back to the summers spent in my grandmother's garden. I remember the hours we spent picking fresh herbs, the sun warming our backs, and the air filled with the intoxicating scent of nature. My grandmother, an inspiring cook, used to prepare a similar pesto with whatever fresh ingredients she could find. Her kitchen was always alive with the sound of the food processor whirring and the smell of garlic mingling with herbs.


One summer night, we decided to experiment by adding a touch of mild chili powder, something my grandmother had never done before. The result was a pesto that had a delightful kick, a combination of her traditional recipe and our modern twist. It became a family favorite, a symbol of our culinary adventures together. Even now, as I prepare this dish, I feel her presence, guiding my hands, and hear her laughter echoing in the kitchen.


Difficulty: 3/10


Classification: Appetizer

This Spicy Cilantro Pesto is not just a dish; it's a journey back to cherished family moments and a testament to the joy of combining tradition with innovation. Whether spread over warm bread, tossed with pasta, or used as a zesty dip, it's bound to become a staple in your kitchen too. Enjoy the spicy, aromatic flavors and maybe create a few nostalgic memories of your own along the way.

Read more about Appetizers

Read more about Main Dishes

Read more about Desserts

Rosemary Rum Raisin Soda Bread with Pecans | Made by Meaghan Moineau

Rosemary Rum Raisin Soda Bread with Pecans | Made by Meaghan Moineau

A Taste of Home: Rosemary Rum Raisin Soda Bread with Pecans


Introduction


Baking has a magical way of bringing people together, and there's something particularly heartwarming about the aroma of freshly baked bread wafting through the air. Today, I invite you to embark on a culinary journey with my Rosemary Rum Raisin Soda Bread with Pecans—a recipe that beautifully blends bold flavors with nostalgic memories. This delightful bread is not just a treat for the taste buds but a treasured family tradition. Get ready to create your own cherished memories with this recipe that rates a 6 out of 10 in difficulty and is perfect as a comforting dessert or a delightful accompaniment to any meal.


Ingredients


- 1 cup raisins


- ½ cup dark rum


- 2 cups all-purpose flour


- 1 cup whole wheat flour


- 1 ½ teaspoons baking soda


- 1 teaspoon salt


- 1 tablespoon fresh rosemary, finely chopped


- ½ cup pecans, toasted and chopped


- 1 cup plain yogurt (plus more if needed)


- 2 tablespoons honey


- Milk, for brushing


- Anise seeds or oats, for sprinkling


Instructions


1. Prepare the Raisins: Combine the raisins and dark rum in a small saucepan. Bring to a boil, then let simmer for 30 seconds. Remove from heat, cover, and allow the raisins to macerate for at least 4 hours, preferably overnight. This step infuses the raisins with a rich, aromatic flavor that forms the heart of this bread.
2. Preheat and Prepare: When you're ready to bake, preheat your oven to 375°F (190°C). Coat a baking sheet with olive oil and dust it lightly with flour, or line it with parchment paper.
3. Mix Dry Ingredients: In a large mixing bowl, whisk together the all-purpose flour, whole wheat flour, baking soda, salt, and rosemary. Stir in the toasted pecans, ensuring they're evenly distributed throughout the mixture.
4. Combine Wet Ingredients: In a separate bowl, combine the macerated raisins (including any remaining rum), yogurt, and honey. Mix well.
5. Form the Dough: Add the wet ingredients to the dry ingredients. Stir until the mixture becomes too stiff to stir, then use your hands to bring it together into a dough. If the dough is too dry, add additional yogurt, one teaspoon at a time, until you achieve a stiff, slightly tacky ball.
6. Shape the Loaf: Turn the dough onto a lightly floured board and shape it into a round loaf. Be careful not to over-knead the dough to avoid a tough texture.
7. Prepare for Baking: Transfer the loaf to the prepared baking sheet. Use a sharp knife to make 4-6 deep slashes across the top of the loaf, cutting about halfway through. Brush the top with milk and sprinkle with anise seeds or oats if desired.
8. Bake: Bake for 40-45 minutes, or until a toothpick inserted into the center comes out clean. The loaf should sound hollow when tapped. Cool on a wire rack.
9. Serve: Enjoy warm or at room temperature with a generous slather of butter. Each bite is a sumptuous blend of aromatic rosemary, sweet raisins, and crunchy pecans—a true celebration of flavors.

A Nostalgic Family Memory


Every year, as the leaves began to fall and the air turned crisp, my family would gather in my grandmother's cozy kitchen to bake this very bread. The process was a cherished tradition, a time when generations came together to share stories and laughter. My grandmother would recount tales of her own childhood, and how her mother taught her to bake this bread in their small country cottage. The scent of rosemary and rum-filled raisins would permeate the air, wrapping us in a cocoon of warmth and love.


This bread, with its rustic charm and hearty flavors, has always symbolized home for me. It's more than just a recipe; it's a link to my roots and a reminder of the love that has been passed down through generations. Even now, as I bake it in my own kitchen, I feel the presence of my family around me, their spirits alive in every slice.


Conclusion


Rosemary Rum Raisin Soda Bread with Pecans is more than just a delightful dessert or accompaniment—it's a piece of history, a connection to loved ones, and a celebration of flavors that warm the heart and soul. Whether you're sharing it with family or enjoying a quiet moment alone, this bread is sure to create memories that will last a lifetime. So, roll up your sleeves, embrace the art of baking, and let this recipe bring a taste of home to your table.

Read more about Appetizers

Read more about Main Dishes

Read more about Desserts

Strawberry Shortcake with Homemade Donuts | Made by Meaghan Moineau

Strawberry Shortcake with Homemade Donuts | Made by Meaghan Moineau

Title: Indulge in Nostalgia with Strawberry Shortcake Donuts: A Sweet Family Tradition
Description:

Dive into the world of heavenly desserts with our Strawberry Shortcake with Homemade Donuts. This unique twist on a classic favorite is not just about the delightful flavors of strawberries and whipped cream—it’s a culinary journey down memory lane. Perfect for dessert lovers seeking a comforting treat that’s equal parts nostalgia and innovation. Whether you're a seasoned baker or a novice in the kitchen, this recipe is a delightful challenge worth every minute. Rated at a moderate difficulty of 6 out of 10, these donuts are sure to become a cherished addition to your dessert repertoire.


---


Strawberry Shortcake Donuts: A Recipe to Relive Memories

There’s something magical about the aroma of freshly baked donuts wafting through the kitchen. It takes me back to sunlit Saturday mornings in my grandmother’s warm, inviting home. Her kitchen was a place of wonder, filled with laughter, stories, and the irresistible smell of her famous Strawberry Shortcake. Today, I’m sharing a special version of this nostalgic treat: Strawberry Shortcake with Homemade Donuts.


Ingredients:

- 2 cups cake flour


- 1 tablespoon baking powder


- ½ teaspoon salt


- ½ cup shortening (or vegetable lard)


- ¾ cup granulated sugar


- 3 egg yolks


- 1 cup sour cream


- 1 teaspoon vanilla extract


- ½ cup whole milk


- 1 cup confectioners sugar


- Fresh strawberries


- Whipped cream


Instructions:
1. Prepare the Dry Ingredients: In a mixing bowl, combine 2 cups of cake flour, 1 tablespoon of baking powder, and ½ teaspoon of salt. If nutmeg is your muse, feel free to add a pinch, though I prefer the simple, clean taste without it. Set this mixture aside.
2. Blend the Wet Ingredients: Using a stand mixer, blend ½ cup of shortening and ¾ cup of granulated sugar on low speed until the mixture resembles fine sand. Gradually add in the 3 egg yolks, mixing on low speed for about a minute.
3. Combine and Chill: Alternate adding your dry ingredients with 1 cup of sour cream to the mixer, ensuring you scrape down the sides of the bowl occasionally. Add 1 teaspoon of vanilla extract and mix until just incorporated. Cover and refrigerate the batter for 15-20 minutes.
4. Preheat and Pipe: Preheat your oven to 350°F. Spoon the batter into a ziplock bag and cut a corner to create a makeshift piping bag. Pipe the batter into a greased donut pan.
5. Bake and Ice: Bake for 10-12 minutes until the donuts are light and fluffy. Meanwhile, in a saucepan over low heat, warm ½ cup of whole milk. Whisk in 1 cup of confectioners sugar until smooth to create a simple icing. Dip the cooled donuts in the icing or drizzle it over the top.
6. Assemble the Shortcakes: Slice the donuts in half, resembling an English muffin. Layer with freshly sliced strawberries and a generous dollop of whipped cream.

---


A Sweet Journey Back in Time

Every bite of these Strawberry Shortcake Donuts is a step back into cherished family moments. I vividly remember sitting at my grandmother’s kitchen table, the sun painting patterns on the floor as she regaled us with tales of her youth. Her strawberry shortcake was a staple at family gatherings, a symbol of love and togetherness. Now, with a modern twist, these donuts bring those cherished memories back to life.


This recipe is rated a 6 out of 10 in difficulty, making it a fun challenge for both baking enthusiasts and those new to the craft. Classified as a dessert, it’s perfect for ending a meal on a sweet note or indulging in a midday treat. So, roll up your sleeves, embrace the nostalgia, and create new memories with every delicious bite.

Read more about Appetizers

Read more about Main Dishes

Read more about Desserts

Rice Stuffed Bell Peppers (Zeytinyagli Biber Dolmasi) | Made by Meaghan Moineau

Rice Stuffed Bell Peppers (Zeytinyagli Biber Dolmasi) | Made by Meaghan Moineau

A Taste of Tradition: Rice Stuffed Bell Peppers (Zeytinyağlı Biber Dolması)


Experience the Heartfelt Flavors of a Timeless Turkish Delicacy


Introduction


There's a certain magic that comes with recreating traditional dishes, especially when they transport you back to cherished family gatherings. One such dish, the Rice Stuffed Bell Peppers, or Zeytinyağlı Biber Dolması, is a testament to the rich culinary heritage of Turkey. This delightful blend of aromatic spices and tender bell peppers filled with a savory rice mixture is both comforting and flavorful, making it a must-try for anyone looking to explore authentic Turkish cuisine.


Difficulty Level: 5/10
Category: Main Dish

Ingredients


- Bell peppers


- Olive oil


- Onions


- Tomatoes


- Tomato paste


- Rice


- Salt


- Sugar


- Allspice


- Cinnamon


- Dried or fresh mint


- Water


Instructions


1. Prepare the Peppers:

Begin by cutting the tops off the bell peppers, removing the seeds, and washing them thoroughly. Set aside to dry.


2. Create the Filling:

In a large pan, lightly sauté the onions in olive oil until they are translucent. Stir in the chopped tomatoes and tomato paste, allowing them to cook for an additional 3 minutes.


3. Cook the Rice:

Add the rice to the onion-tomato mixture and braise it for about 5 minutes. Then, add salt, sugar, allspice, cinnamon, and mint, along with hot water. Allow the mixture to simmer until all the liquid has evaporated. Let it cool for a short while.


4. Stuff the Peppers:

Using a spoon, fill each bell pepper with the rice mixture. Place a slice of tomato on top of each pepper to act as a cap.


5. Cook the Dolmasi:

Arrange the stuffed peppers in a large saucepan or pot. Add enough water to reach halfway up the sides of the peppers. Cover with a lid and cook on low heat for about 15-20 minutes.


6. Serve and Enjoy:

Serve the rice-stuffed bell peppers warm or hot, and enjoy the blend of spices and textures that make this dish so special.


A Nostalgic Family Memory


Growing up, Sunday afternoons at my grandmother's house were filled with the intoxicating aromas of her cooking. Zeytinyağlı Biber Dolması was always a family favorite, and its preparation was a cherished ritual. I can still picture my grandmother, her hands deftly crafting each stuffed pepper with care, while recounting tales of her childhood in the vibrant streets of Istanbul.


The kitchen buzzed with laughter and stories, a symphony of clinking pots and shared memories. We would gather around the table, eager to taste the fruits of her labor. Each bite of the dolmasi was a flavor-packed journey, the spices dancing on our tongues, mingling with the sweetness of the peppers.


These meals were more than just food; they were a connection to our heritage, a bridge linking us to generations past. Every time I prepare this dish, I am transported back to those warm, love-filled Sundays, and I feel a deep sense of gratitude for the culinary legacy passed down to me.


Conclusion


Rice Stuffed Bell Peppers (Zeytinyağlı Biber Dolması) is more than just a meal; it's an experience, a journey into the heart of Turkish culture and family traditions. Whether you're a seasoned cook or a curious beginner, this recipe offers a taste of nostalgia and the opportunity to create lasting memories around the dinner table. So, gather your ingredients, embrace the process, and enjoy the rich, savory flavors of this timeless dish.

Read more about Appetizers

Read more about Main Dishes

Read more about Desserts

Creamy Shrimp Bisque | Made by Meaghan Moineau

Creamy Shrimp Bisque | Made by Meaghan Moineau

Title: A Bowl of Comfort: Crafting the Perfect Creamy Shrimp Bisque
Description: Dive into the heartwarming flavors of our Creamy Shrimp Bisque, a dish that marries the ocean's bounty with rich, creamy indulgence. With a hint of nostalgia and a sprinkle of warmth, this bisque is not just a meal but a cherished memory in a bowl. Join us as we explore this delightful recipe, its roots, and how to make it a staple in your kitchen.

---


A Bowl of Comfort: Crafting the Perfect Creamy Shrimp Bisque

When the leaves start to turn and the air takes on that familiar crisp chill, there’s nothing quite like a steaming bowl of soup to bring comfort to the soul. For me, the Creamy Shrimp Bisque is more than just a dish—it’s a cherished family tradition, a memory wrapped in the aroma of sautéed onions and the gentle bubbling of a savory broth.


Ingredients:

- 2 celery stalks, chopped


- 4 green onions, sliced


- 4 tablespoons butter


- 3 cloves garlic, minced


- 1/4 cup flour


- 2 cups half & half


- 3 cups fish stock


- 2 tablespoons fresh parsley, chopped


- 1 pound cooked shrimp, peeled and deveined


- 1 cup diced potatoes


- 1/4 teaspoon cayenne pepper


- 1 teaspoon onion powder


- 1 teaspoon garlic powder


- 1 teaspoon Old Bay seasoning


- Salt & pepper to taste


Instructions:

1. In a medium saucepan, melt the butter over medium heat. Add the celery and green onions, stirring occasionally until tender, about 10 minutes.


2. Add the garlic and sauté for another 3-4 minutes until fragrant.


3. Stir in the flour, cooking for about 5 minutes to eliminate the raw flour taste.


4. Add the diced potatoes and half & half, allowing them to simmer over medium heat for another 5 minutes.


5. Stir in the fish stock, parsley, and all of the seasonings, letting the mixture cook for an additional 10 minutes until thick and bubbly.


6. Add the cooked shrimp, and let simmer for another 10 minutes.


7. Optional: Cook crispy bacon pieces and set aside. Use the bacon drippings to sauté the onion and celery for an added smoky flavor. Once the bisque is ladled into bowls, sprinkle the top with crispy bacon bits.


A Journey Through Time:

Every spoonful of this Creamy Shrimp Bisque transports me back to cozy winter evenings spent in my grandmother’s kitchen. The warmth from her stove enveloped us as she lovingly stirred her pot of bisque, the rich aroma filling the room and our hearts. It was a dish that always brought our family together—each bowl a testament to her culinary skill and the love she poured into every meal.


One particular winter, during a rare snowstorm, our family huddled around the fireplace, bowls of her bisque in hand, sharing stories and laughter. That night, the bisque was more than a meal; it was a reminder of the warmth of family and the simple joys of life. It was on that snowy night that my husband suggested adding crispy bacon, a twist that has since become a family favorite.


Difficulty Rating: 5/10
Classification: Main Dish

This Creamy Shrimp Bisque strikes the perfect balance between simplicity and elegance, making it an inviting main dish for any occasion. Whether you’re a seasoned chef or a home cook looking to impress, this recipe promises not only flavor but the creation of lasting memories around your dining table.


So, as you embark on this culinary journey, remember that each ingredient, each stir of the pot, is an opportunity to create your own cherished family traditions. Let this bisque be the canvas upon which you paint your own stories, one comforting spoonful at a time.

Read more about Appetizers

Read more about Main Dishes

Read more about Desserts

Almond and cranberry shortbread | Made by Meaghan Moineau

Almond and cranberry shortbread | Made by Meaghan Moineau

Title: Delight in Every Bite: The Perfect Almond and Cranberry Shortbread
Description: Discover the delicate balance of flavors in this almond and cranberry shortbread recipe, a delightful treat that brings warmth to any occasion. With a story that binds generations, these cookies are more than just a dessert—they're a cherished memory.

---


Almond and Cranberry Shortbread: A Recipe Steeped in Family Tradition


Growing up, the holiday season was never complete without the comforting aroma of freshly baked cookies wafting through our home. Each year, as the first snowflakes fell, my grandmother would gather us in her cozy kitchen, where we would embark on the annual ritual of making her famous Almond and Cranberry Shortbread.


This recipe, passed down through generations, is a testament to the simplicity and love that defines our family gatherings. As we creamed the butter and sugar, my grandmother would regale us with tales of her own childhood, painting vivid pictures of festive tables laden with this delightful dessert. The shortbread, with its crumbly texture and the sweet-tart burst of cranberries, always seemed to embody the warmth and togetherness of the season.


Ingredients:


- Butter: The foundation of any good shortbread, bringing richness and that melt-in-your-mouth quality.
- Icing Sugar: For a smooth, glossy mixture that adds the perfect touch of sweetness.
- Egg Yolks: To bind the ingredients together, adding depth to the flavor.
- Lemon Juice: A hint of citrus that brightens the palate.
- Flour: The canvas for our creation.
- Almonds: Both ground and blanched, adding texture and a nutty richness.
- Dried Cranberries: For a pop of color and tangy sweetness.
- Blanched Almonds: To roll the dough in, offering a satisfying crunch.

Instructions:


1. Cream the Butter: Beat the butter for about 5 minutes until it reaches a fluffy consistency.
2. Add the Sweetness: Incorporate the icing sugar, continuing to beat until the mixture shines.
3. Mix in the Yolks and Juice: Add the egg yolks and lemon juice, whisking until fully blended.
4. Combine Dry Ingredients: Mix the flour and ground almonds, gradually adding to the butter mixture until it forms a thick paste. Be careful not to overmix.
5. Knead in the Cranberries: Gently fold in the dried cranberries by hand.
6. Shape the Dough: Divide into two, shaping each into 20-22 cm rolls. Roll in chopped almonds.
7. Chill: Wrap in foil and refrigerate for several hours or overnight.
8. Slice and Bake: Cut into 5-6 mm slices, bake at 180°C for about 12 minutes. Allow to cool on the sheet before transferring to a rack.

A Family Tradition


Every slice of this shortbread is a bite into my family's history. The crunch of almonds and the burst of cranberry flavor is reminiscent of the laughter and stories shared around our table. While the cookies themselves are a simple treat, their true magic lies in the memories they evoke.


Difficulty Rating: 4/10


This recipe is straightforward, making it accessible for bakers of all levels. Its simplicity is part of what makes it such a beloved tradition.


Classification: Dessert


Perfect for any occasion, these cookies shine as a delightful dessert, ideal for pairing with a warm cup of tea or coffee.


---


As the holiday season approaches, I invite you to try this Almond and Cranberry Shortbread recipe. May it bring as much joy to your home as it has to mine. Whether you're creating a new tradition or adding to an existing one, remember that the true essence of these cookies is in the love and memories they carry.

Read more about Appetizers

Read more about Main Dishes

Read more about Desserts

Spiked Watermelon lemonade | Made by Meaghan Moineau

Spiked Watermelon lemonade | Made by Meaghan Moineau

Title: Sip into Summer: The Irresistible Charm of Spiked Watermelon Lemonade
Description: Indulge in the refreshing taste of summer with our Spiked Watermelon Lemonade. This delightful concoction combines the sweetness of watermelon, the tang of fresh lemon juice, the aromatic notes of mint, and the smooth edge of gin. Perfect for a leisurely afternoon or a festive gathering, this recipe will transport you to sunlit memories and create new ones with every sip.

---


Summer is a season that always brings back fond memories of family gatherings, laughter, and the simple joys of life. One particular memory that stands out is when my family would gather at my grandmother’s house for her annual summer barbecue. The backyard would be filled with the scent of sizzling grills, the sound of children playing, and the vibrant colors of a summer in full bloom. And at the heart of these gatherings was her signature Spiked Watermelon Lemonade—a drink that seemed to capture the very essence of summer.


Creating this drink always took a bit of time, but it was a labor of love. As a child, I would watch my grandmother with wide eyes as she carefully prepared the ingredients. The kitchen would be filled with the sweet aroma of fresh watermelon and the invigorating scent of mint. She would always let me help squeeze the lemons, my small hands sticky with juice, while she prepared the mint-infused syrup. The anticipation built as the mint steeped for what felt like an eternity to my young mind.


Finally, the moment would come to blend everything together. The sound of the blender whirring was like a starting bell, signaling the beginning of the festivities. My grandmother would always let me have the first taste, a sip that was both tart and sweet, with a hint of mint that danced on my tongue. As the adults enjoyed theirs with a splash of gin, I was content with my virgin version, feeling every bit as sophisticated.


Now, years later, I've taken up the mantle of making this drink for my own family gatherings. While I’ve added my own twist with a generous splash of gin, the essence remains the same. It continues to be a crowd-pleaser, a conversation starter, and a vessel for nostalgia—each sip a reminder of those sun-kissed days in my grandmother’s backyard.


Recipe Difficulty: 4/10
Classification: Beverage
Ingredients:

- 1 cup sugar


- 2 cups water (divided)


- A handful of fresh mint leaves


- 1 cup freshly squeezed lemon juice


- 4 cups cubed watermelon


- 1 cup gin


Instructions:

1. In a small saucepan, combine sugar and 1 cup of water. Add a handful of fresh mint leaves.


2. Cook over medium heat, stirring continuously, until the sugar is completely dissolved.


3. Remove from heat, cover the saucepan, and allow the mixture to sit for at least an hour to infuse the mint flavor.


4. In a blender, combine the freshly squeezed lemon juice with the cubed watermelon and blend until smooth.


5. Gradually add the mint simple syrup to the watermelon mixture, 1/4 cup at a time, until you reach your desired level of sweetness, approximately one cup.


6. Pour the mixture into a large pitcher. Add the remaining cup of cold water and the gin, then fill with the watermelon mixture.


7. Stir well to combine.


Whether you’re hosting a barbecue, enjoying a quiet afternoon on the porch, or simply reminiscing about summers past, this Spiked Watermelon Lemonade is sure to delight. So go ahead, take a sip, and let it transport you to sunlit memories and create new ones with every refreshing taste.

Read more about Appetizers

Read more about Main Dishes

Read more about Desserts