Eggplant Curry | Made by Meaghan Moineau

Eggplant Curry: A Comforting Classic

Intro

There’s something truly heartwarming about a dish that brings back fond memories of family dinners and cozy evenings at home. For me, Eggplant Curry is that dish. I remember the first time my grandmother made it for us during a chilly autumn evening. The aroma of spices wafting through the house was irresistible, and the warmth of the curry was the perfect antidote to the crisp air outside. We gathered around the table, bowls in hand, ready to dive into this comforting meal. Today, I’m excited to share this beloved recipe with you, hoping it brings the same comfort and joy to your home.

Why You’ll Love It

This Eggplant Curry is a delicious blend of flavors and textures that is sure to become a staple in your recipe collection. The creamy coconut milk perfectly balances the heat from the spices, while the eggplant absorbs all the wonderful flavors, becoming tender and flavorful. It’s a versatile dish that can be adjusted to suit various dietary preferences and spice levels, making it a hit with everyone at the table. Plus, it’s an excellent way to incorporate more vegetables into your diet without sacrificing taste.

Ingredients

  • 1 1/2 cups coconut milk
  • 2 large eggplants, diced
  • 2 yellow onions, chopped
  • 4 cloves garlic, minced
  • 1 tablespoon fresh ginger, grated
  • 2 cups diced heirloom tomatoes
  • 1 tablespoon ground cumin
  • 1 tablespoon ground coriander
  • 1 teaspoon turmeric
  • 1/2 teaspoon cayenne pepper
  • 1/2 teaspoon crushed red pepper flakes
  • Salt to taste
  • 1 cup Greek yogurt, plus more for serving

Instructions

  1. Heat about 1/2 cup of the coconut milk over medium heat in a large skillet. Sauté the onions and garlic in the coconut milk until soft and beginning to brown, about 12 minutes.
  2. Place the diced eggplants and heirloom tomatoes into a 6-quart or larger crockpot.
  3. In a bowl, combine the cumin, coriander, turmeric, cayenne pepper, crushed red pepper flakes, and salt. Stir them together.
  4. Pour the remaining coconut milk, spices, and ginger into the crockpot. Once the onion and garlic mixture is done sautéing, add it to the crockpot and mix everything thoroughly.
  5. Turn the crockpot on high and allow the curry to cook for 6 to 8 hours, stirring periodically.
  6. About 30 minutes before serving, add the Greek yogurt to the curry and mix well. Allow it to cook for an additional 30 minutes.
  7. Prepare quinoa according to package directions (typically a 2:1 water to quinoa ratio; simmer for about 30 minutes).
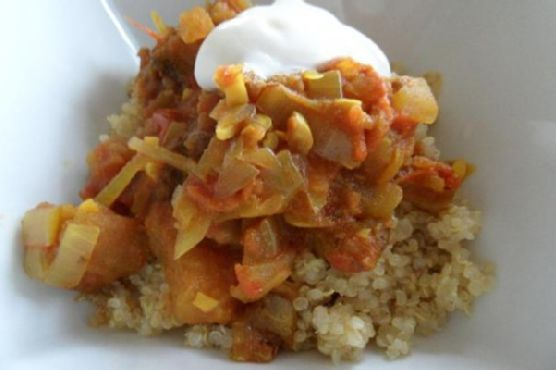
  8. Serve the curry over quinoa and add a dollop of Greek yogurt on top.

Tips

For best results, select firm and glossy eggplants. They should feel heavy for their size. If you prefer a milder curry, reduce the amount of cayenne pepper and crushed red pepper flakes. For a creamier texture, you can add a bit more coconut milk or yogurt.

Variations & Substitutions

If you’re looking to change things up, you can easily substitute the eggplants with other vegetables like zucchini or bell peppers. For a vegan version, replace the Greek yogurt with a plant-based alternative. You can also experiment with different types of tomatoes, such as cherry or plum, to vary the taste and texture of the curry.

Storage

Store leftover curry in an airtight container in the refrigerator for up to 4 days. To reheat, place it in a saucepan over medium heat and stir occasionally until heated through. Alternatively, it can be frozen for up to 3 months. Thaw overnight in the refrigerator before reheating.

FAQ

Can I make this curry on the stovetop instead of a crockpot?

Yes, you can make this curry on the stovetop. Use a large pot or Dutch oven, follow the same sautéing steps, then cover and let it simmer on low heat for about 1 to 1.5 hours, stirring occasionally.

Is there a way to make this curry less spicy?

Absolutely! To reduce the spiciness, decrease the amount of cayenne pepper and crushed red pepper flakes. You can also add more coconut milk or yogurt to mellow the heat.

Nutrition

This Eggplant Curry is not only delicious but also nutritious. It’s packed with fiber from the eggplants and tomatoes, and the spices like turmeric and ginger offer anti-inflammatory benefits. The use of Greek yogurt adds a healthy dose of protein and probiotics, making it a well-rounded meal.

Conclusion

Eggplant Curry is a delightful dish that combines the richness of coconut milk with the vibrant flavors of Indian spices. It’s a recipe that warms the heart and soul, much like it did for me during those cherished family dinners. Whether you’re a seasoned cook or new to curry-making, this recipe is simple to follow and yields a satisfying, comforting meal. I hope it becomes a treasured recipe in your home, bringing warmth and joy to your table. Enjoy!

Related update: Eggplant Curry

Easy Chicken Cordon Bleu | Made by Meaghan Moineau

Easy Chicken Cordon Bleu

Intro

There’s something about the aroma of a good Chicken Cordon Bleu that always takes me back to my grandmother’s kitchen. I remember sitting on a stool, watching her skillfully roll each chicken breast, the aroma of melting cheese filling the air. Her version of this classic dish was something I looked forward to every Sunday dinner. Today, I’ve taken that cherished recipe and added a few personal touches, making it even easier for you to bring a piece of that nostalgia into your own home.

Why You’ll Love It

This Easy Chicken Cordon Bleu recipe is perfect for a cozy dinner at home or a special occasion. Its simplicity doesn’t compromise its flavor. You’ll love how the juicy chicken breast wraps around savory ham and oozy cheddar cheese, all encased in a crispy breadcrumb coating. It’s a dish that’s as delightful to make as it is to eat, and it doesn’t require any fancy cooking techniques. Plus, it’s customizable to your taste preferences, making it a versatile addition to your recipe arsenal.

Ingredients

  • 4 skinless boneless chicken breasts
  • 4 slices of ham
  • 8 sticks of cheddar cheese (or more, if you’re a cheese lover!)
  • Salt, to taste
  • Ground peppercorn, to taste
  • 1 cup bread crumbs
  • 1/2 cup all-purpose flour
  • 2 eggs, beaten
  • Butter

Instructions

  1. Preheat your oven to 180°C (350°F).
  2. Gently pound the chicken breasts to about 1/4 inch thickness using a meat mallet. This ensures even cooking and makes it easier to roll.
  3. Season both sides of the chicken with salt and ground peppercorn.
  4. Place 1 slice of ham and 2 sticks of cheddar cheese on top of each breast. Feel free to add more cheese if desired!
  5. Roll up each breast tightly and secure with a toothpick to hold the shape.
  6. Dredge each rolled chicken breast in flour, ensuring it’s lightly coated.
  7. Brush each roll with beaten eggs, then roll in bread crumbs for a crispy coating.
  8. Brush a baking pan with olive oil and place the chicken rolls inside.
  9. Bake in the preheated oven for about 20 minutes.
  10. Layer each roll with butter cubes. Allow the butter to melt on top, infusing the rolls with its flavor and aroma.
  11. Bake for another 15 minutes, or until the chicken is cooked through and the coating is golden brown.
  12. Remove from the oven and let rest for a few minutes before serving with your favorite sauce.

Tips

For the best results, make sure to pound the chicken thinly and evenly. This not only helps with rolling but also ensures the chicken cooks evenly. If you’re a cheese enthusiast like me, don’t hesitate to add a bit more cheese for an extra gooey center. Lastly, using fresh breadcrumbs can elevate the texture of the crust, giving it a superior crunch.

Variations & Substitutions

Feel free to experiment with different types of cheese; Swiss cheese or Gruyère can be excellent substitutes for cheddar. For a healthier twist, you can use whole wheat breadcrumbs or almond flour instead of regular bread crumbs. If you prefer a different type of meat, turkey breast is a great alternative to chicken.

Storage

Leftover Chicken Cordon Bleu can be stored in an airtight container in the refrigerator for up to 3 days. To reheat, place the rolls in a preheated oven at 175°C (350°F) until warmed through. Avoid microwaving as it can make the breadcrumb coating soggy.

FAQ

Can I prepare Chicken Cordon Bleu ahead of time?

Yes, you can prepare the rolls ahead of time and store them in the refrigerator for up to 24 hours before baking. This makes it a great dish for entertaining, as you can do all the prep work in advance.

What sauce pairs well with Chicken Cordon Bleu?

A creamy Dijon mustard sauce or a simple white wine sauce pairs wonderfully with Chicken Cordon Bleu. The tanginess of the mustard complements the richness of the chicken and cheese perfectly.

Can I freeze Chicken Cordon Bleu?

Absolutely! Once the chicken rolls are assembled, wrap them tightly in plastic wrap and freeze for up to 2 months. When you’re ready to cook, thaw them in the refrigerator overnight before baking.

Nutrition

This recipe serves four and provides approximately 400 calories per serving, with 25g of protein, 20g of fat, and 30g of carbohydrates. Please note that these values can vary based on the specific brands and quantities used.

Conclusion

This Easy Chicken Cordon Bleu recipe is not just a nod to a timeless classic but also a celebration of flavors and memories. It’s perfect for a family dinner or an impressive dish for guests. With its crispy exterior and melty interior, it’s bound to become a beloved favorite in your household, just as it has in mine. Enjoy the process, and don’t forget to savor every bite!

Related update: Easy Chicken Cordon Bleu

Related update: Kielbasa With Brussels Sprouts In Mustard Cream Sauce

Crab Wontons | Made by Meaghan Moineau

Delicious Crab Wontons: A Fusion of Flavor and Elegance

Intro

There’s something magical about the aroma of crab wontons wafting through the kitchen. As a child, I would watch my grandmother expertly fold wonton wrappers, her fingers moving deftly with years of practiced ease. Each fold was a promise of deliciousness to come. Today, I’m excited to share a modern twist on this classic recipe, bringing back fond memories while creating new ones. Whether enjoyed as an appetizer or a delightful snack, these crab wontons are sure to become a favorite in your household.

Why You’ll Love It

Crab wontons are not just a treat for the taste buds but also a feast for the senses. Here are a few reasons why you’ll fall in love with this recipe:

  • Easy to Make: With simple ingredients and straightforward instructions, this recipe is accessible even for novice cooks.
  • Healthy Twist: By using fat-free cream cheese and reduced-fat mayonnaise, you can enjoy these wontons guilt-free.
  • Flavorful Fusion: The combination of crab, cream cheese, and savory seasonings creates a rich, satisfying taste.
  • Perfect for Any Occasion: Whether you’re hosting a dinner party or enjoying a quiet night in, these wontons are versatile enough to suit any event.

Ingredients

  • 1 can of white crabmeat, drained
  • 4 oz fat-free cream cheese, softened
  • 2 tablespoons reduced-fat mayonnaise
  • 1 tablespoon soy sauce
  • 1 clove garlic, minced
  • 1/2 teaspoon onion powder
  • Fresh ground pepper, to taste
  • 12 wonton wrappers

Instructions

  1. Preheat your oven to 350°F (175°C).
  2. Spray a mini muffin tin with nonstick cooking spray to prevent sticking.
  3. In a medium bowl, combine the crab meat, cream cheese, mayonnaise, soy sauce, garlic, onion powder, and fresh ground pepper. Mix until all ingredients are well incorporated.
  4. Place one wonton wrapper in each of the 12 mini muffin cups. The edges of the wonton wrappers will extend beyond the cups and may need to be folded slightly to fit.
  5. Spoon the crab mixture into the center of each wonton cup, filling generously.
  6. Bake for 15 to 20 minutes, or until the edges of the wonton cups are golden brown and the filling is heated through.
  7. Remove from oven and let cool slightly before serving. Enjoy your delicious crab wontons!

Tips

To ensure the best results, consider these helpful tips:

  • Room Temperature Ingredients: Make sure the cream cheese is softened to room temperature for easier mixing.
  • Even Filling: Use a small cookie scoop or spoon to evenly distribute the crab mixture into the wonton cups.
  • Watch the Baking Time: Keep an eye on the wontons as they bake to avoid over-browning.

Variations & Substitutions

Feel free to customize your crab wontons with these variations:

  • Spicy Kick: Add a dash of hot sauce or a pinch of red pepper flakes to the crab mixture for some heat.
  • Cheesy Delight: Sprinkle a little grated Parmesan or mozzarella cheese on top of the crab mixture before baking.
  • Vegetarian Option: Substitute crab with finely chopped mushrooms or tofu for a vegetarian version.

Storage

If you have leftovers (which is rare!), store them in an airtight container in the refrigerator for up to 3 days. To reheat, place the wontons in a preheated oven at 350°F for about 5-7 minutes or until warmed through.

FAQ

Can I freeze crab wontons?

Yes, you can freeze them before baking. Arrange the filled wonton cups on a baking sheet, freeze until solid, then transfer to a freezer-safe bag. When ready to bake, add a few extra minutes to the baking time.

What can I serve with crab wontons?

Crab wontons pair well with a sweet chili sauce or soy sauce for dipping. They also complement a fresh side salad or a bowl of soup for a more substantial meal.

Nutrition

Each serving of crab wontons (2 pieces) contains approximately:

  • Calories: 120
  • Protein: 6g
  • Carbohydrates: 10g
  • Fat: 5g

Nutritional values are estimates and may vary based on specific products used.

Conclusion

These crab wontons are a delightful blend of savory flavors wrapped in a crispy wonton shell. Whether you’re reminiscing about family gatherings or creating new traditions, this recipe is sure to bring joy to your table. Easy to prepare and customize, crab wontons offer a touch of elegance to any occasion. Gather your loved ones, roll up your sleeves, and enjoy this delicious journey down memory lane. Happy cooking!

Related update: Crab Wontons

Related update: Baked Lemon~Lime Chicken Wings

The Perfect Butter Beans Stew | Made by Meaghan Moineau

The Perfect Butter Beans Stew

Intro

There’s something about a warm bowl of stew that feels like a gentle hug on a chilly day. Growing up, butter beans stew was a staple in my grandmother’s kitchen, a dish that brought our family together around the dinner table. I remember the fragrant aroma wafting through the house, the anticipation of that first comforting bite, and the joy of sharing stories while savoring each spoonful. Over the years, I’ve adapted her recipe slightly, but the heart of it remains the same: a humble yet deeply satisfying stew that nourishes both body and soul.

Why You’ll Love It

This Perfect Butter Beans Stew is more than just a meal; it’s an experience. Here’s why you’ll find it irresistible:

  • Hearty and Satisfying: This stew is packed with protein-rich beans, making it a filling and nutritious option.
  • Simple Ingredients: With common pantry staples, you can whip up this delightful dish.
  • Rich Flavors: The combination of tarragon, sweet paprika, and bay leaves creates a symphony of flavors that dance on your palate.
  • Comforting and Nostalgic: It’s a timeless recipe that evokes warmth and homeliness, perfect for family dinners.

Ingredients

  • 250g dry lima beans, soaked overnight
  • 1 large onion, diced
  • 3 garlic cloves, minced
  • 1 teaspoon dry tarragon
  • 1 tablespoon fresh tarragon, chopped
  • 1 teaspoon sweet paprika
  • 2 bay leaves
  • 2 tablespoons unrefined sunflower oil
  • Ground pepper, to taste
  • Sea salt, to taste

Instructions

  1. To get the full instructions for making The Perfect Butter Beans Stew, visit my blog: The Perfect Butter Beans Stew Recipe.

Tips

Here are some tips to ensure your Butter Beans Stew turns out perfectly every time:

  • Soak the Beans: Soaking the beans overnight helps reduce cooking time and makes them easier to digest.
  • Season Generously: Don’t shy away from seasoning. Adjust the salt and pepper to suit your taste, enhancing the stew’s flavors.
  • Low and Slow: Cook the stew on a low flame to allow the flavors to meld beautifully, resulting in a richer taste.

Variations & Substitutions

This stew is wonderfully versatile. Here are some variations and substitutions you can try:

  • Meaty Addition: Add in some cooked bacon or sausage for a non-vegetarian twist.
  • Vegetable Boost: Include diced carrots or celery for added texture and nutrients.
  • Herb Swap: If you don’t have tarragon, try using thyme or rosemary for a different flavor profile.

Storage

Store any leftovers in an airtight container in the refrigerator for up to 3 days. This stew also freezes well. Place it in a freezer-safe container, and it should keep for up to 2 months. Reheat gently on the stovetop, adding a splash of water if needed to reach desired consistency.

FAQ

Can I use canned beans instead of dry beans?

Yes, you can use canned beans for a quicker version of this stew. Drain and rinse the beans before adding them to the stew. You won’t need to cook them as long, just until they are heated through and the flavors have melded.

What can I serve with this stew?

This butter beans stew pairs beautifully with crusty bread or over a bed of rice or quinoa. For a lighter option, serve it alongside a fresh green salad.

Is this stew vegan?

Yes, this recipe is naturally vegan, as it contains no animal products. It’s a great option for those following a plant-based diet.

Nutrition

While I’m not a nutritionist, this stew is packed with plant-based protein and fiber from the beans, making it a wholesome, nutrient-dense meal. The use of unrefined sunflower oil also adds healthy fats, and the variety of herbs and spices contribute additional micronutrients.

Conclusion

The Perfect Butter Beans Stew is more than just a recipe; it’s a cherished memory, a warm embrace, and a promise of comfort. Whether you’re sharing it with family or enjoying a quiet meal alone, this stew is sure to become a favorite in your home. I hope this dish brings as much joy to your table as it has to mine.

Related update: The Perfect Butter Beans Stew

Related update: Pork Carnitas Tacos

Minted Pea & Spinach Soup | Made by Meaghan Moineau

Minted Pea & Spinach Soup

Intro

There’s something magical about the first chill of autumn, when leaves begin to fall and the air turns crisp. It’s the perfect time to cozy up with a comforting bowl of soup. This Minted Pea & Spinach Soup has been a staple in my family for generations. I remember my grandmother making it every Sunday. The aroma of fresh mint mingling with the earthy scent of peas and spinach would fill the house, drawing everyone to the kitchen. I hope this recipe brings the same warmth and comfort to your home as it has to mine.

Why You’ll Love It

This soup is not only delicious but also incredibly nourishing. It’s packed with vitamins and minerals from the peas and spinach, while the mint adds a refreshing twist that brightens the entire dish. The creamy texture makes it feel decadent, yet it’s surprisingly light and healthy. Whether you’re serving it as a starter or a main dish, this soup is sure to impress and satisfy.

Ingredients

  • 1 cup chicken stock
  • 1/2 cup cream
  • 1 teaspoon canned dried mint
  • 1/2 cup milk
  • 2 cups frozen peas
  • 2 cups diced potatoes
  • Salt & pepper to taste
  • 2 cups fresh spinach
  • 1 teaspoon sugar
  • 1/2 cup water
  • 1/4 cup yoghurt

Instructions

  1. Place the diced potatoes in a medium-sized pot with a little bit of water and some salt & pepper. Cover with a lid and cook for 20 minutes until the potatoes are almost soft.
  2. Add the frozen peas to the pot and cook for an additional 5 minutes until the potatoes are soft and fully cooked through.
  3. Stir in the fresh spinach and cook for another 3-5 minutes, until the spinach is wilted.
  4. Remove the pot from the heat and let it cool for a few minutes. Then, blend the mixture to a puree using an immersion blender.
  5. Return the pot to the stovetop and add the cream, milk, water, and chicken stock. Reheat the soup for a few minutes until it is piping hot.
  6. Stir in the yoghurt, mint, sugar, and salt & pepper to taste. Mix well.
  7. Serve immediately, garnished with crispy croutons or bacon bits. For a unique touch, fry up some cheesegrillers in thin slices with a bit of sweet chili sauce and use them as a topper.

Tips

For the best results, use fresh ingredients whenever possible. Fresh spinach and mint will elevate the flavors to new heights. If you’re short on time, you can prepare the soup ahead and reheat it just before serving. The flavors will meld together beautifully, making it even more delicious the next day.

Variations & Substitutions

If you’re vegetarian, simply substitute the chicken stock with vegetable stock. You can also add other green vegetables like kale or broccoli for added nutrition. For a dairy-free version, replace the cream and milk with coconut milk; it will add a delightful, subtle sweetness to the soup.

Storage

This soup can be stored in an airtight container in the refrigerator for up to three days. To freeze, let the soup cool completely, then transfer it to a freezer-safe container. It will keep in the freezer for up to three months. When ready to eat, thaw the soup in the refrigerator overnight and reheat on the stovetop.

FAQ

Can I use fresh peas instead of frozen?

Absolutely! Fresh peas will work perfectly in this recipe. Just make sure to adjust the cooking time slightly, as fresh peas may cook faster than frozen ones.

What can I use instead of an immersion blender?

If you don’t have an immersion blender, you can use a regular blender. Just be sure to blend the soup in batches and allow it to cool slightly before blending to avoid any hot liquid splashes.

Is it possible to make this soup spicier?

Definitely! If you enjoy a bit of heat, consider adding a pinch of cayenne pepper or a few dashes of hot sauce to the soup. Adjust the amount to suit your taste preferences.

Nutrition

This soup is rich in vitamins A, C, and K, thanks to the spinach and peas. It’s also a good source of dietary fiber and protein. The addition of yoghurt and cream provides calcium and healthy fats, making it a well-balanced meal option.

Conclusion

The Minted Pea & Spinach Soup is a delightful blend of flavors that is sure to become a favorite in your household. Its simple yet elegant composition makes it suitable for both everyday meals and special occasions. I hope you enjoy making and savoring this recipe as much as I do. Remember, the best meals are made with love, so pour your heart into it and make it your own!

Related update: Minted Pea & Spinach Soup

Related update: Easy and Delicious Taco Soup

Chavrie Caramelized Red Onion Tarts | Made by Meaghan Moineau

Chavrie Caramelized Red Onion Tarts

Intro

There’s something truly magical about the combination of sweet and savory flavors, and these Chavrie Caramelized Red Onion Tarts capture that magic perfectly. I remember the first time I tasted these delightful bites at a family gathering. My grandmother had just pulled them from the oven, and the rich, comforting aroma filled her cozy kitchen, mingling with laughter and stories from loved ones. With one bite, I was transported: the creamy goat cheese, the sweet caramelized onions, and the hint of tangy red grape jelly created an unforgettable flavor experience. That memory is what I hope to share with you today through this recipe.

Why You’ll Love It

These tarts are not just delicious; they are also incredibly easy to make and versatile. Whether you’re hosting a dinner party, looking for a unique appetizer for a holiday gathering, or simply want a special treat for yourself, these tarts will impress. The balance of flavors is impeccable, with the creamy goat cheese pairing beautifully with the sweet and tangy onion mixture.

Ingredients

  • 1 tablespoon vegetable oil
  • 2 tablespoons unsalted butter
  • 2 large red onions, minced
  • 2 tablespoons sugar
  • 2 tablespoons red grape jelly
  • 2 tablespoons red wine vinegar
  • 4 ounces goat cheese
  • Prepared tart shells

Instructions

  1. Heat the vegetable oil and butter over medium heat in a heavy-gauge skillet.
  2. Add the minced onions and cook until they’re translucent, about 10 minutes.
  3. Stir in the sugar, red grape jelly, and red wine vinegar.
  4. Continue cooking the mixture until it reaches a syrupy consistency, about 15 minutes, stirring occasionally.
  5. Remove from heat and allow the mixture to cool to room temperature.
  6. Place the tart shells on a baking tray and spoon 1 tablespoon of the onion mixture into each shell.
  7. Top each tart with a dollop of goat cheese.
  8. Bake in a preheated oven at 350°F (175°C) for 10-15 minutes, or until the tarts are warmed through and the goat cheese is slightly melted.
  9. Serve warm and enjoy!

Tips

Caramelizing onions can be a delicate process. Make sure to keep the heat at medium to avoid burning them. Stir frequently and be patient; the sweet, rich flavor is worth the time. If your onions start to stick, add a splash of water to deglaze the pan and continue cooking.

Variations & Substitutions

If you’re looking to switch things up, consider adding a sprinkle of fresh thyme or rosemary to the onion mixture for an herbal touch. For a different flavor profile, try using fig jam instead of grape jelly. If you or your guests are not a fan of goat cheese, a creamy brie or a sharp cheddar could also work well in this recipe.

Storage

These tarts are best enjoyed fresh, but if you have leftovers, store them in an airtight container in the refrigerator for up to 3 days. Reheat them in the oven at 300°F (150°C) for about 10 minutes before serving to regain their crispness and warmth.

FAQ

Can I make these tarts ahead of time?

Absolutely! You can prepare the onion mixture a day in advance and store it in the refrigerator. Assemble the tarts just before you’re ready to bake them for the best results.

What type of tart shells should I use?

Pre-made tart shells are convenient and work well for this recipe. Look for ones made from puff pastry for a flaky, buttery crust. You can also use phyllo dough or even make your own tart shells if time permits.

Can I freeze these tarts?

Yes, you can freeze the baked tarts. Allow them to cool completely, then wrap them tightly in plastic wrap and store in a freezer-safe bag. Reheat them directly from the freezer in a 350°F (175°C) oven for about 15-20 minutes.

Nutrition

Each tart contains approximately 150 calories, 8 grams of fat, 12 grams of carbohydrates, and 4 grams of protein. They are a delightful indulgence, so enjoy them in moderation as part of a balanced diet.

Conclusion

Chavrie Caramelized Red Onion Tarts are a delightful addition to any occasion. With their rich, savory-sweet flavor and elegant presentation, they are sure to impress your family and friends. I hope this recipe brings a touch of warmth and nostalgia to your table, just as it did for me all those years ago in my grandmother’s kitchen. Happy cooking!

Related update: Chavrie Caramelized Red Onion Tarts

Related update: Baked Scallops With Parma Ham

Tomato and Bacon Pizza With Rice Crust | Made by Meaghan Moineau

Tomato and Bacon Pizza With Rice Crust

Intro

There’s something undeniably comforting about the aroma of fresh pizza wafting through the kitchen. It takes me back to my childhood, when my grandmother would let me help her prepare her signature pizzas every Sunday. As I stood on tiptoes to reach the counter, she would gently guide my hands as I sprinkled cheese and laid out the toppings. Her secret ingredient was always love, and it’s a lesson I’ve carried with me into my own kitchen. Today, I’m excited to share a unique twist on a classic favorite: Tomato and Bacon Pizza with Rice Crust. This recipe combines savory flavors with a satisfying crunch, offering a delightful spin on the traditional pizza experience.

Why You’ll Love It

This Tomato and Bacon Pizza with Rice Crust brings together the flavors of crispy turkey bacon, juicy tomatoes, and melty mozzarella cheese on a distinctive rice crust. The rice crust is not only a fun alternative to traditional pizza dough, but it’s also naturally gluten-free, making it a great option for those with dietary restrictions. The addition of Italian seasoning adds an aromatic touch that complements the savory toppings perfectly. Whether you’re looking for a new family favorite or a crowd-pleaser for your next gathering, this pizza is sure to impress.

Ingredients

  • 1 bell pepper, sliced
  • 2 cups cooked rice
  • 1 large egg
  • 1 teaspoon Italian seasoning
  • 1 cup shredded mozzarella cheese
  • 2 medium tomatoes, sliced
  • 6 slices of turkey bacon, cooked and crumbled

Instructions

  1. Preheat your oven to 400°F (200°C).
  2. In a large bowl, combine the cooked rice, egg, and Italian seasoning. Mix well until the ingredients are fully incorporated.
  3. Grease a 10-inch pizza pan lightly with oil or non-stick spray. Press the rice mixture onto the pan evenly to form the crust.
  4. Spread the crumbled turkey bacon over the rice crust, followed by the sliced tomatoes and bell pepper.
  5. Sprinkle the shredded mozzarella cheese evenly over the toppings.
  6. Bake in the preheated oven for about 20 minutes, or until the cheese is melted and bubbly.
  7. Once baked, remove from the oven, allow to cool slightly, slice, and serve warm.

Tips

For the best results, make sure your rice is well-cooked and slightly sticky, which helps the crust hold together better. If you find the rice mixture too loose, you can add a tablespoon of flour or gluten-free flour blend to help bind it. Additionally, consider using a pizza stone if you have one, as it can help achieve a crispier crust.

Variations & Substitutions

If you’re looking to switch things up, there are plenty of variations you can try with this recipe. For a vegetarian option, skip the turkey bacon and add more vegetables like mushrooms or spinach. You can also substitute the mozzarella cheese for dairy-free cheese if you’re catering to a dairy-free diet. Experiment with different herbs and spices in the crust for a unique flavor twist, such as adding a pinch of garlic powder or dried basil.

Storage

Leftover pizza can be stored in an airtight container in the refrigerator for up to 3 days. To reheat, place slices in a preheated oven at 350°F (175°C) for about 10 minutes or until warmed through. For a quick option, you can also use the microwave, though the crust will be less crispy.

FAQ

Can I use brown rice instead of white rice for the crust?

Absolutely! Brown rice is a great alternative and will add a nuttier flavor and extra nutrients to your pizza crust. Just ensure it’s cooked thoroughly before mixing it into the crust.

How can I make this recipe vegetarian or vegan?

To make a vegetarian version, simply omit the turkey bacon and consider adding extra veggies. For a vegan option, use a flax egg (1 tablespoon ground flaxseed mixed with 2.5 tablespoons water) in place of the egg and substitute a plant-based cheese for the mozzarella.

Nutrition

This recipe is packed with flavor yet mindful of nutritional needs. While specific values can vary based on the exact ingredients used, a slice of this pizza offers a good balance of protein from the turkey bacon and egg, healthy fats from the cheese, and fiber from the rice and vegetables. It’s a delicious way to enjoy a meal that’s both satisfying and nourishing.

Conclusion

This Tomato and Bacon Pizza with Rice Crust is a wonderful fusion of flavors and textures that pays homage to the comforting tradition of homemade pizza while offering a fresh, modern twist. Whether you’re enjoying it with family on a cozy night in or sharing it with friends at a lively gathering, this pizza is sure to become a beloved staple in your recipe collection. Remember, the best ingredient in any dish is love—so sprinkle it generously as you create this delightful meal. Enjoy!

Related update: Tomato and Bacon Pizza With Rice Crust

Related update: Mango Fried Rice

Upside-Down Blueberry Puffs Brunch | Made by Meaghan Moineau

Upside-Down Blueberry Puffs Brunch

Intro

There’s something magical about a lazy Sunday brunch at home, where the air is filled with the aroma of freshly baked delights. Growing up, my grandmother would often whip up her famous Upside-Down Blueberry Puffs for our family brunches. The anticipation would build as the delectable scent wafted through the house, drawing everyone to the kitchen. These delightful puffs are a cherished family recipe that I’m excited to share with you today. I hope they bring as much joy to your table as they have to mine over the years.

Why You’ll Love It

This Upside-Down Blueberry Puffs recipe is a delightful fusion of simplicity and indulgence. With a tender, buttery crumb and the sweet tang of blueberries, these puffs are the perfect addition to any brunch spread. You’ll love how the blueberries caramelize at the bottom, creating a juicy, flavorful topping once the puffs are flipped. Not only are they delicious, but they are also visually stunning, sure to impress your family and guests alike. Plus, they’re surprisingly easy to make, which means you can enjoy a gourmet brunch experience with minimal effort.

Ingredients

  • 1 teaspoon baking powder
  • 1 cup blueberries, plus 6 extra for topping
  • 1/2 cup butter, softened
  • 1 teaspoon butter vanilla bakery emulsion
  • 1/4 teaspoon cream of tartar
  • 2 large eggs, separated
  • 1 1/2 cups all-purpose flour
  • 1/2 cup milk
  • 1/4 teaspoon salt
  • 3/4 cup sugar

Instructions

  1. Preheat your oven to 375 degrees Fahrenheit.
  2. Wash the blueberries and gently pat them dry.
  3. Spray six 6-ounce custard cups with baking spray and divide the blueberries among the cups, reserving 6 berries to top the cakes later.
  4. In a mixing bowl, combine the flour, salt, and baking powder, then set aside.
  5. Beat the egg whites until foamy, then add the cream of tartar and continue beating until stiff peaks form. Set the beaten egg whites aside.
  6. In a separate bowl, cream the butter, gradually adding the sugar and continuing to cream until light and fluffy.
  7. Add the egg yolks and butter vanilla bakery emulsion to the creamed mixture and mix until well blended.
  8. Alternately add the flour mixture and milk to the butter mixture, beating until well combined. The batter will be thick.
  9. Gently fold the beaten egg whites into the batter until fully incorporated.
  10. Spoon the batter into the prepared custard cups over the blueberries, filling no more than 3/4 full.
  11. Place the custard cups on a baking sheet and bake for 30 minutes, or until a toothpick inserted near the center of the cakes comes out clean.
  12. Turn out the cakes directly from the oven onto wire racks and allow them to cool slightly. Serve warm or at room temperature, optionally with whipped cream or ice cream topped with a blueberry.

Tips

To ensure your Upside-Down Blueberry Puffs turn out perfectly, consider these tips:

  • Use fresh, ripe blueberries for the best flavor. If fresh blueberries are unavailable, you can substitute with frozen ones, but make sure to thaw and drain them first.
  • When beating the egg whites, make sure your bowl and beaters are completely clean and dry to achieve stiff peaks.
  • Let the butter soften at room temperature before creaming to achieve a smooth, creamy texture.

Variations & Substitutions

Feel free to customize this recipe to suit your taste or dietary needs:

  • Fruit Substitution: Swap out the blueberries for other berries like raspberries or blackberries for a different flavor profile.
  • Gluten-Free Option: Use a 1:1 gluten-free flour blend in place of all-purpose flour.
  • Dairy-Free Version: Substitute the butter with a dairy-free margarine and the milk with almond or oat milk.

Storage

If you have any leftovers, store the Upside-Down Blueberry Puffs in an airtight container at room temperature for up to two days. For longer storage, cover them and place in the refrigerator for up to a week. Reheat them in the oven at a low temperature to enjoy them warm again.

FAQ

Can I make these puffs ahead of time?

Yes, you can prepare the batter and divide the blueberries into the custard cups the night before. Store them in the refrigerator and bake fresh in the morning for a warm brunch treat.

What can I serve with these puffs?

These puffs pair beautifully with a side of crispy bacon, a fresh fruit salad, or a simple arugula salad with a lemon vinaigrette to balance the sweetness.

Can I use frozen blueberries?

Yes, you can use frozen blueberries if fresh ones are not available. Make sure to thaw and drain them well before using to prevent excess moisture in the batter.

Nutrition

Each serving of Upside-Down Blueberry Puffs contains approximately:

  • Calories: 250
  • Fat: 12g
  • Carbohydrates: 32g
  • Protein: 4g
  • Sugar: 15g
  • Fiber: 1g

Conclusion

Upside-Down Blueberry Puffs are a delightful way to start your day with a touch of nostalgia and a burst of flavor. Whether you’re hosting a brunch or simply treating yourself to a special breakfast, these puffs are sure to become a favorite in your household. Easy to make and even easier to enjoy, they offer a perfect balance of sweetness and texture. I hope this recipe brings as much warmth and joy to your home as it has to mine. Happy baking!

Related update: Upside-Down Blueberry Puffs Brunch

Bourbon Street Beignets | Made by Meaghan Moineau

Bourbon Street Beignets: A Taste of New Orleans

Intro

There’s something magical about the first bite of a warm beignet, dusted with a generous layer of powdered sugar. My first encounter with these delightful pastries was on a humid summer evening in New Orleans. The air was filled with the lively sounds of jazz, and the sweet aroma of these golden bites wafted through the streets. Every bite took me back to that bustling corner of the French Quarter, where laughter mingled with the sounds of trumpets and saxophones. Today, I’m thrilled to share with you a recipe that brings a piece of Bourbon Street right into your kitchen.

Why You’ll Love It

This Bourbon Street Beignets recipe is a love letter to New Orleans’ vibrant culinary scene. You’ll love the simplicity and authenticity of this recipe, which captures the essence of traditional beignets found in the heart of the French Quarter. The light, airy texture paired with the delicate sweetness of powdered sugar is an unbeatable combination. Plus, making these at home is a delightful way to bring a touch of Southern charm to your dessert table.

Ingredients

  • 1 egg
  • 3 1/2 cups flour, divided
  • 1 cup heavy cream
  • Vegetable oil, for frying
  • Powdered sugar, for dusting
  • 1/2 teaspoon salt
  • 2 tablespoons shortening
  • 1/4 cup sugar
  • 1 cup hot water
  • 1 package (or 2 1/4 teaspoons) active dry yeast

Instructions

  1. Dissolve the yeast in warm water according to package instructions and set aside.
  2. In a large bowl, combine sugar, shortening, salt, and hot water. Stir until the shortening is melted and the sugar is dissolved. Allow the mixture to cool to lukewarm.
  3. Add the heavy cream, egg, 3 cups of flour, and the yeast mixture to the sugar-shortening mix.
  4. Attach the bowl to a stand mixer with a dough hook. Turn to speed “2” and mix for 2 minutes.
  5. Add the remaining flour, 1/2 cup at a time, mixing until the dough clings to the hook and cleans the sides of the bowl, about 5 minutes longer.
  6. Place the dough on a lightly floured board and roll into a 10×24 inch rectangle.
  7. Using a sharp knife, cut the dough into 2-inch squares.
  8. In a large heavy saucepan or deep fat fryer, heat the oil to 360 degrees Fahrenheit.
  9. Fry the doughnuts, turning to brown on both sides, about 3 minutes.
  10. Drain on absorbent towels and sprinkle generously with powdered sugar while warm.

Tips

For the best results, ensure your water is warm but not too hot when dissolving the yeast, as excessively hot water can kill the yeast. When frying, maintain a consistent oil temperature to achieve that perfect golden brown color. A candy thermometer can be a helpful tool to ensure the oil stays at the right temperature.

Variations & Substitutions

If you’re feeling adventurous, try adding a splash of vanilla extract or a hint of nutmeg to the dough for additional depth of flavor. For a gluten-free version, substitute the all-purpose flour with a gluten-free flour blend, keeping in mind that the texture might vary slightly. You can also experiment with different toppings; a drizzle of chocolate or caramel sauce can add a decadent twist.

Storage

Beignets are best enjoyed fresh and warm, but if you have leftovers, store them in an airtight container at room temperature for up to 2 days. To reheat, pop them in a preheated oven at 350 degrees Fahrenheit for a few minutes until warmed through. Avoid the microwave, as it can make them tough.

FAQ

Can I make the dough ahead of time?

Yes, you can prepare the dough ahead of time. Once the dough is mixed and kneaded, cover it tightly with plastic wrap and store it in the refrigerator for up to 24 hours. Allow it to come to room temperature before rolling and cutting.

Why are my beignets greasy?

Greasy beignets are often a result of oil that’s not hot enough. Make sure your oil is at 360 degrees Fahrenheit before frying. If the temperature drops too low, the beignets will absorb more oil instead of cooking quickly on the outside.

Can I freeze beignets?

Yes, you can freeze beignets. After frying, allow them to cool completely, then place them in a single layer on a baking sheet and freeze until solid. Transfer to a freezer-safe bag or container. To reheat, bake in a preheated oven at 350 degrees Fahrenheit until heated through.

Nutrition

While beignets are a treat to be savored, it’s worth noting that they are an indulgent dessert. High in carbohydrates and sugar, they are best enjoyed in moderation. Pairing them with a cup of coffee can create a balanced experience, reminiscent of a New Orleans café.

Conclusion

Making Bourbon Street Beignets at home is a delightful adventure that brings the spirit of New Orleans right to your kitchen. With their crisp exterior and soft, airy center, these beignets are sure to become a family favorite. Whether you’re reminiscing about a past visit to the French Quarter or simply looking to enjoy a taste of the South, this recipe is your ticket to a sweet escape. So go ahead, dust off that powdered sugar, and let the good times roll!

Related update: Bourbon Street Beignets

Japanese Gyoza Pot Stickers | Made by Meaghan Moineau

Japanese Gyoza Pot Stickers

Intro

There’s something incredibly comforting about a plate of perfectly cooked gyoza, or Japanese pot stickers, their crispy bottoms contrasting with a tender, juicy filling. I remember visiting my grandmother’s house on weekends, the kitchen filled with the aromatic scent of sizzling gyoza. She would always let me assist, my small hands struggling to pleat the delicate wrappers just right. It was in those moments that I learned the art of cooking and the love that goes into each fold. Today, I’m excited to share this cherished recipe with you, bringing a piece of my childhood into your home.

Why You’ll Love It

This Japanese Gyoza recipe is a delightful blend of savory, spicy, and aromatic flavors. The combination of ground beef, cabbage, and spices wrapped in a delicate shell is truly irresistible. Whether you’re a seasoned cook or a beginner, these pot stickers are easy to make and perfect for any occasion. Plus, you can customize them with ingredients you love or have on hand!

Ingredients

  • 1/2 teaspoon black pepper
  • 2 cups finely chopped cabbage
  • 1 teaspoon chili sesame oil
  • 1/2 cup dried mushrooms, soaked in warm water and chopped
  • 2 teaspoons grated ginger root
  • 3 to 4 green onions, chopped
  • 1/2 pound ground beef
  • 2 tablespoons salad oil
  • 1 tablespoon sesame oil
  • 2 tablespoons Kikkoman soy sauce
  • 1 tablespoon cooking wine
  • Gyoza wrappers

Instructions

  1. Chop the cabbage finely, place it in a colander, and pour boiling water over it. Allow it to cool to the touch, then squeeze the cabbage well to remove excess water.
  2. In a large bowl, mix the cabbage, chopped green onions, chopped mushrooms, and grated ginger.
  3. In a separate bowl, combine the ground beef, cooking wine, soy sauce, sesame oil, and black pepper. Add this mixture to the bowl of vegetables and mix well.
  4. Place about 1 teaspoon of filling in the center of a gyoza wrapper. Fold the wrapper in half and pleat the edges to seal. If the edges don’t stick, dampen the inside edge with a little water, then pleat.
  5. Heat 2 tablespoons of salad oil in a large skillet over medium heat. Place the gyoza into the skillet, flat side down, and cook until the bottoms are golden brown.
  6. At the edge of the pan, carefully pour in a little water, up to 1/4 of the depth of the pot stickers. Cover the skillet, turn the heat to low, and simmer until the water has evaporated.

Tips

For best results, make sure to squeeze out as much water from the cabbage as possible to prevent the filling from becoming too wet. Also, when pleating the gyoza, try to make small, even pleats to ensure they cook uniformly and look appealing.

Variations & Substitutions

If you’re looking to switch things up, consider these variations:

  • Vegetarian: Replace the ground beef with finely chopped tofu or tempeh.
  • Spicy: Add a dash of chili flakes or a bit more chili sesame oil for an extra kick.
  • Different Proteins: Try ground pork or chicken instead of beef for a different flavor profile.

Storage

Leftover gyoza can be stored in an airtight container in the refrigerator for up to 3 days. To reheat, simply pan-fry them again to regain their crispy texture. You can also freeze uncooked gyoza for up to a month; just be sure to place them in a single layer on a baking sheet to freeze initially before transferring to a freezer bag.

FAQ

Can I use store-bought gyoza wrappers?

Absolutely! Store-bought gyoza wrappers are a convenient option and work perfectly for this recipe. Just be sure to keep them covered with a damp cloth to prevent them from drying out while you work.

How do I prevent the gyoza from sticking to the pan?

Make sure your pan is well-oiled and preheated before adding the gyoza. Adding water to the pan and covering it helps to steam the gyoza, which also prevents sticking. If they still stick, let them sit for a moment after cooking to allow them to release naturally.

Nutrition

While exact nutritional values can vary, each gyoza pot sticker typically contains around 70-80 calories, with a good balance of protein from the beef and vegetables. This makes them a tasty yet relatively light appetizer or main dish. For those watching their sodium intake, be mindful of the soy sauce content, or opt for a low-sodium version.

Conclusion

Japanese Gyoza Pot Stickers are a delightful treat that brings warmth and joy to any meal. Whether you’re making them for a family gathering, a dinner party, or simply to enjoy a taste of Japan at home, these pot stickers promise to be a hit. I hope this recipe brings the same joy to your kitchen as it has to mine. Happy cooking!

Related update: Japanese Gyoza Pot Stickers

Related update: Vegetarian Ratatouille

Croissants With Sesame Seeds (Kifli) | Made by Meaghan Moineau

Croissants With Sesame Seeds (Kifli)

Intro

There is something truly magical about the smell of freshly baked croissants wafting through the house on a Sunday morning. It takes me back to my grandmother’s kitchen, where the warmth from the oven and her loving presence made everything feel just right. She would often bake these delicious croissants with sesame seeds, known as kifli in our family, and they quickly became a beloved tradition. I remember sitting on the counter, eagerly watching her every move and waiting for the moment when I could sink my teeth into the first warm, flaky bite. This recipe carries forward that cherished memory, and I am thrilled to share it with you today.

Why You’ll Love It

These croissants are not only a treat for your taste buds, but they are also a feast for your senses. From the irresistible aroma as they bake to the satisfying crunch of sesame seeds with each bite, these croissants are a perfect blend of nostalgia and flavor. Whether you’re enjoying them as a special breakfast, a delightful brunch addition, or a comforting snack, these kifli will surely become a favorite in your household.

Ingredients

  • 1 cup lukewarm milk
  • 2 tablespoons dry active yeast
  • 1 tablespoon sugar
  • 6 cups flour
  • 1 teaspoon baking powder
  • 1 teaspoon salt
  • 1/4 cup vegetable oil
  • 4 eggs (separated – yolks and whites)
  • Margarine (small pieces for baking)
  • Sesame seeds

Instructions

  1. In a large, deep mixing bowl, pour in the lukewarm milk. Stir in the sugar, 2 tablespoons of flour, and the yeast. Let stand for ten minutes to activate the yeast.
  2. Add in the baking powder, salt, vegetable oil, egg whites, and 6 cups of flour. Stir with a wooden spoon until the mixture is well incorporated. You may need to use your hands toward the end.
  3. Transfer the dough to a lightly floured surface and knead it for 10 minutes until smooth and elastic.
  4. Place the dough in a large bowl, cover it, and let it stand for one hour until doubled in size.
  5. Preheat your oven to 375°F (190°C).
  6. Bring the dough back to your working area and knead it again for another 5 minutes to remove any air bubbles.
  7. Form the dough into a log and cut it into 5 or 6 equal pieces.
  8. Take one piece (cover the rest with a kitchen towel), and roll it out to a size as big as a medium pizza.
  9. With a knife, cut the rolled-out dough into 8 equal slices. Beginning at the widest point of each slice, start rolling it toward the narrowest point to form a crescent shape.
  10. Place the croissants on a lightly greased baking sheet. Repeat with the remaining dough pieces.
  11. In a small mixing bowl, whisk the 4 egg yolks. Brush each croissant with the egg yolk wash and then top with sesame seeds.
  12. Distribute 4 or 5 small pieces of margarine throughout the baking sheet.
  13. Bake for 15 to 20 minutes, or until golden brown. Once baked, cover the croissants with a kitchen towel while they cool slightly.
  14. Serve immediately or store in an airtight container for later enjoyment.

Tips

For best results, make sure your milk is lukewarm, not hot, to activate the yeast properly. If the dough feels sticky, gradually add a little more flour until you achieve the right consistency. When rolling the croissants, ensure they are tightly rolled to prevent them from unrolling during baking.

Variations & Substitutions

If you’re looking to experiment with flavors, consider adding a sprinkle of dried herbs to the dough or incorporating cheese into the filling for a savory twist. For a sweet version, substitute the sesame seeds with a light dusting of sugar or cinnamon before baking.

Storage

These croissants are best enjoyed fresh out of the oven. However, if you have leftovers, store them in an airtight container at room temperature for up to two days. For longer storage, freeze them in a single layer before transferring to a freezer-safe bag. Reheat in the oven to regain the fresh-baked taste and texture.

FAQ

Can I use butter instead of margarine?

Yes, you can substitute butter for margarine in this recipe. It will add a rich flavor to the croissants, but ensure to use it sparingly during baking to prevent excessive greasiness.

Can I make the dough ahead of time?

Absolutely! You can prepare the dough a day in advance. After the first rise, cover it tightly and store it in the refrigerator overnight. Allow it to come to room temperature before proceeding with the remaining steps.

How can I ensure my croissants are flaky?

The key to flaky croissants lies in the kneading and rolling process. Be sure to knead the dough thoroughly and roll it tightly when forming each croissant. This will help create the desired layers and texture.

Nutrition

Each croissant offers a delightful balance of carbohydrates and proteins, making it a satisfying treat. While not low in calories, these croissants are made with wholesome ingredients and offer a moderate amount of healthy fats from the sesame seeds and vegetable oil.

Conclusion

Bringing the aroma and taste of freshly baked sesame seed croissants into your home is a wonderful way to create new memories while honoring old ones. Whether you’re sharing them with family or enjoying a quiet moment alone, these kifli croissants are sure to bring joy to your day. I hope you find as much delight in baking and savoring them as I have. Happy baking!

Related update: Croissants With Sesame Seeds (Kifli)

Related update: Bourbon Street Beignets

Spicy Lemongrass Soup | Made by Meaghan Moineau

Spicy Lemongrass Soup

Intro

There’s something inherently comforting about a bowl of soup—especially one that’s bursting with complex flavors and a hint of heat. Spicy Lemongrass Soup is a delightful dish that takes me back to my childhood. Growing up, my grandmother would often prepare a steaming pot of soup on chilly days, filling the house with a fragrant aroma that meant warmth and love. Lemongrass was a staple in her kitchen, and its citrusy scent evokes memories of her bustling around, always with a smile and a story. Today, I share with you a modern twist on her classic recipe. This Spicy Lemongrass Soup is not only a tribute to her but also a celebration of flavors that will surely become a favorite in your household too.

Why You’ll Love It

This Spicy Lemongrass Soup is a culinary delight, offering a harmonious blend of flavors that dance on your palate. It’s a perfect balance of spicy, tangy, and savory, with the lemongrass adding a refreshing citrus undertone. This soup is not only delicious but also nourishing, thanks to ingredients like tofu and fresh vegetables. Whether you’re craving something hearty on a cold day or looking for a light yet satisfying meal, this soup ticks all the boxes.

Ingredients

  • 2 stalks fresh lemongrass, chopped into 2-inch pieces and sliced down the center
  • 4-5 red dried peppers
  • 1 knob ginger, grated
  • 3 cloves garlic, minced
  • 4 cups vegetable broth
  • 1 can fresh coconut milk
  • 1 cup tofu cubes
  • 1 cup snow peas
  • 1 cup mushrooms, sliced
  • 4 oz rice noodles
  • Juice of 1 lime

Instructions

  1. Chop the lemongrass into 2-inch pieces and slice down the center. Add to a soup pot along with the vegetable broth, coconut milk, garlic, and ginger.
  2. Bring the mixture to a boil, then reduce the heat and let it simmer on low for 30 minutes. This allows the flavors to meld beautifully.
  3. Once the broth is done simmering, strain it through cheesecloth to remove the lemongrass stalks and any solid bits. The lemongrass stalks are not edible, a lesson I learned the hard way.
  4. Return the strained broth to a simmer and add the tofu, mushrooms, snow peas, and rice noodles.
  5. Add the lime juice. You can add some at the beginning and more at the end before serving for an extra burst of freshness.
  6. Simmer the soup until the noodles are soft, then garnish with grated ginger or scallions before serving.

Tips

For the best results, use fresh lemongrass and ginger. These ingredients are key to the depth of flavor in this soup. If you’re sensitive to spice, you can reduce the number of dried red peppers or remove them altogether. Taste as you go to adjust the seasoning according to your preference.

Variations & Substitutions

This recipe is quite flexible. Feel free to add more vegetables like bell peppers or carrots for added nutrition. If you’re not a fan of tofu, you can substitute it with chicken or shrimp. For a gluten-free option, ensure that the rice noodles are certified gluten-free.

Storage

This soup stores well in the refrigerator for up to 3 days. Simply transfer it to an airtight container once it’s cooled. Reheat it gently on the stove, adding a splash of water or broth if needed. It can also be frozen for up to 2 months. Thaw overnight in the fridge before reheating.

FAQ

Can I use dried lemongrass instead of fresh?

While fresh lemongrass is preferred for its vibrant flavor, dried lemongrass can be used in a pinch. Use about 1 tablespoon of dried lemongrass for this recipe. Remember to adjust the cooking time as dried lemongrass may require a bit longer to release its flavors.

How can I make this soup more filling?

To make this soup more substantial, consider adding more protein like chicken or shrimp. You can also increase the amount of tofu or include additional vegetables such as bell peppers or carrots. Serving it with a side of crusty bread can also make it a heartier meal.

Nutrition

This Spicy Lemongrass Soup is packed with nutritious ingredients. It’s a great source of protein from the tofu, and rich in vitamins from the vegetables. Coconut milk adds a healthy dose of fats, while lemongrass and ginger provide antioxidants. It’s a well-rounded meal that nourishes the body and soul.

Conclusion

Spicy Lemongrass Soup is more than just a meal; it’s a sensory experience that warms the heart and excites the taste buds. With its rich flavors and comforting warmth, it’s a wonderful dish to share with loved ones or enjoy on your own. Whether it’s a nod to nostalgic family recipes or a new addition to your culinary repertoire, I hope this soup brings joy and deliciousness to your table. Enjoy every spoonful!

Related update: Spicy Lemongrass Soup

Related update: Tortellini In Brodo

Croissants With Sesame Seeds (Kifli) | Made by Meaghan Moineau

Croissants With Sesame Seeds (Kifli)

Intro

There’s something undeniably magical about the aroma of freshly baked croissants wafting through the house. For me, it transports me back to the cozy kitchen of my grandmother’s home, where she would lovingly prepare these delicate pastries for our family gatherings. Her version, known as “Kifli,” was always adorned with a sprinkle of sesame seeds, adding a delightful crunch to each bite. I’m excited to share this cherished recipe with you, hoping it brings the same warmth and joy to your home as it has to mine over the years.

Why You’ll Love It

This recipe for Croissants With Sesame Seeds, or Kifli, is a delightful twist on traditional croissants. You’ll love how the sesame seeds add a subtle nutty flavor and extra texture. The process of making these croissants is a labor of love, but the result is a batch of soft, flaky pastries with a golden, crisp exterior. Whether you’re serving them for breakfast, brunch, or a special occasion, these croissants are sure to impress your family and friends.

Ingredients

  • 1 cup milk (lukewarm)
  • 1 tablespoon dry active yeast
  • 1 tablespoon sugar
  • 6 cups flour (plus 2 tablespoons for yeast mixture)
  • 1/2 teaspoon baking powder
  • 1 teaspoon salt
  • 1/2 cup vegetable oil
  • 4 eggs (separated, yolks for brushing)
  • 1 cup margarine (for baking sheet)
  • Sesame seeds (for topping)

Instructions

  1. In a large, deep mixing bowl, pour in the lukewarm milk. Stir in the sugar, 2 tablespoons of flour, and the yeast. Let stand for ten minutes until foamy.
  2. Add in the baking powder, salt, vegetable oil, egg whites, and 6 cups of flour. Stir with a wooden spoon until the mixture is well incorporated. You may need to use your hands towards the end to bring the dough together.
  3. Transfer the dough to a lightly floured surface and knead it for 10 minutes until smooth and elastic.
  4. Place the dough in a large bowl, cover it with a kitchen towel, and let it stand for one hour until it doubles in size.
  5. Preheat the oven to 375°F (190°C).
  6. Bring the dough back to your working area and knead it again for another 5 minutes to ensure all air bubbles are out.
  7. Form the dough into a log and cut it into 5 or 6 equal pieces. Keep the pieces you’re not working with covered.
  8. Take one piece and roll it out to a size as big as a medium pizza. With a knife, cut the rolled-out dough into 8 equal slices.
  9. Beginning at the widest point of each slice, roll it towards the narrowest point to form a croissant shape.
  10. Place the croissants on a lightly greased baking sheet. Repeat with the remaining dough pieces.
  11. In a small mixing bowl, whisk the 4 egg yolks and brush each croissant with the egg yolk mixture.
  12. Top each croissant with sesame seeds and place a few small pieces of margarine throughout the baking sheet.
  13. Bake for 15 to 20 minutes, or until the croissants are golden brown.
  14. Once baked, cover the croissants with a kitchen towel while they cool slightly. Serve immediately or store in an airtight container.

Tips

Here are some helpful tips to ensure your croissants turn out perfectly:

  • Ensure your milk is lukewarm, not too hot, to activate the yeast properly.
  • Kneading the dough properly is crucial for that perfect flaky texture. Don’t rush this step!
  • Covering the dough with a towel while it rises prevents it from drying out.
  • Brushing with egg yolk not only helps the sesame seeds stick but also gives the croissants a beautiful golden color.

Variations & Substitutions

Feel free to experiment with this recipe by trying different variations:

  • Cheese Kifli: Add a sprinkle of grated cheese inside the dough before rolling for a cheesy twist.
  • Sweet Kifli: Add a spoonful of jam or Nutella before rolling the dough for a sweet version.
  • Butter Substitute: If you prefer, you can use butter instead of margarine for a richer flavor in the baking sheet.

Storage

Store any leftover croissants in an airtight container at room temperature for up to two days. For longer storage, freeze them in a sealed bag for up to a month. To reheat, simply pop them in the oven at 350°F (175°C) for a few minutes until warm.

FAQ

Can I use instant yeast instead of active dry yeast?

Yes, you can substitute instant yeast for active dry yeast in this recipe. You can add it directly to the flour without the need to dissolve it first. Keep in mind that the rising time may be slightly shorter.

Why are my croissants not as flaky as expected?

Achieving the perfect flaky texture involves proper kneading and ensuring all air bubbles are eliminated during the second kneading. Make sure your dough is well kneaded and rolled out evenly to achieve the best results.

Can I make the dough ahead of time?

Yes, you can prepare the dough a day in advance. After the first rise, punch it down and refrigerate overnight in an airtight container. Allow it to come to room temperature before proceeding with the recipe.

Nutrition

While these croissants are a delightful indulgence, it’s good to be mindful of their nutritional content. Each croissant is approximately 250 calories, with a balance of carbohydrates, proteins, and fats. Enjoy them as part of a balanced diet!

Conclusion

Making these Croissants With Sesame Seeds (Kifli) is not just about creating a delicious pastry; it’s about crafting a moment of nostalgia and warmth. Whether you’re sharing them with loved ones or savoring them with a cup of coffee, these croissants are sure to become a beloved tradition in your home. Happy baking!

Related update: Croissants With Sesame Seeds (Kifli)

Related update: Valentine Hearts

Related update: Upside-Down Blueberry Puffs Brunch

chettinad egg curry | Made by Meaghan Moineau

Chettinad Egg Curry

Intro

Growing up in a bustling South Indian household, weekends were often synonymous with the aromatic allure of traditional dishes wafting through the air. One such dish that always found its way to our dining table was the Chettinad Egg Curry. My grandmother, with her deft hands and generous heart, would conjure up this spicy, fragrant curry that would leave us all licking our fingers. Her secret? The perfect blend of spices and the love she infused into every meal she prepared. Today, as I share this recipe with you, I hope it brings the same warmth and joy to your table as it did to mine.

Why You’ll Love It

Chettinad Egg Curry is a delightful explosion of flavors that will transport you straight to the heart of Tamil Nadu. Its rich, spicy, and aromatic profile is a true representation of the Chettinad cuisine. This dish is not just about the taste; it’s a sensory experience. With the perfect balance of heat from the chilies and warmth from the spices, combined with the creamy texture of coconut, this curry is a feast for your taste buds. It’s versatile, pairs wonderfully with rice or roti, and is sure to be a crowd-pleaser at any gathering.

Ingredients

  • 2-3 green cardamoms (elaichi)
  • 4-5 red chilies
  • 1 small cinnamon stick
  • 1/2 cup grated coconut
  • 2 tbsp coriander seeds
  • 1 tsp cumin seeds
  • A sprig of curry leaves
  • 6 cooked eggs
  • Fresh coriander leaves for garnish
  • 1 tbsp ginger garlic paste
  • 3 tbsp oil
  • 1 large onion, chopped
  • 1/2 tsp pepper
  • 1 tbsp poppy seeds
  • Salt to taste
  • 2 large tomatoes, chopped

Instructions

  1. Heat a pan and dry roast the coriander seeds, cumin seeds, poppy seeds, red chilies, cinnamon stick, and cardamoms until aromatic. Allow them to cool before grinding them into a fine powder.
  2. Add the grated coconut to the grinder and blend everything into a smooth paste, adding a little water if necessary.
  3. In the same pan, heat oil and sauté the onions until they turn golden brown. Add the ginger garlic paste and sauté until the raw smell disappears.
  4. Add the chopped tomatoes and cook until they become soft and mushy.
  5. Mix in the ground spice paste and cook on a low flame until the oil begins to separate from the masala.
  6. Add the curry leaves, pepper, and salt. Stir well to combine.
  7. Gently place the cooked eggs into the curry and simmer for about 5-7 minutes, allowing the eggs to absorb the flavors.
  8. Garnish with fresh coriander leaves before serving.

Tips

For the best results, always use fresh spices. Toasting the spices before grinding enhances their flavor and aroma. Adjust the number of chilies based on your spice tolerance. If you prefer a thicker curry, reduce the amount of water added to the coconut paste.

Variations & Substitutions

You can substitute the eggs with paneer or tofu for a vegetarian version. For a creamier texture, add a splash of coconut milk towards the end of cooking. If poppy seeds are not available, you can use cashews as a substitute.

Storage

Store any leftover curry in an airtight container in the refrigerator for up to 3 days. Reheat on the stovetop or in the microwave before serving. This curry also freezes well for up to a month. To retain its flavors, thaw it in the refrigerator before reheating.

FAQ

Can I make this curry less spicy?

Absolutely! To make the curry less spicy, reduce the number of red chilies or use milder varieties. You can also add a splash of coconut milk to mellow the heat.

What can I serve with Chettinad Egg Curry?

This curry pairs wonderfully with steamed rice, biryani, or any flatbread like roti or naan. It can also be served with dosa for a delicious South Indian breakfast.

Nutrition

While the exact nutritional content can vary based on serving sizes and specific ingredients used, Chettinad Egg Curry is generally high in protein due to the eggs and rich in essential vitamins and minerals from the spices. It’s a wholesome dish that can be part of a balanced diet when enjoyed in moderation.

Conclusion

Chettinad Egg Curry is more than just a dish; it’s a culinary journey that takes you to the vibrant streets of Tamil Nadu. Its robust flavors and aromatic spices make it a standout dish that is sure to impress your family and friends. Whether you’re a seasoned cook or a beginner, this recipe is a delightful adventure in the kitchen. So, gather your ingredients and embark on this flavorful journey. Happy cooking!

Related update: chettinad egg curry

Related update: Oxtail Ragout

Indian Butter Chicken | Made by Meaghan Moineau

Indian Butter Chicken

Intro

There’s something magical about the aroma of spices wafting through the house, reminding me of my grandmother’s cozy kitchen. I remember being a child, watching her deft hands mix spices with precision and love. Her Indian Butter Chicken was a family favorite, and it’s a recipe that has traveled through generations, bringing warmth and joy to our family meals. Now, it’s my turn to share this beloved dish with you. Whether you’re looking for a comfort meal or an exotic dish to impress your dinner guests, this recipe is sure to hit the spot.

Why You’ll Love It

This Indian Butter Chicken is rich, creamy, and packed full of flavor. The perfect blend of spices creates a dish that’s both indulgent and comforting. Not only is it a feast for the taste buds, but it’s also a feast for the soul. You’ll love how easy it is to prepare, making it perfect for both weeknight dinners and special occasions. The combination of tender chicken and a luscious sauce will make it a regular on your dinner table.

Ingredients

  • 2 tablespoons butter
  • 1 pound chicken breasts, chopped
  • 1 cup chicken broth
  • 2 teaspoons garam masala
  • 3 cloves garlic, minced
  • 1 tablespoon fresh ginger, grated
  • 1 tablespoon lemon juice
  • 2 tablespoons oil
  • 1 cup plain yogurt
  • Salt and pepper, to taste
  • 1/2 cup sour cream
  • 1 can (14 ounces) diced tomatoes

Instructions

  1. Start by adding the oil to your pan and heating it up on medium-high heat. Add in your chopped chicken, garlic, and garam masala. Swirl it together and cook for about two to three minutes.
  2. Add in your onion and ginger. Continue cooking until the chicken is cooked through.
  3. Turn the heat down to medium and add in your lemon juice and butter. Let the butter melt completely.
  4. Once the butter has melted, add in the tomatoes and broth. Give the dish a minute or two to heat back up.
  5. Stir in the yogurt and sour cream. Mix it all together and season with salt and pepper to taste.
  6. Serve over rice and enjoy!

Tips

For the best results, use fresh ginger and garlic. This will enhance the flavors and give your dish a more authentic taste. Make sure to cook the chicken until it’s just done to keep it tender and juicy. If you prefer a thicker sauce, let it simmer a little longer after adding the sour cream and yogurt.

Variations & Substitutions

If you’re looking for a dairy-free version, you can substitute coconut milk for the yogurt and sour cream. To add some heat, consider adding a teaspoon of chili powder or a diced chili pepper. You can also substitute chicken thighs for the breasts if you prefer a richer flavor.

Storage

Store any leftovers in an airtight container in the refrigerator for up to three days. To reheat, simply warm it up on the stove over medium heat, adding a splash of water or broth if necessary to maintain the creamy consistency. This dish can also be frozen for up to two months. Thaw overnight in the refrigerator before reheating.

FAQ

Can I make this recipe ahead of time?

Absolutely! The flavors develop even more when made a day in advance. Just store it in the refrigerator and reheat on the stove before serving.

What can I serve with Indian Butter Chicken?

This dish pairs wonderfully with basmati rice or naan bread. A side of steamed vegetables or a simple salad would also complement the meal nicely.

Nutrition

This recipe is rich in protein and offers a good amount of vitamins and minerals from the spices and tomatoes. However, it is also indulgent and contains fats from the butter and sour cream. Moderation is key, and pairing it with wholesome sides like vegetables or whole grains can create a balanced meal.

Conclusion

Indian Butter Chicken is more than just a meal; it’s an experience. It’s about bringing people together and savoring the rich tapestry of flavors that Indian cuisine has to offer. I hope this recipe becomes a cherished part of your culinary repertoire, just as it has been in my family for generations. Enjoy the warmth and comfort it brings, and don’t forget to share it with the ones you love. Happy cooking!

Related update: Indian Butter Chicken

Related update: Chicken Stew For The Soul

Red, White, and Blue Fruit Salsa | Made by Meaghan Moineau

Red, White, and Blue Fruit Salsa

Intro

There’s something undeniably nostalgic about summer gatherings. The aroma of freshly cut grass, children playing in the backyard, and the delightful chatter of family and friends create an atmosphere that’s hard to beat. One of my fondest memories is of July 4th celebrations at my grandmother’s house. The highlight for me was always the vibrant and refreshing fruit salsa she would make. Her recipe has been passed down to me, and today, I’m thrilled to share this Red, White, and Blue Fruit Salsa with you. It’s a dish that not only celebrates the colors of our flag but also captures the essence of those cherished summer days.

Why You’ll Love It

This Red, White, and Blue Fruit Salsa is a perfect blend of sweet and tangy flavors that will have your taste buds dancing. It’s incredibly easy to make, requiring just a handful of ingredients and minimal preparation time. Whether you’re hosting a summer barbecue, a patriotic holiday party, or simply craving a light and refreshing snack, this salsa is sure to impress. Plus, it’s a healthy alternative to traditional chips and dip, making it a hit with health-conscious guests.

Ingredients

  • 1 cup blueberries
  • 1 cup diced strawberries
  • 1/2 cup sweetened shredded coconut
  • 2 tablespoons lime juice
  • 2 tablespoons strawberry jam
  • Freedom Chips (to serve)

Instructions

  1. In a medium-sized bowl, combine the blueberries, diced strawberries, and sweetened shredded coconut. Gently mix them to ensure an even distribution.
  2. Add the lime juice and strawberry jam to the berry mixture. Stir well until all the ingredients are thoroughly combined.
  3. Cover the bowl with plastic wrap or a lid and refrigerate for at least an hour. This allows the flavors to meld together beautifully.
  4. Once chilled, serve the fruit salsa as an appetizer with Freedom Chips. Enjoy the burst of flavors and the delightful crunch of the chips.

Tips

For the best results, use fresh and ripe berries. Their natural sweetness will enhance the overall flavor of the salsa. If you want to add a bit of spice, consider sprinkling a pinch of chili powder or cayenne pepper into the mix for a subtle kick. Always taste the salsa before serving, as you may want to adjust the lime juice or jam to suit your personal preference.

Variations & Substitutions

Feel free to get creative with this recipe! You can substitute raspberries or blackberries for the blueberries if you prefer a different berry flavor. If you’re not a fan of coconut, try using finely chopped mint leaves instead for a refreshing twist. For a healthier option, use unsweetened shredded coconut. You can also experiment with different jams, such as raspberry or apricot, to change up the flavor profile.

Storage

Store any leftover salsa in an airtight container in the refrigerator for up to three days. Keep in mind that the berries might release some juice over time, so give the salsa a good stir before serving again. Unfortunately, this salsa does not freeze well due to the high water content of the fruit.

FAQ

Can I make this salsa ahead of time?

Absolutely! In fact, making it a day ahead can enhance the flavors even more. Just be sure to store it in the refrigerator and give it a good stir before serving.

What are Freedom Chips?

Freedom Chips are simply tortilla chips, but with a playful and patriotic twist. You can use any brand or make your own at home by cutting tortillas into your desired shape and baking or frying them until crispy.

Is there a way to make this salsa more savory?

Yes! You can add diced avocado, chopped cilantro, or a small amount of finely diced red onion to introduce savory elements to the salsa. These additions will complement the sweetness of the berries beautifully.

Nutrition

This fruit salsa is a nutritious choice, packed with vitamins and antioxidants from the fresh berries. It’s low in calories and contains healthy fats from the coconut. While the exact nutritional content will vary based on portion sizes, you can generally expect a serving to be low in fat and high in vitamin C, making it a guilt-free treat.

Conclusion

Red, White, and Blue Fruit Salsa is more than just a dish; it’s a celebration of summer and all the vibrant flavors it brings. Whether you’re reminiscing about past family gatherings or creating new memories, this salsa is sure to be a hit. Its simplicity, flexibility, and delightful taste make it a must-try for any occasion. So gather your loved ones, prepare this refreshing salsa, and let the festivities begin!

Related update: Red, White, and Blue Fruit Salsa

Related update: Italian Tomato and Mozzarella Caprese

Siew Mai | Made by Meaghan Moineau

Siew Mai: A Delightful Dim Sum Classic

Intro

Growing up, dim sum Sundays were a cherished tradition in my family. We would gather around a bustling table, eagerly anticipating the arrival of steaming bamboo baskets filled with an assortment of dumplings. Among my favorites was siew mai, a delectable pork and shrimp dumpling that quickly won my heart with its savory filling and delightful textures. Today, I’m excited to share my family’s recipe for siew mai, a dish that brings back fond memories and continues to be a beloved part of our dining experience.

Why You’ll Love It

Siew mai is a timeless dish that has captivated taste buds for generations. Here’s why you’ll love making and eating these delicious dumplings:

  • Flavorful Filling: The combination of pork, shrimp, and Chinese sausages creates a savory and satisfying flavor profile.
  • Texture Delight: The tender pork is complemented by the crunch of water chestnuts and the chewy texture of glutinous rice.
  • Customizable: Easily adapt the recipe to suit your taste preferences with variations and substitutions.
  • Perfect for Sharing: These bite-sized delights are perfect for gatherings and will surely impress your guests.

Ingredients

  • Wonton wrappers
  • 700g fatty pork
  • 2 tablespoons corn starch
  • 1 teaspoon salt
  • 1 teaspoon white ground pepper
  • 1/2 teaspoon sugar
  • 1 teaspoon Worcestershire sauce or Maggie Seasoning Sauce
  • 2 tablespoons Shaoxing Huatiao wine
  • 2 tablespoons sesame oil
  • 80g canned water chestnuts
  • 4 large Chinese mushrooms
  • Cooked whole shrimp
  • Carrot
  • 2 lap cheongs (Chinese sausages)
  • Raw glutinous rice
  • Shallots
  • Ginger
  • Cooking oil
  • Dried shrimps
  • Cooked dried scallops
  • Light soy sauce
  • Oyster sauce

Instructions

  1. To prepare the pork filling, mince 700g of pork and place it in a large mixing bowl.
  2. Add 2 tablespoons of corn starch, 1 teaspoon of salt, 1 teaspoon of ground white pepper, 1/2 teaspoon of sugar, 1 teaspoon of Worcestershire sauce, 2 tablespoons of Shaoxing Huatiao wine, and 2 tablespoons of sesame oil. Mix well.
  3. Roughly chop 80g of canned water chestnuts and 4 large Chinese mushrooms into fine pieces. Add to the pork mixture and combine thoroughly.
  4. Finely dice a small carrot to garnish the siew mai later. Set aside.
  5. For the glutinous rice filling, soak 2 lap cheongs in boiling water until the skin separates. Remove the skin and dice the sausages.
  6. In a large saucepan over medium-high heat, pan fry the diced lap cheong until they are golden. Follow the instructions for glutinous rice preparation and stir-fry until fragrant. Add the fried lap cheong pieces and set aside to cool.
  7. Prepare the wonton wrappers by placing a sheet on a flat surface. Place a teaspoon of filling in the center of each wrapper.
  8. Dampen your finger with water and wet the edges of the wonton wrapper. Gather the wrapper around the filling and squeeze gently to seal.
  9. Top each pork siew mai with a shrimp and garnish with chopped carrot.
  10. Place the dumplings in a steamer lined with perforated baking paper. Steam over boiling water for 14-15 minutes or until cooked through.
  11. Serve hot, or freeze uncooked dumplings for later use.

Tips

To ensure the best results when making siew mai, keep these tips in mind:

  • Keep it Tight: Make sure the dumplings are tightly wrapped to prevent them from falling apart while steaming.
  • Use Fresh Ingredients: Fresh shrimp and quality pork make a significant difference in taste.
  • Steam Properly: Ensure steam can circulate by cutting holes in the baking paper lining the steamer.

Variations & Substitutions

Feel free to experiment with these variations to suit your preferences:

  • Vegetarian Siew Mai: Replace meat with chopped vegetables such as mushrooms, carrots, and bamboo shoots.
  • Spicy Twist: Add a dash of chili oil or finely chopped fresh chili for a spicy kick.
  • Flavor Enhancers: Add a touch of grated ginger or garlic for additional depth of flavor.

Storage

Siew mai is best enjoyed fresh, but if you have leftovers, store them in an airtight container in the refrigerator for up to 2 days. To freeze uncooked siew mai, place them on a baking sheet lined with parchment paper, freeze until solid, and then transfer to a freezer-safe container. They can be steamed directly from frozen.

FAQ

Can I make siew mai without shrimp?

Yes, you can omit the shrimp if desired. The pork filling is flavorful enough on its own, or you could increase the amount of pork or add other ingredients like mushrooms for added texture and taste.

What can I use instead of wonton wrappers?

If you don’t have wonton wrappers, you can use dumpling wrappers or even make your own from scratch using flour and water. The texture may vary slightly, but they’ll still be delicious.

Nutrition

While exact nutritional values can vary, siew mai is a protein-rich dish thanks to the pork and shrimp. The inclusion of vegetables like mushrooms and water chestnuts adds fiber and vitamins. Opt for leaner pork cuts to reduce fat content if desired.

Conclusion

Siew mai is more than just a dish; it’s a culinary tradition that brings people together. Whether you’re enjoying it as part of a dim sum spread or making it the star of your meal, siew mai is sure to delight with its savory flavors and satisfying textures. I hope this recipe brings joy to your kitchen and adds a touch of nostalgia to your dining table. Happy cooking!

Related update: Siew Mai

Related update: Red, White, and Blue Fruit Salsa

Related update: Lamb Tagine Stew

Grilled Garlicky-Herbed Shrimp | Made by Meaghan Moineau

Grilled Garlicky-Herbed Shrimp

Intro

There’s something truly magical about grilling seafood, especially when it involves a cherished family recipe that has been passed down through generations. I still vividly remember those summer evenings at my grandmother’s house by the sea. As kids, we’d watch her prepare her famous grilled shrimp, the air filled with the rich aroma of garlic and herbs, while we eagerly awaited the feast. This Grilled Garlicky-Herbed Shrimp recipe is a beautiful tribute to those warm, breezy nights and the love shared through food. Whether you’re hosting a backyard BBQ or having a quiet dinner at home, this recipe is sure to bring a touch of nostalgia and delight to your table.

Why You’ll Love It

This Grilled Garlicky-Herbed Shrimp recipe is not just about savoring deliciously marinated shrimp; it’s about enjoying a dish that’s both simple to prepare and packed with flavor. You’ll love how the robust garlic and fresh herbs combine with the subtle heat of chili pepper flakes, creating a perfect marinade that elevates the delicate taste of shrimp. Whether you’re a seafood aficionado or someone trying shrimp for the first time, this recipe promises to be a hit!

Ingredients

  • Chili pepper flakes
  • Extra virgin olive oil
  • Coriander leaves
  • Garlic
  • Shrimp
  • Lemon zest
  • Parsley

Instructions

  1. Combine all ingredients except shrimp in a large bowl.
  2. Add shrimp and toss to combine, making sure all parts of the shrimp are coated in the marinade.
  3. Refrigerate for 4 hours or overnight to let the flavors meld.
  4. Preheat grill on medium heat.
  5. Place shrimp on the grill and cook, turning once, until pink, about 5 minutes.
  6. For a Mediterranean feel, serve the shrimp with a roasted red pepper salad. Enjoy!

Tips

For the best flavor, use fresh shrimp and marinate them overnight if possible. Be cautious not to overcook the shrimp as they can become tough and rubbery. Keep an eye on the grill and turn the shrimp as soon as they turn pink.

Variations & Substitutions

If you prefer a spicier kick, feel free to increase the amount of chili pepper flakes or add a pinch of cayenne. For a milder version, reduce the chili flakes or omit them altogether. You can also substitute cilantro for parsley if you prefer, or add a splash of white wine to the marinade for extra depth of flavor.

Storage

Leftover grilled shrimp can be stored in an airtight container in the refrigerator for up to 2 days. To reheat, gently warm them in a skillet over low heat, or enjoy them cold in a salad or wrap.

FAQ

Can I use frozen shrimp for this recipe?

Yes, you can use frozen shrimp, but make sure to thaw them completely before marinating to ensure they absorb the flavors well.

What kind of grill should I use?

You can use either a gas or charcoal grill. If you don’t have a grill, a grill pan on the stovetop works well too.

How can I tell when the shrimp are done?

Shrimp are done when they turn pink and opaque. Be careful not to overcook them as they can become rubbery.

Nutrition

This dish is low in calories and high in protein, making it a healthy choice. It’s also full of healthy fats from the olive oil and packed with flavor, ensuring that you don’t sacrifice taste for nutrition.

Conclusion

Grilled Garlicky-Herbed Shrimp is more than just a recipe – it’s a culinary experience that brings together the joy of grilling, the delight of fresh ingredients, and the warmth of shared memories. Whether you’re reminiscing about family gatherings or creating new traditions, this shrimp dish is sure to become a favorite. Gather your loved ones, fire up the grill, and enjoy a meal that’s as heartwarming as it is delicious.

Related update: Grilled Garlicky-Herbed Shrimp

Spicy Black-Eyed Pea Curry with Swiss Chard and Roasted Eggplant | Made by Meaghan Moineau

Spicy Black-Eyed Pea Curry with Swiss Chard and Roasted Eggplant

Intro

There’s a certain magic that happens in the kitchen when the aroma of spices fills the air, reminiscent of home-cooked meals that warm the heart and soul. I remember the first time I encountered black-eyed peas in a dish. It was at a family gathering during the holidays, where each dish had its own story and tradition. My grandmother, with her gentle hands and warm smile, would serve a spicy black-eyed pea curry that quickly became the centerpiece of our gatherings. Her secret? A generous helping of roasted eggplant and leafy greens that made the dish as hearty as it was flavorful. Inspired by those cherished moments, I’ve recreated this Spicy Black-Eyed Pea Curry with Swiss Chard and Roasted Eggplant, a dish that’s both comforting and nourishing, perfect for sharing with loved ones.

Why You’ll Love It

This curry is a delightful fusion of flavors and textures. The creamy black-eyed peas intertwine with the smoky, tender roasted eggplant, while the Swiss chard adds a burst of color and nutrition. The medley of spices, including curry powder, garam masala, and cumin, creates a rich, aromatic base that elevates the humble ingredients into a memorable meal. Whether you’re a seasoned cook or a beginner looking to explore new flavors, this recipe is both accessible and rewarding. It’s a versatile dish that can be enjoyed on its own or paired with rice or bread for a complete meal.

Ingredients

  • 1 cup cooked dried black-eyed peas
  • 1 tablespoon curry powder
  • 1 teaspoon garam masala
  • 1 eggplant, preferably Italian globe
  • 1 teaspoon ground coriander
  • 1 teaspoon ground cumin
  • 1/2 teaspoon ground mustard powder
  • Juice of 1 lemon
  • 2 tablespoons olive oil
  • 2-3 red or green chilies, finely chopped
  • Sea salt to taste
  • 2 shallots, finely chopped
  • 2 cups Swiss chard, trimmed and chopped
  • 1 large tomato, chopped
  • 1/2 cup water, plus more as needed

Instructions

  1. Rinse the black-eyed peas and soak them in several inches of water for 6 hours or overnight. Drain and rinse again. Transfer to a large saucepan, cover with fresh water, and bring to a boil. Reduce heat to medium-low, cover, and simmer for 40 to 60 minutes until the peas are tender but not falling apart. Drain and set aside.
  2. To prepare the eggplant, cut off the stem and bottom edge, then halve it lengthwise. Score the flesh into a diagonal pattern, being careful not to cut through the skin. Sprinkle with salt and let it sit for 40 minutes. Rinse and squeeze out excess water.
  3. Brush the eggplant with olive oil and place it in a roasting pan. Bake in a preheated 400°F oven until the flesh appears collapsed and wrinkly, about 30-40 minutes. Remove from heat, let cool for 10 minutes, then scoop out the flesh. If too watery, drain using a strainer. Set aside.
  4. In the same saucepan used for the black-eyed peas, heat the olive oil over medium heat. Add shallots and chilies, sautéing for 2-3 minutes.
  5. Add curry powder, garam masala, ground coriander, cumin, and mustard powder. Stir for another minute until fragrant.
  6. Add the chopped tomato and cook for a few more minutes. Then, add the roasted eggplant and cooked black-eyed peas, stirring frequently.
  7. Pour a few tablespoons of water into the pan. Gradually add Swiss chard, allowing it to wilt before adding more. Add more water as necessary to maintain desired consistency.
  8. Stir in the lemon juice and salt to taste. Remove from heat, cover, and let the curry sit for a few minutes before serving.

Tips

For best results, ensure the black-eyed peas are cooked perfectly tender but not mushy. The eggplant’s roasting time may vary depending on its size; keep an eye on it to achieve the desired texture. Adjust the level of spice by adding more or fewer chilies, based on your heat preference.

Variations & Substitutions

Feel free to experiment with different greens such as spinach or kale if Swiss chard is unavailable. For an added protein boost, consider tossing in some cooked chickpeas. If you prefer a milder curry, use less curry powder and add a dollop of coconut milk for creaminess.

Storage

Store any leftovers in an airtight container in the refrigerator for up to 3 days. This curry also freezes well; simply thaw and reheat on the stove over low heat, adding a splash of water if needed to reach the desired consistency.

FAQ

Can I use canned black-eyed peas for this recipe?

Yes, you can use canned black-eyed peas if you’re short on time. Just be sure to rinse and drain them thoroughly before adding them to the dish.

What other vegetables can I add to this curry?

Feel free to add other vegetables such as bell peppers, zucchini, or carrots. Just be sure to adjust the cooking time accordingly so that all the vegetables are tender.

Is this recipe vegan?

Yes, this Spicy Black-Eyed Pea Curry with Swiss Chard and Roasted Eggplant is entirely vegan, making it a delicious choice for those following a plant-based diet.

Nutrition

This curry is a nutritious powerhouse, rich in fiber, vitamins, and minerals. Black-eyed peas are an excellent source of protein and iron, while Swiss chard provides vitamins A, C, and K. Eggplant adds antioxidants and dietary fiber, making this dish both wholesome and satisfying.

Conclusion

Embark on a culinary adventure with this Spicy Black-Eyed Pea Curry with Swiss Chard and Roasted Eggplant. It’s a dish that brings warmth to the table and joy to those who share it. Whether you’re reminiscing about childhood memories or creating new ones, this curry is sure to become a beloved staple in your kitchen. Enjoy the rich tapestry of flavors and the simplicity of ingredients that come together in this heartwarming meal. Happy cooking!

Related update: Spicy Black-Eyed Pea Curry with Swiss Chard and Roasted Eggplant

Related update: Pork Menudo

Japanese Gyoza Pot Stickers | Made by Meaghan Moineau

Japanese Gyoza Pot Stickers

Intro

There’s something truly magical about gathering around the kitchen table with loved ones, folding gyoza wrappers, and sharing stories. I remember as a child, watching my grandmother skillfully pleat the edges of these delightful Japanese pot stickers, her hands moving with a rhythm that spoke of years of practice. The savory aroma of sizzling gyoza would fill the room, creating an atmosphere of warmth and anticipation. Today, I share with you a recipe that brings back those cherished memories and allows you to create your own.

Why You’ll Love It

This Japanese Gyoza Pot Stickers recipe is a perfect blend of savory and umami flavors wrapped in a tender yet crispy shell. Not only are they incredibly delicious, but they’re also versatile and can be served as appetizers, snacks, or even a main course. The combination of seasoned ground beef with aromatic vegetables and the unique touch of chili sesame oil makes each bite an explosion of flavor. Plus, making them from scratch is a fun and rewarding experience that allows you to create a connection with this beloved Japanese tradition.

Ingredients

  • Black pepper, to taste
  • 1 cup cabbage, finely chopped
  • 1 teaspoon chili sesame oil
  • 1/4 cup dried mushrooms, soaked in warm water and chopped
  • 2 teaspoons grated ginger root
  • 3 to 4 green onions, finely chopped
  • 1 pound ground beef
  • 2 tablespoons salad oil
  • 1 teaspoon sesame oil
  • 2 tablespoons Kikkoman soy sauce
  • 1 tablespoon cooking wine
  • Gyoza wrappers

Instructions

  1. Chop the cabbage finely and place it in a colander. Pour boiling water over the cabbage, then let it cool until it’s comfortable to touch. Squeeze the cabbage well to remove excess water.
  2. In a large bowl, combine the cabbage, chopped green onions, chopped mushrooms, and grated ginger.
  3. In a separate bowl, mix the ground beef with cooking wine, soy sauce, sesame oil, and black pepper. Add the vegetable mixture to the beef and mix well.
  4. Place about 1 teaspoon of filling in the center of a gyoza wrapper. Fold the wrapper in half and pleat the edges to seal. If the edges do not stick, dampen the inside edge with a little water before pleating.
  5. Heat 2 tablespoons of salad oil in a pan over medium heat. Place the gyoza in the pan, flat side down.
  6. At the edge of the pan, carefully pour in a little water, up to 1/4 of the depth of the pot stickers. Cover the pan, reduce the heat to low, and let the gyoza simmer until all the water has evaporated.

Tips

For the best results, make sure not to overfill the gyoza wrappers as this can make sealing difficult and lead to bursting during cooking. When pleating the edges, use a firm but gentle touch to ensure they are securely sealed. Additionally, using a non-stick pan can help prevent sticking during the cooking process.

Variations & Substitutions

If you prefer a vegetarian version, simply replace the ground beef with finely chopped tofu or a plant-based meat substitute. You can also experiment with different vegetables such as carrots or bell peppers to add a unique twist. For a spicier kick, increase the amount of chili sesame oil or add a dash of hot sauce to the filling mixture.

Storage

To store leftover gyoza, let them cool to room temperature before placing them in an airtight container. They can be refrigerated for up to 3 days. For longer storage, consider freezing them in a single layer on a baking sheet before transferring to a freezer bag. Frozen gyoza can be cooked directly from the freezer, just increase the cooking time slightly.

FAQ

Can I make the gyoza filling in advance?

Absolutely! You can prepare the filling up to a day in advance and store it in the refrigerator. This can actually help the flavors meld together, resulting in a more flavorful filling.

What if I can’t find gyoza wrappers?

If gyoza wrappers are unavailable, you can use wonton wrappers as a substitute. They may be slightly thinner, so handle them with care when pleating and sealing.

How do I prevent the gyoza from sticking to the pan?

Ensure your pan is well-oiled and preheated before adding the gyoza. A non-stick pan can also help. If they do stick, allow them to cool briefly before gently loosening with a spatula.

Nutrition

This gyoza recipe offers a balanced combination of protein, vegetables, and healthy fats. Each serving (4-5 pot stickers) contains approximately 250 calories, 14g of protein, 20g of carbohydrates, and 12g of fat. Adjust the portion size based on your dietary needs and preferences.

Conclusion

Making Japanese Gyoza Pot Stickers at home is a delightful experience that brings the authentic flavors of Japan into your kitchen. Whether you’re recreating cherished family memories or starting new traditions, these pot stickers are sure to become a favorite. Enjoy the process of crafting each gyoza, savor the rich and complex flavors, and share them with those you love. Happy cooking!

Related update: Japanese Gyoza Pot Stickers

Related update: Spicy Black-Eyed Pea Curry with Swiss Chard and Roasted Eggplant

Related update: Curry Leaves Potato Chips