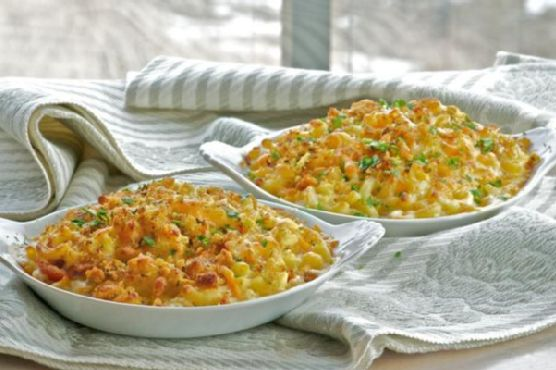
BBQ Mac and Cheese | Made by Meaghan Moineau

BBQ Mac and Cheese

Intro

There’s something incredibly comforting about a bowl of warm, cheesy pasta that just takes you back to childhood. I remember visiting my grandmother’s house every Sunday, where the aroma of her signature mac and cheese, bubbling away in the oven, would greet me at the door. As time passed, I experimented with her classic recipe, infusing it with a smoky BBQ twist that brings a delightful kick to the traditional flavors. Today, I’m thrilled to share my BBQ Mac and Cheese recipe with you—a dish that’s not only a family favorite but also a crowd-pleaser at every gathering.

Why You’ll Love It

This BBQ Mac and Cheese is the ultimate comfort food with a deliciously modern twist. It’s rich and creamy, with the perfect hint of smoky sweetness that sets it apart from the classic mac and cheese. The combination of gooey cheddar and tangy Parmesan, coupled with the subtle heat of jalapeño and the aromatic blend of spices, creates a symphony of flavors that will have you coming back for more. Whether you’re serving it as a main dish or a hearty side, this recipe is sure to be a hit with both kids and adults alike.

Ingredients

  • 1 cup cottage cheese
  • 1/2 cup Parmesan cheese, grated
  • 1/4 cup ketchup
  • 2 tablespoons brown sugar
  • 1 jalapeño, seeded and chopped
  • 2 tablespoons Italian parsley, chopped
  • 1 cup milk
  • 2 cloves garlic, minced
  • 1/2 cup diced onion
  • 1 teaspoon ground cumin
  • Salt and black pepper to taste
  • 2 tablespoons butter
  • 2 cups shredded cheddar cheese
  • 1/2 cup Italian style breadcrumbs
  • 8 ounces macaroni

Instructions

  1. Prepare the macaroni according to the package instructions. Drain and set aside.
  2. In a food processor, combine the cottage cheese, milk, Parmesan cheese, ketchup, brown sugar, jalapeño, garlic, parsley, ground cumin, salt, and black pepper. Blend until smooth and creamy.
  3. In a frying pan, melt 1 tablespoon of butter over medium heat. Add the diced onions and sauté until softened and transparent, about 5 minutes. Remove from heat and set aside.
  4. In another frying pan, melt the remaining tablespoon of butter. Add the breadcrumbs and toss to coat. Continue to brown the breadcrumbs slightly, stirring occasionally. Remove from heat and set aside.
  5. In a large pot, combine the cooked macaroni, onion mixture, cheese sauce, and shredded cheddar cheese. Stir over low heat until the cheese is melted and the pasta is evenly coated.
  6. Transfer the mac and cheese to a baking dish. Sprinkle the toasted breadcrumbs evenly over the top.
  7. Bake in a preheated oven at 350°F (175°C) for 15-20 minutes, or until the top is golden and bubbly. Serve hot and enjoy!

Tips

For the best flavor, use freshly grated Parmesan and cheddar cheeses. If you prefer a spicier kick, leave the seeds in the jalapeño or add a pinch of cayenne pepper to the cheese sauce. This dish pairs beautifully with a simple green salad or grilled vegetables for a balanced meal.

Variations & Substitutions

If you’re looking to switch things up, try using smoked gouda or mozzarella instead of cheddar for a unique flavor profile. For a gluten-free version, substitute the macaroni with your favorite gluten-free pasta and use gluten-free breadcrumbs. Vegetarians can enjoy this dish as is, but for a heartier meal, consider adding cooked bacon or grilled chicken for added protein.

Storage

Leftovers can be stored in an airtight container in the refrigerator for up to 3 days. Reheat in the oven or microwave until warmed through. If the pasta appears dry, add a splash of milk before reheating to restore its creamy texture.

FAQ

Can I make this recipe in advance?

Yes, you can prepare the mac and cheese up to the baking step and refrigerate it for up to 24 hours. When you’re ready to serve, bake it as directed, adding a few extra minutes if necessary to ensure it’s heated through.

What can I use if I don’t have a food processor?

If you don’t have a food processor, you can use a blender to puree the cheese sauce ingredients. Alternatively, mash the cottage cheese with a fork and whisk the remaining sauce ingredients until smooth.

Can I freeze BBQ Mac and Cheese?

Yes, you can freeze this dish. Allow it to cool completely, then transfer to a freezer-safe container. Freeze for up to 2 months. Thaw overnight in the refrigerator before reheating.

Nutrition

This BBQ Mac and Cheese is a rich and indulgent dish, perfect for special occasions or when you need a comforting meal. While exact nutritional values will vary based on portion size and any modifications, be mindful of the cheese and butter content, which contribute generously to the calorie count.

Conclusion

BBQ Mac and Cheese is a delightful twist on a classic comfort food that combines creamy, cheesy goodness with a touch of smoky sweetness. Whether you’re reminiscing about family dinners or creating new memories at your own table, this recipe is sure to become a favorite. Gather your loved ones, serve up a warm bowl of this delicious dish, and enjoy the smiles all around.

Related update: BBQ Mac and Cheese

Related update: Couscous with olives

Fluffy frittata with spinach | Made by Meaghan Moineau

Fluffy Frittata with Spinach

Intro

There’s something magical about the aroma of a freshly made frittata wafting through the kitchen. It takes me back to Sunday mornings at my grandmother’s house, where the sizzle of garlic and the sight of her expertly whisked eggs made breakfast feel like an event. Among her many beloved recipes, her fluffy spinach frittata was always my favorite. Today, I’m excited to share a version of her classic dish that’s not only nostalgic but also incredibly easy to prepare. Whether you’re hosting a brunch or simply treating yourself to a hearty breakfast, this frittata is bound to become your new go-to recipe.

Why You’ll Love It

This fluffy spinach frittata is everything you want in a breakfast dish: quick to make, absolutely delicious, and packed with nutritious ingredients. The combination of fresh spinach and creamy ricotta cheese makes it light yet satisfying, while the hint of garlic and nutmeg adds depth to its flavor. Perfect for both novice and seasoned cooks, this frittata is a testament to the fact that simplicity often leads to the most delightful outcomes.

Ingredients

  • 4 large eggs, separated
  • 1 clove garlic, minced
  • 1/4 teaspoon ground pepper
  • 1/8 teaspoon nutmeg
  • 2 tablespoons olive oil
  • 1/4 cup grated parmesan cheese
  • 1/2 cup ricotta cheese
  • 1/2 teaspoon salt
  • 1 cup fresh spinach (or 1/2 cup dry frozen spinach, thawed and drained)

Instructions

  1. Preheat your oven to 200°C (392°F).
  2. In a medium oven-proof skillet, heat the olive oil over medium heat. Add the minced garlic and cook until softened and fragrant, about 1 minute.
  3. In a large glass or metal bowl, beat the egg whites until stiff peaks form. This will ensure your frittata turns out perfectly fluffy.
  4. In another bowl, beat the egg yolks and stir in the spinach and ricotta cheese. Season the mixture with salt, ground pepper, and nutmeg.
  5. Gently fold the beaten egg whites into the yolk mixture, taking care not to deflate the whites.
  6. Pour the egg mixture into the hot skillet with the garlic. Cook over medium heat until the edges are just set, approximately 2 minutes.
  7. Transfer the skillet to the preheated oven and bake until the frittata is golden and fluffy, about 15 minutes.
  8. Sprinkle the grated parmesan cheese over the top of the frittata and bake for an additional 2 minutes, or until the cheese is melted and bubbly.
  9. Remove from the oven and let it cool slightly before cutting into wedges. Serve immediately for best results.

Tips

For the fluffiest frittata, ensure that the egg whites are beaten to stiff peaks before folding them into the yolk mixture. When folding, use a gentle hand to maintain the airy texture. Preheating the oven and using an oven-proof skillet will help the frittata cook evenly and achieve a beautiful golden color.

Variations & Substitutions

If you’re looking to customize this frittata, consider adding sautéed mushrooms, sun-dried tomatoes, or bell peppers for added flavor and texture. For a bit of heat, a pinch of red pepper flakes can do wonders. If you’re out of fresh spinach, frozen spinach works well, just be sure to thaw and drain it thoroughly. Additionally, feta or goat cheese can be used in place of ricotta for a different cheese profile.

Storage

Leftover frittata can be stored in an airtight container in the refrigerator for up to 3 days. To reheat, place a slice in a skillet over low heat until warmed through, or use a microwave for a quicker option. While it can be frozen, note that the texture may change slightly upon thawing.

FAQ

Can I make this frittata ahead of time?

Yes, this frittata can be made a day in advance. Simply store it in the refrigerator and reheat it in the oven at a low temperature before serving to maintain its texture.

Is it possible to make this frittata dairy-free?

Definitely! You can substitute the ricotta cheese with a dairy-free cheese alternative and use nutritional yeast instead of parmesan for a similar cheesy flavor without the dairy.

Nutrition

This frittata is a great source of protein and packed with vitamins from the spinach. Each serving contains approximately 250 calories, 18 grams of protein, and 5 grams of carbohydrates. It’s a nutritious way to start your day!

Conclusion

This fluffy spinach frittata is a delightful dish that’s sure to become a staple in your breakfast or brunch repertoire. Its simplicity and versatility make it an ideal choice for any occasion. Whether you’re reminiscing about family breakfasts or creating new traditions, this frittata brings warmth and comfort to your table. I hope you enjoy making and sharing this recipe as much as I have over the years. Bon appétit!

Related update: Fluffy frittata with spinach

Related update: Overnight Oatmeal

Related update: BBQ Mac and Cheese

Macaroni and Cheese Gratin | Made by Meaghan Moineau

Macaroni and Cheese Gratin

Intro

There’s something magical about the comforting embrace of macaroni and cheese. It’s a dish that transcends age, a warm hug on a plate for both the young and the old. I remember spending countless afternoons in my grandmother’s kitchen, the air filled with the tantalizing aroma of bubbling cheese and freshly baked bread crumbs. She always let me sprinkle the breadcrumbs on top, a task I took to with glee. This Macaroni and Cheese Gratin recipe has been passed down through generations in my family, and today, I’m thrilled to share it with you.

Why You’ll Love It

This Macaroni and Cheese Gratin is the epitome of comfort food, with a crispy, herbed breadcrumb topping that contrasts beautifully with the creamy, cheesy pasta beneath. It’s perfect for family gatherings, potlucks, or a cozy night in. The blend of cheddar and gruyere provides a rich, tangy flavor, while a hint of nutmeg and pepper sauce adds warmth and depth. You’ll love how the top gets golden and crunchy, making every bite a delightful experience.

Ingredients

  • 2 cups herbed bread crumbs
  • 4 tablespoons butter, divided
  • 2 cups grated cheddar cheese
  • 1 pound elbow macaroni
  • 1/4 cup all-purpose flour
  • 1 cup grated gruyere cheese
  • 4 cups milk
  • 1/4 teaspoon freshly grated nutmeg
  • 1/2 cup grated parmesan cheese
  • 2 tablespoons chopped fresh parsley
  • 1 teaspoon pepper sauce
  • Salt, to taste

Instructions

  1. Bring a large pot of water to a boil. Add a generous pinch of salt, then add the elbow macaroni. Cook until just shy of al dente, since the macaroni will continue to cook in the oven. Drain and set aside.
  2. In another pot, melt two tablespoons of butter over medium heat. Add the flour and stir with a whisk or wooden spoon for a couple of minutes to cook the raw flavor out of the flour.
  3. Gradually whisk in the milk, 1/2 cup at a time, allowing the mixture to thicken before adding more. Once all the milk is incorporated, reduce the heat to low and continue to cook, stirring constantly, until the sauce thickens.
  4. Stir in the grated cheddar, gruyere, and parmesan cheeses until melted and smooth. Add the nutmeg, pepper sauce, and salt to taste. Remove from heat and set aside.
  5. Return the drained macaroni to its pot and pour the cheese sauce over it. Stir gently with a wooden spoon to combine.
  6. Spoon the macaroni mixture into individual gratin dishes or a large buttered baking dish. Feel free to add a few tomato slices here and there, pressing them gently into the surface.
  7. To make the topping, melt the remaining two tablespoons of butter and mix it with the herbed bread crumbs until well combined.
  8. Sprinkle the breadcrumb mixture evenly over the macaroni and cheese. Do not smooth out the top; leave a few peaks for extra crispiness.
  9. Bake in a preheated oven at 375°F (190°C) for 20-25 minutes, or until the top is golden brown and the cheese is bubbly.
  10. Garnish with chopped fresh parsley before serving.

Tips

For best results, use high-quality cheeses for a richer flavor. Feel free to make the cheese sauce ahead of time and store it in the refrigerator. When ready to bake, simply reheat the sauce gently and combine with the pasta.

Variations & Substitutions

Feel free to experiment with different types of cheese. A combination of sharp cheddar and smoked gouda can add a delightful twist. For a gluten-free version, use gluten-free pasta and flour. You can also add cooked bacon or diced ham to the macaroni for a meatier version.

Storage

Store any leftovers in an airtight container in the refrigerator for up to 3 days. To reheat, place in a preheated oven at 350°F (175°C) until warmed through. You can also freeze the gratin before baking; just ensure it’s well-covered. When ready to enjoy, bake directly from frozen, adding an extra 10-15 minutes to the cooking time.

FAQ

Can I make this dish ahead of time?

Yes, you can assemble the gratin up to a day in advance and refrigerate. Just add the breadcrumb topping right before baking.

What can I use instead of gruyere cheese?

If you can’t find gruyere, you can substitute it with Swiss cheese or even a mild provolone for a similar texture and flavor.

Nutrition

While I don’t have exact nutritional information for this dish, keep in mind that it’s a rich and indulgent treat. Moderation is key, and pairing it with a light salad can help balance out the meal.

Conclusion

This Macaroni and Cheese Gratin is more than just a meal; it’s a celebration of cheesy, comforting goodness that brings people together. Whether you’re sharing it with loved ones or savoring it solo, know that each bite is a testament to the timeless joy of home-cooked comfort food. Enjoy!

Related update: Macaroni and Cheese Gratin

Coconut Guava Ice cream | Made by Meaghan Moineau

Coconut Guava Ice Cream: A Tropical Delight

Intro

There’s something magical about the fusion of tropical flavors that instantly transports you to a serene beach with every bite. Coconut Guava Ice Cream embodies this essence perfectly. As a child, I remember visiting my grandmother’s house every summer. She had a beautiful guava tree in her backyard, and we would spend lazy afternoons picking ripe guavas and concocting different treats. This ice cream recipe takes me back to those sun-dappled days, filled with laughter, tropical fruits, and the warmth of family gatherings.

Why You’ll Love It

This Coconut Guava Ice Cream is a luscious blend of creamy coconut milk, sweet guavas, and the delightful crunch of peanuts. It’s vegan-friendly, simple to make, and doesn’t require an ice cream maker. The refreshing taste of guava combined with the rich coconut base creates an indulgent yet refreshing dessert. It’s the perfect treat to beat the heat and impress your guests at any gathering.

Ingredients

  • 1 can of coconut milk
  • 1/2 cup condensed milk
  • 2 ripe guavas, chopped and de-seeded
  • 1/2 cup blueberries
  • 1/4 cup crushed peanuts

Instructions

  1. Place the can of coconut milk in the freezer and allow it to solidify. This could take 4-6 hours depending on the temperature of your freezer.
  2. Take out the can of coconut milk and open it completely. The milk and coconut water will have separated, and the coconut water part will be clearer than the milk.
  3. With a very sharp knife, cut through the frozen coconut milk to separate the milk from the coconut water.
  4. Place the frozen coconut milk part in the blender.
  5. Pour in your condensed milk and chopped de-seeded guavas. Blend for about 3-5 minutes at intervals until smooth.
  6. Pour the mixture into a bowl, add your blueberries, stir in, and pop it in the freezer.
  7. Allow your coconut ice cream to freeze for about 3-6 hours.
  8. Serve garnished with the crushed peanuts.

Tips

To ensure the best texture, make sure the coconut milk is fully solidified before opening. Use ripe guavas for maximum flavor. If you prefer a smoother texture, blend the blueberries with the coconut milk and guavas instead of stirring them in.

Variations & Substitutions

If you want to add a citrusy note, consider adding a tablespoon of lime juice before blending. For a nut-free version, skip the peanuts and garnish with toasted coconut flakes instead. If guavas are not in season, substitute with mangoes or papayas for a different tropical twist.

Storage

Store the Coconut Guava Ice Cream in an airtight container in the freezer for up to two weeks. Allow it to soften at room temperature for a few minutes before serving for the best texture.

FAQ

Can I use fresh coconut milk instead of canned?

While fresh coconut milk can be used, canned coconut milk is preferred for its creaminess and consistency, which enhances the texture of the ice cream.

Is this recipe suitable for vegans?

Yes, this recipe is vegan-friendly as long as you use vegan condensed milk or a homemade version made from coconut milk and sugar.

Can I make this recipe without a blender?

A blender is recommended for achieving a smooth texture. However, you can mash the guavas and mix them with the other ingredients using a fork if a blender is unavailable.

Nutrition

This Coconut Guava Ice Cream is a delightful indulgence. While exact nutritional values may vary based on specific ingredients used, it is generally a good source of healthy fats from the coconut milk and provides vitamins from the fruits. It’s a sweet treat best enjoyed in moderation.

Conclusion

Coconut Guava Ice Cream is a celebration of tropical flavors, nostalgia, and simplicity. With just a few ingredients and steps, you can create a delicious and refreshing dessert that will transport you to a sunny paradise with every bite. Whether you’re entertaining guests or treating yourself, this ice cream is sure to impress. So, why not give it a try and create your own tropical memories?

Related update: Coconut Guava Ice cream

Related update: Macaroni and Cheese Gratin

Thick, Fudgy, One Bowl Brownies | Made by Meaghan Moineau

Thick, Fudgy, One Bowl Brownies

Intro

There’s a certain magic in the smell of brownies baking that instantly transports me back to my grandmother’s kitchen. As a child, I would sit perched on a stool, eagerly watching her skillfully mix and pour, the sweet aroma enveloping the room. Those moments were pure bliss, punctuated by the heavenly taste of a freshly baked brownie, still warm and gooey from the oven. It’s this nostalgic memory that inspired me to create my own version of thick, fudgy, one bowl brownies—a recipe that’s as simple as it is delicious.

Why You’ll Love It

These brownies are everything a chocolate lover dreams of—rich, fudgy, and oh-so-chocolatey. Made in just one bowl, this recipe is perfect for those who crave indulgence without the fuss. Whether you’re a seasoned baker or a novice in the kitchen, these brownies will win you over with their simplicity and decadence. Plus, they’re versatile enough for any occasion, from a cozy night in to an elegant dinner party dessert. You’ll love how quickly they come together and the pure satisfaction they bring with every bite.

Ingredients

  • Semi-sweet chocolate
  • Unsweetened chocolate
  • Unsalted butter
  • Cocoa powder
  • Eggs
  • Vanilla extract
  • Table salt
  • Flour

Instructions

  1. Adjust an oven rack to the lower-middle position and heat the oven to 350°F.
  2. Line an 8-inch square baking pan with two pieces of foil and spray with vegetable oil spray.
  3. Melt the semi-sweet and unsweetened chocolate and butter in a large heatproof bowl set over a saucepan of barely simmering water, stirring occasionally with a spatula or wooden spoon until smooth.
  4. Remove the bowl from heat and stir in the cocoa powder until smooth. Set aside to cool.
  5. Once the mixture has cooled, stir in the eggs, sugar, vanilla, and salt until combined.
  6. Add flour, stirring until just combined.
  7. Transfer the batter to the prepared pan; spread the batter into the corners and smooth the surface using your spatula.
  8. Bake until slightly puffed and a toothpick or wooden skewer inserted into the center of the brownies comes out with a few moist crumbs attached, about 35-40 minutes.
  9. Cool the brownies on a wire rack to room temperature. If you’re impatient like me, even 5 minutes is enough to satisfy a chocolate craving!
  10. Loosen the edges with a paring knife and lift the brownies from the pan using the foil extensions. Cut the brownies into 1-inch squares and serve.

Tips

For the best results, use high-quality chocolate and cocoa powder. This will enhance the flavor and texture of your brownies. Make sure not to overmix the batter once the flour is added; this can result in a tougher brownie. Also, resist the temptation to cut the brownies too soon after baking; allowing them to cool helps them set properly, making them easier to slice.

Variations & Substitutions

Feel free to customize these brownies to suit your taste. You can add a handful of chopped nuts, such as walnuts or pecans, for some crunch. If you prefer a more intense chocolate flavor, sprinkle some chocolate chips into the batter. For a different twist, try adding a teaspoon of espresso powder to enhance the chocolate flavor. For those who need a gluten-free option, substitute the flour with a gluten-free baking mix.

Storage

Store your brownies in an airtight container at room temperature for up to 4 days. If you want to keep them longer, they can be frozen for up to 3 months. Simply wrap them tightly in plastic wrap and place them in a freezer-safe bag. Thaw at room temperature before serving.

FAQ

Can I double this recipe?

Yes, you can easily double the recipe and bake it in a 9×13-inch pan. Just be sure to adjust the baking time accordingly, checking for doneness around the 45-minute mark.

Can I use milk chocolate instead of semi-sweet?

While you can use milk chocolate, it will result in a sweeter brownie. If you prefer a balanced sweetness, stick with semi-sweet chocolate or adjust the sugar content to taste.

Nutrition

Each serving of these brownies (based on 16 servings) contains approximately:

  • Calories: 200
  • Fat: 12g
  • Saturated Fat: 7g
  • Carbohydrates: 24g
  • Sugar: 18g
  • Protein: 3g

Conclusion

Baking these thick, fudgy, one bowl brownies is not just about indulging in a sweet treat; it’s about creating memories and savoring the joys of homemade comfort food. Whether you’re sharing them with loved ones or enjoying a quiet moment alone, these brownies are sure to bring a smile to your face. So gather your ingredients, roll up your sleeves, and let the magic of baking bring a little warmth to your day.

Related update: Thick, Fudgy, One Bowl Brownies

Chili Pie with Green Chile and Cheddar Cornbread Crust | Made by Meaghan Moineau

Chili Pie with Green Chile and Cheddar Cornbread Crust

Intro

Ah, the comforting aroma of chili pie wafting through the kitchen, bringing back warm memories of family gatherings during chilly autumn evenings. I vividly recall my grandmother bustling around her modest kitchen, her apron dusted with flour, as she prepared this delightful dish with a twinkle in her eye. It was always a favorite at our dinner table, and every bite felt like a warm hug. Today, I’m excited to share this cherished recipe with you, hoping it fills your home with the same warmth and joy it brought to mine.

Why You’ll Love It

This Chili Pie with Green Chile and Cheddar Cornbread Crust is the perfect combination of hearty and comforting flavors. The savory chili base, rich with spices and tender vegetables, is topped with a cheesy, golden cornbread crust that adds a delightful contrast in texture. It’s a dish that brings people together—whether you’re serving it at a family dinner or a casual get-together, it never fails to impress. Plus, it’s a versatile recipe that can be adjusted to suit dietary preferences or ingredient availability.

Ingredients

  • 1 tablespoon olive oil
  • 1 yellow onion, diced
  • 2 cloves garlic, minced
  • Salt and pepper to taste
  • 2 (4-ounce) cans diced green chiles
  • 1 pound ground beef
  • 2 teaspoons chile powder, plus more for topping
  • 1 tablespoon Worcestershire sauce
  • 1 teaspoon dried oregano
  • 1 teaspoon smoked paprika
  • 1/2 teaspoon ground cinnamon
  • 1/4 teaspoon ground nutmeg
  • 1/2 cup water
  • 1 (14-ounce) can diced tomatoes, with juices
  • 1 (15-ounce) can cannellini beans, drained and rinsed
  • 1 cup canned or frozen corn
  • 3 cups shredded extra sharp cheddar cheese, divided
  • 1 cup flour
  • 1 cup cornmeal
  • 1 tablespoon baking powder
  • 1 teaspoon table salt
  • 2 large eggs
  • 1 cup milk
  • 1/2 cup melted butter
  • 1/2 cup sour cream

Instructions

  1. In a large skillet, sauté the diced onion in olive oil over medium heat until soft and translucent, about 5 minutes. Season with salt and pepper.
  2. Add minced garlic and sauté until fragrant, about 1 minute.
  3. Remove two-thirds of the onion and garlic mixture from the pan and set aside.
  4. Add the diced green chiles with their juices to the skillet and sauté for 2-3 minutes. Remove and set aside in a separate bowl.
  5. In the same skillet, brown the ground beef, crumbling it as it cooks. Once cooked through, carefully drain any excess grease.
  6. Add the reserved onion mixture back to the skillet along with the chile powder, Worcestershire sauce, oregano, smoked paprika, cinnamon, nutmeg, and water. Mix thoroughly.
  7. Stir in the diced tomatoes with juices, cannellini beans, and corn. Mix well and cook for an additional 3-4 minutes over medium-low heat.
  8. Preheat your oven to 400°F (200°C) and grease a 9×13 inch casserole dish.
  9. Pour the meat mixture into the prepared casserole dish and spread evenly over the bottom. Sprinkle two cups of shredded cheddar cheese on top.
  10. In a large bowl, combine the flour, cornmeal, baking powder, and table salt.
  11. In a separate medium bowl, whisk together the eggs, milk, melted butter, and sour cream.
  12. Pour the wet ingredients into the dry ingredients and stir until just combined.
  13. Fold in the reserved onion/green chile mixture and the remaining cup of shredded cheddar cheese.
  14. Spread the cornbread batter evenly over the meat mixture in the casserole dish. Sprinkle a little extra chile powder on top.
  15. Bake for 25-30 minutes, or until a toothpick inserted into the center of the cornbread comes out clean.
  16. Let the chili pie set for 10 minutes before serving.

Tips

For the best results, make sure to use a high-quality extra sharp cheddar cheese for maximum flavor. If you’re in a pinch, you can use pre-shredded cheese, but freshly shredded cheese will melt better. Also, be sure to let the chili pie set for at least 10 minutes after baking to allow the flavors to meld together and make serving easier.

Variations & Substitutions

Feel free to customize this chili pie to suit your tastes or dietary preferences. You can substitute ground turkey or chicken for the beef for a leaner option. For a vegetarian version, omit the meat altogether and add more beans or vegetables like bell peppers or zucchini. If you like it spicy, add some chopped jalapeños to the chili mixture or use hot chile powder.

Storage

Store any leftovers in an airtight container in the refrigerator for up to 3 days. To reheat, simply microwave individual portions or place the entire casserole dish in a 350°F oven until heated through. This dish also freezes well—wrap it tightly in plastic wrap and foil before freezing for up to 3 months. Thaw in the refrigerator overnight before reheating.

FAQ

Can I make this dish ahead of time?

Absolutely! You can prepare the chili mixture and the cornbread batter separately a day in advance. Store them in the refrigerator, then assemble and bake when you’re ready to serve. This makes it a great option for busy weeknights or entertaining.

What can I serve with chili pie?

This dish is quite filling on its own, but it pairs wonderfully with a fresh green salad or some steamed vegetables. For an extra treat, serve it with a dollop of sour cream or a sprinkle of fresh cilantro on top.

Nutrition

While I don’t have the exact nutritional breakdown, this dish is a hearty meal rich in protein from the beef and beans, and it provides fiber from the beans and cornmeal. The cheese adds calcium, and the use of various spices contributes to its depth of flavor without adding extra calories.

Conclusion

This Chili Pie with Green Chile and Cheddar Cornbread Crust is more than just a meal; it’s a comforting experience that brings warmth to any occasion. I hope you enjoy making and sharing this dish as much as I do. Whether it’s the nostalgia of family dinners or the joy of discovering a new favorite, this recipe is sure to become a beloved staple in your home. Bon appétit!

Related update: Chili Pie with Green Chile and Cheddar Cornbread Crust

Related update: Pasta with Peas and Italian Sausage

No-Bake Fudge Brandy Brownies | Made by Meaghan Moineau

“`html

No-Bake Fudge Brandy Brownies

Intro

I still remember the first time I tasted these luxurious no-bake fudge brandy brownies. It was at a family gathering during the summer when my grandmother decided to introduce us to her secret recipe. The blend of rich chocolate, a hint of brandy, and the crunch from walnuts was a revelation. She shared the story of how she stumbled upon this recipe during her travels in Europe, and how it became a family favorite. Since then, these brownies have been a staple at our gatherings, and I am thrilled to share this delightful dessert with you.

Why You’ll Love It

These no-bake fudge brandy brownies are a perfect blend of easy preparation and decadent taste. Here’s why you will fall in love with them:

  • Quick to Make: With no baking required, you can whip these up in no time.
  • Rich and Decadent: The combination of chocolate, condensed milk, and brandy creates a fudgy, indulgent treat.
  • Customizable: You can easily adjust the ingredients to suit your taste preferences.
  • Perfect for Any Occasion: Whether it’s a casual get-together or a formal dinner, these brownies are sure to impress.

Ingredients

  • 1 cup brandy
  • 1/2 cup butter
  • 1 can condensed milk
  • 2 cups Oreo crumbs (set aside a tablespoon or two for garnish)
  • 1 teaspoon vanilla extract
  • 1 cup walnuts, chopped

Instructions

  1. In a pan, melt chocolate morsels and butter on low heat for about a minute or until completely melted. Stir occasionally. Remove from heat.
  2. In a large bowl, mix Oreo crumbs (set aside a tablespoon or two) and walnuts.
  3. Add condensed milk, vanilla extract, and chocolate mixture to the bowl. Mix well.
  4. Add brandy and mix thoroughly. For an extra kick, consider adding another half a tablespoon of brandy.
  5. Line your container with foil or grease it with butter and sugar. Press the mixture firmly onto the bottom of the container.
  6. Garnish with reserved Oreo crumbs on top.
  7. Refrigerate for about two hours before serving. Enjoy!

Tips

To ensure your brownies have the perfect texture, make sure your chocolate mixture is fully melted and smooth before mixing it with the other ingredients. For a nuttier flavor, toast the walnuts lightly before adding them to the mix.

Variations & Substitutions

Feel free to get creative with this recipe:

  • Alcohol-Free: Substitute the brandy with orange juice or milk for a non-alcoholic version.
  • Nut-Free: Omit the walnuts if you have a nut allergy, or replace them with dried fruit for a chewy texture.
  • Different Cookies: Swap Oreo crumbs for graham crackers or digestive biscuits for a different base flavor.

Storage

Store these brownies in an airtight container in the refrigerator for up to one week. You can also freeze them for up to three months. Simply thaw them in the fridge overnight before serving.

FAQ

Can I use a different type of alcohol?

Absolutely! Feel free to experiment with different spirits. Rum or whiskey can also add a unique flavor to these brownies.

What can I use instead of foil to line my container?

You can use parchment paper or a silicone baking mat as alternatives to foil. They work just as well and make it easy to remove the brownies from the container cleanly.

Do I have to use Oreo crumbs for the base?

Not at all! While Oreo crumbs add a delicious chocolatey flavor, you can use any cookie crumbs you prefer, such as graham crackers or vanilla wafers.

Nutrition

While these brownies are a treat and should be enjoyed in moderation, they are a good source of energy due to the combination of fats and sugars. If you’re looking to make them a bit healthier, consider reducing the amount of butter or using a low-fat alternative.

Conclusion

These no-bake fudge brandy brownies are a testament to the fact that delicious desserts don’t have to be complicated. They’re a perfect way to indulge your sweet tooth while impressing your family and friends. I hope this recipe brings you as much joy and warmth as it has brought to my family over the years. Happy no-baking!

“`

Related update: No-Bake Fudge Brandy Brownies

Related update: 10 Minute Brownies

Layered Baked Eggplant Parmesan | Made by Meaghan Moineau

Layered Baked Eggplant Parmesan | Made by Meaghan Moineau

Savor the Layers: A Nostalgic Journey with Baked Eggplant Parmesan


Description

Dive into the rich, savory layers of Baked Eggplant Parmesan, a classic Italian-American dish that promises to tantalize your taste buds and warm your soul. Perfect for a cozy family dinner or a special gathering, this recipe blends crispy breaded eggplant with layers of melted cheese and hearty tomato sauce. Join me on a flavorful journey as we explore not just the dish, but the cherished family memories it evokes.

---


Layered Baked Eggplant Parmesan Recipe


Ingredients:

- 2 to 3 eggplants

- 1 cup Italian breadcrumbs


- 2 eggs


- 1 tablespoon water


- 1 teaspoon Italian seasoning


- 1 teaspoon onion powder


- 1 cup shredded Parmesan cheese


- 2 cups shredded mozzarella cheese


- 2 cups tomato sauce


- Olive oil cooking spray


Instructions:

1. Preheat & Prep: Begin by preheating your oven to 375°F (190°C). Line a baking sheet with aluminum foil and spray lightly with olive oil cooking spray.
2. Prepare Eggplant: Slice the ends off the eggplants and peel the skin using a vegetable peeler. Cut the eggplants into ½-inch thick slices.
3. Breading Process: In a shallow dish, whisk together eggs and water. In another dish, mix Italian breadcrumbs, Italian seasoning, and onion powder. Dip each eggplant slice into the egg mixture, allowing excess to drip off, and then coat it in the breadcrumb mixture, pressing to adhere.
4. Bake the Eggplant: Place the breaded eggplant slices on the prepared baking sheet. Lightly spray the tops with olive oil. Bake for 20 minutes, flip each slice, and bake for another 20 minutes, or until golden brown. Remove from the oven.
5. Layering: In an 8x8-inch baking dish, spread ½ cup of tomato sauce evenly on the bottom. Place 4 slices of eggplant over the sauce, then top with ½ cup of shredded mozzarella cheese and ¼ cup of Parmesan cheese. Repeat layering with the remaining ingredients, creating three more layers.
6. Final Bake: Return the layered dish to the oven and bake for another 15 minutes, or until the cheese is bubbly and slightly browned.
7. Enjoy: Let it cool slightly before serving. Enjoy the flavors and cherished memories that accompany this delightful dish!

---


A Stroll Down Memory Lane


As I prepare this Layered Baked Eggplant Parmesan, I'm transported back to Sunday afternoons in my grandmother's sunlit kitchen. The intoxicating aroma of tomato sauce simmering on the stove, mingled with the sizzling sound of eggplants frying in her well-loved cast iron skillet, was a sensory symphony that signaled the start of our family gatherings.


Grandma had a way of making cooking an event, not just a task. She would share stories of her childhood in Italy, painting vivid pictures of her family's traditions around the dinner table. My cousins and I would sit wide-eyed, listening and learning, as she expertly layered the eggplants, sauce, and cheese, a process she described as "building love."


Each bite of this dish today brings back those precious moments—the laughter, the stories, and the warmth of family. It's a reminder of how food can connect us to our roots and to each other, transcending time and distance.


---


Recipe Rating and Classification


- Difficulty: 5/10
- Classification: Main Dish

This Layered Baked Eggplant Parmesan isn't just a dish; it's a heartfelt tribute to family, tradition, and the simple joy of sharing a meal with those you love. Whether you're creating new memories or savoring the old, this recipe is sure to be a beloved staple in your culinary repertoire. Enjoy every layer!

Read more about Appetizers

Read more about Main Dishes

Read more about Desserts

Indian-Spiced Ground Beef Main Dish | Made by Meaghan Moineau

Indian-Spiced Ground Beef Main Dish | Made by Meaghan Moineau

Title: "Savoring Tradition: Indian-Spiced Ground Beef Main Dish That Warms the Soul"
Description: Dive into the heart of Indian cuisine with our Indian-Spiced Ground Beef Main Dish. This aromatic recipe, bursting with spices and herbs, is a delightful journey into flavors that promise to tantalize your taste buds. Join us as we explore the vibrant ingredients, step-by-step cooking process, and the sentimental family memories that make this dish a cherished favorite.

---


A Culinary Journey Through Time: Indian-Spiced Ground Beef Main Dish

There’s a certain magic in the air when the kitchen fills with the heady aroma of spices sizzling in hot oil. It’s a sensory experience that transports me back to warm summer evenings at my grandmother's house, where the kitchen was a vibrant hub of activity and love. Today, I’m excited to share a recipe that is not just a meal, but a cherished memory — the Indian-Spiced Ground Beef Main Dish.


Ingredients:

- 2 tablespoons canola oil


- 1 teaspoon red chili powder


- A handful of fresh cilantro


- 1 cinnamon stick


- A few sprigs of fresh mint leaves


- 1 cup frozen spinach, thawed


- 1 teaspoon garam masala


- 1 garlic clove, finely chopped


- 1 teaspoon ginger paste


- 3–4 green cardamom pods


- 2 green chillies, chopped


- 1 lb ground beef


- 1 teaspoon ground cumin


- 1/2 teaspoon ground black pepper


- 1 large onion, finely chopped


- 1 cup plain yogurt


- Salt to taste


Instructions:

1. Begin by making a vibrant green paste. In a food processor, puree the spinach, cilantro, and mint with a tablespoon or two of water. Remember, a little mint goes a long way!


2. Heat canola oil in a pan over medium heat. Add the cardamom pods, cloves, and cinnamon stick, letting them sizzle and infuse the oil for about a minute.


3. Toss in the chopped onion and sauté until it turns a golden-brown, stirring occasionally to prevent burning.


4. Now, add the green chillies, garlic, and ginger paste, cooking for another minute until fragrant.


5. Stir in the ground beef, red chili powder, ground cumin, garam masala, ground black pepper, and salt. Cook on medium-high heat for about 10 minutes, stirring often to break up the beef and evenly distribute the spices.


6. Mix in half of the yogurt, ensuring it is well incorporated, and cook for another 2 minutes.


7. Pour in the green paste, stirring gently to blend the flavors. Let it simmer for 10 minutes, allowing the spices to marry beautifully.


8. Finally, add the remaining yogurt, cooking the dish for an additional 5 minutes. Taste and adjust the salt as needed.


9. Serve hot with parathas and fresh tomato salsa for a complete meal.


A Nostalgic Note:

Growing up, this dish was more than just food; it was a symbol of family unity. I remember my grandmother lovingly preparing it for our family gatherings. The kitchen would be filled with laughter, stories, and the irresistible aroma of spices. Each bite was a taste of home, a reminder of her warmth and the traditions she passed down. It’s a recipe steeped in love and memories, making each preparation a heartfelt tribute to her.


Difficulty Rating: 6/10
Classification: Main Dish

This Indian-Spiced Ground Beef Main Dish is a delightful blend of tradition and flavor. Though it requires a bit of patience and a love for spices, the result is a rewarding culinary experience. Whether you're hosting a dinner party or enjoying a quiet family meal, this dish is sure to impress and bring a touch of nostalgia to your table.

Read more about Appetizers

Read more about Main Dishes

Read more about Desserts

Grilled Fish With Sun Dried Tomato Relish | Made by Meaghan Moineau

Grilled Fish With Sun Dried Tomato Relish | Made by Meaghan Moineau

Title: "A Taste of Memories: Grilled Fish with Sun-Dried Tomato Relish"
Description: Dive into the delightful flavors of Grilled Fish with Sun-Dried Tomato Relish, a dish that beautifully combines the freshness of white fish with a tangy, aromatic relish. This recipe is not just a feast for your taste buds but a journey back to cherished family memories. Perfect as a main dish, this culinary delight scores a 5 out of 10 on the difficulty scale and is sure to become a favorite in your household.

---


A Taste of Memories: Grilled Fish with Sun-Dried Tomato Relish


There's something inherently comforting about a dish that transports you to another time, evoking memories of laughter-filled family gatherings and cherished moments around the dining table. For me, Grilled Fish with Sun-Dried Tomato Relish is one such dish—a delightful blend of flavors that always reminds me of summers spent at my grandmother's house by the sea.


Ingredients:


- 1 white fish fillet
- 2 tablespoons olive oil
- Salt and pepper to taste
- Masterfoods Garlic Pepper (optional)
- 150g cucumber
- 5 leaves of mint or basil
- Sun-dried tomatoes soaked in oil
- 1/2 teaspoon sugar
- 1 teaspoon extra virgin olive oil
- 1/2 teaspoon balsamic vinegar
- 1 teaspoon toasted sesame seeds

Instructions:


1. Preheat and Prepare: Preheat your oven to 200°C (392°F). Line a baking tray with a sheet of baking paper and lightly grease it with olive oil. Lay the fish fillet on the baking sheet and generously rub with the remaining olive oil. Season with salt, pepper, or Masterfoods Garlic Pepper for an extra kick.
2. Cook the Fish: Place the fish in the preheated oven for 15-20 minutes until perfectly cooked. Be cautious not to overcook it as you desire a tender, flaky texture.
3. Prepare the Relish: While the fish is baking, peel the cucumber, leaving some skin for a visual appeal. Slice it into strips, removing the seeds, and dice the crunchy parts. In a bowl, combine the diced cucumber with sun-dried tomatoes (drained and cut into small pieces).
4. Herb Medley: Stack and roll up the mint or basil leaves, then finely slice them using kitchen scissors. Add the herbs to the cucumber-tomato mix.
5. Finishing Touches: Season the relish with salt, pepper, sugar, extra virgin olive oil, balsamic vinegar, and toasted sesame seeds. Stir well to combine all the flavors.
6. Serve: Once the fish is cooked, cut it into serving portions and top each with a generous amount of the sun-dried tomato relish. Garnish with a sprig of mint or basil for an elegant touch.

A Nostalgic Journey:


This dish always takes me back to my grandmother's quaint seaside cottage. Her kitchen was a haven of aromatic wonders, where the scent of fresh herbs mingled with the salty breeze from the ocean. Every summer, she would prepare this dish, using the freshest catch from local fishermen and herbs from her garden. We would gather around her rustic dining table, the sound of waves crashing in the background, and savor the simple yet exquisite flavors that she crafted with love.


Grilled Fish with Sun-Dried Tomato Relish is more than a meal—it's a reminder of those sun-drenched days, the warmth of family, and the joy of sharing good food. Whether you're creating new memories or reliving old ones, this dish is sure to bring a smile to your face and a warmth to your heart.


Difficulty Rating: 5/10
Classification: Main Dish

So, gather your loved ones, embrace the nostalgic flavors, and let this dish become a part of your family's culinary story. Enjoy!

Read more about Appetizers

Read more about Main Dishes

Read more about Desserts

Penne Arrabiata | Made by Meaghan Moineau

Penne Arrabiata | Made by Meaghan Moineau

Title: A Taste of Home: The Timeless Comfort of Penne Arrabiata
Description: Dive into the rich flavors and heartwarming memories of Penne Arrabiata. This classic Italian dish, infused with the vibrant notes of garlic, olive oil, and red peppers, not only satisfies the palate but also brings back cherished family memories. Discover the recipe that's a perfect main dish for any occasion and simple enough for a cozy night in.

---


When the aroma of garlic sizzling in olive oil wafts through the kitchen, I am instantly transported back to my grandmother's bustling kitchen. There, amidst laughter and the clinking of pots, Penne Arrabiata was more than just a meal; it was a cherished tradition. This fiery dish, with its perfect balance of spicy, tangy, and savory notes, encapsulates both the simplicity and depth of Italian cuisine.


Ingredients:

- 1 can whole tomatoes (preferably Pomi, which comes in a box)


- 5 cloves fresh minced garlic


- 3 tablespoons olive oil


- 1 teaspoon dried red peppers


- 2 tablespoons fresh Italian parsley, minced


- Packet of penne pasta


- Fresh basil, coarsely chopped


- A pinch of salt


Instructions:
1. Boil the Pasta: Start by bringing a large pot of salted water to a boil. Add the penne and cook until al dente, which should take about 8-10 minutes. Drain and set aside.
2. Prepare the Sauce: In a large skillet, heat 3 tablespoons of olive oil over medium heat. Add 1 teaspoon of dried red peppers and sauté for about a minute until they release their heat into the oil. Be cautious not to let them burn.
3. Flavor Infusion: Incorporate the minced garlic and 2 tablespoons of fresh parsley into the skillet. Stir continuously until the garlic is fragrant but not browned.
4. Tomato Magic: Add the chopped canned tomatoes to the mixture. Stir well, cover, and let the sauce simmer until it is heated through and slightly thickened.
5. Combine: Once the sauce is ready, add the cooked and drained penne to the skillet. Mix thoroughly to ensure each piece of pasta is coated in the spicy tomato sauce.
6. Finishing Touches: Just before serving, add a generous handful of coarsely chopped fresh basil and a little more parsley for an added burst of flavor and color.
7. Serve Immediately: This dish is best enjoyed hot, straight from the stove to the table.
A Nostalgic Memory:

Every Sunday, our family would gather at my grandmother's house, where Penne Arrabiata was always the centerpiece. Grandma would regale us with tales of her childhood in Italy, where this dish was a staple during festive gatherings. As children, we eagerly watched her expertly toss the pasta in the spicy sauce, waiting for the moment we could dive into our bowls. The lively conversations and shared laughter over this simple yet delectable meal are memories that have stayed with me, encapsulating the warmth and togetherness of family.


Difficulty Rating: 4/10
Classification: Main Dish

Penne Arrabiata is a dish that embodies the heart of Italian cooking—simple ingredients with bold flavors. It's perfect for those seeking comfort in tradition and flavor, offering a taste of Italy with every bite. Whether you're cooking for family or indulging in a solo culinary adventure, this dish promises satisfaction and a touch of nostalgia.

Read more about Appetizers

Read more about Main Dishes

Read more about Desserts

Lentil Salad With Vegetables | Made by Meaghan Moineau

Lentil Salad With Vegetables | Made by Meaghan Moineau

Title: “A Taste of Tradition: Lentil Salad With Vegetables”
Description: Dive into a delightful blend of tradition and taste with our Lentil Salad With Vegetables. This nutritious and flavorful dish is not just a feast for your palate but also a walk down memory lane. Perfect as an appetizer or a healthy main dish, this salad is a testament to the beauty of simple ingredients coming together to create something extraordinary.

A Taste of Tradition: Lentil Salad With Vegetables

In the hustle and bustle of modern life, it’s easy to forget the simple joys of a homemade meal. But every once in a while, a dish comes along that reminds us of home, family, and the comforting flavors of the past. The Lentil Salad With Vegetables is one such dish, hearty and wholesome, perfect for an appetizer or a satisfying main dish. With a difficulty level of just 3 out of 10, it’s accessible even to novice cooks, and its rich flavors will leave you wanting more.

Ingredients:

– 2 tablespoons extra virgin olive oil

– 1 white onion, diced

– 1 cup lentils

– 1 cup tomatoes, chopped

– 1 green bell pepper, diced

– 1 red bell pepper, diced

– 3 green onions, sliced

– 1 teaspoon dried rosemary

– 2 tablespoons balsamic vinegar

– 1 tablespoon red wine vinegar

– Salt and pepper to taste

Instructions:

1. In a saucepan, heat the olive oil over medium-high heat. Add the diced white onion and cook until it becomes translucent.

2. Stir in the lentils, and add enough water to cover them. Cook according to the package directions until the lentils are tender. Drain and allow them to cool.

3. In a large bowl, combine the cooled lentils with the chopped tomatoes, green and red bell peppers, and sliced green onions.

4. Add the rosemary, balsamic vinegar, and red wine vinegar. Drizzle with extra virgin olive oil, and season with salt and pepper to taste.

5. Toss everything together, adjusting the oil or vinegar as desired. Serve the salad cold or at room temperature.

A Nostalgic Family Memory:

Growing up, Sundays were always special in our household. They were a time for family gatherings, laughter, and sharing stories that spanned across generations. My grandmother, with her apron tied securely around her waist, would often prepare a large bowl of Lentil Salad With Vegetables.

The kitchen would fill with the aroma of sautéed onions and rosemary, setting the stage for a heartwarming family meal. As we sat around the table, the salad would be the star, its vibrant colors and fresh taste bringing smiles and sparking conversations.

One particular memory stands out—my little sister, with her eyes wide with curiosity, asked my grandmother why she loved making this salad so much. My grandmother chuckled softly and replied, “Because it reminds me of simplicity and love, and it brings us all together.”

To this day, every time I prepare this salad, I’m transported back to those cherished Sundays, a tradition I hope to continue with my own family.

This Lentil Salad With Vegetables is more than just a recipe; it’s a celebration of family, tradition, and the beautiful simplicity of good food. Whether you’re serving it as an appetizer or a main dish, it’s sure to become a beloved staple in your home, just as it has been in ours.

Read more about Appetizers

Read more about Main Dishes

Read more about Desserts

Also try: Water-Cado Salad

Related update: Agedashi Tofu

Vegetarian Mushroom Shepherd’s Pie | Made by Meaghan Moineau

Vegetarian Mushroom Shepherd's Pie | Made by Meaghan Moineau

Title: Comfort on a Plate: The Heartwarming Magic of Vegetarian Mushroom Shepherd's Pie
Description: Dive into the comforting world of Vegetarian Mushroom Shepherd's Pie, a delightful twist on a timeless classic. With its rich tapestry of flavors and a nostalgic family memory to warm your heart, this recipe is more than just a meal—it's a journey back to cherished moments.

---


Vegetarian Mushroom Shepherd's Pie: A Nostalgic Culinary Journey


Shepherd's Pie has always been a dish that whispers comfort with every bite. Growing up, I remember the aroma wafting through my grandmother's kitchen, drawing everyone to the table. It was a time when family members gathered, stories were shared, and laughter filled the air. Although her version was traditional, my Vegetarian Mushroom Shepherd's Pie captures the same warmth and love, with a modern twist suited for today's plant-based palates.


Ingredients:


- Mashed Potato Layer:

- Red skin potatoes


- Sea salt


- Ground pepper


- Filling:

- Soy granules


- Mushrooms


- Carrot


- Red bell pepper


- Diced onions


- Dill


- Parsley


- Dry eggs (or egg substitute)


- Sweet paprika


- Dry thyme


- Unrefined sunflower oil


Instructions:


1. Prepare the Potatoes:

- Peel the red skin potatoes and place them in a large pot filled with water.


- Boil until tender, then mash and allow them to cool slightly.


2. Prepare the Filling:

- Chop the mushrooms, carrot, and red bell pepper. Add them to your food processor and pulse until well combined.


- Heat unrefined sunflower oil in a large skillet over medium heat.


- Add the blended vegetable mixture, diced onions, chopped dill, parsley, soy granules, dry eggs (or egg substitute), sea salt, ground pepper, sweet paprika, and dry thyme.


- Sauté for approximately 10 minutes. The soy granules will absorb the moisture from the mushrooms, creating a rich, hearty filling.


3. Assemble the Pie:

- Preheat your oven to 390°F (200°C).


- Line a casserole dish with parchment paper.


- Divide the mashed potatoes into two portions. Spread the first half evenly across the bottom of the dish.


- Add the vegetable filling, spreading it out evenly.


- Top with the remaining mashed potatoes, smoothing the surface with a spatula.


4. Bake:

- Place the casserole in the preheated oven and bake for 40 minutes.


- Allow the pie to cool for at least half an hour before serving. This cooling period helps the flavors meld beautifully.


A Walk Down Memory Lane


Every time I prepare this dish, I am transported back to my childhood. I recall sitting around my grandmother's large oak dining table, eagerly anticipating the moment when the pie would be served. My grandmother would regale us with stories of her youth, tales of resilience and joy, as we savored each bite of her lovingly crafted meal. Today, my Vegetarian Mushroom Shepherd's Pie stands as a tribute to those cherished memories, preserving the essence of family gatherings and the comfort of home-cooked meals.


Recipe Difficulty: 4/10


Classification: Main Dish


This Vegetarian Mushroom Shepherd's Pie is more than just an entree; it's a heartfelt nod to the past with a fresh, contemporary twist. Whether you're seeking a comforting family meal or a dish to impress at your next gathering, this recipe promises to deliver warmth and nostalgia with every serving.

Read more about Appetizers

Read more about Main Dishes

Read more about Desserts

Chicken Porridge | Made by Meaghan Moineau

Chicken Porridge | Made by Meaghan Moineau

Title: Hearty Chicken Porridge: A Comforting Family Recipe That Warms the Soul
Description: Dive into the comforting world of Chicken Porridge, a hearty and wholesome dish that not only fills your belly but also warms your heart with nostalgic family memories. This simple recipe, rich with tender chicken and aromatic herbs, is perfect for any occasion.

---


The Warmth of Chicken Porridge: A Family Tradition

There's something about the aroma of chicken porridge wafting through the kitchen that brings me back to my childhood. This humble dish, a staple in our family, was more than just a meal; it was a rite of passage, a comforting embrace on a rainy day, and a reminder of the love that went into every bowl.


I remember the weekends when my grandmother would gather all the grandchildren around her tiny kitchen. The air was filled with laughter and the rhythmic chopping of ingredients, each sound a note in our family symphony. My job, although small, was crucial—I was the designated shallot fryer. Standing on a stool, I would carefully watch as the sliced shallots turned a perfect golden brown, their intoxicating scent filling the room. Once done, I’d drain them of oil and set them aside, feeling a sense of accomplishment as I contributed to our family’s cherished recipe.


Ingredients:

- Diced carrot


- Chicken breast


- Chicken stock


- Julienne young ginger


- White ground pepper


- Parsley


- Rice


- Salt


- Shallots


- Diced spring onion


- Vegetable oil


Instructions:

1. Begin by deep-frying the shallots until they reach a golden brown, then drain them and set aside. Retain the oil for later use.


2. Wash the rice thoroughly and mix it well with the retained shallot oil, enhancing the flavor of the porridge.


3. In a large pot, combine the rice mixture with chicken stock, chicken breast, and diced carrots. Bring it to a boil.


4. Once boiling, reduce the heat to low and let it simmer for about an hour, stirring occasionally to prevent sticking. This slow simmering process allows the flavors to meld beautifully.


5. As the porridge thickens, turn off the heat. Remove the chicken breast, shred it, and return the shredded meat to the pot, stirring it through the creamy porridge.


6. Before serving, warm the porridge gently. Garnish with diced spring onion, parsley, julienne ginger, and the delightful crispy fried shallots. Add a few drops of the shallot oil for an extra burst of flavor.


Difficulty Rating: 4/10
Classification: Main Dish

As we gathered around the dining table, bowls of steaming chicken porridge before us, the room fell silent except for the clinking of spoons. Each bite was a warm hug, a reminder of the family bonds that were as nourishing as the meal itself. Today, I continue this tradition with my own family, sharing not just a meal but a piece of our history, one bowl at a time.


Chicken porridge is more than a dish; it's a testament to the power of food to connect generations, to comfort and to create memories that linger long after the last spoonful has been savored. So, next time you find yourself in need of a little warmth and nostalgia, gather your ingredients and create not just a meal, but a family tradition.

Read more about Appetizers

Read more about Main Dishes

Read more about Desserts

Baked Fried Chicken With Cauliflower Mash | Made by Meaghan Moineau

Baked Fried Chicken With Cauliflower Mash | Made by Meaghan Moineau

Title: Crispy Baked Fried Chicken with Cauliflower Mash: A Healthier Twist on a Family Classic
Description:

Indulge in the comforting flavors of crispy fried chicken without the guilt. Our Baked Fried Chicken with Cauliflower Mash offers a nutritious upgrade to a beloved family classic, combining the rich tastes of buttermilk-marinated chicken with a creamy cauliflower mash. Discover the secrets to this wholesome main dish, perfect for a cozy family dinner.


---


A Taste of Nostalgia: Baked Fried Chicken with Cauliflower Mash


There's something inherently comforting about the aroma of fried chicken wafting through the house. It has a way of bringing back memories of family gatherings, laughter, and shared stories around the dinner table. For us, this Baked Fried Chicken with Cauliflower Mash isn't just a meal; it's a nostalgic journey back to weekends spent at Grandma's house.


Ingredients:
- Marinade:

- 1 cup buttermilk


- 1 tablespoon dijon mustard


- 2 tablespoons fresh lemon juice


- 1 teaspoon cayenne pepper


- 2 garlic cloves, minced


- Salt and pepper to taste


- Chicken:

- 4 skinless boneless chicken breasts, filleted and halved


- Breading:

- 1 cup whole wheat panko


- 1/4 cup flour


- 1/4 cup grated parmesan cheese


- 1 teaspoon paprika


- 1/2 teaspoon thyme


- 1 tablespoon lemon peel


- Cauliflower Mash:

- 1 large head cauliflower, chopped


- 1/4 cup low fat sour cream


- 1/4 cup low fat ricotta cheese


- Salt and pepper to taste


Instructions:
1. Marinating the Chicken:

- Begin by filleting the chicken breasts to make thinner pieces, then cut each piece in half again for smaller portions.


- In a large bowl, whisk together buttermilk, dijon mustard, lemon juice, cayenne pepper, minced garlic, salt, and pepper.


- Add the chicken to the marinade, ensuring each piece is well-coated. For the best flavor, chill the chicken overnight. If you're pressed for time, it's okay to proceed with cooking immediately.


2. Preparing the Breading:

- Preheat your oven to 450°F (232°C).


- In another large bowl, combine whole wheat panko, flour, parmesan cheese, paprika, thyme, and lemon peel.


- Place a wire rack on top of a baking sheet to allow for even cooking.


- Remove the marinated chicken from the bowl, letting any excess marinade drip off.


- Dredge each piece in the breading mixture and transfer it to the wire rack. Repeat with all chicken pieces.


- Lightly spray the tops of the chicken with olive oil to enhance crispiness.


3. Baking:

- Bake the chicken in the preheated oven for about 20-25 minutes, or until golden brown and cooked through.


4. Making the Cauliflower Mash:

- While the chicken bakes, steam the cauliflower until tender.


- In a blender or food processor, blend the cooked cauliflower, sour cream, ricotta cheese, salt, and pepper until smooth and creamy.


5. Serving:

- Serve the baked fried chicken hot, accompanied by a generous scoop of cauliflower mash.


A Family Memory:

Growing up, weekends at Grandma's were synonymous with the tantalizing smell of fried chicken. It was a family tradition to gather in the kitchen, each of us taking turns to help in preparing the feast. Grandma would always have a secret ingredient she never disclosed, making her chicken uniquely hers. This baked version, with its healthier twist, keeps the spirit of those gatherings alive in our household. The creamy cauliflower mash serves as a modern nod to her legendary mashed potatoes, allowing us to enjoy those flavors with a touch of nostalgia.


Rating and Classification:
- Difficulty: 5/10
- Classification: Main Dish

Whether you're revisiting cherished family memories or creating new ones, this Baked Fried Chicken with Cauliflower Mash brings warmth and joy to any table. Enjoy the crispy, flavorful goodness of a traditional favorite, reimagined for a healthier lifestyle.

Read more about Appetizers

Read more about Main Dishes

Read more about Desserts

Falafel Burger | Made by Meaghan Moineau

Falafel Burger | Made by Meaghan Moineau

Title: "Savory Nostalgia: Crafting the Perfect Falafel Burger"
Description: Dive into the flavors of the Mediterranean with this Falafel Burger recipe, a delightful fusion of tradition and innovation. With simple ingredients and straightforward instructions, this dish promises to be a crowd-pleaser at any gathering. Join us as we share not only the recipe but also a cherished family memory that makes this dish truly special.

---


Falafel Burger: A Taste of Tradition and Innovation


As the aroma of sizzling chickpea patties fills the kitchen, I am instantly transported back to a warm summer evening at my grandmother's house. Our family would gather in her garden, the air rich with laughter and the scent of blooming jasmine. It was on one such evening that I first experienced the magic of falafel, a dish that would become a cherished part of our family traditions.


Fast forward a few years, and I found myself yearning to recreate that memory in a modern twist with the Falafel Burger. A perfect blend of tradition and contemporary flavors, this dish is an homage to those unforgettable summer nights.


Ingredients


- 1 can of chickpeas, drained and patted dry


- 2 tablespoons tahini


- 1 tablespoon sriracha sauce


- 2 cloves garlic


- A handful of fresh parsley


- 1/2 red onion, diced


- Peanut oil, for frying


- 1 cucumber, sliced


- 1 tomato, sliced


- Hamburger buns


- Tzatziki sauce


Instructions


1. Prepare the Chickpeas: Begin by patting the chickpeas dry with a paper towel. This step is crucial for achieving the perfect texture in your patties.
2. Puree the Base: Place the chickpeas and garlic into a food processor. Puree until smooth, ensuring no chunks remain for a consistent patty.
3. Incorporate the Flavors: Using your clean hands, mix in the tahini, sriracha, fresh parsley, and diced red onion into the chickpea mixture. The combination of these ingredients brings a balance of spice, freshness, and creamy texture.
4. Shape the Patties: Form the mixture into four equal patties. Set aside while you prepare your skillet.
5. Cook to Perfection: Heat peanut oil in a large skillet over medium heat. Once the oil begins to shimmer, carefully add the patties. Cook for three minutes on each side, or until they achieve a golden-brown crust.
6. Assemble the Burger: Remove the patties from the skillet and place each one in a hamburger bun. Top with two slices of tomato, two slices of cucumber, and a generous dollop of tzatziki sauce.
7. Serve Immediately: For the best texture and flavor, serve the burgers immediately while they’re hot and crisp.

A Family Memory


Every bite of this Falafel Burger takes me back to my grandmother's garden, where the simple joy of sharing food brought our family closer. The recipe has evolved, yet the essence remains the same—a celebration of flavor and family.


Difficulty: 4/10


Classification: Main Dish


This Falafel Burger is more than just a meal; it's a connection to the past and a promise of new memories to come. Whether you’re an experienced cook or a beginner, this recipe is both accessible and rewarding. Enjoy crafting these flavorful patties and perhaps, like me, you'll find yourself cherishing the memories they create.


---


Ready to bring a slice of Mediterranean tradition to your table? Try this Falafel Burger recipe today and let it become part of your family's culinary story.

Read more about Appetizers

Read more about Main Dishes

Read more about Desserts

Duck with Dried Cranberries, Tangerines and Mascarpone Sauce | Made by Meaghan Moineau

Duck with Dried Cranberries, Tangerines and Mascarpone Sauce | Made by Meaghan Moineau

Title: A Gourmet Journey: Duck with Dried Cranberries, Tangerines, and Mascarpone Sauce
Description: Discover the art of creating a gourmet dish that marries the rich flavors of duck with the vibrant tang of tangerines and the creamy allure of mascarpone. This recipe takes you on a culinary adventure, perfect for special occasions or impressing loved ones. Plus, delve into a heartwarming family memory that adds a nostalgic touch to this delectable dish. Rated as a 7/10 in difficulty, this main dish promises to elevate your home dining experience.

---


The Culinary Symphony of Duck, Tangerine, and Mascarpone


Cooking is more than just combining ingredients; it's an emotional journey that weaves together flavors, aromas, and memories. Our recipe for Duck with Dried Cranberries, Tangerines, and Mascarpone Sauce is not just a main dish—it's a story on a plate.


Ingredients:


- 2 duck breasts


- Juice of 6 tangerines


- 1 cup mascarpone


- Salt and pepper to taste


- 1 cup dried cranberries


Instructions:


1. Preheat and Prep: Preheat your oven to 350°F. In an ovenproof skillet, heat a light drizzle of oil over high heat. Generously season both sides of the duck breasts with salt and pepper.
2. Sear the Duck: Place the duck, skin side down, in the hot skillet. Cook until the skin is golden brown, about 5 minutes. Flip and sear the other side for an additional 3 minutes.
3. Roast to Perfection: Turn the duck breasts again so they are skin side up. Discard all fat from the pan and transfer to the hot oven. Roast for 10 to 15 minutes until perfectly cooked. Remove from the oven and cover with aluminum foil to keep warm.
4. Create the Sauce: In a small saucepan, combine the dried cranberries with tangerine juice. Cook over medium heat until cranberries soften and the juice reduces. Lower the heat and stir in the mascarpone until it melts and the sauce begins to thicken.
5. Blend to Smoothness: Use an immersion blender to puree the sauce until smooth. Add a splash of duck juices for added depth, mix well, then briefly return to heat to warm through.
6. Plate and Serve: Spread the velvety sauce on the bottom of a serving plate. Slice the duck and lay it artistically over the sauce.

A Taste of Nostalgia


Growing up, family gatherings were a tapestry of laughter, stories, and indulgent meals. I remember my grandmother preparing duck dishes during festive seasons, her movements a ballet of culinary precision. The kitchen would fill with the zesty aroma of tangerines mixed with the savory richness of duck. It was a scent that meant homecoming and celebration.


One December evening, as snowflakes danced outside, she taught me how to infuse love into every step of cooking. Her secret, she said, was in the sauce—a balance of sweet and savory, just like life itself. To this day, every time I recreate this dish, it transports me back to those cherished moments, where food was the language of love.


---


Difficulty: 7/10
Classification: Main Dish

This exquisite dish demands attention and care, but the reward is a meal that speaks volumes about tradition, innovation, and the joy of sharing good food with family and friends. Embrace the challenge, and let your kitchen become a place where memories are made and cherished anew.

Read more about Appetizers

Read more about Main Dishes

Read more about Desserts

Swordfish with Orange Caramel Sauce | Made by Meaghan Moineau

Swordfish with Orange Caramel Sauce | Made by Meaghan Moineau

Title: Savoring Tradition: Swordfish with Orange Caramel Sauce
Description: Dive into the rich flavors of Swordfish with Orange Caramel Sauce, a dish that promises to tantalize your taste buds while evoking cherished family memories. This main dish, rated 7 out of 10 on the difficulty scale, combines the savory richness of parmesan-crusted swordfish with the tangy sweetness of an orange caramel sauce. Join us as we explore the steps to perfecting this recipe and share a nostalgic tale that makes this dish a beloved family classic.

---


A Culinary Journey: Swordfish with Orange Caramel Sauce


Cooking is often described as a labor of love, a sentiment that rings especially true when preparing a dish that has been passed down through generations. Swordfish with Orange Caramel Sauce is one such recipe in our family, offering a taste of nostalgia with every bite. This dish, with its unique blend of flavors and textures, is a testament to the art of balancing contrasts: the crispy parmesan crust of the swordfish pairs flawlessly with the sweet, tangy orange caramel sauce.


Ingredients for Culinary Success


To recreate this delightful dish, gather the following ingredients:

- Swordfish, cut into equal sizes


- Milk or cream


- Panko bread crumbs


- Parmesan cheese


- Salt and pepper


- Dry sage and marjoram


- Orange


- Unsalted butter


- Sugar


A Step-by-Step Guide to Perfection


1. Prepare the Swordfish: Begin by patting the swordfish dry. This step is crucial for achieving that coveted golden crust.
2. Create the Coating: On a plate, mix together panko, bread crumbs, parmesan cheese, dry sage, marjoram, salt, and pepper. Ensure everything is well combined to form an even coating mixture.
3. Dip and Coat: Pour milk or cream onto a separate plate. Dip the swordfish into the milk, allowing any excess to drip away. Roll the fish in the panko-parmesan mixture, pressing it gently to adhere the coating.
4. Cook to Perfection: In a large skillet, melt 2 tablespoons of butter. Once melted, add the coated swordfish and cook until each side is beautifully golden and the fish is firm but springy to the touch. Remove the swordfish from the skillet and let it rest.
5. Craft the Orange Caramel Sauce: Discard the cooking butter from the skillet and place it over medium-high heat. Add freshly squeezed orange juice, reducing it by half. Stir in the remaining butter and sugar, allowing it to reduce until a thick sauce forms. If the sauce becomes too thick or tangy, add more sugar and swirl in another tablespoon of butter.
6. Serve with Love: Drizzle the orange caramel sauce over the swordfish or serve it alongside for dipping. This dish is best enjoyed fresh, as the flavors meld beautifully when hot.

A Taste of Family Tradition


For me, Swordfish with Orange Caramel Sauce is more than just a meal—it's a warm reminder of family gatherings at my grandmother's house. I recall the aroma of sizzling butter and the vibrant zest of oranges wafting through her kitchen. As children, we would eagerly gather around the dining table, our eyes wide with anticipation. My grandmother would regale us with stories of her own childhood, sharing how this dish became a staple in our family's culinary repertoire.


As I recreate this recipe today, I'm transported back to those cherished moments, surrounded by laughter and stories that have shaped my love for cooking. It's a joy to pass down this tradition to the next generation, ensuring that the flavors of our family's history continue to be savored and celebrated.


---


Final Thoughts

Swordfish with Orange Caramel Sauce is a dish that marries complexity with simplicity, making it a rewarding challenge for any home cook. As a main dish, it's perfect for special occasions or whenever you wish to impress your loved ones with a meal that's rich in flavor and sentiment. Embrace the tradition, savor the taste, and perhaps create new memories of your own with this timeless recipe.

Read more about Appetizers

Read more about Main Dishes

Read more about Desserts

Chicken-Tortilla Chip Soup | Made by Meaghan Moineau

Chicken-Tortilla Chip Soup | Made by Meaghan Moineau

Title: A Warm Hug in a Bowl: Chicken-Tortilla Chip Soup
Description: Dive into the heartwarming flavors of Chicken-Tortilla Chip Soup, a dish that combines simplicity with nostalgia. Perfect for a chilly evening or a family gathering, this soup will transport you back to cherished family memories with every spoonful.

---


As the leaves begin to turn and the air grows crisp, I often find myself yearning for comfort food that not only delights the palate but also stirs the soul. One such dish that never fails to bring a smile to my face is Chicken-Tortilla Chip Soup. This soup is a hearty blend of tender chicken, vibrant carrots, and fragrant cilantro, all simmered together to create a flavor profile that is both familiar and inviting.


Ingredients:

- Water


- Chicken breasts


- Bouillon cubes


- Diced carrots


- Diced cilantro


- Lawry's seasoned salt


- Corn chips


- Monterey Jack cheese


- Slices of avocado


Instructions:

1. Start by boiling the water, chicken breasts, bouillon cubes, diced carrots, diced cilantro, and Lawry's seasoned salt together in a large pot. Allow the ingredients to simmer for about 30-40 minutes, letting the flavors meld into a delicious symphony.


2. Once ready to serve, ladle the soup into bowls and top with crunchy corn chips, a sprinkle of Monterey Jack cheese, and creamy slices of avocado for a delightful finish.


Difficulty Rating: 3/10
Classification: Main Dish

This dish holds a special place in my heart, not just for its comforting taste, but for the memories it revives. I remember cold Sunday afternoons at my grandmother's house, where the aroma of chicken soup would fill the air. My siblings and I would rush inside from playing in the yard, our cheeks red from the chill, and gather around the kitchen table. Grandma would serve the soup with a generous helping of her signature love and care, and we'd eagerly crumble tortilla chips on top, watching them soften in the hot broth. Each bite was like a warm hug, bringing with it stories and laughter shared across generations.


The simplicity of the soup belies its ability to bring people together. It's not just a meal; it's an experience, a tradition passed down and cherished. This Chicken-Tortilla Chip Soup is more than just a recipe; it's a reminder of the warmth of family and the joy of simple pleasures.


So, next time you're looking for a dish that comforts the body and soul, give this Chicken-Tortilla Chip Soup a try. It's a culinary embrace that will undoubtedly become a beloved staple in your home, just as it has in mine.

Read more about Appetizers

Read more about Main Dishes

Read more about Desserts

Chili-Garlic Stir Fry | Made by Meaghan Moineau

Chili-Garlic Stir Fry | Made by Meaghan Moineau

Title: Spice Up Your Dinner: A Heartwarming Chili-Garlic Stir Fry
Description: Dive into a world of vibrant flavors and cherished family memories with our Chili-Garlic Stir Fry recipe. This delightful main dish is a harmonious blend of colorful vegetables, succulent chicken, and a savory sauce with a kick of heat. Perfect for a cozy family dinner or a solo indulgence, this stir fry is both a feast for the senses and a touchstone to nostalgic family moments. With a difficulty rating of 4 out of 10, it’s an ideal choice for both novice and seasoned home chefs looking to bring something special to the table.

---


When I think of comfort food, my mind drifts back to my grandmother's kitchen, where the air was always filled with the tantalizing aroma of sizzling ingredients and the warm laughter of family. One dish that stands out in my memory is her Chili-Garlic Stir Fry, an unassuming yet flavorful creation that brought us all together, especially on those cozy Sunday afternoons.


The magic began with the rich scent of sesame oil heating in her well-loved wok, a cue for us kids to gather around the table in anticipation. The sizzle of skinless boneless chicken breast meeting the pan was music to our ears, a promise of the delicious meal to come. As the chicken cooked to perfection, my grandmother would share stories of her own childhood, weaving tales that seemed as vibrant as the vegetables she skillfully chopped: crisp bok choy, sweet snow peas, crunchy carrots, and the vibrant yellows and oranges of bell peppers.


While we waited, the kitchen would fill with a new aroma—the pungent, mouthwatering smell of garlic sautéing in sesame oil. It was then that she would whisk together the sauce, a delicate balance of low sodium chicken broth, cooking sherry, and just the right amount of Sriracha for that extra kick. Watching her stir the sauce into a thick, glossy coating was like watching an artist at work, each movement deliberate and filled with love.


Finally, the moment we all waited for: the melding of flavors. The chicken and vegetables reunited in the wok, green onions adding their fresh, sharp note alongside the leafy tops of the bok choy. The sauce enveloped everything, transforming individual ingredients into a cohesive, delectable masterpiece.


Now, as I recreate this Chili-Garlic Stir Fry in my own kitchen, I am reminded not only of the deliciousness of the dish but of the joy and togetherness it represents. It's a testament to how food can transcend taste, becoming a bridge to memories and a celebration of family.


Ingredients:

- 3 teaspoons sesame oil, divided


- 1 pound skinless boneless chicken breast, sliced


- 1 bunch bok choy, stalks and leaves separated


- 1 cup snow peas


- 1 cup carrots, julienned


- 1 yellow bell pepper, sliced


- 1 orange bell pepper, sliced


- 3 green onions, chopped


- 1 cup low sodium chicken broth


- 2 tablespoons cooking sherry


- 2 teaspoons cornstarch


- 1 tablespoon Sriracha


- 3 cloves garlic, minced


Instructions:

1. In a wok or large skillet, heat 1 teaspoon of sesame oil over medium-high heat. Add the chicken and sauté until cooked through. Set aside and cover to keep warm.


2. Using the same pan, heat another teaspoon of sesame oil over medium-high heat. Add the bok choy stalks, carrots, and snow peas. Sauté until just tender, about 3-4 minutes. Set aside and cover.


3. In a medium bowl, whisk together the chicken broth, cooking sherry, cornstarch, and Sriracha until smooth.


4. Heat the final teaspoon of sesame oil in the pan over medium-high heat. Add the garlic and sauté until fragrant, about 30 seconds to 1 minute.


5. Pour the sauce mixture into the pan, bringing it to a boil. Stir continuously until it thickens, about 2 minutes.


6. Return the chicken and vegetables to the pan, adding in the bok choy leaves and green onions. Stir everything together until well-coated and heated through, about 2-3 minutes.


7. Serve hot, garnished with additional green onions if desired.


This Chili-Garlic Stir Fry is more than just a meal; it's a slice of family heritage, a dish that invites you to create your own memories around the dinner table. Whether serving it as a quick weeknight dinner or as part of a larger family gathering, this dish is sure to become a beloved tradition in your home, too.

Read more about Appetizers

Read more about Main Dishes

Read more about Desserts