German Goulash | Made by Meaghan Moineau

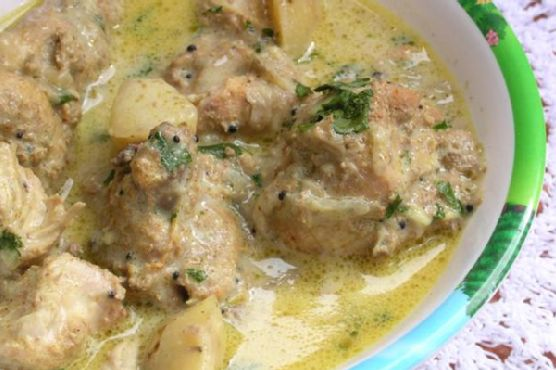
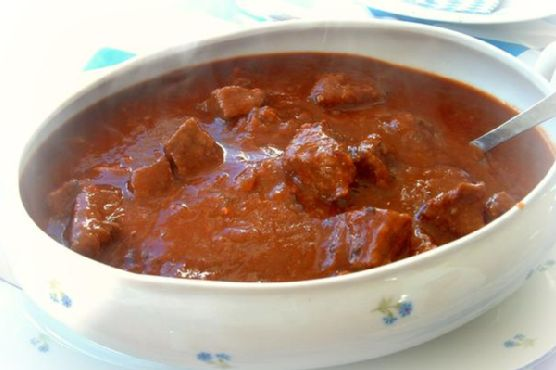
Authentic German Goulash: A Hearty, Comforting Stew

Intro

Growing up, Sundays were always special in our household. The aroma of simmering stews would fill our home, and my grandmother would be at the helm, orchestrating the kitchen like a seasoned maestro. One of her time-honored creations was her German Goulash, a dish that brought the family together and warmed our hearts as much as it did our bellies. I can still remember the sound of her cherished wooden spoon clinking against her favorite Dutch oven and the comforting taste of tender meat complimented with rich, savory spices.

Today, I am thrilled to share this cherished recipe with you, so you can recreate those cozy Sunday afternoons with your loved ones. This German Goulash is not only delicious but also a wonderful way to bring warmth and nostalgia to your meal times.

Why You’ll Love It

This German Goulash is a hearty, soul-warming dish that is perfect for any occasion. Whether you’re looking to impress dinner guests or simply want a comforting meal on a cold evening, this recipe is sure to please. The combination of tender beef and rich, flavorful sauce creates a symphony of taste that is both satisfying and delightful. Plus, it’s easy to make with just a few simple ingredients and can be adapted for slow cooking, making it perfect for busy schedules.

Ingredients

  • 2 pounds top round beef roast, cut into 1-inch cubes
  • 1 large onion, chopped
  • 2 tablespoons oil
  • 2 cups water
  • 1 cup tomato sauce
  • 2 beef bouillon cubes
  • 2 tablespoons paprika
  • 1 teaspoon ground pepper
  • 2 tablespoons flour

Instructions

  1. Preheat your Dutch oven over medium heat and add the oil.
  2. Brown the beef cubes and chopped onion in the oil until the meat is seared on all sides, about 5-7 minutes.
  3. Add the water, tomato sauce, beef bouillon cubes, paprika, ground pepper, and flour to the pot.
  4. Stir well to combine all ingredients.
  5. Reduce the heat to low and cover the pot. Let it simmer slowly for about 2 hours, or until the meat is tender and the flavors are well blended.
  6. Stir occasionally to prevent sticking, and add a little more water if the sauce becomes too thick.
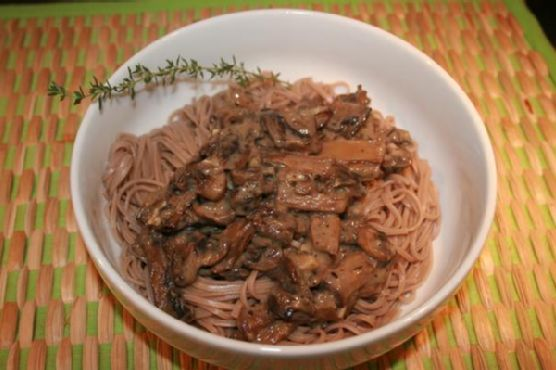
  7. Once done, serve the goulash hot over cooked egg noodles.

This dish also cooks up very well in a crock pot. Simply brown the meat and onions first, then transfer all ingredients to the crock pot and cook on low for 6-8 hours.

Tips

For the best results, make sure to sear the meat thoroughly to lock in flavor. Using a well-seasoned cast iron Dutch oven can enhance the depth of flavor as well. If you prefer a thicker sauce, you can adjust the amount of flour to your liking or continue to simmer until you reach the desired consistency. Remember to taste and adjust the seasoning before serving!

Variations & Substitutions

Feel free to add your own twist to this classic goulash. For a spicier kick, consider adding a pinch of cayenne pepper or red pepper flakes. You can also incorporate vegetables like bell peppers or carrots for added nutrition and flavor. If you’re looking for a gluten-free option, use cornstarch in place of flour to thicken the sauce.

Storage

German Goulash can be stored in an airtight container in the refrigerator for up to 3 days. It’s a great dish for meal prep as the flavors continue to develop over time. To reheat, simply warm on the stove over low heat, adding a splash of water if needed to loosen the sauce.

FAQ

Can I make this goulash ahead of time?

Absolutely! In fact, goulash often tastes even better the next day as the flavors continue to meld. Prepare it a day ahead, then reheat gently on the stove before serving.

What cut of beef is best for goulash?

Top round beef roast is ideal for this recipe as it becomes tender and flavorful when slow-cooked. However, you can also use chuck roast or beef stew meat if preferred.

Can I freeze leftover goulash?

Yes, you can freeze goulash in a freezer-safe container for up to 3 months. Thaw in the refrigerator overnight and reheat on the stove, adding a bit of water as needed.

Nutrition

This recipe serves approximately 6 people and is a rich source of protein. While exact nutritional values can vary based on specific ingredients used, a typical serving provides a balanced amount of protein, fats, and carbohydrates, making it a wholesome choice for a family meal.

Conclusion

German Goulash is more than just a meal; it’s a comforting embrace of tradition and flavor passed down through generations. Whether you’re savoring it alone or sharing it with family, this dish is sure to warm your heart and home. I hope this recipe becomes a beloved staple in your culinary repertoire, just as it has in mine. Enjoy the rich history and taste of this classic stew, and don’t forget to savor the moments shared with those you love most.

Related update: German Goulash

Related update: Cheesy Bacon Burger with Spicy Chipotle Aiolo Sauce

Creamy White Chili | Made by Meaghan Moineau

Creamy White Chili

Intro

There’s something magical about the chill of autumn that beckons the comforting warmth of a hearty chili. Growing up, the first signs of fall meant gathering around the kitchen with my family, eagerly awaiting my grandmother’s famous chili. But one chilly evening, she surprised us with a new twist—a creamy white chili that instantly became a family favorite. The aroma of onions and garlic sizzling in olive oil would fill the house, signaling that something wonderful was on its way. This creamy white chili is a delightful departure from the traditional tomato-based chili, offering a rich and satisfying experience. Today, I’m excited to share this cherished recipe with you.

Why You’ll Love It

This creamy white chili is a comforting bowl of goodness that’s perfect for any occasion. Here are a few reasons why you’ll fall in love with it:

  • Rich and Creamy: The combination of sour cream and heavy whipping cream gives this chili a luxuriously smooth texture.
  • Flavorful and Satisfying: Packed with tender chicken, hearty beans, and a blend of spices, each spoonful is a burst of flavor.
  • Easy to Make: With just a few simple steps, this dish comes together quickly, making it perfect for busy weeknights.
  • Customizable: Easily adjust the heat level or make substitutions to suit your dietary needs and preferences.

Ingredients

  • 2 tablespoons olive oil
  • 1 pound chicken, cubed
  • 1 onion, chopped
  • 2 cloves garlic, minced
  • 2 cans (15 ounces each) great northern beans, drained and rinsed
  • 2 cups canned chicken broth
  • 2 cans (4 ounces each) green chilies, chopped
  • 1 teaspoon cumin
  • 1 teaspoon oregano
  • Salt to taste
  • Black pepper to taste
  • 1 cup sour cream
  • 1/2 cup heavy whipping cream
  • 1 cup shredded cheddar cheese

Instructions

  1. In a heavy saucepan, heat the olive oil over medium heat. Add the chicken, onion, and garlic. Sauté until the chicken is cooked through and the onions are translucent.
  2. Add the chicken broth, great northern beans, green chilies, cumin, oregano, salt, and black pepper to the saucepan. Stir to combine.
  3. Reduce the heat to low and let the chili simmer for about 20 minutes, allowing the flavors to meld together.
  4. Remove the saucepan from the heat and stir in the sour cream and heavy whipping cream until well combined.
  5. Top each serving with shredded cheddar cheese before serving.

Tips

  • For added flavor, try using rotisserie chicken instead of cubed chicken breast.
  • If you prefer a spicier chili, add a pinch of cayenne pepper or a diced jalapeño.
  • For a thicker consistency, mash some of the beans before adding them to the pot.

Variations & Substitutions

Make this creamy white chili your own with these variations and substitutions:

  • Vegetarian Option: Replace the chicken with extra beans or tofu, and use vegetable broth instead of chicken broth.
  • Dairy-Free: Substitute coconut milk or an unsweetened non-dairy creamer for the heavy whipping cream, and use a dairy-free yogurt or sour cream alternative.
  • Cheese Swap: Try using Monterey Jack or Pepper Jack cheese for a different flavor profile.

Storage

Store any leftover creamy white chili in an airtight container in the refrigerator for up to 3 days. To reheat, warm gently on the stovetop over low heat, stirring occasionally. You may need to add a splash of broth or water to achieve the desired consistency.

FAQ

Can I make this chili in a slow cooker?

Yes, you can! Simply sauté the chicken, onion, and garlic in a skillet before transferring them to a slow cooker. Add the remaining ingredients, except for the sour cream, heavy whipping cream, and cheddar cheese. Cook on low for 4-6 hours. Stir in the creams before serving and top with cheese.

Can I freeze creamy white chili?

While you can freeze this chili, the texture may change slightly due to the dairy content. If you do choose to freeze it, let the chili cool completely, then transfer it to a freezer-safe container. Freeze for up to 3 months. Thaw in the refrigerator overnight before reheating.

Nutrition

While I don’t have the exact nutritional breakdown for this dish, it’s worth noting that this recipe is rich in protein from the chicken and beans. The use of sour cream and heavy whipping cream contributes to its calorie and fat content, so consider portion sizes accordingly.

Conclusion

This creamy white chili is more than just a meal; it’s a cozy experience that brings people together. Whether you’re serving it at a family gathering or enjoying a quiet night in, each bowl is a reminder of the warmth and love that comes from sharing a homemade meal. So, gather your ingredients, invite your loved ones, and savor the comforting flavors of this delightful dish. I hope it becomes a cherished recipe in your kitchen, just as it has in mine.

Related update: Creamy White Chili

Related update: German Goulash

Related update: Asparagus and Pea Soup: Real Convenience Food

Creamy Mushrooms Over Soba Noodles (Vegan) | Made by Meaghan Moineau

Creamy Mushrooms Over Soba Noodles (Vegan)

Intro

There’s something incredibly comforting about a warm bowl of noodles topped with a creamy, savory sauce. This dish, Creamy Mushrooms Over Soba Noodles, brings me back to my childhood, when my grandmother would whip up her magical mushroom sauce on chilly autumn evenings. She’d let me stir the pot, watching in awe as the earthy aroma filled the kitchen. This vegan recipe is a modern twist on her classic, combining the deep flavors of mushrooms with the subtle nuttiness of soba noodles, all wrapped in a luscious, creamy sauce.

Why You’ll Love It

If you’re looking for a meal that’s both hearty and wholesome, this recipe is for you. The combination of creamy mushrooms with the slight chewiness of soba noodles creates a satisfying texture that is sure to please your taste buds. It’s vegan, making it a perfect choice for plant-based eaters, and packed with flavors that even non-vegans will love. Plus, it’s relatively quick to prepare, making it a great option for busy weeknights.

Ingredients

  • 2 tablespoons Earth Balance buttery spread
  • 1 pound of mushrooms (cremini, white, or your choice), sliced
  • 3 cloves of garlic, minced
  • 2 tablespoons all-purpose flour
  • 1 cup unsweetened soy milk
  • 1/4 cup white wine
  • 1 tablespoon fresh thyme, chopped
  • Juice of half a lemon
  • Salt and pepper to taste
  • 8 ounces soba noodles

Instructions

  1. In a sauté pan, melt 1 tablespoon of the Earth Balance buttery spread over medium heat.
  2. Add the sliced mushrooms and minced garlic to the pan, stirring occasionally until the mushrooms are dark and reduced. Set the mushrooms aside.
  3. In the same pan, melt the remaining tablespoon of Earth Balance buttery spread. Stir in the flour, cooking and stirring for about a minute to make a roux. This will help thicken your sauce.
  4. Slowly add the soy milk to the roux, stirring continuously until the mixture is smooth and thickened.
  5. Return the mushrooms to the pan, and add the lemon juice, fresh thyme, salt, and pepper. Stir well to combine.
  6. Add 1/4 cup of white wine to the mushroom mixture. Continue to cook until the sauce has reduced slightly and reached a pleasant consistency.
  7. Cook the soba noodles according to package instructions. Drain and divide the noodles into bowls.
  8. Ladle the creamy mushroom sauce over the soba noodles. Garnish with sprigs of fresh thyme if desired.
  9. Serve immediately and enjoy!

Tips

For the best results, use fresh mushrooms and cook them until they are well browned to enhance their flavor. If you prefer a thicker sauce, you can add a bit more flour to the roux. Make sure to stir continuously when adding the soy milk to prevent lumps from forming.

Variations & Substitutions

If you don’t have soba noodles on hand, feel free to substitute with whole wheat spaghetti or any other pasta of your choice. For a gluten-free option, use gluten-free flour and soba noodles made from 100% buckwheat. You can also play around with the mushroom variety; shiitake mushrooms add a unique flavor and texture.

Storage

Leftover creamy mushroom sauce can be stored in an airtight container in the refrigerator for up to 3 days. Reheat gently on the stovetop, adding a splash of soy milk if the sauce has thickened too much. Cooked soba noodles are best enjoyed fresh, but can be kept in a separate container for up to 2 days.

FAQ

Can I use a different type of milk?

Absolutely! While unsweetened soy milk works wonderfully in this recipe, you can substitute it with any plant-based milk such as almond, oat, or coconut milk. Just make sure it’s unsweetened to maintain the savory flavor profile.

What if I don’t have white wine?

No problem! You can substitute white wine with vegetable broth or even a little more soy milk. The wine adds depth to the sauce, but it’s not a dealbreaker if you don’t have it on hand.

How can I make this dish more filling?

To make this meal heartier, consider adding cooked chickpeas or tofu for extra protein. You can also toss in some spinach or kale for added nutrients and texture.

Nutrition

This dish is not only delicious but also packed with nutrients. Mushrooms are a great source of antioxidants, B vitamins, and minerals such as selenium and copper. Soba noodles, made from buckwheat, provide fiber and protein, making this meal both nourishing and satisfying.

Conclusion

Creamy Mushrooms Over Soba Noodles is a delightful vegan dish that combines rich flavors with wholesome ingredients. It’s a warm and comforting meal that will remind you of cozy family dinners while offering a modern twist. Whether you’re a seasoned cook or a kitchen novice, this recipe is approachable and rewarding. So, gather your ingredients and enjoy a bowl of creamy goodness that will surely become a favorite at your dinner table.

Related update: Creamy Mushrooms Over Soba Noodles (Vegan)

Related update: Creamy White Chili

Simple Squash Salad | Made by Meaghan Moineau

Simple Squash Salad

Intro

Welcome to a delightful journey of flavors with our Simple Squash Salad. Picture this: a warm summer afternoon at my grandmother’s house. The sun was setting, casting a golden hue over her lush garden. I remember the first time she showed me how to pick the freshest zucchinis, their vibrant green skin glistening with dew. We’d bring them into the kitchen, and she would whip up a salad that was both simple and exquisite. This recipe is a tribute to those cherished moments, capturing the essence of fresh garden produce and the warmth of shared meals.

Why You’ll Love It

This Simple Squash Salad is a celebration of fresh, colorful vegetables and bold, tangy flavors. Whether you’re looking for a healthy side dish or a light main course, this salad delivers. Here’s why you’ll fall in love with it:

  • Quick and Easy: With just a few simple steps, you can have a delicious salad ready to impress.
  • Healthy and Nutritious: Packed with vitamins and minerals from fresh vegetables and herbs.
  • Versatile: Perfect for picnics, potlucks, or a light lunch.
  • Flavorful: A perfect balance of tart, sweet, and savory flavors.

Ingredients

  • Diced bell pepper
  • Diced zucchini
  • Onion
  • Garlic
  • Fresh parsley
  • Capers plus 2 tablespoons caper juice
  • Lemon
  • Vinegar
  • Salt
  • Sugar
  • Black pepper
  • Garlic powder
  • Dried oregano
  • Red pepper flakes

Instructions

  1. In a large bowl, combine the diced bell pepper, diced zucchini, onion, garlic, and fresh parsley.
  2. In a separate cup, mix together the capers, caper juice, lemon juice, vinegar, salt, sugar, black pepper, garlic powder, dried oregano, and red pepper flakes.
  3. Adjust the dressing ingredients to taste, ensuring a good balance of sour and sweet.
  4. Pour the dressing over the salad ingredients and toss well to coat evenly.
  5. Cover the salad and let it sit in the refrigerator for a few hours before serving to enhance the flavors.

Tips

To get the most out of your Simple Squash Salad, consider these helpful tips:

  • Freshness is Key: Use the freshest vegetables you can find for the best flavor and texture.
  • Let it Marinate: Allowing the salad to sit in the refrigerator for a few hours helps the flavors meld beautifully.
  • Adjust to Taste: Taste and adjust the seasoning as needed, especially the balance of acidity and sweetness.

Variations & Substitutions

This salad is wonderfully flexible. Here are some ideas to make it your own:

  • Add Protein: Include grilled chicken, shrimp, or chickpeas for a heartier dish.
  • Try Different Herbs: Swap parsley with basil or cilantro for a different herbal note.
  • Use Different Squash: Experiment with yellow squash or other summer squash varieties for a change in flavor and color.
  • Extra Crunch: Add sunflower seeds or toasted almonds for an extra crunchy texture.

Storage

Store any leftovers in an airtight container in the refrigerator for up to 3 days. The flavors will continue to develop, making it even tastier the next day. However, keep in mind that the vegetables may lose some of their crispness over time.

FAQ

Can I make this salad in advance?

Absolutely! This salad is perfect for making ahead of time. Just prepare it as directed and store it in the refrigerator. The flavors will meld together beautifully as it sits.

What can I serve with this salad?

This salad pairs well with grilled meats or seafood, making it a great addition to any barbecue or picnic. It also works as a light main course alongside a crusty piece of bread.

Can I use dried herbs instead of fresh ones?

Yes, you can use dried herbs, but fresh herbs will provide a more vibrant flavor. If using dried, remember to use them sparingly, as their flavor is more concentrated.

Nutrition

This Simple Squash Salad is not only delicious but also nutritious. Packed with vitamins A and C, fiber, and antioxidants, it’s a healthy choice for any meal. The exact nutritional content will vary based on the specific quantities and brands of ingredients used.

Conclusion

There you have it, a simple yet sumptuous salad that captures the essence of fresh produce and delightful flavors. Whether it reminds you of a summer evening in a loved one’s garden or introduces you to a new favorite dish, this salad is sure to please. Enjoy the simplicity and freshness of this recipe, and share it with those you cherish, creating your own nostalgic moments around the table.

Related update: Simple Squash Salad

Related update: Creamy Mushrooms Over Soba Noodles (Vegan)

Related update: Thai Cucumber Salad (By Roz)

How to Make the Cheesiest Bowtie Mac and Cheese | Made by Meaghan Moineau

How to Make the Cheesiest Bowtie Mac and Cheese

Intro

Mac and cheese has always held a special place in my heart. Growing up, it was a staple at every family gathering, holiday, and cozy Sunday dinner. I remember the comforting aroma of cheese melting in the oven and the sight of my grandmother carefully crafting her signature dish with love. This recipe for the Cheesiest Bowtie Mac and Cheese is inspired by those cherished memories, adding a modern twist with a variety of cheeses and a unique pasta shape. It’s a dish that speaks of home, warmth, and togetherness, perfect for making new memories with your loved ones.

Why You’ll Love It

This Bowtie Mac and Cheese is a delightful twist on the classic comfort food. The bowtie pasta not only adds a fun shape but also perfectly cradles the rich, creamy cheese sauce. The combination of extra sharp cheddar and white extra sharp cheddar creates an intense cheesy flavor that will have you coming back for seconds. A hint of sour cream adds a tangy depth, while a sprinkle of fresh parsley brings a burst of freshness. It’s easy to prepare, making it ideal for busy weeknights or as a show-stopping side dish at your next gathering.

Ingredients

  • 1 pound bowtie pasta, cooked as directed
  • 2 cups extra sharp cheddar cheese, shredded
  • 2 cups white extra sharp cheddar cheese, shredded
  • Salt and pepper, to taste
  • 1 cup sour cream
  • 1/2 cup unsalted butter, melted
  • Fresh parsley, chopped (for garnish)

Instructions

  1. Preheat your oven to 350 degrees Fahrenheit.
  2. Cook the bowtie pasta according to the package instructions. Once cooked, drain and set aside.
  3. In a large mixing bowl, combine the cooked pasta, shredded cheddar cheeses, sour cream, melted butter, salt, and pepper. Stir until all ingredients are well combined.
  4. Transfer the mixture to a 9 x 13 prepared casserole dish. Sprinkle additional cheese on top, if desired.
  5. Bake in the preheated oven for 20 minutes, or until the cheese is bubbly and golden brown.
  6. Remove from the oven and let it cool for a few minutes. Garnish with fresh parsley before serving hot.

Tips

For the ultimate gooey texture, grate your cheese from a block rather than using pre-shredded cheese. This simple step makes a noticeable difference in both flavor and texture. Be sure to salt your pasta water generously—this is your first chance to season the pasta itself.

Variations & Substitutions

Feel free to experiment with different cheese combinations such as gruyère, fontina, or mozzarella for a unique twist. You can also add a bit of spice by incorporating a pinch of cayenne pepper or a few dashes of hot sauce into the cheese mixture. For a heartier version, consider adding cooked bacon bits or diced ham.

Storage

If you have leftovers, store them in an airtight container in the refrigerator for up to 3 days. To reheat, place a portion in a microwave-safe dish and warm on medium power until heated through. Alternatively, reheat in an oven at 300 degrees Fahrenheit for about 10-15 minutes.

FAQ

Can I make this recipe ahead of time?

Yes, you can prepare the mac and cheese up to the baking step. Simply cover and refrigerate it for up to 24 hours. When you’re ready to enjoy, bake it as directed, adding an extra 5-10 minutes to the baking time if needed.

Is it possible to make this dish gluten-free?

Absolutely! Just substitute the bowtie pasta with your favorite gluten-free pasta. Be sure to check the labels on your cheese and other ingredients to ensure they are also gluten-free.

What can I use instead of sour cream?

If you prefer, Greek yogurt is a great substitute for sour cream. It will maintain the creamy texture and add a similar tangy flavor.

Nutrition

While exact nutritional values will vary based on portion size and specific ingredients used, this dish is rich in protein and calcium from the cheese, providing a hearty and satisfying meal. For those mindful of their intake, consider using low-fat cheese and sour cream alternatives.

Conclusion

This Cheesiest Bowtie Mac and Cheese is more than just a dish—it’s a celebration of flavor and nostalgia. Whether you’re serving it as a comforting weeknight meal or a special side dish, it’s bound to become a beloved favorite in your household. Enjoy creating new memories as you share this cheesy delight with friends and family. Happy cooking!

Related update: How to Make the Cheesiest Bowtie Mac and Cheese

Moosewood Lentil Soup | Made by Meaghan Moineau

Moosewood Lentil Soup

Intro

There’s something deeply comforting about a warm bowl of lentil soup on a chilly evening. The way the aroma fills the kitchen, the steam that rises from the pot, and the savory flavors that come together so perfectly—it’s like a culinary hug. This Moosewood Lentil Soup has been a staple in my family for generations. I remember the first time I tasted it; I was a child, visiting my grandmother’s home in upstate New York. It was one of those snowy afternoons, and the world outside was transformed into a winter wonderland. As I sat at her table, spoon in hand, I felt a warmth that extended beyond the soup. It was the warmth of love, family, and tradition. Today, I am thrilled to share this cherished recipe with you, hoping it brings the same joy and comfort to your home.

Why You’ll Love It

This Moosewood Lentil Soup is not only delicious but also incredibly nutritious and easy to make. The lentils provide a hearty base, packed with protein and fiber, while the vegetables bring a delightful crunch and color. It’s a versatile dish that suits both vegetarians and meat-lovers alike. Plus, it’s budget-friendly and made with simple ingredients that you probably already have in your pantry. Whether you’re looking for a wholesome weeknight dinner or a satisfying lunch, this soup is sure to please.

Ingredients

  • 1 cup lentils
  • 6 cups water
  • 2 tablespoons grapeseed oil (or butter)
  • 1 large onion, chopped
  • 2 stalks celery, diced
  • 3 carrots, sliced
  • 3 cloves garlic, minced
  • 1 teaspoon salt
  • 1/2 teaspoon black pepper
  • 1 teaspoon dried herbs (such as thyme or oregano)
  • 1 tablespoon brown sugar
  • 2 tablespoons fresh lemon juice
  • 1 tablespoon red wine vinegar
  • 1 can (14.5 ounces) tomatoes, crushed

Instructions

  1. Place lentils and water in a large soup pot or Dutch oven. Bring to a boil, then lower the heat to a simmer. Let cook until lentils are mushy, about 45 minutes. Add more water as needed to reach your desired consistency.
  2. While the lentils are cooking, heat oil or melt butter in a medium-sized skillet over medium heat. Add onion, celery, and carrots, and sauté for about 10 minutes until they begin to soften.
  3. Add garlic, salt, black pepper, and dried herbs of your choice. Continue to sauté for another 5 minutes until the garlic is fragrant.
  4. Transfer the vegetable mixture to the pot with the lentils. Stir in the crushed tomatoes, brown sugar, fresh lemon juice, and red wine vinegar.
  5. Taste the soup and adjust seasonings if necessary. Simmer for at least 15 minutes longer to allow the flavors to meld together.
  6. Serve hot, with a drizzle of red wine vinegar over each serving, and a sprinkling of minced scallions or parsley on top if desired.

Tips

To enhance the flavor, consider adding a bay leaf while the lentils cook. Remember to remove it before serving. If you prefer a smoother texture, you can blend a portion of the soup with an immersion blender. For a touch of spice, add a pinch of red pepper flakes or a dash of hot sauce.

Variations & Substitutions

This soup is highly adaptable. You can use any type of lentils: green, brown, or red. Each variety offers a slightly different texture. Feel free to swap grapeseed oil with olive oil or butter, and add other vegetables like bell peppers or zucchini for extra nutrition. If you’re not a fan of tomatoes, simply leave them out or replace them with roasted red peppers for a sweeter taste.

Storage

Store any leftover soup in an airtight container in the refrigerator for up to 5 days. It also freezes beautifully. Just pour the cooled soup into freezer-safe containers or bags and freeze for up to 3 months. To reheat, thaw in the refrigerator overnight and warm on the stove over low heat.

FAQ

Can I make this soup in a slow cooker?

Yes, absolutely! To make in a slow cooker, simply add all ingredients except for the fresh lemon juice and red wine vinegar to the cooker. Cook on low for 7-8 hours or high for 4-5 hours. Stir in lemon juice and vinegar before serving.

Can I add meat to this recipe?

Certainly! If you wish to add meat, cooked and crumbled sausage or shredded chicken make excellent additions. Simply cook the meat separately and add it to the soup during the final simmering stage.

Nutrition

A serving of this Moosewood Lentil Soup provides a rich source of protein, dietary fiber, and essential vitamins and minerals. It’s low in fat and calories, making it a heart-healthy option for any meal.

Conclusion

Whether you’re a seasoned cook or a beginner in the kitchen, this Moosewood Lentil Soup is a recipe that promises warmth, comfort, and satisfaction. Its rich flavors and wholesome ingredients make it a beloved dish that you’ll want to return to time and again. From my family’s table to yours, may this soup bring joy and nourishment to all who gather around your table.

Related update: Moosewood Lentil Soup

Related update: How to Make the Cheesiest Bowtie Mac and Cheese

Smoked Salmon and Mascarpone Calzone | Made by Meaghan Moineau

Smoked Salmon and Mascarpone Calzone

Intro

There’s something truly magical about the aroma of freshly baked calzones wafting through the kitchen. It instantly transports me back to my childhood, where Sunday afternoons were reserved for family cooking sessions. My grandmother, with her deft hands and infectious laughter, would guide us through the art of making the perfect calzone, each one stuffed with her secret ingredient—love. Today, I’m sharing a modern twist on this nostalgic favorite: the Smoked Salmon and Mascarpone Calzone. It’s a delightful fusion of creamy mascarpone, savory smoked salmon, and the delicate flavor of fresh chives and leeks, all encased in a perfectly golden crust.

Why You’ll Love It

This Smoked Salmon and Mascarpone Calzone is not just a dish; it’s an experience. Whether you’re a fan of traditional Italian cuisine or looking to try something new, this recipe offers a unique blend of flavors and textures that will captivate your taste buds. The richness of the mascarpone complements the smokiness of the salmon perfectly, while the leeks add a subtle sweetness that ties everything together. Plus, making calzones is a fun activity for the whole family, reminiscent of those cherished childhood memories.

Ingredients

  • Black pepper
  • Egg white
  • Extra virgin olive oil
  • Fresh chives
  • Kosher salt
  • Leek
  • Mascarpone
  • Pizza dough
  • Smoked salmon

Instructions

  1. Preheat your oven to 450°F and place the top rack in the lower third of your oven. Line a baking sheet with parchment paper for easier cleanup.
  2. Wash and pat dry the leek. Slice the leek lengthwise, then cut each half into long, very thin strips. Cut the strips into short pieces, about 2 inches long. Set aside.
  3. Divide the dough into two equal parts, and roll out each into a 10-inch circle. Gently spread a thin layer of mascarpone on the surface of the dough, leaving at least a 1-inch crust.
  4. In a small bowl, break up the smoked salmon using your fingers until it is fluffy. You want the filling of the calzone to be pretty even, or it will fall apart as you eat it.
  5. Divide the salmon between the two crusts, arranging it only on one side of the crust (in a half-moon shape), again leaving at least a 1-inch crust. Sprinkle the chives and leeks over the salmon, then lightly salt and pepper. Finally, drizzle with about 1 tsp of olive oil.
  6. Fold each calzone in half, making sure that the crusts line up. Using the tines of a fork, gently press down the edge all the way around the rounded side of the calzone to seal it. Make sure you get a tight seal; this will help the calzone puff up during baking.
  7. Brush the tops of each calzone with egg white. Bake at 450°F for about 15 minutes, or until golden brown and delicious.

Tips

Here are a few tips to ensure your calzones turn out perfectly:

  • Make sure your oven is fully preheated before baking to achieve the best crust.
  • If you’re short on time, store-bought pizza dough works just as well as homemade.
  • Ensure the seal is tight to prevent any filling from leaking out during baking.

Variations & Substitutions

This recipe is wonderfully versatile. Here are some variations and substitutions you can try:

  • Swap the smoked salmon for smoked trout or cooked shrimp for a different seafood twist.
  • Replace mascarpone with cream cheese for a tangier flavor.
  • Add capers or dill for an extra burst of flavor.

Storage

To store your calzones, allow them to cool completely, then wrap them tightly in foil or place them in an airtight container. They can be refrigerated for up to 3 days. To reheat, simply place them in an oven preheated to 350°F for 10-12 minutes or until warmed through.

FAQ

Can I make the calzone dough ahead of time?

Yes, you can make the dough ahead of time. Simply prepare the dough according to your recipe, then wrap it tightly in plastic wrap and store it in the refrigerator for up to 24 hours. Allow it to come to room temperature before rolling it out.

What can I serve with these calzones?

These calzones pair beautifully with a fresh green salad or a side of roasted vegetables. You can also serve them with a simple tomato sauce or a lemon-dill sauce for dipping.

Nutrition

While the exact nutritional content may vary depending on the specific brands and quantities used, each calzone is a good source of protein and healthy fats, thanks to the smoked salmon and mascarpone. For those watching their sodium intake, you may wish to use less kosher salt.

Conclusion

The Smoked Salmon and Mascarpone Calzone is more than just a meal; it’s a touchstone to cherished memories and a versatile recipe that can be adapted to suit any palate. Whether you’re making it for a special occasion or a casual family dinner, this calzone promises to deliver warmth, comfort, and plenty of flavor. Gather your loved ones, roll up your sleeves, and enjoy the delightful experience of making and sharing this delicious dish.

Related update: Smoked Salmon and Mascarpone Calzone

Pork with Blueberry Sauce | Made by Meaghan Moineau

Pork with Blueberry Sauce

Intro

There’s something uniquely satisfying about combining savory flavors with a touch of sweetness. It reminds me of summer evenings spent at my grandmother’s house, where she would always surprise us with her inventive dishes. One of my fondest memories is of her tangy pork chops served with a delightful fruit sauce that seemed to encapsulate the essence of the season. Inspired by those cherished moments, I’ve crafted this recipe for Pork with Blueberry Sauce. It’s a dish that promises to bring a burst of flavor to your dinner table, and I’m excited to share it with you.

Why You’ll Love It

This Pork with Blueberry Sauce is a symphony of flavors. The juicy pork chops are perfectly seasoned and seared to golden perfection, while the blueberry sauce provides a sweet and tangy counterpoint. The balsamic vinegar adds depth, and the lime zest gives it a zesty punch. Whether you’re hosting a dinner party or enjoying a quiet meal at home, this dish is sure to impress. Plus, it’s easy to make and requires just a few simple ingredients!

Ingredients

  • Pork chops
  • Salt and pepper
  • Canola oil
  • Fresh pint blueberries
  • Brown sugar
  • Balsamic vinegar
  • Red diced onion
  • Lime zest
  • Parsley, for garnish

Instructions

  1. Preheat the oven to 400 degrees Fahrenheit.
  2. In a nonreactive bowl, mash the blueberries with the brown sugar to your desired consistency and set aside.
  3. Heat a sauté pan over medium heat. Season the pork chops with salt and pepper on both sides.
  4. Add canola oil to the sauté pan. Brown the pork chops on both sides until golden and crispy, about 2-3 minutes on each side. Remove from the pan and place on a baking dish to finish cooking in the oven, if necessary. If the pork is thin, keep it warm aside until the sauce is ready.
  5. In the same pan, add the chopped red onion and sauté until translucent.
  6. Add the mashed blueberry-sugar mixture and balsamic vinegar. Cook until the sauce thickens, about 2-3 minutes.
  7. Add the lime zest and juice to the sauce, seasoning with salt and pepper to taste.
  8. If you placed the pork in the oven, remove it and place on serving plates. Serve the sauce on top and garnish with parsley or cilantro. Enjoy!

Tips

To get the perfect sear on your pork chops, make sure your pan is hot before adding the meat. This will help achieve a crispy exterior while keeping the inside juicy. Additionally, letting the pork rest after cooking allows the juices to redistribute, resulting in tender and flavorful meat.

Variations & Substitutions

If you’re looking to switch things up, you can substitute pork chops with chicken breasts or turkey cutlets. For a vegetarian version, consider using seared tofu or tempeh. You can also experiment with different fruits like raspberries or blackberries for the sauce, adjusting the sugar to taste.

Storage

Leftover pork with blueberry sauce can be stored in an airtight container in the refrigerator for up to 3 days. To reheat, gently warm it in a pan over medium-low heat, adding a splash of water if the sauce has thickened too much during storage.

FAQ

Can I use frozen blueberries for this recipe?

Yes, you can use frozen blueberries if fresh ones are not available. Just make sure to thaw them and drain any excess liquid before mashing them with the sugar.

What can I serve with Pork with Blueberry Sauce?

This dish pairs beautifully with a variety of sides. Consider serving it with creamy mashed potatoes, roasted vegetables, or a simple green salad to complement the flavors.

Nutrition

While the exact nutritional content can vary based on the specific ingredients and portion sizes used, this dish is a good source of protein from the pork and antioxidants from the blueberries. It’s a balanced meal that offers both nutrients and flavor.

Conclusion

This Pork with Blueberry Sauce is more than just a meal; it’s an experience that brings together the best of sweet and savory. Whether you’re cooking for your family or hosting guests, this dish is sure to delight everyone at the table. I hope it becomes a favorite in your home, just as it has in mine. Enjoy the journey of flavors and happy cooking!

Related update: Pork with Blueberry Sauce

Related update: Smoked Salmon and Mascarpone Calzone

Chicken Stew For The Soul | Made by Meaghan Moineau

Chicken Stew For The Soul

Intro

There’s something magical about a simmering pot of chicken stew, its enticing aroma wafting through the kitchen, enveloping you in warmth and comfort. This Chicken Stew For The Soul is a recipe that has been passed down through generations in my family. I remember spending weekends at my grandmother’s house, eagerly helping her gather ingredients from her lush garden. The anticipation of tasting the rich, flavorful stew made the wait worthwhile. This recipe is not just a dish; it’s a culinary hug, a reminder of love and family gatherings.

Why You’ll Love It

This Chicken Stew for the Soul is everything you want in a comforting meal. It’s aromatic, thanks to a blend of spices like cardamoms and cinnamon, and creamy with the addition of coconut milk. The stew is perfect for gatherings, offering a hearty meal that warms both the heart and the stomach. It’s easy to make, yet feels like a special treat every time. Whether you’re cooking for yourself or for loved ones, this stew is sure to bring smiles all around.

Ingredients

  • Cardamoms
  • Chicken
  • Cinnamon stick, broken
  • Coconut milk
  • Curry leaves
  • Fresh coriander
  • Garam masala
  • Ginger garlic paste
  • Green chillies
  • Red ground chilli
  • Ground coriander
  • Ground turmeric
  • Lemon (juice)
  • Onion
  • Potatoes
  • Salt

Instructions

  1. Slice the onions, slit the chillies, cube the potatoes, and keep aside.
  2. Heat oil in a heavy-bottomed pan or pressure cooker, splutter mustard seeds.
  3. Add the whole spices and stir till you begin to get the aroma of the spices.
  4. Add sliced onions, curry leaves, and green chillies and sauté.
  5. Stir in the ground coriander and add the marinated chicken. Stir so that the chicken is covered well in the sautéed mixture.
  6. Cover and let it cook. When it is half done, add the cubed potatoes.
  7. When the chicken is almost done, add the garam masala, salt, and coconut milk and stir.
  8. When done, turn off the heat and garnish with chopped fresh coriander.
  9. Remember, the most important ingredient is love. Stir it with lots of love for the family and friends who will partake of the meal.
  10. Serve hot chicken stew with freshly made appams.

Tips

– For the best flavors, marinate the chicken with ginger-garlic paste, salt, and a squeeze of lemon juice for at least 30 minutes before cooking.
– If using a pressure cooker, be cautious with the cooking time to avoid overcooking the chicken and potatoes.
– Adjust the spice level according to your taste by varying the amount of green chillies and red ground chilli.

Variations & Substitutions

You can swap chicken with lamb for a richer taste, though it will require a longer cooking time. For a vegetarian version, use a mix of hearty vegetables like carrots and beans, or add chickpeas for protein. If coconut milk is unavailable, you can substitute it with heavy cream, though it will alter the flavor slightly.

Storage

Leftover chicken stew can be stored in an airtight container in the refrigerator for up to 3 days. To reheat, gently simmer the stew on the stove to ensure even heating without drying out the chicken.

FAQ

Can I freeze chicken stew?

Yes, you can freeze chicken stew for up to 3 months. Allow it to cool completely before transferring to a freezer-safe container. Thaw overnight in the refrigerator before reheating.

What can I serve with chicken stew?

Chicken stew pairs beautifully with freshly made appams, rice, or even a warm crusty bread to soak up the savory sauce.

Nutrition

While the exact nutritional content can vary, this chicken stew is a well-balanced meal offering protein from the chicken, healthy fats from coconut milk, and a range of vitamins and minerals from the spices and vegetables. It’s hearty yet healthy, making it a perfect choice for a nourishing family meal.

Conclusion

Chicken Stew For The Soul is more than just a recipe; it’s a heartfelt tradition that brings warmth and joy to any table. Whether shared with family on a cozy evening or enjoyed solo as a comforting indulgence, this stew is a testament to the power of good food to nurture the soul. I hope you enjoy making and savoring this dish as much as we do in our family. Bon appétit!

Related update: Chicken Stew For The Soul

Related update: Pork with Blueberry Sauce

Related update: Moosewood Lentil Soup

Huli-Huli Chicken | Made by Meaghan Moineau

Huli-Huli Chicken Recipe: A Taste of Aloha

Intro

There’s something magical about the aroma of Huli-Huli Chicken wafting through the air. This Hawaiian classic takes me back to sun-drenched days on the island of Maui, where I first savored its sweet and savory flavors. On a family vacation, we stumbled upon a small roadside stand, drawn in by the tantalizing smell. With a warm smile, the vendor served us this succulent chicken, grilled to perfection, alongside juicy pineapple slices. This moment, filled with laughter and delicious food, is etched in my memory and has inspired me to recreate this beloved dish at home. Now, I’d love to share this recipe with you, bringing a bit of that island magic to your kitchen.

Why You’ll Love It

Huli-Huli Chicken is a dish that captures the essence of Hawaiian cuisine: vibrant, flavorful, and perfect for sharing. You will love this recipe because:

  • It’s easy to make and requires simple, fresh ingredients.
  • The marinade infuses the chicken with incredible flavor, making each bite a delightful experience.
  • Grilling adds a smoky char that enhances the sweetness of the sauce and pineapple.
  • It’s a crowd-pleaser, perfect for family dinners or summer cookouts.

Ingredients

  • 4 chicken drumsticks
  • 4 chicken thighs
  • 4 cloves garlic, smashed
  • 1 piece of ginger root, smashed
  • 1 tablespoon kosher salt
  • 1 fresh pineapple, sliced

Instructions

  1. Mix together the brine: water, sugar, salt, garlic, ginger, and thyme.
  2. Place the brine in a large resealable bag and add the chicken.
  3. Refrigerate for at least an hour, but not more than four hours.
  4. Put the sauce ingredients into a saucepan, stir, and simmer until the sauce thickens.
  5. Strain off the sauce and place it in a bowl.
  6. Remove the chicken from the brine and grill until medium brown and cooked through to the bone.
  7. Place the pineapple on the grill and lightly baste the chicken and pineapple with the sauce.
  8. Turn and baste 2-3 times every 2-3 minutes.
  9. Remove from grill and serve.

Tips

  • For the best flavor, don’t rush the marinating process. Allow the chicken to soak up the brine fully.
  • Use a meat thermometer to ensure the chicken is cooked through to a safe internal temperature of 165°F (74°C).
  • Keep the grill lid closed while cooking to maintain a consistent temperature.

Variations & Substitutions

Feel free to adapt this recipe to suit your taste:

  • Swap chicken thighs and drumsticks for boneless chicken breasts if you prefer leaner meat.
  • Add a dash of chili flakes to the sauce for a spicy kick.
  • If fresh pineapple isn’t available, canned pineapple rings can be used as a substitute.

Storage

Leftover Huli-Huli Chicken can be stored in an airtight container in the refrigerator for up to 3 days. To reheat, place the chicken in a preheated oven at 350°F (175°C) until warmed through. The grilled pineapple is best eaten fresh but can also be stored for a short period and reheated.

FAQ

Can I make Huli-Huli Chicken without a grill?

Absolutely! If you don’t have a grill, you can use a grill pan or an oven broiler. Cook the chicken in a preheated oven at 400°F (200°C) for about 25-30 minutes, turning and basting occasionally until cooked through.

What can I serve with Huli-Huli Chicken?

Huli-Huli Chicken pairs wonderfully with steamed rice, a side of coleslaw, or a fresh green salad. For a true Hawaiian experience, try serving it with macaroni salad and a slice of chilled watermelon.

Nutrition

While nutritional values can vary based on specific ingredients used, a serving of Huli-Huli Chicken (including a piece of pineapple) typically contains:

  • Calories: 250
  • Protein: 20g
  • Carbohydrates: 15g
  • Fat: 10g
  • Sodium: 400mg

Conclusion

Whether you’re reminiscing about a Hawaiian vacation or simply seeking a new recipe to delight your taste buds, Huli-Huli Chicken is sure to become a favorite. Its blend of sweet, savory, and smoky flavors captures the spirit of the islands and brings a touch of aloha to your table. I hope you enjoy making and sharing this dish as much as I do. Mahalo!

Related update: Huli-Huli Chicken

Related update: Chicken Stew For The Soul

Related update: Parmesan Mashed Potatoes

Corn Chowder with Potatoes, Poblanos, and Smoked Gouda | Made by Meaghan Moineau

Corn Chowder with Potatoes, Poblanos, and Smoked Gouda

Introduction

There’s something incredibly comforting about a warm bowl of chowder on a chilly evening. This Corn Chowder with Potatoes, Poblanos, and Smoked Gouda is a family favorite that takes me back to my grandmother’s kitchen. I remember sitting at her table, my feet barely touching the ground, as she ladled steaming bowls of this creamy soup. The aroma of smoked gouda mingled with sweet corn filled the room, and a hint of spice from the poblanos added a delightful twist. It was the kind of meal that brought everyone together, with laughter and stories flowing as freely as the chowder itself.

Why You’ll Love It

This chowder is the epitome of comfort food. It’s creamy, rich, and bursting with flavor, thanks to the combination of smoked gouda and poblano chiles. The potatoes add a hearty texture, while the fresh corn brings a hint of sweetness that perfectly balances the dish. Whether you’re serving it as a starter or the main course, this chowder is sure to warm you up from the inside out.

Ingredients

  • 1 bay leaf
  • Chives, chopped for garnish
  • 4 cups fresh corn kernels
  • 1 teaspoon fresh thyme leaves
  • 1 cup smoked gouda cheese, shredded, divided
  • 1 cup half-and-half
  • 1 onion, diced
  • 1 can (4 oz) diced poblano chiles
  • 4 cups potatoes, peeled and diced
  • Salt, to taste
  • 2 tablespoons unsalted butter
  • 4 cups water

Instructions

  1. In a large sauté pan, melt the butter over medium heat and sauté the onion for about 10 minutes, or until lightly browned.
  2. Transfer the onion to a 7-quart slow cooker and add the potatoes, bay leaf, thyme, and water.
  3. Cover and cook on LOW for about 4 hours, or until the potatoes are tender.
  4. Mash some of the potatoes against the inside of the cooker or use a handheld immersion blender to puree a small amount of potato and thicken the soup slightly.
  5. Add the corn, chiles, half-and-half, and 1 cup of the smoked gouda. Add salt to taste and continue cooking for 20 to 30 minutes, or just until all the ingredients are hot.
  6. Ladle the soup into bowls and garnish each bowl with the remaining gouda and chopped chives.

Tips

For the best flavor, use fresh corn when it’s in season. If fresh corn isn’t available, frozen corn is a good substitute. Be sure to adjust the salt according to your taste preferences, especially if you’re using canned chiles that may already contain salt.

Variations & Substitutions

If you’re looking to add a bit more heat, consider using fresh jalapeños in place of or in addition to the poblano chiles. For a vegetarian version, replace the half-and-half with coconut milk for a slight tropical twist. You can also substitute sharp cheddar for the smoked gouda if you prefer a more traditional cheesy flavor.

Storage

This chowder stores beautifully. Let it cool to room temperature and transfer it to an airtight container. It will keep in the refrigerator for up to 3 days. You can also freeze it for up to 2 months. Be sure to reheat slowly over low heat to maintain the creamy texture.

FAQ

Can I make this chowder on the stovetop instead of a slow cooker?

Absolutely! Simply follow the same steps using a large pot on the stovetop. Bring the mixture to a simmer and cook until the potatoes are tender, then proceed with the recipe as directed.

Can I use a different type of cheese?

Yes, you can substitute any cheese that melts well. Cheddar, Monterey Jack, or even Pepper Jack would work great if you want to add more spice.

How can I make this chowder dairy-free?

You can substitute the half-and-half with full-fat coconut milk for a creamy, dairy-free option. Use a dairy-free cheese alternative to replace the smoked gouda.

Nutrition

While I don’t have the exact nutritional breakdown, this chowder is a hearty meal that combines the benefits of vegetables like corn and potatoes with the rich flavors of cheese and cream. Adjust the ingredients to suit your dietary needs, and enjoy it as part of a balanced diet.

Conclusion

There’s nothing like a bowl of Corn Chowder with Potatoes, Poblanos, and Smoked Gouda to bring back fond memories and create new ones. Whether you’re sharing it with family or savoring a bowl on your own, this chowder is a celebration of warmth, flavor, and togetherness. I hope this recipe brings as much joy to your table as it has to mine. Enjoy!

Related update: Corn Chowder with Potatoes, Poblanos, and Smoked Gouda

Related update: Huli-Huli Chicken

Crisp Winter Salad with Maple Gorgonzola Dressing | Made by Meaghan Moineau

Crisp Winter Salad with Maple Gorgonzola Dressing

Intro

As the leaves begin to fall and the air turns crisp, I’m reminded of cozy family gatherings in my childhood home. My mother would always prepare a fresh, vibrant salad that seemed to mirror the beauty of the winter landscape outside. Her secret? A delightful blend of crunchy vegetables and a rich, creamy dressing that brought warmth to our hearts and smiles to our faces. This Crisp Winter Salad with Maple Gorgonzola Dressing is an homage to those cherished memories and a testament to the joy of sharing simple yet luxurious meals with loved ones.

Why You’ll Love It

This salad is a symphony of flavors and textures, perfect for those chilly months when you crave something fresh yet comforting. The crunchy vegetables provide a satisfying bite, while the maple gorgonzola dressing offers a creamy and tangy contrast. It’s a versatile dish that can be served as a starter, a side, or even a light main course. Whether you’re hosting a festive gathering or enjoying a quiet meal at home, this salad is sure to impress.

Ingredients

  • Broccoli stems, thinly sliced
  • Celery, thinly sliced
  • Cider vinegar
  • Dijon mustard
  • Gorgonzola cheese, crumbled
  • Jicama, julienned
  • Kosher salt
  • Low fat sour cream
  • Maple syrup
  • Olive oil
  • Radishes, thinly sliced
  • Red green apple, thinly sliced
  • Romaine lettuce, chopped
  • Savoy cabbage, shredded
  • Walnuts, toasted
  • White pepper

Instructions

  1. In a large bowl, combine the broccoli stems, celery, jicama, radishes, apple, romaine lettuce, and savoy cabbage. Toss gently to mix.
  2. In a medium bowl, whisk together the low fat sour cream, olive oil, cider vinegar, dijon mustard, maple syrup, kosher salt, and white pepper until smooth.
  3. Gently stir in the gorgonzola cheese, using a fork to combine without mashing the cheese—ensure there are visible chunks in the dressing.
  4. Add the toasted walnuts to the salad mixture, then pour the dressing over the top. Toss everything together until well coated.
  5. Serve immediately or refrigerate for up to an hour to allow the flavors to meld.

Tips

For the best results, use fresh, high-quality ingredients. Ensure your vegetables are crisp and your gorgonzola is flavorful and creamy. Toasting the walnuts enhances their flavor and adds a delightful crunch to the salad. Feel free to adjust the amount of maple syrup in the dressing to suit your taste for sweetness.

Variations & Substitutions

If gorgonzola isn’t your favorite, try substituting it with feta or blue cheese for a different flavor profile. For a vegan version, swap the sour cream with a plant-based alternative and omit the cheese altogether. Add some grilled chicken or roasted chickpeas for extra protein, making this salad a more substantial meal.

Storage

This salad is best enjoyed fresh, but you can store leftovers in an airtight container in the refrigerator for up to two days. If you plan to store the salad, keep the dressing separate and toss it just before serving to maintain the crunchiness of the vegetables.

FAQ

Can I make the dressing ahead of time?

Yes, you can prepare the dressing up to two days in advance. Store it in a sealed container in the refrigerator and give it a good stir before using.

What can I serve with this salad?

This salad pairs beautifully with roasted meats or grilled seafood. It also works well alongside hearty soups or stews, adding a fresh contrast to warm, rich dishes.

Can I use a different type of lettuce?

Absolutely! While romaine offers a nice crunch, you can use mixed greens, arugula, or even spinach for a different texture and flavor.

Nutrition

This salad is packed with nutritious ingredients. The array of vegetables provides fiber, vitamins, and minerals, while the walnuts add healthy fats. The dressing, although creamy, is made with low fat sour cream and olive oil, making it a healthier choice compared to traditional creamy dressings.

Conclusion

Our Crisp Winter Salad with Maple Gorgonzola Dressing is a delightful addition to any meal, bringing together the best of winter’s bounty. It’s a dish that not only nourishes the body but also warms the soul, reminding us of the simple joys of good food and cherished company. Whether you’re gathering around the table with family or treating yourself to a solo feast, this salad promises to deliver comfort and joy with every bite. Enjoy!

Related update: Crisp Winter Salad with Maple Gorgonzola Dressing

Monastery soup | Made by Meaghan Moineau

Monastery Soup: A Simple, Soul-Warming Delight

Intro

There’s something incredibly comforting about a bowl of hot soup, especially when it has a rich history and a story to tell. Monastery Soup is one such dish, with roots deeply embedded in the traditions of monastic cooking. I remember visiting a serene monastery nestled in the hills during my travels in Europe. The air was crisp, and the architecture, simplistic yet awe-inspiring. After a long day of exploration, I was offered a bowl of this humble soup by one of the monks. It was a moment of pure bliss, where the warmth of the soup matched the warmth in my heart. That moment has stayed with me, and today, I want to share this memory and recipe with you.

Why You’ll Love It

Monastery Soup is not just food; it’s an experience. Here’s why you’ll fall in love with this delightful dish:

  • Simplicity: With just a few wholesome ingredients, this soup is easy to prepare yet incredibly nourishing.
  • Heartiness: Packed with vegetables and beans, it’s a meal in itself, perfect for a satisfying lunch or dinner.
  • Customizable: You can easily adjust the ingredients to suit your taste or dietary needs.
  • Comforting: The aroma alone is enough to lift your spirits on a cold day.

Ingredients

  • 2 tablespoons sunflower oil
  • 2 medium potatoes, diced
  • 1 large onion, chopped
  • 3 cloves garlic, minced
  • 2 carrots, sliced
  • 1 leek, sliced
  • 2 stalks celery, chopped
  • 1 cup broad beans
  • 4 cups vegetable stock
  • Fresh parsley, chopped
  • Salt and pepper to taste

Instructions

  1. Heat the sunflower oil in a large pan over medium heat.
  2. Add the diced potatoes, chopped onion, and minced garlic. Sauté, covered, for about 10 minutes until the onions are translucent and the potatoes start to soften.
  3. Stir in the sliced carrots, leek, and chopped celery. Continue to sauté for another 5 minutes, allowing the vegetables to become tender.
  4. Add the broad beans and pour in the vegetable stock. Stir well, cover the pan, and let it simmer gently for another 10 minutes, or until the potatoes and broad beans are soft.
  5. Season with freshly chopped parsley, salt, and pepper according to your taste.
  6. Serve hot with crusty bread for a complete meal.

Tips

  • For a creamier texture, blend a portion of the soup and mix it back in.
  • Use fresh, seasonal vegetables for the best flavor.
  • Adjust the amount of garlic according to your preference for a more robust flavor.

Variations & Substitutions

Monastery Soup is wonderfully adaptable. Here are some variations you might want to try:

  • Vegetables: Swap out the potatoes for sweet potatoes or add some zucchini for a different taste.
  • Beans: If you don’t have broad beans, try using chickpeas or lentils instead.
  • Herbs: Experiment with adding thyme or rosemary for an aromatic twist.

Storage

Monastery Soup stores well, making it perfect for meal prep:

  • Refrigerate: Store in an airtight container for up to 4 days.
  • Freeze: You can freeze the soup for up to 3 months. Thaw in the refrigerator overnight before reheating.

FAQ

Can I make this soup in advance?

Absolutely! This soup tastes even better the next day as the flavors have more time to meld together. Simply reheat on the stove over low heat until warmed through.

Is Monastery Soup vegan?

Yes, as long as you use vegetable stock and avoid any animal-based additives, this soup remains vegan-friendly.

What can I serve with Monastery Soup?

A slice of crusty bread or a fresh green salad makes a perfect accompaniment to this hearty soup.

Nutrition

This soup is not only delicious but also nutritious. It’s packed with fiber from the vegetables and beans, and provides a good source of vitamins and minerals. It’s a guilt-free comfort food that’s perfect for any diet.

Conclusion

Monastery Soup is more than just a meal; it’s a bowl of comfort that carries with it a sense of history and tranquility. Whether you’re enjoying it on a cool evening or sharing it with loved ones, it’s a dish that warms both the body and soul. I hope this recipe brings as much joy to your kitchen as it does to mine. May it become a cherished part of your culinary repertoire, as it has become a staple in my own home.

Related update: Monastery soup

Related update: Corn Chowder with Potatoes, Poblanos, and Smoked Gouda

Cheesy Bacon Burger with Spicy Chipotle Aiolo Sauce | Made by Meaghan Moineau

Cheesy Bacon Burger with Spicy Chipotle Aioli Sauce

Intro

There’s something about the sizzle of a burger on the grill that takes me back to summer evenings spent in my grandmother’s backyard. The air would be filled with the aroma of sizzling meat and the laughter of family members gathering around the picnic table. It was during those cherished gatherings that I learned the art of creating the perfect burger, one that would be etched in our hearts as a family tradition. Today, I am excited to share with you a modern twist on that classic memory – the Cheesy Bacon Burger with Spicy Chipotle Aioli Sauce. This recipe not only brings back those nostalgic moments but also adds a spicy kick that will surely become a new favorite in your home.

Why You’ll Love It

This Cheesy Bacon Burger is a delightful combination of flavors and textures that will make your taste buds dance with joy. The juicy beef patty encasing a creamy Swiss cheese center is topped with crispy turkey bacon, sautéed bell peppers, and onions, all nestled within a soft whole wheat bun. The real star, however, is the Spicy Chipotle Aioli Sauce, which adds a smoky and tangy kick to every bite. Whether you are hosting a backyard barbecue or simply craving a delicious homemade burger, this recipe is sure to impress.

Ingredients

  • Chipotle chiles in adobo
  • Fat-free mayonnaise
  • Garlic
  • Garlic powder
  • Greek yogurt
  • Green bell pepper
  • Ground cumin
  • Black ground pepper
  • Lean ground beef
  • Fresh lime juice
  • Onion
  • Whole wedges of Laughing Cow Swiss cheese
  • Cooked turkey bacon
  • Whole wheat hamburger buns

Instructions

  1. For the burgers: In a pan, cook turkey bacon according to the directions on the package. Once cooked, remove the bacon and set it aside.
  2. In the same pan, add bell pepper and onion and cook until tender, about 10 minutes.
  3. Add ground beef to a small bowl, along with garlic powder and ground pepper, and mix well.
  4. Divide the raw meat into 8 equal pieces (approximately 2oz each). Flatten each piece, place 1/2 a cheese wedge onto each piece of hamburger, and top with another piece of meat. Seal the edges to prevent the cheese from oozing out during cooking.
  5. Place the burgers on the grill and cook until done, about 5 minutes per side.
  6. Place the cooked burgers on buns and top with bacon, peppers & onions, and Spicy Chipotle Aioli Sauce.
  7. For the Spicy Chipotle Aioli Sauce: In a small bowl, whisk together chipotle chiles in adobo, fat-free mayonnaise, garlic, Greek yogurt, ground cumin, and fresh lime juice until combined. This makes 3/4 cup, or 12 tablespoons, of sauce.

Tips

To ensure your burgers are perfectly cooked, use a meat thermometer to check that the internal temperature reaches 160°F (71°C). If you prefer a milder sauce, reduce the amount of chipotle chiles. For an extra layer of flavor, toast your hamburger buns on the grill for a few minutes before assembling your burgers.

Variations & Substitutions

If you prefer a different cheese, cheddar or pepper jack would work wonderfully in this recipe. You can also substitute ground turkey for the beef if you want a leaner option. For a vegetarian twist, try using a plant-based burger patty and coconut bacon.

Storage

Store any leftover cooked burgers in an airtight container in the refrigerator for up to 3 days. The Spicy Chipotle Aioli Sauce can be stored in a separate container in the fridge for up to a week. Reheat the burgers in a pan or microwave before serving.

FAQ

Can I make the Spicy Chipotle Aioli Sauce in advance?

Absolutely! The sauce can be made a day or two in advance and stored in the refrigerator. This will allow the flavors to meld together even more, enhancing its delicious taste.

What is the best way to cook the burgers if I don’t have a grill?

If you don’t have a grill, you can cook the burgers in a skillet on the stovetop. Simply heat a little oil in the pan over medium-high heat and cook the burgers for about 5 minutes on each side, or until they reach the desired doneness.

Can I freeze the burgers?

Yes, you can freeze the uncooked burger patties. Place them on a baking sheet and freeze until solid, then transfer to a freezer-safe bag or container. They can be stored in the freezer for up to 3 months. Thaw in the refrigerator before cooking.

Nutrition

This Cheesy Bacon Burger recipe, when made with lean ground beef and turkey bacon, is a protein-packed meal. The use of Greek yogurt and fat-free mayonnaise in the aioli sauce also helps to keep the calorie count in check. As with any meal, moderation is key to maintaining a balanced diet.

Conclusion

The Cheesy Bacon Burger with Spicy Chipotle Aioli Sauce is more than just a meal; it’s a culinary experience that brings together the comfort of classic flavors with a modern twist. Whether you’re reminiscing about family gatherings or creating new memories, this burger is sure to be a hit with everyone. So fire up the grill, gather your loved ones, and savor the deliciousness of this mouthwatering creation!

Related update: Cheesy Bacon Burger with Spicy Chipotle Aiolo Sauce

Grilled Garlicky-Herbed Shrimp | Made by Meaghan Moineau

Grilled Garlicky-Herbed Shrimp

Intro

Growing up, summers meant endless family gatherings by the beach, where the air was filled with the tantalizing aroma of grilled seafood. My father, always at the helm of the grill, would prepare his signature shrimp dish. The combination of garlic, fresh herbs, and a hint of lemon always drew everyone to the table. Today, I’m excited to share a recipe that captures that nostalgia: Grilled Garlicky-Herbed Shrimp. It’s a dish that’s simple yet bursting with flavor, perfect for bringing a slice of summer to your table anytime.

Why You’ll Love It

This recipe is a celebration of bold flavors and simplicity. The garlicky-herb marinade infuses the shrimp with a delightful zest, while the grilling process adds a smoky finish that enhances each bite. It’s quick to prepare, requires minimal ingredients, and is versatile enough for both casual family dinners and elegant gatherings. Plus, it’s a healthy, protein-rich dish that complements a variety of sides.

Ingredients

  • 1 teaspoon chili pepper flakes
  • 1/4 cup extra virgin olive oil
  • 1/4 cup finely chopped coriander leaves
  • 4 cloves garlic, minced
  • 1 pound large shrimp, peeled and deveined
  • Zest of 1 lemon
  • 1/4 cup finely chopped parsley

Instructions

  1. In a large bowl, combine chili pepper flakes, olive oil, coriander leaves, garlic, lemon zest, and parsley.
  2. Add the shrimp to the bowl and toss to ensure each piece is thoroughly coated in the marinade.
  3. Cover the bowl with plastic wrap and refrigerate for at least 4 hours or overnight for maximum flavor infusion.
  4. Preheat your grill to medium heat. Once hot, place the shrimp on the grill.
  5. Cook the shrimp for about 5 minutes, turning once, until they turn pink and are slightly charred.
  6. Serve immediately, perhaps with a roasted red pepper salad for a Mediterranean twist.

Tips

For the best results, use fresh shrimp as they tend to absorb flavors better than frozen ones. If using wooden skewers, soak them in water for at least 30 minutes before grilling to prevent burning. Always keep an eye on the shrimp while grilling to avoid overcooking, which can make them tough.

Variations & Substitutions

Feel free to customize this recipe to your liking. You can substitute the coriander leaves with basil or cilantro for a different herby flavor. If you prefer a bit more heat, increase the amount of chili pepper flakes or add a dash of cayenne pepper. For a citrusy twist, add a splash of lime juice to the marinade.

Storage

Store any leftover grilled shrimp in an airtight container in the refrigerator for up to 2 days. Reheat them gently in a skillet over low heat to avoid overcooking. While it’s best to consume them fresh, you can freeze the marinated shrimp before grilling for up to 2 months.

FAQ

Can I use a grill pan instead of an outdoor grill?

Absolutely! A grill pan on the stovetop works perfectly fine. Just ensure it’s preheated before adding the shrimp, and cook them as you would on an outdoor grill.

Is it necessary to marinate the shrimp overnight?

While marinating overnight yields the best flavor, a minimum of 4 hours will still allow the shrimp to absorb the delicious garlicky-herb essence. If you’re short on time, even 1 hour can impart good flavor.

Nutrition

Each serving of Grilled Garlicky-Herbed Shrimp (approximately 4-5 shrimp) provides approximately:

  • Calories: 220
  • Protein: 25g
  • Fat: 12g
  • Carbohydrates: 3g
  • Fiber: 1g

This dish is high in protein and healthy fats, making it a nutritious choice for those seeking a balanced meal.

Conclusion

Grilled Garlicky-Herbed Shrimp is a dish that brings together the warmth of family gatherings and the vibrant flavors of the Mediterranean. It’s easy to prepare, incredibly flavorful, and sure to impress anyone who takes a bite. Whether you’re reminiscing about summer barbecues or simply looking to add a new favorite to your recipe repertoire, this shrimp dish is a delightful choice. Enjoy it with loved ones and create new memories around the table.

Related update: Grilled Garlicky-Herbed Shrimp

Related update: Cheesy Bacon Burger with Spicy Chipotle Aiolo Sauce

Zucchini & Basil Frittata | Made by Meaghan Moineau

Zucchini & Basil Frittata: A Delightful Breakfast or Brunch Dish

Intro

There’s something undeniably comforting about the aroma of a frittata wafting through the kitchen on a lazy Sunday morning. It takes me back to weekends spent with my grandmother, who had an uncanny ability to turn simple ingredients into magical meals. Her kitchen was a place of warmth, filled with laughter and the clatter of pots and pans. One of my favorite dishes that she made was a zucchini and basil frittata, a dish that seemed to capture the essence of summer in every bite. Today, I’m sharing this beloved recipe with you, hoping it brings as much joy to your table as it has to mine.

Why You’ll Love It

This Zucchini & Basil Frittata is a perfect blend of flavors and textures. The zucchini provides a tender, moist base, while fresh basil adds a burst of herby freshness. Cheddar cheese gives it a touch of richness, and green onions offer a hint of sharpness. It’s a dish that’s not only delicious but also incredibly versatile, making it perfect for breakfast, brunch, or even a light dinner. Plus, it’s a great way to use up any extra zucchini you might have on hand during the summer months.

Ingredients

  • 2 medium zucchini
  • 1/4 cup fresh basil, chopped
  • 1 cup cheddar cheese, shredded
  • 6 large eggs
  • 2 tablespoons grapeseed oil
  • 2 green onions, thinly sliced
  • Salt, to taste

Instructions

  1. Shred the zucchini using a box grater or a food processor.
  2. Place the shredded zucchini in a colander with a large bowl underneath. Sprinkle with a little salt and allow some water to seep out, about 20 minutes. You can squeeze some of the water out with your hands if you’re in a hurry. This step can be completed ahead of time, and the shredded zucchini can stay in your refrigerator overnight if you would like to do this recipe in stages.
  3. In a large mixing bowl, add the shredded zucchini, green onion, basil, cheddar cheese, and salt. Stir to combine.
  4. Crack the eggs in a separate bowl and beat them. Pour the egg mixture into the bowl with the veggies and stir to combine all ingredients.
  5. Preheat your oven to 350 degrees F.
  6. In a 10-inch cast iron skillet, heat 1 to 2 tablespoons of grapeseed oil (or olive oil). Spread the oil around, making sure the sides are nicely oiled as well.
  7. Heat to medium, then add the egg/zucchini mixture, ensuring the mixture is evenly distributed.
  8. Cook until the egg begins to set on the sides of the skillet, about 3 to 5 minutes.
  9. Use a potholder to place the skillet in the oven. Bake for 12 to 15 minutes until the center tests clean.

Tips

For the best results, make sure to thoroughly drain the zucchini to prevent the frittata from becoming too watery. If you’re in a rush, you can use a clean kitchen towel to squeeze out the excess moisture more quickly. Also, using a cast iron skillet not only helps with even cooking but also adds a beautiful rustic touch to your presentation.

Variations & Substitutions

Feel free to get creative with this recipe! You can substitute the cheddar cheese with feta or goat cheese for a tangier flavor. If you’re not a fan of basil, try using parsley or dill instead. For a bit of heat, add a pinch of red pepper flakes or a dash of hot sauce. This frittata is also a great way to use up other vegetables you have on hand, such as bell peppers or mushrooms.

Storage

This frittata can be stored in an airtight container in the refrigerator for up to three days. To reheat, simply pop it in the oven at 350 degrees F for about 10 minutes or until warmed through. Alternatively, you can reheat individual slices in the microwave for about 1 minute.

FAQ

Can I make this frittata ahead of time?

Yes, you can prepare the zucchini and store it in the refrigerator, then quickly assemble and bake the frittata when you’re ready to serve. The baked frittata also keeps well, making it a great make-ahead option for busy mornings.

Can I freeze the frittata?

While frittatas are best enjoyed fresh, you can freeze any leftovers. Simply wrap individual slices in plastic wrap and place them in a freezer-safe container. To reheat, bake in the oven at 350 degrees F until heated through, or microwave on a low setting.

What can I serve with this frittata?

This frittata pairs beautifully with a simple green salad or some crusty bread. If you’re serving it for brunch, consider adding a fruit salad or some roasted potatoes to round out the meal.

Nutrition

This zucchini and basil frittata is a nutritious option, packed with protein from the eggs and cheese, along with vitamins and minerals from the zucchini and basil. It’s a satisfying meal that will keep you fueled throughout the day.

Conclusion

The Zucchini & Basil Frittata is more than just a dish; it’s a celebration of simple, fresh flavors that come together to create something truly special. Whether you’re serving it for a leisurely weekend brunch or a quick weekday breakfast, it’s sure to become a favorite in your household. So, gather your ingredients, embrace the comforting process of cooking, and enjoy this delightful frittata with your loved ones. Bon appétit!

Related update: Zucchini & Basil Frittata

Related update: Grilled Garlicky-Herbed Shrimp

Crunchy Prawn Skewers With Lemony Avocado Dip | Made by Meaghan Moineau

Crunchy Prawn Skewers With Lemony Avocado Dip

Intro

There’s something undeniably special about grilling prawns on a warm summer evening. It takes me back to the seaside holidays of my childhood, where the salty ocean breeze mingled with the enticing aroma of seafood cooking on the grill. Those were the days when my family would gather around, sharing stories and laughter as we eagerly awaited the delicious feast. This recipe for Crunchy Prawn Skewers with Lemony Avocado Dip encapsulates that nostalgic experience, combining the crispy texture of breadcrumbs with the refreshing zest of lemon-infused avocado. It’s a dish that not only satisfies the palate but also warms the heart, making it perfect for any gathering, big or small.

Why You’ll Love It

These Crunchy Prawn Skewers are a delightful fusion of textures and flavors. The succulent prawns are coated in crispy breadcrumbs, delivering a satisfying crunch with every bite. The Lemony Avocado Dip adds a creamy, tangy contrast that elevates the dish to a whole new level. Whether you’re hosting a backyard barbecue or a simple dinner with friends, these skewers are a crowd-pleaser, offering a gourmet touch that’s surprisingly easy to achieve. Plus, they’re a fantastic way to enjoy seafood that’s both healthy and delicious.

Ingredients

  • Flesh of 1 ripe avocado
  • 2 tablespoons crème fraiche
  • Juice of 1 lemon
  • 1 cup breadcrumbs
  • Zest of 1 lemon
  • 12 large prawns, peeled and deveined
  • 2 tablespoons olive oil
  • 4 bamboo skewers

Instructions

  1. In a food processor, combine the flesh of the avocado, crème fraiche, and lemon juice. Blend until smooth. Season to taste with salt and pepper, and set aside.
  2. In a bowl, combine the breadcrumbs and lemon zest. Season well with salt and pepper.
  3. Coat the prawns evenly with olive oil, then toss them in the breadcrumb mixture until fully covered.
  4. Thread three prawns onto each bamboo skewer.
  5. Preheat the grill to medium-high heat. Grill the skewers for about 2 minutes on each side, or until the prawns are crisp and golden.
  6. Serve immediately with the Lemony Avocado Dip on the side.

Tips

To prevent the bamboo skewers from burning, soak them in cold water for at least an hour before using. This simple step ensures that your skewers remain intact and your prawns cook evenly.

Variations & Substitutions

Feel free to get creative with this recipe! If prawns aren’t available, you can substitute them with chicken or tofu for a different take on the skewers. For an extra kick, add a pinch of cayenne pepper or smoked paprika to the breadcrumb mixture. You can also swap out the crème fraiche for Greek yogurt if you prefer a tangier dip.

Storage

If you have leftovers, store the skewered prawns in an airtight container in the refrigerator for up to two days. The Lemony Avocado Dip is best consumed fresh but can be stored separately in an airtight container for up to one day. To enjoy again, reheat the skewers in the oven or on a skillet until warmed through.

FAQ

Can I prepare the skewers in advance?

Yes, you can prepare the skewers up to a day in advance. Simply coat the prawns in the breadcrumb mixture and store them in the refrigerator until ready to grill. This makes them a convenient option for entertaining, allowing you to focus on your guests.

Can I use frozen prawns?

Absolutely! If using frozen prawns, make sure to thaw them completely and pat them dry before proceeding with the recipe. This ensures that the breadcrumbs adhere properly and the prawns cook evenly.

Nutrition

This dish is not only delicious but also nutritious. Prawns are a great source of lean protein, while the avocado provides healthy fats and essential nutrients. Each skewer contains approximately 180 calories, 10 grams of protein, and 12 grams of healthy fats, making it a balanced option for any meal.

Conclusion

Crunchy Prawn Skewers with Lemony Avocado Dip is a recipe that brings people together, just as it did during my childhood seaside gatherings. The crispy, golden prawns paired with a refreshing dip create a symphony of flavors that will transport you to a sunny beach with each bite. Whether you’re hosting a party or simply enjoying a quiet dinner, this dish promises to deliver satisfaction and smiles all around. So fire up the grill and embrace the joy of cooking and sharing this delectable treat with your loved ones.

Related update: Crunchy Prawn Skewers With Lemony Avocado Dip

Related update: Crisp Winter Salad with Maple Gorgonzola Dressing

Kung Po Chicken | Made by Meaghan Moineau

Kung Po Chicken: A Fiery Delight

Intro

Growing up in a bustling household filled with the aromas of diverse cuisines, one dish always managed to stand out on our family dinner table: Kung Po Chicken. I vividly remember the excitement of watching my grandmother expertly toss the sizzling ingredients in her trusty old wok, her hands moving with the grace of a seasoned chef. The kitchen would fill with the mouth-watering scent of toasted spices and roasted peanuts, leaving us all impatient for the first bite. Today, I’m thrilled to share this cherished recipe with you, hoping it brings as much joy to your family as it has to mine.

Why You’ll Love It

Kung Po Chicken is a classic Chinese dish that’s beloved for its bold flavors and delightful textures. Here are a few reasons why this dish deserves a spot in your culinary repertoire:

  • Quick and Easy: Ready in under 30 minutes, this dish is perfect for busy weeknights.
  • Flavorful: The combination of spicy chili, savory soy sauce, and nutty sesame oil creates a tantalizing taste experience.
  • Versatile: Easily adapt this recipe to suit your dietary preferences or spice tolerance.
  • Nostalgic: A dish that brings the warmth of home and family to your dining table.

Ingredients

  • 2 whole chicken breasts, cut into 1/2 inch cubes (about 1-1/2 cups)
  • 6-8 red dried whole chili peppers
  • 3 tablespoons corn oil
  • 2 tablespoons cornstarch
  • 1 egg white
  • 1/2 cup roasted peanuts
  • 1 teaspoon salt
  • 2 scallions, chopped
  • 1 tablespoon sesame oil
  • 2 tablespoons soy sauce
  • 3 tablespoons water
  • 1 tablespoon white distilled vinegar

Instructions

  1. Cut the chicken breasts into 1/2 inch cubes, yielding approximately 1-1/2 cups of chicken.
  2. In a medium bowl, combine the egg white, cornstarch, soy sauce, and 1 tablespoon of water. Mix well and add the chicken cubes, ensuring they are coated evenly. Set aside for 30 minutes to marinate.
  3. Using a damp towel, wipe the chili peppers clean. Remove the tops and set them aside on a plate with the chopped scallions.
  4. In a small cup, combine the soy sauce, white distilled vinegar, and remaining water to create the sauce. Set aside near the cooking area.
  5. Place a strainer over a pot near the cooking station for ease of use.
  6. Heat a wok over moderate heat until it is very hot. Add the corn oil and heat to about smoking point.
  7. Mix the marinated chicken again and carefully add it to the hot oil. Raise the heat to high and stir-fry for about 3-4 minutes or until the chicken is cooked through.
  8. Remove the chicken using the strainer and set aside.
  9. In the same wok, add the chili peppers and stir-fry until they darken slightly, releasing their fragrance.
  10. Add the scallions and peanuts to the wok, stir-fry for an additional minute.
  11. Return the chicken to the wok, pour in the prepared sauce, and stir well to combine all ingredients.
  12. Drizzle with sesame oil, give it a final quick toss, and serve hot.

Tips

  • For a milder dish, remove the seeds from the chili peppers.
  • Ensure the wok is properly heated before adding the oil to achieve the perfect stir-fry texture.
  • Feel free to adjust the amount of chili peppers based on your spice preference.

Variations & Substitutions

The beauty of Kung Po Chicken lies in its adaptability. Here are some ways you can make this dish your own:

  • Vegetarian: Substitute the chicken with firm tofu or tempeh for a plant-based version.
  • Nuts: Swap peanuts with cashews or almonds for a different nutty twist.
  • Gluten-Free: Use tamari or coconut aminos instead of soy sauce.

Storage

Store any leftover Kung Po Chicken in an airtight container in the refrigerator for up to 3 days. Reheat in a skillet over medium heat, adding a splash of water to bring back the sauce’s consistency.

FAQ

Can I freeze Kung Po Chicken?

Yes, you can freeze Kung Po Chicken. Allow it to cool completely before transferring it to a freezer-safe container. It can be stored in the freezer for up to 2 months. Thaw overnight in the refrigerator before reheating.

What can I serve with Kung Po Chicken?

Kung Po Chicken pairs wonderfully with steamed jasmine rice or fried rice. For a low-carb option, serve it with cauliflower rice or a side of stir-fried vegetables.

Is it necessary to use a wok?

While a wok is ideal for stir-frying due to its shape and heat distribution, a large skillet can also be used. Just ensure it’s hot enough before adding the ingredients.

Nutrition

This dish is rich in protein and healthy fats from the chicken and peanuts. However, due to the use of oil and nuts, it is relatively high in calories. Adjust the oil and nuts according to your dietary needs if necessary.

Conclusion

Kung Po Chicken is more than just a meal; it’s a celebration of flavors and memories. Whether you’re looking to recreate a taste of home or simply enjoy a deliciously spicy dish, this recipe is sure to satisfy your cravings. I hope you enjoy making and sharing this dish with your loved ones as much as I have. Happy cooking!

Related update: Kung Po Chicken

Beef Pot Pies with Irish Cheddar Crust | Made by Meaghan Moineau

Beef Pot Pies with Irish Cheddar Crust

Intro

There’s something incredibly heartwarming about the aroma of a savory pot pie wafting through the house, especially on a cool, crisp evening. The first time I made Beef Pot Pies with Irish Cheddar Crust, I was transported back to my grandmother’s kitchen, where the warmth from her oven seemed to envelop us in a comforting embrace. Her stories of growing up in Ireland, where cheddar cheese was a staple in many family dishes, always fascinated me. Now, I cherish the tradition of baking these pies, filling my home with both a sense of nostalgia and the promise of a delicious meal.

Why You’ll Love It

This recipe combines the hearty richness of beef stew with the indulgence of a buttery, cheesy crust. The Irish cheddar adds a sharp, tangy flavor to the dough, perfectly complementing the savory filling. You’ll love how the tender beef melts in your mouth, contrasted by the flaky, golden crust. Whether you’re preparing a cozy family dinner or impressing guests with a classic dish, these pot pies are sure to delight.

Ingredients

  • Unsalted butter
  • Shredded sharp cheddar cheese
  • Flour
  • Sugar
  • Salt
  • Dry mustard
  • Cayenne pepper
  • Ice water
  • Vegetable oil
  • Beef chuck meat
  • Salt & pepper
  • Onion
  • Carrots
  • Garlic
  • Fresh thyme
  • Fresh marjoram
  • Flour
  • Canned beef broth
  • Water
  • Dijon mustard
  • Fresh parsley
  • Egg

Instructions

  1. Place the cut-up butter pieces in the freezer for 15 minutes to chill.
  2. Meanwhile, in the work bowl of a food processor, combine flour, sugar, dry mustard, salt, and cayenne pepper. Pulse to combine.
  3. After the butter has chilled, scatter the pieces over the flour mixture (still in the food processor), along with the cheddar. Pulse about 10 times.
  4. Sprinkle half the ice water over the dough, pulse about 3 times, repeat with remaining water, pulsing 3 more times. Pinch the dough to check if it sticks together; if not, add a tablespoon or two more ice water, until it comes together.
  5. Dump the mix in a large bowl and press it together to form the dough. Divide dough in half, shaping each into a 4-inch disk. Wrap each piece in plastic wrap and refrigerate at least an hour.
  6. Begin the filling: Pat the meat dry with paper towels and season with salt & pepper.
  7. Heat 2 teaspoons of oil in a large skillet over medium-high heat until just smoking. Add the meat in a single layer and cook, without stirring, until the meat browns well on the underside, anywhere between 5-10 minutes.
  8. Stir the meat and cook another couple of minutes, until it loses the raw color. Remove to a plate and set aside.
  9. Reduce heat to medium, add the remaining 2 teaspoons of oil, and the onions and carrots. Sauté until softened and starting to brown, stirring occasionally, around 5 minutes.
  10. Add the garlic, thyme, and marjoram, and cook until very fragrant, about a minute. Stir in flour, cook and stir about a minute.
  11. Slowly add in the beef broth and water, then the meat, along with any juices left on the plate. Bring to a simmer, then reduce the heat to low, to med-low. Cover and cook, stirring occasionally, until the meat is just becoming tender, around 45 minutes.
  12. Remove from heat, add in the Dijon and parsley. Adjust seasoning with salt & pepper. Set aside to cool.

Tips

For the best results, ensure your butter is very cold before incorporating it into the dough. This helps create a flaky texture in the crust. When browning the meat, patience is key—avoid stirring too soon to allow a flavorful crust to form.

Variations & Substitutions

Feel free to experiment with different types of cheese in the crust—an aged Gouda or a sharp Swiss would provide a delightful twist. For a vegetarian version, substitute the beef with hearty mushrooms and swap the beef broth for vegetable stock. You can also add peas or potatoes to the filling for additional texture and flavor.

Storage

These pot pies can be made ahead and stored in the refrigerator for up to three days. To freeze, wrap the unbaked pies tightly in plastic wrap and aluminum foil, and store for up to two months. When ready to bake, simply add a few extra minutes to the baking time.

FAQ

Can I make the dough by hand if I don’t have a food processor?

Yes, you can make the dough by hand. Use a pastry cutter or your fingertips to work the butter and cheese into the flour mixture until it resembles coarse crumbs. Gradually add the ice water, mixing until the dough comes together.

What can I serve with these pot pies?

These pot pies are quite filling on their own, but a light side salad or some roasted vegetables can complement them beautifully. A glass of red wine or a robust ale pairs wonderfully with the rich flavors of the dish.

Can I use store-bought pie dough?

While homemade dough provides a unique flavor and texture, you can certainly use store-bought pie dough for convenience. Just be sure to add some shredded cheddar to the dough if you want to keep the cheesy crust element.

Nutrition

While I don’t have specific nutritional information for this recipe, it’s worth noting that these pot pies are an indulgence, combining buttery crusts and rich beef filling. Moderation is key, and you can always tailor the recipe to your dietary needs by adjusting the salt or using leaner cuts of beef.

Conclusion

Beef Pot Pies with Irish Cheddar Crust are more than just a meal; they’re a connection to cherished memories and a testament to the comforting power of homemade food. Whether you’re new to baking or a seasoned cook, this recipe invites you to enjoy the process and savor the results. Gather your loved ones, share a story or two, and enjoy the warmth and goodness these pot pies bring to your table.

Related update: Beef Pot Pies with Irish Cheddar Crust

Related update: Kung Po Chicken

Guinness and Brats | Made by Meaghan Moineau

Guinness and Brats: A Delicious Grilled Delight

Intro

There’s something magical about the smell of bratwurst sizzling on a grill, mingling with the rich aroma of Guinness Stout. It takes me back to summer evenings spent in my grandparents’ backyard. Grandpa would fire up the grill, the scent of the brats and onions wafting through the air, while Grandma would hum an old tune, setting the table with mismatched plates and cutlery. Those moments, filled with laughter and stories under the setting sun, are forever etched in my memory. Today, I want to share this cherished family recipe with you, bringing a piece of my past to your table.

Why You’ll Love It

This recipe is a true crowd-pleaser, perfect for gatherings or a simple family meal. Here’s why you’ll love it:

  • Simplicity: With just a few ingredients, it’s easy to prepare and even easier to enjoy.
  • Flavor: The combination of Guinness Stout and bratwurst creates a rich, savory dish that’s hard to resist.
  • Versatility: While grilling is our favorite method, you can adapt this recipe for the oven or stovetop.
  • Nostalgia: It’s the perfect way to create lasting memories with family and friends.

Ingredients

  • Bratwurst
  • Hotdog buns
  • Onions, quartered
  • Guinness Stout beer

Instructions

  1. Preheat your grill to about 400°F.
  2. In a large cast iron skillet, place the bratwurst links and quartered onions.
  3. Pour a bottle of Guinness Stout over the bratwurst and onions.
  4. Place the skillet on the grill and close the lid.
  5. Every 5-10 minutes, lift the lid and toss the onions and brats in the Guinness to ensure even cooking.
  6. After about 45 minutes to an hour, the bratwurst should be fully cooked and the onions caramelized.
  7. Remove from the grill and place a bratwurst and some caramelized onions onto a hotdog bun.
  8. Serve immediately and enjoy!

Tips

  • Preheat Properly: Always ensure your grill is preheated to the right temperature for the best results.
  • Use a Cast Iron Skillet: This retains heat well and provides even cooking.
  • Regular Tossing: Toss the brats and onions regularly to ensure even cooking and prevent sticking.

Variations & Substitutions

Feel free to get creative with this recipe:

  • Beer Variations: While Guinness Stout is my personal favorite, you can use any stout or dark beer you prefer.
  • Onion Choices: Try using different types of onions, such as red or sweet onions, for a slightly different flavor profile.
  • Bun Options: Swap out hotdog buns for pretzel buns or whole wheat buns for a different texture and flavor.

Storage

If you have leftovers, store the bratwurst and onions in an airtight container in the refrigerator for up to 3 days. To reheat, place them in a skillet over medium heat until warmed through. Avoid storing the brats in the buns as they may become soggy.

FAQ

Can I make this recipe without a grill?

Yes, you can make this recipe on the stovetop or in the oven. Simply follow the same instructions using a stovetop burner or preheated oven at 400°F. The cooking time may vary, so keep an eye on the brats and onions to ensure they are cooked through.

What should I serve with Guinness and Brats?

This dish pairs wonderfully with classic sides like potato salad, coleslaw, or grilled vegetables. For a more traditional touch, serve with a side of German-style potato pancakes or soft pretzels.

Can I use a different type of sausage?

Absolutely! While bratwurst is traditional, you can experiment with other sausages like Italian or Polish sausages. Keep in mind that different sausages may have varying cooking times.

Nutrition

While I don’t have the exact nutritional breakdown, it’s good to note that bratwurst and beer-based recipes are typically higher in calories and fat. If you’re looking for a lighter version, consider using a leaner sausage and opting for whole grain buns.

Conclusion

Guinness and Brats is more than just a recipe; it’s a journey down memory lane, a celebration of flavors, and a testament to the joy of sharing a meal with loved ones. Whether you’re hosting a barbecue, celebrating a special occasion, or simply enjoying a quiet evening at home, this dish is sure to bring warmth and happiness to your table. I hope you enjoy making and eating it as much as we do. Cheers to good food, great memories, and cherished traditions!

Related update: Guinness and Brats

Related update: Beef Pot Pies with Irish Cheddar Crust