Mutton Rendang | Made by Meaghan Moineau

Mutton Rendang | Made by Meaghan Moineau

## The Art of Mutton Rendang: A Culinary Journey into Tradition
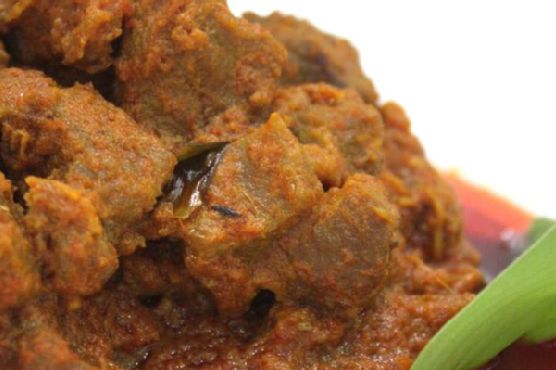

### Description:


Indulge in the rich flavors and aromatic spices of Mutton Rendang, a classic dish that transcends time and brings families together. Unravel the secrets of this beloved recipe, infused with cherished memories and traditional techniques. Perfect for a cozy family dinner or a festive celebration, Mutton Rendang is sure to captivate your taste buds and warm your heart.


---


### A Culinary Nostalgia: The Heartwarming Tale of Mutton Rendang


Cooking has always been more than just preparing food; it’s a journey into the heart of family traditions and shared memories. For me, Mutton Rendang is not just a dish; it’s a delicious reminder of my childhood, spent in my grandmother's warm kitchen. The air filled with the comforting aroma of spices sizzling in hot oil—a scent that, to this day, transports me back to those joyful days.


Every festive season, my family would gather at my grandmother's house. The centerpiece of our celebration was always her legendary Mutton Rendang. I remember watching her skillfully mix mutton pieces with turmeric powder and salt, a ritual that marked the beginning of a culinary masterpiece. She would then carefully cover the saucepan and place it on the stove, letting it boil until the meat was tender and flavorful.


As the meat simmered, my grandmother would blend a fragrant paste of dried chillis, shallots, onion, garlic, ginger, lemongrass, galangal, and fresh turmeric. The kitchen would come alive with the vibrant colors and tantalizing scents of these essential ingredients. The sound of cumin and fennel seeds crackling in hot oil signified the start of a magical transformation.


My grandmother always emphasized the importance of patience. "The longer you sauté the paste, the better the flavor," she would say with a twinkle in her eye. Her dedication to perfection was evident in every stir of the wok, every addition of thin coconut milk, dried tamarind, and turmeric leaf, and in the careful balance of salt. The final touch was the thick coconut milk, which enveloped the mutton in a creamy embrace, and the toasted coconut, adding a delightful texture and nutty aroma.


The result was a symphony of flavors—rich, spicy, and deeply satisfying. As we gathered around the dining table, each bite of Mutton Rendang was a taste of tradition, a spoonful of love passed down through generations. It was more than a meal; it was a celebration of family, heritage, and the art of cooking.


### Recipe Difficulty: 8/10


### Classification: Main Dish


Mutton Rendang is a dish that requires time, patience, and a love for authentic flavors. While the process may seem intricate, the reward is a delectable masterpiece that brings joy and togetherness to any meal. Whether you're a seasoned cook or a culinary enthusiast, this recipe invites you to experience the magic of traditional cooking and create lasting memories with your loved ones.

Read more about Appetizers

Read more about Main Dishes

Read more about Desserts

Mashed Sweet Potatoes | Made by Meaghan Moineau

Mashed Sweet Potatoes | Made by Meaghan Moineau

**Title: Comfort in a Bowl: Nostalgic Mashed Sweet Potatoes**


**Description:** Dive into the heartwarming world of Mashed Sweet Potatoes, a dish that marries the comforting flavors of cinnamon and cardamom with the sweet allure of maple syrup and brown sugar. This recipe is not just a side dish; it's a journey through cherished family memories and the warmth of home cooking. Join me as I share the joy of creating and savoring this delectable, easy-to-make dish that scores a low 3/10 on the difficulty scale, perfect as a delightful side for any meal.


---


**The Sweet Essence of Family: A Mashed Sweet Potatoes Journey**


There's something magical about the kitchen during the holidays. The hum of conversation, the clinking of dishes, and the mouthwatering aroma of sweet and spicy flavors dancing through the air create an atmosphere of warmth and togetherness. For me, one dish that encapsulates this feeling is Mashed Sweet Potatoes—a dish as comforting as a grandmother's hug.


**A Nostalgic Tale:**


Growing up, the holiday season was a bustling affair at my grandmother's house. The kitchen was always filled with the sights and sounds of family members working side by side, each contributing to the festive feast. Among the many dishes, my grandmother's Mashed Sweet Potatoes held a special place on the table and in our hearts.


I vividly remember the first time she let me help prepare them. I was barely tall enough to see over the countertop, but she handed me a wooden spoon and guided my tiny hands as we mashed the sweet potatoes together. "Now, add a bit of this," she'd say, passing me a pinch of cinnamon or a spoonful of maple syrup, her eyes twinkling with the wisdom of years spent perfecting this recipe.


The secret, she confided, was in the balance of flavors—the warm spice of cardamom, the unexpected heat of cayenne pepper, and the bright zest of an orange, all melded together by the luxurious smoothness of cream and butter. Each bite was a revelation, a perfect harmony of sweet and savory that left you longing for more.


**The Recipe: Mashed Sweet Potatoes**


**Ingredients:**


- 4 large sweet potatoes, peeled and cut into chunks


- 1/4 cup brown sugar


- 1/4 cup butter


- 1/2 teaspoon ground cardamom


- 1/8 teaspoon cayenne pepper


- 1 teaspoon ground cinnamon


- 1/4 cup cream


- Kosher salt, to taste


- 1/4 cup maple syrup


- 1 tablespoon orange zest


- 1 teaspoon vanilla extract


**Instructions:**


1. Begin by boiling the sweet potatoes until tender. Drain and return them to the pot.


2. Mash the peeled potatoes until well broken up. For a smoother texture, feel free to use an electric mixer.


3. In a separate bowl, mix together the cinnamon, cayenne, cardamom, orange zest, and brown sugar. Set this aromatic mixture aside.


4. Add the butter, cream, vanilla extract, and maple syrup to the mashed sweet potatoes. Stir thoroughly until the mixture is well combined and creamy.


5. Incorporate the cinnamon sugar mixture, blending until smooth.


6. Salt to taste, adjusting the seasoning until the flavors sing.


**A Dish for Every Occasion:**


Rated at a 3/10 on the difficulty scale, this dish is not only simple to make but also versatile enough to accompany a variety of meals. Whether served as a comforting side to a holiday roast or as a hearty addition to a weeknight dinner, these Mashed Sweet Potatoes bring a touch of nostalgia and warmth to any table.


As you savor this dish, remember that it's more than just a recipe; it's a celebration of family, tradition, and the simple joys of cooking together. So, gather your loved ones, share the story, and enjoy the sweet embrace of a dish that feels like home.

Read more about Appetizers

Read more about Main Dishes

Read more about Desserts

Roasted Brussels Sprouts With Red Onions and Pancetta | Made by Meaghan Moineau

Roasted Brussels Sprouts With Red Onions and Pancetta | Made by Meaghan Moineau

**Title: "A Taste of Home: Roasted Brussels Sprouts with Red Onions and Pancetta"**


**Description: Discover the heartwarming flavors of Roasted Brussels Sprouts with Red Onions and Pancetta, a recipe that combines savory pancetta, aromatic garlic, and crispy bread crumbs for a delightful dish. Perfect as an appetizer or a comforting main dish, this recipe will transport you to cherished family gatherings with every bite.**


---


There's something undeniably comforting about the aroma of roasted Brussels sprouts wafting through the kitchen. It’s a scent that transports me back to cozy family gatherings during the chilly months, where we would gather around the dining table, eager to dig into a meal that always felt like a warm embrace. One dish that stood out amidst the spread was my grandmother's Roasted Brussels Sprouts with Red Onions and Pancetta. It wasn’t just a dish; it was a staple that held a special place in our hearts and on our plates.


**Ingredients:**


- Brussels sprouts


- Pancetta


- Garlic


- Olive oil


- Bread


**Instructions:**


1. Preheat your oven to 350 degrees Fahrenheit. In a large plastic zippered bag, toss the Brussels sprouts with 3 pressed garlic cloves and 2 tablespoons of olive oil. Shake well to ensure even coating.


2. Empty the contents into an ovenproof dish and roast for 40 minutes. The Brussels sprouts should be tender with a slight char that enhances their natural sweetness.


3. While the Brussels sprouts are roasting, heat 1/4 cup of olive oil in a pan. Once heated, sauté a slice of bread until browned on both sides. Set aside to cool and become crisp.


4. When the Brussels sprouts are done, return to the pan used for the bread. Add the red onions and sauté for about 3 minutes. Be cautious not to let them become fully tender; they should retain a subtle crunch.


5. Introduce the pancetta to the pan, allowing it to heat through for an additional minute. The pancetta should be aromatic and slightly crispy.


6. Add the roasted Brussels sprouts to the pan and heat through for another 3 minutes. This will allow the flavors to meld beautifully.


7. Remove from heat. In a food processor, blend the sautéed bread with 1-2 cloves of garlic. This will create a fragrant, crunchy topping.


8. Sprinkle the garlic bread crumbs over the Brussels sprouts mixture and finish with a final drizzle of olive oil for added richness.


What I love about this dish is its simplicity and the way it brings people together. My grandmother used to say that the secret ingredient was love, and I wholeheartedly believe her. The combination of the savory pancetta with the slight bitterness of the Brussels sprouts, balanced by the sweetness of the onions and the crunch of the garlic-infused bread crumbs, creates a symphony of flavors that is both nostalgic and comforting.


This recipe, with its robust flavors and comforting taste, is rated a 4 out of 10 in difficulty—making it accessible to both novice and experienced cooks. It can be served as a delightful appetizer to whet the appetite, or as a main dish that stands proudly at the center of any meal.


So, if you are looking to recreate a dish that is as rich in flavor as it is in family history, give this Roasted Brussels Sprouts with Red Onions and Pancetta a try. It’s not just about cooking; it’s about creating memories that will be cherished for generations to come.

Read more about Appetizers

Read more about Main Dishes

Read more about Desserts

Baked Alaska | Made by Meaghan Moineau

Baked Alaska | Made by Meaghan Moineau

**Title: Nostalgic Elegance: Crafting the Perfect Baked Alaska**


**Description:** Discover the timeless allure of Baked Alaska, a classic dessert that combines the richness of cake, the chill of ice cream, and the ethereal beauty of meringue. This blog post offers a step-by-step guide to creating this show-stopping dessert while sharing a heartfelt family memory that adds a touch of nostalgia to every bite. Perfect for those looking to impress at their next dinner party or simply indulge in a sweet trip down memory lane.


---


### The Art of Baked Alaska: A Dessert with a Story


Baked Alaska is more than just a dessert; it's an experience—a theatrical finale to any meal that leaves your guests in awe. This classic dessert combines the simplicity of a round cake, the delight of creamy ice cream, and the elegance of golden meringue peaks. With its captivating contrast of hot and cold, Baked Alaska is a sweet symphony that dances on your taste buds.


#### Ingredients You'll Need:


- Round cake


- 1/2 gallon ice cream


- 4 egg whites


- 1/4 teaspoon cream of tartar


- 1 cup powdered sugar


#### Step-by-Step Instructions:


1. **Prepare the Ice Cream Layer**:


Grease a 7-inch bowl with flavorless oil or unsalted butter. Allow the ice cream to soften until it's workable. Pack it tightly into the bowl, smoothing the top. Freeze until it hardens completely.


2. **Make the Meringue**:


Beat the egg whites until foamy. Add the cream of tartar and continue whipping until stiff peaks form. Gradually fold in the powdered sugar, ensuring the meringue is smooth and glossy.


3. **Assemble the Baked Alaska**:


Place the frozen cake on a plate slightly larger than the cake. Unmold the ice cream onto the center of the cake. If the ice cream is stubborn, dip the bowl briefly in warm water to release it.


4. **Decorate with Meringue**:


"Frost" the cake and ice cream with the meringue, covering it completely. Use a spoon or spatula to create decorative peaks.


5. **Bake to Perfection**:


Preheat your oven to 450°F. Bake the assembled Baked Alaska for 6-7 minutes until the meringue peaks are golden brown. Store in the freezer until you're ready to serve.


#### A Family Memory: The Sweetness of Tradition


Every year, my family gathers for a cherished tradition—Grandma's birthday. Amongst the laughter and shared stories, Baked Alaska takes center stage. I remember one year when I was young, standing on a chair to get a better view as my mother carefully crafted the dessert. The kitchen was filled with the sweet aroma of cake and sugary meringue. As we all gathered around the table, eyes wide with anticipation, Grandma's eyes sparkled with joy. The Baked Alaska was more than a dessert; it was our family's love, layered with memories of the past and hopes for the future. Even now, every bite transports me back to that warm kitchen, surrounded by love and laughter.


#### Difficulty Rating: 6/10


Creating Baked Alaska requires some skills, especially with the meringue and timing. However, with patience and practice, this dessert can become a beautiful centerpiece for any occasion.


#### Classification: Dessert


This spectacular creation is the quintessential dessert—a perfect blend of textures and temperatures that will leave a lasting impression on your guests.


---


Embrace the nostalgia and the sweet challenge of making Baked Alaska. Whether it's for a special occasion or simply to relive fond memories, this dessert promises to be a delightful journey for both the baker and those fortunate enough to enjoy it.

Read more about Appetizers

Read more about Main Dishes

Read more about Desserts

Soufflé au chocolat | Made by Meaghan Moineau

Soufflé au chocolat | Made by Meaghan Moineau

**Title: Fluffy Decadence: Mastering the Soufflé au Chocolat**


**Description: Dive into the art of creating the perfect Soufflé au Chocolat with this step-by-step guide. Discover a cherished family memory that brings this delightful dessert to life, and learn the secrets to achieving a dessert that will leave everyone in awe.**


---


### Introduction


There’s something undeniably magical about a soufflé—its delicate rise, the way it teases your senses with its rich aroma, and the blissful moment when you dig into its airy depths. Today, we're focusing on a timeless classic, the Soufflé au Chocolat, a dessert that's as much a treat for the eyes as it is for the palate. Rated at a difficulty of 7 out of 10, this dessert is sure to impress and delight.


### Ingredients


- 6 ounces of high-quality chocolate


- 4 large egg whites


- 3 large egg yolks


- 1/3 cup of heavy cream


- 1/4 teaspoon of salt


- 2 tablespoons of sugar


- Butter for greasing the soufflé dishes


- Additional sugar for coating the dishes


### Instructions


1. **Preparation:**


Begin by buttering eight 3/4-cup soufflé dishes. Generously sprinkle sugar inside each dish, tilting to ensure an even coat, and tap out any excess. Arrange these prepared dishes on a large baking sheet.


2. **Chocolate Mixture:**


In a large metal bowl, combine the chocolate and heavy cream. Set the bowl over a saucepan of barely simmering water. Stir continuously until the chocolate is melted and the mixture is smooth. Remove the bowl from heat and stir in the egg yolks and salt.


3. **Egg Whites:**


Using an electric mixer, beat the egg whites in another large bowl until soft peaks form. Gradually add 2 tablespoons of sugar, beating until semi-firm peaks form.


4. **Combine:**


Using a rubber spatula, fold one-quarter of the beaten egg whites into the chocolate mixture to lighten it. Gently fold in the remaining egg whites in two additions.


5. **Fill and Bake:**


Divide the chocolate mixture among the prepared soufflé dishes, filling them completely. Position the oven rack in the center and preheat to 204°C (400°F). Bake the soufflés on the baking sheet until they are puffed and the tops feel firm—approximately 16 minutes for room temperature batter or 18 minutes if chilled.


### A Nostalgic Family Memory


Growing up, the Soufflé au Chocolat was a staple at our family gatherings. My grandmother, a culinary maestro, would orchestrate a symphony of flavors that left every guest in awe. I vividly remember one snowy winter evening when she decided to teach me her secrets. The kitchen was filled with warmth and the rich scent of chocolate. Her gentle guidance and patient hands taught me the art of folding egg whites, an essential technique for this delicate dessert. That night, as we sat around the table, the soufflés rose beautifully, much like the laughter and joy that filled the room. It was in those moments that I learned that cooking is not just about food—it's about creating memories that last a lifetime.


### Conclusion


The Soufflé au Chocolat is more than just a dessert; it’s a celebration of culinary artistry and a testament to the love and care poured into every dish. Whether you’re crafting this for a special occasion or a cozy night in, this recipe promises to transport you and your loved ones to a place of indulgence and nostalgia. So, preheat your oven, gather your ingredients, and prepare to delight in a chocolate cloud that is sure to make hearts flutter.


### Classification


- **Difficulty:** 7/10


- **Type:** Dessert


---


Embrace the challenge, enjoy the process, and savor the sweet rewards of this timeless classic. Bon appétit!

Read more about Appetizers

Read more about Main Dishes

Read more about Desserts

Steamed Artichokes With Roasted Red Pepper Aioli | Made by Meaghan Moineau

Steamed Artichokes With Roasted Red Pepper Aioli | Made by Meaghan Moineau

### Title: Nostalgic Flavors: Steamed Artichokes with Roasted Red Pepper Aioli


#### Description:


Dive into a culinary journey with our Steamed Artichokes with Roasted Red Pepper Aioli recipe. This delightful dish, rated 6/10 in difficulty, serves as a perfect appetizer for any gathering. Infused with rich flavors and a touch of nostalgia, it's a must-try for those who want to impress their guests while reminiscing about cherished family moments.


---


#### A Taste of Memories: Steamed Artichokes with Roasted Red Pepper Aioli


The clatter of pots and pans, the gentle hum of conversation, and the irresistible aroma of steaming artichokes mingling with the tangy scent of roasted red pepper aioli—it all transports me back to those cherished family gatherings at my grandmother's house. Her kitchen was a place of warmth and laughter, where recipes were passed down through generations and every dish told a story.


This Steamed Artichokes with Roasted Red Pepper Aioli is more than just an appetizer; it's a gateway to nostalgia, a dish that brings back the vibrant energy of my childhood. I vividly remember sitting around the large oak dining table, eagerly waiting for the artichokes to finish steaming. My grandmother would carefully trim and prepare them, her hands skillfully working their magic. We, the little ones, were tasked with setting the table and sneaking tastes of the aioli, much to her feigned dismay.


#### Ingredients:


- Artichokes


- Egg yolks


- Garlic clove


- Cayenne pepper


- Lemon juice


- Oil


- Red roasted pepper


- Salt


#### Instructions:


1. **Prepare the Aioli**: Place the egg yolks, garlic, cayenne pepper, and a pinch of salt in a food processor. Puree until smooth. Add the roasted red pepper and puree again until the mixture is fully smooth. While the processor is running, gradually pour in the oil, allowing the mixture to emulsify to your desired consistency. Taste and adjust with more salt if needed. Cover and refrigerate until ready to serve.


2. **Steam the Artichokes**: Fill a large pot with about 2 inches of water and place a steaming basket over it. Cover and bring to a boil. Trim the artichoke stems and remove about 1 inch from the top of the artichoke flower. Discard any damaged leaves at the base. Using kitchen shears, trim the pointed tips of the outer leaves. Squeeze lemon juice over the cut edges to prevent browning. Sprinkle with salt and place the artichokes in the steaming basket. Cover and steam for 30-40 minutes, or until a center leaf pulls out easily.


3. **Serve**: Arrange the steamed artichokes on a platter, with the roasted red pepper aioli on the side for dipping. For an added touch, serve alongside fingerling potatoes, which also pair beautifully with the aioli.


#### A Culinary Journey


As I savor this dish today, I am reminded of those joyful family meals, a time when life seemed simpler and every meal was a celebration. The earthy taste of the artichokes combined with the creamy, spicy aioli evokes memories of laughter and togetherness. This recipe not only delights the senses but also acts as a tribute to family traditions and the timeless art of home cooking.


#### Difficulty: 6/10


#### Classification: Appetizer


Whether you're introducing this dish at a family gathering or simply recreating a beloved memory, Steamed Artichokes with Roasted Red Pepper Aioli is sure to leave a lasting impression. Enjoy the flavors, relish the memories, and, most importantly, share the joy with those you love.

Read more about Appetizers

Read more about Main Dishes

Read more about Desserts

Baked Cinnamon Apple Wedges | Made by Meaghan Moineau

Baked Cinnamon Apple Wedges | Made by Meaghan Moineau

**Title: A Warm Hug in Every Bite: Baked Cinnamon Apple Wedges**


**Description:** Dive into the nostalgic flavors of fall with our Baked Cinnamon Apple Wedges. This simple yet flavorful dessert is perfect for cozy gatherings or a comforting treat at home. With just four ingredients, this easy-to-make dish brings back cherished family memories while delighting your taste buds.


---


As autumn leaves begin to fall and a crisp breeze fills the air, my thoughts often drift back to cozy family gatherings. One of my fondest memories is of my grandmother bustling around her warm kitchen, the welcoming scent of cinnamon and nutmeg weaving through the house like a comforting embrace. She had a knack for turning the simplest ingredients into something magical, and her Baked Cinnamon Apple Wedges were no exception.


Every autumn, she would gather the freshest apples from the local orchard, their skins glistening in shades of red and green. I remember sitting at the kitchen table, my feet barely touching the floor, as she meticulously cut each apple into perfect wedges. She would then drizzle them with rich maple syrup, sprinkle them with aromatic cinnamon and nutmeg, and slide them into the oven. The anticipation was almost too much to bear, as the sweet and spicy aroma filled the room, wrapping us in its warmth.


Just ten minutes later, the apples emerged from the oven, golden brown and tender, ready to be savored. Each bite was like a warm hug, the flavors perfectly balanced and reminiscent of everything wonderful about the season. We would gather around the table, sharing stories and laughter, the simple act of enjoying these baked apple wedges creating memories that would last a lifetime.


Now, as I prepare this dish for my own family, I am reminded not only of my grandmother's love but also of the joy found in sharing these timeless recipes. The Baked Cinnamon Apple Wedges are more than just a dessert; they are a connection to the past, a celebration of the present, and a tradition I hope to pass on.


**Recipe: Baked Cinnamon Apple Wedges**


**Ingredients:**


- 1 apple


- 1 tablespoon maple syrup


- 1 teaspoon ground cinnamon


- 1/4 teaspoon ground nutmeg


**Instructions:**


1. Preheat your oven to 180 degrees Celsius (356 degrees Fahrenheit).


2. Cut the apple into approximately 10-12 wedges.


3. In a bowl, mix the apple wedges with maple syrup, cinnamon, and nutmeg until evenly coated.


4. Arrange the apple wedges in a single layer in a small baking dish or on a baking tray.


5. Bake in the preheated oven for 10 minutes, or until the apples are golden brown and cooked through.


6. Serve warm and enjoy the comforting flavors.


**Difficulty Rating:** 2/10


**Classification:** Dessert


Whether you're looking to recreate cherished family memories or simply indulge in a deliciously easy dessert, these Baked Cinnamon Apple Wedges are sure to delight. With their enticing aroma and comforting taste, they capture the essence of fall in every bite. So gather your loved ones, share a story or two, and enjoy this warm hug from the oven.

Read more about Appetizers

Read more about Main Dishes

Read more about Desserts

Chicken and Roasted Broccoli Salad With Goat Cheese | Made by Meaghan Moineau

Chicken and Roasted Broccoli Salad With Goat Cheese | Made by Meaghan Moineau

# Nostalgic Flavors: Chicken and Roasted Broccoli Salad with Goat Cheese


## A Taste of Home: Family Gatherings and Culinary Memories


Growing up, my family had a tradition of gathering every Sunday for a hearty meal. The kitchen would be filled with laughter, the clatter of pots and pans, and the mouthwatering aroma of delicious dishes. One of the standout recipes that often graced our table was the Chicken and Roasted Broccoli Salad with Goat Cheese. This dish, with its perfect blend of savory chicken, tangy goat cheese, and roasted broccoli, is not just a meal—it's a cherished memory.


### Ingredients:


- 1 head of broccoli, chopped into florets


- 2 garlic cloves, minced


- 4 oz goat cheese, crumbled


- Juice from 1 lemon


- 3 tbsp olive oil


- 1 tsp dried oregano


- 1/2 tsp freshly ground pepper


- 1 red bell pepper, sliced


- A pinch of red pepper flakes


- Salt, to taste


- 2 cups cooked shredded chicken


- 1 tsp sugar


### Instructions:


1. **Preheat the Oven:** Begin by heating your oven to a scorching 500 degrees Fahrenheit. Place a sturdy baking sheet on the lowest rack. This high heat is essential for achieving perfectly roasted broccoli.


2. **Prepare the Broccoli:** In a large bowl, toss the broccoli florets with minced garlic, olive oil, salt, pepper, and a dash of red pepper flakes. For an added touch of sweetness, sprinkle in the sugar.


3. **Roast the Broccoli:** Spread the broccoli mixture evenly on the preheated baking sheet. Roast in the oven for about 15-20 minutes, or until the broccoli is tender and has a slight char.


4. **Assemble the Salad:** In a large serving bowl, combine the roasted broccoli, shredded chicken, and red bell pepper slices. Drizzle with lemon juice and sprinkle with dried oregano.


5. **Add the Goat Cheese:** Finish the salad by crumbling goat cheese over the top. Its creamy texture and tangy flavor will elevate the dish.


6. **Serve:** Toss everything gently to combine, ensuring an even distribution of ingredients. Serve warm or at room temperature.


### A Family Memory:


I vividly remember one particular Sunday when my grandmother decided to add her unique twist to this classic dish. With her usual flair, she infused the salad with extra lemon juice and a touch of oregano, creating a symphony of flavors that lingered on our taste buds. That afternoon, we gathered around the table, reminiscing about old times and sharing stories that spanned generations. The Chicken and Roasted Broccoli Salad with Goat Cheese became more than just a meal—it was a symbol of love, tradition, and the bonds that tie us together.


### Difficulty Rating: 4/10


This dish is straightforward and perfect for cooks of all levels. The simple steps and readily available ingredients make it an ideal choice for a relaxing Sunday dinner.


### Classification: Main Dish


With its hearty combination of protein, vegetables, and cheese, this salad serves as a satisfying main dish. It’s perfect for a family meal or a casual dinner with friends.


---


Whether you're recreating family memories or crafting new ones, the Chicken and Roasted Broccoli Salad with Goat Cheese is a delightful dish that will warm your heart and satisfy your palate. Enjoy the nostalgia and flavors that come with each bite!

Read more about Appetizers

Read more about Main Dishes

Read more about Desserts

Crème Fraiche Coconut Bavarians | Made by Meaghan Moineau

Crème Fraiche Coconut Bavarians | Made by Meaghan Moineau

**Title: Indulge in Nostalgia with Crème Fraiche Coconut Bavarians: A Dessert That Transcends Time**


**Description: Dive into the rich, creamy world of Crème Fraiche Coconut Bavarians—a dessert that perfectly blends tradition and modern culinary artistry. Infused with the tropical allure of coconut and the luxurious texture of crème fraiche, this dessert is not just a treat for the palate but also a journey down memory lane. Discover how this delectable creation became a cherished family tradition and learn how to create it yourself with our step-by-step guide.**


**Crème Fraiche Coconut Bavarians: A Sweet Taste of Memory**


The gentle hum of our family kitchen was always punctuated by the rhythmic clattering of dishes and the soft laughter of loved ones. Among the many desserts that graced our dining table, one stood out for its sumptuous texture and evocative flavor—Crème Fraiche Coconut Bavarians. It wasn't just a dessert; it was the embodiment of family gatherings, a sweet testament to our shared history.


**Ingredients:**


- 1 packet gelatin


- 1 can coconut milk, divided


- 1 can sweetened condensed milk


- 1/2 cup sugar


- 4 egg yolks


- 1 cup Alouette Cuisine Crème Fraiche


- 1/2 cup shredded coconut


**Instructions:**


1. **Bloom the Gelatin:** In a small bowl, combine the gelatin with 4 tablespoons of coconut milk. Let it sit to bloom while you prepare the rest of the ingredients.


2. **Simmer the Milks:** In a medium saucepan, bring the sweetened condensed milk and remaining coconut milk to a gentle simmer over medium-high heat. Stir occasionally to ensure it doesn't stick to the bottom.


3. **Temper the Egg Yolks:** Meanwhile, whisk together the sugar and egg yolks in a separate bowl until well combined. Slowly add a small amount of the heated milk mixture to the egg yolks, whisking continuously to temper them without cooking the eggs.


4. **Combine and Thicken:** Gradually pour the tempered egg yolk mixture back into the saucepan. Stir constantly and heat until the mixture thickens enough to coat the back of a spoon, about 5 to 7 minutes. Remove from heat and stir in the bloomed gelatin until fully dissolved.


5. **Chill and Whip:** Transfer the mixture to a bowl and refrigerate until it begins to gel. While waiting, whip the Alouette Cuisine Crème Fraiche in a separate bowl until soft peaks form.


6. **Fold and Mold:** Once the gelatin mixture has slightly set, gently fold it together with the whipped crème fraiche. Pour the combined mixture into your chosen molds immediately.


7. **Refrigerate Overnight:** Allow the Bavarians to set in the refrigerator overnight.


8. **Serve with Nostalgia:** Unmold the Bavarians just before serving and generously sprinkle with shredded coconut. Enjoy the dessert that has become a beloved part of our family's culinary heritage.


**A Nostalgic Family Memory**


I remember the first time my grandmother made Crème Fraiche Coconut Bavarians. The kitchen was filled with the enticing aroma of coconut, a scent that still evokes memories of those bustling family gatherings. As children, we watched in awe as she carefully folded the whipped crème fraiche into the gelling mixture, her hands moving with the grace of years of practice. Each bite was a reminder of her warmth and the love she poured into every dish. Even today, making this dessert feels like a sweet conversation with her, a way to keep her spirit alive in our hearts and taste buds.


**Difficulty Rating:** 6/10


**Classification:** Dessert


Creating Crème Fraiche Coconut Bavarians is not just about following a recipe—it's about connecting with the past, savoring the present, and crafting memories for the future. Whether you're a seasoned chef or a culinary novice, this dessert promises a rewarding experience that goes beyond taste. So, gather your ingredients, embrace the process, and indulge in a dessert that truly transcends time.

Read more about Appetizers

Read more about Main Dishes

Read more about Desserts

Avocado-Mango Salad With Grilled Shrimp | Made by Meaghan Moineau

Avocado-Mango Salad With Grilled Shrimp | Made by Meaghan Moineau

**Title: A Taste of Summer: Avocado-Mango Salad with Grilled Shrimp**


**Description: Dive into the flavors of summer with our Avocado-Mango Salad with Grilled Shrimp. This dish, a symphony of fresh ingredients and vibrant tastes, is perfect for family gatherings or a simple weeknight dinner. Rated a 6/10 in difficulty, this main dish is sure to impress without overwhelming your culinary skills.**


---


**A Taste of Summer: Avocado-Mango Salad with Grilled Shrimp**


There’s something inherently nostalgic about summer meals. The smell of a grill heating up, the sound of laughter and chatter in the background, and the vibrant flavors of fresh produce all remind me of family gatherings at my grandmother's house. Today, I want to share a recipe that encapsulates those cherished memories: Avocado-Mango Salad with Grilled Shrimp. This dish not only brings a burst of flavor but also transports me back to those carefree days of summer.


**Ingredients:**


- 1 lb shrimp, peeled and deveined


- 2 ripe Hass avocados, diced


- 1 cup diced mango


- Lime wedges for garnish


- 2 tbsp red wine vinegar


- 2 tbsp fresh lime juice


- 1 tsp fresh ginger, grated


- 1 tsp sugar


- 1 tbsp Dijon mustard


- 1/4 cup canola oil


- 1/4 cup cilantro, chopped


- 1 tsp lime zest


- 1 diced habanero chile (optional for heat)


- 1/2 cup red onion, thinly sliced


- Salt and black pepper to taste


**Instructions:**


1. **Preheat the Grill:** Start by preheating your gas grill to high heat. This ensures that the shrimp will cook quickly and evenly, achieving that perfect charred flavor.


2. **Prepare the Dressing:** In a small bowl, combine the red wine vinegar, fresh lime juice, grated ginger, sugar, Dijon mustard, and canola oil. Whisk until the ingredients are well blended. Season with salt and black pepper to taste. Set aside.


3. **Grill the Shrimp:** Season the shrimp with a pinch of salt and black pepper. Place them on the grill and cook for about 2-3 minutes on each side, until they turn pink and opaque. Remove from the grill and set aside.


4. **Assemble the Salad:** In a large bowl, combine the diced avocados, mango, red onion, lime zest, and cilantro. If you're feeling adventurous and enjoy a bit of heat, add the diced habanero chile. Drizzle the prepared dressing over the salad and toss gently to coat.


5. **Serve:** Arrange the grilled shrimp atop the salad, and garnish with lime wedges. This dish can be served warm or at room temperature, making it a versatile option for any occasion.


**A Family Memory:**


This dish always takes me back to the annual summer barbecues at my grandmother's house. I remember the excitement of helping her in the kitchen, carefully dicing the avocados and mangos while listening to her stories of summers past. The aroma of grilled shrimp would waft through the air as family members gathered around the picnic table, sharing laughter and love. It was during one of these gatherings that I first tasted the combination of creamy avocado with sweet mango and succulent shrimp—a flavor match made in heaven that has since become a family favorite.


**Final Thoughts:**


Our Avocado-Mango Salad with Grilled Shrimp is more than just a meal; it's an experience. It's a reminder of the joy that comes from sharing delicious food with loved ones. Whether you're creating new memories or reminiscing about old ones, this dish is sure to bring sunshine to your table.


**Difficulty Rating: 6/10**


**Classification: Main Dish**


So fire up the grill and gather your loved ones. It's time to create some delicious memories!

Read more about Appetizers

Read more about Main Dishes

Read more about Desserts

Brown Rice Mushroom Pilaf | Made by Meaghan Moineau

Brown Rice Mushroom Pilaf | Made by Meaghan Moineau

**Title: A Hearty Bowl of Comfort: Brown Rice Mushroom Pilaf**


**Description:** Discover the heartwarming delight of Brown Rice Mushroom Pilaf, a dish that brings back cherished family memories. Perfect as a main dish, this simple yet flavorful recipe is a wholesome addition to your menu. Join me as I share a nostalgic journey and a recipe that scores a 4 out of 10 on the difficulty scale, yet offers a 10 in satisfaction.


---


When the cool winds of autumn arrive, they carry with them a cascade of memories from a time when family gatherings were frequent and hearty meals filled the air with irresistible aromas. One such dish that has been a staple in my family for generations is the Brown Rice Mushroom Pilaf. With its earthy flavors and comforting warmth, it never fails to evoke a sense of home.


**The Nostalgic Story:**


I remember the first time I helped my grandmother make this pilaf. It was a chilly Saturday afternoon, and we were preparing for a large family dinner. The aroma of onions sizzling in sunflower oil filled the kitchen, mingling with the earthy scent of mushrooms. My grandmother, with her kind eyes and gentle hands, guided me through the process, teaching me how to patiently sauté the onions and mushrooms until they reached that perfect golden hue.


As the brown rice was added to the pan, she imparted her wisdom, "The secret, my dear, is to let each grain soak up the flavors. It’s like life; we must take in all the goodness around us." With her guidance, I learned the art of stirring the rice just enough to coat it in the oil without overdoing it, allowing each grain to absorb the rich flavors of the dish.


Once the water was added, we waited, sharing stories and laughter, letting the pilaf simmer, filling the air with its inviting aroma. The lid was placed on the saucepan, and we let it rest, just like she taught me, ensuring every drop of liquid was absorbed, leaving the rice tender and flavorful.


This dish, simple in its ingredients yet profound in its ability to bring people together, became a symbol of our family’s love and togetherness. To this day, whenever I prepare Brown Rice Mushroom Pilaf, it’s as if my grandmother is right there with me, smiling and reminding me of the importance of savoring life’s simple pleasures.


**Recipe for Brown Rice Mushroom Pilaf:**


**Ingredients:**


- 1 onion, chopped


- 1 cup brown rice


- 1 can (or equal amount) fresh mushrooms, sliced


- 2 tablespoons unrefined sunflower oil


- 2 cups water


- Sea salt, to taste


- Ground pepper, to taste


**Instructions:**


1. Heat the sunflower oil in a large saucepan over medium heat.


2. Add the chopped onion and sliced mushrooms, sautéing them for about 5 minutes until the onion becomes translucent and the mushrooms soften.


3. Stir in the brown rice, ensuring each grain is well-coated with the oil and flavors from the onion and mushrooms.


4. Pour in the water and bring the mixture to a boil.


5. Reduce the heat to a simmer, covering the saucepan. Let it cook for approximately 30 minutes.


6. Remove from heat, keeping the lid on, and let the pilaf rest until all the liquid is absorbed into the rice.


7. Season with sea salt and ground pepper to taste, then fluff with a fork before serving.


**Difficulty Rating:** 4/10


**Classification:** Main Dish


This Brown Rice Mushroom Pilaf is more than just a meal; it’s a journey into the past, a reminder of the warmth and love of family traditions. It’s perfect for a cozy dinner, offering a delightful blend of flavors that speak to the heart and soul. Whether you’re recreating cherished memories or making new ones, this dish is sure to become a beloved favorite in your home.

Read more about Appetizers

Read more about Main Dishes

Read more about Desserts

Salmon Caesar Salad | Made by Meaghan Moineau

Salmon Caesar Salad | Made by Meaghan Moineau

**Title: "Savor the Memories: A Family Tradition with Salmon Caesar Salad"**


**Description:**


Dive into a delightful blend of flavors with our Salmon Caesar Salad, a dish that not only tantalizes the taste buds but also brings back treasured family memories. Perfect as a main dish, this recipe is easy to prepare and offers a healthy twist on a classic favorite. Join us as we explore the simplicity of bringing together fresh ingredients and cherished moments in the kitchen.


---


### A Nostalgic Flavor Journey: Salmon Caesar Salad


As the aroma of sizzling salmon fills the kitchen, I'm instantly transported back to Sunday afternoons spent in my grandmother's sunlit dining room. It was there, amidst the laughter and stories shared across generations, that our family tradition of Salmon Caesar Salad was born.


My grandmother, a woman of simple tastes yet an extraordinary cook, had a knack for transforming humble ingredients into culinary masterpieces. Her version of Salmon Caesar Salad was no exception, a dish that became a staple at every family gathering.


#### The Heart of the Recipe


The magic begins with fresh, succulent salmon fillets, seasoned gently with salt and a sprinkle of paprika. As they sear in a hot skillet, the kitchen fills with a warm, inviting aroma, reminiscent of those cherished Sundays. The light seasoning allows the natural flavors of the salmon to shine, while a dash of freshly squeezed lemon juice adds a refreshing zing.


The salad itself is a crisp medley of romaine lettuce tossed in a light Caesar dressing. The crunch of the lettuce paired with the creamy dressing creates a perfect base for the star of the dish. Topped with shredded Parmesan cheese and slivered almonds, each bite offers a delightful contrast in textures and flavors.


#### Bringing it All Together


Once the salmon is perfectly cooked to your liking—I prefer mine slightly undercooked for a tender, melt-in-your-mouth experience—it's time to assemble the dish. In a large bowl, mix the romaine lettuce with the Caesar dressing before spreading it out on a large plate. Layer the salmon slices on top, each piece a testament to the careful preparation and love poured into the dish. A final sprinkle of black pepper and a touch more lemon juice complete the masterpiece, ready to be shared with loved ones.


#### A Family Tradition


Every time I prepare this dish, I'm reminded of the joy and warmth of family gatherings. The simplicity of the ingredients mirrors the uncomplicated happiness we found in each other’s company. Sharing this meal is more than just satisfying hunger; it's about preserving a legacy of love, laughter, and delicious food.


#### Recipe Details


- **Difficulty:** 3/10


- **Classification:** Main Dish


Whether you're a seasoned chef or a beginner in the kitchen, this Salmon Caesar Salad is a delightful way to bring a touch of nostalgia and a burst of flavor to your table. It's a dish that celebrates the beauty of simplicity and the joy of shared moments, one forkful at a time.


---


Embrace the tradition, savor the memories, and enjoy the delicious harmony of flavors with your own family. This Salmon Caesar Salad is more than just a recipe—it's a gateway to cherished memories and new traditions.

Read more about Appetizers

Read more about Main Dishes

Read more about Desserts

Not Momofuku Ginger Scallion Noodles | Made by Meaghan Moineau

Not Momofuku Ginger Scallion Noodles | Made by Meaghan Moineau

**Title: A Taste of Nostalgia: Not Momofuku Ginger Scallion Noodles**


**Description:** Dive into the comforting embrace of Not Momofuku Ginger Scallion Noodles, a delightful dish packed with vibrant flavors and warm memories. This recipe is your gateway to a symphony of taste and nostalgia, blending simple ingredients into a soul-soothing experience. Perfect for a cozy dinner, this dish will transport you back to cherished family gatherings, making it a must-try for any home cook.


---


**Blog Post:**


There's something magical about a recipe that evokes cherished memories with every bite. For me, Not Momofuku Ginger Scallion Noodles is more than just a dish; it's a bridge to my past, a flavorful reminder of family gatherings filled with laughter, love, and of course, delightful aromas wafting from the kitchen.


**Ingredients:**


- Soba noodles


- 1/4 cup grapeseed oil


- 2 cups green onions, finely chopped


- 2 tablespoons ginger, minced


- 4 cloves garlic, minced


- 2 shallots, thinly sliced


- 2 tablespoons fish sauce


- 1 tablespoon sesame seed oil


- 1 tablespoon rice wine vinegar


- 2 tablespoons wheat-free tamari sauce


- 1 tablespoon honey


- 1 red chile pepper, crushed


- Himalayan salt, to taste


**Instructions:**


1. Heat the grapeseed oil in a saucepan over high heat until shimmering and hot, but not smoking. This is where the magic begins.


2. Carefully add the green onions, ginger, garlic, and shallots to the pan. Watch as the ingredients sizzle and the aroma fills your kitchen, instantly transforming the space into a fragrant haven. The onions will wilt and turn a vibrant green almost immediately.


3. Remove the pan from the heat and stir the mixture with a wooden spoon. Feel the warmth of the moment as you add the fish sauce, sesame seed oil, rice wine vinegar, tamari sauce, honey, crushed red chile pepper, and Himalayan salt. Allow the sauce to sit for 15 minutes, letting the flavors meld together.


4. Toss with your favorite noodles. While I used fresh Chinese egg noodles for a traditional touch, soba noodles offer a splendid alternative, absorbing the sauce beautifully.


**A Nostalgic Connection:**


This dish always takes me back to my grandmother's kitchen. As a child, I spent countless weekends there, perched on a stool, watching her deftly chop green onions and ginger while regaling me with stories of her own childhood. She had a way of making the simplest ingredients sing, turning every meal into an event. The aroma of sizzling onions and ginger would fill the house, drawing everyone to the kitchen like moths to a flame. Every bite of her noodles was a testament to her love; a warm, comforting embrace on a plate.


**Difficulty Rating: 3/10**


Classified as a **Main Dish**, Not Momofuku Ginger Scallion Noodles is surprisingly straightforward to prepare, making it an ideal choice for both novice cooks and seasoned chefs alike. Its simplicity is its strength, allowing each ingredient to shine while wrapping you in a blanket of nostalgia and flavor.


---


There's an undeniable comfort in recreating a recipe that has stood the test of time in your family. Not Momofuku Ginger Scallion Noodles is more than just a meal; it's a journey back to those precious moments spent with loved ones. Whether you're cooking for a crowd or just for yourself, this dish is sure to bring a smile to your face and warmth to your heart. So, gather your ingredients, ignite your stove, and let the magic of nostalgia fill your kitchen once more.

Read more about Appetizers

Read more about Main Dishes

Read more about Desserts

Mango Fried Rice | Made by Meaghan Moineau

Mango Fried Rice | Made by Meaghan Moineau

**Title: Tropical Delight: Mango Fried Rice That Takes You Back Home**


**Description:** Dive into the vibrant fusion of flavors with our Mango Fried Rice recipe, a tropical twist on a classic dish that’s sure to awaken your taste buds. This delightful main dish combines the sweetness of mango with the rich flavors of chicken stock and the spicy kick of scotch bonnet peppers, promising a culinary journey that’s both comforting and exciting. Easy to prepare with a difficulty rating of 3 out of 10, this dish is perfect for any gathering or a cozy evening at home. Discover the magic of this recipe, where every bite tells a story of warmth and family traditions.


---


**Mango Fried Rice Recipe: A Taste of Nostalgia and Tropical Bliss**


There’s something incredibly heartwarming about a dish that not only satisfies your palate but also transports you back to cherished moments from the past. For me, Mango Fried Rice is that dish—a vibrant blend of flavors that evokes memories of family gatherings under the golden glow of the afternoon sun.


**Ingredients:**


- Rice


- Chicken stock


- Seasoning cubes


- Mango, cubed


- Mixed vegetables (your choice: carrots, peas, bell peppers, etc.)


- Scotch bonnet pepper, finely chopped


**Instructions:**


1. Begin by washing your rice thoroughly. Bring it to a gentle boil on medium heat with just a little water, as you’ll continue cooking it in chicken stock later. This method ensures the rice absorbs all the delicious flavors without becoming mushy.


2. Once the rice is slightly soft and the initial water has dried up, reduce the heat. Pour in the chicken stock and cook until it’s fully absorbed and the rice is perfectly tender. If your chicken stock is freshly made, it might have some natural oils from the chicken, negating the need for additional oil.


3. Increase the heat and stir in the chopped vegetables and scotch bonnet pepper. Add your seasoning cube to enhance the flavors.


4. Finally, gently fold in the cubed mango, allowing its sweetness to seep into every grain of rice. Serve warm with any protein of your choice. Personally, I recommend pairing it with grilled chicken, but feel free to customize it to your liking.


**Nostalgic Family Memory:**


Growing up, Sundays were a time of togetherness in our household. After a long week, we would gather in the kitchen, everyone playing a part in preparing the Sunday meal. My mother, with her warm smile and gentle guidance, would often lead us in making Mango Fried Rice. I remember the anticipation as we chopped fresh mangoes, their sweet aroma filling the air and mingling with the savory scent of chicken stock simmering on the stove.


Those afternoons were filled with laughter and stories shared around the kitchen table, the kind of memories that linger long after the meal is over. It was during these times that I learned the true essence of cooking—it wasn’t just about the food; it was about the love and tradition that went into every dish.


**Conclusion:**


Mango Fried Rice is more than just a recipe; it’s a testament to the power of food to bring people together and create lasting memories. With its simple preparation and rich blend of flavors, this dish is a delightful addition to any meal, offering a touch of nostalgia with every bite. Whether you’re an experienced cook or just starting out, this recipe promises a taste of tropical bliss that’s both easy to make and a joy to share.


Rating its difficulty at 3 out of 10, this main dish is perfect for those looking to explore new flavors without the hassle. So gather your ingredients, invite your loved ones, and create your own memories with Mango Fried Rice—a dish that’s sure to become a family favorite.

Read more about Appetizers

Read more about Main Dishes

Read more about Desserts

Cheesy Spinach Stuffed Shells | Made by Meaghan Moineau

Cheesy Spinach Stuffed Shells | Made by Meaghan Moineau

### Title: Delightfully Cheesy Spinach Stuffed Shells: A Comforting Family Classic


#### Description: Dive into the rich flavors of Cheesy Spinach Stuffed Shells, a wholesome and delicious main dish that brings families together. Discover the simple steps to create this comforting meal, and enjoy a nostalgic tale of family gatherings centered around this beloved recipe. Perfect for a cozy night in, this dish is sure to become a cherished favorite.


---


### Cheesy Spinach Stuffed Shells: A Wholesome Family Favorite


There's something undeniably comforting about a pan of cheesy, saucy stuffed shells fresh out of the oven. The aroma fills the kitchen, and suddenly, it feels as though every corner of the house is wrapped in a warm, loving embrace. This recipe for Cheesy Spinach Stuffed Shells is not just about the delightful combination of flavors, but it’s also about the memories it creates and the love it represents.


#### Ingredients:


- Jumbo shells


- Cooked frozen spinach


- Wheat germ


- Shredded parmesan cheese


- Pecans


- Shredded Mexican cheese


- Diced green onions


- Salt


- Dried basil


- Eggs


- Water


- Alfredo sauce


- Spaghetti sauce


#### Instructions:


1. **Prepare the Shells**: Begin by pre-boiling your jumbo shells in a large pot of salted water. Cook them for about 9 minutes, then drain them face down on a paper towel to remove excess moisture.


2. **Create the Filling**: While the shells cook, prepare the filling by microwaving the frozen spinach according to the package instructions, without adding water. Once thawed, mix in wheat germ, parmesan cheese, shredded Mexican cheese, chopped pecans, and diced green onions. Season with salt, pepper, and dried basil to taste. For a unique twist, a pinch of nutmeg can be added as well.


3. **Combine Ingredients**: Add in two eggs and a splash of water, mixing until the eggs are fully incorporated into the spinach mixture. Stuff each shell with this delicious filling.


4. **Assemble the Dish**: Grease an 8 x 8 (or 9 x 1) baking pan with cooking spray. Spread a layer of Alfredo sauce on the bottom, followed by spaghetti sauce. Arrange the stuffed shells over the sauce, then top with the remaining sauce.


5. **Bake and Serve**: Place the dish in a preheated 350-degree oven, uncovered, and bake for 30-35 minutes until the sauce is bubbly. Serve hot, and enjoy!


#### Nostalgic Family Memory:


I remember the first time my grandmother taught me how to make these Cheesy Spinach Stuffed Shells. It was a chilly Sunday afternoon, and the entire family was gathered at her cozy kitchen. The snow was gently falling outside, but inside, the warmth from the oven and the laughter shared over mixing bowls made the world feel just right.


Grandma had a way of making cooking feel like an art, and her love for family meals was evident in every dish she prepared. As we stuffed the shells together, she shared stories of her childhood and how her own mother would prepare this dish for family gatherings. It was a tradition passed down through generations, each shell filled with not just ingredients but with love and memories.


#### Difficulty: 4/10


#### Classification: Main Dish


This recipe for Cheesy Spinach Stuffed Shells is an easy-to-follow main dish perfect for a family dinner or a cozy night in. With its simple instructions and familiar flavors, it's a delightful way to bring everyone together around the dinner table. Whether you're creating new memories or reminiscing about old ones, this dish is sure to become a cherished part of your family's culinary tradition.

Read more about Appetizers

Read more about Main Dishes

Read more about Desserts

Ginger Molasses Rounds | Made by Meaghan Moineau

Ginger Molasses Rounds | Made by Meaghan Moineau

**Title: The Timeless Delight of Ginger Molasses Rounds: A Nostalgic Treat**


**Description: Discover the sweet nostalgia of Ginger Molasses Rounds, a delicious dessert that brings warmth and memories to the heart and home. With a perfect blend of spices and a chewy texture, this recipe is simple yet rich with family tradition.**


---


### A Taste of Nostalgia: Ginger Molasses Rounds


As the autumn leaves begin to fall and the air grows crisp, there's nothing quite like the comforting aroma of freshly baked cookies wafting through the house. If there's one recipe that embodies the spirit of warmth and family togetherness, it's Ginger Molasses Rounds. These cookies, with their perfect chewiness and spice, have been a beloved tradition in my family for generations.


I vividly remember the first time I helped my grandmother bake these delightful rounds. Her kitchen, always a hub of laughter and the tantalizing scents of spices, was a place where magic happened. I was a curious child, always eager to learn, and my grandmother was a patient teacher. She would gently guide my small hands as I carefully measured out the ingredients — flour, salt, baking soda, and those aromatic spices: cinnamon and ground ginger. Each step was a lesson not just in baking, but in life, as she shared stories of her childhood and how her mother taught her the same recipe.


### The Recipe


#### Ingredients:


- 1 cup butter, softened


- 1 cup sugar


- 1 egg


- 1/4 cup molasses


- 2 cups all-purpose flour


- 2 teaspoons baking soda


- 1/4 teaspoon salt


- 1 teaspoon ground cinnamon


- 1 teaspoon ground ginger


- Additional granulated sugar for rolling


#### Instructions:


1. **Cream the Butter and Sugar:**


In a large bowl, cream together the butter and sugar until smooth and fluffy. This step is essential for that perfect cookie texture.


2. **Add Egg and Molasses:**


Beat in the egg and molasses until well combined. The molasses gives these cookies their rich color and deep flavor.


3. **Mix Dry Ingredients:**


In a separate bowl, whisk together the flour, baking soda, salt, cinnamon, and ground ginger. Gradually blend this dry mixture into the creamed ingredients.


4. **Shape and Roll:**


Shape the dough into small balls, about an inch in diameter. Roll each ball in additional granulated sugar to coat.


5. **Bake:**


Place the balls 2 inches apart on a baking sheet lined with parchment paper. Bake in a preheated 350-degree oven for 8-9 minutes, until the tops are just set and slightly cracked. Remember, they will be soft but will harden as they cool, achieving that perfect chewy texture.


### A Family Tradition


Each time I bake Ginger Molasses Rounds, I'm transported back to those cherished days in my grandmother's kitchen. The cookies not only serve as a sweet treat but as a reminder of the love and lessons passed down through generations. As my own children gather around, eager to help and hear stories of the past, I know this tradition will continue, weaving a tapestry of memories that will last a lifetime.


### Difficulty and Classification


Rated a 3 out of 10 on the difficulty scale, this recipe is both simple and rewarding, making it perfect for bakers of all levels. Classified as a dessert, these cookies are a delightful way to end a meal or share with friends and family over a cup of tea.


As you bake and enjoy these Ginger Molasses Rounds, may they bring warmth to your heart and home, just as they have to mine for so many years.

Read more about Appetizers

Read more about Main Dishes

Read more about Desserts

Spicy Salad with Kidney Beans, Cheddar, and Nuts | Made by Meaghan Moineau

Spicy Salad with Kidney Beans, Cheddar, and Nuts | Made by Meaghan Moineau

**Title: Zesty Delight: Spicy Salad with Kidney Beans, Cheddar, and Nuts**


**Description:** Dive into a symphony of flavors with our Spicy Salad featuring kidney beans, cheddar, and a medley of nuts. This vibrant dish is not just a treat for your taste buds but also a wholesome meal that can be whipped up in record time. Perfect for a quick lunch or a light dinner, this salad is both nutritious and satisfying, boasting a tantalizing mix of creamy, crunchy, and spicy elements. Join me as I share a cherished family memory that this delightful salad brings to mind.


---


**The Art of Quick and Healthy: Spicy Salad with Kidney Beans, Cheddar, and Nuts**


When it comes to preparing a meal that's both quick and nourishing, salads often take the spotlight. This Spicy Salad with Kidney Beans, Cheddar, and Nuts is a testament to how simple ingredients can come together to create a dish that's delicious and deeply satisfying. As a bonus, it's a meal that carries with it a personal story from my childhood that makes it even more special.


**Ingredients:**


- 1 cup cooked kidney beans, rinsed and drained


- 1/4 cup almonds


- 1 ripe avocado, sliced


- 2 tablespoons balsamic vinegar


- 1/2 cup cheddar cheese, torn into small pieces


- 4 cups mixed greens


- 2 tablespoons olive oil


- 1/4 cup salted roasted cashews


- 1/4 cup sundried tomatoes, cut into strips


- A dash of Tabasco


**Instructions:**


1. Begin by preparing your ingredients: Rinse and drain the kidney beans, cut the sundried tomatoes into strips, and tear the cheddar cheese into small, bite-sized pieces.


2. In a large salad bowl, lay down a bed of mixed greens. Top the greens with kidney beans, sundried tomatoes, cheddar cheese, almonds, and cashews.


3. In a small mixing bowl, combine olive oil, balsamic vinegar, and a dash of Tabasco sauce. Stir well to create a zesty dressing.


4. Drizzle the dressing over the salad, ensuring every ingredient gets a touch of that spicy, tangy goodness.


5. Give it a gentle toss, ensuring all the flavors meld together beautifully.


This salad is not just a wonderful mix of textures and flavors but also a slice of my family's culinary history. Growing up, Sundays were reserved for family picnics in our local park. My mother would pack a wicker basket with freshly prepared dishes, and this spicy salad was always a staple. I remember the vivid flavors of the kidney beans and cheddar mixing with the crunch of the nuts and the tangy kick from the Tabasco-laced dressing. It was the perfect meal to enjoy on a sunny afternoon, surrounded by laughter and the rustling of leaves.


**Difficulty:** 3/10


**Classification:** Main Dish


With its simple preparation and vibrant flavors, this salad is an excellent choice for anyone looking to enjoy a quick, healthy meal that's rich in protein and fiber. Whether you're reminiscing about family picnics or simply seeking a nutritious lunch option, this Spicy Salad with Kidney Beans, Cheddar, and Nuts is sure to become a favorite. Enjoy the journey of flavors and memories with every bite!

Read more about Appetizers

Read more about Main Dishes

Read more about Desserts

Szechuan-Style Shirataki Noodles | Made by Meaghan Moineau

Szechuan-Style Shirataki Noodles | Made by Meaghan Moineau

# Spice Up Your Meals with Szechuan-Style Shirataki Noodles


Are you looking for an exciting twist to your weeknight dinners? Look no further! Our Szechuan-Style Shirataki Noodles are a flavorful, easy-to-make dish that will tantalize your taste buds and impress your family and friends. This recipe is packed with bold flavors and is the perfect combination of spicy, savory, and aromatic goodness. Plus, it’s a guilt-free indulgence, thanks to the low-calorie shirataki noodles. Get ready to dive into a delightful culinary adventure!


## A Family Tradition with a Twist


Growing up, family dinners were always a cherished time in our household. My mother, a culinary enthusiast, would often experiment with various global cuisines. One of my fondest memories is the first time she introduced us to Szechuan-style cooking. The spicy aroma that filled the kitchen was unlike anything I had ever smelled before. I remember sitting around the dining table, our eyes wide with anticipation, as she served us a dish that would soon become a family favorite.


Years later, I decided to recreate this dish with a modern twist by incorporating shirataki noodles. Not only did it bring back a flood of happy memories, but it also offered a healthier alternative without compromising on flavor. Sharing this dish with my own family has kept the tradition alive, and it’s now a staple in our home.


## Ingredients You’ll Need


- Shirataki noodles


- Protein of your choice (tofu, chicken, beef, or turkey)


- Soy sauce


- Dry rice wine


- Chili sauce


- Fresh ginger


- Green and white scallions


- Raw veggies (bell peppers, carrots, broccoli, etc.)


- Sesame oil


## Step-by-Step Instructions


1. **Prepare the Noodles**: Microwave the shirataki noodles for 1 minute on high. Drain them thoroughly, pat them dry, and set aside.


2. **Marinate the Protein**: In a bowl, combine soy sauce, rice wine, and chili sauce. Add your chosen protein and toss to coat. If using ground meat, mix thoroughly and set aside.


3. **Stir-Fry Magic**: Spray a non-stick skillet with vegetable oil and heat over high flame. Add fresh ginger and cook for about 30 seconds until fragrant. Add your raw veggies and stir-fry until they’re nearly al dente.


4. **Add Flavor and Protein**: Toss in the scallions and marinated protein. Continue to stir-fry until the protein is cooked through (1-2 minutes for tofu, soy, or turkey).


5. **Combine and Serve**: Add the shirataki noodles to the skillet, sprinkle with an additional 2 tsp. of soy sauce, and stir-fry for about 1 minute until heated through. Transfer to a serving bowl, drizzle with sesame oil, and toss.


## Dish Classification and Difficulty


- **Classification**: Main Dish


- **Difficulty**: 4/10


This delightful dish is not only easy to prepare but also offers a quick escape to the vibrant streets of Szechuan. Whether you’re a seasoned cook or a beginner, this recipe is straightforward and guaranteed to deliver a burst of flavor with every bite.


## Final Thoughts


Our Szechuan-Style Shirataki Noodles are more than just a meal—they’re a journey through family memories and culinary exploration. By combining traditional Szechuan flavors with the modern twist of shirataki noodles, this dish offers a perfect balance of health and taste. Gather your loved ones, share your own stories, and create new memories with this delightful recipe. Enjoy!

Read more about Appetizers

Read more about Main Dishes

Read more about Desserts

Gingerbread | Made by Meaghan Moineau

Gingerbread | Made by Meaghan Moineau

**Title: "Grandma's Timeless Gingerbread: A Warm Slice of Family Tradition"**


**Description:** Dive into the rich, aromatic world of gingerbread with this classic recipe that has been lovingly passed down through generations. Infused with the comforting flavors of molasses and spices, this gingerbread is not just a dessert—it's a piece of family history. Perfect for creating new memories or reliving cherished ones, this recipe is simple enough for a cozy weekend bake and special enough for festive gatherings.


---


There's something magical about the smell of gingerbread baking in the oven. For me, it immediately conjures up memories of my grandmother's kitchen, a warm haven filled with the symphony of spices and laughter. Every holiday season, my family comes together to recreate Grandma’s legendary gingerbread, a tradition that binds us across time and generations.


**Ingredients:**


- 1 cup molasses


- 1 teaspoon salt


- 2 eggs


- 1/2 cup salad oil


- 1 cup sugar


- 1 teaspoon soda


- 1 cup boiling water


- 2 1/2 cups flour


- 1 teaspoon ginger


- 1 teaspoon cinnamon


**Instructions:**


1. **Begin the Journey:** Start by preheating your oven to 350 degrees. In a large mixing bowl, combine the molasses, salad oil, sugar, ginger, cinnamon, and salt. Stir together these ingredients, allowing their fragrances to mingle and fill the air with nostalgia.


2. **Add a Touch of Love:** Crack in the eggs and beat the mixture until smooth. This step was always my favorite as a child, eagerly watching the transformation under Grandma's expert hands.


3. **The Secret Ingredient:** Dissolve the soda in 1/8 cup of boiling water, then stir it into the mixture. This little trick was Grandma’s secret to creating a perfectly airy texture.


4. **Create the Canvas:** Gradually add the flour and the remaining water, stirring gently. The batter will be thin, but don't worry—it's exactly how it should be.


5. **Bake to Perfection:** Pour the batter into a 9"x13" pan and bake until done. The anticipation builds as the spicy aroma wafts through every corner of the house.


6. **Optional Glaze:** To add an extra layer of decadence, prepare the glaze. Melt 1 stick of butter in a saucepan, add 1/4 cup milk and 1 cup brown sugar, and bring to a boil. Let it bubble away for about four minutes before drizzling generously over the gingerbread.


**Nostalgic Memory:**


One chilly afternoon, as the snowflakes danced outside, I sat by the kitchen table watching Grandma prepare her famous gingerbread. She shared stories of her childhood, her eyes twinkling with joy. Each slice of gingerbread was a gateway to the past, a comforting reminder of the enduring bonds of family. There was something inherently special about knowing that this simple recipe had brought warmth to so many generations before me.


**Difficulty Rating:** 3/10


**Classification:** Dessert


---


Whether served hot with a dollop of whipped cream or enjoyed cold with a steaming cup of tea, this gingerbread is more than just a dessert; it's a testament to the enduring power of family traditions. As you bake, may the memories of loved ones fill your heart and home with warmth and cheer. Happy baking!

Read more about Appetizers

Read more about Main Dishes

Read more about Desserts

Crispy Rhubarb Pockets | Made by Meaghan Moineau

Crispy Rhubarb Pockets | Made by Meaghan Moineau

**Title: Crispy Rhubarb Pockets: A Sweet Nostalgia Wrapped in Flaky Phyllo**


**Description:** Dive into the delightful world of Crispy Rhubarb Pockets, where the tangy sweetness of rhubarb meets the buttery flakiness of phyllo pastry. This easy-to-make dessert is perfect for those cozy family gatherings or when you simply want to indulge in a nostalgic treat. Follow our step-by-step guide to create this mouthwatering dessert that will transport you back to simpler times.


---


There's something magical about the way food can transport us back in time, evoking cherished memories with every bite. For me, Crispy Rhubarb Pockets are a ticket to my childhood, where summer afternoons were spent in my grandmother's kitchen. The sun would stream through the windows, and the air was filled with the sweet and slightly tangy scent of rhubarb simmering on the stove.


Grandma always had a knack for turning simple ingredients into something extraordinary. The sight of her gently stirring the diced rhubarb with granulated sugar, cornstarch, and a pinch of salt in her trusty saucepan is etched in my memory. The kitchen would fill with a symphony of bubbling sounds and the unmistakable aroma of rhubarb slowly releasing its liquid and transforming into a thick, chunky sauce.


As the rhubarb mixture cooled, Grandma would prepare the delicate phyllo sheets, brushing each with melted butter, creating a stack that was both crispy and decadent. I would watch in awe as she expertly cut the phyllo into perfect squares, placing a generous spoonful of the rhubarb filling in the center of each one.


The real magic happened when she pinched the corners of the phyllo, creating a beautiful pouch that would soon become a golden-brown masterpiece in our old oven. I remember eagerly waiting for the timer to ding, signaling that the Crispy Rhubarb Pockets were ready to emerge, fragrant and inviting.


Sitting around the kitchen table, we would savor each bite, the warm rhubarb filling mingling with the buttery crunch of the phyllo. It was a simple pleasure, but one that brought our family together, sharing stories and laughter as the afternoon sun dipped below the horizon.


Today, I carry on Grandma's tradition, making Crispy Rhubarb Pockets whenever I need a taste of home. This dessert, with its perfect balance of tart and sweet, is a testament to the power of food to create lasting memories and bring loved ones together.


**Difficulty:** 5/10


**Category:** Dessert


**Recipe:**


**Ingredients:**


- Diced rhubarb


- Granulated sugar


- Cornstarch


- Salt


- Vanilla extract


- Phyllo sheets


- Melted butter


**Instructions:**


1. Combine the diced rhubarb, sugar, cornstarch, and salt in a medium saucepan over medium-low heat.


2. Cook, stirring occasionally, until the rhubarb releases its liquid and begins to break down, creating a thick, chunky sauce (about 10 minutes).


3. Remove the pan from the heat and stir in the vanilla extract. Set aside to cool to room temperature.


4. Layer 4 phyllo sheets, brushing each with melted butter. Preheat the oven to 350 degrees F.


5. Cut four 4-inch squares from the phyllo stack.


6. Place 2 teaspoons of filling in the center of each square.


7. Brush phyllo from the edge of the filling to each point of the square lightly with water.


8. Gather the points of the square and pinch together just above the filling. Brush the pouch with butter.


9. Repeat the process for all 4 pouches.


10. Place filled pouches at least 1" apart on an ungreased cookie sheet or baking pan.


11. Bake in the preheated oven for 12 to 15 minutes or until golden brown.


12. Remove the pouches and let them cool on a wire rack for about 5 minutes.


13. Serve warm or at room temperature.


Indulge in this deliciously nostalgic treat and let the flavors whisk you away to simpler times. Enjoy!

Read more about Appetizers

Read more about Main Dishes

Read more about Desserts