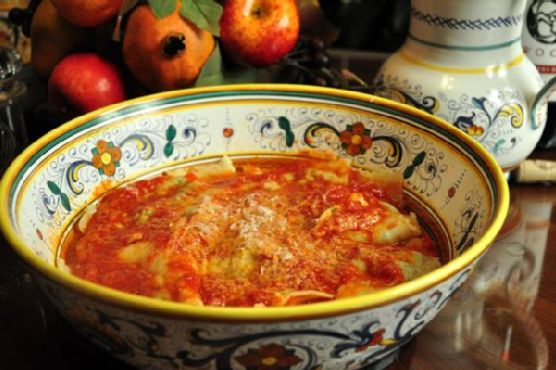
Buttered Plantain Fries and Seasoned Avocado | Made by Meaghan Moineau

Buttered Plantain Fries and Seasoned Avocado | Made by Meaghan Moineau

Title: Reliving Family Moments with Buttered Plantain Fries and Seasoned Avocado
Description: Dive into the heartwarming world of culinary nostalgia with our Buttered Plantain Fries and Seasoned Avocado recipe. This easy-to-make appetizer is not only a delightful treat for your taste buds but also a gateway to cherished family memories. Discover the blend of crispy plantains and creamy avocado that promises to be both a crowd-pleaser and a conversation starter at any gathering.

---


Buttered Plantain Fries and Seasoned Avocado: A Taste of Home

There's something magical about the aroma of buttered plantains sizzling in the kitchen. It takes me back to lazy Sunday afternoons, where the warmth of family laughter filled the air, mingling seamlessly with the comforting smell of plantains frying on the stove. My grandmother, with a knowing smile, would always say that the secret to the best plantain fries was patience—letting them brown to perfection.


Ingredients:


- 1 ripe plantain


- 2 tablespoons butter


- 1 tablespoon vegetable oil


- 1 ripe avocado


- 1 chili pepper, finely chopped


- 1 clove of garlic, minced


- Salt, to taste


- Onions, chopped for garnish


Instructions:


1. Prepare the Plantains:

- Begin by peeling the plantain and slicing it into thin stripes. This step is crucial; the thinner the slices, the crispier the fries.


2. Fry the Plantains:

- In a medium-sized pan, pour in the butter and vegetable oil. Heat slowly until the butter melts and the mixture is hot.


- Gently toss in the plantain slices, ensuring they are evenly coated with the butter and oil.


- Allow them to cook, turning occasionally, until they are golden brown on all sides. The aroma at this stage is simply irresistible.


3. Prepare the Avocado:

- While the plantains are frying, mash the avocado in a bowl until smooth and creamy.


- Season with a pinch of salt, and stir in the chopped chili pepper, minced garlic, and some of the chopped onions. This seasoned avocado mix is the perfect complement to the crispy plantains.


4. Serve:

- Arrange the buttered plantain fries on a serving platter and accompany them with a generous dollop of the seasoned avocado. Garnish with additional chopped onions for a touch of freshness.


Nostalgic Story:


Every time I make this dish, I'm transported back to my grandmother's kitchen. I remember sitting on the counter, swinging my legs as I watched her expertly slice the plantains. She would tell stories of her childhood, of how plantains were a staple in her family's home. Her tales of family gatherings and the joy of sharing meals created a legacy that I now pass on to my own children. The combination of crispy plantains and creamy avocado has always been more than just food; it’s a reminder of love, family, and tradition.


Difficulty Rating:


- Difficulty: 3/10

This dish is simple to prepare, making it perfect for both novice cooks and seasoned chefs looking for a quick yet satisfying appetizer.


Classification:


- Appetizer

Whether you're hosting a family gathering or simply want a nostalgic snack, Buttered Plantain Fries and Seasoned Avocado is a dish that bridges the past with the present, bringing a slice of home to your table. Enjoy the journey of flavors and memories with every bite.

Read more about Appetizers

Read more about Main Dishes

Read more about Desserts

Baked Ziti Or Rigatoni | Made by Meaghan Moineau

Baked Ziti Or Rigatoni | Made by Meaghan Moineau

Title: "Savor the Comfort: Baked Ziti/Rigatoni Recipe to Warm the Heart and Home"
Description: Dive into the rich, comforting flavors of this Baked Ziti or Rigatoni recipe—a classic Italian-American dish that's sure to become a family favorite. With gooey mozzarella, creamy ricotta, and a savory tomato sauce, this main dish is both easy to prepare and delightful to eat. Follow along as we share not only the simple steps to this delicious pasta bake but also a nostalgic family story that highlights the warmth and love this dish brings to the table.

---


A Taste of Home: Baked Ziti/Rigatoni


When the air turns crisp and the leaves begin to fall, there's nothing quite like indulging in a hearty dish that feels like a warm hug. Baked Ziti or Rigatoni is that dish for many families, a staple at gatherings and a beacon of comfort on chilly evenings. This recipe is a straightforward yet flavorful delight, earning a difficulty rating of 4 out of 10, making it an accessible main dish for cooks of all levels.


Ingredients:

- Cooked ziti or rigatoni

- 1 egg


- 1 cup Parmesan cheese, divided


- 1 cup ricotta cheese


- 2 cups shredded mozzarella cheese


- 3 1/2 cups spaghetti sauce, divided


Instructions:

1. Preheat your oven to 375°F (190°C).

2. In a large mixing bowl, combine the cooked ziti, egg, 1/2 cup of Parmesan cheese, ricotta, shredded mozzarella, and 1 1/2 cups of spaghetti sauce. Mix until well blended.


3. In a 2 1/2 quart baking dish, spread 1/2 cup of spaghetti sauce evenly across the bottom.


4. Pour the ziti mixture into the baking dish, spreading it out evenly.


5. Top the ziti mixture with the remaining 1 1/2 cups of spaghetti sauce.


6. Sprinkle the top with the remaining 1/2 cup of Parmesan cheese.


7. Bake in the preheated oven for 30 minutes, or until the top is slightly browned and bubbly.


8. Allow to cool for a few minutes before serving.


A Family Memory


For me, Baked Ziti has always been more than just a meal; it's a cherished family tradition. I remember one particularly chilly autumn day when my grandmother decided to teach me how to make her famous Baked Ziti. The kitchen was filled with the scent of simmering tomato sauce and fresh herbs, a sensory invitation to warmth and comfort.


As we prepared the dish together, my grandmother shared stories of her own childhood, recounting how her mother would make this very dish for Sunday dinners. It was a ritual of love, bringing the family together after a long week. We laughed as we accidentally spilled a bit of mozzarella on the floor, and she playfully nudged me with her elbow, reminding me that cooking is just as much about the memories we create as it is about the food itself.


When the ziti emerged from the oven, golden and bubbling, it was as if time had slowed down, allowing us to savor the moment. Each bite was rich and satisfying, filled with the flavors of tradition and the warmth of family bonds. Even now, years later, every time I bake ziti, I am transported back to that cozy kitchen, enveloped by the love and laughter of generations past.


Conclusion


Baked Ziti or Rigatoni is more than just a recipe; it's a bridge to the past, a tradition to be savored and shared. Whether you're cooking for loved ones or enjoying a quiet meal at home, this dish promises comfort and joy with every bite. So gather your ingredients, preheat your oven, and let this simple yet exquisite recipe become a part of your family's cherished memories.

Read more about Appetizers

Read more about Main Dishes

Read more about Desserts

Colcannon | Made by Meaghan Moineau

Colcannon | Made by Meaghan Moineau

A Taste of Tradition: Colcannon, A Hearty Irish Classic


Recreating Family Memories with Every Bite


Colcannon, a traditional Irish dish, is more than just a meal; it's a cherished piece of my family history. This comforting blend of creamy mashed potatoes and cabbage takes me back to my grandmother's kitchen, a place filled with laughter, storytelling, and the warmth of a hearty meal shared among loved ones.


Ingredients You'll Need:


- 2 rashers of optional bacon


- Butter


- 1 head of cabbage


- Stems of green onions


- Milk


- Fresh parsley


- Pepper


- Potatoes


- Salt


A Step-by-Step Guide to Making Colcannon:


1. Prepare the Cabbage: Start by cutting into the top of the cabbage, hollowing it out while leaving 3-4 outer leaves intact. Reserve the hollowed-out portion for later use.
2. Cook the Cabbage: Plunge the hollowed-out cabbage head into a large pot of boiling water. Let it simmer for about 5 minutes or until it is tender-crisp, ensuring it maintains its shape. Quickly cool it in cold water, then invert and drain.
3. Chop and Stir Fry: Chop the reserved cabbage pieces until you have about 1 1/2 cups. Stir fry them in butter along with the green onions until they are tender and set aside.
4. Mash the Potatoes: Boil the potatoes until tender, then mash them, incorporating milk, salt, and pepper to taste.
5. Combine: Stir in the sautéed cabbage mixture and add a sprinkle of fresh parsley for garnish.

A Dish Steeped in Nostalgia


I vividly remember the first time I helped my grandmother make Colcannon. The kitchen was filled with the savory aroma of butter and onions sizzling in the pan. My grandmother, with her gentle hands, showed me how to hollow out the cabbage, a task I found both fascinating and challenging. The kitchen was a flurry of activity, with my cousins setting the table and my grandfather recounting tales of his youth in Ireland.


As we sat down to enjoy the meal, I realized that Colcannon was not just food; it was a vessel of memories, stories, and traditions passed down through generations. Each bite was a reminder of who we were and where we came from, a connection to our roots and to each other.


Difficulty Rating: 4/10


Colcannon is a straightforward dish that even novice cooks can master with a bit of practice. The most challenging part might be hollowing out the cabbage, but with patience, it becomes an enjoyable task.


Classification: Main Dish


Colcannon is hearty and filling, making it a perfect main dish that embodies the essence of comfort food. It pairs beautifully with meats like ham or sausages, but it can also stand alone as a satisfying vegetarian meal.


Conclusion


Recreating this traditional Colcannon recipe allows me to honor my family's heritage while creating new memories in my own kitchen. Each time I prepare it, I am reminded of the love, warmth, and laughter that filled my grandmother's home. I hope this recipe brings the same joy and connection to your family table, creating new stories and memories for generations to come.

Read more about Appetizers

Read more about Main Dishes

Read more about Desserts

Crumbled Feta Couscous Salad | Made by Meaghan Moineau

Crumbled Feta Couscous Salad | Made by Meaghan Moineau

**Title: A Taste of Nostalgia: Crumbled Feta Couscous Salad**


**Description: Discover the comforting flavors and heartwarming memories wrapped up in our Crumbled Feta Couscous Salad. This easy-to-make dish, packed with fresh ingredients and cherished family stories, will become a staple in your culinary repertoire.**


---


### A Taste of Nostalgia: Crumbled Feta Couscous Salad


In the bustling heart of Mediterranean cuisine lies a dish that marries simplicity with flavor—our beloved Crumbled Feta Couscous Salad. This delightful recipe, rated a 3 out of 10 on the difficulty scale, effortlessly serves as an elegant appetizer or a light main dish. With every bite, you'll be transported back to cherished family gatherings, where food and laughter were the bonds that held us together.


#### Ingredients:


- 1 cup couscous


- 1 ½ cups vegetable stock or water


- 2 tablespoons quality olive oil


- A pinch of salt


- 1 diced Roma tomato


- ½ red onion, finely chopped


- ¼ cup fresh mint, chopped


- ¼ cup fresh parsley, chopped


- 2 tablespoons white balsamic vinegar


- ½ cup crumbled feta cheese


#### Instructions:


1. In a medium saucepan, bring the vegetable stock or water to a boil. Add the couscous, stirring quickly to ensure even cooking.


2. Remove the saucepan from the heat and cover it with a lid. Allow the couscous to stand for 4-5 minutes, absorbing all the flavors of the stock.


3. Remove the lid and stir in the olive oil, adding a subtle richness to the dish.


4. Pour the cooked couscous into a large bowl and let it chill, stirring occasionally to cool evenly.


5. Once cooled, stir in the diced Roma tomato, red onion, mint, parsley, and white balsamic vinegar.


6. Finally, fold in the crumbled feta cheese, ensuring each bite is filled with creamy goodness.


7. Chill the salad completely before serving to allow the flavors to meld beautifully.


#### A Family Memory


As a child, I remember summers spent in my grandmother's kitchen, a place where time seemed to slow down, and every moment was filled with warmth and love. The Crumbled Feta Couscous Salad was a staple at our family gatherings, a dish that brought everyone to the table with its vibrant colors and fresh aroma.


I recall one particular summer afternoon when Grandma decided to teach me how to make this salad. She showed me how to properly chop the herbs, her fingers deftly moving with years of practice. "The secret," she whispered, "is in the freshness of the ingredients. The mint and parsley should always be from the garden, and the olive oil must be the finest you can find."


As we stirred the couscous together, she shared stories of her childhood, of how this recipe had been passed down through generations, each one adding a little something of their own. That day, I learned not only how to prepare a dish but how food could carry the essence of family history, connecting us to those who came before.


Even today, when I make this Crumbled Feta Couscous Salad, I am reminded of those sunny afternoons with Grandma, the laughter echoing through the house, and the sense of belonging that only comes from being with loved ones.


#### Conclusion


The Crumbled Feta Couscous Salad is more than just a dish; it's a bridge to the past, a reminder of the joy that comes from sharing meals with family. Easy to prepare and bursting with flavor, it's perfect for any occasion. So gather your ingredients, invite your family, and create memories that will last a lifetime.

Read more about Appetizers

Read more about Main Dishes

Read more about Desserts

{No Bake} Cinnamon Butterscotch Energy Bites | Made by Meaghan Moineau

{No Bake} Cinnamon Butterscotch Energy Bites | Made by Meaghan Moineau

# Sweet Simplicity: {No Bake} Cinnamon Butterscotch Energy Bites


**Description:** Dive into the symphony of flavors with our {No Bake} Cinnamon Butterscotch Energy Bites. A perfect blend of nostalgia and nutrition, these bites are a breeze to whip up and are sure to become a family favorite. Whether you're looking for a quick snack or a delightful treat, these energy bites promise to fuel your day with a touch of sweetness and a lot of love.


## Introduction


There’s something incredibly comforting about the aroma of cinnamon and butterscotch wafting through the kitchen. It instantly transports me back to those cozy afternoons at my grandmother’s house, where the kitchen was a sanctuary of warmth and love. I remember sitting on the counter, watching her mix ingredients with a practiced hand, always sneaking in a taste when she wasn’t looking. The memory of her laughter and the delightful treats she created still linger with me today.


One of my favorite recipes, inspired by those cherished moments, is the {No Bake} Cinnamon Butterscotch Energy Bites. Quick to prepare and packed with flavor, these bites are a tribute to those sweet, nostalgic days.


## The Ingredients


To recreate this heartwarming delicacy, you will need:


- 1 cup oats (ground into a fine powder)


- 1 cup rice cereal


- 1/2 cup whole oats


- 1/4 cup ground flax seed


- 1/4 cup protein powder


- 1/4 cup brown sugar


- 1/2 cup peanut butter


- 1/4 cup honey


- 1/2 cup butterscotch chips


## Instructions


1. **Prepare the Oats:** Begin by grinding 1 cup of oats in a blender until they reach a fine, flour-like consistency.


2. **Mix the Dry Ingredients:** In a large bowl, combine the rice cereal, whole oats, ground oats, protein powder, and ground flax seed. This dry mixture is the foundation of your energy bites.


3. **Melt the Sweetness:** In a microwave-safe bowl, mix together the brown sugar, peanut butter, and honey. Heat in the microwave in 15-second intervals, stirring between each interval until the mixture is completely melted and smooth.


4. **Combine and Chill:** Pour the melted mixture over the dry ingredients and stir until everything is evenly combined. Place the bowl in the refrigerator for about 30 minutes to let the mixture firm up.


5. **Shape Your Bites:** Once the mixture has chilled, remove it from the fridge and roll into small balls. Press a few butterscotch chips into each ball for that extra burst of sweetness.


6. **Enjoy!** These energy bites are ready to serve as soon as you finish rolling and pressing the butterscotch chips.


## A Bite of Nostalgia


Creating these energy bites always brings me back to those treasured afternoons with my grandmother. Her kitchen was a place where stories were shared, laughter was abundant, and love was evident in every bite. While my version of the cinnamon butterscotch treat might be a tad different, the essence remains the same – a simple, sweet reminder of home.


## Difficulty Rating


I would rate this recipe a 3 out of 10 in terms of difficulty. It’s straightforward and requires no baking, making it a perfect project for kids or for anyone looking to indulge in a quick, satisfying treat.


## Classification


These {No Bake} Cinnamon Butterscotch Energy Bites can be classified as a **Dessert**. However, they also make for a delightful snack that can be enjoyed any time of the day.


Whether you're reminiscing about your own family traditions or creating new ones, this recipe is sure to add a touch of sweetness to your day. Enjoy the simplicity and the deliciousness of these energy bites, and let them bring a little bit of joy into your home.

Read more about Appetizers

Read more about Main Dishes

Read more about Desserts

Basil Tagliatelle with Roasted Red Bell Pepper Salad | Made by Meaghan Moineau

Basil Tagliatelle with Roasted Red Bell Pepper Salad | Made by Meaghan Moineau

**Title: A Taste of Home: Basil Tagliatelle with Roasted Red Bell Pepper Salad**


**Description: Discover the heartwarming flavors of Basil Tagliatelle with Roasted Red Bell Pepper Salad—a dish that brings together the vibrant taste of fresh herbs and the sweet smokiness of roasted peppers. Join me as I recount a cherished family memory linked to this delightful main dish, and learn how to create this comforting recipe in your own kitchen.**


---


### A Nostalgic Family Dinner: Basil Tagliatelle with Roasted Red Bell Pepper Salad


There’s something magical about a recipe that not only delights the taste buds but also stirs fond memories of family gatherings. For me, Basil Tagliatelle with Roasted Red Bell Pepper Salad is one such dish. It transports me back to endless summer evenings spent at my grandmother’s house, where the kitchen was always bustling with activity and laughter.


Growing up, Sunday dinners at Grandma’s were a cherished tradition. Her small, sunlit kitchen seemed to have a life of its own, filled with the enticing aromas of fresh basil and garlic mingling with the earthy scent of roasting red bell peppers. The adults would gather around the table, sharing stories and laughter, while we kids played in the backyard, eagerly awaiting the call to dinner.


This recipe, a main dish that stands out for its simplicity and vibrant flavors, was often the centerpiece of those gatherings. Grandma would toss whole wheat tagliatelle with a generous helping of fresh basil, drizzling it with a fragrant mixture of extra virgin olive oil, lemon juice, and finely chopped garlic cloves. The roasted red bell pepper salad, with its bright colors and tangy notes, provided the perfect accompaniment, balancing the richness of the pasta with a hint of smoky sweetness.


The secret ingredient that made this dish unforgettable was a touch of freshly grated horseradish, adding just the right amount of kick to the ensemble. Topped with finely sliced green onions and a sprinkle of parsley, the dish was a feast for the senses—its vibrant colors mirrored by the lively conversations around the table.


Creating this dish today in my own kitchen, I am reminded of those joyful family dinners. The aroma of the basil mingling with the roasted peppers instantly transports me back to those cherished moments. It's a reminder of the power of food to connect us to our past, and to each other.


### Recipe Highlights


**Ingredients:**


- Whole wheat tagliatelle


- Red bell peppers


- Garlic cloves


- Fresh parsley


- Horseradish


- Green onions


- Lemon juice


- Extra virgin olive oil


- Sea salt


- Ground pepper


For the full instructions on how to prepare this delicious dish, please visit my blog: [Gourmandelle](http://gourmandelle.com/basil-tagliatelle-with-roasted-red-bell-pepper-salad/).


### Recipe Classification and Difficulty


This Basil Tagliatelle with Roasted Red Bell Pepper Salad is classified as a **Main Dish**. With a difficulty rating of **6 out of 10**, it’s accessible for most home cooks who are comfortable with basic pasta and salad preparation techniques. Whether you're hosting a family dinner or simply looking to enjoy a cozy meal at home, this recipe is sure to bring warmth and joy to your table.


Embrace the nostalgia and create new memories with this delightful and flavorful dish. Happy cooking!

Read more about Appetizers

Read more about Main Dishes

Read more about Desserts

Spinach Salad with Strawberry Vinaigrette | Made by Meaghan Moineau

Spinach Salad with Strawberry Vinaigrette | Made by Meaghan Moineau

**Title: A Taste of Spring: Spinach Salad with Strawberry Vinaigrette**


**Description: Discover a refreshing and vibrant salad that's as easy to make as it is delicious. Our Spinach Salad with Strawberry Vinaigrette is a delightful blend of fresh ingredients that promises to bring a burst of flavor to your table. Dive into a nostalgic story that makes this dish a cherished family favorite.**


---


**A Taste of Spring: Spinach Salad with Strawberry Vinaigrette**


When the first warm breeze of spring swept through our small town, it was always a signal for my family to gather in my grandmother's garden. Her backyard was a sanctuary of bursting colors, with rows of strawberries glistening like jewels under the sun and spinach leaves swaying gently in the breeze. Among the many dishes that graced our family table, none heralded the arrival of spring quite like our Spinach Salad with Strawberry Vinaigrette.


**Ingredients:**


- Fresh spinach leaves


- Strawberries, sliced


- Almonds, toasted


- Feta cheese, crumbled


- Cooked chicken, sliced


- Shallot, finely chopped


- Fresh thyme, finely chopped


- Ground pepper, to taste


**For the Strawberry Vinaigrette:**


- Strawberries, puréed


- Balsamic vinegar


- Dijon mustard


- Water


**Instructions:**


1. **Prepare the Vinaigrette:** In a small bowl, mix the puréed strawberries with balsamic vinegar, dijon mustard, and a splash of water. Whisk until smooth and set aside.


2. **Assemble the Salad:** On a large plate, layer the fresh spinach leaves. Top with sliced strawberries, toasted almonds, crumbled feta cheese, and cooked chicken.


3. **Add Flavor:** Sprinkle finely chopped shallot and fresh thyme over the salad. Season with ground pepper to taste.


4. **Drizzle and Serve:** Generously drizzle the strawberry vinaigrette over the salad. Serve immediately and enjoy a taste of spring.


**A Nostalgic Family Memory**


As children, my siblings and I would race barefoot through the garden, eager to pick the ripest strawberries. My grandmother would laugh at our stained fingers and delighted giggles as we tried to sneak a few berries into our mouths. Once the basket was full, she'd lead us to the kitchen, where we'd help her prepare this simple yet extraordinary salad.


Around the dinner table, stories of past springs would unfold, each tale more vibrant with the flavors of our meal. The combination of sweet strawberries, tangy vinaigrette, and savory chicken created a symphony on our plates, one that still resonates with me today.


**Difficulty: 2/10**


This recipe is delightfully easy, perfect for beginner cooks or anyone looking for a quick, nutritious meal.


**Classification: Main Dish**


Whether served as a light lunch or a refreshing dinner, this Spinach Salad with Strawberry Vinaigrette is a versatile main dish that embodies the essence of spring. Enjoy this dish with loved ones, and perhaps, create your own cherished memories around the table.

Read more about Appetizers

Read more about Main Dishes

Read more about Desserts

Mutton Rendang | Made by Meaghan Moineau

Mutton Rendang | Made by Meaghan Moineau

## The Art of Mutton Rendang: A Culinary Journey into Tradition


### Description:


Indulge in the rich flavors and aromatic spices of Mutton Rendang, a classic dish that transcends time and brings families together. Unravel the secrets of this beloved recipe, infused with cherished memories and traditional techniques. Perfect for a cozy family dinner or a festive celebration, Mutton Rendang is sure to captivate your taste buds and warm your heart.


---


### A Culinary Nostalgia: The Heartwarming Tale of Mutton Rendang


Cooking has always been more than just preparing food; it’s a journey into the heart of family traditions and shared memories. For me, Mutton Rendang is not just a dish; it’s a delicious reminder of my childhood, spent in my grandmother's warm kitchen. The air filled with the comforting aroma of spices sizzling in hot oil—a scent that, to this day, transports me back to those joyful days.


Every festive season, my family would gather at my grandmother's house. The centerpiece of our celebration was always her legendary Mutton Rendang. I remember watching her skillfully mix mutton pieces with turmeric powder and salt, a ritual that marked the beginning of a culinary masterpiece. She would then carefully cover the saucepan and place it on the stove, letting it boil until the meat was tender and flavorful.


As the meat simmered, my grandmother would blend a fragrant paste of dried chillis, shallots, onion, garlic, ginger, lemongrass, galangal, and fresh turmeric. The kitchen would come alive with the vibrant colors and tantalizing scents of these essential ingredients. The sound of cumin and fennel seeds crackling in hot oil signified the start of a magical transformation.


My grandmother always emphasized the importance of patience. "The longer you sauté the paste, the better the flavor," she would say with a twinkle in her eye. Her dedication to perfection was evident in every stir of the wok, every addition of thin coconut milk, dried tamarind, and turmeric leaf, and in the careful balance of salt. The final touch was the thick coconut milk, which enveloped the mutton in a creamy embrace, and the toasted coconut, adding a delightful texture and nutty aroma.


The result was a symphony of flavors—rich, spicy, and deeply satisfying. As we gathered around the dining table, each bite of Mutton Rendang was a taste of tradition, a spoonful of love passed down through generations. It was more than a meal; it was a celebration of family, heritage, and the art of cooking.


### Recipe Difficulty: 8/10


### Classification: Main Dish


Mutton Rendang is a dish that requires time, patience, and a love for authentic flavors. While the process may seem intricate, the reward is a delectable masterpiece that brings joy and togetherness to any meal. Whether you're a seasoned cook or a culinary enthusiast, this recipe invites you to experience the magic of traditional cooking and create lasting memories with your loved ones.

Read more about Appetizers

Read more about Main Dishes

Read more about Desserts

Mashed Sweet Potatoes | Made by Meaghan Moineau

Mashed Sweet Potatoes | Made by Meaghan Moineau

**Title: Comfort in a Bowl: Nostalgic Mashed Sweet Potatoes**


**Description:** Dive into the heartwarming world of Mashed Sweet Potatoes, a dish that marries the comforting flavors of cinnamon and cardamom with the sweet allure of maple syrup and brown sugar. This recipe is not just a side dish; it's a journey through cherished family memories and the warmth of home cooking. Join me as I share the joy of creating and savoring this delectable, easy-to-make dish that scores a low 3/10 on the difficulty scale, perfect as a delightful side for any meal.


---


**The Sweet Essence of Family: A Mashed Sweet Potatoes Journey**


There's something magical about the kitchen during the holidays. The hum of conversation, the clinking of dishes, and the mouthwatering aroma of sweet and spicy flavors dancing through the air create an atmosphere of warmth and togetherness. For me, one dish that encapsulates this feeling is Mashed Sweet Potatoes—a dish as comforting as a grandmother's hug.


**A Nostalgic Tale:**


Growing up, the holiday season was a bustling affair at my grandmother's house. The kitchen was always filled with the sights and sounds of family members working side by side, each contributing to the festive feast. Among the many dishes, my grandmother's Mashed Sweet Potatoes held a special place on the table and in our hearts.


I vividly remember the first time she let me help prepare them. I was barely tall enough to see over the countertop, but she handed me a wooden spoon and guided my tiny hands as we mashed the sweet potatoes together. "Now, add a bit of this," she'd say, passing me a pinch of cinnamon or a spoonful of maple syrup, her eyes twinkling with the wisdom of years spent perfecting this recipe.


The secret, she confided, was in the balance of flavors—the warm spice of cardamom, the unexpected heat of cayenne pepper, and the bright zest of an orange, all melded together by the luxurious smoothness of cream and butter. Each bite was a revelation, a perfect harmony of sweet and savory that left you longing for more.


**The Recipe: Mashed Sweet Potatoes**


**Ingredients:**


- 4 large sweet potatoes, peeled and cut into chunks


- 1/4 cup brown sugar


- 1/4 cup butter


- 1/2 teaspoon ground cardamom


- 1/8 teaspoon cayenne pepper


- 1 teaspoon ground cinnamon


- 1/4 cup cream


- Kosher salt, to taste


- 1/4 cup maple syrup


- 1 tablespoon orange zest


- 1 teaspoon vanilla extract


**Instructions:**


1. Begin by boiling the sweet potatoes until tender. Drain and return them to the pot.


2. Mash the peeled potatoes until well broken up. For a smoother texture, feel free to use an electric mixer.


3. In a separate bowl, mix together the cinnamon, cayenne, cardamom, orange zest, and brown sugar. Set this aromatic mixture aside.


4. Add the butter, cream, vanilla extract, and maple syrup to the mashed sweet potatoes. Stir thoroughly until the mixture is well combined and creamy.


5. Incorporate the cinnamon sugar mixture, blending until smooth.


6. Salt to taste, adjusting the seasoning until the flavors sing.


**A Dish for Every Occasion:**


Rated at a 3/10 on the difficulty scale, this dish is not only simple to make but also versatile enough to accompany a variety of meals. Whether served as a comforting side to a holiday roast or as a hearty addition to a weeknight dinner, these Mashed Sweet Potatoes bring a touch of nostalgia and warmth to any table.


As you savor this dish, remember that it's more than just a recipe; it's a celebration of family, tradition, and the simple joys of cooking together. So, gather your loved ones, share the story, and enjoy the sweet embrace of a dish that feels like home.

Read more about Appetizers

Read more about Main Dishes

Read more about Desserts

Roasted Brussels Sprouts With Red Onions and Pancetta | Made by Meaghan Moineau

Roasted Brussels Sprouts With Red Onions and Pancetta | Made by Meaghan Moineau

**Title: "A Taste of Home: Roasted Brussels Sprouts with Red Onions and Pancetta"**


**Description: Discover the heartwarming flavors of Roasted Brussels Sprouts with Red Onions and Pancetta, a recipe that combines savory pancetta, aromatic garlic, and crispy bread crumbs for a delightful dish. Perfect as an appetizer or a comforting main dish, this recipe will transport you to cherished family gatherings with every bite.**


---


There's something undeniably comforting about the aroma of roasted Brussels sprouts wafting through the kitchen. It’s a scent that transports me back to cozy family gatherings during the chilly months, where we would gather around the dining table, eager to dig into a meal that always felt like a warm embrace. One dish that stood out amidst the spread was my grandmother's Roasted Brussels Sprouts with Red Onions and Pancetta. It wasn’t just a dish; it was a staple that held a special place in our hearts and on our plates.


**Ingredients:**


- Brussels sprouts


- Pancetta


- Garlic


- Olive oil


- Bread


**Instructions:**


1. Preheat your oven to 350 degrees Fahrenheit. In a large plastic zippered bag, toss the Brussels sprouts with 3 pressed garlic cloves and 2 tablespoons of olive oil. Shake well to ensure even coating.


2. Empty the contents into an ovenproof dish and roast for 40 minutes. The Brussels sprouts should be tender with a slight char that enhances their natural sweetness.


3. While the Brussels sprouts are roasting, heat 1/4 cup of olive oil in a pan. Once heated, sauté a slice of bread until browned on both sides. Set aside to cool and become crisp.


4. When the Brussels sprouts are done, return to the pan used for the bread. Add the red onions and sauté for about 3 minutes. Be cautious not to let them become fully tender; they should retain a subtle crunch.


5. Introduce the pancetta to the pan, allowing it to heat through for an additional minute. The pancetta should be aromatic and slightly crispy.


6. Add the roasted Brussels sprouts to the pan and heat through for another 3 minutes. This will allow the flavors to meld beautifully.


7. Remove from heat. In a food processor, blend the sautéed bread with 1-2 cloves of garlic. This will create a fragrant, crunchy topping.


8. Sprinkle the garlic bread crumbs over the Brussels sprouts mixture and finish with a final drizzle of olive oil for added richness.


What I love about this dish is its simplicity and the way it brings people together. My grandmother used to say that the secret ingredient was love, and I wholeheartedly believe her. The combination of the savory pancetta with the slight bitterness of the Brussels sprouts, balanced by the sweetness of the onions and the crunch of the garlic-infused bread crumbs, creates a symphony of flavors that is both nostalgic and comforting.


This recipe, with its robust flavors and comforting taste, is rated a 4 out of 10 in difficulty—making it accessible to both novice and experienced cooks. It can be served as a delightful appetizer to whet the appetite, or as a main dish that stands proudly at the center of any meal.


So, if you are looking to recreate a dish that is as rich in flavor as it is in family history, give this Roasted Brussels Sprouts with Red Onions and Pancetta a try. It’s not just about cooking; it’s about creating memories that will be cherished for generations to come.

Read more about Appetizers

Read more about Main Dishes

Read more about Desserts

Baked Alaska | Made by Meaghan Moineau

Baked Alaska | Made by Meaghan Moineau

**Title: Nostalgic Elegance: Crafting the Perfect Baked Alaska**


**Description:** Discover the timeless allure of Baked Alaska, a classic dessert that combines the richness of cake, the chill of ice cream, and the ethereal beauty of meringue. This blog post offers a step-by-step guide to creating this show-stopping dessert while sharing a heartfelt family memory that adds a touch of nostalgia to every bite. Perfect for those looking to impress at their next dinner party or simply indulge in a sweet trip down memory lane.


---


### The Art of Baked Alaska: A Dessert with a Story


Baked Alaska is more than just a dessert; it's an experience—a theatrical finale to any meal that leaves your guests in awe. This classic dessert combines the simplicity of a round cake, the delight of creamy ice cream, and the elegance of golden meringue peaks. With its captivating contrast of hot and cold, Baked Alaska is a sweet symphony that dances on your taste buds.


#### Ingredients You'll Need:


- Round cake


- 1/2 gallon ice cream


- 4 egg whites


- 1/4 teaspoon cream of tartar


- 1 cup powdered sugar


#### Step-by-Step Instructions:


1. **Prepare the Ice Cream Layer**:


Grease a 7-inch bowl with flavorless oil or unsalted butter. Allow the ice cream to soften until it's workable. Pack it tightly into the bowl, smoothing the top. Freeze until it hardens completely.


2. **Make the Meringue**:


Beat the egg whites until foamy. Add the cream of tartar and continue whipping until stiff peaks form. Gradually fold in the powdered sugar, ensuring the meringue is smooth and glossy.


3. **Assemble the Baked Alaska**:


Place the frozen cake on a plate slightly larger than the cake. Unmold the ice cream onto the center of the cake. If the ice cream is stubborn, dip the bowl briefly in warm water to release it.


4. **Decorate with Meringue**:


"Frost" the cake and ice cream with the meringue, covering it completely. Use a spoon or spatula to create decorative peaks.


5. **Bake to Perfection**:


Preheat your oven to 450°F. Bake the assembled Baked Alaska for 6-7 minutes until the meringue peaks are golden brown. Store in the freezer until you're ready to serve.


#### A Family Memory: The Sweetness of Tradition


Every year, my family gathers for a cherished tradition—Grandma's birthday. Amongst the laughter and shared stories, Baked Alaska takes center stage. I remember one year when I was young, standing on a chair to get a better view as my mother carefully crafted the dessert. The kitchen was filled with the sweet aroma of cake and sugary meringue. As we all gathered around the table, eyes wide with anticipation, Grandma's eyes sparkled with joy. The Baked Alaska was more than a dessert; it was our family's love, layered with memories of the past and hopes for the future. Even now, every bite transports me back to that warm kitchen, surrounded by love and laughter.


#### Difficulty Rating: 6/10


Creating Baked Alaska requires some skills, especially with the meringue and timing. However, with patience and practice, this dessert can become a beautiful centerpiece for any occasion.


#### Classification: Dessert


This spectacular creation is the quintessential dessert—a perfect blend of textures and temperatures that will leave a lasting impression on your guests.


---


Embrace the nostalgia and the sweet challenge of making Baked Alaska. Whether it's for a special occasion or simply to relive fond memories, this dessert promises to be a delightful journey for both the baker and those fortunate enough to enjoy it.

Read more about Appetizers

Read more about Main Dishes

Read more about Desserts

Soufflé au chocolat | Made by Meaghan Moineau

Soufflé au chocolat | Made by Meaghan Moineau

**Title: Fluffy Decadence: Mastering the Soufflé au Chocolat**


**Description: Dive into the art of creating the perfect Soufflé au Chocolat with this step-by-step guide. Discover a cherished family memory that brings this delightful dessert to life, and learn the secrets to achieving a dessert that will leave everyone in awe.**


---


### Introduction


There’s something undeniably magical about a soufflé—its delicate rise, the way it teases your senses with its rich aroma, and the blissful moment when you dig into its airy depths. Today, we're focusing on a timeless classic, the Soufflé au Chocolat, a dessert that's as much a treat for the eyes as it is for the palate. Rated at a difficulty of 7 out of 10, this dessert is sure to impress and delight.


### Ingredients


- 6 ounces of high-quality chocolate


- 4 large egg whites


- 3 large egg yolks


- 1/3 cup of heavy cream


- 1/4 teaspoon of salt


- 2 tablespoons of sugar


- Butter for greasing the soufflé dishes


- Additional sugar for coating the dishes


### Instructions


1. **Preparation:**


Begin by buttering eight 3/4-cup soufflé dishes. Generously sprinkle sugar inside each dish, tilting to ensure an even coat, and tap out any excess. Arrange these prepared dishes on a large baking sheet.


2. **Chocolate Mixture:**


In a large metal bowl, combine the chocolate and heavy cream. Set the bowl over a saucepan of barely simmering water. Stir continuously until the chocolate is melted and the mixture is smooth. Remove the bowl from heat and stir in the egg yolks and salt.


3. **Egg Whites:**


Using an electric mixer, beat the egg whites in another large bowl until soft peaks form. Gradually add 2 tablespoons of sugar, beating until semi-firm peaks form.


4. **Combine:**


Using a rubber spatula, fold one-quarter of the beaten egg whites into the chocolate mixture to lighten it. Gently fold in the remaining egg whites in two additions.


5. **Fill and Bake:**


Divide the chocolate mixture among the prepared soufflé dishes, filling them completely. Position the oven rack in the center and preheat to 204°C (400°F). Bake the soufflés on the baking sheet until they are puffed and the tops feel firm—approximately 16 minutes for room temperature batter or 18 minutes if chilled.


### A Nostalgic Family Memory


Growing up, the Soufflé au Chocolat was a staple at our family gatherings. My grandmother, a culinary maestro, would orchestrate a symphony of flavors that left every guest in awe. I vividly remember one snowy winter evening when she decided to teach me her secrets. The kitchen was filled with warmth and the rich scent of chocolate. Her gentle guidance and patient hands taught me the art of folding egg whites, an essential technique for this delicate dessert. That night, as we sat around the table, the soufflés rose beautifully, much like the laughter and joy that filled the room. It was in those moments that I learned that cooking is not just about food—it's about creating memories that last a lifetime.


### Conclusion


The Soufflé au Chocolat is more than just a dessert; it’s a celebration of culinary artistry and a testament to the love and care poured into every dish. Whether you’re crafting this for a special occasion or a cozy night in, this recipe promises to transport you and your loved ones to a place of indulgence and nostalgia. So, preheat your oven, gather your ingredients, and prepare to delight in a chocolate cloud that is sure to make hearts flutter.


### Classification


- **Difficulty:** 7/10


- **Type:** Dessert


---


Embrace the challenge, enjoy the process, and savor the sweet rewards of this timeless classic. Bon appétit!

Read more about Appetizers

Read more about Main Dishes

Read more about Desserts

Steamed Artichokes With Roasted Red Pepper Aioli | Made by Meaghan Moineau

Steamed Artichokes With Roasted Red Pepper Aioli | Made by Meaghan Moineau

### Title: Nostalgic Flavors: Steamed Artichokes with Roasted Red Pepper Aioli


#### Description:


Dive into a culinary journey with our Steamed Artichokes with Roasted Red Pepper Aioli recipe. This delightful dish, rated 6/10 in difficulty, serves as a perfect appetizer for any gathering. Infused with rich flavors and a touch of nostalgia, it's a must-try for those who want to impress their guests while reminiscing about cherished family moments.


---


#### A Taste of Memories: Steamed Artichokes with Roasted Red Pepper Aioli


The clatter of pots and pans, the gentle hum of conversation, and the irresistible aroma of steaming artichokes mingling with the tangy scent of roasted red pepper aioli—it all transports me back to those cherished family gatherings at my grandmother's house. Her kitchen was a place of warmth and laughter, where recipes were passed down through generations and every dish told a story.


This Steamed Artichokes with Roasted Red Pepper Aioli is more than just an appetizer; it's a gateway to nostalgia, a dish that brings back the vibrant energy of my childhood. I vividly remember sitting around the large oak dining table, eagerly waiting for the artichokes to finish steaming. My grandmother would carefully trim and prepare them, her hands skillfully working their magic. We, the little ones, were tasked with setting the table and sneaking tastes of the aioli, much to her feigned dismay.


#### Ingredients:


- Artichokes


- Egg yolks


- Garlic clove


- Cayenne pepper


- Lemon juice


- Oil


- Red roasted pepper


- Salt


#### Instructions:


1. **Prepare the Aioli**: Place the egg yolks, garlic, cayenne pepper, and a pinch of salt in a food processor. Puree until smooth. Add the roasted red pepper and puree again until the mixture is fully smooth. While the processor is running, gradually pour in the oil, allowing the mixture to emulsify to your desired consistency. Taste and adjust with more salt if needed. Cover and refrigerate until ready to serve.


2. **Steam the Artichokes**: Fill a large pot with about 2 inches of water and place a steaming basket over it. Cover and bring to a boil. Trim the artichoke stems and remove about 1 inch from the top of the artichoke flower. Discard any damaged leaves at the base. Using kitchen shears, trim the pointed tips of the outer leaves. Squeeze lemon juice over the cut edges to prevent browning. Sprinkle with salt and place the artichokes in the steaming basket. Cover and steam for 30-40 minutes, or until a center leaf pulls out easily.


3. **Serve**: Arrange the steamed artichokes on a platter, with the roasted red pepper aioli on the side for dipping. For an added touch, serve alongside fingerling potatoes, which also pair beautifully with the aioli.


#### A Culinary Journey


As I savor this dish today, I am reminded of those joyful family meals, a time when life seemed simpler and every meal was a celebration. The earthy taste of the artichokes combined with the creamy, spicy aioli evokes memories of laughter and togetherness. This recipe not only delights the senses but also acts as a tribute to family traditions and the timeless art of home cooking.


#### Difficulty: 6/10


#### Classification: Appetizer


Whether you're introducing this dish at a family gathering or simply recreating a beloved memory, Steamed Artichokes with Roasted Red Pepper Aioli is sure to leave a lasting impression. Enjoy the flavors, relish the memories, and, most importantly, share the joy with those you love.

Read more about Appetizers

Read more about Main Dishes

Read more about Desserts

Baked Cinnamon Apple Wedges | Made by Meaghan Moineau

Baked Cinnamon Apple Wedges | Made by Meaghan Moineau

**Title: A Warm Hug in Every Bite: Baked Cinnamon Apple Wedges**


**Description:** Dive into the nostalgic flavors of fall with our Baked Cinnamon Apple Wedges. This simple yet flavorful dessert is perfect for cozy gatherings or a comforting treat at home. With just four ingredients, this easy-to-make dish brings back cherished family memories while delighting your taste buds.


---


As autumn leaves begin to fall and a crisp breeze fills the air, my thoughts often drift back to cozy family gatherings. One of my fondest memories is of my grandmother bustling around her warm kitchen, the welcoming scent of cinnamon and nutmeg weaving through the house like a comforting embrace. She had a knack for turning the simplest ingredients into something magical, and her Baked Cinnamon Apple Wedges were no exception.


Every autumn, she would gather the freshest apples from the local orchard, their skins glistening in shades of red and green. I remember sitting at the kitchen table, my feet barely touching the floor, as she meticulously cut each apple into perfect wedges. She would then drizzle them with rich maple syrup, sprinkle them with aromatic cinnamon and nutmeg, and slide them into the oven. The anticipation was almost too much to bear, as the sweet and spicy aroma filled the room, wrapping us in its warmth.


Just ten minutes later, the apples emerged from the oven, golden brown and tender, ready to be savored. Each bite was like a warm hug, the flavors perfectly balanced and reminiscent of everything wonderful about the season. We would gather around the table, sharing stories and laughter, the simple act of enjoying these baked apple wedges creating memories that would last a lifetime.


Now, as I prepare this dish for my own family, I am reminded not only of my grandmother's love but also of the joy found in sharing these timeless recipes. The Baked Cinnamon Apple Wedges are more than just a dessert; they are a connection to the past, a celebration of the present, and a tradition I hope to pass on.


**Recipe: Baked Cinnamon Apple Wedges**


**Ingredients:**


- 1 apple


- 1 tablespoon maple syrup


- 1 teaspoon ground cinnamon


- 1/4 teaspoon ground nutmeg


**Instructions:**


1. Preheat your oven to 180 degrees Celsius (356 degrees Fahrenheit).


2. Cut the apple into approximately 10-12 wedges.


3. In a bowl, mix the apple wedges with maple syrup, cinnamon, and nutmeg until evenly coated.


4. Arrange the apple wedges in a single layer in a small baking dish or on a baking tray.


5. Bake in the preheated oven for 10 minutes, or until the apples are golden brown and cooked through.


6. Serve warm and enjoy the comforting flavors.


**Difficulty Rating:** 2/10


**Classification:** Dessert


Whether you're looking to recreate cherished family memories or simply indulge in a deliciously easy dessert, these Baked Cinnamon Apple Wedges are sure to delight. With their enticing aroma and comforting taste, they capture the essence of fall in every bite. So gather your loved ones, share a story or two, and enjoy this warm hug from the oven.

Read more about Appetizers

Read more about Main Dishes

Read more about Desserts

Chicken and Roasted Broccoli Salad With Goat Cheese | Made by Meaghan Moineau

Chicken and Roasted Broccoli Salad With Goat Cheese | Made by Meaghan Moineau

# Nostalgic Flavors: Chicken and Roasted Broccoli Salad with Goat Cheese


## A Taste of Home: Family Gatherings and Culinary Memories


Growing up, my family had a tradition of gathering every Sunday for a hearty meal. The kitchen would be filled with laughter, the clatter of pots and pans, and the mouthwatering aroma of delicious dishes. One of the standout recipes that often graced our table was the Chicken and Roasted Broccoli Salad with Goat Cheese. This dish, with its perfect blend of savory chicken, tangy goat cheese, and roasted broccoli, is not just a meal—it's a cherished memory.


### Ingredients:


- 1 head of broccoli, chopped into florets


- 2 garlic cloves, minced


- 4 oz goat cheese, crumbled


- Juice from 1 lemon


- 3 tbsp olive oil


- 1 tsp dried oregano


- 1/2 tsp freshly ground pepper


- 1 red bell pepper, sliced


- A pinch of red pepper flakes


- Salt, to taste


- 2 cups cooked shredded chicken


- 1 tsp sugar


### Instructions:


1. **Preheat the Oven:** Begin by heating your oven to a scorching 500 degrees Fahrenheit. Place a sturdy baking sheet on the lowest rack. This high heat is essential for achieving perfectly roasted broccoli.


2. **Prepare the Broccoli:** In a large bowl, toss the broccoli florets with minced garlic, olive oil, salt, pepper, and a dash of red pepper flakes. For an added touch of sweetness, sprinkle in the sugar.


3. **Roast the Broccoli:** Spread the broccoli mixture evenly on the preheated baking sheet. Roast in the oven for about 15-20 minutes, or until the broccoli is tender and has a slight char.


4. **Assemble the Salad:** In a large serving bowl, combine the roasted broccoli, shredded chicken, and red bell pepper slices. Drizzle with lemon juice and sprinkle with dried oregano.


5. **Add the Goat Cheese:** Finish the salad by crumbling goat cheese over the top. Its creamy texture and tangy flavor will elevate the dish.


6. **Serve:** Toss everything gently to combine, ensuring an even distribution of ingredients. Serve warm or at room temperature.


### A Family Memory:


I vividly remember one particular Sunday when my grandmother decided to add her unique twist to this classic dish. With her usual flair, she infused the salad with extra lemon juice and a touch of oregano, creating a symphony of flavors that lingered on our taste buds. That afternoon, we gathered around the table, reminiscing about old times and sharing stories that spanned generations. The Chicken and Roasted Broccoli Salad with Goat Cheese became more than just a meal—it was a symbol of love, tradition, and the bonds that tie us together.


### Difficulty Rating: 4/10


This dish is straightforward and perfect for cooks of all levels. The simple steps and readily available ingredients make it an ideal choice for a relaxing Sunday dinner.


### Classification: Main Dish


With its hearty combination of protein, vegetables, and cheese, this salad serves as a satisfying main dish. It’s perfect for a family meal or a casual dinner with friends.


---


Whether you're recreating family memories or crafting new ones, the Chicken and Roasted Broccoli Salad with Goat Cheese is a delightful dish that will warm your heart and satisfy your palate. Enjoy the nostalgia and flavors that come with each bite!

Read more about Appetizers

Read more about Main Dishes

Read more about Desserts

Crème Fraiche Coconut Bavarians | Made by Meaghan Moineau

Crème Fraiche Coconut Bavarians | Made by Meaghan Moineau

**Title: Indulge in Nostalgia with Crème Fraiche Coconut Bavarians: A Dessert That Transcends Time**


**Description: Dive into the rich, creamy world of Crème Fraiche Coconut Bavarians—a dessert that perfectly blends tradition and modern culinary artistry. Infused with the tropical allure of coconut and the luxurious texture of crème fraiche, this dessert is not just a treat for the palate but also a journey down memory lane. Discover how this delectable creation became a cherished family tradition and learn how to create it yourself with our step-by-step guide.**


**Crème Fraiche Coconut Bavarians: A Sweet Taste of Memory**


The gentle hum of our family kitchen was always punctuated by the rhythmic clattering of dishes and the soft laughter of loved ones. Among the many desserts that graced our dining table, one stood out for its sumptuous texture and evocative flavor—Crème Fraiche Coconut Bavarians. It wasn't just a dessert; it was the embodiment of family gatherings, a sweet testament to our shared history.


**Ingredients:**


- 1 packet gelatin


- 1 can coconut milk, divided


- 1 can sweetened condensed milk


- 1/2 cup sugar


- 4 egg yolks


- 1 cup Alouette Cuisine Crème Fraiche


- 1/2 cup shredded coconut


**Instructions:**


1. **Bloom the Gelatin:** In a small bowl, combine the gelatin with 4 tablespoons of coconut milk. Let it sit to bloom while you prepare the rest of the ingredients.


2. **Simmer the Milks:** In a medium saucepan, bring the sweetened condensed milk and remaining coconut milk to a gentle simmer over medium-high heat. Stir occasionally to ensure it doesn't stick to the bottom.


3. **Temper the Egg Yolks:** Meanwhile, whisk together the sugar and egg yolks in a separate bowl until well combined. Slowly add a small amount of the heated milk mixture to the egg yolks, whisking continuously to temper them without cooking the eggs.


4. **Combine and Thicken:** Gradually pour the tempered egg yolk mixture back into the saucepan. Stir constantly and heat until the mixture thickens enough to coat the back of a spoon, about 5 to 7 minutes. Remove from heat and stir in the bloomed gelatin until fully dissolved.


5. **Chill and Whip:** Transfer the mixture to a bowl and refrigerate until it begins to gel. While waiting, whip the Alouette Cuisine Crème Fraiche in a separate bowl until soft peaks form.


6. **Fold and Mold:** Once the gelatin mixture has slightly set, gently fold it together with the whipped crème fraiche. Pour the combined mixture into your chosen molds immediately.


7. **Refrigerate Overnight:** Allow the Bavarians to set in the refrigerator overnight.


8. **Serve with Nostalgia:** Unmold the Bavarians just before serving and generously sprinkle with shredded coconut. Enjoy the dessert that has become a beloved part of our family's culinary heritage.


**A Nostalgic Family Memory**


I remember the first time my grandmother made Crème Fraiche Coconut Bavarians. The kitchen was filled with the enticing aroma of coconut, a scent that still evokes memories of those bustling family gatherings. As children, we watched in awe as she carefully folded the whipped crème fraiche into the gelling mixture, her hands moving with the grace of years of practice. Each bite was a reminder of her warmth and the love she poured into every dish. Even today, making this dessert feels like a sweet conversation with her, a way to keep her spirit alive in our hearts and taste buds.


**Difficulty Rating:** 6/10


**Classification:** Dessert


Creating Crème Fraiche Coconut Bavarians is not just about following a recipe—it's about connecting with the past, savoring the present, and crafting memories for the future. Whether you're a seasoned chef or a culinary novice, this dessert promises a rewarding experience that goes beyond taste. So, gather your ingredients, embrace the process, and indulge in a dessert that truly transcends time.

Read more about Appetizers

Read more about Main Dishes

Read more about Desserts

Avocado-Mango Salad With Grilled Shrimp | Made by Meaghan Moineau

Avocado-Mango Salad With Grilled Shrimp | Made by Meaghan Moineau

**Title: A Taste of Summer: Avocado-Mango Salad with Grilled Shrimp**


**Description: Dive into the flavors of summer with our Avocado-Mango Salad with Grilled Shrimp. This dish, a symphony of fresh ingredients and vibrant tastes, is perfect for family gatherings or a simple weeknight dinner. Rated a 6/10 in difficulty, this main dish is sure to impress without overwhelming your culinary skills.**


---


**A Taste of Summer: Avocado-Mango Salad with Grilled Shrimp**


There’s something inherently nostalgic about summer meals. The smell of a grill heating up, the sound of laughter and chatter in the background, and the vibrant flavors of fresh produce all remind me of family gatherings at my grandmother's house. Today, I want to share a recipe that encapsulates those cherished memories: Avocado-Mango Salad with Grilled Shrimp. This dish not only brings a burst of flavor but also transports me back to those carefree days of summer.


**Ingredients:**


- 1 lb shrimp, peeled and deveined


- 2 ripe Hass avocados, diced


- 1 cup diced mango


- Lime wedges for garnish


- 2 tbsp red wine vinegar


- 2 tbsp fresh lime juice


- 1 tsp fresh ginger, grated


- 1 tsp sugar


- 1 tbsp Dijon mustard


- 1/4 cup canola oil


- 1/4 cup cilantro, chopped


- 1 tsp lime zest


- 1 diced habanero chile (optional for heat)


- 1/2 cup red onion, thinly sliced


- Salt and black pepper to taste


**Instructions:**


1. **Preheat the Grill:** Start by preheating your gas grill to high heat. This ensures that the shrimp will cook quickly and evenly, achieving that perfect charred flavor.


2. **Prepare the Dressing:** In a small bowl, combine the red wine vinegar, fresh lime juice, grated ginger, sugar, Dijon mustard, and canola oil. Whisk until the ingredients are well blended. Season with salt and black pepper to taste. Set aside.


3. **Grill the Shrimp:** Season the shrimp with a pinch of salt and black pepper. Place them on the grill and cook for about 2-3 minutes on each side, until they turn pink and opaque. Remove from the grill and set aside.


4. **Assemble the Salad:** In a large bowl, combine the diced avocados, mango, red onion, lime zest, and cilantro. If you're feeling adventurous and enjoy a bit of heat, add the diced habanero chile. Drizzle the prepared dressing over the salad and toss gently to coat.


5. **Serve:** Arrange the grilled shrimp atop the salad, and garnish with lime wedges. This dish can be served warm or at room temperature, making it a versatile option for any occasion.


**A Family Memory:**


This dish always takes me back to the annual summer barbecues at my grandmother's house. I remember the excitement of helping her in the kitchen, carefully dicing the avocados and mangos while listening to her stories of summers past. The aroma of grilled shrimp would waft through the air as family members gathered around the picnic table, sharing laughter and love. It was during one of these gatherings that I first tasted the combination of creamy avocado with sweet mango and succulent shrimp—a flavor match made in heaven that has since become a family favorite.


**Final Thoughts:**


Our Avocado-Mango Salad with Grilled Shrimp is more than just a meal; it's an experience. It's a reminder of the joy that comes from sharing delicious food with loved ones. Whether you're creating new memories or reminiscing about old ones, this dish is sure to bring sunshine to your table.


**Difficulty Rating: 6/10**


**Classification: Main Dish**


So fire up the grill and gather your loved ones. It's time to create some delicious memories!

Read more about Appetizers

Read more about Main Dishes

Read more about Desserts

Brown Rice Mushroom Pilaf | Made by Meaghan Moineau

Brown Rice Mushroom Pilaf | Made by Meaghan Moineau

**Title: A Hearty Bowl of Comfort: Brown Rice Mushroom Pilaf**


**Description:** Discover the heartwarming delight of Brown Rice Mushroom Pilaf, a dish that brings back cherished family memories. Perfect as a main dish, this simple yet flavorful recipe is a wholesome addition to your menu. Join me as I share a nostalgic journey and a recipe that scores a 4 out of 10 on the difficulty scale, yet offers a 10 in satisfaction.


---


When the cool winds of autumn arrive, they carry with them a cascade of memories from a time when family gatherings were frequent and hearty meals filled the air with irresistible aromas. One such dish that has been a staple in my family for generations is the Brown Rice Mushroom Pilaf. With its earthy flavors and comforting warmth, it never fails to evoke a sense of home.


**The Nostalgic Story:**


I remember the first time I helped my grandmother make this pilaf. It was a chilly Saturday afternoon, and we were preparing for a large family dinner. The aroma of onions sizzling in sunflower oil filled the kitchen, mingling with the earthy scent of mushrooms. My grandmother, with her kind eyes and gentle hands, guided me through the process, teaching me how to patiently sauté the onions and mushrooms until they reached that perfect golden hue.


As the brown rice was added to the pan, she imparted her wisdom, "The secret, my dear, is to let each grain soak up the flavors. It’s like life; we must take in all the goodness around us." With her guidance, I learned the art of stirring the rice just enough to coat it in the oil without overdoing it, allowing each grain to absorb the rich flavors of the dish.


Once the water was added, we waited, sharing stories and laughter, letting the pilaf simmer, filling the air with its inviting aroma. The lid was placed on the saucepan, and we let it rest, just like she taught me, ensuring every drop of liquid was absorbed, leaving the rice tender and flavorful.


This dish, simple in its ingredients yet profound in its ability to bring people together, became a symbol of our family’s love and togetherness. To this day, whenever I prepare Brown Rice Mushroom Pilaf, it’s as if my grandmother is right there with me, smiling and reminding me of the importance of savoring life’s simple pleasures.


**Recipe for Brown Rice Mushroom Pilaf:**


**Ingredients:**


- 1 onion, chopped


- 1 cup brown rice


- 1 can (or equal amount) fresh mushrooms, sliced


- 2 tablespoons unrefined sunflower oil


- 2 cups water


- Sea salt, to taste


- Ground pepper, to taste


**Instructions:**


1. Heat the sunflower oil in a large saucepan over medium heat.


2. Add the chopped onion and sliced mushrooms, sautéing them for about 5 minutes until the onion becomes translucent and the mushrooms soften.


3. Stir in the brown rice, ensuring each grain is well-coated with the oil and flavors from the onion and mushrooms.


4. Pour in the water and bring the mixture to a boil.


5. Reduce the heat to a simmer, covering the saucepan. Let it cook for approximately 30 minutes.


6. Remove from heat, keeping the lid on, and let the pilaf rest until all the liquid is absorbed into the rice.


7. Season with sea salt and ground pepper to taste, then fluff with a fork before serving.


**Difficulty Rating:** 4/10


**Classification:** Main Dish


This Brown Rice Mushroom Pilaf is more than just a meal; it’s a journey into the past, a reminder of the warmth and love of family traditions. It’s perfect for a cozy dinner, offering a delightful blend of flavors that speak to the heart and soul. Whether you’re recreating cherished memories or making new ones, this dish is sure to become a beloved favorite in your home.

Read more about Appetizers

Read more about Main Dishes

Read more about Desserts

Salmon Caesar Salad | Made by Meaghan Moineau

Salmon Caesar Salad | Made by Meaghan Moineau

**Title: "Savor the Memories: A Family Tradition with Salmon Caesar Salad"**


**Description:**


Dive into a delightful blend of flavors with our Salmon Caesar Salad, a dish that not only tantalizes the taste buds but also brings back treasured family memories. Perfect as a main dish, this recipe is easy to prepare and offers a healthy twist on a classic favorite. Join us as we explore the simplicity of bringing together fresh ingredients and cherished moments in the kitchen.


---


### A Nostalgic Flavor Journey: Salmon Caesar Salad


As the aroma of sizzling salmon fills the kitchen, I'm instantly transported back to Sunday afternoons spent in my grandmother's sunlit dining room. It was there, amidst the laughter and stories shared across generations, that our family tradition of Salmon Caesar Salad was born.


My grandmother, a woman of simple tastes yet an extraordinary cook, had a knack for transforming humble ingredients into culinary masterpieces. Her version of Salmon Caesar Salad was no exception, a dish that became a staple at every family gathering.


#### The Heart of the Recipe


The magic begins with fresh, succulent salmon fillets, seasoned gently with salt and a sprinkle of paprika. As they sear in a hot skillet, the kitchen fills with a warm, inviting aroma, reminiscent of those cherished Sundays. The light seasoning allows the natural flavors of the salmon to shine, while a dash of freshly squeezed lemon juice adds a refreshing zing.


The salad itself is a crisp medley of romaine lettuce tossed in a light Caesar dressing. The crunch of the lettuce paired with the creamy dressing creates a perfect base for the star of the dish. Topped with shredded Parmesan cheese and slivered almonds, each bite offers a delightful contrast in textures and flavors.


#### Bringing it All Together


Once the salmon is perfectly cooked to your liking—I prefer mine slightly undercooked for a tender, melt-in-your-mouth experience—it's time to assemble the dish. In a large bowl, mix the romaine lettuce with the Caesar dressing before spreading it out on a large plate. Layer the salmon slices on top, each piece a testament to the careful preparation and love poured into the dish. A final sprinkle of black pepper and a touch more lemon juice complete the masterpiece, ready to be shared with loved ones.


#### A Family Tradition


Every time I prepare this dish, I'm reminded of the joy and warmth of family gatherings. The simplicity of the ingredients mirrors the uncomplicated happiness we found in each other’s company. Sharing this meal is more than just satisfying hunger; it's about preserving a legacy of love, laughter, and delicious food.


#### Recipe Details


- **Difficulty:** 3/10


- **Classification:** Main Dish


Whether you're a seasoned chef or a beginner in the kitchen, this Salmon Caesar Salad is a delightful way to bring a touch of nostalgia and a burst of flavor to your table. It's a dish that celebrates the beauty of simplicity and the joy of shared moments, one forkful at a time.


---


Embrace the tradition, savor the memories, and enjoy the delicious harmony of flavors with your own family. This Salmon Caesar Salad is more than just a recipe—it's a gateway to cherished memories and new traditions.

Read more about Appetizers

Read more about Main Dishes

Read more about Desserts

Not Momofuku Ginger Scallion Noodles | Made by Meaghan Moineau

Not Momofuku Ginger Scallion Noodles | Made by Meaghan Moineau

**Title: A Taste of Nostalgia: Not Momofuku Ginger Scallion Noodles**


**Description:** Dive into the comforting embrace of Not Momofuku Ginger Scallion Noodles, a delightful dish packed with vibrant flavors and warm memories. This recipe is your gateway to a symphony of taste and nostalgia, blending simple ingredients into a soul-soothing experience. Perfect for a cozy dinner, this dish will transport you back to cherished family gatherings, making it a must-try for any home cook.


---


**Blog Post:**


There's something magical about a recipe that evokes cherished memories with every bite. For me, Not Momofuku Ginger Scallion Noodles is more than just a dish; it's a bridge to my past, a flavorful reminder of family gatherings filled with laughter, love, and of course, delightful aromas wafting from the kitchen.


**Ingredients:**


- Soba noodles


- 1/4 cup grapeseed oil


- 2 cups green onions, finely chopped


- 2 tablespoons ginger, minced


- 4 cloves garlic, minced


- 2 shallots, thinly sliced


- 2 tablespoons fish sauce


- 1 tablespoon sesame seed oil


- 1 tablespoon rice wine vinegar


- 2 tablespoons wheat-free tamari sauce


- 1 tablespoon honey


- 1 red chile pepper, crushed


- Himalayan salt, to taste


**Instructions:**


1. Heat the grapeseed oil in a saucepan over high heat until shimmering and hot, but not smoking. This is where the magic begins.


2. Carefully add the green onions, ginger, garlic, and shallots to the pan. Watch as the ingredients sizzle and the aroma fills your kitchen, instantly transforming the space into a fragrant haven. The onions will wilt and turn a vibrant green almost immediately.


3. Remove the pan from the heat and stir the mixture with a wooden spoon. Feel the warmth of the moment as you add the fish sauce, sesame seed oil, rice wine vinegar, tamari sauce, honey, crushed red chile pepper, and Himalayan salt. Allow the sauce to sit for 15 minutes, letting the flavors meld together.


4. Toss with your favorite noodles. While I used fresh Chinese egg noodles for a traditional touch, soba noodles offer a splendid alternative, absorbing the sauce beautifully.


**A Nostalgic Connection:**


This dish always takes me back to my grandmother's kitchen. As a child, I spent countless weekends there, perched on a stool, watching her deftly chop green onions and ginger while regaling me with stories of her own childhood. She had a way of making the simplest ingredients sing, turning every meal into an event. The aroma of sizzling onions and ginger would fill the house, drawing everyone to the kitchen like moths to a flame. Every bite of her noodles was a testament to her love; a warm, comforting embrace on a plate.


**Difficulty Rating: 3/10**


Classified as a **Main Dish**, Not Momofuku Ginger Scallion Noodles is surprisingly straightforward to prepare, making it an ideal choice for both novice cooks and seasoned chefs alike. Its simplicity is its strength, allowing each ingredient to shine while wrapping you in a blanket of nostalgia and flavor.


---


There's an undeniable comfort in recreating a recipe that has stood the test of time in your family. Not Momofuku Ginger Scallion Noodles is more than just a meal; it's a journey back to those precious moments spent with loved ones. Whether you're cooking for a crowd or just for yourself, this dish is sure to bring a smile to your face and warmth to your heart. So, gather your ingredients, ignite your stove, and let the magic of nostalgia fill your kitchen once more.

Read more about Appetizers

Read more about Main Dishes

Read more about Desserts