Green Tea Fruit Medley Smoothie | Made by Meaghan Moineau

Green Tea Fruit Medley Smoothie | Made by Meaghan Moineau

Title: Sipping on Memories: The Green Tea Fruit Medley Smoothie
Description: Dive into the vibrant, refreshing world of the Green Tea Fruit Medley Smoothie, a delightful blend that not only tantalizes your taste buds but also warms your heart with nostalgia. Discover how this smoothie, steeped in family tradition, can become a staple in your kitchen. Easy to make and bursting with flavor, this smoothie is perfect for breakfast, as a midday pick-me-up, or a light dessert.

---


In the hustle and bustle of our daily lives, it's often the simplest of pleasures that bring us the greatest joy. For me, the Green Tea Fruit Medley Smoothie is much more than just a refreshing drink; it’s a cherished family tradition that has been lovingly passed down through the generations.


A Trip Down Memory Lane

Growing up, summers at my grandmother's house were a kaleidoscope of colorful memories. Her backyard, a sprawling canvas of greenery and fresh blooms, was our playground. But what I remember most vividly is the scent of freshly brewed green tea wafting through the open kitchen window, mingling with the sweet, tangy aroma of ripe berries.


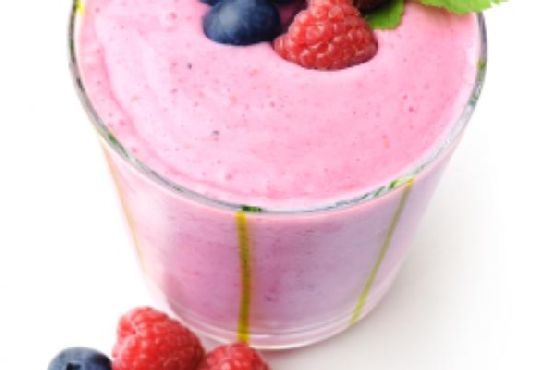
Every afternoon, my grandmother would prepare what she affectionately called her "secret elixir" — a concoction she swore was the secret to her youthful energy and radiant smile. It was the Green Tea Fruit Medley Smoothie, a harmonious blend of robust green tea, succulent fresh berries, and the tropical sweetness of pineapple juice, all swirled together with creamy vanilla yogurt.


As children, my siblings and I would gather around the kitchen counter, eagerly watching as she steeped the green tea bags in a pot of boiling water. The anticipation was palpable as she squeezed out the tea bags, releasing every last drop of flavor before discarding them. With a twinkle in her eye, she would pour the fragrant tea into the blender, adding generous handfuls of vibrant berries and a splash of pineapple juice. The final touch was a dollop of vanilla yogurt and a few ice cubes to create a perfectly chilled treat.


With the press of a button, the blender would roar to life, transforming the disparate ingredients into a smooth, frothy masterpiece. We would clink our glasses together, savoring each sip as we laughed and shared stories under the summer sun.


Crafting Your Own Smoothie Magic
Creating this delightful smoothie is as easy as it is rewarding, making it a perfect addition to any meal. Here’s how you can bring a taste of my family’s tradition into your home:
Ingredients:

- 1 cup boiling water


- 3 Bigelow Green Tea bags


- 1 cup fresh berries (your choice of strawberries, blueberries, or raspberries)


- 1/2 cup pineapple juice


- 1/2 cup vanilla yogurt


- 1 cup ice cubes


Instructions:

1. Begin by preparing the tea. Steep 3 Bigelow Green Tea bags in 1 cup of boiling water for 5 minutes.


2. Carefully squeeze out the tea bags to extract all the flavor, then discard them.


3. In a blender, combine the freshly brewed tea, fresh berries, pineapple juice, vanilla yogurt, and ice cubes.


4. Blend until smooth, ensuring all ingredients are well incorporated.


5. Pour the smoothie into glasses and enjoy!


Simplicity at Its Best

With a difficulty rating of 3 out of 10, this smoothie is accessible to everyone, from novice cooks to kitchen aficionados. Whether you enjoy it as a vibrant appetizer, a refreshing main dish, or a light dessert, the Green Tea Fruit Medley Smoothie is sure to become a beloved part of your culinary repertoire.


So, next time you find yourself longing for a taste of something special, remember the Green Tea Fruit Medley Smoothie — a drink that’s as much about celebrating life’s simple pleasures as it is about savoring the delightful flavors of nature’s bounty.

Read more about Appetizers

Read more about Main Dishes

Read more about Desserts

Crispy Tiger Prawns With Honey and Garlic Sauce | Made by Meaghan Moineau

Crispy Tiger Prawns With Honey and Garlic Sauce | Made by Meaghan Moineau

Title: Crispy Tiger Prawns with Honey and Garlic Sauce: A Savory Journey Down Memory Lane
Description:

Dive into the irresistible flavors of our Crispy Tiger Prawns with Honey and Garlic Sauce—an exquisite dish that marries sweetness with savory undertones. Perfectly crisped to golden perfection, these prawns are a delightful treat that promises to transport you back to cherished family gatherings. Rated 5/10 on the difficulty scale, this dish serves as a stellar appetizer that will leave your guests clamoring for more. Follow along as we share a nostalgic story that makes this recipe a family favorite!


---


Crispy Tiger Prawns with Honey and Garlic Sauce

*Ingredients:*


- 500g tiger prawns, peeled and deveined


- 2 tablespoons cornflour


- 1/4 cup water


- 2 tablespoons light soy sauce


- 1 egg yolk


- 1 teaspoon sesame oil


- Vegetable oil, for frying


- 1 spring onion, finely chopped (for garnish)


*For the Honey & Garlic Sauce:*


- 3 tablespoons honey


- 2 tablespoons dry shao hsing wine


- 4 diced garlic cloves


- 2 tablespoons light soy sauce


---


Instructions:
1. Prepare the Prawns: In a large bowl, blend the cornflour and water until dissolved. Add the prawns, soy sauce, egg yolk, and sesame oil, mixing well to ensure the prawns are evenly coated.
2. Make the Honey & Garlic Sauce: In a separate bowl, combine all the sauce ingredients and set aside.
3. Fry the Prawns: Heat vegetable oil in a wok over high heat until the surface shimmers. Carefully deep-fry half of the prawns for about 1 minute, or until they turn golden brown. Remove with a slotted spoon and drain on kitchen paper. Repeat with the remaining prawns.
4. Prepare the Sauce: Drain the oil from the wok, saving it for future use if desired. Wipe the wok clean with kitchen paper. Heat the wok over moderate heat and add the honey & garlic sauce mixture. Simmer for about 1 minute.
5. Combine and Serve: Add the prawns to the sauce, stirring until they are hot and just cooked through. Garnish with finely chopped spring onion and serve immediately.

---


A Nostalgic Family Memory:

The first time I made this dish was for a family reunion at my grandmother's house. I vividly remember the kitchen filled with the aroma of sizzling garlic and the sweet hint of honey. As a child, I watched in awe as my grandmother skillfully tossed tiger prawns in her cherished wok, her hands moving with the grace and confidence that only years of practice can bestow.


The dish was always the centerpiece of our gatherings, a testament to its ability to bring people together. The laughter and stories shared around the table, the clinking of glasses, and the satisfied sighs after each bite are memories I cherish dearly. Recreating this dish always takes me back to those warm, laughter-filled evenings, reminding me of the joy of family and the power of a good meal to create lasting bonds.


Difficulty: 5/10
Classification: Appetizer

---


This recipe for Crispy Tiger Prawns with Honey and Garlic Sauce is sure to become a favorite in your household as well, bringing a touch of nostalgia and a burst of flavor to your dining table. Enjoy!

Read more about Appetizers

Read more about Main Dishes

Read more about Desserts

Lemony Greek Lentil Soup | Made by Meaghan Moineau

Lemony Greek Lentil Soup | Made by Meaghan Moineau

Lemony Greek Lentil Soup: A Hearty Bowl of Comfort and Tradition


Description


Dive into the rich flavors of the Mediterranean with our Lemony Greek Lentil Soup. This hearty, tangy dish is a beautiful blend of earthy lentils, fresh herbs, and zesty lemon juice. Perfect for chilly evenings or as a comforting main dish, this soup is a delightful journey into Greek culinary tradition. Whether you're a seasoned chef or a kitchen novice, this recipe is rated a manageable 5 out of 10 in difficulty and promises to fill your home with warmth and your heart with nostalgia.


---


Ingredients


- 1 cup brown lentils
- 8 cups water
- 1 carrot, chopped
- 1 teaspoon dried thyme
- 2 tablespoons lemon juice
- 1 teaspoon dried basil
- 1 tablespoon fresh thyme
- 1 teaspoon dried oregano
- Salt and black pepper, to taste
- 1 onion, chopped
- 3 cloves garlic, minced
- 2 tablespoons olive oil
- 1 can (28 ounces) whole canned tomatoes

- Crusty bread and soft cheese like St. Andre or Cambazola for serving


Instructions


1. Initial Cooking: In an 8-quart stockpot, combine the lentils, water, carrot, and 1 teaspoon of dried thyme. Cover and set over medium heat. Allow the mixture to cook for 15 minutes, then lower the heat slightly and let it simmer gently for about 30 minutes more.
2. Resting Phase: Once the lentils reach boiling point, turn off the burner and let the soup sit covered for 1 hour to allow the flavors to meld.
3. Flavor Infusion: After an hour, bring the soup back to a simmer. Stir in the lemon juice, dried basil, fresh thyme, oregano, salt, and black pepper. Let it simmer for another hour.
4. Sauté Aromatics: In a separate pan, slowly sauté the chopped onion and minced garlic in olive oil until the onion is tender and translucent.
5. Tomato Addition: Coarsely chop the canned tomatoes directly in the can using kitchen scissors. Add the tomatoes and the onion-garlic mixture to the soup. Adjust the salt to taste.
6. Final Simmer: Bring everything back to a boil, then reduce to a simmer for another hour. Keep the burner on its lowest setting, and let the soup sit with its lid slightly ajar until you're ready to serve.
7. Serving Suggestion: Serve hot with crusty bread and a side of soft cheese like St. Andre or Cambazola.

---


A Taste of Family Tradition


Growing up, my grandmother's kitchen was a haven of enticing aromas and laughter. Each autumn, as the leaves turned golden and the air grew crisp, she would prepare her signature Lemony Greek Lentil Soup. The recipe was passed down through generations, a cherished family heirloom that connected us to our Greek roots.


I remember the warmth of her kitchen, the chatter of family gathered around the table, and the comforting smell of thyme and oregano wafting through the air. We would sit, savoring each spoonful, as stories of our ancestors unfolded – tales of life in a small Greek village, where this simple yet flavorful dish symbolized sustenance and love.


Even today, as I prepare this soup, I am transported back to those cherished family gatherings. It's more than just a meal; it's a celebration of heritage, a reminder of loved ones, and a bowl of comfort that transcends time and place.


---


Conclusion


Our Lemony Greek Lentil Soup is more than just a dish; it's a journey into the heart of Greek culinary tradition, a nod to family memories, and a testament to the power of food to bring people together. With its rich, tangy flavors and hearty ingredients, this soup is an ideal main dish for any occasion. Enjoy it as part of your own family tradition, and let the nostalgic flavors carry you to a place of warmth and connection.

Read more about Appetizers

Read more about Main Dishes

Read more about Desserts

Simit (Turkish Circular Bread) | Made by Meaghan Moineau

Simit (Turkish Circular Bread) | Made by Meaghan Moineau

Title: Unraveling the Magic of Simit: A Taste of Turkish Tradition
Description: Dive into the rich history and irresistible flavor of Simit, a quintessential Turkish circular bread. This blog post not only offers a detailed recipe but also weaves in a heartwarming family tale, bringing you closer to the essence of this beloved dish. Rated 5/10 in difficulty, Simit is a delightful appetizer that will transport you straight to the bustling streets of Istanbul.

---


Unraveling the Magic of Simit: A Taste of Turkish Tradition


Every corner of the world boasts its own signature bread, but few can stir the soul quite like Simit, the iconic circular bread of Turkey. Crisp on the outside and soft on the inside, its nutty sesame seed crust is a nod to the bustling street vendors of Istanbul, where the air is filled with the tantalizing aroma of freshly baked goods.


Ingredients:


- 4 cups all-purpose flour


- 1 tablespoon dry yeast


- 1 teaspoon salt


- 1 tablespoon olive oil


- 1 cup lukewarm water


- 1/2 cup molasses


- 1 cup sesame seeds


Instructions:


1. Mixing the Dough: In a medium bowl, combine the flour, dry yeast, and salt. Make a well in the center and pour in the olive oil and lukewarm water. Knead the dough with your hands for 5-10 minutes until smooth and elastic.
2. Forming the Simit: Divide the dough into 16 equal pieces. Roll each piece into thin strips (about 30-35 cm long). Take two strips, place them side-by-side, and pinch the ends together. Twist them and form a ring, pinching the ends to seal.
3. Proofing: Place the rings on baking sheets lined with parchment paper. Let the dough rest in a warm place for 20-30 minutes to rise.
4. Preparing the Coating: Preheat the oven to 200°C (392°F). Toast the sesame seeds in a pan over medium heat, stirring every 4-5 minutes until golden. In a separate bowl, whisk together molasses and boiling water until the molasses is fully dissolved.
5. Coating the Simit: Dip each ring in the molasses mixture, allowing excess to drain. Then, coat both sides in the toasted sesame seeds. Place on the prepared baking sheets.
6. Baking: Bake in the preheated oven for about 17 minutes until golden brown and crisp.

A Nostalgic Tale: Simit Sundays


Growing up, Sundays were Simit days in our household, a tradition that began with my grandmother. As the sun gently kissed the morning sky, she would begin her ritual of kneading dough, her hands moving rhythmically, a dance passed down through generations.


I remember the warmth of her kitchen, the comforting aroma of freshly toasted sesame seeds filling the air. My siblings and I would gather around the table, eager to partake in the creation of this beloved bread. Grandma would let us twist the dough, our small hands clumsy but enthusiastic.


Once baked to golden perfection, we would sit together, tearing into the warm, fragrant rings, paired with feta cheese and olives. Each bite was a taste of home, a reminder of the love baked into every Simit.


Those Sundays were more than just about the bread; they were about family, laughter, and the stories shared over a meal. And though my grandmother is no longer with us, her legacy lives on in each Simit we bake.


Difficulty Level: 5/10


Making Simit is a joyous culinary adventure that balances simplicity with a touch of technique. With a bit of patience and practice, even novice bakers can achieve the perfect twist.


Classification: Appetizer


Simit is more than just bread; it's a versatile appetizer that pairs perfectly with a variety of dips and spreads. Whether enjoyed with a traditional Turkish breakfast or as a midday snack, its flavor and texture make it an evergreen favorite.


---


Embrace this time-honored recipe and create your own memories with Simit. As you knead, twist, and bake, remember that you're not just making bread; you're weaving a tapestry of tradition, flavor, and love.

Read more about Appetizers

Read more about Main Dishes

Read more about Desserts

Chicken Piccata with Artichokes | Made by Meaghan Moineau

Chicken Piccata with Artichokes | Made by Meaghan Moineau

Title: A Taste of Home: Chicken Piccata with Artichokes
Description: Dive into a heartwarming family favorite with our Chicken Piccata with Artichokes recipe. This delightful main dish, rated a 5 out of 10 in difficulty, combines zesty lemon, savory capers, and tender artichokes, creating a symphony of flavors that transport you to a cozy family gathering. Perfectly paired with penne rigate and a sprinkle of parmesan, it’s a meal that promises comfort in every bite.

---


There’s something magical about the aroma of a warm, home-cooked meal wafting through the house. For me, Chicken Piccata with Artichokes is more than just a dish; it’s a cherished memory, a tapestry of flavors that brings to life the laughter and love shared around our family table.


A Nostalgic Culinary Journey

I remember the first time my grandmother introduced us to this dish. It was a crisp autumn afternoon, the kind where the leaves danced gracefully from the trees. We were gathered for our annual family reunion, a day filled with stories, games, and of course, a feast. My grandmother, with her apron tied snugly around her waist, stood in the kitchen like an artist ready to create a masterpiece.


As she cooked, she shared tales from her past, stories of her own childhood and how this recipe had been passed down through generations. The kitchen was filled with the sounds of sizzling chicken and the fragrant medley of lemon and capers. Each ingredient was carefully chosen, a testament to the love and care she poured into every meal.


When the dish was finally ready, we gathered around the table, eager to taste the fruits of her labor. With the first bite, I was enveloped in the vibrant and tangy flavors of the chicken piccata, each note perfectly balanced by the rich parmesan and delicate artichokes. It was a symphony on the palate, a celebration of flavors that spoke of home and heritage.


Creating Your Own Family Memories
Now, I pass this beloved recipe on to you. Whether you’re creating new memories or reliving old ones, this Chicken Piccata with Artichokes is sure to become a staple in your home. Here’s how you can bring this family favorite to your table:
Ingredients:

- 2 boneless chicken breasts


- Salt and pepper, to taste


- 1/2 cup flour, for dredging


- 2 tablespoons extra virgin olive oil


- 1 cup reduced sodium chicken broth


- 1/4 cup lemon juice


- 2 tablespoons capers


- 1 can artichoke hearts, drained and quartered


- 2 cups cooked penne rigate


- 1/4 cup chopped flat leaf parsley


- 1/4 cup grated parmesan cheese


Instructions:

1. In a large bowl, combine the chicken breasts with a pinch of salt and pepper. Lightly dredge the chicken in flour, shaking off any excess.


2. In a large skillet over medium heat, pour in the extra virgin olive oil. Add the chicken and cook until browned and the juices run clear, about 12 minutes.


3. Stir in the chicken broth, lemon juice, capers, and artichokes, cooking for about 3 minutes.


4. Reduce the heat to a simmer and cook for an additional 3 minutes.


5. Stir in the cooked penne rigate until well combined. Add the parsley and transfer the mixture to a serving bowl.


6. Sprinkle with parmesan cheese and serve warm.


With each bite, savor the rich connection to the past and the promise of new memories. This Chicken Piccata with Artichokes is more than just a meal; it’s a legacy of love on a plate, perfect for sharing with those you hold dear.


---


So, gather your loved ones, roll up your sleeves, and embark on a culinary adventure that bridges generations. May this dish bring warmth to your home and joy to your heart, just as it has to mine.

Read more about Appetizers

Read more about Main Dishes

Read more about Desserts

Crab and Shrimp Burgers With Garlic Grits Fries | Made by Meaghan Moineau

Crab and Shrimp Burgers With Garlic Grits Fries | Made by Meaghan Moineau

Title: Coastal Comfort: Crab and Shrimp Burgers with Garlic Grits Fries
Description: Dive into the flavors of the seaside with our Crab and Shrimp Burgers paired with irresistible Garlic Grits Fries. This recipe combines the best of land and sea, offering a delicious and comforting meal that brings back cherished family memories. Perfect as a main dish, this creation is sure to become a family favorite.

---


Coastal Comfort: Crab and Shrimp Burgers with Garlic Grits Fries

As the aroma of the salty sea breeze mingled with the laughter of my family, I recall those sun-drenched afternoons at my grandparents' beach house. The vibrant energy of the shore, combined with the tantalizing scent of seafood cooking in the kitchen, created memories that have lingered in my heart for years. One dish that stood out during those times was my grandmother's famous Crab and Shrimp Burgers with Garlic Grits Fries. This recipe not only brings a taste of those cherished moments but also offers a delightful culinary experience that celebrates the best of coastal flavors.


Ingredients You'll Need:
For the Crab and Shrimp Burgers:

- Fresh shrimp


- Fresh crab meat


- Lemon juice


- Tabasco sauce


- Dijon mustard


- Mayonnaise


- Jalapeno


- Onion


- Fresh parsley


- White pepper


- Kosher salt


- Panko crumbs


- Egg


- Bread crumbs


- Seafood seasoning


For the Garlic Grits Fries:

- Unsalted butter


- Grits


- Water


- Milk


- Kosher salt


- Shredded mozzarella cheese


- Dried garlic


Instructions:

1. In a large bowl, carefully mix all of the ingredients for the burgers except the breadcrumbs, seafood seasoning, and butter. Form the mixture into 8 patties and set them on a baking sheet. Chill for an hour to ensure they hold their shape.


2. Once chilled, cover all sides of the patties with bread crumbs and lay them on a separate baking sheet. Bake in an oven preheated to 375 degrees for 15-20 minutes, flipping once to ensure even cooking.


3. If desired, top the patties with a bit of butter and set the burgers onto a vegetable grill basket. Heat for 1-2 minutes on a preheated grill for added flavor and a touch of color.


4. Serve the burgers on warm buns, and enjoy the delicious medley of flavors.


5. For the Garlic Grits Fries, cook the grits according to package instructions, using a mix of water and milk for added creaminess. Stir in unsalted butter, kosher salt, shredded mozzarella cheese, and dried garlic until well combined.


6. Spread the grits onto a baking sheet and let cool until firm. Cut into fry shapes and bake until golden and crispy.


A Taste of Nostalgia:

The combination of crab and shrimp in these burgers always takes me back to those family gatherings by the sea. I vividly remember the sound of the waves crashing against the shore, the sun setting over the horizon, and my grandmother bustling about in the kitchen, her face alight with joy as she prepared meals that brought us all together. These burgers were a symbol of love, bringing warmth and happiness to our hearts, much like the sun's gentle embrace on a cool evening.


Difficulty Level: 6/10
Classification: Main Dish

Recreate this coastal classic in your own kitchen and make new memories with the ones you love. Whether it's a family gathering or a simple dinner, these Crab and Shrimp Burgers with Garlic Grits Fries are sure to delight and inspire. Enjoy the flavors of the ocean, and let them transport you to a place of comfort and nostalgia.

Read more about Appetizers

Read more about Main Dishes

Read more about Desserts

Basic Hummus | Made by Meaghan Moineau

Basic Hummus | Made by Meaghan Moineau

Title: "A Taste of Tradition: Mastering the Art of Basic Hummus"
Description: Discover the simplicity and flavor of homemade hummus with our easy-to-follow recipe. This classic dish, rich in Middle Eastern tradition, is perfect for gatherings or a cozy night in. Learn how to create a creamy, flavorful hummus and enjoy a nostalgic family story that brings this recipe to life. Rated at a 3/10 for difficulty, this appetizer will become a staple in your kitchen.

---


A Taste of Tradition: Mastering the Art of Basic Hummus

Hummus is more than just a dip; it's a journey back to the comforting embrace of family gatherings and the warmth of shared meals. This simple yet flavorful dish has been a staple in my family for generations, bringing us together around the table, sharing stories and laughter.


Ingredients:

- 1 can of chickpeas, drained and rinsed


- 2 tablespoons of olive oil, plus extra for garnish


- Juice of 1 lemon


- 2 cloves of garlic, peeled


- ¼ cup of tahini


- 2-4 tablespoons of water


- 1 teaspoon of ground cumin


- Salt to taste


- Paprika for garnish


- Whole chickpeas and extra virgin olive oil for topping


Instructions:
1. Begin with the Tahini: Start by pureeing the tahini in a food processor for about a minute until it transforms into a smooth paste. This step is crucial for achieving that creamy texture hummus is known for.
2. Incorporate the Flavors: Add olive oil, garlic, lemon juice, cumin, and salt. Pulse until the ingredients are well incorporated, forming a smooth base.
3. Chickpeas in Stages: Add the chickpeas in two batches. Wait until the first batch is completely smooth before adding the second. This ensures a creamy consistency and allows each chickpea to blend seamlessly.
4. Adjust to Taste: If you prefer a smoother hummus, feel free to add more lemon juice or water until you reach your desired consistency. Taste and adjust the seasoning as needed.
5. Presentation: Pour the hummus into a serving bowl. Garnish with a few whole chickpeas in the center, sprinkle with paprika, and drizzle your best extra virgin olive oil on top. Serve with warm, whole wheat pita bread for an authentic touch.
A Family Memory:

Every summer, my family would gather at my grandmother's house for a reunion. The air was always filled with the scent of blooming jasmine and the sound of children playing. However, the highlight was the long table laden with dishes that told stories of our heritage. Among them, a bowl of hummus always stood out.


I remember watching my grandmother in the kitchen, her hands skillfully combining ingredients, turning simple chickpeas into a velvety hummus that everyone adored. She would let me taste it, asking if it needed more lemon or salt—a secret way of teaching me the art of cooking by feel rather than measurement. The hummus was always a hit, disappearing quickly as we scooped it up with pieces of warm pita.


Those memories are etched in my mind, a reminder of the love and tradition that food brings to our lives. Making hummus today is like revisiting those cherished moments, connecting with my roots through the flavors and aromas that once filled my grandmother's kitchen.


Difficulty Rating: 3/10
Classification: Appetizer

This basic hummus recipe is a delightful way to bring a taste of tradition to your table. Whether you're a seasoned cook or a kitchen novice, this dish offers a simple yet satisfying culinary experience. Enjoy crafting this classic recipe, and let it become a part of your own family story.

Read more about Appetizers

Read more about Main Dishes

Read more about Desserts

Mediterranean Orzo Salad | Made by Meaghan Moineau

Mediterranean Orzo Salad | Made by Meaghan Moineau

Title: Savoring Tradition: A Mediterranean Orzo Salad That Brings Family Together
Description: Dive into the flavors of the Mediterranean with our vibrant and refreshing Orzo Salad recipe. Infused with the zest of lemon, the crunch of fresh vegetables, and the creamy tang of feta cheese, this salad is the perfect dish to transport you to a sunny coastal escape. Rated 4 out of 10 in difficulty, this dish is an ideal appetizer or light main dish for any gathering. Discover how this recipe became a cherished family tradition.

---


A Journey of Flavors: Mediterranean Orzo Salad


There's something undeniably special about a dish that transcends mere ingredients and becomes a bridge to cherished memories. Our Mediterranean Orzo Salad is one such recipe—a symphony of flavors that not only delights the palate but also stirs the heart with nostalgia.


Ingredients:


- 1 cup orzo


- Kosher salt


- 1/4 cup pine nuts


- 8 tablespoons extra virgin olive oil (EVOO), divided


- 3 green onions, chopped


- 1/4 cup Italian parsley, chopped


- Zest and juice of 1 lemon


- 1 diced cucumber


- 1 green bell pepper, diced


- 1 cup cherry tomatoes, halved


- 1/4 cup red onion, finely chopped


- 1/4 cup pepperoncinis, sliced


- 1/2 cup feta cheese, crumbled


- 2 tablespoons red wine vinegar


Instructions:


1. Cooking the Orzo: Begin by bringing a pot of water to a rapid boil. Generously salt the water and add orzo, cooking until tender, approximately 7-9 minutes. Drain and set aside.
2. Toasting the Pine Nuts: While the orzo is cooking, spread pine nuts on a baking sheet and toast lightly in an oven preheated to 400 degrees Fahrenheit. Remove from oven and set aside.
3. Sautéing for Flavor: Heat two tablespoons of EVOO over medium heat in a non-stick pan. Sauté the chopped green onions for about 2 minutes. Add parsley, lemon juice, lemon zest, toasted pine nuts, and cooked orzo. Sauté for an additional 3-4 minutes, allowing the flavors to meld and absorb into the orzo. Remove from heat.
4. Combining Ingredients: In a large mixing bowl, combine the cucumber, green bell pepper, cherry tomatoes, red onion, and pepperoncinis with the orzo mixture. Add crumbled feta cheese, red wine vinegar, and the remaining six tablespoons of EVOO. Mix well until all ingredients are evenly coated.
5. Serving Suggestions: This salad can be refrigerated for later enjoyment or served immediately for a fresh and vibrant appetizer or light main dish.

A Taste of Tradition


Every time I prepare this Mediterranean Orzo Salad, I'm transported back to a sun-drenched summer afternoon at my grandmother's house. Her kitchen, filled with the fragrant aroma of fresh herbs and the warmth of family laughter, was the heart of our gatherings. She would meticulously prepare this salad, her hands deftly chopping vibrant vegetables and crumbling feta with care.


We would gather around her large wooden table, a motley crew of aunts, uncles, and cousins, eagerly anticipating the first bite. The salad, with its blend of tangy, crunchy, and creamy elements, was always the star of our meals, a testament to the simple yet profound joy of sharing food with loved ones.


This recipe, passed down through generations, remains a cherished symbol of our family heritage, a reminder of those joyful days spent together. It’s more than just a dish; it’s a celebration of tradition, love, and the enduring power of food to bring people together.


---


Difficulty: 4/10
Classification: Appetizer / Light Main Dish

Embrace the warmth of Mediterranean flavors and create new memories with this beloved Orzo Salad—a timeless dish sure to delight both your taste buds and your heart.

Read more about Appetizers

Read more about Main Dishes

Read more about Desserts

Easy Chicken with White Wine Sauce | Made by Meaghan Moineau

Easy Chicken with White Wine Sauce | Made by Meaghan Moineau

Savory Simplicity: Easy Chicken with White Wine Sauce


A Flavorful Family Favorite


Description

Indulge in the savory simplicity of our Easy Chicken with White Wine Sauce. This delightful main dish combines tender chicken breast halves with a rich, flavorful sauce that brings elegance to any dinner table in no time. With a difficulty rating of just 3 out of 10, this dish is perfect for both novice cooks and seasoned chefs seeking a quick yet impressive meal. Read on to discover how this recipe transforms simple ingredients into a nostalgic culinary masterpiece.

---


Ingredients


- 2 tablespoons olive oil


- 4 skinless, boneless chicken breast halves


- 1 shallot, finely chopped


- 1 teaspoon fresh thyme leaves


- 1/2 cup dry white wine


- 1/4 cup flavor-concentrated chicken broth


Instructions


1. Prepare the Chicken: Heat the olive oil in a 10-inch skillet over medium heat. Add the chicken breast halves and cook for 10 minutes, ensuring they are well browned on both sides. Remove the chicken from the skillet and set aside.
2. Create the Sauce Base: In the same skillet, add the chopped shallot and fresh thyme leaves. Cook and stir for about 30 seconds until the shallot is fragrant.
3. Deglaze and Reduce: Pour in the dry white wine and let it cook for 2 minutes, allowing the mixture to reduce by half. The wine's acidity will deglaze the pan, lifting those delicious brown bits from the bottom.
4. Enhance with Broth: Stir in the flavor-concentrated chicken broth, combining it well with the reduced wine mixture.
5. Finish Cooking the Chicken: Return the browned chicken to the skillet. Cook for an additional 5 minutes, or until the chicken is cooked through and tender.
6. Serve and Enjoy: Once done, plate the chicken and drizzle the luscious sauce over each piece. Garnish with a sprinkle of fresh thyme leaves for an extra touch of elegance.

---


A Nostalgic Tale


The aroma of chicken sizzling in a skillet always takes me back to Sunday dinners at my grandmother's house. Every week, like clockwork, she would prepare this Easy Chicken with White Wine Sauce, filling her cozy kitchen with the comforting scent of thyme and shallots.


As a child, I would watch her with awe, my eyes wide as she expertly cooked the chicken until perfectly golden brown. Her secret, she would whisper, was in the sauce—a blend of dry white wine and concentrated chicken broth that would transform the simple dish into something extraordinary.


Years later, I found myself replicating this recipe in my own kitchen. The first bite transported me back to those cherished moments with family, reminding me of the warmth and love that came with every meal.


Now, I pass this recipe on to you, hoping it brings as much joy and nostalgia to your table as it has to mine. So gather your loved ones, and let this dish become a part of your culinary traditions.


---


Conclusion


This Easy Chicken with White Wine Sauce is more than just a meal—it's a journey through flavors and memories. Whether you're cooking for a special occasion or a weeknight dinner, this dish promises to impress with its delicate balance of simplicity and sophistication. Enjoy creating new memories with a recipe that's as comforting as it is delicious. Bon appétit!

Read more about Appetizers

Read more about Main Dishes

Read more about Desserts

Easy Parmesan Knots | Made by Meaghan Moineau

Easy Parmesan Knots | Made by Meaghan Moineau

Title: "A Taste of Home: Easy Parmesan Knots That Bring Back Sweet Memories"
Description:

Discover the simple delight of Easy Parmesan Knots, a recipe that not only tantalizes your taste buds but also warms your heart with nostalgia. Perfect as an appetizer, this dish is rated 3/10 in difficulty, making it an ideal choice for both novice and seasoned cooks. Join me as I share a cherished family memory tied to this savory treat, and learn how to create these delicious knots in no time.


---


There’s something truly magical about the aroma of freshly baked bread wafting through the kitchen. It has an uncanny ability to transport you back to simpler times, evoking memories of family gatherings and the comforting presence of loved ones. For me, Easy Parmesan Knots are more than just a delicious appetizer; they are a cherished link to my grandmother's kitchen, where love was always the main ingredient.


Growing up, Sundays were reserved for family dinners at Grandma's house. Her kitchen was a sanctuary of delightful scents and warm smiles, where everyone was welcome and no one ever left hungry. Among the many dishes that graced her table, her Parmesan Knots were an undisputed favorite. These golden, cheesy delights were always the first to disappear, eagerly devoured by everyone from the youngest cousin to the eldest uncle.


Ingredients:

- Refrigerated buttermilk biscuits


- Canola oil


- Dried parsley flakes


- Garlic powder


- Dried oregano


- Canned green Parmesan cheese


Instructions:

1. Preheat your oven to 400°F (200°C).


2. Roll each biscuit into a 12-inch rope and tie it into a knot, tucking the ends under. Place the knots 2 inches apart on a greased baking sheet.


3. Bake for 8-10 minutes or until they are golden brown and fragrant.


4. In a large bowl, combine canola oil, dried parsley flakes, garlic powder, dried oregano, and Parmesan cheese.


5. Once the knots are baked, brush them with the mixture while they are still warm, allowing the flavors to meld beautifully.


As the knots baked, Grandma would regale us with stories from her youth, her eyes twinkling with mischief and nostalgia. She’d speak of summer picnics by the lake, where these Parmesan Knots were a staple, easily carried in a basket and shared among friends. Each bite was a reminder of those sun-drenched days, filled with laughter and the simple joy of being together.


The beauty of this recipe lies in its simplicity and the way it brings people together, just as it did in Grandma’s kitchen. Whether you’re hosting a dinner party or simply craving a taste of home, these Easy Parmesan Knots are sure to please. They’re a testament to the power of food to evoke memories and create new ones, all while being effortlessly delicious.


So why not bring a piece of my family tradition into your home? With just a few ingredients and a little love, you can create a dish that’s bound to become a beloved part of your own culinary repertoire. After all, the best recipes are the ones that remind us of where we’ve been and inspire us to create new memories with those we hold dear.

Read more about Appetizers

Read more about Main Dishes

Read more about Desserts

Dulce De Leche Swirled Amaretto Frozen Yogurt | Made by Meaghan Moineau

Dulce De Leche Swirled Amaretto Frozen Yogurt | Made by Meaghan Moineau

Title: Sweet Memories: Crafting Dulce De Leche Swirled Amaretto Frozen Yogurt


Description:

Dive into the world of creamy indulgence with Dulce De Leche Swirled Amaretto Frozen Yogurt. This dessert marries the nutty elegance of amaretto with the caramel richness of dulce de leche, creating a symphony of flavors that dance on your palate. Perfect for a nostalgic treat that brings back memories of family gatherings and joyful celebrations. Follow our simple guide to recreate this delightful dessert and relive cherished moments.

---


A Sweet Nostalgia: The Heartwarming Tale Behind the Recipe


As the summer sun dipped below the horizon, casting a golden hue across the kitchen, my grandmother would gather us around for our beloved family tradition: making frozen yogurt. The air was always filled with laughter and the sweet anticipation of dessert. This particular recipe, Dulce De Leche Swirled Amaretto Frozen Yogurt, holds a special place in my heart. It reminds me of the evenings spent in my grandmother’s kitchen, where the essence of amaretto mingled with the warmth of caramel, creating an aroma that was nothing short of magical.


In those days, my grandmother would regale us with stories from her youth, tales of her travels through Europe, and the culinary inspirations she collected along the way. The addition of amaretto cream to our frozen yogurt was her nod to those adventures, a flavor she discovered in a quaint Italian café. Dulce de leche, on the other hand, was a tribute to our Argentinian heritage, a sweet reminder of home that tied our family history together in the most delicious way.


Recipe: Dulce De Leche Swirled Amaretto Frozen Yogurt


Ingredients:

- 4 cups of vanilla yogurt

- 1 cup of amaretto cream


- 1 cup of dulce de leche (or caramel)


Instructions:

1. Prepare the Yogurt: Start by draining the vanilla yogurt overnight. This step ensures a thick, creamy texture, perfect for churning.
2. Mix the Amaretto: Once the yogurt is ready, gently mix in the amaretto cream. The nutty notes of amaretto blend seamlessly with the tangy yogurt, setting the stage for a decadent dessert.
3. Churn: Pour the mixture into your ice cream maker and churn according to the manufacturer’s instructions. This process usually takes about 20-30 minutes, during which the mixture transforms into a velvety frozen yogurt.
4. Prepare the Dulce de Leche: While the yogurt churns, warm the dulce de leche in the microwave for 30 seconds. This makes it easier to drizzle and ensures it doesn’t harden too quickly.
5. Layer and Freeze: Once the yogurt is done churning, layer it in a container, drizzling generous swirls of dulce de leche between layers. This creates beautiful, caramel ribbons throughout the yogurt. Store in the freezer for at least 2 hours before serving.

Difficulty Rating: 4/10


Classification: Dessert


---


The Joy of Sharing


Every spoonful of this frozen yogurt transports me back to those cherished moments with my grandmother. The combination of amaretto and dulce de leche is not just a treat for the taste buds; it's a bridge to the past, a delicious reminder of family and the joy of sharing. Whether you’re crafting this dessert for a family gathering or simply indulging in a moment of nostalgia, Dulce De Leche Swirled Amaretto Frozen Yogurt is a sweet tribute to cherished memories and the timeless comfort of home.

Read more about Appetizers

Read more about Main Dishes

Read more about Desserts

Sweet & Spicy White Cheddar Cheese Ball with apples & Bacon | Made by Meaghan Moineau

Sweet & Spicy White Cheddar Cheese Ball with apples & Bacon | Made by Meaghan Moineau

Title: Unforgettable Flavors: Sweet & Spicy White Cheddar Cheese Ball with Apples & Bacon
Description: Dive into a world of flavors with our Sweet & Spicy White Cheddar Cheese Ball, perfectly paired with apples and bacon. This appetizer brings a delightful blend of tangy, sweet, and spicy notes that will leave your taste buds craving more. Plus, enjoy a heartwarming family memory that makes this dish even more special.

---


A Nostalgic Family Gathering: The Cheese Ball That Brought Us Closer

Every autumn, as the leaves turned and the air grew crisp, my family would gather at my grandmother's house for our annual fall feast. It was a tradition that brought warmth to our hearts and joy to our souls. The centerpiece of our appetizer table was always the Sweet & Spicy White Cheddar Cheese Ball. This dish, with its intriguing blend of flavors, became a symbol of our family's togetherness.


I remember the first time my grandmother introduced us to this cheese ball. She had just returned from a trip to upstate New York, where she discovered Adams Reserve New York Extra Sharp Cheddar. Inspired by the cheese’s bold flavor, she decided to create something special. The kitchen was filled with the comforting aromas of sizzling bacon and the sweet scent of maple syrup, signaling the start of our cherished gathering.


As we sat around the table, my grandmother shared stories of her childhood, weaving tales of family traditions and the importance of coming together. With each bite of the cheese ball, the zing of cayenne pepper danced on our tongues, perfectly complemented by the sweetness of dried apples and the smoky crispiness of bacon. The combination was magical, much like the moments we shared.


This cheese ball has since become a staple in our family’s autumn celebrations. It's a recipe that's passed down through generations, each one adding its own personal touch. For me, it’s not just an appetizer; it’s a reminder of those precious moments spent with loved ones, and the flavors of love and family that never fade.


---


Ingredients:

- 1 cup dried apple, finely chopped


- 2 tablespoons applejack brandy


- 1 tablespoon maple syrup


- 6 slices bacon, cooked and crumbled


- 8 ounces lowfat cream cheese, softened


- 2 cups shredded Adams Reserve New York Extra Sharp Cheddar Cheese


- 1/4 teaspoon cayenne pepper


- 2 tablespoons dark brown sugar


- 1 cup sweet and spicy pecans, finely chopped


Instructions:

1. Place the dried apple slices in a small dish and sprinkle with applejack brandy and maple syrup. Let them soak while you prep the rest of the recipe.


2. In a large skillet, fry the bacon until crisp, turning frequently. Set aside on a paper towel-lined plate to cool.


3. Finely chop the apples. In a food processor, combine the cream cheese, shredded cheddar, cayenne pepper, and chopped apples. Pulse until thoroughly mixed.


4. In a mini food processor (or a cleaned and dried regular processor), combine the pecans, brown sugar, and crumbled bacon. Process until finely chopped.


5. Use a spatula to transfer the cheese mixture to a cutting board. Lightly wet your hands and roll the mixture into a ball.


6. Roll the cheese ball in the bacon pecan mixture, patting gently to coat.


7. Arrange the cheese ball on a serving platter with crackers and apple slices dipped in lemon juice/water to prevent browning. Enjoy!


Difficulty: 4/10
Classification: Appetizer

With its rich tapestry of flavors and a story woven from love and history, this Sweet & Spicy White Cheddar Cheese Ball is more than just a dish—it's a celebration of family, memories, and the joy of coming together. Enjoy making it, sharing it, and savoring every moment with those you love.

Read more about Appetizers

Read more about Main Dishes

Read more about Desserts

Broccoli Tartar | Made by Meaghan Moineau

Broccoli Tartar | Made by Meaghan Moineau

A Taste of Memories: Crafting the Perfect Broccoli Tartar


Description: Dive into the vibrant world of Broccoli Tartar, a colorful and nutritious appetizer that brings together the essence of fresh vegetables and aromatic herbs. This delightful dish not only pleases the palate but also rekindles cherished family memories, making it a perfect starter for any gathering.

---


Ingredients


- 1 head of broccoli


- 2 medium tomatoes, peeled


- 1 red bell pepper


- 1 small onion


- 1 tablespoon apple vinegar


- 2 tablespoons olive oil


- 1 tablespoon soy sauce


- 1 tablespoon fresh parsley, chopped


- 1 teaspoon herbs de Provence


- 1 teaspoon red chili powder


- Sea salt, to taste


- 2 tablespoons sesame seeds, toasted


- 1/4 cup soaked arame seaweed


- Fresh vegetables for serving


---


Instructions


1. Preparation: Begin by soaking the arame seaweed in a bowl of pure water. Meanwhile, bring a pot of water to a boil with a pinch of sea salt.
2. Vegetable Prep: Wash the broccoli, red bell pepper, parsley, and tomatoes. Carve a cross on the bottom of each tomato and halve the bell pepper to remove the seeds.
3. Blanching: Once the water is boiling, immerse the tomatoes for a quick blanch, then shock them in cold water to easily remove the skins. Next, let the broccoli swim in the boiling water for 6 minutes. Refresh under cold water to maintain their vibrant green color.
4. Roasting: Place the bell pepper under the grill until its skin is charred. Let it cool before peeling.
5. Blending: In a long narrow bowl, blend the cooled broccoli with a hand blender, adding olive oil, apple vinegar, and sea salt to taste. Incorporate half of the chopped parsley to achieve a smooth puree.
6. Mixing: Dice the peeled tomatoes and roasted bell pepper into tiny pieces. Finely chop the onion and mix all the vegetables with the broccoli puree. Season with soy sauce, a hint of red chili powder, and herbs de Provence.
7. Finishing Touch: Drain and finely chop the soaked arame seaweed, gently folding it into the mixture. Shape the tartar into small balls with an ice cream scoop and garnish with toasted sesame seeds.
8. Serving: Serve the Broccoli Tartar on a bed of fresh vegetables. Bon appétit!

---


Nostalgic Family Memory


Growing up, Sunday afternoons at my grandmother's house were always special. Her kitchen was a haven of delightful aromas and heartfelt laughter. Among her many culinary masterpieces, Broccoli Tartar held a unique place. It was a dish that brought us together, a vibrant green bowl of goodness that perfectly mirrored her love and care.


I remember sitting at the kitchen table, watching her nimble fingers expertly peel tomatoes and chop parsley. She would hum softly, a tune that resonated with warmth and comfort. The tartar was always the first dish to disappear at family dinners, a testament to its simple yet captivating taste.


Every time I prepare this dish, I'm transported back to those cherished Sundays, surrounded by family, sharing stories and creating memories. It's not just a recipe; it's a legacy of love, passed down through generations.


---


Difficulty Rating


- Difficulty: 6/10
- Classification: Appetizer

---


Broccoli Tartar is more than just a dish; it's a sensory journey that celebrates the harmony of fresh ingredients and nostalgic flavors. Perfect for any occasion, it invites you to create lasting memories with every bite.

Read more about Appetizers

Read more about Main Dishes

Read more about Desserts

Jambalaya Stew | Made by Meaghan Moineau

Jambalaya Stew | Made by Meaghan Moineau

Savoring the South: A Heartwarming Jambalaya Stew


Description

Dive into the rich and flavorful world of Southern cuisine with our Jambalaya Stew recipe. This hearty dish combines the savory taste of Italian sweet chicken sausage with the bold spices of Cajun seasoning, creating a symphony of flavors that dance on your palate. Perfect for a cozy family dinner or a gathering with friends, this stew is sure to bring warmth and joy to your table. Join us as we explore the nostalgic memories tied to this beloved dish and learn how to make it yourself.

---


A Flavorful Escape: Our Jambalaya Stew Recipe


Difficulty: 5/10

Classification: Main Dish


Ingredients:

- 4 cooked Italian sweet chicken sausage links, sliced

- 2 cans (14.5 oz each) diced tomatoes


- 1 large onion, chopped


- 1 yellow bell pepper, chopped


- 1 green bell pepper, chopped


- 2 stalks celery, chopped


- 4 cups low sodium chicken broth


- 1 cup uncooked brown rice


- 3 cloves garlic, minced


- 2 tablespoons Cajun seasoning


- 1-2 teaspoons hot sauce (to taste)


- 1 teaspoon dried oregano


- 1 teaspoon dried thyme


- 1 pound raw shrimp, peeled and deveined


Instructions:

1. Combine Ingredients: Add all ingredients except the shrimp to a large pot on the stove. Mix thoroughly to ensure even distribution of spices and vegetables.
2. Boil and Simmer: Bring the mixture to a boil. Once boiling, reduce the heat to medium-low, cover, and allow it to simmer. Cook until the vegetables are tender and the rice is fluffy, about 35 minutes.
3. Add Shrimp: Stir in the raw shrimp and re-cover the pot. Continue to cook until the shrimp are tender and cooked through, approximately 6 minutes.
4. Season to Taste: For those who enjoy a little extra kick, season to taste with salt, black pepper, and additional hot sauce.
5. Serve and Enjoy: Ladle the Jambalaya Stew into bowls, serve hot, and savor every bite of this comforting dish.

A Nostalgic Family Memory:

Growing up, Jambalaya Stew was more than just a meal; it was a cherished family tradition. Every summer, our family would gather at my grandmother's house in the heart of Louisiana. The humid air would be filled with laughter, the sound of children playing, and the irresistible aroma of this hearty dish simmering on the stove.

My grandmother, a true Southern matriarch, would orchestrate the bustling kitchen with precision, calling each of us to lend a hand. I remember the joy of standing on a stool, barely tall enough to reach the counter, as I eagerly chopped bell peppers and onions under her watchful eye. As the stew simmered, she would weave tales of her own childhood and the generations before, each story as rich and vibrant as the dish itself.


When the stew was finally ready, we would gather around the table, bowls in hand, and savor the medley of flavors that had brought us together. Each bite was a reminder of family, love, and the timeless beauty of Southern cooking. Even now, as I prepare Jambalaya Stew in my own kitchen, I'm transported back to those sun-drenched afternoons, where food and family were all that mattered.


---


Experience the magic of Jambalaya Stew for yourself and create your own cherished memories around the table. Whether you're a seasoned chef or a novice in the kitchen, this recipe offers a glimpse into the heart of Southern hospitality and the enduring power of food to bring people together.

Read more about Appetizers

Read more about Main Dishes

Read more about Desserts

Lemon and pepper veal cutlets | Made by Meaghan Moineau

Lemon and pepper veal cutlets | Made by Meaghan Moineau

Title: A Taste of Nostalgia: Lemon and Pepper Veal Cutlets


Description: Dive into the vibrant flavors of our Lemon and Pepper Veal Cutlets, a dish that's not only a feast for your taste buds but also a journey back to cherished family gatherings. This delightful recipe blends zesty lemon with the warmth of black pepper and rosemary, creating a culinary masterpiece that's both comforting and sophisticated. Rated a manageable 6 out of 10 in difficulty, this main dish is perfect for special occasions or a cozy weekend dinner at home.

---


A Culinary Journey: Lemon and Pepper Veal Cutlets


Cooking has always been a way to keep my family connected, and nothing evokes memories of our sunlit Sunday lunches quite like the aroma of Lemon and Pepper Veal Cutlets sizzling on the stove. This dish, an elegant blend of tangy lemon and aromatic rosemary, brings back vivid memories of my grandmother's kitchen, where love was the secret ingredient in every recipe.


Ingredients:

- Veal cutlets

- 2 tablespoons corn flour


- Salt to taste


- 1 teaspoon black cracked pepper


- 2 tablespoons butter


- 2 tablespoons olive oil


- 1 tablespoon lemon juice


- 1 teaspoon lemon rind


- 1/2 cup cream


- 1/4 cup sour cream


- Fresh rosemary sprigs


Instructions:

1. Prepare the Veal: Begin by slightly flattening the veal cutlets with a meat mallet to ensure even cooking. In a shallow dish, combine corn flour, salt, and black cracked pepper. Dredge the cutlets through this mixture, ensuring each piece is well-coated.
2. Cooking the Cutlets: In a large pan, heat butter and olive oil over medium heat. Once the butter has melted, add the veal cutlets. Cook for approximately 3 minutes on each side, or until they are browned and cooked to your preferred level of doneness. Remove the veal from the pan and cover to keep warm.
3. Making the Sauce: In the same pan, add cream, sour cream, lemon rind, lemon juice, rosemary, additional pepper, and salt. Stir to combine, then bring the mixture to a gentle boil. Reduce the flame and let it simmer, uncovered, for about 5 minutes or until the sauce has thickened slightly.
4. Bringing it All Together: Return the veal cutlets to the pan, coating them generously with the sauce. Allow them to warm through for a minute or two.
5. Serving Suggestions: Serve the veal cutlets with a side of fragrant pilaf and a fresh green salad for a balanced and satisfying meal.

A Nostalgic Memory

Every time I prepare this dish, I am transported back to my grandmother's dining room. The table was laden with delicious food, but the veal cutlets always took center stage. I remember our family gathered around the table, the sound of laughter mingling with the clinking of cutlery. My grandmother would tell stories from her childhood as we savored the rich flavors of her cooking. It wasn't just a meal; it was a tapestry of shared moments, woven together with love and tradition.

Conclusion:

Lemon and Pepper Veal Cutlets is more than a recipe; it's a connection to a simpler time, where food was about more than sustenance. It's about family, love, and creating memories that last a lifetime. As you recreate this dish in your own kitchen, may it bring you as much joy and nostalgia as it has brought to my family over the years. Enjoy this flavorful main dish and make new memories with your loved ones around the dining table.

Read more about Appetizers

Read more about Main Dishes

Read more about Desserts

Wisconsin Beer Cheese Soup | Made by Meaghan Moineau

Wisconsin Beer Cheese Soup | Made by Meaghan Moineau

Title: A Taste of Home: Crafting the Perfect Wisconsin Beer Cheese Soup
Description: Dive into the rich, comforting flavors of Wisconsin Beer Cheese Soup, a dish that embodies the heart and soul of the Midwest. Discover how to bring this classic recipe to life with a step-by-step guide, and explore the cherished family memories that make this dish a beloved staple.

---


A Taste of Home: Crafting the Perfect Wisconsin Beer Cheese Soup


In the heart of the Midwest, where the winters are long and the evenings are best spent by a crackling fire, nothing warms the soul quite like a bowl of Wisconsin Beer Cheese Soup. This rich and creamy dish, infused with the robust flavors of Wisconsin cheddar and local beer, is more than just a meal—it's a piece of home, a culinary embrace that carries with it the nostalgia of family gatherings and kitchen camaraderie.


Ingredients:


- 4 tablespoons butter


- 1 onion, diced


- 2 carrots, diced


- 2 celery sticks, diced


- 2 cloves garlic, minced


- 1/4 cup all-purpose flour


- 1 cup Wisconsin beer


- 2 cups broth (chicken or vegetable)


- 1 cup half & half


- 2 cups shredded Wisconsin cheddar


- 1 tablespoon mustard


- 1 tablespoon Worcestershire sauce


- 1/2 teaspoon black pepper


- 1/4 teaspoon red pepper flakes


- Salt to taste


Instructions:


1. Begin Your Base: Start by melting the butter over medium heat in a large pot. Add the diced onion, carrots, celery, and minced garlic. Sauté for 3-4 minutes, allowing the vegetables to soften and release their flavors.
2. Build the Body: Stir in the flour, ensuring it blends well with the vegetables to form a roux, which will thicken your soup.
3. Pour in the Brew: Gradually add the Wisconsin beer and broth to the pot, stirring continuously. Bring the mixture to a gentle boil, then reduce the heat to low.
4. Creamy Indulgence: Stir in the half & half and shredded Wisconsin cheddar. Allow the cheese to melt completely, creating a luscious, creamy texture.
5. Flavor Elevation: Add the mustard, Worcestershire sauce, black pepper, and red pepper flakes. For a perfectly smooth soup, use an immersion blender to blend the mixture until velvety. If using a standard blender, puree in batches, filling only a third of the way each time and securing the lid tightly.
6. Finishing Touches: Taste and add salt as needed. Serve hot and enjoy the savory richness that is quintessentially Wisconsin.

A Nostalgic Journey:


I remember the first time I tasted this soup in my grandmother's kitchen. It was a blustery winter evening, and the windows were fogged with steam from the stove. Grandma stood over the pot, her apron dusted with flour and her cheeks flushed from the warmth of the kitchen. As we gathered around the table, laughter and stories intertwined with the aroma of melting cheese and simmering beer. Each spoonful was like a warm hug, a reminder of the love that binds our family together, no matter the miles or years that separate us.


Difficulty Rating: 5/10

This dish is moderately easy to prepare, making it accessible for home cooks looking to impress with minimal fuss.

Classification: Main Dish

Rich and hearty, this soup serves as a satisfying main course, perfect for a cozy dinner to share with loved ones or savor alone, wrapped in a blanket of nostalgia and warmth.

Wisconsin Beer Cheese Soup is more than just a recipe; it's a tradition, a taste of comfort, and a story passed down through generations. Whether you're a native Midwesterner longing for a taste of home or a culinary explorer eager to try something new, this soup is sure to delight and satisfy.

Read more about Appetizers

Read more about Main Dishes

Read more about Desserts

Moroccan Chicken Pitas | Made by Meaghan Moineau

Moroccan Chicken Pitas | Made by Meaghan Moineau

Moroccan Chicken Pitas: A Flavorsome Journey to My Family’s Heart


Description

Dive into the rich and aromatic world of Moroccan cuisine with our delightful Moroccan Chicken Pitas recipe. This dish combines spicy, savory, and sweet elements, bringing an exotic yet comforting flavor profile to your table. Perfect for a hearty lunch or a satisfying dinner, these pitas will transport your taste buds to the vibrant streets of Marrakech. Rated a 5 out of 10 in difficulty, this recipe is a flavorful adventure suitable for any home cook. It's classified as a Main Dish, guaranteed to impress your family and friends.

Ingredients

- Pita bread

- Skinless boneless chicken breasts


- 1 tsp paprika


- 1 tsp coriander


- 1/2 tsp cinnamon


- 1 tsp cumin


- 1/4 tsp cayenne pepper


- 2 cloves garlic, minced


- 1 tbsp ginger, grated


- Salt to taste


- Olive oil


- Fresh Italian parsley, a bunch


- 1 cup cooked quinoa


- 1 can diced petite tomatoes


- 1 yellow onion, diced


- Juice of 1 lemon


- 1/2 cup diced Medjool dates


- Sea salt to taste


- Greek yogurt


- 1 cucumber, diced


- Fresh mint, chopped


- Juice of 1 lemon


Instructions

1. Prepare the Marinade: In a small dish, combine paprika, coriander, cinnamon, cumin, cayenne pepper, garlic, ginger, and salt. Stir thoroughly.
2. Tenderize the Chicken: Use a meat mallet to pound the chicken breasts to about 1/2 inch thick.
3. Marinate the Chicken: Rub the spice mixture generously on all sides of the chicken breasts. Cover and refrigerate for an hour.
4. Make the Tabbouleh: In a bowl, combine quinoa, tomatoes, onion, lemon juice, and Medjool dates. Add chopped parsley and adjust with salt and olive oil to your liking. Cover and chill.
5. Grill the Chicken: Preheat your grill to medium heat. Grill the marinated chicken until fully cooked and slightly crispy on the edges, about 16 minutes.
6. Assemble the Pitas: Cut the pita bread in half and gently open each half. Fill with grilled chicken, tabbouleh, and a dollop of Greek yogurt sauce made with cucumber, mint, and lemon juice. Serve immediately.

A Nostalgic Family Memory

Growing up, Moroccan Chicken Pitas were a staple in my family's kitchen, especially during festive gatherings. My fondest memory involves a summer afternoon when my grandmother decided to teach me her secret recipe. The kitchen was filled with the intoxicating aroma of spices, and we laughed as we accidentally spilled a little too much cayenne pepper into the mix.

While the chicken marinated, we sat on the porch, nibbling on pita chips dipped in freshly made tabbouleh, sharing stories of her childhood in Casablanca. She told me about the bustling markets, the vibrant colors, and the sounds that brought life to the streets. As the sun began to set, we grilled the chicken together, the air filled with a smoky, spicy scent that signaled it was nearly time to eat.


This dish, to me, is not just about flavors; it’s a tapestry of memories, love, and heritage. It’s a reminder of family ties and the joy of sharing a meal with those you cherish.


Conclusion

The Moroccan Chicken Pitas recipe is more than just a meal; it's an experience that brings the warmth of family and the richness of Moroccan culture to your kitchen. Try it out, and maybe, it will become a cherished memory for your family too. Enjoy the journey of flavors, and don't forget to savor every bite!

Read more about Appetizers

Read more about Main Dishes

Read more about Desserts

Candy Cane Chocolate Marshmallows | Made by Meaghan Moineau

Candy Cane Chocolate Marshmallows | Made by Meaghan Moineau

A Sweet Holiday Treat: Candy Cane Chocolate Marshmallows


Description

Step into the holiday season with a delicious twist on a classic treat: Candy Cane Chocolate Marshmallows. This delightful dessert marries the rich flavors of dark and milk chocolate with the festive crunch of candy canes. Perfect for satisfying sweet cravings or adding a touch of magic to your holiday gatherings, these marshmallows are sure to become a cherished tradition. Easy to make and even easier to enjoy, they are a wonderful way to celebrate the season with family and friends.

Ingredients

- Candy canes

- Dark chocolate


- Marshmallows


- Milk chocolate


Instructions

1. Crush the Candy Canes: Begin by crushing the candy canes into small pieces using the bottom of a glass, a mallet, or any other tool at your disposal. The goal is to create a festive, crunchy topping for your marshmallows.
2. Melt the Chocolate: Set up a double boiler or another method to melt your chocolate without letting it touch the water. Melt together the dark and milk chocolate until smooth and silky.
3. Dip the Marshmallows: Carefully dip each marshmallow into the melted chocolate, ensuring it's well-coated. Immediately roll the chocolate-covered marshmallow in the crushed candy canes, pressing gently so the pieces adhere.
4. Set and Chill: Place each coated marshmallow on wax paper and let them chill in the refrigerator for at least an hour, or until the chocolate hardens completely.
5. Store and Enjoy: Once hardened, store your Candy Cane Chocolate Marshmallows in an airtight container. Enjoy them on their own or dunk them into a steaming mug of hot chocolate for an extra indulgent treat.

A Nostalgic Family Memory


Every holiday season, my family gathered at my grandmother’s cozy kitchen, a place filled with warmth and the aroma of holiday spices. One year, my little sister, in her eagerness to help, accidentally dropped a whole bag of candy canes on the floor. Instead of getting upset, my grandmother saw an opportunity. She took out a rolling pin and showed us how to crush the candy canes into a fine, colorful dust.


We spent the afternoon dipping marshmallows into rich, melted chocolate and rolling them in the crushed candy canes. The kitchen echoed with laughter and the occasional Christmas carol as we created these delightful treats. That day, what could have been a small disaster turned into a cherished family tradition. Every time I make Candy Cane Chocolate Marshmallows, I'm reminded of that cozy kitchen, the laughter, and the sweet spirit of the holidays.


Difficulty: 3/10

This recipe is simple and straightforward, perfect for novice and seasoned cooks alike, making it an ideal project for family bonding.

Classification: Dessert


Candy Cane Chocolate Marshmallows are a delectable dessert, perfect for holiday parties, cozy nights by the fire, or as a sweet homemade gift for loved ones. Enjoy creating this festive treat and making memories that will last a lifetime.

Read more about Appetizers

Read more about Main Dishes

Read more about Desserts

Heirloom Tomato Basil and Olive Oil Wine Sauce over Pasta | Made by Meaghan Moineau

Heirloom Tomato Basil and Olive Oil Wine Sauce over Pasta | Made by Meaghan Moineau

Title: A Taste of Tradition: Heirloom Tomato Basil and Olive Oil Wine Sauce over Pasta
Description: Dive into the heart of Italian cuisine with our Heirloom Tomato Basil and Olive Oil Wine Sauce over Pasta. This dish combines the rich, vibrant flavors of heirloom tomatoes, fresh basil, and extra virgin olive oil with a touch of dry white wine. Perfect as a main dish, this recipe is not only a feast for the senses but also a nostalgic journey back to family gatherings and the comforting warmth of homemade meals. Rated 5/10 for difficulty, it's accessible for home cooks seeking to create a memorable dining experience.

---


A Taste of Tradition: Heirloom Tomato Basil and Olive Oil Wine Sauce over Pasta

In the world of culinary delights, few dishes evoke the warmth and comfort of family gatherings like a lovingly prepared pasta. One such dish that holds a special place in my heart is the Heirloom Tomato Basil and Olive Oil Wine Sauce over Pasta. Each bite is a harmonious blend of rich flavors and cherished memories.


Growing up, Sundays were always reserved for family. The kitchen would buzz with activity, filled with laughter and the tantalizing aromas of fresh ingredients. My grandmother, the heart of our family, would preside over the stove, her hands deftly transforming simple ingredients into a feast. This recipe, passed down through generations, was always the highlight of our Sunday dinners.


Ingredients:

- 400g of your favorite pasta


- 5 heirloom tomatoes


- A generous bunch of fresh basil


- 4 cloves of garlic


- 1/2 cup of extra virgin olive oil


- 1/2 cup of dry white wine


- Sea salt, to taste


Instructions:

1. Begin by grating two heirloom tomatoes using a cheese grater, capturing all the juice and pulp. Dice the remaining three tomatoes and set them aside.


2. Chop a generous handful of basil and set it aside for later.


3. Mince the garlic cloves and sauté them in a tablespoon of olive oil over medium heat until they turn a light golden color, stirring often to prevent burning.


4. Add the dry white wine to the garlic and allow it to reduce until it reaches a syrupy consistency. This step imparts a rich depth of flavor to the sauce.


5. While the wine is reducing, bring a pot of salted water to a boil. Add a splash of olive oil to prevent the pasta from sticking, then cook the pasta according to the package directions.


6. Incorporate the grated and diced tomatoes into the reduced wine, adding a pinch of sea salt to enhance the flavors. Pour in half a cup of extra virgin olive oil and reduce the heat to medium-low.


7. Gradually stir in the chopped basil, allowing the flavors to meld together. Cook until the tomatoes are hot and soft, creating a thick, luscious sauce.


8. Once the pasta is al dente, drain it and combine it with the sauce, ensuring every strand is coated in the vibrant mixture.


This dish, with its rating of 5/10 in difficulty, is a perfect main dish for those seeking to create a heartfelt meal. The simplicity of the ingredients belies the complexity of flavors, making it a testament to the beauty of traditional cooking.


Every time I prepare this pasta, I'm transported back to those cherished Sundays, surrounded by family and the warmth of shared meals. It's more than just a recipe; it's a piece of my heritage, a reminder of the love and togetherness that food can bring. So gather your loved ones, and savor the taste of tradition with every delightful bite.

Read more about Appetizers

Read more about Main Dishes

Read more about Desserts

Herb and Cheddar Cordon Bleu | Made by Meaghan Moineau

Herb and Cheddar Cordon Bleu | Made by Meaghan Moineau

Herb and Cheddar Cordon Bleu: A Flavorful Twist on a Classic Dish


A Hearty Main Dish That Brings Back Warm Family Memories


Herb and Cheddar Cordon Bleu isn't just a meal; it's a culinary journey back to those cherished family gatherings, where the aroma of baked chicken and herbs filled the air, and laughter echoed through the dining room. This delicious main dish combines the comforting flavors of cheddar cheese and deli ham with a crispy herb-infused crust, offering a delightful twist on the classic cordon bleu. Whether you're hosting a dinner party or simply want to treat your family to something special, this dish is sure to impress.


Ingredients:


- 4 chicken breasts


- 4 slices of deli ham


- 4 slices of cheddar cheese


- 1 cup breadcrumbs


- 1 teaspoon dried marjoram


- 1 teaspoon dried parsley


- 1 teaspoon dried rosemary


- 1 egg


- 1/2 cup flour


- Salt and pepper to taste


Instructions:


1. Preparation: Pre-heat your oven to 350°F (about 176°C). Place the chicken breasts between two slices of wax paper and flatten them with a rolling pin or meat mallet until they are about a quarter of an inch thick.
2. Assembly: Lay a slice of ham and a slice of cheddar cheese on each chicken breast. Roll the chicken breast as tightly as possible, securing with toothpicks or small skewers if necessary.
3. Breading Stations: Beat the egg in a shallow baking dish. Prepare two additional "stations" using foil or other dishes: one for the flour and another for the mixture of dried herbs and breadcrumbs.
4. Coating: Coat the rolled chicken breasts in flour, then dip them into the egg mixture. Finally, press them into the mixture of dried herbs and breadcrumbs until they are completely covered on all sides.
5. Baking: Place the chicken in an oiled (or buttered) baking dish and bake for about 30 minutes, or until the chicken is cooked through and the breadcrumb crust is golden brown.

A Nostalgic Story:


Every Sunday, my family would gather at my grandmother’s house for a hearty lunch. It was a tradition that brought us all together, no matter how busy life got. I vividly remember the first time Grandma served her special Herb and Cheddar Cordon Bleu. As the dish emerged from the oven, the kitchen was filled with the enticing aroma of rosemary and cheddar, a scent that felt like a warm hug.


Grandma would always tell us stories as we ate, tales of her childhood and how she learned to cook from her own mother. The Herb and Cheddar Cordon Bleu was a recipe she'd innovated herself, inspired by the classic cordon bleu but with her own herbaceous twist. It was her way of adding a little piece of herself to each meal. We all looked forward to those Sundays, not just for the delicious food but for the love and laughter that always accompanied them.


Difficulty Level: 5/10


This dish is moderately easy to prepare, making it perfect for both novice and seasoned cooks. With a little patience, you can master this recipe and create a memorable meal that your family will love.


Conclusion:


Herb and Cheddar Cordon Bleu is more than just a dish; it’s a celebration of flavors and family memories. It brings together the richness of cheddar, the savory taste of ham, and the fragrant herbs in a beautifully baked chicken roll that is sure to become a favorite at your dinner table. Whether you're cooking for loved ones or simply wanting to treat yourself, this dish is a delightful reminder that the best meals are the ones shared with those you care about.

Read more about Appetizers

Read more about Main Dishes

Read more about Desserts