Peanut Butter And Chocolate Oatmeal | Made by Meaghan Moineau

Peanut Butter And Chocolate Oatmeal | Made by Meaghan Moineau

Title: A Sweet Nostalgia: The Comfort of Peanut Butter and Chocolate Oatmeal
Description: Dive into the delightful blend of peanut butter and chocolate with this simple yet satisfying oatmeal recipe. Perfect for breakfast or a comforting dessert, this quick dish is a trip down memory lane with every bite.

---


In the hustle and bustle of modern life, finding moments of comfort and nostalgia can be a precious gift. The smell of toasting oats, the rich aroma of cocoa, and the creamy allure of peanut butter can instantly transport you back to simpler times. Today, I want to share a recipe that not only warms your belly but also your heart: Peanut Butter and Chocolate Oatmeal. This dish is more than just a meal; it's a memory, a whisper of the past, wrapped in the cozy embrace of familiar flavors.


Ingredients:

- 1/2 cup cooking oats


- 1 tablespoon unsweetened cocoa powder


- 1 tablespoon agave syrup


- 1 tablespoon crunchy peanut butter


- 1 cup non-fat milk


Instructions:

1. Combine all the ingredients in a small bowl or mug.


2. Microwave for 1 minute.


3. Stir well and enjoy!


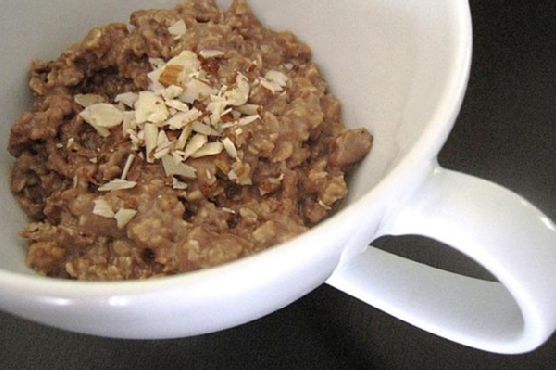
4. For an extra crunch, garnish with crushed peanuts or almonds.


*Rate of Difficulty: 2/10*


*Classification: Dessert*


This recipe is as easy as it is comforting, making it perfect for those mornings when you need a quick yet indulgent breakfast, or for those quiet evenings when you're craving a sweet dessert. The ease of preparation, a mere two out of ten on the difficulty scale, means it’s accessible to everyone, whether you’re a seasoned chef or a kitchen novice.


A Nostalgic Tale:

Every time I make this dish, I am transported back to my grandmother's cozy kitchen. As a child, her home was a haven of warmth and love, and the smell of oats and cocoa simmering on the stove was a familiar melody. On chilly winter mornings, she would prepare a pot of oatmeal, the kitchen windows fogging up from the steam. I remember sitting at her small, round table, legs swinging, waiting eagerly for my bowl of comfort.


My grandmother had a knack for turning simple ingredients into something magical, and her secret was always a generous dollop of peanut butter. She’d swirl it into the steaming oats, the creamy texture melding perfectly with the rich cocoa. Sometimes, she’d sprinkle crushed nuts on top, adding a delightful crunch that made every spoonful a new adventure.


This Peanut Butter and Chocolate Oatmeal recipe is my homage to those cherished mornings, a gentle reminder that sometimes the simplest dishes carry the most profound memories. Whether you're sharing it with family or enjoying a quiet moment alone, I hope this dish brings you the same warmth and joy it has always brought me.


Conclusion:

In a world full of complexities, it's the simple pleasures that often bring the most happiness. This Peanut Butter and Chocolate Oatmeal is not just a recipe; it's a passport to treasured memories, a taste of home, and an embrace from the past. Whether you're starting your day or winding down, indulge in this delightful dessert and savor the nostalgia it brings.

Read more about Appetizers

Read more about Main Dishes

Read more about Desserts

Pumpkin gnocchi with basil and Parmesan | Made by Meaghan Moineau

Pumpkin gnocchi with basil and Parmesan | Made by Meaghan Moineau

Title: Embrace Autumn with Homemade Pumpkin Gnocchi: A Nostalgic Family Recipe
Description: Dive into the cozy flavors of fall with our delightful Pumpkin Gnocchi with Basil and Parmesan. This recipe, a cherished family favorite, combines the earthy sweetness of pumpkin with aromatic basil and the rich saltiness of Grana Padano cheese. Follow along for step-by-step instructions, a heartwarming family story, and a taste of autumn in every bite.

---


As the golden leaves of autumn blanket the ground, there's nothing quite like the comforting embrace of a warm, homemade dish to fill the home with joy. One of my fondest memories of this season involves gathering around the kitchen table with my family, hands dusted with flour, as we crafted our beloved Pumpkin Gnocchi with Basil and Parmesan.


This dish is more than just a meal; it's a celebration of togetherness and tradition, passed down through generations. I remember chilly afternoons in my grandmother's kitchen, the scent of pumpkin and fresh basil dancing in the air as we worked side by side. Her stories of childhood autumns spent on the family farm always added a sprinkle of nostalgia to our culinary endeavors.


Ingredients:

- 1 medium-sized pumpkin


- 2 whole eggs


- Sea salt, to taste


- Freshly ground black pepper, to taste


- A handful of fresh basil leaves, chopped


- 2 cups wheat flour (plus extra for dusting)


- 1/2 cup corn flour


- Olive oil, for sautéeing


- 1 cup Grana Padano cheese, grated


- Additional fresh basil leaves, for garnish


Instructions:

1. Begin by separating the meat from the pumpkin and chopping it into a smooth puree. In a large mixing bowl, combine the pumpkin puree with the eggs, stirring until well mixed.


2. Season the mixture with sea salt, black pepper, and freshly chopped basil. Gradually incorporate the wheat and corn flours, kneading until a soft dough forms. Depending on the moisture of your pumpkin, you may need to adjust the flour quantity.


3. Once your dough is ready, divide it into equal rolls, approximately 3 cm thick and 20 cm long. Cut each roll into 2 cm pieces, forming the gnocchi.


4. Bring a large pot of salted water to a boil. Cook the gnocchi in batches; they are done when they float to the surface. Use a slotted spoon to remove them.


5. For a finishing touch, heat olive oil in a pan and gently sauté the cooked gnocchi until they develop a light golden crust.


6. Serve your gnocchi hot, generously sprinkled with Grana Padano cheese and garnished with fresh basil leaves.


Difficulty Rating: 6/10
Classification: Main Dish

Every bite of this Pumpkin Gnocchi is a journey back to those family afternoons, where laughter echoed and the world outside seemed to pause. The combination of creamy pumpkin, fragrant basil, and savory cheese is a testament to the magic that happens when tradition meets culinary creativity. Whether you're making it for a special occasion or a cozy weeknight dinner, this dish is sure to bring warmth and joy to your table.


As you embark on your own gnocchi-making adventure, I hope it becomes a cherished part of your family's autumn traditions, just as it has been for mine. Happy cooking!

Read more about Appetizers

Read more about Main Dishes

Read more about Desserts

Farfalle with Peas, Ham and Cream | Made by Meaghan Moineau

Farfalle with Peas, Ham and Cream | Made by Meaghan Moineau

Title: A Taste of Nostalgia: Farfalle with Peas, Ham, and Cream
Description: Dive into the comforting embrace of a classic pasta dish, Farfalle with Peas, Ham, and Cream. This rich and creamy delight not only tantalizes your taste buds but also evokes precious family memories. Whether you're a seasoned chef or a kitchen novice, this main dish is a breeze to whip up, with a difficulty rating of just 3 out of 10. Join me as I share a cherished family recipe that brings warmth and love to every bite.

---


A Taste of Nostalgia: Farfalle with Peas, Ham, and Cream

There's something truly special about a dish that transports you back to simpler times, where every bite is infused with love and nostalgia. For me, Farfalle with Peas, Ham, and Cream is much more than just a meal; it is a cherished memory served on a plate.


Ingredients:

- Butter


- Diced ham


- Farfalle pasta


- Canned heavy cream


- Parmesan cheese


- Frozen peas


- Salt and pepper


Instructions:

1. Begin by cooking the farfalle pasta according to the package directions. While the pasta boils, take a moment to reminisce about family gatherings and the tantalizing aromas that filled the kitchen.


2. In a skillet, melt butter over medium heat. Add the frozen peas and diced ham, sautéing for about 5 minutes. As the peas and ham sizzle, they release a fragrant aroma that fills the kitchen, reminiscent of those comforting Sunday dinners at grandma's house.


3. Pour in the canned heavy cream, adding a generous pinch of salt and pepper. Allow the mixture to cook over medium heat for 5 to 10 minutes, stirring occasionally, until the cream thickens slightly. This creamy concoction is the heart of the dish, wrapping each farfalle bow in a velvety hug.


4. Once the pasta is cooked and drained, return it to the pot. Pour the creamy sauce over the pasta, stirring well to ensure every bowtie is coated in the luscious mixture.


5. Finally, sprinkle in the Parmesan cheese, letting it melt into the sauce, adding a touch of savory richness.


Serve this delightful dish nice and hot, and watch as it brings smiles to the faces of your loved ones.
A Family Memory:

Growing up, Sundays at my grandparents' house were a beloved tradition. The kitchen was always bustling, with pots and pans clattering and the aroma of home-cooked meals enveloping every corner. My grandmother, an expert in creating simple yet delicious dishes, would often prepare Farfalle with Peas, Ham, and Cream. I remember sitting around the table with my family, eagerly awaiting dinner as grandma shared stories of her childhood. This dish was always the star of the show, its creamy richness a comforting embrace that brought us all together.


Difficulty Rating: 3/10
Classification: Main Dish

In just a few simple steps, you can recreate this heartwarming family recipe in your own kitchen. Perfect for any occasion, Farfalle with Peas, Ham, and Cream is a dish that promises to delight your palate and warm your heart, just as it has done for my family for generations. Enjoy this culinary journey down memory lane, and may it bring as much joy to your table as it has to mine.

Read more about Appetizers

Read more about Main Dishes

Read more about Desserts

Banana Pudding Cake | Made by Meaghan Moineau

Banana Pudding Cake | Made by Meaghan Moineau

Banana Pudding Cake: A Nostalgic Dessert Delight


Description: Dive into the creamy and rich layers of Banana Pudding Cake, a dessert that perfectly marries the flavors of ripe bananas, velvety custard, and luscious whipped cream. This recipe is a delightful journey that not only satisfies your sweet tooth but also brings back cherished family memories.

---


A Slice of Nostalgia: The Banana Pudding Cake Story


There's something uniquely comforting about desserts that carry a sense of nostalgia. For me, the Banana Pudding Cake isn't just a treat; it's a time machine that takes me back to my grandmother's cozy kitchen. I remember the warm summer afternoons spent there, the windows open, letting in a gentle breeze mixed with the sweet aroma of bananas and vanilla.


Every family gathering was incomplete without this cake. My grandmother had a magical way of making everyone feel welcome, and her Banana Pudding Cake was the star of every reunion. As a child, I would watch her with wide eyes as she carefully layered the cake, custard, and bananas with the precision of an artist. She'd always let me sprinkle the crumbled vanilla wafers—a task I took on with great pride.


One memorable summer, my little brother decided to be my grandmother's "official helper." His enthusiasm was infectious, and he took his role very seriously, even if it meant sneaking a few banana slices into his mouth when he thought no one was looking. We laughed, chatted, and enjoyed the simple joy of creating something delicious together.


The cake wasn't just a dessert; it was a symbol of love, laughter, and family unity. Even now, whenever I make this Banana Pudding Cake, I feel a connection to those joyful days, making it a perfect recipe to share at gatherings or to simply enjoy a taste of the past.


---


Ingredients


- 1 ½ teaspoons baking powder


- 3 ripe bananas, sliced


- 2 tablespoons cocoa powder


- 4 egg yolks


- 6 eggs (4 separated, 2 whole)


- 1 cup all-purpose flour


- 1 cup heavy whipping cream


- 2 cups milk


- 1 ½ cups powdered sugar


- ¼ teaspoon salt


- 1 package vanilla pudding mix


- 1 ½ cups sugar


- 2 teaspoons vanilla extract


- 1 box vanilla wafers, crumbled


- Whipped cream (for topping)


---


Instructions


1. Prepare the Cake Batter

- In a large bowl, beat egg yolks with sugar and set aside.


- In the bowl of an electric mixer, whip egg whites until stiff. Add baking powder, processed wafers, and cocoa to the egg yolk mixture.


- Drop about 1/4 of the egg whites into the larger bowl and fold lightly. Fold in the remaining whites carefully.


- Line a jellyroll sheet pan with parchment paper covering all sides and spray with non-stick floured baking spray. Spread cake batter onto paper, covering the entire pan.


- Bake in a preheated oven at 350°F (175°C) for 15-20 minutes. Let cake cool completely on the sheet (at least 30 minutes to an hour).


2. Make the Custard

- As the cake cools, mix sugar, flour, and salt in the top of a double boiler. Blend in egg yolks and milk.


- Cook, uncovered, over boiling water, stirring constantly for 10 to 12 minutes or until thickened. Remove from heat and stir in vanilla.


3. Assemble the Cake

- Once the cake is cooled, carefully lift the parchment paper, remove from the pan, and place on a flat surface. Cut into three even pieces starting from the short end.


- Place the first layer of cake on a serving platter. Spread half of the custard over the top, then cover with one third of the banana slices. Sprinkle with one third of the crumbled wafers.


- Top with the next piece of cake and repeat, reserving a few bananas and crumbled cookies.


- Spread the final amount of custard onto the top layer of cake, and refrigerate the whole cake for at least 2 hours or until ready to serve.


4. Make the Whipped Cream Topping

- Just before serving, make the whipped cream topping. Combine all ingredients together in a large mixing bowl until cream thickens and becomes stiff.


- Spread whipped cream on the cake and top with remaining banana and wafers.


*Pro Tip:* To keep the bananas fresh and prevent browning, sprinkle them with a bit of lemon juice and store in an airtight container until ready to use.


---


Difficulty: 6/10
Category: Dessert

Whether you're looking to create new memories or relive old ones, this Banana Pudding Cake is sure to become a beloved addition to your dessert repertoire. Enjoy every slice with the warmth of family and the sweetness of nostalgia.

Read more about Appetizers

Read more about Main Dishes

Read more about Desserts

Chicken Lo Mein | Made by Meaghan Moineau

Chicken Lo Mein | Made by Meaghan Moineau

Title: Savoring Memories: Crafting the Perfect Chicken Lo Mein


Description:

Explore the delightful simplicity of Chicken Lo Mein, a family-favorite dish that blends savory flavors with cherished memories. This easy-to-follow recipe will transport you back to warm family dinners and create new culinary traditions. Discover the joy of making this main dish with a dash of nostalgia.

---


Chicken Lo Mein Recipe: A Culinary Journey Down Memory Lane

There's something magical about the aroma of Chicken Lo Mein wafting through the kitchen. It takes me back to bustling family gatherings and the comforting clatter of chopsticks against porcelain bowls. This dish, a staple in our household, was always a symbol of togetherness and joy.


Difficulty Rating: 3/10
Category: Main Dish

Ingredients:


- 2 tablespoons peanut oil


- 2 cloves garlic, minced


- 1 tablespoon fresh ginger, grated


- 1 pound skinless, boneless chicken breast, thinly sliced


- 1 cup carrot, julienned


- 1 cup bok choy, chopped


- 1 cup mushrooms, sliced


- 1 cup bean sprouts


- 4 scallions, sliced


- 1/2 cup low sodium chicken broth


- 3 tablespoons low sodium soy sauce


- 8 ounces cooked spaghetti


Instructions:


1. Heat the Peanut Oil: In a large nonstick skillet, heat the peanut oil over medium heat. Add the minced garlic and grated ginger, cooking for about 1 minute until fragrant.
2. Cook the Chicken and Carrots: Increase the heat to medium-high. Add the sliced chicken breast and julienned carrot to the skillet. Cook, stirring occasionally, until the chicken is lightly browned, about 2 minutes.
3. Incorporate Vegetables: Add bok choy, mushrooms, bean sprouts, and scallions to the skillet. Stir constantly, cooking until the carrot is tender-crisp, approximately 3 minutes.
4. Add Noodles and Sauce: Stir in the cooked spaghetti, low sodium chicken broth, and soy sauce. Cook everything together until the noodles are heated through, about 1 minute.
5. Serve and Enjoy: Serve hot, garnished with additional scallions if desired, and enjoy a meal that feels like a warm hug from the past.

---


A Nostalgic Family Memory


Every time I prepare Chicken Lo Mein, I'm transported back to my grandmother's kitchen. Her culinary skills were unmatched, and the kitchen was her domain—a place where love was the secret ingredient in every dish. I remember standing on a stool beside her, barely tall enough to see over the counter, watching in awe as she effortlessly brought ingredients to life.


The sizzle of chicken hitting the hot skillet, the vibrant colors of fresh vegetables, and the rhythmic clinking of her wooden spoon were the soundtrack of my childhood. Each bite of her Chicken Lo Mein was a medley of flavors that mirrored the harmony in our family. The dish was more than sustenance; it was a testament to the joy of sharing and the bonds that food can forge.


As I cook this dish today, I feel her presence, guiding my hands and reminding me that meals are more than just fuel—they're a way to connect with loved ones, past and present. Chicken Lo Mein isn't just a recipe; it's a cherished family tradition, a dish that continues to bring us together, one delicious bite at a time.


In creating this dish, I invite you to form your own memories, to gather with those you love, and to celebrate the timeless ritual of sharing a meal together. Enjoy every moment, every flavor, and every memory made.

Read more about Appetizers

Read more about Main Dishes

Read more about Desserts

Dark Shadows Baileys Chocolate Cheesecake Brownies | Made by Meaghan Moineau

Dark Shadows Baileys Chocolate Cheesecake Brownies | Made by Meaghan Moineau

Title: Indulge in Nostalgia: Dark Shadows Baileys Chocolate Cheesecake Brownies
Description: Dive into the rich, velvety world of Dark Shadows Baileys Chocolate Cheesecake Brownies—a dessert that weaves together bittersweet chocolate, creamy cheesecake, and the unmistakable warmth of Baileys Irish Cream. This recipe not only satisfies your sweet cravings but also stirs up nostalgic family memories, making it a perfect addition to your dessert repertoire. Let's embark on a delicious journey that’s both indulgent and heartwarming.

---


A Chocolate Symphony: Dark Shadows Baileys Chocolate Cheesecake Brownies


As the autumn leaves began to fall, painting the world in shades of amber and gold, our kitchen transformed into a sanctuary of comfort and warmth. The scent of bittersweet chocolate mingling with the earthy aroma of walnuts and the smooth whisper of Baileys Irish Cream was enough to draw everyone into the heart of our home.


The Dark Shadows Baileys Chocolate Cheesecake Brownies are more than just a dessert; they are a piece of our family's culinary tapestry. Every year, as Halloween drew near, my grandmother would gather us around her as she prepared this decadent treat. The excitement was palpable as we watched the chocolate melt into a glossy pool of temptation, and the cream cheese swirl dance atop the rich brownie batter.


Ingredients:


- Baking Powder: 1 teaspoon
- Bittersweet Chocolate: 8 ounces
- Butter: ½ cup, softened
- Cream Cheese: 8 ounces, softened
- Egg Yolk: 1
- Eggs: 2
- Flour: ¾ cup
- Granulated Sugar: 1 cup
- Baileys Irish Cream: ¼ cup
- Salt: ¼ teaspoon
- Unsweetened Cocoa Powder: ¼ cup
- Vanilla Extract: 1 teaspoon
- Walnuts: ½ cup, chopped

Instructions:


1. Cheesecake Mixture:

In the bowl of a food processor, place the cream cheese, sugar, egg yolk, and Baileys Irish Cream. Process until smooth and set aside.


2. Brownie Directions:

- Preheat your oven to 350°F (175°C). Lightly grease an 8-by-8-inch baking pan with cooking spray. For easy removal, line the pan with two 7-by-12-inch sheets of parchment paper or aluminum foil, leaving an overhang to use as handles.


- Melt the chocolate by placing it in a small heatproof bowl set in a wide pan of hot water. Stir occasionally until smooth.


- In a medium bowl, whisk together flour, cocoa, baking powder, and salt.


- In another bowl, beat the butter and sugar until well blended. Add the eggs one at a time, incorporating each one fully before adding the next. Stir in the vanilla extract.


- Gradually blend the dry ingredients and melted chocolate into the egg mixture. Fold in the walnuts with a spatula until just combined.


- Spread the brownie batter evenly in the prepared baking pan.


- Drop large spoonfuls of the cheesecake mixture over the brownie batter. Use a butter knife to swirl the cheesecake into the batter, creating a marbled effect.


- Bake for 45-50 minutes or until set. Be careful not to over-bake to maintain a gooey texture.


A Nostalgic Family Memory:


I remember the first time my grandmother handed me the responsibility of swirling the cheesecake mixture into the brownie batter. It felt like a rite of passage, a torch being passed down through generations. The swirling motion was mesmerizing, a dance of flavors and textures coming together. As the brownies baked, the kitchen filled with a scent that promised warmth and happiness. We would gather around the table, each bite a reminder of family bonds and cherished memories.


Difficulty: 6/10

Classification: Dessert

These Dark Shadows Baileys Chocolate Cheesecake Brownies are a delightful blend of rich chocolate and creamy cheesecake, with a hint of Baileys to evoke nostalgia. Perfect for dessert lovers seeking a touch of indulgence, this recipe is a bit of a challenge but well worth the effort. Whether it’s a family gathering or a personal treat, these brownies are sure to create memories that linger long after the last crumb is gone.

Read more about Appetizers

Read more about Main Dishes

Read more about Desserts

Smoky Deviled Eggs | Made by Meaghan Moineau

Smoky Deviled Eggs | Made by Meaghan Moineau

Title: Rediscovering Tradition: The Irresistible Allure of Smoky Deviled Eggs
Description: Dive into the rich flavors and cherished memories that Smoky Deviled Eggs bring to the table. This classic appetizer, infused with a hint of nostalgia and a touch of smoked paprika, is bound to become a family favorite. Discover how a simple recipe can evoke treasured moments, making every bite a journey back in time.

---


Smoky Deviled Eggs: A Taste of Home and Heritage


As the aroma of smoked paprika gently fills the air, I'm transported back to my grandmother's cozy kitchen on a warm summer afternoon. There, amidst the chatter of family and the clinking of dishes, Smoky Deviled Eggs were always the star of our gatherings. This simple yet elegant dish carries with it a legacy of love, laughter, and a touch of culinary magic.


Ingredients:


- 6 large eggs


- 3 tablespoons mayonnaise


- 1 tablespoon Dijon mustard


- Salt and pepper, to taste


- 1 small shallot, finely minced


- 1 teaspoon smoked paprika, plus more for garnish


Instructions:


1. Boil the Eggs: Place the eggs in a pot and cover them with water. Bring to a boil, then reduce the heat and simmer for about 10 minutes. Once fully cooked, drain the eggs and place them in a bowl of cool water. Allow them to sit until completely cooled.
2. Prepare the Filling: Once cooled, carefully peel the eggs and slice them in half lengthwise. Gently remove the yolks and place them in a mixing bowl. Mash the yolks with a fork until they reach a smooth consistency.
3. Mix Ingredients: Add mayonnaise, Dijon mustard, minced shallot, salt, pepper, and smoked paprika to the mashed yolks. Blend until the mixture is smooth and slightly moist.
4. Assemble the Eggs: Spoon about 1-2 tablespoons of the filling into the egg whites or, for a more polished look, use a pastry bag to pipe the filling into the whites. Sprinkle a touch of smoked paprika on top for that extra flair.
5. Chill and Serve: Cover the deviled eggs and chill them in the refrigerator for at least one hour before serving. This allows the flavors to meld beautifully.

A Nostalgic Bite


Every family has their own version of deviled eggs, but for us, the addition of smoked paprika was a game-changer, reminiscent of the summer BBQs we enjoyed in our backyard. My grandmother would often recount the story of how she stumbled upon smoked paprika at a local farmer's market, and it quickly became her secret ingredient, adding a smoky depth that we all came to love.


The kitchen was her domain, and she reveled in the joy of feeding her family. I remember watching her deftly prepare these deviled eggs, her hands moving with practiced ease, all the while sharing stories of her youth and the recipes passed down through generations. It was in those moments that I learned the true power of food to connect us with our past and to create lasting memories.


Difficulty Rating: 3/10


Classification: Appetizer

Smoky Deviled Eggs are not just a dish; they are a testament to tradition, a culinary heirloom cherished by our family. So the next time you're looking to add a touch of nostalgia and flavor to your table, give this recipe a try. You might just find yourself creating a new family tradition of your own.

Read more about Appetizers

Read more about Main Dishes

Read more about Desserts

Berry Frozen Yogurt Popsicles | Made by Meaghan Moineau

Berry Frozen Yogurt Popsicles | Made by Meaghan Moineau

Title: Beat the Heat with Berry Frozen Yogurt Popsicles: A Sweet Trip Down Memory Lane


Description: Dive into the refreshing world of homemade Berry Frozen Yogurt Popsicles. Discover an easy-to-follow recipe that brings together the tangy delight of fresh berries and creamy frozen yogurt, all while evoking cherished family memories. Perfect for a summer dessert, these popsicles are not only a treat for the taste buds but also a simple pleasure that brings generations together.


---


As the summer sun blazed in my childhood backyard, the air filled with the laughter of cousins playing tag, I remember my grandmother emerging from the kitchen with a tray of homemade popsicles. These weren't just any popsicles; they were her famous Berry Frozen Yogurt Popsicles, a treat that became synonymous with our family gatherings.


The tradition began with a simple yet delightful recipe that she swore by, using just three ingredients: frozen vanilla yogurt, fresh raspberries, and fresh blueberries. The magic began with a whirring food processor, as we eagerly watched the vibrant berries blend into the creamy yogurt, creating a luscious mixture that made our mouths water in anticipation.


Ingredients:

- Frozen vanilla yogurt


- Fresh raspberries


- Fresh blueberries


Instructions:
1. Blend It Up: Add the vanilla frozen yogurt, 3 oz of raspberries, and 3 oz of blueberries into a food processor or blender. Pulse about 20 times until the fruit is broken up and the mixture is smooth.
2. Layer the Love: Scoop 1 tablespoon of the fro-yo mixture into each of your popsicle molds. Drop a couple of blueberries in each mold. Add another tablespoon of the fro-yo mixture to each mold. Now add a couple of raspberries. Then add another tablespoon of the fro-yo mixture to each mold and repeat with the blueberries and then again with the raspberries (if you have room).
3. Freeze and Enjoy: Freeze the pops until solid, at least 4 hours. To release the popsicles, just run the molds under really warm water for 10-15 seconds. Jiggle and pull out!

This recipe, rated at a 3 out of 10 in difficulty, falls under the dessert category, making it a perfect culinary project for budding chefs or a fun activity with kids. These popsicles are more than just a way to cool down on a hot day—they are a testament to the simple joys of life and the memories that flavors can evoke.


I remember the look on my grandmother's face as we took our first bites—satisfaction mixed with a touch of nostalgia. For her, these popsicles were a bridge between generations, a sweet reminder of her own childhood and the traditions passed down through her mother.


So, as you savor these Berry Frozen Yogurt Popsicles, know that you're not just indulging in a delicious dessert. You're partaking in a story, a slice of family history that celebrates the joy of shared moments and the bonds that tie us together. Enjoy every bite, and perhaps these popsicles will become a beloved tradition in your family too.

Read more about Appetizers

Read more about Main Dishes

Read more about Desserts

Cranberry Margarita | Made by Meaghan Moineau

Cranberry Margarita | Made by Meaghan Moineau

Title: Sip Into the Past: The Enchanting Cranberry Margarita
Description: Discover the tantalizing flavors of the Cranberry Margarita, a cocktail that marries the tartness of fresh cranberries with the smooth warmth of tequila. This delightful drink is perfect for holiday gatherings or cozy evenings by the fire. Immerse yourself in a nostalgic family story and learn how to recreate this magical beverage that’s sure to impress your guests.

---


As the leaves begin to carpet the ground in hues of orange and gold, and the crisp autumn air fills our lungs, my mind always drifts back to cherished family gatherings around the holidays. One particular memory stands out from the rest: the Cranberry Margarita, a cocktail that became an unexpected star at a family Thanksgiving many years ago.


The year was 1995, and my grandmother, known for her culinary prowess and love for experimenting with flavors, decided to surprise us with a unique cocktail creation. The Cranberry Margarita was born out of her desire to blend the traditional warmth of the holidays with a refreshing twist. As the family trickled in from the cold, Grandma stood in the kitchen, her apron dusted with sugar, and a glint of excitement in her eye.


The preparation was a ritual in itself. Fresh cranberries bubbled in a saucepan, their tartness tempered by the citrusy sweetness of orange juice. The aroma filled the kitchen, a fragrant reminder of the season. With her trusty blender, Grandma transformed the cooked cranberries into a vibrant puree, the heart of her masterpiece.


The Cranberry Margarita quickly became a family favorite, and as I take my first sip each year, I'm transported back to that cozy kitchen, surrounded by laughter and the comforting chaos of family. This cocktail isn't just a drink; it's a vessel of nostalgia, a reminder of the warmth and love that defined our family gatherings.


Cranberry Margarita Recipe
Ingredients:

- Fresh cranberries


- Grand Marnier


- Orange juice


- Light Karo syrup


- Sugar


- Tequila


Instructions:

1. In a saucepan over medium heat, melt a cup of sugar in the orange juice. Add the cranberries, reserving some for the skewers, and cook over low heat for 10 minutes. Set aside and let it cool.


2. Blend the cooked cranberries in a blender, then strain to make the puree.


3. In a shaker, add crushed ice, 1 1/2 ounces of tequila, 1/2 ounce of Grand Marnier, and 2 ounces of cranberry puree. Shake to mix.


4. Skewer several cranberries onto 10 skewer sticks, leaving enough skewer exposed on one end.


5. Lightly brush each cranberry skewer with Karo syrup and then sprinkle extra sugar over them.


6. Place the cranberry swizzle sticks on wax paper and put them in the freezer to set.


7. Pour the drink into a sugar-rimmed martini glass and add a cranberry swizzle stick for garnish.


(Note: Nutritional information does not include sugar on the rim.)


Difficulty Rating: 4/10
Classification: Appetizer

This Cranberry Margarita is more than just a cocktail; it's a celebration of tradition and innovation. It's the perfect way to kick off a festive gathering, offering a burst of flavor that echoes the joy and warmth of family reunions. So, this holiday season, raise a glass to the past, and create new memories with this delightful concoction. Cheers!

Read more about Appetizers

Read more about Main Dishes

Read more about Desserts

Detox Orange Carrot Juice | Made by Meaghan Moineau

Detox Orange Carrot Juice | Made by Meaghan Moineau

Title: Sip Your Way to Wellness: The Nostalgic Comfort of Detox Orange Carrot Juice
Description: Dive into a rejuvenating journey with our Detox Orange Carrot Juice, a vibrant blend of carrots, oranges, ginger, and turmeric, sweetened with a touch of honey. This homemade elixir not only revitalizes your body but also stirs cherished family memories. Easy to make and perfect as an appetizer, this juice is a delightful way to start your day on a refreshing note.

---


A Juicy Trip Down Memory Lane

I remember it vividly: the golden hues of autumn casting a warm glow over our kitchen, the air crisp with the promise of a new season. Every weekend, my grandmother and I would embark on our little tradition of juicing, transforming humble ingredients into liquid sunshine. The kitchen would come alive with the rhythmic hum of the juicer, the sweet aroma of oranges mingling with the earthiness of freshly picked carrots, and the zing of ginger teasing our senses.


Grandma, with her wise eyes and gentle smile, would always say, "Nature has its own way of healing, and this juice is our little potion of wellness." She had a special knack for turning ordinary moments into cherished memories, her hands moving deftly as she peeled and chopped, infusing every step with love and care.


As a child, I didn't fully grasp the health benefits of our weekend ritual. But I cherished those mornings, the laughter we shared, and the stories she told of her own childhood spent on a farm, where fresh produce was a way of life. Today, every sip of Detox Orange Carrot Juice takes me back to those golden mornings, a comforting reminder of her wisdom and warmth.


The Recipe
Ingredients:

- 4 large carrots


- 2 oranges, peeled


- 1-inch piece of fresh ginger


- 1 teaspoon fresh ground turmeric (or 1/2 teaspoon if using ground)


- 1 tablespoon honey


Instructions:
1. Juice Preparation: Begin by juicing the carrots, oranges, and ginger in your juicer. If using fresh turmeric, juice it along with the other ingredients.
2. Mixing: Stir in the ground turmeric and honey into the freshly extracted juice.
3. Serving: Divide the juice between two medium glasses or pour it all into one large glass.
4. Enjoy: Sip immediately and feel the refreshing and lighter sensation take over.

This vibrant concoction is packed with antioxidants and anti-inflammatory properties, thanks to the powerhouse combination of carrots, oranges, ginger, and turmeric. Perfect as an appetizer, this juice is sure to awaken your senses and prepare your palate for the day ahead.


Difficulty Level: 3/10

Whether you're looking to kickstart your morning or indulge in a healthy afternoon pick-me-up, Detox Orange Carrot Juice is a simple yet profound way to nourish your body and soul. So why not pour yourself a glass, bask in the memories of yesteryear, and toast to health and happiness?

Read more about Appetizers

Read more about Main Dishes

Read more about Desserts

Spicy Salmon Patties | Made by Meaghan Moineau

Spicy Salmon Patties | Made by Meaghan Moineau

A Taste of Nostalgia: Spicy Salmon Patties


A Zesty Delight with a Heartwarming Twist


Introduction


In the world of culinary delights, some dishes transcend mere sustenance, weaving themselves into the very fabric of our cherished memories. One such creation is the Spicy Salmon Patties—a recipe that not only tantalizes the taste buds but also transports me back to the comforting embrace of family gatherings. Join me on a flavorful journey as we explore the secrets of crafting this delectable dish, enriched with a sprinkle of nostalgia.


The Essence of Spicy Salmon Patties


As the name suggests, Spicy Salmon Patties are a delightful medley of flavors and textures. This dish, with its perfect balance of heat and zest, serves as an ideal appetizer or main dish, bringing a burst of freshness to any dining table. The combination of pink salmon, savory scallions, aromatic fresh parsley flakes, and a hint of red pepper flakes creates a harmonious blend that is both satisfying and invigorating.


Ingredients


- Pink Salmon: The star of the dish, providing a rich source of omega-3 fatty acids and a delightful umami flavor.
- Eggs: Essential for binding the ingredients together, resulting in perfectly shaped patties.
- Fresh Parsley Flakes: Adding a touch of earthiness and vibrancy.
- Scallions: Offering a mild onion flavor, enhancing the overall taste profile.
- Italian Bread Crumbs: Bringing a subtle crunch and a hint of Italian flair.
- Lemon Juice: Infusing a refreshing citrus note that brightens up the dish.
- Red Pepper Flakes: Delivering a gentle kick of heat that awakens the senses.
- Mayonnaise: Optional, for serving as a creamy and tangy accompaniment.

Instructions


1. Prepare the Salmon: Begin by removing the skin from the pink salmon. Crush the bones gently with your thumb and index finger—keeping them in for added calcium and texture.
2. Mix the Ingredients: In a large bowl, knead together the salmon with eggs, parsley flakes, scallions, Italian bread crumbs, lemon juice, and red pepper flakes. Ensure the ingredients are well combined to form a cohesive mixture.
3. Cook the Patties: Lightly oil a cast-iron pan and heat it over medium heat. Shape the salmon mixture into patties and cook until they are golden brown on both sides.
4. Serve: Serve the patties warm, optionally with a side of mayonnaise for dipping.

A Nostalgic Family Memory


As the aroma of sizzling salmon fills the kitchen, I am transported back to my grandmother's cozy home, where laughter and love intertwined with the scents of a hearty meal. Every summer, our family would gather at her quaint cottage by the lake. My grandmother, with her gentle hands and warm smile, would prepare her famous Spicy Salmon Patties for our family picnics.


We would sit by the water, the sun casting a golden glow, savoring the flavorful patties as stories from generations past were shared. My grandmother would recount tales of her own childhood, where this recipe had been a centerpiece of family feasts. Each bite was a connection to our roots, a reminder of the love and resilience that bound us together.


Difficulty Rating: 4/10


Spicy Salmon Patties are a breeze to make, with a difficulty rating of 4 out of 10. This dish is perfect for both novice cooks and seasoned chefs looking for a quick yet impressive addition to their culinary repertoire.


Conclusion


Spicy Salmon Patties are more than just a dish—they are a celebration of flavors and memories, a testament to the enduring power of food to bring us together. Whether you're crafting them for a family gathering or a cozy dinner at home, these patties promise to delight and inspire. Embrace the nostalgia, savor the spice, and create your own cherished memories around this timeless recipe.

Read more about Appetizers

Read more about Main Dishes

Read more about Desserts

Asian Shrimp Stir-Fry | Made by Meaghan Moineau

Asian Shrimp Stir-Fry | Made by Meaghan Moineau

Sizzling Asian Shrimp Stir-Fry: A Family Favorite with a Nostalgic Twist


Description

Dive into the vibrant flavors of Asia with our Asian Shrimp Stir-Fry. This quick and easy dish combines succulent shrimp with colorful vegetables, all wrapped in a savory sauce that bursts with umami. Perfect for busy weeknights, this stir-fry is not only a feast for the taste buds but also a walk down memory lane. Rated 4 out of 10 in difficulty, it's an ideal main dish that will have your family asking for seconds.

A Trip Down Memory Lane

Growing up, Sunday dinners at my grandmother's house were a cherished tradition. The aroma of sizzling garlic and ginger wafting through the air was our signal to gather around the kitchen, eagerly anticipating the culinary magic that was about to unfold. My grandmother, with her well-worn apron and twinkling eyes, would expertly toss shrimp and vibrant vegetables in her trusty skillet, weaving love and laughter into every dish she made.

Her Asian Shrimp Stir-Fry was always the star of the meal. The sound of the shrimp hitting the hot pan was like music, a rhythmic reminder of the warmth and comfort of family gatherings. As we sat around the table, sharing stories and savoring each bite, the stir-fry became more than just a dish; it was a vessel of connection, binding generations together with its rich flavors and cherished memories.


Ingredients


- 2 tablespoons canola oil


- 1 pound shrimp, peeled and deveined


- 1 red bell pepper, thinly sliced


- 1 yellow onion, thinly sliced


- 3 cloves garlic, minced


- 1 tablespoon fresh ginger root, grated


- 1/2 teaspoon crushed red pepper


- 1/4 cup flavor concentrated seafood broth


- 2 tablespoons soy sauce


- 1 teaspoon sugar


- 1 tablespoon water


- 1 teaspoon sesame oil


- 1 tablespoon sesame seeds


- 2 green onions, sliced


Instructions


1. Prepare the Skillet:

Heat the canola oil in a 12-inch skillet over medium-high heat. Once the oil is hot, add the shrimp and stir-fry for 3 minutes, or until they are cooked through and pink. Remove the shrimp from the skillet and set aside.


2. Sauté the Vegetables:

Add the red bell pepper and yellow onion to the same skillet. Stir-fry for 2 minutes, or until the vegetables are tender-crisp yet vibrant.


3. Infuse with Flavor:

Add the minced garlic, grated ginger root, and crushed red pepper to the skillet. Stir-fry for 30 seconds, allowing the fragrant aromas to permeate the kitchen.


4. Combine and Simmer:

Return the shrimp to the skillet. Stir in the concentrated seafood broth, soy sauce, sugar, and water. Cook for 1 minute, ensuring the mixture is hot and well-incorporated.


5. Finish with Flair:

Remove the skillet from the heat and stir in the sesame oil for a nutty finish. Sprinkle the shrimp mixture with sesame seeds and sliced green onions for garnish.


A Dish to Remember

This Asian Shrimp Stir-Fry is more than just a meal; it's a cherished family memory, reimagined. With its bright colors and rich flavors, it captures the essence of those Sunday dinners, inviting you to create your own memories around the table. Whether you're cooking for family or friends, this dish promises to bring joy, warmth, and a touch of nostalgia to your dining experience.

Difficulty: 4/10

Classification: Main Dish


So why not gather your loved ones, roll up your sleeves, and recreate this beloved family favorite? After all, the best meals are those shared with the ones you cherish most.

Read more about Appetizers

Read more about Main Dishes

Read more about Desserts

The Secret to Easy Skillet Filet Mignon Steak Tacos | Made by Meaghan Moineau

The Secret to Easy Skillet Filet Mignon Steak Tacos | Made by Meaghan Moineau

Title: Unveiling the Secret to Easy Skillet Filet Mignon Steak Tacos: A Culinary Masterpiece
Description: Dive into the exquisite world of gourmet tacos with our Easy Skillet Filet Mignon Steak Tacos recipe. Perfectly seasoned and cooked filet mignon pairs beautifully with creamy guacamole, tangy sour cream, and sharp cheddar cheese, all nestled in warm white corn tortillas. This dish is not just a meal; it's an experience that will transport you back to cherished family gatherings. Easy to prepare yet sophisticated in flavor, these tacos are the perfect main dish for any occasion.

---


Who doesn't love tacos? They are versatile, flavorful, and bring people together in a way that few other foods can. But when you elevate the humble taco with luxury ingredients like filet mignon, you create something truly special. This recipe for Easy Skillet Filet Mignon Steak Tacos not only satisfies your cravings but also evokes heartwarming memories of family gatherings.


A Nostalgic Trip Down Memory Lane

Growing up, Sunday dinners were a sacred ritual in my family. My grandmother would spend the entire afternoon preparing a feast that would bring us all together. One of her most beloved dishes was her special steak tacos. I can still remember the aroma of sizzling steak filling the kitchen, mingling with the warmth of laughter and stories shared around the dinner table.


My grandmother had a knack for turning a simple meal into a grand celebration. Her tacos, much like these Easy Skillet Filet Mignon Steak Tacos, were more than just food; they were a symbol of love and togetherness. Every bite was a reminder of those cherished moments spent with family, making memories that would last a lifetime.


Ingredients:

- 2 filet mignon steaks


- Olive oil extra virgin


- Cracked black pepper


- White corn tortillas


- Guacamole


- Sour cream


- Shredded cheddar cheese


Instructions:
1. Prepare the Skillet: Heat a skillet over medium to low heat. This gentle heat ensures the steaks cook evenly without losing their tenderness.
2. Season the Steaks: Rub the filet mignon steaks with extra virgin olive oil and season generously with cracked black pepper. This simple seasoning allows the natural flavors of the steak to shine.
3. Cook the Steaks: Place the steaks in the heated skillet. For medium doneness, cook each side for about 7 minutes, adjusting as necessary for your preferred level of doneness. The key is to cook them slowly to maintain their juicy tenderness.
4. Slice the Steaks: Once cooked to perfection, remove the steaks from the heat and let them rest for a few minutes. Then, slice them thinly and lengthwise for easy taco assembly.
5. Warm the Tortillas: In a clean skillet over medium heat, warm the white corn tortillas until they're soft and pliable.
6. Assemble the Tacos: Generously top each tortilla with slices of steak. Add dollops of guacamole and sour cream, then sprinkle with shredded cheddar cheese for that perfect cheesy finish.
A Delicious Main Dish

These Easy Skillet Filet Mignon Steak Tacos are more than just a meal; they're an invitation to gather around the table, share stories, and create new memories. Rated at a difficulty level of 4 out of 10, this dish is accessible to both seasoned cooks and kitchen novices alike. Perfect as a main dish, it's sure to impress your family and friends with its gourmet appeal and nostalgic charm.


As you savor each bite, may you be reminded of the simple joys of life and the power of food to bring us together. Enjoy!

Read more about Appetizers

Read more about Main Dishes

Read more about Desserts

Cajun Potato Wedges | Made by Meaghan Moineau

Cajun Potato Wedges | Made by Meaghan Moineau

Title: Crispy Cajun Potato Wedges: A Hearty Side with a Dash of Nostalgia
Description: Dive into the world of bold flavors with our Cajun Potato Wedges recipe. Perfectly seasoned and oven-baked to crispy perfection, this dish is a delightful journey down memory lane. Whether served as a tempting appetizer or a satisfying side dish, these wedges promise to be a hit at any gathering.

---


When it comes to comfort food, there's something undeniably satisfying about the humble potato. Its versatility and heartiness have made it a staple in kitchens around the globe. Among the myriad ways to prepare potatoes, Cajun Potato Wedges stand out with their robust flavors and crispy texture. But beyond the spices and the crunch, this dish holds a special place in my heart, evoking fond memories of Sunday afternoons at my grandmother's house.


A Walk Down Memory Lane

Every Sunday, our family would gather at Grandma's cozy home, the air thick with the aroma of her delicious cooking. Among the many dishes that graced her table, her Cajun Potato Wedges were always my favorite. As a child, I would watch in awe as she skillfully sliced the russet potatoes into perfect wedges, her hands moving with the practiced ease of someone who had done this a thousand times before.


While the potatoes baked, she'd regale us with stories of her youth, tales rich with laughter and life lessons. The kitchen, warm and inviting, was the heart of our family, where we shared not just meals but also moments of joy and connection. The spicy aroma of cayenne pepper, garlic powder, and paprika would fill the room, mingling with the sound of our chatter and laughter.


The Recipe: Cajun Potato Wedges

*Ingredients:*


- 4 russet potatoes


- 2 tablespoons olive oil


- 1 teaspoon cayenne pepper


- 1 teaspoon garlic powder


- 1 teaspoon onion powder


- 1 teaspoon paprika


- 1 teaspoon Italian seasoning


- 1 teaspoon salt


- 1/2 teaspoon pepper


*Instructions:*


1. Preheat your oven to 425 degrees Fahrenheit.


2. Slice the potatoes into ½-inch thick wedges, ensuring each piece is about half the length of the potato.


3. In a small bowl, create your spice mixture by combining cayenne pepper, garlic powder, onion powder, paprika, Italian seasoning, salt, and pepper.


4. Spray a cookie sheet with olive oil cooking spray. Arrange the potato wedges on the sheet and toss them with olive oil to ensure an even coating.


5. Sprinkle the spice mixture generously over the potatoes and toss them again to distribute the seasoning evenly.


6. Bake the wedges for 25 minutes, then flip them over and bake for an additional 5 minutes to achieve that perfect crispy finish.


Difficulty: 3/10
Category: Appetizer

These Cajun Potato Wedges are more than just a side dish; they are a testament to the power of food to bring people together. Each bite carries the warmth of family gatherings and the joy of shared stories. Whether you're preparing them for a casual get-together or a special occasion, these wedges are sure to be a crowd-pleaser, evoking smiles and perhaps even a sense of nostalgia.


So, next time you're in the mood for something flavorful and comforting, give this recipe a try. Who knows, it might just become a cherished tradition in your family too.

Read more about Appetizers

Read more about Main Dishes

Read more about Desserts

Pear and Walnut Coffee Cake | Made by Meaghan Moineau

Pear and Walnut Coffee Cake | Made by Meaghan Moineau

Title: "A Slice of Comfort: Pear and Walnut Coffee Cake Recipe"
Description:

Discover the heartwarming flavors of our Pear and Walnut Coffee Cake. This delightful dessert combines the sweet juiciness of pears with the nutty crunch of walnuts, all wrapped in a spiced crumble topping. Perfect for family gatherings, this cake is sure to evoke nostalgic memories and create new ones. Follow our step-by-step guide to baking a cake that will fill your home with warmth and joy.


---


A Slice of Comfort: Pear and Walnut Coffee Cake Recipe


There's something magical about the aroma of freshly baked cake wafting through the house—a scent that carries you back to simpler times. For my family, the Pear and Walnut Coffee Cake has always been more than just a dessert. It's a cherished tradition, a symbol of togetherness, and a reminder of delightful afternoons spent in my grandmother's cozy kitchen.


Ingredients:


- Topping:

- ½ cup brown sugar


- ½ cup all-purpose flour


- 1 tablespoon wheat germ


- ½ cup walnuts, finely chopped


- ½ teaspoon ground cinnamon


- ¼ teaspoon ground ginger


- ¼ teaspoon ground cardamom


- ¼ teaspoon ground allspice


- ¼ cup diced unsalted butter


- Cake:

- 1 cup diced pears, tossed with juice of 1 lemon


- 1 cup unsalted butter, softened


- 1 cup brown sugar


- 2 teaspoons lemon zest


- 2 large eggs


- 1 teaspoon vanilla extract


- 2 cups all-purpose flour


- 1 teaspoon baking powder


- ½ teaspoon baking soda


- ½ teaspoon kosher salt


- 1 cup sour cream


Instructions:


1. Prepare the Topping:

- In a food processor, combine the brown sugar, flour, wheat germ, walnuts, cinnamon, ginger, cardamom, allspice, and butter. Pulse until the mixture becomes crumbly. Cover and refrigerate to keep cold.


2. Prepare the Pan:

- Grease a 10-inch springform pan with butter. Lightly dust with flour, tapping out any excess. Set aside.


3. Cake Batter:

- Using an electric mixer, beat the butter, brown sugar, and lemon zest until light and fluffy, about 3-5 minutes.


- Add the eggs, one at a time, mixing well after each addition. Stir in the vanilla extract.


4. Combine Dry Ingredients:

- In a separate bowl, whisk together the flour, baking powder, baking soda, and salt.


5. Mix the Batter:

- Alternately add the dry ingredients and sour cream to the butter-sugar mixture, beginning and ending with the dry ingredients. Mix until just combined.


6. Assemble the Cake:

- Pour the batter into the prepared pan. Arrange the lemon-tossed pears on top of the batter. Sprinkle the cold crumble topping evenly over the pears.


7. Bake:

- Preheat your oven to 350°F (175°C). Bake the cake for 40-50 minutes, or until a tester inserted into the center comes out clean.


8. Cool and Serve:

- Remove from the oven and allow the cake to cool in the pan for at least 20-25 minutes before serving. Enjoy a warm slice with your favorite cup of coffee or tea.


A Nostalgic Family Memory


As a child, the kitchen was the heart of my grandmother's home. Every autumn, we'd gather around her kitchen table, eager to help prepare the Pear and Walnut Coffee Cake. I can still see her gentle hands guiding mine as we arranged the sliced pears on the batter, her stories of past family gatherings weaving a tapestry of love and laughter. That cake was always the centerpiece of our holiday table, its aromatic spices and tender crumb bringing smiles and warmth to our family, year after year.


Rating and Classification


- Difficulty: 6/10
- Classification: Dessert

Baking this cake is a delightful experience, filled with the sweet anticipation of creating something truly special. Whether you're continuing a family tradition or starting a new one, the Pear and Walnut Coffee Cake is sure to become a favorite in your home. Enjoy every slice, and may it bring as much joy to your family as it has to mine.

Read more about Appetizers

Read more about Main Dishes

Read more about Desserts

Mahi-Mahi With Lemon Caper Sauce | Made by Meaghan Moineau

Mahi-Mahi With Lemon Caper Sauce | Made by Meaghan Moineau

Savor the Sea: Mahi-Mahi With Lemon Caper Sauce


Dive into Flavor with This Simple Yet Elegant Seafood Dish


Description:

Embark on a culinary journey with our Mahi-Mahi with Lemon Caper Sauce, a dish that marries the delicate flavors of the sea with the vibrant zest of lemon and capers. Perfect as a main dish, this recipe is sure to transform any meal into a memorable dining experience. With a difficulty rating of 5 out of 10, both novice and seasoned cooks can enjoy creating this delightful dish. Let's delve into the step-by-step guide, enriched with a personal family memory that makes this recipe truly special.

---


Ingredients:

- Mahi-mahi fillets

- Salt and pepper (or lemon pepper)


- Olive oil


- Butter


- Shallot, finely chopped


- White wine


- Vegetable broth


- Lemon (juice and zest)


- Capers, rinsed


Instructions:

1. Prepare the Fish: Begin by sprinkling each side of the mahi-mahi fillets with salt and pepper, or lemon pepper for an added citrusy kick.
2. Heat the Pan: Pour olive oil into a stainless steel pan and set it over medium-high heat. Test the temperature by touching the tip of a fillet to the oil; it's ready when it crackles.
3. Cook the Mahi-Mahi: Place the fillets in the pan. Cook for 3-4 minutes per side, depending on thickness, until the fish is golden and flaky. Remove the fillets from the pan and cover loosely to keep them warm.
4. Prepare the Sauce: Add butter to the hot pan. Once melted, sauté the shallots until they soften. Pour in the wine, broth, lemon juice, and zest. Use a spatula to deglaze the pan, scraping up any browned bits.
5. Reduce the Sauce: Allow the mixture to simmer, reducing by about 1/3 to 1/2. Stir occasionally to combine flavors. Adjust the wine and broth ratio to suit your taste.
6. Finish the Sauce: Stir in the rinsed capers and let them simmer for another minute.
7. Plate and Serve: Arrange the mahi-mahi fillets on plates and generously pour the sauce over the top. Serve immediately for the best flavor.

---


Difficulty Rating: 5/10

Classification: Main Dish


---


A Taste of Nostalgia:


Every time I prepare this Mahi-Mahi with Lemon Caper Sauce, I am transported back to my childhood summers spent by the coast with my grandparents. They had a small beach house where the scent of the ocean mingled with the aroma of fresh-cooked meals. My grandfather, an avid fisherman, would often bring home fresh catches of the day, and my grandmother would transform them into culinary masterpieces.


One evening, she introduced us to this very dish. I remember sitting around the outdoor dining table, the sun setting on the horizon, and the sound of waves crashing softly in the background. The tangy sauce perfectly complemented the tender fish, and each bite was a celebration of fresh flavors and cherished family moments. It was in those moments that I learned the true power of food to bring people together and create lasting memories.


As you create this dish, I hope it brings you the same warmth and joy it has given me over the years. Whether enjoyed at a family gathering or a quiet dinner for two, may it become a treasured part of your culinary repertoire.

Read more about Appetizers

Read more about Main Dishes

Read more about Desserts

Luscious Lemon Soufflé Pudding | Made by Meaghan Moineau

Luscious Lemon Soufflé Pudding | Made by Meaghan Moineau

Luscious Lemon Soufflé Pudding: A Sweet Trip Down Memory Lane


Description: Dive into the zesty delight of our Luscious Lemon Soufflé Pudding—a dessert that marries the airy lightness of a soufflé with the comforting richness of a pudding. Perfect for any occasion, this recipe is not just a treat for your taste buds but also a delightful journey into cherished family memories.

---


Ingredients


- Unsalted butter, for greasing


- 1 cup sugar (remove 2 tablespoons for later)


- Cream of tartar


- 3 large eggs, separated


- 1/4 cup all-purpose flour


- 1/2 cup fresh lemon juice


- Zest of 1 lemon


- 1/8 teaspoon salt


- 1 teaspoon vanilla extract


- 1 cup low-fat milk


- Powdered sugar, for dusting


Instructions


1. Preheat & Prep: Preheat your oven to 325°F (170°C). Generously butter 6 individual ramekins or Pyrex bowls.
2. Sugar & Eggs: Set aside 2 tablespoons of sugar. Separate the eggs, placing the yolks in a large mixing bowl and the whites in a separate bowl (preferably plastic or metal).
3. Cream the Butter: Cream the butter with the remaining sugar until fluffy. Beat in the yolks one at a time until well blended.
4. Add Flavors: Mix in the vanilla extract and lemon zest. Add the flour and salt, mixing just until combined.
5. Liquid Ingredients: With the mixer on low, gradually add the milk and lemon juice. The mixture will be quite liquid.
6. Whip the Whites: Using clean beaters, beat the egg whites with the cream of tartar until foamy. Gradually add the reserved 2 tablespoons of sugar, continuing to beat until stiff peaks form.
7. Combine: Gently fold the beaten egg whites into the yolk mixture until just incorporated and smooth.
8. Fill & Bake: Ladle the mixture into the prepared ramekins, filling almost to the top. Place the ramekins in a large baking pan, adding hot water to the pan until it reaches halfway up the sides of the ramekins.
9. Bake: Carefully place the baking pan in the oven and bake for 40-45 minutes until the tops are puffed and golden brown.
10. Cool & Serve: Remove from the oven, carefully taking the ramekins out of the water bath. Let them cool slightly before serving. Sprinkle with powdered sugar or add a dollop of whipped cream for an extra touch.

---


Difficulty Rating


Difficulty: 6/10
Classification: Dessert

---


A Nostalgic Tale


As I prepare this delightful Luscious Lemon Soufflé Pudding, I'm transported back to my grandmother's cozy kitchen. Every Sunday afternoon, the citrusy aroma of fresh lemons would fill the air as my grandmother and I embarked on our weekly baking ritual. She would tell stories of her own childhood, weaving tales as vibrant as the lemon zest we grated together.


The soufflé would rise with an almost magical grace, much like the laughter and love that filled the room. Each spoonful was a taste of sunshine, echoing the warmth of those cherished moments. Even now, as I continue this tradition with my own family, I smile at the thought of my grandmother's gentle guidance, a timeless recipe passed down through generations.


---


Creating this Luscious Lemon Soufflé Pudding is more than just making a dessert; it's about reliving memories and crafting new ones. Whether it's a family gathering or a quiet afternoon treat, this soufflé pudding promises an experience as sweet and uplifting as the dessert itself.

Read more about Appetizers

Read more about Main Dishes

Read more about Desserts

Fall Apple Yeast Bread | Made by Meaghan Moineau

Fall Apple Yeast Bread | Made by Meaghan Moineau

Title: "Savor the Season: Baking Fall Apple Yeast Bread"
Description: Dive into the warmth of autumn with our Fall Apple Yeast Bread recipe. This delightful dessert marries the comforting flavors of apple cider, cinnamon, and honey, enveloping them in a soft, golden crust. Perfect for cozy gatherings or a nostalgic trip down memory lane, this bread is a seasonal favorite that brings family and friends together.

---


As the leaves turn golden and the air carries a crispness that only autumn can bring, my kitchen transforms into a hub of warmth and aroma. Fall Apple Yeast Bread, a cherished family tradition, plays a starring role in this seasonal symphony. This recipe, a treasure passed down through generations, not only fills our home with the scent of apples and cinnamon but also with cherished memories of family gatherings.


A Nostalgic Family Tradition

Growing up, the arrival of fall was heralded by the scent of this bread baking in my grandmother's kitchen. I remember her bustling around, her apron dusted with flour and a twinkle in her eye as she taught me the secrets of our family recipe. We would sip apple cider, our laughter mingling with the hum of the oven, as she regaled me with stories of her childhood. The bread, with its sweet, spiced aroma, was more than just a dessert; it was a testament to our heritage, a link to the past, and a promise for the future.


Ingredients:

- Apple cider


- Apples


- Dried/instant yeast


- Eggs


- Flour


- Ground cinnamon


- Orange zest


- Powdered sugar


- Runny honey


- Salt


- Sugar


- Vanilla extract


- Vegetable oil


- Water


Instructions:

1. Start by mixing warm water with oil, honey, and yeast. Let it foam for 10 minutes.


2. Add the rest of the dough ingredients and knead until you have a soft, smooth, and elastic dough (about 8-10 minutes).


3. Place the dough in an oiled bowl, cover, and let it rise for 2 hours until puffy and nearly doubled in size.


4. Grease a 9-inch round cake pan.


5. Toss apple chunks with sugar, cinnamon, and rum.


6. Gently deflate the dough and flatten it into a rough rectangle.


7. Spread half the apple chunks in the center of the dough, fold over, and seal.


8. Spread remaining apple chunks, fold again, and seal.


9. Cut the dough into 16 pieces, tuck in apple chunks, and arrange in the pan.


10. Cover and let it rise for 1-1.5 hours.


11. Preheat oven to 325°F and bake for 55 minutes.


12. Whisk cider and powdered sugar, brush over cooled bread.


Difficulty Rating: 7/10
Classification: Dessert

The process of making this bread is a labor of love. While the steps may seem daunting, the reward is a beautifully golden loaf, bursting with the flavors of fall. The warm, spiced sweetness of the bread is perfect for those cozy family gatherings or as a special treat on a chilly afternoon.


Every time I bake this bread, I'm reminded of the laughter and love that filled my grandmother's kitchen. It's a tradition I now share with my children, hoping to pass on not just a recipe, but a legacy of warmth, family, and the simple joy of baking together. So, gather your loved ones, roll up your sleeves, and let the magic of Fall Apple Yeast Bread fill your home and heart this season.

Read more about Appetizers

Read more about Main Dishes

Read more about Desserts

Gluten-Free Tres Leches Cake | Made by Meaghan Moineau

Gluten-Free Tres Leches Cake | Made by Meaghan Moineau

A Taste of Tradition: Gluten-Free Tres Leches Cake Recipe


Description

Dive into the rich, flavorful world of traditional Latin American desserts with a modern twist. This Gluten-Free Tres Leches Cake combines the best of both worlds—classic taste with a gluten-free update. With a moist, indulgent texture enhanced by a trio of luscious milks, this cake is topped with fresh strawberries and mint leaves for a refreshing finish. Perfect for any celebration or just a sweet treat, this dessert is sure to become a cherished family favorite.
Keywords: Gluten-Free Tres Leches Cake, gluten-free desserts, Latin American desserts, traditional recipes, family favorite

---


Ingredients

- 1 cup sugar, divided

- 5 large eggs, separated


- 1/2 cup butter, softened


- 1 teaspoon vanilla extract


- Zest of 1 orange


- 1 teaspoon ground cinnamon


- 1/2 cup sorghum flour


- 1/2 cup masa harina


- 1 tablespoon baking powder


- 1/2 teaspoon xanthan gum


- 1/2 cup milk


- 1/4 teaspoon cream of tartar


- 1 can (12 ounces) evaporated milk


- 1 can (14 ounces) sweetened condensed milk


- 1/2 cup half-and-half


- 1 cup whipping cream


- 2 tablespoons sugar


- Strawberries and mint leaves for garnish


Instructions


1. Preheat your oven to 350°F (175°C) and generously butter a 13x9-inch baking dish.


2. In a large bowl, beat 1/2 cup of sugar, egg yolks, and butter until light and fluffy, approximately 5 minutes.


3. Fold in the vanilla extract, orange zest, cinnamon, sorghum flour, masa harina, baking powder, xanthan gum, and milk.


4. In another large bowl, beat the egg whites until soft peaks form. Add the cream of tartar after about 20 seconds. Gradually add the remaining 1/2 cup of sugar and continue beating until the egg whites are glossy and firm, but not dry.


5. Gently fold the egg whites into the cake mixture. Pour the batter into the prepared baking dish, spreading it evenly.


6. Bake for about 25 minutes, or until the cake is golden and a toothpick inserted in the center comes out clean.


7. Once baked, pierce the cake all over with a toothpick.


8. In a separate bowl, whisk together the evaporated milk, sweetened condensed milk, and half-and-half. Pour this mixture evenly over the cake.


9. Allow the cake to cool slightly, then cover and refrigerate for at least 4 hours, or overnight.


10. Before serving, beat the whipping cream, sugar, and vanilla in a mixer bowl until stiff peaks form.


11. Spread the whipped cream over the cake and garnish with strawberries and mint leaves.


12. Chill in the refrigerator until ready to serve.


A Nostalgic Memory


Growing up, Tres Leches Cake was a staple at every family gathering. The anticipation would build as the sweet aroma filled the kitchen, signaling that something special was on the way. My grandmother would carefully craft each cake with love, her hands moving with the expertise of years spent perfecting the recipe. For her, it wasn't just about making a dessert; it was about creating a legacy of flavors that connected us all.


One summer, I remember sitting on the back porch with my cousins, watching the sunset while savoring bites of the cake, its milky sweetness mingling perfectly with the fresh strawberries. The laughter, the stories, and the shared moments over that Tres Leches Cake are memories I cherish deeply. Now, as I bake my own gluten-free version of this classic, I feel her spirit guiding me with each step, ensuring her tradition lives on in every bite.


Difficulty Rating: 6/10

Classification: Dessert


This Gluten-Free Tres Leches Cake is a delightful and rewarding endeavor. While it requires a bit of patience and technique, especially with the egg whites, the end result is a delicious dessert that's well worth the effort. Perfect for family gatherings, special occasions, or just because—this cake is a testament to the power of tradition, flavor, and love.

Read more about Appetizers

Read more about Main Dishes

Read more about Desserts

Avocado, Corn, Tomato and Tortilla Soup | Made by Meaghan Moineau

Avocado, Corn, Tomato and Tortilla Soup | Made by Meaghan Moineau

Title: A Taste of Togetherness: Avocado, Corn, Tomato, and Tortilla Soup
Description: Dive into the comforting flavors of our Avocado, Corn, Tomato, and Tortilla Soup, a simple yet delightful main dish that brings warmth and nostalgia to your table. With fresh ingredients and a heartwarming backstory, this recipe is perfect for family gatherings or a quiet evening at home.

---


When the days grow shorter and the air crisper, my family and I find ourselves naturally gravitating towards the kitchen, seeking out dishes that warm the soul and ignite cherished memories. One such recipe that stands out in my mind is the Avocado, Corn, Tomato, and Tortilla Soup—a dish that has become a staple in our family gatherings.


Ingredients:

- 4 cups chicken stock


- Salt and black pepper, to taste


- 1 cup frozen corn kernels


- 1 red onion, thinly sliced


- 1 cup cooked shredded chicken


- Juice of 1 lime


- 2 avocados, diced


- 3 roma tomatoes, diced


- 1/4 cup whole cilantro leaves


- Tortilla chips, for garnish


Instructions:

1. In a small saucepan, bring the chicken stock to a simmer over medium heat. Season with salt and pepper to taste.


2. Stir in the corn and onion, cooking for about 1 minute to soften.


3. Add the shredded chicken to the saucepan and bring the mixture back to a boil.


4. Stir in the lime juice, then remove the saucepan from the heat.


5. Divide the diced avocado, roma tomatoes, and cilantro leaves between two soup bowls.


6. Ladle the hot stock over the ingredients in the bowls, ensuring the solids are equally divided.


7. Garnish each bowl with a generous handful of tortilla chips and enjoy.


A Nostalgic Family Memory:

Growing up, the kitchen was always the heart of our home. I vividly recall the first time my grandmother introduced me to this colorful and fragrant soup. It was a chilly autumn evening, and we were gathered in her cozy kitchen, the windows fogged with warmth and the aroma of simmering stock filling the air.


As she guided me through the recipe, step by step, my grandmother shared stories of her childhood in Mexico, where fresh ingredients were always at the forefront of her family's meals. The vibrant colors of the avocados, tomatoes, and cilantro reminded her of the lively markets she frequented with her mother. With each spoonful of soup, I felt a connection to my heritage, a sense of belonging that transcended generations.


This dish has become more than just a meal; it's a cherished tradition, a reminder of the love and stories passed down through the years. Every time I prepare this soup, I am transported back to that evening, surrounded by family, laughter, and the comforting embrace of a shared meal.


Difficulty Rating: 4/10
Classification: Main Dish

This Avocado, Corn, Tomato, and Tortilla Soup is not only a simple and quick recipe but also a vessel for family memories and traditions. Whether you're hosting a gathering or enjoying a quiet night in, this soup offers a taste of togetherness that warms both the body and soul.

Read more about Appetizers

Read more about Main Dishes

Read more about Desserts