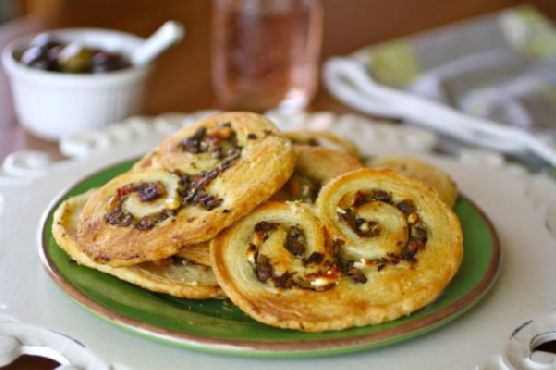
Savory Olive & Goat Cheese Palmiers | Made by Meaghan Moineau
Title: Elegant Entertaining Made Easy: Savory Olive & Goat Cheese PalmiersDescription: Discover the perfect appetizer to impress your guests with our Savory Olive & Goat Cheese Palmiers. This simple yet sophisticated recipe combines the rich flavors of goat cheese and olive tapenade with the buttery flakiness of puff pastry. Easy to make and even easier to enjoy, this dish will become a staple for your gatherings.
---
When I think back to family gatherings during my childhood, I can almost smell the mouth-watering aroma of freshly baked pastries wafting through my grandmother's cozy kitchen. The heart of our family home, it was a place where culinary magic happened and where my love for cooking first took root. Amongst the many delightful treats she prepared, one in particular stands out in my memory: her Savory Olive & Goat Cheese Palmiers.
Every holiday season, our extended family would gather, and my grandmother would set the table with an array of delicious appetizers. The palmiers were always the star of the show. Their golden, flaky exterior and the rich, savory filling made them irresistible. As a child, I would eagerly await my turn to help in the kitchen, watching in awe as my grandmother expertly rolled the pastry with her delicate hands, imparting not only her culinary skills but also her warmth and love into each creation.
Ingredients:
- Coarse salt
- Goat cheese
- Cooked olive tapenade
- Pine nuts
- Cooked puff pastry dough
Instructions:
1. Allow the puff pastry dough to thaw according to the package directions.
2. Lightly flour a flat work surface. Place one sheet of the dough on top of the other on the floured surface, and gently roll it out to a 9x12-inch shape that is about 1/4-inch thick. (You could use each sheet of dough individually, if you prefer.)
3. Spread the olive tapenade over the dough, followed by the crumbled goat cheese. Top with the toasted pine nuts.
4. Start by rolling the short ends of the dough toward each other until they meet in the middle.
5. Tightly wrap the rolled dough in plastic wrap and refrigerate for about 30 minutes.
6. Preheat your oven to 425 degrees F.
7. Line a baking sheet with parchment or a silicone baking mat.
8. Unwrap the dough and use a serrated knife to slice the rolled dough into 1/4-inch slices, and put them on the baking sheet about 2 inches apart.
9. Sprinkle the tops with the coarse salt and bake for 12-14 minutes, or until they are just lightly golden.
10. Serve warm.
Difficulty Rating: 4/10
Classification: Appetizer
These Savory Olive & Goat Cheese Palmiers are the epitome of elegance and flavor, making them the perfect appetizer for any celebration. The ease of preparation belies their impressive presentation, allowing you to focus on spending quality time with loved ones. Whether you are hosting a sophisticated dinner party or a casual get-together, these palmiers are sure to delight your guests and create cherished memories for years to come.