Rosemary Walnut Bread | Made by Meaghan Moineau

Rosemary Walnut Bread | Made by Meaghan Moineau

Title: Aromas of Nostalgia: A Family’s Journey with Rosemary Walnut Bread


Description:

Dive into the heartwarming story of how Rosemary Walnut Bread became a cherished family tradition. With its savory aroma, this delightful bread brings together the richness of walnuts and the earthy fragrance of rosemary. Perfect for both novice and seasoned bakers, this recipe will become a staple in your kitchen. Rated 6/10 in difficulty, this bread is a versatile addition to any meal, classified as an appetizer or a delightful side. Join us as we share the secret to creating this flavorful, memory-laden bread.

---


The Story Behind the Bread


There's something magical about the aroma of freshly baked bread wafting through a home. It's a scent that can transport you back in time, evoking fond memories and warming the heart. For my family, Rosemary Walnut Bread is not just a recipe; it's a cherished tradition that ties generations together.


I remember my grandmother's kitchen, a cozy haven where laughter and the scent of baking bread filled the air. Every Sunday, she would don her well-worn apron and begin the ritual of making Rosemary Walnut Bread. As a child, I would watch, fascinated as she combined cream cheese, dry yeast, and eggs with care, adding honey for a subtle sweetness and lemon zest for a hint of freshness. Her hands moved with a practiced grace, transforming simple ingredients into a masterpiece.


Once the dough was mixed, she'd cover it with a damp cloth and let it rest in a warm spot, allowing the yeast to weave its magic. The anticipation built as the dough rose, filling the kitchen with its comforting aroma. The real fun began when it was time to knead. Grandma would guide my small hands through the process, our laughter mingling with the rhythmic sound of dough hitting the floured surface.


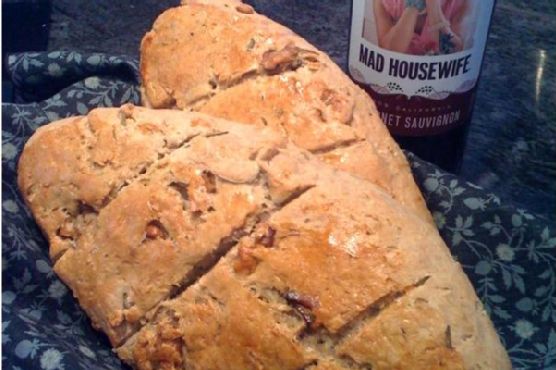
The addition of aromatic rosemary and crunchy walnuts brought the bread to life, infusing it with a unique flavor that was both earthy and robust. Grandma would form the dough into two leaf-shaped loaves, a tradition passed down from her mother. As the bread baked, the irresistible scent filled the house, drawing family members to the kitchen like moths to a flame.


Once baked, the bread would rest for a tantalizing twenty minutes. Those moments felt like an eternity to my younger self, but the wait was always worth it. The first slice, still warm, was a revelation of flavors and textures, a perfect harmony of chewy, nutty, and fragrant notes.


The Recipe: Rosemary Walnut Bread


Ingredients:

- 4 oz cream cheese

- 2 1/4 tsp dry yeast


- 2 eggs, plus 1 for brushing


- 4 cups flour


- 2 tbsp honey


- 1 tsp lemon zest


- 1 cup milk


- 2 tbsp olive oil


- 1 tbsp chopped fresh rosemary


- 1 tsp salt


- 1 cup chopped walnuts


Instructions:


1. Combine Ingredients: In a large bowl, combine cream cheese, dry yeast, 2 eggs, flour, honey, lemon zest, and milk. Stir well to blend.
2. Activate Yeast: Add the yeast to the mixture and let it stand for about 5 minutes until it becomes frothy.
3. Initial Rise: Stir in two cups of flour, cover with plastic wrap, and place in a warm spot (approximately 85°F) for 15 minutes.
4. Knead Dough: Add remaining flour, walnuts, lemon zest, rosemary, and salt to the bowl. Mix until the dough begins to come together. Transfer to a floured surface and knead for about 10 minutes.
5. First Proof: Rub the top of the dough with olive oil and place it in an oiled bowl. Cover with a damp cloth and let it rise for 1 hour.
6. Shape Loaves: Return the dough to the floured surface and divide it into two portions. Shape each into a leaf form and place on a baking sheet.
7. Prepare for Baking: Make three diagonal slashes on each loaf, about 1/4 inch deep. Brush the tops with beaten egg.
8. Final Rise and Bake: Let the loaves rise for another 30 minutes. Preheat the oven to 375°F and bake for 40 minutes.
9. Cool and Enjoy: Allow the bread to stand for 20 minutes before slicing, or as long as you can resist the tempting aroma.

This Rosemary Walnut Bread is a beautiful way to bring tradition and flavor into your home. Whether served as an appetizer or alongside a main dish, it’s sure to become a family favorite. Enjoy the process, the scent, and most importantly, the memories you’ll create with this delightful bread.

Read more about Appetizers

Read more about Main Dishes

Read more about Desserts

Classic Buttermilk Pie | Made by Meaghan Moineau

Classic Buttermilk Pie | Made by Meaghan Moineau

Title: A Slice of Nostalgia: Crafting the Perfect Classic Buttermilk Pie
Description: Dive into the heartwarming world of classic Southern desserts with our detailed guide on baking the perfect Buttermilk Pie. Experience a taste of tradition with a story that brings warmth to your kitchen, while enjoying a dessert that is a staple for any family gathering. Simple ingredients and step-by-step instructions make this a delightful treat to prepare and savor.

---


There are few desserts that capture the essence of Southern tradition quite like the Classic Buttermilk Pie. With its rich, custardy filling and buttery crust, this pie is more than just a sweet treat; it's a slice of history that brings back memories of family gatherings and cherished moments around the dinner table.


Ingredients:

- 1/2 cup butter, melted

- 1 cup buttermilk


- 3 large eggs


- 3 tablespoons all-purpose flour


- 2 cups sugar


- 1 unbaked 9-inch pie shell


- 1 teaspoon vanilla extract


Instructions:

1. Preheat the Oven: Set your oven to 325 degrees Fahrenheit to ensure a gentle, even bake for the custard filling.
2. Prepare the Filling: In a mixing bowl, slightly beat the eggs. Gradually add in the sugar and flour, ensuring a smooth consistency without lumps. Stir in the melted butter, mixing thoroughly.
3. Combine Flavors: Pour in the buttermilk and vanilla extract, blending them into the egg mixture until well combined.
4. Prepare the Pie Shell: Lightly dust the unbaked pie shell with a bit of flour to help the filling adhere and bake evenly.
5. Assemble the Pie: Pour the prepared batter into the pie shell. Sprinkle a little more flour on top, which will help create a slight crust on the custard as it bakes.
6. Bake to Perfection: Place the pie in the preheated oven and bake for approximately 1 hour, or until the custard is set and a gentle jiggle is observed only in the center.

Family Nostalgia:

Growing up, family gatherings at my grandmother's house were never complete without the presence of her famous Buttermilk Pie. I remember the anticipation that would build as the sweet aroma wafted through the house, signaling that dessert time was near. My cousins and I would circle the kitchen like bees to honey, eagerly waiting for that first slice.

Grandma would always serve the pie warm, its golden crust giving way to a rich, creamy filling that melted in our mouths. Each bite was a comforting reminder of the love and care she poured into all her recipes. Now, every time I bake this pie, it feels like a warm hug from her, a cherished tradition I am proud to continue and share with my own family.


Difficulty Rating: 3/10

This pie is classified as a Dessert, and its simplicity makes it an approachable recipe for bakers of all skill levels, yet it delivers a profound depth of flavor that belies its ease of preparation.

---


This Classic Buttermilk Pie is not just a dessert—it's a connection to the past, a testament to the enduring power of family recipes to bring people together. Whether you're a seasoned baker or new to the kitchen, this pie is sure to become a beloved addition to your culinary repertoire. Enjoy a slice of nostalgia and savor the sweetness of tradition with every bite.

Read more about Appetizers

Read more about Main Dishes

Read more about Desserts

New Orleans Red Beans and Rice with Andouille Sausage | Made by Meaghan Moineau

New Orleans Red Beans and Rice with Andouille Sausage | Made by Meaghan Moineau

Title: Savoring Tradition: The Heartwarming Comfort of New Orleans Red Beans and Rice with Andouille Sausage
Description: Dive into the rich culinary heritage of New Orleans with our classic Red Beans and Rice recipe featuring smoked Andouille sausage. This flavorful main dish, steeped in tradition and bursting with Southern charm, is a delightful way to bring the warmth of Louisiana into your home. With a nostalgic family story and step-by-step instructions, you'll be transported to a cozy kitchen filled with laughter and love. Rated 6/10 in difficulty, this dish is perfect for those looking to explore the vibrant flavors of Creole cuisine.

---


A Taste of New Orleans: Red Beans and Rice with Andouille Sausage

When it comes to soul food, few dishes capture the essence of New Orleans quite like Red Beans and Rice with Andouille Sausage. This hearty main dish, with its roots deeply embedded in Creole culture, is a testament to the culinary artistry of the Crescent City. Every bite is a melody of flavors, harmonizing the smoky richness of Andouille sausage with the earthy goodness of red kidney beans, all embraced by a creamy, seasoned gravy.


Ingredients:

- Smoked Andouille sausage


- Bay leaves


- Bell pepper


- Canola oil


- Diced celery


- Creole seasoning


- Garlic


- Onion


- Red dried kidney beans


- Salt and pepper


- Smoked ham hock


- Tabasco sauce


- Dried thyme leaves


- White long-grain rice


- Worcestershire sauce


Instructions:
1. Soak the Beans: Begin by soaking the red kidney beans overnight in cool water. This step is crucial for achieving the perfect texture.
2. Cook the Beans: The next day, drain the beans and add fresh water to cover them in a Dutch oven. Bring to a boil, then simmer over medium-high heat for 45-60 minutes until they are tender but not falling apart. Drain and set aside.
3. Sauté the Vegetables: In a skillet, heat canola oil and sauté the onions, celery, and bell pepper until translucent, about 8-10 minutes. Add garlic and continue to sauté for an additional 2 minutes.
4. Combine and Season: Add the sautéed vegetables to the beans along with the ham hock, Andouille sausage, bay leaves, Creole seasoning, salt, pepper, Tabasco sauce, dried thyme, and Worcestershire sauce. Pour in just enough water to cover the mixture.
5. Simmer to Perfection: Bring the mixture to a boil, then reduce heat to a low simmer. Allow it to cook for at least 2 hours, preferably 3, until the gravy becomes creamy. Stir occasionally, ensuring the mixture doesn't burn or stick to the pot.
6. Adjust the Consistency: If the gravy isn't creamy enough, mash some of the beans and return them to the pot. Remember, it's not considered cheating—it's culinary magic!
7. Serve and Enjoy: Once the beans reach the desired consistency, serve them over a bed of fluffy white long-grain rice.
A Nostalgic Family Memory:

Growing up, Sundays were a time for family gatherings at my grandmother's house, where the air was always filled with the mouthwatering aroma of her famous Red Beans and Rice. I remember sitting at the kitchen table, watching her expertly slice the Andouille sausage and sprinkle just the right amount of Creole seasoning into the pot. Her hands, seasoned with years of culinary wisdom, moved with a grace that I admired deeply.


As the beans simmered, she would share stories of her own childhood in New Orleans, painting vivid pictures of Mardi Gras parades and jazz-filled streets. Those afternoons were filled with laughter and the comforting warmth of family, memories etched into my heart with every spoonful of her delicious creation.


Difficulty Rating: 6/10
Classification: Main Dish

This recipe is a celebration of flavors and tradition, perfect for family dinners or special occasions. With its moderate difficulty level, it's a great opportunity to explore the vibrant world of Creole cuisine while creating lasting memories in your own kitchen. So put on some jazz, grab your apron, and let this New Orleans classic transport you to a place where food and family intertwine in the most beautiful way.

Read more about Appetizers

Read more about Main Dishes

Read more about Desserts

Saffron Chicken Tikka | Made by Meaghan Moineau

Saffron Chicken Tikka | Made by Meaghan Moineau

Title: Saffron Chicken Tikka: A Culinary Journey Through Spice and Memory
Description: Dive into the rich flavors of Saffron Chicken Tikka, a dish that marries aromatic spices with tender chicken to create a culinary masterpiece. This blog post will guide you through the steps to perfecting this Indian classic, all while sharing a nostalgic family story that encapsulates the warmth and joy of cooking together. Rated at a moderate difficulty of 6 out of 10, this main dish is perfect for those looking to impress at their next dinner gathering.

---


Saffron Chicken Tikka: A Culinary Journey Through Spice and Memory

If there's one dish that evokes fond memories of family gatherings and the comforting aroma of home, it's the Saffron Chicken Tikka. This dish is more than just a meal; it's a delightful blend of culture, tradition, and cherished family moments.


The Essence of Saffron Chicken Tikka

Creating Saffron Chicken Tikka is akin to painting with spices. The journey begins by soaking precious saffron strands in warm milk, allowing them to release their golden hue and unique aroma. This step, which takes a gentle 15 to 20 minutes, sets the stage for the flavors to come.


Meanwhile, the kitchen fills with the warm, inviting scent of dry roasted spices. Cinnamon sticks, black and green cardamom seeds, white peppercorns, and cloves are gently toasted to elevate their natural oils and flavors. Once roasted, these spices are pounded into a powder—not too fine—to retain their robust character.


A spicy kick is added with a paste made from green chilies, ground meticulously in a mortar and pestle. A pinch of coarse salt aids in achieving the perfect texture.


With all ingredients ready, the marinade comes together harmoniously. The chicken breasts, cut into cubes and patted dry, are enveloped in this fragrant mixture. A bowl of marinating chicken is then lovingly covered and placed in the refrigerator, allowing the flavors to meld overnight. The result? Moist and tender chicken tikkas that are sure to impress.


A Story of Flavor and Family

Every time I prepare Saffron Chicken Tikka, I'm transported back to a bustling kitchen filled with laughter and the clinking of dishes. It was during a summer family reunion when I first learned the art of making this dish from my grandmother. Her hands, seasoned by years of cooking, moved with an effortless grace as she orchestrated the symphony of spices.


We would gather around the kitchen island, each family member assigned a task. My cousins and I were in charge of pounding the spices, a job that came with the reward of licking our fingers to taste the fiery chilies. As the chicken marinated, we sat around the table sharing stories, our mouths watering in anticipation.


The next day, as the chicken skewers sizzled on the grill, the aroma wafted through the garden, drawing everyone to the table. The first bite was always magical, a testament to the love and care that went into its preparation.


Bringing it All Together

Saffron Chicken Tikka is more than just an appetizer; it is a main dish that speaks to the heart. With a moderate difficulty rating of 6 out of 10, it offers a rewarding challenge for those eager to explore the depths of Indian cuisine. Whether you're cooking for family or friends, this dish is bound to create lasting memories and perhaps inspire new traditions.


So, gather your ingredients, embrace the spices, and embark on a culinary journey that promises not only flavor but a taste of nostalgia.

Read more about Appetizers

Read more about Main Dishes

Read more about Desserts

Cherry Lime Mojito | Made by Meaghan Moineau

Cherry Lime Mojito | Made by Meaghan Moineau

Title: "Sip into Nostalgia with a Refreshing Cherry Lime Mojito"
Description: Dive into the delightful world of the Cherry Lime Mojito, a cocktail that brings together the vibrant flavors of cherries, mint, and lime. This refreshing drink is perfect for any gathering and is sure to evoke fond family memories. With a difficulty rating of 4 out of 10, it's an easy-to-make dessert-like drink that will transport you to a simpler time.

---


As the warm breeze of summer makes its way through the porch screens, I can't help but reminisce about the long, lazy afternoons spent at my grandmother’s house. Her backyard was a haven, brimming with lush greenery and the sweet scent of blooming flowers. But more than anything, it was the laughter and love that permeated the air during our family gatherings that made those days unforgettable.


One particular memory that stands out is when Grandma introduced us to the Cherry Lime Mojito, a drink that quickly became a family favorite. It was a hot July afternoon, and the elders were gathered around the patio table, chatting animatedly as we kids played tag under the shade of the old oak tree. Grandma emerged from the kitchen with a tray of vibrant, colorful glasses filled with her signature mojito.


The Cherry Lime Mojito is a delightful concoction that combines the tartness of cherries with the refreshing zest of lime and the aromatic touch of mint leaves. Here's how to recreate this nostalgic drink that will surely bring a splash of joy and a hint of nostalgia to your gatherings.


Ingredients:

- Fresh cherries


- A handful of mint leaves


- 1 lime, sliced


- 2 teaspoons demerara sugar


- 2 ounces of white rum


- Carbonated water


Instructions:
1. Muddle for Memories: Begin by placing the cherries, mint leaves, demerara sugar, and lime slices in a tall glass. Use a muddler or the back of a spoon to gently crush the ingredients together. This process releases the juices and oils, creating a fragrant and flavorful base for your mojito.
2. Ice it Up: Add a few ice cubes to the glass, providing the perfect chill for your refreshing drink.
3. The Spirit of Celebration: Pour in the white rum, letting it mingle with the muddled mixture.
4. Fizz and Finish: Fill the glass the rest of the way with carbonated water, giving your mojito that delightful effervescence. Stir gently to combine all the flavors.
5. Serve and Savor: Garnish with a sprig of mint and a cherry on top. Serve immediately and let the nostalgia wash over you with every sip.

This Cherry Lime Mojito isn't just a drink; it's a bridge to cherished memories, a testament to the joy of family gatherings, and a celebration of the simple pleasures in life. Classified as a dessert-like drink, it’s the perfect sweet ending to a day filled with laughter and love.


With a difficulty rating of 4 out of 10, this mojito is accessible to even the novice mixologist. Its simplicity and flavor make it a go-to choice for any occasion. So, next time you’re looking to add a touch of nostalgia to your gathering, shake up a Cherry Lime Mojito and toast to the memories that bind us all. Cheers!

Read more about Appetizers

Read more about Main Dishes

Read more about Desserts

Chicken Adobo & Coconut Ginger Rice | Made by Meaghan Moineau

Chicken Adobo & Coconut Ginger Rice | Made by Meaghan Moineau

Title: Savoring Memories: The Heartwarming Taste of Chicken Adobo & Coconut Ginger Rice


Description: Discover the rich flavors of Chicken Adobo paired with Coconut Ginger Rice. This comforting main dish is not just a feast for the senses but a nostalgic journey back to cherished family gatherings.


---


Introduction


There’s something truly magical about the way certain dishes can transport us back in time, evoking cherished memories and family traditions. For me, Chicken Adobo served with Coconut Ginger Rice is one such dish. Its tantalizing aroma and bold flavors remind me of warm family gatherings and the joy of sharing meals with loved ones.


Ingredients


- For the Chicken Adobo:

- 1/2 cup low sodium soy sauce


- 1/2 cup apple cider vinegar


- 4 cloves garlic, minced


- 1 teaspoon peppercorns


- 1 tablespoon brown sugar


- 2 bay leaves


- 8 bone-in chicken thighs


- 1 tablespoon grapeseed oil


- 1 cup chicken broth


- 1 tablespoon cornstarch


- 1/4 cup water


- For the Coconut Ginger Rice:

- 3 cups water


- 1 1/2 cups rice


- Pinch of kosher salt


- 1/4 cup scallions, chopped


- 2 tablespoons fresh ginger, grated


- 1/4 cup sweetened shredded coconut


- 2 tablespoons parsley, chopped


Instructions


1. Marinate the Chicken:

In a large bowl or flat dish, combine soy sauce, vinegar, garlic, peppercorns, brown sugar, and bay leaves. Add chicken thighs, ensuring they are well-coated. Cover and marinate in the fridge for at least an hour, or for a more intense flavor, overnight.


2. Cook the Chicken:

Heat grapeseed oil in a large pan over medium-high heat. Add marinated chicken thighs, skin-side down, and brown for 2-3 minutes on each side. Once browned, remove from the pan and set aside.


3. Prepare the Sauce:

Pour the marinade and chicken broth into the pan and bring to a boil. Return the chicken to the pan, cover, and simmer for 10 minutes.


4. Thicken the Sauce:

In a small bowl, whisk together cornstarch and water. Stir into the pan and turn the chicken pieces over. Cover and cook for another 6-9 minutes, until the chicken is cooked through and the sauce thickens.


5. Cook the Rice:

Bring 3 cups of water to a boil in a separate pot. Add a pinch of salt, then stir in the rice. Cook according to package instructions. Once done, fluff the rice with a fork and toss with scallions, parsley, ginger, and shredded coconut.


6. Serve:

Plate the Coconut Ginger Rice and top with Chicken Adobo. Drizzle with the rich adobo sauce for an extra burst of flavor.


A Nostalgic Family Memory


Every year, our extended family would gather at my grandmother's house for a much-anticipated reunion. The air would be filled with laughter, and the kitchen would be bustling with activity. Among the many dishes that graced the table, my grandmother's Chicken Adobo was a perennial favorite. The recipe, passed down through generations, held a special place in our hearts.


As a child, I vividly remember the aroma of garlic and soy sauce wafting through the house, mixing with the sweet scent of coconut from the rice. My cousins and I would eagerly hover around the kitchen, sneaking tastes whenever we could. Sharing this meal, surrounded by family, was a comforting ritual that brought us all closer together. Even now, whenever I prepare this dish, those warm memories come flooding back, and it feels like my grandmother is right there with us.


Difficulty Rating


6/10 - This dish requires some preparation and attention to detail, but the effort is well worth the reward. It’s an ideal choice for a comforting and flavorful main dish that will impress your family and friends.

---


Relive the warmth of family gatherings and indulge in the rich flavors of Chicken Adobo with Coconut Ginger Rice. This dish is more than just a meal; it's a journey back to moments filled with love and laughter.

Read more about Appetizers

Read more about Main Dishes

Read more about Desserts

Japan inflation comes in at 3.6%, surpasses BOJ target for three straight years – CNBC | Analysis by Brian Moineau

Japan inflation comes in at 3.6%, surpasses BOJ target for three straight years - CNBC | Analysis by Brian Moineau

Japan's Inflation Odyssey: The Land of the Rising Prices

Japan, a nation renowned for its cherry blossoms, cutting-edge technology, and rich cultural tapestry, is now also notable for its inflation rates surpassing the Bank of Japan's (BOJ) target for three consecutive years. According to a recent CNBC report, Japan's inflation grew 3.6% year on year in March, marking a significant departure from the BOJ's long-standing 2% target. But what does this mean for Japan and the global economic landscape?

The Inflation Conundrum

For years, Japan grappled with deflation—a persistent decline in prices that stymied economic growth and stifled consumer spending. The BOJ's 2% inflation target was established as a remedy, intended to stimulate the economy by encouraging spending and investment. However, overshooting this target presents its own set of challenges.

The current 3.6% inflation rate, while modest compared to the double-digit figures seen in some other parts of the world (such as Argentina, where inflation exceeded 100% in 2023), is significant for Japan. It suggests that the country's economy is heating up faster than anticipated. This raises the question: how will policymakers respond to this continued rise in prices?

A Global Perspective

Japan's inflationary pressures are not occurring in isolation. Around the world, countries are grappling with the economic ripple effects of the COVID-19 pandemic, supply chain disruptions, and geopolitical tensions. For instance, the war in Ukraine has led to increased energy prices globally, affecting nations far beyond Europe. Similarly, the U.S. has experienced rising inflation rates, prompting the Federal Reserve to increase interest rates—a potential move Japan might consider, though it could have complex implications for its economy.

Interestingly, in an era where many countries are tightening monetary policy to combat inflation, Japan's approach has remained relatively accommodative. The BOJ continues to maintain low interest rates, prioritizing economic growth and stability over aggressive inflation control. This divergence in strategy highlights the unique economic landscape in Japan, where decades of economic stagnation have fostered a cautious approach to monetary policy adjustments.

Cultural and Economic Impacts

For the average Japanese citizen, rising inflation can have tangible impacts on daily life. From increased grocery bills to higher costs for everyday goods and services, the effects of inflation are felt most acutely by consumers. Yet, there is also a cultural dimension at play. Japan's aging population and shrinking workforce present additional economic challenges, leading to debates about immigration policies, workforce participation, and technological innovation as potential solutions.

A Lighthearted View

Despite the serious economic implications, there's an opportunity to find some levity in the situation. As Japan continues to navigate these inflationary waters, perhaps it's time for some creative thinking. Imagine a world where inflation is met with humor—where economists become stand-up comedians, turning complex economic theories into punchlines, and where inflation indices are humorously compared to sumo wrestling matches, with the yen battling it out on the global stage.

Final Thoughts

Japan's inflation journey is a testament to the complexities of managing an economy in a rapidly changing world. While the 3.6% inflation rate surpasses the BOJ's target, it also reflects broader global trends and challenges. As Japan charts its course forward, balancing growth and stability will be key. And who knows, maybe a little humor along the way will provide the resilience needed to weather the economic storms.

For more insights on Japan's economic landscape, check out the full [CNBC article](https://www.cnbc.com).

Read more about AI in Business

Read more about Latest Sports Trends

Read more about Technology Innovations

Almond Rainbow Cake | Made by Meaghan Moineau

Almond Rainbow Cake | Made by Meaghan Moineau

Title: Almond Rainbow Cake: A Sweet Slice of Nostalgia
Description: Dive into the delightful world of baking with our Almond Rainbow Cake recipe. This visually stunning and delicious dessert is more than just a treat; it's a canvas for cherished family memories. Discover the simple joys of creating a masterpiece that appeals to both the eyes and the palate.

---


Almond Rainbow Cake: A Sweet Slice of Nostalgia


In the world of desserts, few things capture the imagination quite like a beautifully layered cake. The Almond Rainbow Cake is a vibrant testament to the joys of baking, combining the delicate flavor of almond with the visual allure of rainbow hues. This cake isn't just a feast for the eyes and taste buds; it's a portal to cherished family memories that are as sweet as the cake itself.


Ingredients:


- 1 box of white cake mix


- 1 cup of all-purpose flour


- 1 cup of granulated sugar


- ¼ teaspoon of salt


- 1 ⅓ cups of water


- 2 tablespoons of vegetable oil


- 1 teaspoon of real vanilla extract


- 1 teaspoon of almond extract


- 1 cup of sour cream


- 4 large egg whites


Instructions:


1. Prepare the Dry Mix: In a large mixing bowl, combine the white cake mix, flour, granulated sugar, and salt. Stir these dry ingredients together using a wire whisk to ensure even distribution.
2. Blend the Batter: Add water, vegetable oil, vanilla extract, almond extract, sour cream, and egg whites to the dry mixture. Beat the batter for two minutes until smooth and well-combined.
3. Pour and Tap: Grease and flour your chosen cake pans. Pour the batter into the pans, filling each a little over half full. Lightly tap the pans on the counter to release any trapped air bubbles.
4. Bake to Perfection: Preheat your oven to 325°F. Bake the cakes until they are done, testing with a toothpick. The baking time will vary based on the size and depth of your pans, whether you're making cupcakes or a grand 14-inch round cake.

Rating and Classification:


- Difficulty: 5/10
- Classification: Dessert

A Slice of Family History


The Almond Rainbow Cake holds a special place in my heart, closely tied to the vibrant tapestry of my family’s culinary history. Every spring, my grandmother would gather us in her cozy kitchen, the air filled with the sweet aroma of almond and vanilla. As a child, I watched her deftly layer batter in pans of different sizes, her hands moving with the confidence that comes from years of practice.


She would recount stories of her own childhood while teaching us the art of baking. Each layer of the cake represented a family member, a splash of color and flavor that came together to create something beautiful and whole. The rainbow hues weren't just for show; they were a celebration of diversity and unity within our family.


As the cake baked, we would gather around the kitchen table, giggling and sharing stories. The anticipation was almost as delightful as the first bite. When the cake was finally ready, we’d all sit together, savoring each slice as if it were a slice of our shared history.


Conclusion


Baking the Almond Rainbow Cake is more than a culinary endeavor; it's an opportunity to create and relive memories with loved ones. Whether you're an experienced baker or a novice in the kitchen, this cake offers a delightful challenge that's as rewarding to make as it is to eat. Gather your ingredients, preheat your oven, and let the magic of the Almond Rainbow Cake transport you to moments of joy and togetherness.

Read more about Appetizers

Read more about Main Dishes

Read more about Desserts

Best Potato Cheese Soup in a bread bowl | Made by Meaghan Moineau

Best Potato Cheese Soup in a bread bowl | Made by Meaghan Moineau

Warm Comfort in a Bread Bowl: The Best Potato Cheese Soup Recipe


Description:

Dive into a bowl of pure comfort with our Best Potato Cheese Soup, served in a warm, crusty bread bowl. This hearty dish combines creamy textures and rich flavors, making it the ultimate comfort food for chilly days. Infused with the savory goodness of Velveeta and sharp cheddar, and topped with crispy bacon crumbles, this soup is a nostalgic nod to cozy family gatherings. Perfect for both a luxurious appetizer or a satisfying main dish.

Ingredients:

- 2 tablespoons olive oil

- 1 sweet diced onion


- 2 cloves garlic, minced


- 4 cups chicken stock


- 2 cups water


- 1 teaspoon salt


- 4 cups red potatoes, diced


- 2 cups carrots, diced


- 2 cups whole milk


- 1 cup heavy cream


- 2 tablespoons butter


- 1 block Velveeta cheese, cubed


- 2 cups shredded sharp cheddar cheese


- Salt and pepper to taste


- Garnishes: Bacon crumbles, chives, sour cream, shredded Parmesan cheese


Instructions:

1. Sauté Aromatics: In a large heavy stock pot, heat 2 tablespoons of olive oil over medium heat. Add the diced onion and cook until translucent, about 2-3 minutes. Add minced garlic and sauté for another minute until fragrant.
2. Create the Base: Pour in the chicken stock, water, and salt. Stir well, then add the diced red potatoes and carrots. Bring the mixture to a boil and cook until the potatoes are fork-tender.
3. Blend and Thicken: Turn off the heat and let the soup cool slightly. Remove about half of the potatoes with a slotted spoon and blend them into a smooth paste in a food processor or blender. Return the potato paste to the pot, mixing thoroughly.
4. Add Creaminess: Place the stock pot back on medium heat. Add the whole milk, heavy cream, butter, and Velveeta cheese. Stir continuously until the butter and cheese have melted, making sure the soup does not reach a boil. Reduce heat to low as it nears boiling.
5. Enhance with Cheese: Gradually add the shredded sharp cheddar, one handful at a time, stirring each time until melted. Stir in the Parmesan cheese. Season with additional salt and pepper to taste, keeping in mind the saltiness of the cheeses.
6. Serve with Style: Ladle the warm, creamy soup into bread bowls or regular bowls. Garnish with crispy bacon crumbles, fresh chives, a dollop of sour cream, and a sprinkle of shredded Parmesan cheese.

A Nostalgic Bite:

Every spoonful of this potato cheese soup brings back cherished memories of family dinners at my grandmother's house. On chilly winter evenings, her kitchen was a haven of warmth and savory aromas. I remember sitting at the old oak table, eagerly waiting as she ladled the velvety soup into bowls, the steam curling up like whispers of comfort. The first bite was always magical; the creamy blend of potatoes and cheese enveloped in the soft bread bowl reminded me of childhood and the love that went into every meal. It was a dish that brought us all together, a shared experience of laughter and stories over a simple yet soul-satisfying meal.

Difficulty Rating: 5/10

This recipe is moderately easy to prepare, making it accessible to cooks with some experience in the kitchen. The steps are straightforward, but ensuring the perfect creamy consistency requires attention and patience.

Classification: Main Dish

This potato cheese soup is hearty enough to stand alone as a main dish, especially when served in a bread bowl that soaks up the rich flavors. However, it can also shine as a decadent appetizer to start a cozy meal.

Enjoy the warmth and nostalgia of this delicious soup, perfect for creating new family memories around the table.

Read more about Appetizers

Read more about Main Dishes

Read more about Desserts

Roasted Cauliflower and Leek Soup | Made by Meaghan Moineau

Roasted Cauliflower and Leek Soup | Made by Meaghan Moineau

Title: Comfort in a Bowl: Roasted Cauliflower and Leek Soup Recipe
Description: Discover the warmth and nostalgia of our Roasted Cauliflower and Leek Soup, an easy-to-make recipe that brings families together. With its rich, savory flavors, this dish is perfect for cozy dinners or as a starter to any meal.

---


As the leaves turn golden and a crisp chill fills the air, there's nothing quite like the comforting embrace of a warm bowl of soup. Today, I'm excited to share a beloved family recipe that has warmed our hearts and filled our home with delightful aromas—Roasted Cauliflower and Leek Soup.


Ingredients:

- 1 head of cauliflower, chopped


- 3 green and white parts of leeks, cleaned and chopped


- 4 cloves of garlic, peeled


- 2 tablespoons olive oil


- 2 cans of chicken broth


- Kosher salt, to taste


- Freshly ground black pepper, to taste


Instructions:
1. Preheat Your Oven: Start by preheating your oven to 425°F (220°C).
2. Prepare the Vegetables: Spread the chopped cauliflower, leeks, and garlic evenly on a baking sheet. Drizzle with olive oil and toss the vegetables until they are thoroughly coated. Sprinkle with kosher salt.
3. Roast to Perfection: Place the baking sheet in the oven and roast for 40-45 minutes. You'll know they're ready when the vegetables are browned on the edges and slightly softened.
4. Create the Soup Base: Transfer the roasted vegetables into a saucepan. Add the chicken broth and season with freshly ground black pepper to taste.
5. Bring to a Bubble: Heat the mixture over medium-high heat until it begins to bubble gently.
6. Blend Until Smooth: Using an immersion blender, puree the soup until it reaches a smooth, creamy consistency. If you’re using a regular blender, be cautious with hot liquids—vent the lid slightly to avoid any kitchen mishaps.
Nostalgic Family Memory:

This soup has been a staple in our family for as long as I can remember. Every autumn, my mother would gather us around in the kitchen, teaching us the art of roasting vegetables. I vividly recall the way the kitchen would fill with the sweet, nutty aroma of cauliflower and leeks mingling in the oven. It was more than just a soup—it was an event. We would eagerly await that first creamy spoonful, knowing it signaled the start of cozy nights spent together, sharing stories and laughter. This dish, with its deep flavors and heartwarming memories, always reminds me of the love and warmth that comes with family.


Difficulty Rating: 3/10
Classification: Appetizer

This Roasted Cauliflower and Leek Soup is not only easy to prepare but also a delightful way to bring a touch of nostalgia and comfort to your table. Whether you serve it as an appetizer or enjoy it as a light meal, it's sure to become a cherished favorite in your culinary repertoire. So, gather your loved ones, and let this simple yet flavorful soup create new memories for you and your family. Enjoy!

Read more about Appetizers

Read more about Main Dishes

Read more about Desserts

Stuffed zucchini with rice and mushroom | Made by Meaghan Moineau

Stuffed zucchini with rice and mushroom | Made by Meaghan Moineau

Title: Reliving Childhood Memories with Stuffed Zucchini Delight
Description: Discover the heartwarming allure of Stuffed Zucchini with Rice and Mushroom, a dish that marries the comforting flavors of fresh vegetables and savory fillings. Learn how to create this delightful main dish and immerse yourself in a nostalgic family tale that harks back to simpler times.

---


A Taste of Nostalgia: Stuffed Zucchini with Rice and Mushroom

When I think of Stuffed Zucchini with Rice and Mushroom, I am transported back to the warm, sunlit kitchen of my grandmother's house. The aroma of fresh zucchinis and savory mushrooms filled the air, creating an inviting atmosphere that promised a delicious family meal. This dish wasn't just food; it was a tradition, a celebration of togetherness that brought our family closer with every bite.


Growing up, weekends were reserved for family gatherings, where everyone would converge at my grandmother's home, bringing along stories, laughter, and appetites. The highlight of these gatherings was always the Stuffed Zucchini with Rice and Mushroom. Grandmother, with her nimble fingers and gentle smile, would prepare this dish with love, transforming simple ingredients into a symphony of flavors.


The zucchinis, fresh from the local farmer's market, were hollowed out with precision, ready to cradle the savory filling of rice, mushrooms, and bell peppers. The red onions and garlic, sautéed in a splash of oil, added a rich depth of flavor that was both comforting and familiar. As the filling simmered, the kitchen filled with the scent of melting cheese and tomato sauce—an aroma that signaled the anticipation of a meal shared with loved ones.


As a child, I had the important role of sprinkling the final touch of cheese over the stuffed zucchinis before they went into the oven. Watching the cheese melt and bubble over the golden zucchinis was a sight to behold, one that promised a delicious feast was soon to follow.


Today, I recreate this dish not just to savor its delectable taste but to relive those cherished moments of family, laughter, and love. Stuffed Zucchini with Rice and Mushroom is more than a meal; it's a bridge to the past, a way to keep those who are gone, ever present in our lives.


Difficulty Rating: 5/10
Classification: Main Dish

For detailed instructions on how to make this comforting and delicious Stuffed Zucchini with Rice and Mushroom, visit myzucchinirecipes.com. Whether you're looking to relive a cherished memory or create new ones, this dish is sure to bring warmth and joy to your dining table.

Read more about Appetizers

Read more about Main Dishes

Read more about Desserts

Cinnamon Eggless Coffee Cake | Made by Meaghan Moineau

Cinnamon Eggless Coffee Cake | Made by Meaghan Moineau

Title: A Nostalgic Brew: Eggless Cinnamon Coffee Cake
Description: Discover the comforting embrace of our Cinnamon Eggless Coffee Cake, a delightful dessert that brings back cherished family memories with every bite. This easy-to-make, aromatic cake is perfect for sharing with loved ones over a cup of tea or coffee. Follow our simple recipe and relive the warmth of home.

---


There's something truly magical about the aroma of cinnamon wafting through the kitchen, mingling with the rich scent of freshly brewed coffee. It instantly transports me back to cozy Sunday afternoons at my grandmother's house, where the air was always filled with warmth, laughter, and the promise of a delicious treat. The Cinnamon Eggless Coffee Cake was a staple in our family, a dessert that held the power to unite us all at the table, sharing stories and creating memories.


Ingredients for Nostalgia:

- 1 cup all-purpose flour


- 1 cup wholewheat flour


- 1 cup powdered sugar (plus 1 tsp. for sprinkling)


- 1/2 cup vegetable oil


- 1 tbsp vinegar


- 1 tbsp coffee powder


- 1 tsp cinnamon powder


- 1 tsp baking soda


- 1/2 tsp salt


- 1 tsp vanilla essence


- 1 cup curd


- 1/2 cup strong coffee decoction


Instructions to Create Magic:
1. Preheat & Prepare: Preheat your oven to 180°C (350°F) for 10 minutes. Grease a rectangular baking tin and set it aside.
2. Sift Dry Ingredients: In a large bowl, sift together the all-purpose flour, wholewheat flour, coffee powder, cinnamon powder, baking soda, and salt. Repeat the sifting process three times to ensure a smooth texture.
3. Mix Sugar & Oil: In another bowl, beat the powdered sugar and vegetable oil until light and fluffy, approximately 10 minutes of mixing.
4. Combine Wet Ingredients: Add the curd, strong coffee decoction, vanilla essence, and vinegar to the sugar and oil mixture, stirring thoroughly.
5. Blend Together: Gently fold the wet mixture into the dry ingredients, mixing lightly until the batter resembles a uniform paste. Avoid over-mixing; 10-12 gentle strokes should suffice.
6. Prepare to Bake: Pour the prepared batter into the greased baking tin. Sprinkle the reserved teaspoon of sugar over the top for a subtle sweet crust.
7. Bake: Place the tin in the preheated oven and bake for 25-30 minutes. Check for doneness by inserting a clean knife; if it comes out clean, your cake is ready. If not, bake for a few more minutes.
8. Cool & Serve: Once baked, remove the cake from the oven and allow it to cool on a wire rack. Cut into desired shapes and serve with tea or coffee. This cake remains fresh for a week, allowing you to enjoy its comforting taste over several days.

In our family, this cake wasn't just a dessert; it was a tradition. I remember my grandmother's gentle hands guiding mine as we mixed the ingredients, her stories blending with the sweet aroma filling the room. Each slice of cake was a slice of our family history, rich with love and laughter.


Difficulty Level: 4/10
Classification: Dessert
Conclusion:

This Cinnamon Eggless Coffee Cake is more than just a treat—it's a vessel for nostalgia, a bridge to the past that you can bake in your own kitchen today. Gather your loved ones, brew a pot of coffee, and let this delightful dessert bring warmth and joy to your home, just as it did for our family.

Read more about Appetizers

Read more about Main Dishes

Read more about Desserts

Siew Mai | Made by Meaghan Moineau

Siew Mai | Made by Meaghan Moineau

Savoring Tradition: Unveiling the Art of Making Siew Mai


Description:

Dive into the heart of traditional Chinese cuisine with our delectable Siew Mai recipe. This comprehensive guide not only walks you through the step-by-step process of crafting these delightful dumplings but also shares a nostalgic family memory that makes this dish truly special. Classified as an appetizer, this recipe boasts a difficulty rating of 7/10, perfect for those looking to challenge themselves in the kitchen.

---


The Perfect Siew Mai Recipe: A Culinary Journey


In the world of dim sum, few dishes evoke as much joy and nostalgia as Siew Mai. These succulent dumplings, wrapped delicately in wonton wrappers, are a staple at any dim sum feast. With a rich filling of fatty pork, shrimp, and savory glutinous rice, each bite is a symphony of flavors that instantly transports you to the bustling streets of Hong Kong or a cherished family gathering. Today, I invite you to join me on this culinary journey, where tradition meets taste.


Ingredients:

- Wonton wrappers
- For Pork Filling:

- 700g fatty pork, minced


- 2 tablespoons corn starch


- 1 teaspoon salt


- 1 teaspoon white ground pepper


- 1/2 teaspoon sugar


- 1 teaspoon Worcestershire sauce


- 2 tablespoons Shaoxing Huatiao wine


- 2 tablespoons sesame oil


- 80g canned water chestnuts, finely chopped


- 4 large mushrooms, finely chopped


- 1 small carrot, finely diced


- Cooked whole shrimp for topping


- For Glutinous Rice Filling:

- Raw glutinous rice (prepared as per linked recipe)


- 2 lap cheongs (Chinese sausages), diced


- Dried shrimps and scallops, cooked


- 1 tablespoon cooking oil


- Shallots and ginger, finely chopped


- Light soy sauce, oyster sauce, salt, white ground pepper


Instructions:


1. Prepare the Pork Filling:

- In a large mixing bowl, combine the minced pork with corn starch, salt, white ground pepper, sugar, Worcestershire sauce, Shaoxing Huatiao wine, and sesame oil.


- Add the chopped water chestnuts and mushrooms to the pork mixture. Mix well to combine.


- Set aside the pork mixture and diced carrots until ready to wrap the dumplings.


2. Prepare the Glutinous Rice Filling:

- Soak the lap cheongs in boiling water until the skin separates. Remove the skin and dice.


- Pan fry the diced lap cheongs until golden. Set aside.


- Prepare the glutinous rice as per the linked recipe, incorporating the diced lap cheongs.


3. Wrap the Dumplings:

- Place a sheet of wonton wrapper on a flat surface. Add a teaspoon of filling in the center.


- Wet the edges of the wrapper, gather, and squeeze gently to wrap the filling tightly.


- Top each pork Siew Mai with a shrimp and garnish with diced carrots or your choice of toppings.


4. Steam and Serve:

- Arrange the dumplings in a steamer lined with baking paper. Cut holes in the paper for steam.


- Steam over boiling water for 14-15 minutes or until cooked. Serve hot.


---


A Nostalgic Memory


Growing up, Siew Mai was more than just a dish; it was a family ritual. Every Sunday, my grandmother would gather us in her cozy kitchen, the air filled with the aromas of spices and laughter. She would share stories of her childhood, teaching us the art of wrapping dumplings with the patience only a grandmother possesses. As we gathered around the table, savoring each delicious bite, I realized that Siew Mai was more than just food—it was a symbol of love and tradition, a legacy I now share with my own family.


Difficulty Rating: 7/10


Classification: Appetizer


Crafting Siew Mai is an art that demands attention to detail and a touch of patience. The result, however, is a dish that not only delights the palate but also warms the heart, making it a perfect appetizer for any occasion. Whether you're a novice or a seasoned chef, this recipe offers a rewarding challenge that celebrates the timeless joy of cooking and sharing.

Read more about Appetizers

Read more about Main Dishes

Read more about Desserts

Fresh Strawberry Yogurt Cake | Made by Meaghan Moineau

Fresh Strawberry Yogurt Cake | Made by Meaghan Moineau

Title: "Sweet Memories: The Timeless Delight of Fresh Strawberry Yogurt Cake"
Description: Dive into the heartwarming flavors of our Fresh Strawberry Yogurt Cake, a dessert that effortlessly marries the sweetness of strawberries with the tangy zest of lemon. This delightful treat not only tantalizes your taste buds but also evokes cherished family memories. With a difficulty rating of 6 out of 10, it's the perfect dessert to impress your loved ones.

---


A Taste of Nostalgia: Fresh Strawberry Yogurt Cake

There's something inherently special about a recipe that transcends generations, weaving itself into the tapestry of family memories. For me, the Fresh Strawberry Yogurt Cake is not just a dessert—it's a portal to cherished times spent in my grandmother's cozy kitchen.


Ingredients:

- 2 cups flour, plus an additional ¼ cup


- 1 teaspoon baking soda


- ½ teaspoon salt


- Zest of 1 lemon


- ¾ cup butter, softened


- 1 ½ cups sugar


- 3 large eggs


- 1 tablespoon lemon juice, plus 2 tablespoons for the glaze


- 1 cup plain vanilla yogurt


- 1 ½ cups diced fresh strawberries


- 1 cup powdered sugar


Instructions:

1. Preheat your oven to 325°F (163°C) and prepare a 10-inch Bundt pan by greasing and flouring it.


2. Sift together 2 cups of flour, baking soda, and salt. Add the lemon zest to this mixture and set aside.


3. In a separate bowl, use an electric mixer to cream together the butter and sugar until the mixture is light and fluffy.


4. Beat in the eggs one at a time, ensuring each is well incorporated before adding the next. Stir in 1 tablespoon of lemon juice.


5. Gradually mix in the flour mixture and the yogurt, alternating between the two until just incorporated.


6. Toss the diced strawberries with the remaining ¼ cup of flour and gently fold them into the batter.


7. Pour the batter into the prepared Bundt pan and bake for 60 minutes, or until a toothpick inserted into the center comes out clean.


8. Allow the cake to cool in the pan for 10 minutes before transferring it to a wire rack to cool completely.


9. Once cooled, whisk together the remaining 2 tablespoons of lemon juice with the powdered sugar, and drizzle this glaze over the top of the cake.


A Journey Back in Time:

As a child, summers meant endless days at my grandparents' farmhouse. Nestled amidst lush strawberry fields, it was a haven of laughter and love. My grandmother, a wizard in the kitchen, would often invite me to help her bake. The Fresh Strawberry Yogurt Cake was her signature dessert, always made with strawberries freshly plucked from the backyard.


I remember the excitement of picking strawberries with my little hands, my grandmother’s gentle guidance ensuring I chose only the ripest ones. The kitchen would soon be filled with the comforting aroma of the cake as it baked, mingling with the sweet, tangy scent of lemon and vanilla.


Once the cake was ready, the whole family would gather around the table. Each slice was a reminder of the love and warmth that my grandmother infused into her cooking. Today, as I prepare this cake for my own family, I am transported back to those idyllic summer days. It’s a recipe I treasure, not only for its deliciousness but for the cherished memories it brings back.


Conclusion:

The Fresh Strawberry Yogurt Cake is more than a delightful dessert; it’s a tribute to family traditions and the joy of shared experiences. With a difficulty rating of 6 out of 10, this dessert is accessible yet impressive, perfect for family gatherings or a sweet treat to end a meal. Whether you're making it for the first time or the hundredth, this cake promises to be a delightful journey through flavors and memories.

Read more about Appetizers

Read more about Main Dishes

Read more about Desserts

Endive Appetizer With Blue Cheese, Dried Cranberries and Walnuts | Made by Meaghan Moineau

Endive Appetizer With Blue Cheese, Dried Cranberries and Walnuts | Made by Meaghan Moineau

Title: A Taste of Tradition: Endive Appetizer with Blue Cheese, Dried Cranberries, and Walnuts
Description: Discover the delicious blend of flavors in our Endive Appetizer with Blue Cheese, Dried Cranberries, and Walnuts. This elegant yet simple appetizer is perfect for any gathering and brings back cherished family memories. Learn how to create this delightful dish with our easy-to-follow recipe.

---


A Taste of Tradition: Endive Appetizer with Blue Cheese, Dried Cranberries, and Walnuts

There’s something magical about a dish that can transport you back in time, evoking memories of family gatherings and shared laughter. Our Endive Appetizer with Blue Cheese, Dried Cranberries, and Walnuts does just that. This delightful appetizer, with its perfect balance of flavors, has been a staple at our family reunions for as long as I can remember.


Ingredients:

- 2 apples, thinly sliced


- 1/4 cup light balsamic vinaigrette


- 3 heads of Belgian endive, leaves separated


- 1 cup crumbled blue cheese


- 1/2 cup dried cranberries


- 1/2 cup walnut pieces


Instructions:
1. Toast the Walnuts: Begin by toasting the walnut pieces in a dry skillet over medium heat for about two minutes, or until they become fragrant. Make sure to stir them occasionally to prevent burning. Once toasted, set them aside to cool.
2. Prepare the Platters: Arrange the apple slices on one platter, and the endive leaves on another. The contrast of colors from the apples and endive will make for an impressive presentation.
3. Mix the Toppings: In a medium bowl, combine the cooled walnuts, dried cranberries, and blue cheese. This mixture will serve as the flavorful topping for your endive leaves.
4. Assemble the Appetizer: Top each endive leaf with approximately one tablespoon of the cheese mixture. Add a drop or two of light balsamic vinaigrette to each leaf for a touch of acidity that complements the flavors.
5. Serve with Apples: Place the remaining cheese mixture in a bowl to serve alongside the apple slices. The crispness of the apples pairs wonderfully with the creamy blue cheese and the sweet-tart cranberries.
A Nostalgic Journey:

This dish is more than just a combination of flavors; it’s a journey back to summer picnics at my grandparents’ house. I can still picture the large oak tree in their backyard, under which we’d spread out a checkered blanket. My grandmother, with her gentle smile, would bring out a tray of these endive appetizers. The adults would savor them with a glass of wine, while we, the kids, would nibble on the apple slices, occasionally sneaking bites of the cheese mixture.


As the years have passed, this appetizer has become a symbol of those cherished moments. Whenever I make it, I’m reminded of the laughter, the stories, and the love that surrounded us. It’s a dish that not only delights the palate but also warms the heart.


Difficulty: 3/10
Classification: Appetizer

Whether you’re hosting a formal dinner or a casual get-together, this Endive Appetizer with Blue Cheese, Dried Cranberries, and Walnuts is sure to impress your guests. Its simplicity belies its elegance, making it the perfect choice for any occasion. Enjoy the delightful flavors and create your own treasured memories with this timeless recipe.

Read more about Appetizers

Read more about Main Dishes

Read more about Desserts

Mangoes with Rum and Ice Cream | Made by Meaghan Moineau

Mangoes with Rum and Ice Cream | Made by Meaghan Moineau

Title: Tropical Bliss: Mangoes with Rum and Ice Cream


Description:

Dive into a tropical paradise with our delectable Mangoes with Rum and Ice Cream recipe. This exquisite dessert, brimming with vibrant flavors and a hint of nostalgia, will transport you to sun-kissed beaches and carefree summer days. Easy to prepare yet impressively indulgent, this dish is a must-try for fruit and dessert lovers alike.

---


A Nostalgic Journey with a Tropical Twist


As the summer sun began to set, casting a golden hue over the horizon, our family would gather on the porch, eagerly anticipating the sweet treat that had become a cherished tradition. Mangoes with Rum and Ice Cream was more than just a dessert; it was a celebration of the season and a gentle reminder of cherished moments shared with loved ones.


I vividly remember my grandmother, her hands deftly peeling the ripe mangoes, ensuring every slice was free of the green flesh that might mar the golden perfection. She had a knack for transforming simple ingredients into culinary masterpieces, and this dish was no exception. The scent of fresh lime and dark rum would waft through the air, mingling with the laughter and stories that filled the evening.


The secret to her Mangoes with Rum and Ice Cream was in the marinade—a tantalizing blend of sugar, dark rum, freshly squeezed lime juice, and the zest of lime rind. The mango pieces would soak up this flavorful concoction, chilling to perfection while we shared stories and memories on those warm summer nights.


When served, the dessert was a feast for the senses. The vibrant mango slices, glistening with their rum-infused marinade, nestled atop velvety scoops of vanilla ice cream, creating a symphony of flavors with every bite. Each spoonful was a tropical escape, a small indulgence that captured the essence of summer.


This recipe is not just about the flavors; it's about the memories that accompany each serving. It's about the joy of sharing a lovingly prepared dessert with those closest to you, and the simple pleasure of savoring a dish that transcends the ordinary.


Recipe: Mangoes with Rum and Ice Cream


Ingredients:

- Fresh mangoes


- 1/4 cup sugar


- 1/4 cup dark rum


- 2 tablespoons fresh lime juice


- 1 teaspoon grated lime rind


- Vanilla ice cream


Instructions:

1. Peel the mangoes, ensuring all green-colored flesh is removed. Carefully slice the mango around the pit into 1/2-inch thick pieces, discarding the pit.


2. In a bowl, combine the sugar, dark rum, grated lime rind, and fresh lime juice. Mix well until the sugar is dissolved.


3. Add the mango slices to the bowl, gently mixing to ensure each piece is coated with the marinade.


4. Chill the mixture in the refrigerator for a couple of hours, allowing the flavors to meld beautifully.


5. Serve the mangoes alone in chilled glasses or over generous scoops of vanilla ice cream for an indulgent treat.


Difficulty Rating: 3/10
Classification: Dessert

Embrace the nostalgia and share this tropical delight with your loved ones, creating new memories that will be cherished for years to come. Whether enjoyed on a balmy evening or as a refreshing end to a meal, Mangoes with Rum and Ice Cream is a testament to the simple joys of life.

Read more about Appetizers

Read more about Main Dishes

Read more about Desserts

Curried Cauliflower Gratin | Made by Meaghan Moineau

Curried Cauliflower Gratin | Made by Meaghan Moineau

Title: A Journey of Flavors: Curried Cauliflower Gratin
Description: Dive into the rich, aromatic world of Curried Cauliflower Gratin, a dish that combines the earthy essence of cauliflower with the warmth of exotic spices. Discover a family story that adds a touch of nostalgia to this delightful recipe, perfect as a main dish for any occasion. With a difficulty rating of 5 out of 10, this recipe promises a rewarding culinary adventure.

---


Curried Cauliflower Gratin: A Nostalgic Culinary Journey

There’s something inherently magical about the way certain dishes can transport us back to cherished moments in time. For me, Curried Cauliflower Gratin is more than just a delightful blend of flavors; it's a doorway to fond family gatherings where laughter echoed through the kitchen and the scent of spices filled the air.


Ingredients:

- 1 whole cauliflower


- 2 tablespoons peanut oil


- 1 shallot, finely chopped


- 2 cloves garlic, minced


- 1 tablespoon fresh ginger, grated


- 1 teaspoon ground cumin


- 1 teaspoon curry powder


- 1/2 teaspoon ground cardamom


- 1/2 teaspoon ground nutmeg


- 1/4 teaspoon cinnamon


- 1 teaspoon kosher salt


- 2 tablespoons flour


- 1 can (13.5 oz) coconut milk


- 1 tablespoon cumin seeds


- 1/2 cup breadcrumbs


- 2 tablespoons unsalted butter, melted


- Fresh cilantro, minced, for garnish


Instructions:
1. Prepare Your Workspace: Preheat the oven to 400°F. Butter an 8x8-inch baking dish and set it aside.
2. Steam the Cauliflower: Gently steam the whole cauliflower until it's tender but not overly soft—about 15 minutes. Once cooled, slice the cauliflower horizontally.
3. Create the Flavor Base: In a medium saucepan over medium heat, warm the peanut oil. Add the ginger, shallot, and garlic, and sauté for 3 to 4 minutes until fragrant and slightly golden.
4. Spice it Up: Introduce the ground cumin, curry powder, cardamom, nutmeg, and cinnamon to the saucepan. Sauté the spices for about 3 minutes until their aromas blossom.
5. Thicken the Sauce: Sprinkle in the flour, stirring to combine for about 2 minutes. Gradually whisk in the coconut milk and add the salt, allowing the mixture to simmer and thicken for 3 to 5 minutes.
6. Assemble the Gratin: Layer the cauliflower slices with the curry cream in your prepared baking dish. Scatter the cumin seeds and breadcrumbs over the top.
7. Add the Finishing Touches: Drizzle the breadcrumbs with melted butter to ensure a crispy, golden finish. Bake for 25 to 30 minutes until the gratin is bubbling and golden brown.
8. Garnish and Serve: Once out of the oven, sprinkle the dish generously with fresh cilantro. Serve warm and enjoy!
A Family Memory:

Growing up, our family kitchen was the heart of the home, a place where stories were shared and recipes were passed down. I vividly remember one Sunday afternoon when my grandmother decided to teach me the secrets of her Curried Cauliflower Gratin. Her eyes would twinkle with joy as she recounted tales of her own mother, who had introduced her to the aromatic world of spices.


The moment the gratin hit the table, the room was filled with groans of delight, the creamy texture and complex flavors a testament to the love and care baked into every bite. To this day, every time I prepare this dish, I am reminded of those precious moments and the legacy of culinary tradition.


Difficulty Rating: 5/10
Classification: Main Dish

---


This Curried Cauliflower Gratin is a perfect marriage of tradition and taste, offering a unique spin on a classic comfort food. Whether you're sharing it with family or introducing it to friends, it’s a dish that's sure to leave an impression, sparking conversations and creating memories of your own.

Read more about Appetizers

Read more about Main Dishes

Read more about Desserts

No-bake Toasted Coconut Chocolate Cake with Chocolate Macaroon Cookies | Made by Meaghan Moineau

No-bake Toasted Coconut Chocolate Cake with Chocolate Macaroon Cookies | Made by Meaghan Moineau

Title: A Slice of Nostalgia: No-Bake Toasted Coconut Chocolate Cake with Chocolate Macaroon Cookies
Description: Dive into the delightful world of our No-Bake Toasted Coconut Chocolate Cake, paired perfectly with Chocolate Macaroon Cookies. This guilt-free dessert, enriched with the goodness of avocados, coconut, and dark carob powder, promises to be a crowd-pleaser for all occasions. Join us as we blend culinary creativity with cherished family memories, creating not just a dish, but an experience.

---


No-Bake Toasted Coconut Chocolate Cake with Chocolate Macaroon Cookies


A Journey Through Flavors and Memories


Few things evoke emotions quite like the scents and flavors of a beloved family recipe. For me, this No-Bake Toasted Coconut Chocolate Cake with Chocolate Macaroon Cookies is more than just a dessert; it's a portal to treasured moments spent in my grandmother's cozy kitchen.


Ingredients:


- 1 cup avocados


- ½ cup dark carob powder


- 1 cup chocolate chips


- 1 cup coconut


- ½ cup coconut oil


- 1 cup dates


- ¼ cup maple syrup


- ½ cup peanut butter


- 1 cup pecans


- 1 cup unsweetened coconut


- 1 tsp vanilla bean extract


Instructions:


Crust:
1. Optional Step: Begin by soaking the pecans for at least an hour to soften them, enhancing their natural sweetness.

2. In a blender or food processor, pulse the pecans and dates until finely chopped.


3. Press this mixture into the base of your preferred pan, creating an even layer for your cake's crust.


4. Place the pan in the fridge, allowing the crust to firm up as you prepare the filling.


Filling:

1. In your food processor or blender, combine the dark carob powder, ripe avocados, maple syrup, and coconut oil.


2. Blend until the mixture is silky smooth, with a consistency reminiscent of a decadent chocolate mousse.


3. Pour the filling over the prepared crust, spreading it evenly.


Topping:

1. Sprinkle a generous layer of shredded unsweetened coconut and chocolate chips over the top.


2. For the macaroon cookies, blend coconut, peanut butter, and vanilla bean extract until well combined. Form small cookie shapes and place them on top of the cake.


3. Refrigerate the cake for at least 2 hours or until fully set.


Family Story: A Nostalgic Touch


Every summer, my grandmother would gather the family for an afternoon of baking and storytelling. Her kitchen was a haven, filled with laughter, the sweet aroma of chocolate, and tales from her youth. One particular story that stayed with me was about her first attempt at making a no-bake cake during the sweltering heat of July. With no air conditioning, she had to get creative to avoid turning on the oven. Her ingenuity led to the creation of this very recipe.


I remember watching her blend the ingredients with a twinkle in her eye, recounting how she once surprised my grandfather with this cake on their anniversary. The delight in her voice as she shared how he had been amazed at its rich taste and creamy texture without any baking was infectious. This memory, much like the recipe, has been passed down through generations, serving as a reminder of the simple joys and love that bind us.


Difficulty Rating: 4/10


This recipe is straightforward, perfect for both novice and experienced cooks looking to indulge in a deliciously healthy treat without the fuss of baking.


Classification: Dessert


Indulge in this rich, velvety dessert that stays true to the essence of homemade goodness. Whether it's a family gathering or a quiet evening treat, this No-Bake Toasted Coconut Chocolate Cake with Chocolate Macaroon Cookies is sure to become a staple in your dessert repertoire, creating memories for years to come.

Read more about Appetizers

Read more about Main Dishes

Read more about Desserts

Instant Pot Chicken Taco Soup | Made by Meaghan Moineau

Instant Pot Chicken Taco Soup | Made by Meaghan Moineau

Title: Warm Up Your Evenings with Instant Pot Chicken Taco Soup: A Flavorful Journey Down Memory Lane
Description: Dive into the heartwarming flavors of our Instant Pot Chicken Taco Soup, a delightful and easy-to-make main dish that brings family memories and comfort to your table. Perfect for busy weeknights, this soup is rich with spices and packed with nutritious ingredients that will surely make it a family favorite.

---


Instant Pot Chicken Taco Soup: A Nostalgic Culinary Experience


As the leaves begin to fall and the days grow shorter, there's nothing quite like the comforting embrace of a steaming bowl of soup. Today, I'm thrilled to share with you a recipe that not only warms the body but also the soul: Instant Pot Chicken Taco Soup. This dish is a symphony of flavors, blending the zest of Mexican spices with the wholesome goodness of chicken and vegetables. It’s a main dish that’s as easy to prepare as it is delicious, with a difficulty rating of just 3 out of 10.


Ingredients for a Flavor-Packed Bowl


- Boneless, skinless chicken breasts


- 1 can of black beans, drained and rinsed


- 1 can of corn, drained


- 1 can of green chilis


- 1 can of diced tomatoes, including juice


- 2 tablespoons chili powder


- 1 tablespoon dried cilantro


- 1 green bell pepper, diced


- 2 green onions, sliced


- 1 tablespoon olive oil


- 1 onion, diced


- 2 cups of water


Instructions: A Quick and Easy Preparation


1. Sauté the Vegetables: Press the 'Sauté' button on your Instant Pot and heat the olive oil. Add the diced onion and bell pepper, sautéing until they become translucent and fragrant.
2. Combine the Ingredients: Add the canned tomatoes (including their juice) and water to the pot, making sure to scrape any delicious bits from the bottom. This step ensures a flavorful base and prevents sticking.
3. Add Main Ingredients: Place the chicken breasts in the pot, followed by chili powder, corn, black beans, sliced green onions, green chilis, and half a cup of cilantro.
4. Cook Under Pressure: Lock the lid of the Instant Pot and press the 'Manual' or 'Pressure Cook' button, setting the time for 15 minutes.
5. Release and Shred: Once the time is up, do a quick release until the valve drops. Unlock the lid and carefully shred the chicken using two forks. Let the soup simmer for an additional 5 minutes to fully meld the flavors.
6. Serve and Enjoy: Ladle the soup into bowls and customize with your favorite toppings like sour cream, cheese, or avocado for an added touch of creaminess and flavor.

A Trip Down Memory Lane


This recipe holds a special place in my heart, as it takes me back to cozy winter evenings spent with my family. I vividly remember the aroma of spices wafting through our kitchen as my grandmother prepared a similar dish. The warmth and love she infused into her cooking were palpable with every bite. As we gathered around the dinner table, sharing stories and laughter, this soup became more than just a meal; it was a tradition, a moment of togetherness that I cherish deeply.


Conclusion


Our Instant Pot Chicken Taco Soup is more than just a dish; it's a celebration of flavors and memories. Whether you're a seasoned cook or a beginner, this recipe is designed to be simple yet satisfying, making it perfect for a delightful family dinner. So, gather your loved ones, and let this soup bring a taste of nostalgia and warmth to your table. Enjoy every spoonful!

Read more about Appetizers

Read more about Main Dishes

Read more about Desserts

Easy Eclairs | Made by Meaghan Moineau

Easy Eclairs | Made by Meaghan Moineau

Sweet Nostalgia: Crafting Easy Eclairs at Home


Introduction


There's something undeniably magical about sinking your teeth into a perfectly crafted éclair. The crisp choux pastry, the decadent pastry cream, and the glossy chocolate ganache create a symphony of flavors and textures that dance on your palate. Today, we're diving into the delightful world of eclairs with a recipe that is not only easy to follow but also rich in nostalgia. Join me as I share my family’s cherished recipe for Easy Eclairs, a dessert that has been a staple in our family gatherings.


A Taste of Memories: The Story Behind the Recipe


Growing up, my grandmother's kitchen was always filled with the inviting aroma of freshly baked goods. Sunday afternoons were reserved for baking, and eclairs were a family favorite. I remember standing on a stool, barely able to reach the counter, watching in awe as my grandmother expertly piped the choux pastry onto the baking tray. Her hands moved with a grace that only years of practice could achieve. The kitchen would fill with laughter and stories, and the sweet anticipation of biting into a freshly made éclair was a feeling I'll never forget. Today, whenever I make these eclairs, I am transported back to those warm afternoons, surrounded by love and the comforting hum of family chatter.


Recipe: Easy Eclairs


Ingredients


Choux Pastry:

- 1 cup water

- 1/2 cup full cream milk


- 1/2 cup butter


- 1 tablespoon sugar


- 1/4 teaspoon salt


- 1 cup plain flour


- 4 eggs


Pastry Cream:

- 2 cups milk

- 1/2 cup sugar


- 4 egg yolks


- 1/4 cup cornstarch


- 1/2 cup cream


Chocolate Ganache:

- 1 cup cream

- 200g dark chocolate, chopped


Instructions


Choux Pastry:

1. Preheat your oven to 180°C (356°F). Line a baking tray with parchment paper or a baking mat.

2. In a saucepan, combine water, milk, butter, sugar, and salt. Bring to a boil over medium heat.


3. Stir in flour quickly and continue to cook over low heat, stirring constantly, until the mixture pulls away from the sides of the pan and forms a ball.


4. Transfer the dough to a mixing bowl. Beat on low speed with an electric mixer for about 3 minutes to cool slightly.


5. Add eggs one at a time, beating well after each addition.


6. Cover the bowl with plastic wrap and chill in the fridge for at least 30 minutes (up to 24 hours if needed).


7. Fill the chilled dough into a piping bag. Pipe into small logs about 5 cm in length on the baking tray.


8. Bake for 20-25 minutes until golden brown. Pierce a small hole to allow steam to escape and prevent sogginess. Optionally, return to the oven for another 2 minutes to dry.


9. Allow to cool on a rack.


Pastry Cream:

1. Place all ingredients in a saucepan and whisk until combined.

2. Heat over medium heat, stirring continuously, until the mixture thickens into a paste.


3. Remove from heat and transfer to a bowl. Cover with plastic wrap and chill until fully set.


4. Once chilled, fill a piping bag with the pastry cream and fill the cooled eclairs.


Chocolate Ganache:

1. Heat cream in a saucepan until just about boiling.

2. Remove from heat and stir in chopped dark chocolate until melted and smooth.


3. Allow to cool and thicken. Dip or drizzle over filled eclairs.


Difficulty Rating: 5/10


Classification: Dessert


Conclusion


Crafting these easy eclairs is not just about the end product; it’s about the journey through memories and the joy of creating something delicious from scratch. Whether you're an experienced baker or a novice, this recipe is a delightful way to bring a touch of elegance to your dessert table. So why not gather your loved ones, share stories, and create your own sweet memories over a batch of homemade eclairs? Happy baking!

Read more about Appetizers

Read more about Main Dishes

Read more about Desserts