Banana & Oreo Muffin | Made by Meaghan Moineau

Banana & Oreo Muffin | Made by Meaghan Moineau

Title: Nostalgia Baked Fresh: Banana & Oreo Muffins
Description: Dive into the delightful fusion of flavors with our Banana & Oreo Muffin recipe! This scrumptious dessert combines the moist sweetness of bananas with the beloved crunch of Oreo cookies, creating a treat that’s sure to bring back fond memories. Perfect as a comforting dessert, this easy-to-follow recipe will transport you back to cozy family gatherings, all while tantalizing your taste buds. Discover the joy of baking and sharing a piece of nostalgia with your loved ones.

---


Banana & Oreo Muffin Recipe


Difficulty: 3/10
Category: Dessert

Ingredients:

- 1/2 cup butter, softened

- 3/4 cup sugar


- 1 1/2 cups all-purpose flour


- 1 tsp baking powder


- 1/2 tsp baking soda


- 1 large egg


- 1/2 cup condensed milk


- 2 ripe bananas, mashed


- 1 tsp vanilla essence


- 1/2 tsp banana essence


- 10 Oreo cookies


Instructions:

1. Prepare the Dry Ingredients:

Sift the flour, baking powder, and baking soda together in a medium-sized bowl and set aside.


2. Crush the Oreos:

Remove the cream from the Oreo cookies. Place the cookies in a ziplock bag and crush them into fine crumbs using a rolling pin.


3. Cream the Butter and Sugar:

In a large mixing bowl, use an electric beater to cream the butter and sugar until the mixture is light and fluffy. This should take about 3 minutes on medium speed.


4. Add Wet Ingredients:

Beat in the egg, ensuring the mixture is well combined with no egg traces. Add the mashed bananas, vanilla essence, and condensed milk. Give it a quick whisk to blend it all together.


5. Combine with Dry Ingredients:

Lower the mixer speed and gradually add the flour mixture to the wet ingredients. Blend until the batter is smooth.


6. Incorporate Oreo Crumbs:

Gently fold the crushed Oreo crumbs into the batter until well combined.


7. Prepare for Baking:

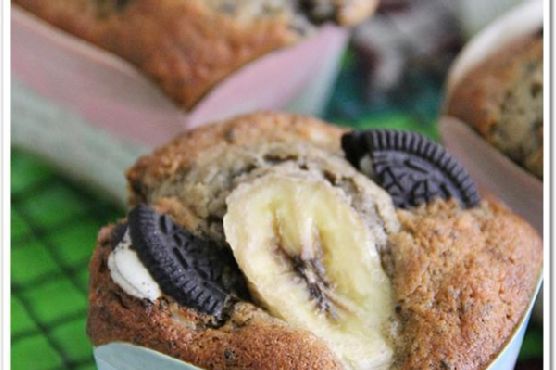
Scoop the batter into prepared muffin cups, filling each about 3/4 full. Top with extra banana slices and Oreo cookie pieces for added flair.


8. Bake:

Preheat the oven to 180°C (350°F). Bake the muffins for 20-25 minutes or until a toothpick inserted into the center comes out clean.


---


A Whiff of Nostalgia


Growing up, Sunday afternoons were always a time for family gatherings at Grandma's house. The aroma of freshly baked goods would greet us as we walked through the door, an invisible hug that promised warmth and love. Among the spread of treats, her Banana & Oreo Muffins stood out, not just for their heavenly taste but for the laughter and stories shared around the kitchen table as we savored each bite.


I remember the first time I helped her bake these muffins. My small hands were clumsy, scattering flour and sugar across the countertop, but Grandma's patient guidance turned it into an adventure rather than a chore. As we crushed the Oreos, she would tell tales of her own childhood, painting vivid pictures of a time long past. Those afternoons taught me the power of food to bring people together, to forge connections across generations.


Today, as I bake these muffins in my own kitchen, the memories come flooding back. Each step of the recipe is a breadcrumb trail leading back to those cherished moments. Every bite is a reminder of the joy and love that flavored my childhood, and I hope it can bring a taste of that nostalgia to your home too.


---


Whether you're a seasoned baker or a beginner, this Banana & Oreo Muffin recipe is a delightful way to create new memories while honoring the old. Enjoy the process and the delicious results!

Read more about Appetizers

Read more about Main Dishes

Read more about Desserts

Fusilli With Zucchini Flowers, Ricotta and Saffron | Made by Meaghan Moineau

Fusilli With Zucchini Flowers, Ricotta and Saffron | Made by Meaghan Moineau

A Taste of Nostalgia: Fusilli With Zucchini Flowers, Ricotta, and Saffron


A Delightful Culinary Journey


In the heart of Italian cuisine, simplicity meets elegance in a dish that encapsulates the vibrant flavors of summer: Fusilli with Zucchini Flowers, Ricotta, and Saffron. This delightful recipe not only brings together the rich and creamy textures of ricotta and the aromatic warmth of saffron but also weaves a tapestry of memories that will transport you back to cherished family gatherings.


Ingredients That Dance on Your Palate


- 1 red onion, finely chopped


- 2 tablespoons of extra virgin olive oil (EVO)


- 1/4 cup sliced almonds


- A pinch of salt


- 8 zucchini flowers, stems and pistils removed, cut into strips


- 200g Fusilloro Verrigni or Fusilloni


- 1/2 cup ricotta cheese


- A generous pinch of saffron


- Salt and pepper to taste


Instructions: Crafting a Memory


1. Sauté with Love: Begin by washing and finely chopping the red onion. In a pan, gently dry the onion with a drizzle of extra virgin olive oil and a pinch of salt. Add the sliced almonds, allowing them to toast lightly, enhancing their nutty aroma.
2. A Floral Touch: Discard the stem and pistil of the zucchini flowers, slicing them into delicate strips. Add these to the pan, stirring briefly before turning off the heat. The flowers will imbue the mixture with a subtle sweetness.
3. Perfect Pasta: In a pot of boiling salted water, drop the Fusilloro Verrigni or Fusilloni. Cook for 9 minutes until al dente, ensuring the pasta retains a satisfying bite.
4. Creamy Dream: In a bowl, mix the ricotta cheese with saffron, adding a spoonful of pasta cooking water to achieve a smooth, creamy consistency. Season with salt and pepper.
5. Bringing It All Together: Drain the pasta and add it to the pan with the sautéed zucchini flowers. Pour in the saffron cream, mixing gently to coat the fusilli in the luscious sauce.
6. Serve and Savor: Plate your creation immediately, savoring each bite as the flavors meld together harmoniously.

Difficulty Rating: 4/10


This dish is approachable for most home cooks and promises an impressive result with minimal effort. It makes for a beautiful Main Dish that celebrates the season's bounty.

A Walk Down Memory Lane


Growing up, summer Sundays were synonymous with family lunches at Nonna's house. Her kitchen, filled with laughter and the aroma of fresh ingredients, was a sanctuary where time seemed to stand still. One of my fondest memories was watching her prepare this very dish, Fusilli with Zucchini Flowers, Ricotta, and Saffron. She would enlist my help to carefully pick zucchini flowers from the garden, teaching me to appreciate the beauty of nature's gifts.


As we cooked side by side, Nonna would share stories of her childhood, painting vivid pictures of bustling Italian markets and sun-drenched fields. Each ingredient held a story, a tradition passed down through generations. Sitting around the table, surrounded by loved ones, the dish was more than just a meal; it was a testament to our heritage, a reminder of the simple joys that bind us together.


This recipe is a homage to those precious moments, an invitation to create your own memories and savor the timeless flavors that connect us all. So, gather your loved ones, and let the magic of Italian cuisine bring a piece of my family's story into your home. Buon appetito!

Read more about Appetizers

Read more about Main Dishes

Read more about Desserts

Creamy Mushrooms Over Soba Noodles (Vegan) | Made by Meaghan Moineau

Creamy Mushrooms Over Soba Noodles (Vegan) | Made by Meaghan Moineau

Title: A Taste of Home: Creamy Vegan Mushrooms Over Soba Noodles
Description: Dive into a comforting, plant-based culinary experience with our Creamy Mushrooms Over Soba Noodles. This vegan dish combines the earthy flavors of mushrooms with a rich, creamy sauce, all elegantly draped over soba noodles. Perfect for a cozy dinner, this recipe is inspired by cherished family memories and is sure to bring warmth to your table.

---


There's something about the aroma of sautéed mushrooms wafting through the kitchen that transports me back to my grandmother's house. As a child, I would sit on the tall stool by the counter, watching her expertly toss ingredients into her well-worn pan, each movement a dance she had perfected over the years. Her version of creamy mushrooms over soba noodles was a family favorite, a dish that brought us together around the table, warming both our hearts and bellies.


Fast forward to today, and I find myself recreating this beloved dish with a modern twist—making it entirely vegan while keeping its comforting essence intact. This recipe, Creamy Mushrooms Over Soba Noodles, is a tribute to those cherished moments and the simple joy of sharing a delicious meal with loved ones.


Ingredients:

- 2 tablespoons Earth Balance buttery spread


- 2 cups cremini mushrooms (or your choice), sliced


- 2 cups white mushrooms, sliced


- 3 cloves garlic, minced


- 2 tablespoons all-purpose flour


- 1 cup unsweetened soy milk


- 1/4 cup white wine


- 1 tablespoon fresh thyme, plus more for garnish


- 1 tablespoon lemon juice


- Salt & pepper to taste


- 8 ounces soba noodles


Instructions:
1. Sauté the Mushrooms: Melt 1 tablespoon of Earth Balance in a sauté pan over medium heat. Add the sliced mushrooms and minced garlic, stirring occasionally until the mushrooms are dark and reduced. Set the mushrooms aside.
2. Make the Roux: In the same pan, melt the remaining tablespoon of Earth Balance. Stir in the all-purpose flour, cooking and stirring for about a minute until it forms a roux to thicken your sauce.
3. Create the Sauce: Slowly add the soy milk to the roux, stirring continuously until the mixture is smooth and thickened. Return the mushrooms to the pan, then add the lemon juice, fresh thyme, salt, and pepper.
4. Add the Wine: Pour in the white wine and continue to cook the sauce until it reduces and reaches a pleasant, creamy consistency.
5. Serve: Cook the soba noodles according to package instructions, then divide them into bowls. Ladle the creamy mushroom sauce over the noodles and garnish with sprigs of fresh thyme if desired.
6. Enjoy: Relish the flavors and memories with each bite.

---


Difficulty: 4/10
Classification: Main Dish

---


This recipe is more than just a meal; it's a journey back to simpler times, a connection to family, and a celebration of plant-based cooking. Whether you're sharing it with loved ones or savoring it solo, this dish promises to deliver warmth, nostalgia, and satisfaction. Bon appétit!

Read more about Appetizers

Read more about Main Dishes

Read more about Desserts

Homemade Apple Almond Granola Bars | Made by Meaghan Moineau

Homemade Apple Almond Granola Bars | Made by Meaghan Moineau

Title: Crunchy Comfort: Homemade Apple Almond Granola Bars for Every Heartfelt Moment
Description: Dive into the delightful world of homemade apple almond granola bars. This easy-to-make recipe not only offers a delicious, nutritious snack but also brings back cherished family memories. Perfect for breakfast on the go or a healthy dessert, these granola bars are sure to become a staple in your kitchen.

---


There's something inherently comforting about the aroma of baking apples and cinnamon wafting through the house. It stirs a sense of nostalgia, transporting me back to chilly autumn afternoons spent in my grandmother's warm kitchen. She would be bustling around, preparing various delights for the family. One of my fondest memories is of her apple almond granola bars—a treat that was both simple and satisfying.


A Family Tradition Rekindled

As a child, I eagerly watched my grandmother as she mixed together rolled oats, ground flax seed, and oat bran with a sprinkle of cinnamon, the spices dancing in the air. The sweet touch of honey would follow, bringing everything together into a harmonious blend. My favorite part was helping her chop up the apples and almonds, little tasks that made me feel like an essential part of the culinary process.


Those granola bars were more than just a snack; they were a symbol of love and togetherness. Each bite was infused with the warmth of family gatherings and laughter that echoed through the kitchen—a tradition that I've carried into my own home, recreating that same cozy atmosphere for my children.


Recipe for Homemade Apple Almond Granola Bars
Ingredients:

- 2 cups rolled oats


- 1/4 cup ground flax seed


- 1/4 cup oat bran


- 1/4 cup wheat bran


- 1/4 teaspoon salt


- 1 teaspoon baking powder


- 1 teaspoon cinnamon


- 1/4 cup sugar substitute


- 1/4 cup unsweetened coconut


- 1/2 cup non-fat milk


- 1/4 cup sweet honey


- 1 large egg


- 1 teaspoon vanilla extract


- 1 apple, peeled and chopped


- 1/2 cup almonds, chopped


Instructions:

1. Preheat your oven to 350°F (175°C). Lightly spray a 9x13 inch pan with non-stick cooking spray.


2. In a large mixing bowl, combine the rolled oats, ground flax seed, oat bran, wheat bran, salt, baking powder, cinnamon, sugar substitute, and unsweetened coconut. Stir until all the ingredients are well mixed.


3. Add in the non-fat milk, sweet honey, egg, and vanilla extract. Stir until the mixture is fully combined.


4. Gently fold in the chopped apple and almonds, ensuring they are evenly distributed throughout the mixture.


5. Press the mixture firmly into the prepared pan, creating an even layer.


6. Bake for 15-20 minutes, or until the edges start to brown and the kitchen is filled with a tantalizing aroma.


7. Allow the granola to cool for about 10 minutes. Cut into bars while still warm, then let them cool completely before serving.


Difficulty Rating: 4/10
Classification: Dessert

These homemade apple almond granola bars are a testament to the timeless bond between family and food. Easy to make yet packed with flavor and nutrition, they're perfect for a quick breakfast, a healthy dessert, or a nostalgic snack that takes you back to simpler times. Share this recipe with loved ones, and continue creating cherished memories in your kitchen.

Read more about Appetizers

Read more about Main Dishes

Read more about Desserts

Hyderabadi baghara Baingan | Made by Meaghan Moineau

Hyderabadi baghara Baingan | Made by Meaghan Moineau

A Culinary Journey to India: Mastering Hyderabadi Baghara Baingan


The Perfect Blend of Tradition and Flavor


Welcome to a tantalizing journey through the heart of Indian cuisine with our authentic Hyderabadi Baghara Baingan recipe. This exquisite eggplant curry, infused with aromatic spices and a hint of tangy tamarind, promises to transport your taste buds straight to the vibrant streets of Hyderabad. Whether you're a seasoned chef or a home cook looking to explore new flavors, this dish will be a delightful addition to your culinary repertoire.


A Family Heirloom: Memories of Baghara Baingan


Growing up, the aroma of Baghara Baingan wafting through the house signaled a special occasion. My grandmother, a culinary wizard in her own right, would meticulously prepare this dish for family gatherings. I remember sitting in the kitchen, watching her deftly handle the spices, her hands working magic over the sizzling pan. The sound of cumin seeds crackling, the rich fragrance of coconut and chilies, and the sight of eggplants simmering in a luscious sauce are memories etched in my heart.


One particular summer afternoon, as the monsoon rains danced outside, my grandmother invited me to help her in the kitchen. It was a rite of passage, she said, to learn the family recipe. Together, we crafted the perfect blend of spices, her stories weaving the rich tapestry of our heritage. Every bite of Baghara Baingan was a taste of home, a reminder of the love and warmth that defined our family gatherings.


Ingredients


- Baby eggplants – 10-12


- Red Kashmiri chilies – 3-4


- Coconut


- Coriander seeds


- Cumin seeds


- Curry leaves – 8-10


- Garlic


- Ginger – 1


- Tamarind – a lime-sized ball


- Oil


- Onion


- Salt


- Nigella seeds


- Sesame seeds


- Turmeric


- Jaggery


- Peanuts


- Cashew nuts


Instructions


1. Prepare the Eggplants: Wash the eggplants and pat them dry. Slit them lengthwise into four, keeping the stems intact to ensure they remain joined. Set aside.
2. Prepare the Spice Paste: Heat a teaspoon of oil in a pan and add cumin seeds, peanuts, and cashew nuts. Fry for a few seconds. Add ginger, garlic, and chopped onion, frying for a minute. Incorporate turmeric, coriander seeds, coconut, and Kashmiri red chilies. Cook until the mixture turns brown. Allow it to cool completely, then blend into a fine paste with a little water. Set aside.
3. Cook the Eggplants: Heat oil in a thick-bottomed pan and fry the eggplants until brown and tender. Remove and keep aside.
4. Assemble the Curry: In the same oil, add nigella seeds, allowing them to crackle. Stir in curry leaves and fry briefly. Add the prepared spice paste, tamarind pulp, salt, and jaggery. Mix well.
5. Simmer: Add the sautéed eggplants and half a cup of water. Cover and cook on low heat until the eggplants are cooked through and soft.
6. Serve: Enjoy the curry hot with rice or rotis.

Difficulty Rating


This recipe is rated a 7 out of 10 in terms of difficulty due to the precise handling of spices and the delicate cooking of eggplants. It's categorized as a Main Dish, perfect for a flavorful dinner that’s sure to impress.


Conclusion


Hyderabadi Baghara Baingan is more than just a dish; it's a celebration of culture and family bonds. As you recreate this recipe in your kitchen, may it bring the same joy and warmth to your table as it has to mine. Enjoy your culinary adventure!

Read more about Appetizers

Read more about Main Dishes

Read more about Desserts

Easy Homemade Oreo Cookies | Made by Meaghan Moineau

Easy Homemade Oreo Cookies | Made by Meaghan Moineau

Title: Nostalgic Delights: Easy Homemade Oreo Cookies to Sweeten Your Day
Description: Dive into the delightful world of homemade treats with our Easy Homemade Oreo Cookies recipe. This simple yet rewarding dessert will not only satisfy your sweet tooth but also transport you back to fond family memories. Discover how a few ingredients can come together to create magic in your kitchen, and relive the joy of baking with loved ones.

---


There's something undeniably heartwarming about biting into a freshly baked cookie. The soft crunch, the creamy filling, and the burst of sweetness all come together to create a moment of pure joy. Our Easy Homemade Oreo Cookies recipe is a testament to this simple pleasure, and it comes with a sprinkle of nostalgia.


Ingredients:

- 8 oz cream cheese


- 2 eggs


- 1 box of chocolate cake mix


- 1 cup icing sugar


- ½ cup margarine


- 2 tablespoons milk


- ¼ cup oil


- 1 teaspoon vanilla extract


Instructions:

1. Preheat your oven to 325°F (163°C).


2. In a gigantic bowl, combine the cream cheese, eggs, chocolate cake mix, margarine, milk, oil, and vanilla extract. Mix thoroughly. If the bowl seems too crowded, consider mixing in parts to ensure everything is well-blended.


3. Roll the dough into small balls. Remember, the smaller the balls, the more cookies you'll have to enjoy!


4. Place the dough balls on a baking sheet and bake for 8 to 10 minutes. Once done, gently flatten them with a spatula.


5. Transfer the cookies to wire racks and let them cool completely.


6. For the filling, beat the icing sugar with a bit of cream cheese until smooth. Feel free to get creative with flavors and colors—try mint extract with light green food coloring for a refreshing twist.


7. Once cooled, spread the icing between two cookies to form delightful sandwiches.


8. Store your homemade Oreo cookies in the refrigerator or freezer to keep them fresh.


A Sweet Family Memory:

I remember the first time I made these cookies with my grandmother during one rainy afternoon. The house was filled with the comforting aroma of chocolate, and the sound of rain tapping against the windows created a cozy ambiance. We laughed as flour dusted our noses and chocolate smeared our aprons. My grandmother, with her gentle hands, showed me how to roll the dough just right.


After baking, we sat at the kitchen table, assembling the cookies with our chosen mint filling, each bite taking us to a world of sweet nostalgia. It wasn’t just about the cookies; it was about the time spent together, the stories shared, and the love poured into every step. These homemade Oreo cookies became a family favorite, a treat that brought us together time and time again.


Difficulty Rating: 3/10
Classification: Dessert

Whether you’re recreating a cherished family memory or starting a new tradition, these Easy Homemade Oreo Cookies are sure to bring smiles to your table. Enjoy every bite, and remember—the best ingredients are always love and laughter.

Read more about Appetizers

Read more about Main Dishes

Read more about Desserts

Coffee Cream Martinis | Made by Meaghan Moineau

Coffee Cream Martinis | Made by Meaghan Moineau

Sip into Nostalgia: The Irresistible Coffee Cream Martinis


Description

Indulge in the luxurious blend of rich coffee and creamy liqueurs with our Coffee Cream Martinis. This decadent dessert cocktail, dusted with a coffee-sugar rim and drizzled with chocolate, is perfect for savoring cherished memories. Whether you're hosting a dinner party or simply unwinding after a long day, this recipe will transport you to a moment of warmth and nostalgia. Easy to make and even easier to enjoy, these martinis promise to be a delightful end to any evening.

---


A Sip of Memory: The Family Tradition of Coffee Cream Martinis


Coffee Cream Martinis have always been more than just a delicious drink for my family—they're a cherished tradition passed down through generations. I remember my grandmother pulling out her vintage martini glasses every holiday season, the anticipation of her signature cocktail bringing our family together in a way that nothing else could.


As a child, I'd watch in awe as she expertly mixed the ingredients, her hands moving with practiced grace. The kitchen would fill with the rich aroma of coffee and the sweet scent of chocolate, a sensory delight that signaled the festivities had truly begun. Her laughter would echo through the room as she rimmed each glass with a mixture of sugar and coffee grounds, ensuring every sip was perfect.


While the adults enjoyed their Coffee Cream Martinis, I would sit at the kitchen table, sipping on my own "mocktail" version, feeling like a part of the grown-up world. Those moments were filled with stories of past holiday gatherings, laughter, and love, creating a tapestry of memories that I treasure to this day.


Now, as I prepare these martinis for my own family, I feel a connection to my grandmother and the traditions she instilled. The simple act of mixing vodka, Baileys, and Kahlua together, and watching the chocolate syrup cascade down the inside of the glass, brings a piece of the past into the present. It's a reminder that, while life may change, the comfort of family and the joy of shared moments remain constant.


---


Recipe: Coffee Cream Martinis


Ingredients:

- Granulated sugar

- Ground coffee


- Vodka


- Baileys Irish Cream


- Kahlua


- Chocolate syrup


- Ice cubes


Instructions:

1. Prepare the Rim: In a small bowl, combine the granulated sugar and ground coffee, mixing well. Spoon a layer of the mixture onto a plate. Moisten the rim of a martini glass with water, then hold it upside down and press into the sugar-coffee mixture to create a nice rim. Set aside.
2. Mix the Martini: Fill a martini shaker three-fourths full with ice cubes. Add vodka, Baileys, and Kahlua. Shake vigorously until condensation forms on the outside of the shaker.
3. Serve: Drizzle chocolate syrup on the inside of the prepared martini glass. Strain the martini mixture into the glass and serve immediately.

---


Difficulty: 3/10


Classification: Dessert


Indulge in a sip of nostalgia and create cherished memories with every glass of Coffee Cream Martinis. Whether you're revisiting old family traditions or starting new ones, this delightful cocktail is sure to become a beloved staple in your home. Cheers to the joy of family and the timeless pleasure of a well-crafted martini!

Read more about Appetizers

Read more about Main Dishes

Read more about Desserts

Thai Street Vendor Salmon Skewers | Made by Meaghan Moineau

Thai Street Vendor Salmon Skewers | Made by Meaghan Moineau

Title: Savoring Memories: How Thai Street Vendor Salmon Skewers Became Our Family’s Culinary Tradition
Description: Dive into the vibrant flavors of Thai Street Vendor Salmon Skewers, a dish that seamlessly blends the tangy, spicy, and sweet notes of Thai cuisine. With ingredients like yu choy, brown sugar, and fresh ginger, this dish is not only a feast for your taste buds but also a nostalgic journey back to cherished family moments. Rated a 6 out of 10 in difficulty, this main dish promises to captivate your senses and enrich your dining experience.

---


There’s something about the tantalizing aroma of grilled salmon, kissed by the heat of a summer barbecue, that transports me back to lazy Sunday afternoons at my grandmother's house. Our family, bound by love and an insatiable appetite for good food, would gather around the grill, eagerly awaiting the unveiling of our favorite dish: Thai Street Vendor Salmon Skewers.


The Essence of Thai Flavors

This dish is a beautiful marriage of bold Thai flavors and the simplicity of grilled salmon. Each bite is a delightful explosion of spicy, sweet, and savory notes, thanks to the harmonious blend of chili sauce, brown sugar, and fish sauce. Fresh ginger and dried ground turmeric add layers of warmth and earthiness, while the zest and juice of lime bring an invigorating brightness.


A Family Tradition

The memory of my grandmother meticulously preparing the skewers is etched in my mind. She would start by removing the skin from the salmon fillet, her hands moving with practiced precision, trimming away any brown fatty areas. As she threaded the bamboo skewers through the fish, her stories would flow as easily as her laughter.


“This recipe,” she would say, “is inspired by the bustling streets of Bangkok, where vendors expertly grill skewers over open flames, creating magic with just a handful of ingredients.” We would watch with eager anticipation as she prepared the sauce, mincing fresh ginger through a garlic press, an ingenious trick she learned from a friendly street vendor during her travels.


The Art of Marination

The marination process was a lesson in patience. My grandmother would place the salmon skewers in a deep bowl, generously coating them with the aromatic sauce. “The secret,” she would whisper, “is in the marination; let it soak up the flavors, but not too long, else the lime will cook the fish.”


We would wait, the fridge door opening and closing as we checked the clock, until the skewers were ready to meet the grill. The sizzle of salmon hitting the hot grill was music to our ears, the aroma an irresistible prelude to the feast.


A Delightful Pairing

Served with chilled raw yu choy, the skewers were a revelation. We would wrap the salmon pieces in the crisp greens, drizzling them with the reserved sauce, creating a bite that was both refreshing and indulgent.


A Culinary Legacy

Today, as I prepare Thai Street Vendor Salmon Skewers in my own kitchen, I feel a deep sense of connection to my roots. This dish, rated a 6 out of 10 in difficulty, is more than just a family recipe—it is a legacy, a cherished memory shared with loved ones, and a testament to the rich tapestry of flavors that define Thai cuisine. Every time I grill these skewers, I am reminded of my grandmother, her stories, and the warmth of our family gatherings—a tradition I am proud to continue.


Whether you’re a seasoned chef or a culinary novice, these skewers promise an unforgettable dining experience. Gather your family, fire up the grill, and let the magic of Thai Street Vendor Salmon Skewers create new memories for you to cherish.

Read more about Appetizers

Read more about Main Dishes

Read more about Desserts

Cinnamon Rolls by Bing | Made by Meaghan Moineau

Cinnamon Rolls by Bing | Made by Meaghan Moineau

Title: The Heartwarming Aroma of Homemade Cinnamon Rolls: A Nostalgic Recipe for Family Gatherings
Description: Dive into the world of comfort and nostalgia with this delightful cinnamon roll recipe. Perfect for family gatherings, these rolls combine the warmth of cinnamon, the crunch of pecans, and the sweetness of honey-infused icing, creating a culinary masterpiece that will be cherished for generations. Rated 6/10 in difficulty, these cinnamon rolls serve as a delightful dessert that promises to bring a smile to everyone’s face.

---


The Heartwarming Aroma of Homemade Cinnamon Rolls: A Nostalgic Recipe for Family Gatherings

There's something undeniably comforting about the aroma of freshly baked cinnamon rolls wafting through the air. It's a scent that instantly transports me back to my grandmother's kitchen, where love was the secret ingredient in every dish she prepared. Her cinnamon rolls were more than just a dessert; they were a symbol of family, warmth, and cherished memories.


Every Sunday, our family would gather at my grandmother's house for brunch. The highlight of the meal was always her famous cinnamon rolls. I remember watching her in awe as she skillfully mixed the dough, her hands moving with a practiced grace that came from years of experience. The kitchen was filled with laughter and stories, creating a tapestry of memories that are as vivid today as they were back then.


Ingredients:

- 4 cups whole milk


- 1 cup vegetable oil


- 1 cup sugar


- 2 packets dry active yeast (about 16g, 4.5 teaspoons)


- 9 cups plain flour


- 1 heaping teaspoon baking powder


- 1 scant teaspoon baking soda


- 2 teaspoons salt


- 2 cups whole butter, melted


- 1 cup caster sugar


- 1 cup brown sugar


- 1/4 cup ground cinnamon


- 2 cups chopped pecan nuts


For the Icing:

- 1/4 cup strong coffee


- 1 tablespoon quality honey


- A pinch of salt


- 6 tablespoons melted butter


- 2 cups icing sugar


- 1-2 tablespoons fresh cream


Instructions:

1. Begin by pouring 4 cups of whole milk into a large cooking pot. Add 1 cup of sugar and 1 cup of vegetable oil. Heat over medium flame, stirring until the sugar dissolves. Do not boil. Let the mixture cool to lukewarm, about 38°C.


2. Once lukewarm, sprinkle 2 packets of instant dry yeast on the surface and let it sit for 3 to 5 minutes until it begins to foam.


3. Add 8 cups of plain flour to the mixture and combine until just mixed. Cover with a cloth and let it rise in a warm place for 1 hour.


4. After the dough has doubled in size, punch it down and add the remaining 1 cup of flour, 1 heaping teaspoon of baking powder, 1 scant teaspoon of baking soda, and 2 teaspoons of salt. Mix well and let it rise again for 1 hour in a warm place or 3 hours in the fridge.


5. Roll the dough out into a large rectangle on a floured surface. Spread 2 cups of melted butter evenly over the dough.


6. Sprinkle 1/4 cup of cinnamon, 1 cup of caster sugar, and 1 cup of brown sugar over the buttered dough. Add 2 cups of chopped pecans.


7. Roll the dough lengthwise into a long roll and cut into 1-inch thick rolls.


8. Grease baking pans with melted butter and place the rolls inside, ensuring not to overcrowd them. Let them rise for another hour.


9. Preheat your oven to 180°C and bake the rolls for 15 to 17 minutes.


10. While baking, prepare the icing by mixing 1/4 cup of strong coffee with 1 tablespoon of honey, a pinch of salt, 6 tablespoons of melted butter, 2 cups of icing sugar, and 1-2 tablespoons of fresh cream.


11. Pour the icing over the hot cinnamon rolls and serve.


These cinnamon rolls are more than just a treat; they are a vessel for memories, a testament to the power of food in bringing families together. As you bake them, imagine the laughter and love that will fill your home, just as it did in my grandmother's kitchen all those years ago.


Difficulty: 6/10
Classification: Dessert

Embrace the warmth and nostalgia of this cherished family recipe, and may it bring as much joy to your home as it has to ours.

Read more about Appetizers

Read more about Main Dishes

Read more about Desserts

Oatmeal Pancake (Yummy & Heart Healthy) | Made by Meaghan Moineau

Oatmeal Pancake (Yummy & Heart Healthy) | Made by Meaghan Moineau

Title: "Golden Mornings: The Heartwarming Tradition of Oatmeal Pancakes"
Description: Discover the joy of savoring heart-healthy oatmeal pancakes, a dish that's as comforting as a childhood memory. With ingredients like blueberries and agave, this recipe is not only delicious but also packed with nutrients. Perfect for breakfast or brunch, these pancakes will transport you back to cozy family mornings.

---


Golden Mornings: The Heartwarming Tradition of Oatmeal Pancakes

Is there anything quite like waking up to the smell of pancakes sizzling on a Sunday morning? In our family, oatmeal pancakes have always been more than just a breakfast staple; they’re a symbol of warmth, love, and cherished memories. Today, I’m excited to share our special Oatmeal Pancake recipe, a dish that's both delicious and heart-healthy.


Ingredients


- Irish oats
- Fat-free milk
- Egg whites
- Whole wheat multi-purpose flour
- Baking powder
- Agave (or sugar)
- Blueberries
- 100% maple syrup

Instructions


1. Soak the Oats: Start by adding Irish oats to the fat-free milk. Let them soak for 3-4 hours or, for the best results, overnight in the refrigerator. This step ensures the oats are tender and blend seamlessly into the batter.
2. Prepare the Batter: Combine the soaked oats with egg whites, whole wheat multi-purpose flour, baking powder, and agave in a processor or coffee grinder. Blend until smooth and well mixed.
3. Cook the Pancakes: Heat a non-stick pan over medium heat. Pour 5 to 7 spoons of the batter onto the pan, spreading it gently. There’s no need for oil or additional greasing. Flip the pancake after 1 to 2 minutes, once it’s puffy and golden brown.
4. Serve and Enjoy: Top with fresh blueberries and drizzle with 100% maple syrup.

A Nostalgic Note


Growing up, these oatmeal pancakes were a Sunday morning tradition. I remember waking up to the gentle hum of the radio in the kitchen, my mother flipping pancakes with expert precision. The kitchen would be filled with the sweet aroma of maple syrup and the comforting scent of warm oats. My siblings and I would gather around the table, eagerly anticipating the first bite. Those mornings were not just about the food; they were about family, laughter, and the simple joy of being together.


Difficulty: 3/10


This recipe is incredibly easy to make, making it perfect for cooks of all skill levels. With minimal prep and cooking time, you can enjoy a delightful breakfast without the fuss.


Classification: Main Dish


While these pancakes could easily serve as a dessert with the addition of a scoop of vanilla ice cream, we’ve always enjoyed them as a hearty main dish, ideal for starting the day on a healthy and happy note.


This Oatmeal Pancake recipe is more than just a meal; it’s a tradition that brings with it a sense of nostalgia and warmth. Whether you’re making it for yourself or sharing it with loved ones, these pancakes are sure to become a beloved part of your breakfast repertoire. Enjoy the journey of flavors and memories with each bite!

Read more about Appetizers

Read more about Main Dishes

Read more about Desserts

Minted Pea & Spinach Soup | Made by Meaghan Moineau

Minted Pea & Spinach Soup | Made by Meaghan Moineau

Title: A Taste of Nostalgia: Minted Pea & Spinach Soup
Description: Discover the heartwarming flavors of our Minted Pea & Spinach Soup, a dish that marries simplicity with elegance. Infused with the freshness of mint and the earthiness of spinach, this soup is not only a feast for the senses but also a journey down memory lane. Perfect as an appetizer, this recipe is rated a 4 out of 10 in difficulty, making it an accessible yet sophisticated addition to your culinary repertoire.

---


A Taste of Nostalgia: Minted Pea & Spinach Soup


There's something incredibly comforting about a warm bowl of soup, especially when it carries with it the whispers of cherished family memories. Our Minted Pea & Spinach Soup is a dish that does just that—bringing together flavors that are both familiar and refreshing, while evoking a sense of nostalgia for family gatherings and cozy evenings spent by the fire.


Ingredients:

- 1 cup chicken stock

- 1/2 cup cream


- 1 teaspoon canned dried mint


- 1/2 cup milk


- 2 cups frozen peas


- 2 diced potatoes


- Salt & pepper to taste


- 1 cup fresh spinach


- 1 teaspoon sugar


- 1/4 cup water


- 1/4 cup yoghurt


Instructions:


1. Prepare the Potatoes: In a medium-sized pot, place the diced potatoes with a little water and a dash of salt and pepper. Cover with a lid and let them cook for approximately 20 minutes until they are nearly soft.
2. Add the Peas: Introduce the frozen peas to the pot, allowing them to cook for an additional 5 minutes until both the peas and potatoes are tender.
3. Incorporate the Spinach: Gently stir in the fresh spinach and let it cook for 3-5 minutes until it is wilted. Remove the pot from heat and allow it to cool slightly.
4. Blend to Perfection: Use an immersion blender to puree the mixture until smooth. Return the pot to the stovetop.
5. Finish with Creamy Goodness: Add the cream, milk, water, and chicken stock to the pot. Reheat the mixture until it's piping hot.
6. Season and Serve: Stir in the yoghurt, mint, sugar, and adjust the salt and pepper to taste. Serve immediately, garnished with crispy croutons or bacon bits. For a delightful twist, try topping with thinly sliced cheesegrillers fried in sweet chili sauce.

A Family Memory


This soup always takes me back to my grandmother's kitchen, a place where the aromas of home-cooked meals danced through the air. I remember the way she would hum softly while preparing this very dish, her hands deftly working through the motions that seemed like second nature to her. On cold winter nights, my family would gather around the table, bowls of this minted pea and spinach soup steaming before us, warming our hands and hearts alike. The simplicity of the ingredients belied the complexity of flavors, each spoonful a reminder of those precious family moments.


As I prepare this soup today, I am transported back to those evenings, the warmth of the soup a comforting embrace, and the taste a gentle reminder of the love and care that went into every meal.


Difficulty Rating: 4/10


Category: Appetizer

Whether you're looking to create new memories or relive old ones, this Minted Pea & Spinach Soup is sure to become a beloved staple in your home. Its rich, velvety texture and vibrant flavors make it the perfect way to begin any meal, ensuring that every gathering is both delicious and memorable.

Read more about Appetizers

Read more about Main Dishes

Read more about Desserts

Crab Salad Stuffed Pita Pockets | Made by Meaghan Moineau

Crab Salad Stuffed Pita Pockets | Made by Meaghan Moineau

Title: A Taste of Summer: Crab Salad Stuffed Pita Pockets
Description: Dive into a delicious blend of fresh flavors with our Crab Salad Stuffed Pita Pockets. This light and refreshing dish combines the sweetness of apple, the tang of yellow bell pepper, and the savory taste of white crabmeat, all wrapped in a warm, toasted wholewheat pita. Perfect for a summer afternoon, this recipe is quick and easy to prepare, bringing back cherished family memories with every bite.

---


Summer at our family beach house was always a magical time. The sun-drenched days were filled with the laughter of children playing by the shore, the comforting sound of waves crashing, and the enticing aroma of delicious meals being prepared in the kitchen. One dish that always marked the highlight of these summer gatherings was my grandmother's Crab Salad Stuffed Pita Pockets.


I vividly remember the hustle and bustle in the kitchen, where the air was filled with the crisp scent of freshly chopped apples and the vibrant smell of coriander leaves. My grandmother would stand at the counter, her hands deftly mixing the canned white crabmeat with diced apple and yellow bell pepper. She had a way of creating magic with the simplest of ingredients.


As she worked, my siblings and I would eagerly gather around, occasionally sneaking a taste of the sweet, juicy apple or the tangy bell pepper. The anticipation would build as we watched her toast the wholewheat pita breads until they were perfectly puffed and golden brown.


Once the crab salad was seasoned to perfection with just the right amount of salt and pepper, and lovingly folded with light mayonnaise, the real fun began. We would help stuff the warm pita pockets with fresh, peppery watercress and the delicious crab mixture. Each bite was a symphony of flavors—sweet, savory, and herbaceous—all reminding us of those carefree, sunlit days.


Every time I prepare this dish, I am transported back to those cherished family summers, filled with love, laughter, and great food. It's a simple recipe, yet it holds a treasure trove of memories.


Crab Salad Stuffed Pita Pockets Recipe
Ingredients:

- 1 apple, diced


- 1 can white crabmeat, drained


- A handful of fresh coriander leaves, chopped


- 2 tablespoons light mayonnaise


- 4 wholewheat pita breads


- Salt and pepper to taste


- A bunch of fresh watercress


- 1 yellow bell pepper, diced


Instructions:

1. In a large bowl, combine the crabmeat, diced apple, and yellow bell pepper.


2. Season the mixture with salt and pepper to taste, then add the chopped coriander leaves.


3. Gently fold in the light mayonnaise until everything is well combined.


4. Toast the wholewheat pita breads until they are puffed up and golden brown.


5. Carefully cut open the pitas on one side and stuff them with a generous handful of fresh watercress, followed by the crab mixture.


6. Serve immediately and enjoy a taste of summer nostalgia.


Difficulty Rating: 3/10
Classification: Appetizer

This delightful appetizer is not only a breeze to make but also a wonderful way to bring a bit of summer into your home, no matter the season. Enjoy this family favorite and create your own cherished memories with each delicious bite.

Read more about Appetizers

Read more about Main Dishes

Read more about Desserts

Vegan Taco bowls with Cilantro Lime Cauliflower Rice | Made by Meaghan Moineau

Vegan Taco bowls with Cilantro Lime Cauliflower Rice | Made by Meaghan Moineau

Title: Savoring Simplicity: Vegan Taco Bowls with Cilantro Lime Cauliflower Rice
Description: Discover the vibrant flavors of Vegan Taco Bowls with Cilantro Lime Cauliflower Rice. This wholesome, plant-based dish is not only a feast for your taste buds but also a nod to family traditions and shared meals. Perfect as a main dish, this recipe is a delightful medley of textures and tastes, bringing together creamy guacamole, spicy nut meat, and aromatic cauliflower rice. Rated 5/10 in difficulty, it's an accessible and rewarding culinary experience.

---


A Delicious Dive into Nostalgia


There’s something magical about the way certain dishes can transport us back in time, rekindling cherished memories of laughter-filled kitchens and family gatherings. For me, Vegan Taco Bowls with Cilantro Lime Cauliflower Rice is one such dish—an homage to those warm summer evenings spent at my grandmother's house, where the air was always filled with the tantalizing aroma of spices and fresh herbs.


Growing up, taco nights were a staple in our household, a tradition that never failed to bring the family together. My grandmother, with her infectious smile and knack for storytelling, would regale us with tales from her childhood in New Mexico. Her stories were as rich and vibrant as the flavors she infused into her cooking—each ingredient carefully chosen, every spice a reminder of her roots.


This recipe for Vegan Taco Bowls is my plant-based twist on her classic taco nights, a dish that captures the essence of those evenings while embracing a modern, healthy lifestyle. With every bite, I'm reminded of the joy of family, the importance of tradition, and the simple pleasure of a well-cooked meal.


Ingredients


- Avocado oil


- Cauliflower


- Red New Mexico chili powder


- Fresh cilantro


- Garlic powder


- Hass avocado


- Fresh jalapeño


- Fresh lime juice


- Onion


- Salt


- Tomato


- Walnuts


Instructions


1. Prepare the Nuts: Begin by soaking the walnuts in a bowl of water for 2-8 hours before preparing the "meat."
2. Preheat and Prep: Preheat your oven to 375°F (190°C) and line a baking sheet with aluminum foil. Finely chop the cauliflower into rice-sized pieces or pulse in a food processor until the desired consistency is achieved.
3. Cauliflower Rice: Toss the cauliflower with avocado oil and spread it onto the prepared baking sheet in an even layer. Bake for 18 minutes, stirring halfway through to ensure even cooking.
4. Guacamole: While the cauliflower rice is baking, prepare the guacamole. Cut the avocado into large chunks and place it into a small bowl. Add the lime juice and mash the avocado to your preferred consistency. Stir in the chopped cilantro, jalapeño, onion, and a blend of spices. Set aside.
5. Taco Nut Meat: Drain the soaked walnuts and place them into a small food processor. Pulse until they reach a ground meat-like consistency, about 5-7 pulses. Transfer the mixture to a bowl and stir in salt, cumin, garlic powder, and red chili powder. Set aside.
6. Finish the Rice: Once the cauliflower is done baking, transfer it to a mixing bowl while still warm. Stir in fresh lime juice, cilantro, and salt to taste.
7. Assemble the Bowls: To assemble your taco bowls, layer 1 cup of the cilantro lime cauliflower rice in a bowl. Add a generous scoop of taco nut meat, a dollop of guacamole, fresh tomato slices, and a sprinkling of fresh cilantro. Serve immediately, garnished with an additional slice of lime if desired.

A Culinary Journey


Creating these Vegan Taco Bowls is more than just preparing a meal; it's a journey through flavors and memories. With a difficulty rating of 5/10, this dish is approachable yet satisfying, ideal as a hearty main dish for any occasion. Whether you're a seasoned cook or a kitchen novice, this recipe invites you to explore the vibrant world of plant-based cooking, one delicious bowl at a time.


So, gather your loved ones, share stories, and savor every bite—because sometimes, the simplest meals are the ones that create the most lasting memories.

Read more about Appetizers

Read more about Main Dishes

Read more about Desserts

{No Bake} Cinnamon Butterscotch Energy Bites | Made by Meaghan Moineau

{No Bake} Cinnamon Butterscotch Energy Bites | Made by Meaghan Moineau

No Bake Cinnamon Butterscotch Energy Bites: A Sweet Trip Down Memory Lane


A Delightful No-Bake Treat with a Touch of Nostalgia


There's something magical about recipes that require no baking—especially when they're packed with flavors that evoke cherished memories. Today, I'm thrilled to share a recipe that not only satisfies your sweet cravings but also transports you back to simpler times: No Bake Cinnamon Butterscotch Energy Bites.


The Magic Mix of Ingredients


These energy bites combine the perfect blend of brown sugar, butterscotch chips, rice cereal, ground flax seed, honey, oats, peanut butter, and protein powder to create a delectable treat that's both nutritious and delicious. The gentle spice of cinnamon weaves through every bite, adding a comforting warmth that pairs beautifully with the sweet butterscotch.


A Nostalgic Family Memory


Growing up, I spent countless summer afternoons at my grandmother's house, where the kitchen was always filled with the aroma of something sweet. My grandmother had a knack for creating delicious treats without ever turning on the oven, a skill I admired deeply. One of my fondest memories is of her teaching me how to make these very energy bites.


We would gather all the ingredients on her antique wooden countertop. As I carefully measured out the oats and rice cereal, she'd share stories of her childhood, weaving tales as rich as the flavors we were about to create. Once the mixture was prepared, she'd let me press the butterscotch chips into each ball—a task I took very seriously, ensuring each one was perfectly adorned.


When we finished, we'd sit on her porch, enjoying our creations while sipping iced tea, the summer breeze carrying the sound of birds chirping. Those afternoons taught me the joy of cooking with love and intention, a lesson I carry with me to this day.


Recipe Instructions


1. Grind the Oats: Start by grinding 1 cup of oats in a blender until you achieve a fine texture.
2. Mix the Dry Ingredients: In a large bowl, combine the rice cereal, whole oats, ground oats, protein powder, and ground flax seed.
3. Create the Liquid Mixture: In a microwavable safe bowl, mix together brown sugar, peanut butter, and honey. Heat in the microwave in 15-second intervals, stirring intermittently, until melted and well-combined.
4. Combine and Chill: Pour the liquid mixture into the bowl of dry ingredients and stir until thoroughly combined. Refrigerate the mixture for about 30 minutes.
5. Form and Finish: Once chilled, remove the mixture from the fridge and roll it into bite-sized balls. Press butterscotch chips into each ball for that sweet, nostalgic touch.

Difficulty and Classification


Difficulty: 3/10
Classification: Dessert

These No Bake Cinnamon Butterscotch Energy Bites are incredibly easy to make, requiring minimal effort for maximum flavor payoff. Whether you're a seasoned baker or a kitchen novice, this recipe is a delightful way to create something special without the hassle of baking.


Conclusion


These energy bites are more than just a tasty treat—they're a journey back to cherished moments and the warmth of family. I hope this recipe brings you as much joy and nostalgia as it does for me. Enjoy every bite and perhaps, create some sweet memories of your own along the way.

Read more about Appetizers

Read more about Main Dishes

Read more about Desserts

Bacon & Egg Toast Cups | Made by Meaghan Moineau

Bacon & Egg Toast Cups | Made by Meaghan Moineau

Title: Perfect Breakfast Delight: Bacon & Egg Toast Cups
Description: Discover the delightful simplicity of Bacon & Egg Toast Cups, a nostalgic breakfast treat that brings back cherished family memories. Easy to prepare yet impressively delicious, this dish is sure to become a staple in your morning routine.

---


In the tapestry of family traditions, breakfast holds a special place, weaving together the scents and sounds of cherished mornings. One such cherished memory of mine involves the delightful creation of Bacon & Egg Toast Cups, a dish that perfectly combines simplicity with a touch of elegance. As I share this nostalgic recipe, I hope it brings warmth and joy to your breakfast table just as it did to mine.


Ingredients:


- Unsalted butter


- 6 slices of sandwich bread


- 6 slices of bacon


- 6 eggs


- Salt & pepper to taste


Instructions:


1. Preheat and Prepare: Begin by preheating your oven to 375°F (190°C). Lightly butter six standard muffin cups to prevent sticking.
2. Create the Toast Cups: Using a rolling pin, gently flatten the bread slices. With a 4.5-inch cookie cutter, cut each slice into four rounds. Cut each round in half, then press the two halves into each muffin cup, overlapping slightly and ensuring the bread extends to the edges. Use any extra bread and crusts to patch holes if necessary. Brush with the remaining butter for added flavor.
3. Cook the Bacon: In a large skillet, cook the bacon until almost crisp, about four minutes, flipping once. The bacon will continue to cook in the oven, so avoid overcooking it at this stage.
4. Assemble and Bake: Lay one bacon slice in each bread cup. Crack an egg over each, taking care not to break the yolk. Season with salt and pepper. Bake in the preheated oven until the egg whites are just set, approximately 25 minutes.
5. Serve and Enjoy: Once baked, run a small knife around the cups to loosen them. Serve hot and enjoy the delightful combination of flavors.

Nostalgic Family Memory:


I vividly remember Sunday mornings at my grandmother's house, where the aroma of bacon sizzling in the kitchen would gently coax us out of bed. My siblings and I would gather around the breakfast table, eagerly awaiting the moment when my grandmother would present her famous Bacon & Egg Toast Cups. Each bite was a comforting blend of crispy bacon, perfectly cooked eggs, and warm, buttery toast—a symphony of flavors that felt like a loving hug.


These mornings were filled with laughter and the joy of being together, creating memories that have lasted a lifetime. Now, as I prepare this dish for my own family, I am reminded of those cherished moments and the bond we shared over this simple yet delicious meal.


Recipe Rating:


- Difficulty: 3/10
- Classification: Main Dish

Whether you're looking for a quick weekday breakfast or a special treat for a leisurely weekend brunch, Bacon & Egg Toast Cups are a delightful choice. With their ease of preparation and rich, satisfying flavors, this dish is a testament to the beauty of simple ingredients coming together to create something truly special. Enjoy this recipe, and may it bring the same warmth and joy to your family as it has to mine.

Read more about Appetizers

Read more about Main Dishes

Read more about Desserts

Tuna Stuffed Hard-Boiled Eggs | Made by Meaghan Moineau

Tuna Stuffed Hard-Boiled Eggs | Made by Meaghan Moineau

Title: Delightful Nostalgia: Tuna Stuffed Hard-Boiled Eggs for Every Family Gathering
Description: Dive into a deliciously nostalgic journey with our Tuna Stuffed Hard-Boiled Eggs recipe. This simple, yet flavorful appetizer is perfect for every family gathering, evoking cherished memories with every bite. Discover how to create this dish that marries ease with elegance, leaving a lasting impression on your guests.

---


Every family has that one recipe that holds a special place in their hearts. For me, it's the Tuna Stuffed Hard-Boiled Eggs. This delightful appetizer was a staple at every family reunion, birthday party, and holiday gathering. The aroma of tuna mixed with fresh parsley and a hint of lemon would fill the kitchen, pulling us all together around the table, eager to dig in.


Ingredients:

- Hardboiled eggs


- 1 can of tuna


- 1 small onion, finely chopped


- 1 carrot, shredded


- Fresh parsley, chopped


- Lemon juice


- Corn kernels for garnish


Instructions:

1. Begin by cutting each hardboiled egg in half and carefully removing the yolks. Set the egg whites aside on a serving platter.


2. In a small bowl, combine the canned tuna with the finely chopped onion, shredded carrot, chopped parsley, and a generous squeeze of lemon juice. Mix well until the ingredients are thoroughly combined.


3. Spoon the tuna mixture into each egg white half, creating a small mound. Ensure each egg is generously filled for optimum flavor.


4. Garnish each stuffed egg with a few corn kernels, adding a touch of sweetness and color to the dish.


5. Serve immediately or refrigerate until ready to enjoy.


Difficulty Level: 3/10
Classification: Appetizer

---


A Walk Down Memory Lane

Growing up, my grandmother's kitchen was the heart of our home. It was a place filled with laughter, stories, and the comforting scent of home-cooked meals. Among the many dishes she prepared, her Tuna Stuffed Hard-Boiled Eggs stood out as a family favorite.


I remember one sunny Easter Sunday when I was about eight years old. We were gathered at my grandparents' house, eagerly participating in the annual egg hunt. Afterward, as everyone settled around the table, my grandmother brought out a platter of her signature stuffed eggs. The room fell silent, except for the clinking of forks and the occasional hum of delight as we savored each bite.


Those eggs were more than just an appetizer; they were a symbol of togetherness. Every time we tasted that familiar combination of creamy tuna and citrusy lemon, we were transported back to those joyful gatherings, surrounded by the warmth of family.


Recreating this dish today is like opening a time capsule. It's a simple recipe, yet it carries with it decades of love and tradition. Whether you're looking to create new memories with your loved ones or revisit old ones, Tuna Stuffed Hard-Boiled Eggs are a delightful way to bring everyone together. Enjoy this easy-to-make appetizer and let it become a cherished part of your family's culinary story.

Read more about Appetizers

Read more about Main Dishes

Read more about Desserts

Japanese Chicken Donburi | Made by Meaghan Moineau

Japanese Chicken Donburi | Made by Meaghan Moineau

A Taste of Tradition: Reliving Memories with Japanese Chicken Donburi


Description: Dive into a heartwarming culinary journey with Japanese Chicken Donburi, a classic dish that combines tender chicken, fresh spinach, and a delightful egg mixture over a bed of fluffy rice. This main dish, rated 5/10 in difficulty, is perfect for those seeking a flavorful meal that's both comforting and easy to prepare. Join me as I share a cherished family memory that makes this dish even more special.

---


Japanese Chicken Donburi: A Bowl of Comfort and Tradition


There's something incredibly comforting about a warm bowl of Japanese Chicken Donburi. The tender chicken, the freshness of baby spinach, and the richness of the egg mixture create a symphony of flavors that dance on your palate. But for me, this dish is more than just a meal; it's a bridge to cherished family memories and a reminder of the warmth that comes from shared moments around the dinner table.


Ingredients:

- 1 tablespoon salad oil
- 1 onion, thinly sliced
- 1 tablespoon fresh ginger, grated
- 1/2 cup fat-skimmed chicken broth
- 3 tablespoons soy sauce
- 1 tablespoon sugar
- 1 boned, skinned chicken breast, thinly sliced
- 2 cups baby spinach leaves
- 4 eggs
- Cooked rice
- 1 diced roma tomato

Instructions:

1. Prepare the Aromatics: In a deep 10-inch or 12-inch frying pan over high heat, stir together the salad oil, onion, and fresh ginger until the onion is lightly browned, about 2 minutes.
2. Simmer the Broth: Add the chicken broth, soy sauce, and sugar to the pan. Stir until combined, then add the sliced chicken breast. Bring the mixture to a boil.
3. Integrate the Spinach: Add the baby spinach to the pan, cover, and cook until the spinach is wilted, about 1 minute.
4. Create the Egg Mixture: In a small bowl, beat the eggs until blended. Reduce the heat to low, evenly distribute the mixture in the pan, and pour in the eggs.
5. Cook with Care: Using a spatula, gently push the vegetables aside so the egg mixture can flow through the sauce. Cover and cook just until the eggs are softly set, about 2 to 2 1/2 minutes.
6. Assemble the Donburi: Meanwhile, spoon the cooked rice into bowls. Top each serving equally with the egg-spinach mixture, including the flavorful juices. Sprinkle with diced roma tomato for a fresh finish.

A Nostalgic Family Memory


Growing up, weekends at my grandmother's house were a whirlwind of laughter, stories, and the irresistible aroma of her cooking. One of the highlights was her Japanese Chicken Donburi, a dish that seemed to capture the essence of her warmth and generosity. I remember sitting at her kitchen table, eagerly watching as she expertly stirred the pan, her stories intertwining with the sizzle of the ingredients.


Grandma had a way of making even the simplest meals feel like a grand celebration. As we gathered around the table, bowls of steaming donburi in hand, she'd recount tales of her own childhood, painting vivid pictures of her adventures and lessons learned. Each bite was a journey, a connection to a time and place where love was the secret ingredient.


Even now, as I prepare this dish in my own kitchen, I feel her presence. The fragrant blend of soy sauce and ginger transports me back to those cherished Saturdays, and with each spoonful, I am reminded of the enduring power of family and tradition.


Conclusion


Japanese Chicken Donburi is more than just a main dish; it's a taste of nostalgia, a reminder of the simple joys found in the company of loved ones. Whether you're recreating a family favorite or discovering it for the first time, this dish promises warmth, comfort, and a flavorful embrace of tradition.


So, gather your ingredients, and let the aromas whisk you away to your own treasure trove of memories. Enjoy the rich flavors, and perhaps, create new stories to savor for years to come.

Read more about Appetizers

Read more about Main Dishes

Read more about Desserts

Tequila Lime Shrimp | Made by Meaghan Moineau

Tequila Lime Shrimp | Made by Meaghan Moineau

Title: Savoring Summer: Tequila Lime Shrimp with a Dash of Nostalgia
Description: Dive into the vibrant flavors of Tequila Lime Shrimp, a dish that brings together zesty lime, smooth tequila, and succulent shrimp. Perfect as a main dish, this recipe not only tantalizes your taste buds but also stirs up cherished family memories. Experience a taste of summer with this easy-to-follow, flavorful recipe. Difficulty: 4/10.

---


Savoring Summer: Tequila Lime Shrimp with a Dash of Nostalgia


As the warm breeze of summer fades into the crisp air of autumn, I often find myself reminiscing about sun-drenched family gatherings and the laughter that echoed through our backyard. One dish that always stood out during these summer feasts was Tequila Lime Shrimp—a recipe that not only satisfied our taste buds but also became a cherished family tradition.


Ingredients:


- Shrimp: A pound of large, juicy shrimp, peeled and deveined.
- Tequila: The star of the show, adding a smooth, rich flavor.
- Lime Juice: Freshly squeezed for that zesty punch.
- Honey: Just a touch to balance the acidity with sweetness.
- Garlic: A couple of cloves, minced to perfection.
- Fresh Cilantro: Chopped, for a burst of freshness.
- Kosher Salt: To taste.
- Black Fresh Ground Pepper: For a subtle kick.

Instructions:


1. Prepare the Shrimp: Start by peeling and deveining the shrimp, ensuring they are clean and ready to absorb all the delicious flavors.
2. Create the Marinade: In a large mixing bowl, whisk together the tequila, lime juice, honey, garlic, salt, pepper, and cilantro. The aroma itself is enough to make your mouth water.
3. Marinate the Shrimp: Add the shrimp to the bowl, making sure each piece is well-coated. Let them marinate for about 15 minutes, allowing the flavors to meld.
4. Reduce the Marinade: Remove the shrimp from the marinade and set them aside. Transfer the marinade to a saucepot and place it over medium-high heat. Bring it to a boil, then reduce the heat and let it simmer until it reduces by half, intensifying the flavors.
5. Grill the Shrimp: Fire up the grill and place the shrimp over direct-high heat. Grill for about 2 minutes on each side, ensuring they are perfectly cooked with a slight char.
6. Serve and Enjoy: Drizzle the reduced marinade over the shrimp just before serving. This not only enhances the flavor but also adds a beautiful glaze.

A Taste of Nostalgia


Every time I prepare this dish, I am transported back to those lazy summer afternoons. I can almost hear the sizzle of the grill and my grandfather's voice, as he recounted stories of his youth. It was his idea to infuse the traditional shrimp dish with tequila and lime—a nod to his Mexican heritage, and a twist that became a family favorite.


As we gathered around the table, each bite of the Tequila Lime Shrimp was a celebration of flavors and memories. It was more than just a meal; it was a reminder of the love and laughter that bound us together.


Conclusion


Tequila Lime Shrimp is more than just a main dish; it's a journey back to those joyful summer days. With a difficulty rating of 4/10, it’s an accessible recipe that brings gourmet flavors to your home kitchen. So, gather your loved ones, fire up the grill, and create your own lasting memories with this delightful dish.


---


Whether you're a seasoned chef or a home cook, this Tequila Lime Shrimp recipe offers a simple yet flavorful way to bring a taste of summer to your table. Enjoy the blend of tangy lime, sweet honey, and the subtle warmth of tequila, and let it become a tradition in your home too.

Read more about Appetizers

Read more about Main Dishes

Read more about Desserts

Herb Roasted Chicken | Made by Meaghan Moineau

Herb Roasted Chicken | Made by Meaghan Moineau

Title: Savoring Tradition: Herb Roasted Chicken for Every Family Gathering


Description: Discover the comforting flavors of Herb Roasted Chicken, a dish that brings family together with its aromatic herbs and juicy tenderness. Perfect for any occasion, this recipe is steeped in tradition and love, making every bite memorable.


---


There's something truly special about the aroma of a perfectly roasted chicken wafting through the house. It’s an aroma that evokes memories of family gatherings, laughter, and shared stories. In our family, Herb Roasted Chicken isn't just a meal—it's a tradition.


Ingredients:

- 2 bay leaves

- 1/4 cup brown sugar


- 4 tablespoons butter, softened


- 2 teaspoons dried basil


- 2 teaspoons dried rosemary


- 2 teaspoons dried thyme


- 1 teaspoon fennel seeds


- 1 quart ice water


- 1 cup kosher salt


- 1 teaspoon black coarse pepper


- 4 quarts water


- 1 whole chicken (about 4-5 pounds)


Instructions:


1. Prepare the Brine: In a large saucepan, combine water, salt, sugar, half of the dried herbs, and bay leaves. Bring to a boil, stirring to dissolve the salt and sugar. Reduce heat to low and simmer for 10 minutes to draw out the flavors of the herbs. Pour the brine into a large bowl and cool it down with ice water. Set aside.
2. Prepare the Chicken: Rinse the chicken cavity and skin thoroughly. Place the chicken in the brine, ensuring it is completely submerged. Cover and marinate for at least 1 hour and up to 6 hours.
3. Preheat and Prep: Preheat the oven to 375°F. Remove the chicken from the brine and pat dry with a paper towel. Carefully separate the skin from the flesh by inserting your fingers underneath the skin.
4. Season and Roast: Rub butter underneath the skin to ensure moist, tender meat. Coat the skin with the remaining herbs. Place the chicken in a roasting pan. Bake for about 1 hour and 10 minutes, basting halfway through and again during the last 10 minutes. The chicken is done when a meat thermometer reads 165°F in the thickest part of the breast.
5. Rest and Carve: Transfer the chicken to a carving board and let it rest for 10-20 minutes. This allows the juices to settle. Carve by starting at the joints, removing wings, legs, and thighs, and finally, slicing the breasts.

A Nostalgic Family Memory:


Every Thanksgiving, our home was filled with the scent of Herb Roasted Chicken. My grandmother, with her apron dusted with flour and a warm smile on her face, would gather us around the kitchen counter. The kitchen was the heart of our home, bustling with activity and chatter. As a child, I remember standing on a stool, peering over the counter as she showed me how to gently rub butter beneath the chicken's skin, a secret she said made all the difference.


After the chicken was roasted to perfection, we would sit around the table, sharing stories of past gatherings and making new memories. The Herb Roasted Chicken was always the centerpiece, a symbol of togetherness and love. Even now, as I prepare this dish for my own family, I can feel her presence, guiding my hands and warming my heart.


Difficulty Rating: 6/10


Classification: Main Dish


This Herb Roasted Chicken is more than just a meal; it's a cherished family tradition that brings warmth and connection to any gathering. Whether you're a seasoned chef or a kitchen novice, this recipe is sure to become a beloved staple in your culinary repertoire. Enjoy the flavors and the memories it brings.

Read more about Appetizers

Read more about Main Dishes

Read more about Desserts

Valentine’s Day Potted Plant Ice-Cream Desserts | Made by Meaghan Moineau

Valentine's Day Potted Plant Ice-Cream Desserts | Made by Meaghan Moineau

Title: "Blooming Love: Valentine's Day Potted Plant Ice-Cream Desserts"


Description:

Unleash your creativity this Valentine's Day with our whimsical Potted Plant Ice-Cream Desserts. This charming treat, blending creamy vanilla bean ice-cream with the crunch of mixed nuts and blueberries, promises to delight both the eyes and the taste buds. Perfect for a romantic evening or a fun family project, these desserts are as fun to make as they are to devour.

---


A Nostalgic Valentine’s Day Delight


Every February, as the chill of winter slowly gives way to the promise of spring, my family gathers for a unique Valentine's Day tradition. We recreate the "Potted Plant Ice-Cream Desserts," a recipe passed down from my grandmother, who believed that love should always be celebrated with a touch of whimsy and creativity.


It all started one Valentine's Day when I was a child. My grandmother, a woman with a green thumb and a heart full of love, decided to surprise us with an unconventional dessert. As she pulled out the ingredients — the vanilla bean ice-cream, diced palm seeds, mixed nuts, and blueberries — I watched in awe, not quite understanding how these could transform into a dessert.


The real magic happened when she introduced the Oreo cookies. With a gleam in her eye, she removed the cream from the cookies, pounded them into fine crumbs, and set them aside. "This will be our soil," she whispered to me with a wink. Together, we mixed the ice-cream with the palm seeds, nuts, and blueberries, spooning the mixture into small cups before freezing them. The final touch was adding the Oreo "soil" and a sprig of parsley, creating the illusion of a tiny potted plant.


That evening, as we sat around the table enjoying our desserts, my grandmother told us stories of her own childhood, of gardens full of blooming flowers and the importance of nurturing love like one nurtures a garden. It was a lesson in love and life, wrapped up in a deliciously creative dessert.


Now, every Valentine's Day, my children and I continue this tradition. The joy of smashing cookies into crumbs, the laughter as we create our messy little "plants," all serve as a reminder that love, like plants, needs care, a little creativity, and a lot of fun.


---


Recipe: Valentine's Day Potted Plant Ice-Cream Desserts


Ingredients:

- 1 liter vanilla bean ice-cream

- 1 cup diced palm seeds


- 1/2 cup mixed nuts


- 1 cup blueberries


- 6 Oreo cookies


- Fresh parsley sprigs for garnish


Instructions:


1. Remove the cream from the Oreo cookies and pound the cookies into fine crumbs. Set aside the "soil."


2. In a large mixing bowl, combine the vanilla bean ice-cream, diced palm seeds, mixed nuts, and blueberries.


3. Spoon the ice-cream mixture into small serving cups, leaving space at the top for the Oreo crumbs.


4. Freeze the cups until the ice-cream is firm.


5. Just before serving, top each cup with a generous layer of Oreo crumbs and insert a sprig of parsley into the center to mimic a plant.


6. Serve immediately and enjoy the charming surprise!


*Tip: Embrace the messiness! The "soil" shouldn't look too neat; after all, real plants thrive in a bit of chaos.*


Difficulty:

4/10

Classification:

Dessert

---


This Valentine's Day, indulge in the nostalgia and create new memories with a dessert that's as delightful to make as it is to eat. The Potted Plant Ice-Cream Desserts are a testament to the enduring power of love—and a reminder that sometimes, the best things in life are a little bit messy.

Read more about Appetizers

Read more about Main Dishes

Read more about Desserts