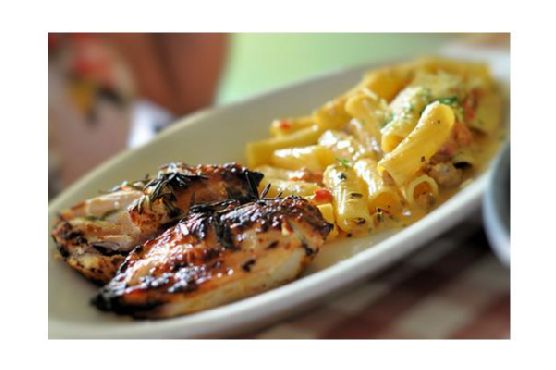
Chicken Piccata with Artichokes | Made by Meaghan Moineau
Title: Discover the Magic of Chicken Piccata with Artichokes: A Nostalgic Family FavoriteDescription: Dive into the heartwarming flavors of Chicken Piccata with Artichokes, a delightful main dish that brings family memories to life. With the perfect blend of savory and tangy notes, this recipe is a culinary journey you won’t want to miss. Rated 4 out of 10 for difficulty, it's approachable for home cooks of all levels.
---
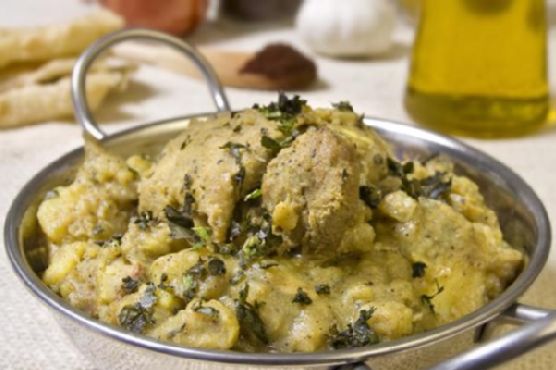
The Magic of Chicken Piccata with Artichokes: A Family Tradition
There’s something about the aroma of a lovingly prepared meal that transports us back to cherished moments shared around the family table. For me, Chicken Piccata with Artichokes is more than just a dish—it's a portal to Sunday dinners at my grandmother’s house.
Every Sunday, my grandmother would don her favorite apron and set to work in her cozy kitchen, filling the air with the mouthwatering scent of sautéing chicken and fresh herbs. The heart of our gatherings, her signature Chicken Piccata with Artichokes, was a dish that brought smiles to everyone’s faces, transcending the ordinary and creating a feast of flavors and memories.
This recipe, with its combination of tender boneless chicken breasts and the unique tang of artichokes and capers, is a tribute to my grandmother’s culinary wisdom. It’s a dish that’s as much about the experience of making it as it is about the enjoyment of eating it.
Ingredients:
- 4 boneless chicken breasts
- Salt and pepper to taste
- 1/2 cup flour for dredging
- 3 tablespoons extra virgin olive oil
- 1/2 cup reduced sodium chicken broth
- 1/4 cup freshly squeezed lemon juice
- 1/4 cup capers, drained
- 1 can artichoke hearts, drained and halved
- 1/4 cup chopped flat leaf parsley
- 1/2 cup freshly grated parmesan cheese
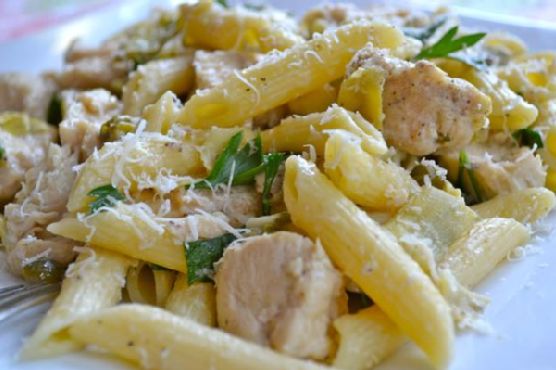
- 1 lb cooked penne rigate
Instructions:
1. In a large bowl, combine the chicken with a generous pinch of salt and pepper. Lightly dredge the chicken in flour, shaking off excess.
2. Heat the extra virgin olive oil in a large skillet over medium heat. Add the chicken breasts, cooking until browned and the juices run clear, approximately 12 minutes.
3. Stir in the chicken broth, lemon juice, capers, and artichokes, allowing the mixture to cook for about 3 minutes. The combination of these ingredients creates a tantalizing sauce that perfectly complements the chicken.
4. Reduce the heat to a simmer for an additional 3 minutes, letting the flavors meld together.
5. Stir in the cooked penne rigate until fully combined, absorbing the delicious sauce.
6. Add the chopped parsley, infusing the dish with freshness, and transfer to a serving bowl. Finish with a generous sprinkle of parmesan cheese for a savory touch.
A Culinary Journey
Each bite of this Chicken Piccata with Artichokes is a step back in time, recalling laughter-filled evenings and the comfort of family bonds. As a main dish, it’s perfect for gathering loved ones and creating new memories, just as my grandmother did every Sunday.
With a difficulty rating of 4 out of 10, this recipe is accessible for novice cooks, yet sophisticated enough to impress seasoned chefs. Its versatility makes it a staple for any home cook’s repertoire—a dish that truly embodies the warmth of home cooking and the joy of shared meals.
So next time you’re looking to evoke a sense of nostalgia while satisfying your culinary cravings, try this Chicken Piccata with Artichokes. It’s more than just a meal; it’s a celebration of family, flavor, and the timeless tradition of gathering around the table.