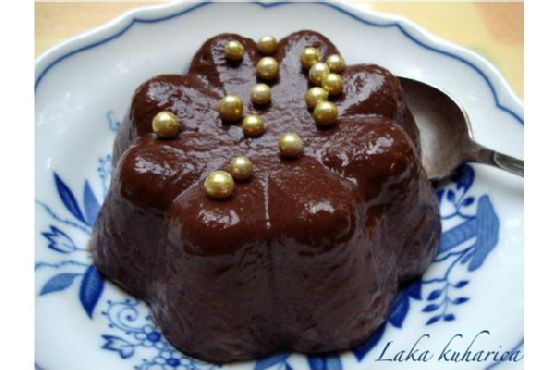
Bittersweet chocolate pudding | Made by Meaghan Moineau
Title: Indulging in Nostalgia: The Bittersweet Chocolate Pudding That Warms the HeartDescription: Discover the rich, velvety delight of bittersweet chocolate pudding—a family favorite that blends deep cocoa flavors with a touch of nostalgia. Join us on a culinary journey as we explore this simple yet soul-soothing dessert that has been a cherished tradition in our household.
---
A Nostalgic Delight: Bittersweet Chocolate Pudding
There's something inherently comforting about the silky texture and rich flavor of chocolate pudding. It has the power to transport us back in time, to family gatherings and childhood memories filled with laughter and warmth. Today, I'm sharing my family's cherished recipe for Bittersweet Chocolate Pudding—a dessert that has been a cornerstone of our culinary traditions for generations.
Ingredients:
- 3 tablespoons cocoa powder
- 2 tablespoons cornstarch
- 1 large egg
- 2 cups milk
- 1/4 teaspoon salt
- 1/2 cup sugar
- 2 tablespoons unsalted butter
- 1 teaspoon vanilla extract
Instructions:
1. Whisk the Dry Ingredients: In a medium saucepan, whisk together the cornstarch, cocoa powder, sugar, and salt. Make sure there are no lumps, as a smooth mixture will ensure a velvety pudding.
2. Combine Milk and Egg: In a separate bowl, gently beat the egg and then mix in the milk. This step is crucial for achieving the perfect consistency.
3. Mix and Heat: Gradually pour the milk mixture into the saucepan, whisking continuously until everything is thoroughly mixed. This gradual combination prevents the egg from curdling.
4. Cook the Mixture: Heat the mixture over medium heat, stirring constantly, until it begins to boil. Once boiling, cook for an additional minute, then remove from heat.
5. Add Butter and Vanilla: Stir in the unsalted butter and vanilla extract. This addition creates a glossy finish and a depth of flavor that elevates the pudding.
6. Mold and Chill: Pour the pudding into molds that have been rinsed with cold water to ensure easy removal. Chill in the refrigerator until set.
A Journey Through Time
As a child, I remember gathering around the kitchen table with my siblings, eagerly awaiting the moment when my grandmother would unveil her famous chocolate pudding. The aroma of cocoa would fill the air, mingling with the laughter of family and the warmth of the kitchen. Each bite was a celebration—a bittersweet blend of flavors that mirrored the joy and nostalgia of family togetherness.
This pudding was more than just a dessert; it was a tradition. It marked special occasions and everyday moments alike, reminding us of the simple joys in life. My grandmother would often share stories as we indulged, tales of her own childhood and how this very recipe was passed down from her mother. It was a legacy, rich with history and love.
Difficulty: 4/10
Classification: Dessert
Creating this Bittersweet Chocolate Pudding is an experience that combines simplicity with the richness of tradition. With a difficulty rating of just 4 out of 10, it's a perfect indulgence for budding home cooks and seasoned chefs alike. Whether you're crafting this dessert for a special occasion or as a comforting treat on a rainy day, it promises to bring a touch of nostalgia and warmth to your table.
So, gather your ingredients, embrace the process, and let this bittersweet delight whisk you away to cherished memories and new celebrations.