Hard-Boiled Egg Gratin In A Bechamel Sauce | Made by Meaghan Moineau

Hard-Boiled Egg Gratin In A Bechamel Sauce | Made by Meaghan Moineau

A Nostalgic Twist on Comfort Food: Hard-Boiled Egg Gratin in a Bechamel Sauce


Discover the Heartwarming Delight of a Family Favorite


In the world of culinary delights, few dishes evoke a sense of nostalgia quite like a good old-fashioned gratin. Today, we're diving into a recipe that has stood the test of time in my family: Hard-Boiled Egg Gratin in a Bechamel Sauce. This comforting, flavorful dish is not only a feast for the taste buds but also a journey down memory lane. With its creamy bechamel sauce, rich gruyère cheese, and perfectly hard-boiled eggs, this recipe is sure to become a staple in your home as it is in mine.


Ingredients


- Butter


- Eggs


- Flour


- Gruyère cheese


- Milk


- Nutmeg


- Onion


- White salt and pepper


Instructions


1. Hard-Boil the Eggs: Start by bringing a saucepan of salted water to a boil. Gently add the eggs, reduce the heat, and let them simmer for 10 minutes. Once done, transfer the eggs to cold water until they are just cool enough to handle. This makes peeling them a breeze. A little trick I learned from my grandmother: roll the eggs with the palm of your hand on a hard surface to crack the shell, then peel them under a slow stream of running water. Reserve the eggs in a bowl of warm water.
2. Cook the Onion: Melt some butter in a saucepan or small frying pan over low heat. Add the onion and cook, stirring frequently, until it's tender but not colored.
3. Prepare the Bechamel Sauce: In a medium heavy-bottomed saucepan, melt the butter over low heat. Add the flour and whisk for about 2 minutes, being careful not to let it color. Gradually whisk in the milk and bring to a boil, whisking constantly to prevent lumps. Season with nutmeg, salt, and pepper to taste. Reduce the heat and simmer for 10 minutes, whisking constantly and scraping the bottom and sides of the pan to keep the sauce smooth. Stir in the cooked onions and let it cook for an additional 5 minutes.
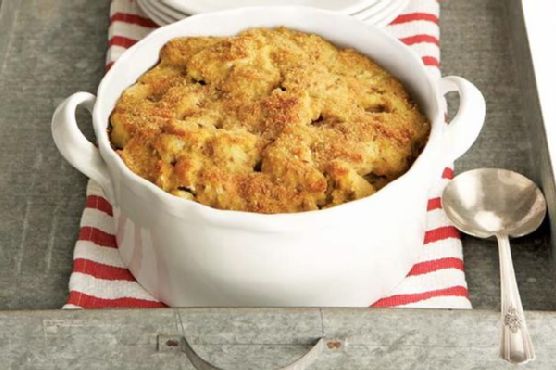
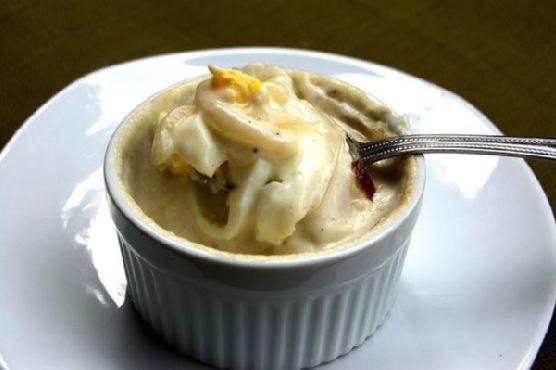
4. Assemble the Gratin: Preheat your grill. Slice the eggs into 1 cm (0.4 inch) thick slices. Spread a thin layer of the bechamel sauce over the bottom of your gratin dish. Layer the egg slices over the sauce and coat them with the remaining sauce. Sprinkle with grated gruyère cheese, then grill, turning the dish if necessary to ensure an evenly golden-brown top. Serve immediately.

A Family Memory


This dish always takes me back to Sunday afternoons at my grandmother's house. She would prepare her kitchen with the aroma of melted butter and onions, a scent that still makes me feel at home. My siblings and I would gather around, watching her every move, eager to learn the secrets of her cooking. The moment she pulled the gratin from the oven, with its golden-brown crust and bubbling cheese, we knew we were in for a treat. Sharing this meal brought us closer, and each bite was a reminder of the warmth of family and tradition.


Difficulty: 6/10


Classification: Main Dish


Hard-Boiled Egg Gratin in a Bechamel Sauce is more than just a meal—it's a journey back to simpler times, a celebration of comfort and family. Whether you're looking for a hearty main dish or a nostalgic culinary adventure, this recipe is sure to delight both the palate and the heart. So, gather your loved ones, roll up your sleeves, and create your own cherished memories with this timeless classic.

Read more about Appetizers

Read more about Main Dishes

Read more about Desserts

Creamy Tomato Soup | Made by Meaghan Moineau

Creamy Tomato Soup | Made by Meaghan Moineau

Warm Memories in a Bowl: Creamy Tomato Soup Recipe


Description:

Indulge in the comforting embrace of our Creamy Tomato Soup, a soul-warming recipe that marries the richness of tomatoes with a creamy smoothness, creating a symphony of flavors that dance on your taste buds. This delightful dish is perfect for cozy evenings and family gatherings, where stories and laughter are shared over steaming bowls of soup. This Appetizer, rated a 4 out of 10 for difficulty, is sure to become a staple in your culinary repertoire.

---


Ingredients:

- 1 tablespoon olive oil

- 1 diced onion


- 1 teaspoon fresh dried basil


- 1 teaspoon fresh dried thyme


- Salt to taste


- Black pepper to taste


- 2 cans diced tomatoes


- 2 tablespoons tomato paste


- 1/4 cup all-purpose flour


- 3 cups chicken broth, divided


- 1 tablespoon Splenda


- 1 cup evaporated milk


---


Instructions:

1. Sauté the Aromatics: In a large saucepan, heat the olive oil over medium heat. Add the diced onion, basil, thyme, salt, and black pepper. Cook, stirring occasionally, until the onion is tender and golden.
2. Simmer the Tomatoes: Add the diced tomatoes and tomato paste to the saucepan. Stir well and let the mixture simmer for about 10 minutes, allowing the flavors to meld together.
3. Thicken the Base: In a small bowl, whisk together the flour and 1/4 cup of chicken broth until smooth. Stir this mixture into the tomato mixture, ensuring it is well blended.
4. Create the Soup: Add the remaining chicken broth to the saucepan. Let the soup simmer for 30 minutes, stirring frequently to prevent sticking.
5. Blend to Perfection: Use an immersion blender to puree the soup until smooth.
6. Finish with Creaminess: Stir in the Splenda and evaporated milk. Heat through before serving.

---


A Nostalgic Family Memory:


Growing up, our family kitchen was the heart of our home, a place where the aroma of delicious meals would draw us together. I vividly recall a chilly autumn evening when my grandmother decided to make her famous Creamy Tomato Soup. The air outside was crisp, and the leaves painted the ground in hues of gold and red. Inside, the kitchen was warm with the smell of onions sautéing in olive oil, a scent that always signaled something special was brewing.


As we gathered around the table, bowls steaming with the rich, creamy soup, my grandmother regaled us with stories of her childhood. She spoke of simpler times, of a little kitchen in her hometown where tomato soup was a cherished tradition. With each spoonful, we were not just savoring a meal but also connecting with our roots and the love that spanned generations.


Even now, whenever I prepare this Creamy Tomato Soup, I am transported back to that evening, to the laughter and warmth of family. This recipe is more than just a dish; it's a vessel of memories, a reminder of the love that binds us all together.


---


Bring a taste of nostalgia and warmth to your table with this Creamy Tomato Soup. Perfect for nourishing both body and soul, it's a dish that invites you to create new memories while cherishing the old.

Read more about Appetizers

Read more about Main Dishes

Read more about Desserts

Farro & Leek Soup | Made by Meaghan Moineau

Farro & Leek Soup | Made by Meaghan Moineau

Title:

Hearty Comfort in a Bowl: The Timeless Allure of Farro & Leek Soup


Description:

Dive into the nourishing warmth of Farro & Leek Soup, a dish that marries the rustic charm of ancient grains with the delicate flavors of leeks and herbs. This blog post takes you on a culinary journey, complete with a heartwarming family memory, and offers a simple yet flavorful recipe that’s perfect for any season. Discover why this soup is not just a meal, but a cherished tradition.


---


A Nostalgic Journey with Farro & Leek Soup

There's something deeply comforting about a bowl of soup. It’s warmth, aroma, and the memories it evokes. For me, Farro & Leek Soup is a gateway to cherished family moments. Growing up, our kitchen was the heart of the home, especially during the chilly months when my grandmother would lovingly prepare this hearty soup. The scent of leeks and herbs wafting through the house was the signal that warmth and love were soon to embrace us.


The Secret to a Simple Yet Flavorful Soup
What makes Farro & Leek Soup so special is its simplicity. With just a few humble ingredients, you can create a dish that is not only satisfying but also deeply nourishing. Here's how you can recreate this classic family favorite:
Ingredients:

- 2 tablespoons olive oil


- 3 white leeks, thinly sliced


- 200 grams farro


- 2 stalks of celery, diced


- 2 carrots, diced


- 1 onion, diced


- 4 cups meat stock (homemade is best, no bouillon cubes)


- 1 sprig of thyme


- 1 bay leaf


- Parmesan cheese, for garnish


- Salt & pepper, to taste


Instructions:
1. Prepare the Base: In a heavy-bottomed pot, heat the olive oil over medium-low heat. Add the leeks, celery, carrots, and onion. Sweat the vegetables until they become translucent and soft, ensuring they do not brown. If they start to stick, reduce the heat and add a spoonful of water.
2. Incorporate the Farro: Add the farro to the pot, toasting it with the vegetables for 1-2 minutes to enhance its nutty flavor.
3. Simmer with Stock and Herbs: Introduce the thyme, bay leaf, and meat stock to the mix. Season with salt and pepper to your preference. Bring the soup to a low simmer and let it cook for 30-40 minutes until the farro is tender, stirring occasionally.
4. Adjust the Consistency: Depending on your preference, you can adjust the consistency of the soup. For a stew-like texture, hold back some of the stock. For a more soupy consistency, feel free to add more stock.
5. Finish and Serve: Drizzle with extra virgin olive oil, sprinkle with freshly grated Parmesan cheese, and serve hot with a side of toasty bread.
A Dish Beyond the Kitchen

Every spoonful of this soup takes me back to my grandmother's kitchen, where laughter mingled with the aroma of cooking. It was a place where stories were shared, and bonds were strengthened. Today, as I prepare Farro & Leek Soup for my own family, I am reminded of the timeless nature of food and its power to connect generations.


Difficulty Level: 4/10
Classification: Main Dish

With its rich flavors and wholesome ingredients, Farro & Leek Soup is more than just a meal; it is a tradition, a memory, a hug in a bowl. Whether you're seeking comfort on a cold day or a light yet satisfying main dish, this soup is sure to become a cherished favorite in your home, just as it has in mine.

Read more about Appetizers

Read more about Main Dishes

Read more about Desserts

Caribbean black bean and sweet potato soup | Made by Meaghan Moineau

Caribbean black bean and sweet potato soup | Made by Meaghan Moineau

Title: A Warm Caribbean Hug in a Bowl: Black Bean and Sweet Potato Soup
Description: Dive into a heartwarming journey with our Caribbean Black Bean and Sweet Potato Soup. Infused with aromatic spices and enriched with sweet potatoes, this delightful dish is a symphony of flavors that will transport you to the sun-kissed beaches of the Caribbean. Join us as we explore this comforting recipe, perfect for any season, and share a nostalgic family memory that makes this dish truly special.

---


A Taste of the Caribbean: Black Bean and Sweet Potato Soup


As the leaves begin to fall and the air turns crisp, there's nothing quite like a steaming bowl of soup to warm the soul. This Caribbean Black Bean and Sweet Potato Soup is more than just a meal; it's a memory, a tradition, and a comforting embrace from the past.


Ingredients:

- 1 cup dry black turtle beans

- 2 tablespoons coconut oil


- 1 yellow sweet onion, diced


- 2 jalapenos, seeded and chopped


- 1 teaspoon ground ginger


- 1/2 teaspoon ground allspice


- 1 teaspoon thyme


- 1 teaspoon coarse sea salt


- 6 cups vegetable broth


- 2 large sweet potatoes, peeled and diced


- 2 tablespoons brown sugar


- 2 green onions, chopped


- 1/4 cup fresh cilantro, chopped


- Salt and pepper to taste


Instructions:

1. Prepare the Beans: Rinse the black turtle beans and place them in a large bowl. Cover with 4 inches of water and soak overnight, or for at least 8 hours. After soaking, strain and rinse the beans.
2. Sauté the Aromatics: In a large soup pot, heat the coconut oil over medium heat. Add the diced onion and chopped jalapenos, sautéing for about 10 minutes until they become soft and fragrant.
3. Simmer the Soup: Add the rinsed beans and vegetable broth to the pot. Stir in the ground ginger, allspice, thyme, and coarse sea salt. Bring the mixture to a boil, then reduce the heat and let it simmer gently for 1 hour and 30 minutes.
4. Add Sweetness and Texture: Introduce the diced sweet potatoes and brown sugar into the pot, allowing the soup to simmer for an additional 30 minutes. This will ensure the beans and sweet potatoes are tender and packed with flavor.
5. Blend for Creaminess: Carefully puree 1 cup of the soup in a blender, then return it to the pot. This step enhances the soup's texture, making it creamy while still maintaining its hearty character.
6. Garnish and Serve: Stir in the chopped green onions and fresh cilantro. Adjust the seasoning with salt and pepper to suit your taste. Serve hot and enjoy!

A Nostalgic Memory


This soup is a beloved family tradition, taking me back to my grandmother's cozy kitchen. I remember the warmth of the stove mingling with the rich aroma of spices, as we gathered around the table for our Sunday family dinner. My grandmother, with her gentle hands, would prepare this soup with love, weaving tales of her own childhood in the Caribbean. Each spoonful was a reminder of those cherished moments, where laughter and stories filled the air, and the soup brought us all closer together.


Difficulty Rating: 5/10


This recipe is moderately challenging, perfect for home cooks looking to expand their culinary repertoire with a dish that is both satisfying and impressive.


Classification: Main Dish


This Caribbean Black Bean and Sweet Potato Soup stands out as a hearty main dish, perfect for a comforting dinner or a cozy lunch. Experience the warmth and flavors of the Caribbean with every delightful bite.

Read more about Appetizers

Read more about Main Dishes

Read more about Desserts

A Post Thanksgiving “sopa De Tortilla” | Made by Meaghan Moineau

A Post Thanksgiving “sopa De Tortilla” | Made by Meaghan Moineau

A Heartwarming Post-Thanksgiving Tradition: Sopa De Tortilla


Description:

Transform your Thanksgiving leftovers into a comforting and delicious Sopa De Tortilla. This flavorful Mexican-inspired dish is a wonderful way to make use of leftover turkey while warming the soul with its rich and aromatic broth. Perfect for chilly post-holiday days, this recipe will become a cherished family tradition.

---


As the last leaves fall and the vibrant hues of autumn begin to fade, our family gathers once more around the table, not for a grand feast, but for something even more special—a humble bowl of Sopa De Tortilla. This post-Thanksgiving tradition has been passed down through generations, a beloved ritual that warms not just our bodies but our hearts.


Ingredients:

- 1 whole turkey breast

- 1 avocado, cubed


- 2 large carrots, peeled and cubed


- 2 stalks of celery, chopped


- 1 bunch of cilantro (stems and leaves separated)


- 2 tablespoons olive oil


- 2 cloves garlic, quartered


- 1 large onion, quartered


- 1 roasted poblano pepper, peeled and deveined


- 1 8 oz. can organic stewed tomatoes


- 1 cup fried tortilla strips or good quality store-bought tortilla chips


- Ground cumin, to taste


- Salt, to taste


Instructions:


1. Prepare the Stock:

- In a large stockpot, drizzle 2 tablespoons of olive oil and add the quartered onion, garlic, and turkey breast.


- Add the carrot peels, and 2 stalks of celery, and cilantro stems.


- Fill the pot with water until it is three-quarters full. Cover and boil for 1-2 hours, ensuring the stock does not reduce to less than a quarter of the pot.


- Remove the turkey from the bone and reserve the meat. Discard the bone and vegetables. Strain the stock and set aside 1-2 cups per guest for the soup, freezing any leftovers for future use.


2. Make the Soup:

- In a blender, combine the stewed tomatoes, olive oil, a pinch of salt, and the roasted poblano pepper. Puree and set aside.


- Add cubed carrots and chopped celery to the stock and boil for 30 minutes until tender.


- Gradually add the pureed pepper-tomato mixture to the broth.


- Include 1/3 cup of turkey meat per cup of stock, allowing it to simmer.


- Adjust seasoning with salt and a pinch of ground cumin.


3. Serve:

- Ladle the soup into bowls, topping with additional turkey meat, tortilla strips, fresh cilantro, and cubed avocado.


Nostalgic Family Memory:


Every year, after the Thanksgiving festivities have quieted down, my grandmother would gather us in the kitchen and retell the story of how this Sopa De Tortilla became our family's tradition. It began decades ago when her parents, having immigrated from Mexico, found themselves facing their first American Thanksgiving. Not wanting to waste the leftover turkey, they decided to create a dish reminiscent of their homeland. This was how our family's version of Sopa De Tortilla was born—a fusion of cultures, flavors, and love.


As we sit around the table, savoring each spoonful, I'm reminded of the countless stories shared and the laughter that filled our home, year after year. This simple soup connects us to our roots and to each other, making every post-Thanksgiving gathering a cherished memory.


Difficulty: 5/10

Classification: Main Dish


---


This Sopa De Tortilla is more than just a meal; it's a celebration of family and tradition. May it bring warmth and joy to your home as it has to ours.

Read more about Appetizers

Read more about Main Dishes

Read more about Desserts

Instant Pot Chicken Tacos | Made by Meaghan Moineau

Instant Pot Chicken Tacos | Made by Meaghan Moineau

Instant Pot Chicken Tacos: A Quick, Flavorful Feast for the Whole Family


Description


Discover the magic of Instant Pot Chicken Tacos, a delicious and easy meal that brings families together. With simple ingredients like chicken breasts, purple onion, and canned salsa, this dish transforms into a mouthwatering main course that's sure to please. Perfect for busy weeknights or a casual dinner party, these tacos capture the essence of home-cooked comfort food in a fraction of the time. Dive into this recipe and enjoy a taste of nostalgia with every bite.


A Nostalgic Family Memory


Growing up, Taco Tuesdays were a cherished tradition in our household. As the sun dipped below the horizon, casting a warm glow over our kitchen, my siblings and I would gather around the table, eagerly awaiting the sizzling sounds and tantalizing aromas that filled the air. Mom would always make her signature chicken tacos, a recipe passed down from her grandmother. The kitchen buzzed with laughter and stories as we chopped fresh onions and seasoned the chicken with care.


One particular Tuesday stands out in my memory. It was a chilly autumn evening, and the first hint of winter's bite was in the air. Mom had recently received an Instant Pot as a gift, and she was eager to try it out with our beloved taco recipe. We were skeptical at first—could this new gadget really recreate the flavors we held so dear?


As the Instant Pot worked its magic, we shared stories of past family adventures and dreamed of future ones. The smell of seasoned chicken and salsa wafted through the room, and our mouths watered in anticipation. When the timer finally beeped, signaling the end of the cooking process, we gathered around as Mom carefully lifted the lid.


The result was nothing short of spectacular. The chicken was tender and infused with the rich flavors of taco seasoning and salsa. As we bit into our tacos, the familiar taste of lime juice and savory chicken transported us back to a simpler time. That evening, we realized that while the method had changed, the heart of our family tradition remained unchanged.


Recipe


Ingredients


- 2 chicken breasts


- Black pepper


- 1 tablespoon taco seasoning


- 1 purple onion, sliced


- 1 cup canned salsa


- 2 tablespoons lime juice


Instructions


1. Season both sides of the chicken breasts with black pepper and taco seasoning.


2. Place the seasoned chicken into the bottom of the Instant Pot.


3. Top the chicken with sliced purple onion and canned salsa.


4. Secure the Instant Pot lid into the lock position.


5. Select the Poultry setting and set the timer for 12 minutes.


6. Once cooking is complete, allow the Instant Pot to naturally release pressure for 20 minutes.


7. Carefully remove the chicken from the Instant Pot and shred it using two forks.


8. Sprinkle the shredded chicken with lime juice for added zest.


9. Serve over rice or with warm tortillas for a delightful taco experience.


Difficulty Rating


This recipe is rated a 3 out of 10 for difficulty, making it an ideal choice for cooks of all skill levels. Its simplicity and efficiency make it a fantastic option for those new to using an Instant Pot or anyone looking for a quick, satisfying meal.


Classification


Instant Pot Chicken Tacos are classified as a Main Dish, perfect for family dinners or entertaining guests with minimal fuss.


---


Embrace the ease and flavor of Instant Pot Chicken Tacos, and create new family memories with this delightful dish. Whether you're a seasoned cook or just starting out, this recipe is sure to become a beloved staple in your culinary repertoire.

Read more about Appetizers

Read more about Main Dishes

Read more about Desserts

Cabbage and sausages in beer | Made by Meaghan Moineau

Cabbage and sausages in beer | Made by Meaghan Moineau

Title: A Heartwarming Bowl: Cabbage and Sausages in Beer
Description: Dive into a comfort food classic with our Cabbage and Sausages in Beer recipe. This simple yet flavorful main dish combines savory smoked sausages with the earthy goodness of cabbage and the subtle sweetness of beer. Perfect for a cozy family dinner, this dish will fill your kitchen with mouthwatering aromas and your heart with nostalgia.

---


There are certain dishes that transport us back in time, evoking memories that are as rich and comforting as the flavors themselves. Our Cabbage and Sausages in Beer recipe is one such culinary time machine, whisking me back to countless family gatherings in my grandmother's warm, bustling kitchen.


A Stroll Down Memory Lane


Growing up, Sunday dinners at Grandma's house were a cherished ritual. The savory aroma of smoked sausages simmering in beer would greet us at the door, mingling with the laughter of cousins and the comforting hum of adult conversation. The centerpiece of our family feast was always a heaping bowl of cabbage and sausages, tender and steaming, served with a side of thick, crusty bread.


Grandma had a knack for turning simple ingredients into something magical. She would melt a generous pat of butter in her well-loved pot, adding diced onions that would sizzle and turn golden, filling the room with a sweet, caramelized scent. A sprinkle of sugar and salt would follow, her wooden spoon working its way around the pan with the precision of years of practice.


Next came the beer—a splash of golden liquid that bubbled and hissed as it hit the pan, its malty aroma inviting everyone to gather around. The sausages were nestled in among the cabbage and potatoes, their smoky essence infusing the entire dish. The pot, brimming with promise, would simmer gently, allowing the flavors to meld into a comforting symphony.


Creating Your Own Memories


To recreate this dish, start by melting butter in a large pan over medium-low heat. Add the onions, a pinch of sugar, and a dash of salt. Stir frequently, watching as the onions transform into a golden hue, about 5-8 minutes. Pour in the beer, scraping up any flavorful bits clinging to the bottom of the pan.


Introduce the smoked sausages, green cabbage, and potatoes into this aromatic mix. Let the dish simmer, covered, for 20 minutes or until the vegetables are tender and full of flavor. Serve the sausages and veggies in big bowls, ensuring each serving is accompanied by plenty of the rich cooking liquid. A sprinkle of freshly cracked pepper adds the final touch.


A Dish for Every Occasion


This recipe, with its simple ingredients and deep, satisfying flavors, makes for a perfect main dish. It's a 3 out of 10 on the difficulty scale, making it accessible for cooks of all skill levels. Whether you're looking to create new family traditions or simply need a hearty meal for a chilly evening, this Cabbage and Sausages in Beer will not disappoint.


As you savor each bite, let the comforting flavors remind you of the warmth of family and the simple joys of a meal shared with loved ones. Here's to creating your own cherished memories around the dining table. Enjoy!

Read more about Appetizers

Read more about Main Dishes

Read more about Desserts

Broccoli Cheddar Soup, A Panera Bread Co. Copycat | Made by Meaghan Moineau

Broccoli Cheddar Soup, A Panera Bread Co. Copycat | Made by Meaghan Moineau

Title: Savor the Comfort: A Panera Bread Co. Copycat Broccoli Cheddar Soup Recipe
Description: Dive into the heartwarming nostalgia of a family favorite with this Broccoli Cheddar Soup, inspired by Panera Bread Co. Relive cherished memories as you create a bowl of creamy, cheesy delight. Perfect as a main dish, this recipe is a 6 out of 10 on the difficulty scale, making it a delightful challenge for home chefs.

---


There’s something undeniably comforting about a bowl of Broccoli Cheddar Soup. For me, it's a dish that instantly transports me back to chilly Sunday afternoons spent with my family. The kitchen would fill with warmth and the rich aroma of simmering cheese, as my mom and I prepared our own version of Panera Bread Co.'s famous soup. It was our little tradition, a perfect blend of laughter, stories, and, of course, great food.


Ingredients:

- 4 tablespoons butter


- 1 onion, diced


- 1/4 cup flour


- 2 cups half-and-half


- 3 cups low sodium chicken broth


- 2 bay leaves


- A pinch of nutmeg


- Salt and pepper to taste


- 4 cups broccoli florets


- 2 carrots, diced


- 2 1/2 cups shredded yellow and white sharp cheddar cheese


- Sourdough bread boules, for serving


Instructions:
1. Sauté the Aromatics: Begin by melting the butter in a large Dutch oven or pot over medium heat. Add the diced onion and cook until tender, about 5 minutes. This step always reminds me of my mom’s gentle stirring, ensuring the onions never browned too quickly.
2. Create the Base: Whisk in the flour and cook until golden, 3 to 4 minutes. Gradually whisk in the half-and-half until smooth. The creamy texture swirling in the pot often sparked conversations about school and friends.
3. Simmer the Soup: Add the chicken broth, bay leaves, and nutmeg. Season with salt and pepper, and bring the soup to a simmer. Reduce the heat to medium-low and cook, uncovered, for about 20 minutes, allowing the flavors to meld together.
4. Prepare the Bread Bowls: While the soup simmers, use a sharp knife to cut a circle into the top of each sourdough loaf, leaving a 1-inch border. Hollow out the middle, creating a perfect vessel for the soup. This was always my favorite part, as I loved nibbling on the soft bread innards.
5. Add the Vegetables: Stir in the broccoli and carrot to the broth mixture and simmer until tender, about 20 minutes. Discard the bay leaves afterwards.
6. Blend to Perfection: Puree the soup in batches in a blender until smooth, leaving some flecks of carrot and broccoli visible. Alternatively, you can use an immersion blender directly in the pot.
7. Incorporate the Cheese: Return the soup to the pot and add the shredded cheese, whisking over medium heat until melted. If the soup seems too thick, add up to 3/4 cup water.
8. Serve and Enjoy: Ladle the soup into the prepared bread bowls. Garnish with additional cheese if desired. Each bite is a delicious reminder of family gatherings and shared stories.
Nostalgic Story:

One particular memory stands out vividly. It was a snowy day, and the world outside was a blanket of white. My siblings and I had spent hours playing in the snow, our cheeks red from the cold. As we stumbled inside, the inviting smell of broccoli cheddar soup greeted us. We gathered around the kitchen table, still in our mittens and scarves, as my mom ladled the soup into freshly prepared bread bowls. We laughed, shared our day's adventures, and savored each warm, cheesy bite. That day, the soup was more than just a meal; it was the essence of home.


Difficulty: 6/10
Classification: Main Dish

This Broccoli Cheddar Soup not only fills your belly but also warms your soul, bringing a touch of nostalgia with every ladle. Whether you're recreating family memories or starting new traditions, this recipe is sure to become a beloved favorite.

Read more about Appetizers

Read more about Main Dishes

Read more about Desserts

Grilled Ham and Cheese French Toast For A Quick Weeknight Dinner | Made by Meaghan Moineau

Grilled Ham and Cheese French Toast For A Quick Weeknight Dinner | Made by Meaghan Moineau

Title: Quick and Delicious: Grilled Ham and Cheese French Toast for a Weeknight Treat
Description: Discover the comfort of a Grilled Ham and Cheese French Toast that’s perfect for those busy weeknights. Made with wholesome ingredients like low-fat Jarlsberg cheese, lean turkey ham, and hearty wheat bread, this dish combines the savory satisfaction of a classic sandwich with the sweet nostalgia of French toast. Easy to prepare and packed with flavor, this meal is sure to become a family favorite.

---


A Taste of Childhood: Grilled Ham and Cheese French Toast


There’s something inherently comforting about a grilled cheese sandwich. The golden, crispy bread and gooey, melted cheese transport many of us back to simpler times. This Grilled Ham and Cheese French Toast elevates that classic comfort, combining it with the delightful flavors of French toast for a meal that’s both nostalgic and novel.


Ingredients:


- Buttermilk: Adds a tangy richness to the French toast coating.
- Egg Whites: Helps bind the ingredients and provides a light texture.
- Dijon Mustard: Infuses the bread with a subtle kick.
- Wheat Bread: Offers a wholesome base for the sandwich.
- Low Fat Jarlsberg Cheese: Melts beautifully and imparts a nutty flavor.
- Lean Turkey Ham: A healthier alternative to traditional ham.
- Dill Pickles: Adds a crunchy, tangy contrast.
- Low Fat Light Smart Balance Heart Right: Ensures a buttery crust without the extra calories.

Instructions:


1. Preheat the Oven: Set it to 350 degrees to keep the sandwiches warm.
2. Prepare the Coating: In a shallow bowl, whisk together buttermilk and egg whites, then set aside.
3. Assemble the Sandwiches: Spread mustard on each slice of bread. Top half with cheese, ham, and pickles, then complete with remaining slices.
4. Cook the Sandwiches: Melt reduced-fat butter in a nonstick pan over medium heat. Dip sandwiches in the buttermilk mixture, ensuring they’re lightly coated. Cook covered for 3-5 minutes, flip and press, then cook uncovered for another 2-3 minutes until golden.
5. Keep Warm: Place cooked sandwiches on a baking sheet in the oven while repeating with the remaining sandwiches.
6. Serve: Slice each sandwich in half and enjoy with a fork and knife.

A Slice of Family Memory


Growing up, my family had a tradition of spending Friday nights together, sharing stories over a comforting meal. My grandmother, a culinary enthusiast, often surprised us with creative twists on classic dishes. One memorable evening, she introduced us to her version of Grilled Ham and Cheese French Toast. As we gathered around the table, the air filled with the aroma of melting cheese and sizzling butter, we knew we were in for a treat.


This dish, with its crispy edges and soft, cheesy center, quickly became a family favorite. Every bite was a delightful blend of flavors and textures, reminiscent of lazy Sunday mornings and bustling family gatherings. Even today, preparing this meal brings back those cherished memories, turning any weeknight dinner into a warm family occasion.


Difficulty Rating: 3/10


This Grilled Ham and Cheese French Toast is simple to prepare, making it a perfect choice for a quick and satisfying weeknight dinner. With minimal ingredients and straightforward instructions, even a novice cook can master this dish. Enjoy the fusion of flavors and the joy of creating a meal that’s both nostalgic and delicious.


Classification: Main Dish

---


Embrace the nostalgia and savor every bite of this Grilled Ham and Cheese French Toast. It’s more than just a meal; it’s a journey back to the warmth of family gatherings and the joy of sharing good food with loved ones.

Read more about Appetizers

Read more about Main Dishes

Read more about Desserts

Quick and Easy Southwestern Corn Chowder | Made by Meaghan Moineau

Quick and Easy Southwestern Corn Chowder | Made by Meaghan Moineau

Title: A Hearty Bowl of Comfort: Quick and Easy Southwestern Corn Chowder
Description: Dive into the warmth of Southwestern flavors with this Quick and Easy Corn Chowder. Perfect for busy weeknights, this delightful dish combines vibrant vegetables, tender chicken, and creamy cheese for a soul-satisfying experience. Join me as I share my personal family memories tied to this comforting meal.

---


As the leaves begin to turn and the air becomes crisp, there's nothing quite like a warm, hearty soup to bring comfort to both the body and soul. Our Quick and Easy Southwestern Corn Chowder is not just a dish; it's a bowl of memories, nostalgia, and love. This flavorful chowder combines the earthy sweetness of fresh corn with the gentle heat of chili flakes, making it a perfect companion for cozy evenings.


Nostalgic Family Memory:

Growing up, my family always gathered around the kitchen on Sunday evenings to prepare meals together. It was a sacred ritual, a time to connect after our busy weeks. My grandmother, with her worn-out apron and gentle smile, was the maestro of our kitchen symphony. She had an uncanny ability to turn simple ingredients into something magical, and her Southwestern Corn Chowder was no exception.


I fondly remember the aroma of onions and peppers gently sweating in the Dutch oven, filling the house with an inviting warmth. As a child, my job was to carefully measure the corn kernels, making sure not to spill any on our kitchen floor—a task I took very seriously. The heart of our chowder was always the fresh corn, harvested from our backyard garden, adding a touch of sweetness that only nature can provide.


As my grandmother stirred the pot, she would share stories of her childhood, tales of her family's own kitchen gatherings in the Southwest. Each spoonful of chowder was a journey back to those stories, a connection to our roots and a reminder of the love that bound us together. Now, every time I make this dish, I feel her presence in the kitchen, guiding me, just as she did all those years ago.


Recipe Details:
Ingredients:

- 2 tablespoons butter


- 1 cup cheddar cheese (optional)


- 1 teaspoon chili flakes


- 4 cups yellow fresh corn kernels


- 1 green bell pepper, diced


- 1 cup half and half


- 1 red bell pepper, diced


- Salt and pepper to taste


- 2 cups cooked shredded chicken


- 1 cup sweet onions, diced


- 4 cups vegetable stock


Instructions:

1. In a Dutch oven, melt the butter over medium heat. Add the diced sweet onions and bell peppers, along with a pinch of salt. Sweat the vegetables until the onions become translucent and fragrant.


2. Sprinkle in the chili flakes, allowing them to release their warmth into the mix.


3. Pour in the vegetable stock, followed by the fresh corn kernels and shredded chicken. Stir to combine and bring the mixture to a gentle simmer. Cover and let it simmer for about 10 minutes, allowing the flavors to meld.


4. Once the chowder has simmered, reduce the heat and stir in the half and half. If desired, add the cheddar cheese, stirring until melted and incorporated.


5. Season with salt and pepper to taste, adjusting to your preference.


6. Serve hot, garnished with additional cheese or fresh herbs if desired.


Difficulty Rating: 3/10
Classification: Main Dish

This Southwestern Corn Chowder is more than just a meal; it’s a tradition, a family heirloom passed down through generations, warming hearts and homes with its rich flavors and cherished memories. Enjoy this dish with your loved ones and create your own stories to share around the dinner table.


---


Let us know how this recipe turned out for you and share your own kitchen memories in the comments below!

Read more about Appetizers

Read more about Main Dishes

Read more about Desserts

Glazed pork chops | Made by Meaghan Moineau

Glazed pork chops | Made by Meaghan Moineau

Title: A Taste of Home: Glazed Pork Chops with a Nostalgic Twist
Description: Dive into a culinary journey with our Glazed Pork Chops recipe, perfectly balanced with honey, soy sauce, and balsamic vinegar. This main dish not only promises a delightful dining experience but also brings back cherished family memories. Discover how to transform simple ingredients into a meal that speaks to the heart and soul. Rated a 5/10 on the difficulty scale, this dish is accessible yet impressive, perfect for any home cook eager to bring a touch of nostalgia to the dinner table.

---


Glazed Pork Chops: A Recipe Steeped in Family Tradition


In the heart of every family kitchen, there exists a dish that holds the power to transport us back to simpler times. For my family, that dish is Glazed Pork Chops. The aroma of sizzling pork, mingling with the sweet and tangy glaze, evokes memories of Sunday dinners at my grandmother's house where laughter and love were the main courses.


Growing up, Sundays were sacred. The whole family would gather around Grandma’s large oak dining table, eager to share stories and enjoy the feast she had lovingly prepared. Among all the delightful dishes, it was her Glazed Pork Chops that stole the show. Tender, juicy, and perfectly seasoned, they were the highlight of our meals.


As I recreate this dish today, I am reminded of my grandmother's kitchen, a place filled with warmth and the comforting hum of conversations. The secret to her unforgettable pork chops lay not only in the ingredients but in the love she infused into each step of the process.


Ingredients:


- Lean boneless pork chops


- Black pepper


- 2 tablespoons butter


- 2 garlic cloves, minced


- 1/4 cup honey


- 2 tablespoons soy sauce


- 1 tablespoon balsamic vinegar


- 1 tablespoon cornstarch


- Fresh green onions, chopped


Instructions:


1. Prepare the Pork Chops: Start by pressing one side of each pork chop into cracked black pepper. This step is crucial for infusing the meat with a peppery kick that complements the sweet glaze.
2. Cook the Pork Chops: Heat a nonstick grill skillet until hot. Add the pork chops, pepper side down, and cook for about 4 minutes or until browned. Reduce the heat to medium, flip the pork chops, and continue cooking for 6-8 minutes. Once done, remove the skillet from the heat, cover the pork chops, and set aside.
3. Prepare the Glaze: In a separate bowl, mix honey, soy sauce, balsamic vinegar, and cornstarch until smooth. Add a pinch of black pepper and stir well.
4. Make the Sauce: Melt butter in a small pan over medium heat. Add minced garlic and cook for 30 seconds, stirring constantly to prevent burning. Stir in the honey mixture, bring to a boil, and cook for 1 minute, stirring continuously until the sauce thickens.
5. Serve: Spoon the luscious glaze over the pork chops and sprinkle with fresh green onions. For a complete meal, serve alongside creamy polenta and a fresh green salad.

A Dish for Every Occasion


Rated 5/10 on the difficulty scale, this main dish is perfect for both novice cooks and seasoned chefs looking to add a nostalgic twist to their repertoire. The balance of flavors, from the robust pepper to the sweet and tangy glaze, creates a symphony of taste that leaves a lasting impression.


As I prepare this dish today, I am enveloped in a sense of nostalgia, remembering the joy and unity that this meal brought to my family. I hope that, in sharing this recipe, you too can create new memories while honoring the old. Embrace the simplicity, savor the flavors, and let each bite transport you to a place where love, laughter, and delicious food reign supreme.

Read more about Appetizers

Read more about Main Dishes

Read more about Desserts

Tortellini In Brodo | Made by Meaghan Moineau

Tortellini In Brodo | Made by Meaghan Moineau

Title: A Taste of Tradition: Reliving Family Memories with Tortellini In Brodo
Description: Dive into the comforting world of Tortellini In Brodo, a classic Italian dish that combines simplicity with rich flavors. This heartwarming recipe not only serves as a perfect main dish but also unlocks cherished family memories. Join me as I share the recipe, a personal story, and tips to recreate this delightful meal at home.

---


Tortellini In Brodo: A Soupy Embrace of Tradition


There's something magical about the aroma of simmering chicken stock and the tender pockets of tortellini floating within. For me, Tortellini In Brodo is more than just a meal; it's a fragrant journey back to my grandmother's kitchen in the heart of winter. As the snowflakes danced outside, we gathered around the dining table, eagerly anticipating the soul-warming bowls that awaited us.


Ingredients You'll Need:

- Chicken stock

- Fresh lemon juice


- Lemon zest


- Parmigiano-Reggiano


- Salt and pepper


- Frozen tortellini


Instructions to Warm the Heart:

1. Begin by heating your chicken stock to a gentle boil. The rich aroma will soon fill your kitchen, much like it did in my grandmother's.

2. Add the frozen tortellini. As they cook, they absorb the savory essence of the broth, transforming into delightful morsels of comfort.


3. Once cooked, ladle the steaming soup into bowls. The warmth seems to wrap around you like a cozy blanket.


4. Squeeze fresh lemon juice into each bowl, stirring gently to incorporate the tangy brightness.


5. Grate a generous amount of Parmigiano-Reggiano on top, allowing the cheese to melt ever so slightly into the broth.


6. Finish with a sprinkle of lemon zest, freshly ground salt, and pepper for that perfect balance of flavors.


7. Serve immediately, and watch as smiles light up around the table.


A Nostalgic Family Memory:


Every spoonful of Tortellini In Brodo transports me back to those cherished winter evenings with my family. My grandmother, a beacon of warmth and love, would often share stories of her childhood in Italy as we savored each bite. Her stories were as rich as the broth itself, weaving tales of her youthful adventures and the traditional Italian recipes passed down through generations. This dish was more than sustenance; it was a connection to our heritage, a reminder of where we came from, and a testament to the love that binds us.


As I prepare this dish today, I find joy in the continuity of tradition, knowing that I am creating new memories while honoring the old. It's a simple recipe, yet its impact is profound, reminding us that the essence of family is captured in the meals we share.


Recipe Difficulty: 3/10


Classification: Main Dish


Whether you're a seasoned cook or a kitchen novice, Tortellini In Brodo is a delightful recipe that promises to bring warmth and joy to your home. Embrace the simplicity, savor the flavors, and as you do, may you create your own treasured memories with those you love.

Read more about Appetizers

Read more about Main Dishes

Read more about Desserts

Tropical Breakfast Quinoa | Made by Meaghan Moineau

Tropical Breakfast Quinoa | Made by Meaghan Moineau

Title: A Taste of Paradise: Tropical Breakfast Quinoa
Description: Dive into a bowl of sunshine with our Tropical Breakfast Quinoa, a delightful blend of creamy coconut, sweet pineapple, and warm cinnamon. This breakfast bowl is not only a nutritious start to your day but also a heartwarming journey back to cherished family memories. Easy to prepare and bursting with flavor, this dish is sure to become a staple in your morning routine.

---


When I was a child, Saturday mornings were the highlight of my week. My family would gather in the kitchen, the heart of our home, for a breakfast that was as much about togetherness as it was about the food. My mother, a lover of all things tropical, would often whip up a version of this Tropical Breakfast Quinoa. The aroma of coconut milk warming on the stove would fill the air, mingling with the sweet scent of pineapple and cinnamon. It was a smell that promised comfort and joy.


I remember standing on a stool, my tiny hands eagerly helping to stir the pot, watching as the ingredients melded together into a creamy, fragrant mixture. My mother would tell stories of her childhood trips to the beach, where fresh fruit was always in abundance. She’d talk about how the taste of pineapple and coconut reminded her of those sunny days, and how she wanted to bring a piece of that paradise to our table.


As the quinoa cooked, we’d prepare the toppings – toasting coconut flakes until golden, chopping pecans, and slicing strawberries. The pièce de résistance was always a subtle drizzle of balsamic vinegar, a surprising twist that added a depth of flavor to the dish. Each family member had a role, and the kitchen buzzed with laughter and chatter, turning a simple breakfast into a tapestry of shared moments.


This Tropical Breakfast Quinoa is more than just a meal; it’s a reminder of those carefree mornings, filled with love and laughter. It’s a recipe that carries the warmth of family tradition, while also infusing your mornings with the vibrant flavors of the tropics.


Instructions:

1. In a medium-sized pot, combine the cooked quinoa, light coconut milk, crushed pineapple, cinnamon, and maple syrup. Stir to blend all ingredients well.


2. Bring the mixture to a gentle boil, then reduce the heat and let it simmer. Cook for 5 minutes, stirring occasionally to ensure nothing sticks to the bottom.


3. Once cooked, spoon the quinoa mixture into bowls.


4. Top each serving with a handful of toasted coconut, chopped pecans, and sliced strawberries.


5. Finish with a light drizzle of balsamic vinegar for an unexpected yet delightful contrast.


Difficulty: 3/10
Classification: Main Dish

This recipe is a testament to the idea that the simplest of dishes can carry the most profound memories. So, gather your loved ones, and share a moment of paradise with this Tropical Breakfast Quinoa. Whether you're creating new traditions or reliving old ones, may this dish bring warmth and joy to your table.

Read more about Appetizers

Read more about Main Dishes

Read more about Desserts

Baked Ziti Or Rigatoni | Made by Meaghan Moineau

Baked Ziti Or Rigatoni | Made by Meaghan Moineau

Title: "Baked Ziti Bliss: A Nostalgic Journey Through Flavor and Family"
Description: Dive into the heartwarming world of Baked Ziti, a comforting Italian classic that brings families together. Explore this simple yet flavorful recipe, perfect for any occasion, and discover a cherished family story that highlights the joy and connection this dish brings to our lives.

---


Baked Ziti: A Taste of Tradition and Togetherness

When the aroma of Baked Ziti wafts through the house, it signals more than just a hearty Italian meal; it marks a gathering, a celebration, and a rekindling of memories. This classic dish, rich with creamy ricotta, tangy spaghetti sauce, and melty mozzarella, is more than just a recipe—it's a tradition that has warmed our family's table for generations.


Ingredients:

- Cooked ziti or rigatoni


- 1 egg, beaten


- 1 cup grated Parmesan cheese, divided


- 1 cup ricotta cheese


- 2 cups shredded mozzarella cheese


- 2 cups spaghetti sauce, divided


Instructions:
1. Combine and Create: In a large mixing bowl, combine the cooked ziti, beaten egg, 1/2 cup of Parmesan cheese, ricotta cheese, shredded mozzarella, and 1 1/2 cups of spaghetti sauce. Stir until all ingredients are evenly mixed.
2. Layer and Love: Spread 1/2 cup of spaghetti sauce on the bottom of a 2 1/2 quart baking dish, ensuring the base is nicely coated. Pour in the ziti mixture, spreading it evenly across the dish. Top with the remaining 1 1/2 cups of spaghetti sauce, ensuring every nook and cranny is covered.
3. Finish with Flair: Sprinkle the remaining 1/2 cup of Parmesan cheese over the top, creating a delightful cheesy crust as it bakes.
4. Bake to Perfection: Preheat your oven to 375 degrees Fahrenheit. Bake for 30 minutes or until the top is slightly browned and bubbling with cheesy goodness.
A Family Story to Savor:

Growing up, Baked Ziti was not just a meal; it was an event. I remember my grandmother's kitchen, a warm haven filled with the laughter of cousins and the comforting hum of family chatter. Every Sunday, she would prepare this dish with love and patience, her hands deftly mixing the ingredients while sharing stories from her own childhood in Italy.


One particular Sunday stands out in my memory. It was a rare snowy day, and the world outside was blanketed in white. As the snow softly fell, we gathered around the dining table, eager to dive into the steaming dish that promised warmth and fullness. With each bite, the room filled with satisfied murmurs and the kind of contentment that only a family meal could bring.


Now, every time I prepare Baked Ziti, I'm transported back to that snow-kissed afternoon, to the coziness of my grandmother's kitchen, and to the enduring bond that food has the power to create.


Difficulty: 3/10
Classification: Main Dish

Whether you're a seasoned cook or new to the kitchen, Baked Ziti offers a straightforward yet rewarding culinary experience. It's a dish that invites you to gather your loved ones and savor not only its rich flavors but also the precious moments spent together. So, roll up your sleeves, embrace the nostalgia, and enjoy a plate of Baked Ziti bliss.

Read more about Appetizers

Read more about Main Dishes

Read more about Desserts

South Carolina Style Pulled Pork | Made by Meaghan Moineau

South Carolina Style Pulled Pork | Made by Meaghan Moineau

Title: Savoring Southern Comfort: The Ultimate South Carolina Style Pulled Pork Recipe
Description: Dive into the heart of Southern cuisine with our South Carolina Style Pulled Pork recipe. This dish captures the essence of family gatherings, smoky barbecues, and the rich traditions of the American South. Follow our detailed guide to recreate this mouthwatering main dish, complete with a nostalgic tale that brings warmth to your culinary adventure. Rated 7/10 in difficulty, this recipe is perfect for those who cherish the art of slow cooking and the joy of sharing a hearty meal with loved ones.

---


South Carolina Style Pulled Pork: A Taste of Tradition


There's something inherently comforting about the aroma of slow-cooked pork wafting through the air, mingling with the sweet and tangy notes of a well-crafted barbecue sauce. This South Carolina Style Pulled Pork is not just a dish but a tribute to the time-honored tradition of Southern barbecues—a tradition that, for many, is synonymous with family, laughter, and the joy of good food.


Ingredients:

- 1 Boston butt pork shoulder

- 1 cup apple cider vinegar


- 1 cup barbecue sauce


- 1 tablespoon chili powder


- 2 tablespoons Dijon mustard


- 4 cloves garlic, minced


- 1 tablespoon ground cumin


- 2 tablespoons hoisin sauce


- 3 tablespoons honey


- 1/4 cup maple syrup


- 1 teaspoon crushed red pepper flakes


- 2 tablespoons soy sauce


- 1 tablespoon table salt


- 3 tablespoons tomato paste


- 2 tablespoons vegetable oil


- 2 tablespoons Worcestershire sauce


- 1 large yellow onion, diced


Instructions:

1. Prepare the Marinade: Combine Dijon mustard, apple cider vinegar, soy sauce, Worcestershire sauce, honey, and crushed red pepper flakes in a bowl. Massage the mixture into the pork shoulder or use a ziplock bag to ensure full coverage. Refrigerate for at least 3 hours, or up to 3 days, for optimal flavor infusion.
2. Prepping the Grill: Remove the marinated pork from the fridge at least an hour before cooking. Let it come to room temperature. Meanwhile, soak wood chips in water, and prepare a two-level fire on your grill, placing the soaked wood chips on the hot coals for added smokiness.
3. Smoking the Pork: Place the pork in a disposable aluminum pan on the side of the grill opposite the coals. Maintain a temperature of 275°F by adding briquettes as needed. Smoke the pork for about 3 hours, basting occasionally with the marinade.
4. Oven Cooking: Preheat your oven to 325°F. Wrap the pork in heavy-duty foil and bake for 2 hours until fork-tender.
5. Resting the Meat: Place the foil-wrapped pork in a brown paper bag, crimp the end shut, and let it rest for an hour.
6. Making the Barbecue Sauce: While the pork rests, sauté onions and garlic in oil until translucent. Add tomato paste, hoisin sauce, maple syrup, and the remaining ingredients. Simmer for 30 minutes and set aside.
7. Shred and Serve: Shred the pork and mix with a cup of barbecue sauce. Serve with additional sauce on the side.

A Nostalgic Flavor Journey


Growing up, family barbecues were the highlight of my summers. The smoky scent of pork mingling with laughter and the clinking of glasses set the scene for unforgettable evenings. I remember my grandmother, the queen of Southern cooking, meticulously preparing her famous pulled pork for our annual family reunion. As kids, we’d sneak bites of the tender meat before it even hit the table, earning playful scolds from the adults.


The secret, she'd say with a wink, was in the marinade—a blend of tangy, sweet, and spicy flavors that danced on the palate. Her recipe, a closely guarded family treasure, was passed down to me, and I now carry the torch, sharing her legacy with my own children. Every time I prepare this dish, I’m transported back to those sun-drenched afternoons, surrounded by the warmth of family and the simple joy of sharing a meal together.


Difficulty: 7/10

Classification: Main Dish


This South Carolina Style Pulled Pork is not just about the flavors but the memories it evokes—making it a truly special dish to share with your loved ones. So fire up your grill, gather your family, and embark on a culinary journey that promises to delight your senses and warm your heart.

Read more about Appetizers

Read more about Main Dishes

Read more about Desserts

Chicken Adobo & Coconut Ginger Rice | Made by Meaghan Moineau

Chicken Adobo & Coconut Ginger Rice | Made by Meaghan Moineau

Title: Savoring Memories: The Heartwarming Taste of Chicken Adobo & Coconut Ginger Rice


Description: Discover the rich flavors of Chicken Adobo paired with Coconut Ginger Rice. This comforting main dish is not just a feast for the senses but a nostalgic journey back to cherished family gatherings.


---


Introduction


There’s something truly magical about the way certain dishes can transport us back in time, evoking cherished memories and family traditions. For me, Chicken Adobo served with Coconut Ginger Rice is one such dish. Its tantalizing aroma and bold flavors remind me of warm family gatherings and the joy of sharing meals with loved ones.


Ingredients


- For the Chicken Adobo:

- 1/2 cup low sodium soy sauce


- 1/2 cup apple cider vinegar


- 4 cloves garlic, minced


- 1 teaspoon peppercorns


- 1 tablespoon brown sugar


- 2 bay leaves


- 8 bone-in chicken thighs


- 1 tablespoon grapeseed oil


- 1 cup chicken broth


- 1 tablespoon cornstarch


- 1/4 cup water


- For the Coconut Ginger Rice:

- 3 cups water


- 1 1/2 cups rice


- Pinch of kosher salt


- 1/4 cup scallions, chopped


- 2 tablespoons fresh ginger, grated


- 1/4 cup sweetened shredded coconut


- 2 tablespoons parsley, chopped


Instructions


1. Marinate the Chicken:

In a large bowl or flat dish, combine soy sauce, vinegar, garlic, peppercorns, brown sugar, and bay leaves. Add chicken thighs, ensuring they are well-coated. Cover and marinate in the fridge for at least an hour, or for a more intense flavor, overnight.


2. Cook the Chicken:

Heat grapeseed oil in a large pan over medium-high heat. Add marinated chicken thighs, skin-side down, and brown for 2-3 minutes on each side. Once browned, remove from the pan and set aside.


3. Prepare the Sauce:

Pour the marinade and chicken broth into the pan and bring to a boil. Return the chicken to the pan, cover, and simmer for 10 minutes.


4. Thicken the Sauce:

In a small bowl, whisk together cornstarch and water. Stir into the pan and turn the chicken pieces over. Cover and cook for another 6-9 minutes, until the chicken is cooked through and the sauce thickens.


5. Cook the Rice:

Bring 3 cups of water to a boil in a separate pot. Add a pinch of salt, then stir in the rice. Cook according to package instructions. Once done, fluff the rice with a fork and toss with scallions, parsley, ginger, and shredded coconut.


6. Serve:

Plate the Coconut Ginger Rice and top with Chicken Adobo. Drizzle with the rich adobo sauce for an extra burst of flavor.


A Nostalgic Family Memory


Every year, our extended family would gather at my grandmother's house for a much-anticipated reunion. The air would be filled with laughter, and the kitchen would be bustling with activity. Among the many dishes that graced the table, my grandmother's Chicken Adobo was a perennial favorite. The recipe, passed down through generations, held a special place in our hearts.


As a child, I vividly remember the aroma of garlic and soy sauce wafting through the house, mixing with the sweet scent of coconut from the rice. My cousins and I would eagerly hover around the kitchen, sneaking tastes whenever we could. Sharing this meal, surrounded by family, was a comforting ritual that brought us all closer together. Even now, whenever I prepare this dish, those warm memories come flooding back, and it feels like my grandmother is right there with us.


Difficulty Rating


6/10 - This dish requires some preparation and attention to detail, but the effort is well worth the reward. It’s an ideal choice for a comforting and flavorful main dish that will impress your family and friends.

---


Relive the warmth of family gatherings and indulge in the rich flavors of Chicken Adobo with Coconut Ginger Rice. This dish is more than just a meal; it's a journey back to moments filled with love and laughter.

Read more about Appetizers

Read more about Main Dishes

Read more about Desserts

Best Potato Cheese Soup in a bread bowl | Made by Meaghan Moineau

Best Potato Cheese Soup in a bread bowl | Made by Meaghan Moineau

Warm Comfort in a Bread Bowl: The Best Potato Cheese Soup Recipe


Description:

Dive into a bowl of pure comfort with our Best Potato Cheese Soup, served in a warm, crusty bread bowl. This hearty dish combines creamy textures and rich flavors, making it the ultimate comfort food for chilly days. Infused with the savory goodness of Velveeta and sharp cheddar, and topped with crispy bacon crumbles, this soup is a nostalgic nod to cozy family gatherings. Perfect for both a luxurious appetizer or a satisfying main dish.

Ingredients:

- 2 tablespoons olive oil

- 1 sweet diced onion


- 2 cloves garlic, minced


- 4 cups chicken stock


- 2 cups water


- 1 teaspoon salt


- 4 cups red potatoes, diced


- 2 cups carrots, diced


- 2 cups whole milk


- 1 cup heavy cream


- 2 tablespoons butter


- 1 block Velveeta cheese, cubed


- 2 cups shredded sharp cheddar cheese


- Salt and pepper to taste


- Garnishes: Bacon crumbles, chives, sour cream, shredded Parmesan cheese


Instructions:

1. Sauté Aromatics: In a large heavy stock pot, heat 2 tablespoons of olive oil over medium heat. Add the diced onion and cook until translucent, about 2-3 minutes. Add minced garlic and sauté for another minute until fragrant.
2. Create the Base: Pour in the chicken stock, water, and salt. Stir well, then add the diced red potatoes and carrots. Bring the mixture to a boil and cook until the potatoes are fork-tender.
3. Blend and Thicken: Turn off the heat and let the soup cool slightly. Remove about half of the potatoes with a slotted spoon and blend them into a smooth paste in a food processor or blender. Return the potato paste to the pot, mixing thoroughly.
4. Add Creaminess: Place the stock pot back on medium heat. Add the whole milk, heavy cream, butter, and Velveeta cheese. Stir continuously until the butter and cheese have melted, making sure the soup does not reach a boil. Reduce heat to low as it nears boiling.
5. Enhance with Cheese: Gradually add the shredded sharp cheddar, one handful at a time, stirring each time until melted. Stir in the Parmesan cheese. Season with additional salt and pepper to taste, keeping in mind the saltiness of the cheeses.
6. Serve with Style: Ladle the warm, creamy soup into bread bowls or regular bowls. Garnish with crispy bacon crumbles, fresh chives, a dollop of sour cream, and a sprinkle of shredded Parmesan cheese.

A Nostalgic Bite:

Every spoonful of this potato cheese soup brings back cherished memories of family dinners at my grandmother's house. On chilly winter evenings, her kitchen was a haven of warmth and savory aromas. I remember sitting at the old oak table, eagerly waiting as she ladled the velvety soup into bowls, the steam curling up like whispers of comfort. The first bite was always magical; the creamy blend of potatoes and cheese enveloped in the soft bread bowl reminded me of childhood and the love that went into every meal. It was a dish that brought us all together, a shared experience of laughter and stories over a simple yet soul-satisfying meal.

Difficulty Rating: 5/10

This recipe is moderately easy to prepare, making it accessible to cooks with some experience in the kitchen. The steps are straightforward, but ensuring the perfect creamy consistency requires attention and patience.

Classification: Main Dish

This potato cheese soup is hearty enough to stand alone as a main dish, especially when served in a bread bowl that soaks up the rich flavors. However, it can also shine as a decadent appetizer to start a cozy meal.

Enjoy the warmth and nostalgia of this delicious soup, perfect for creating new family memories around the table.

Read more about Appetizers

Read more about Main Dishes

Read more about Desserts

Roasted Cauliflower and Leek Soup | Made by Meaghan Moineau

Roasted Cauliflower and Leek Soup | Made by Meaghan Moineau

Title: Comfort in a Bowl: Roasted Cauliflower and Leek Soup Recipe
Description: Discover the warmth and nostalgia of our Roasted Cauliflower and Leek Soup, an easy-to-make recipe that brings families together. With its rich, savory flavors, this dish is perfect for cozy dinners or as a starter to any meal.

---


As the leaves turn golden and a crisp chill fills the air, there's nothing quite like the comforting embrace of a warm bowl of soup. Today, I'm excited to share a beloved family recipe that has warmed our hearts and filled our home with delightful aromas—Roasted Cauliflower and Leek Soup.


Ingredients:

- 1 head of cauliflower, chopped


- 3 green and white parts of leeks, cleaned and chopped


- 4 cloves of garlic, peeled


- 2 tablespoons olive oil


- 2 cans of chicken broth


- Kosher salt, to taste


- Freshly ground black pepper, to taste


Instructions:
1. Preheat Your Oven: Start by preheating your oven to 425°F (220°C).
2. Prepare the Vegetables: Spread the chopped cauliflower, leeks, and garlic evenly on a baking sheet. Drizzle with olive oil and toss the vegetables until they are thoroughly coated. Sprinkle with kosher salt.
3. Roast to Perfection: Place the baking sheet in the oven and roast for 40-45 minutes. You'll know they're ready when the vegetables are browned on the edges and slightly softened.
4. Create the Soup Base: Transfer the roasted vegetables into a saucepan. Add the chicken broth and season with freshly ground black pepper to taste.
5. Bring to a Bubble: Heat the mixture over medium-high heat until it begins to bubble gently.
6. Blend Until Smooth: Using an immersion blender, puree the soup until it reaches a smooth, creamy consistency. If you’re using a regular blender, be cautious with hot liquids—vent the lid slightly to avoid any kitchen mishaps.
Nostalgic Family Memory:

This soup has been a staple in our family for as long as I can remember. Every autumn, my mother would gather us around in the kitchen, teaching us the art of roasting vegetables. I vividly recall the way the kitchen would fill with the sweet, nutty aroma of cauliflower and leeks mingling in the oven. It was more than just a soup—it was an event. We would eagerly await that first creamy spoonful, knowing it signaled the start of cozy nights spent together, sharing stories and laughter. This dish, with its deep flavors and heartwarming memories, always reminds me of the love and warmth that comes with family.


Difficulty Rating: 3/10
Classification: Appetizer

This Roasted Cauliflower and Leek Soup is not only easy to prepare but also a delightful way to bring a touch of nostalgia and comfort to your table. Whether you serve it as an appetizer or enjoy it as a light meal, it's sure to become a cherished favorite in your culinary repertoire. So, gather your loved ones, and let this simple yet flavorful soup create new memories for you and your family. Enjoy!

Read more about Appetizers

Read more about Main Dishes

Read more about Desserts

Stuffed zucchini with rice and mushroom | Made by Meaghan Moineau

Stuffed zucchini with rice and mushroom | Made by Meaghan Moineau

Title: Reliving Childhood Memories with Stuffed Zucchini Delight
Description: Discover the heartwarming allure of Stuffed Zucchini with Rice and Mushroom, a dish that marries the comforting flavors of fresh vegetables and savory fillings. Learn how to create this delightful main dish and immerse yourself in a nostalgic family tale that harks back to simpler times.

---


A Taste of Nostalgia: Stuffed Zucchini with Rice and Mushroom

When I think of Stuffed Zucchini with Rice and Mushroom, I am transported back to the warm, sunlit kitchen of my grandmother's house. The aroma of fresh zucchinis and savory mushrooms filled the air, creating an inviting atmosphere that promised a delicious family meal. This dish wasn't just food; it was a tradition, a celebration of togetherness that brought our family closer with every bite.


Growing up, weekends were reserved for family gatherings, where everyone would converge at my grandmother's home, bringing along stories, laughter, and appetites. The highlight of these gatherings was always the Stuffed Zucchini with Rice and Mushroom. Grandmother, with her nimble fingers and gentle smile, would prepare this dish with love, transforming simple ingredients into a symphony of flavors.


The zucchinis, fresh from the local farmer's market, were hollowed out with precision, ready to cradle the savory filling of rice, mushrooms, and bell peppers. The red onions and garlic, sautéed in a splash of oil, added a rich depth of flavor that was both comforting and familiar. As the filling simmered, the kitchen filled with the scent of melting cheese and tomato sauce—an aroma that signaled the anticipation of a meal shared with loved ones.


As a child, I had the important role of sprinkling the final touch of cheese over the stuffed zucchinis before they went into the oven. Watching the cheese melt and bubble over the golden zucchinis was a sight to behold, one that promised a delicious feast was soon to follow.


Today, I recreate this dish not just to savor its delectable taste but to relive those cherished moments of family, laughter, and love. Stuffed Zucchini with Rice and Mushroom is more than a meal; it's a bridge to the past, a way to keep those who are gone, ever present in our lives.


Difficulty Rating: 5/10
Classification: Main Dish

For detailed instructions on how to make this comforting and delicious Stuffed Zucchini with Rice and Mushroom, visit myzucchinirecipes.com. Whether you're looking to relive a cherished memory or create new ones, this dish is sure to bring warmth and joy to your dining table.

Read more about Appetizers

Read more about Main Dishes

Read more about Desserts

Curried Cauliflower Gratin | Made by Meaghan Moineau

Curried Cauliflower Gratin | Made by Meaghan Moineau

Title: A Journey of Flavors: Curried Cauliflower Gratin
Description: Dive into the rich, aromatic world of Curried Cauliflower Gratin, a dish that combines the earthy essence of cauliflower with the warmth of exotic spices. Discover a family story that adds a touch of nostalgia to this delightful recipe, perfect as a main dish for any occasion. With a difficulty rating of 5 out of 10, this recipe promises a rewarding culinary adventure.

---


Curried Cauliflower Gratin: A Nostalgic Culinary Journey

There’s something inherently magical about the way certain dishes can transport us back to cherished moments in time. For me, Curried Cauliflower Gratin is more than just a delightful blend of flavors; it's a doorway to fond family gatherings where laughter echoed through the kitchen and the scent of spices filled the air.


Ingredients:

- 1 whole cauliflower


- 2 tablespoons peanut oil


- 1 shallot, finely chopped


- 2 cloves garlic, minced


- 1 tablespoon fresh ginger, grated


- 1 teaspoon ground cumin


- 1 teaspoon curry powder


- 1/2 teaspoon ground cardamom


- 1/2 teaspoon ground nutmeg


- 1/4 teaspoon cinnamon


- 1 teaspoon kosher salt


- 2 tablespoons flour


- 1 can (13.5 oz) coconut milk


- 1 tablespoon cumin seeds


- 1/2 cup breadcrumbs


- 2 tablespoons unsalted butter, melted


- Fresh cilantro, minced, for garnish


Instructions:
1. Prepare Your Workspace: Preheat the oven to 400°F. Butter an 8x8-inch baking dish and set it aside.
2. Steam the Cauliflower: Gently steam the whole cauliflower until it's tender but not overly soft—about 15 minutes. Once cooled, slice the cauliflower horizontally.
3. Create the Flavor Base: In a medium saucepan over medium heat, warm the peanut oil. Add the ginger, shallot, and garlic, and sauté for 3 to 4 minutes until fragrant and slightly golden.
4. Spice it Up: Introduce the ground cumin, curry powder, cardamom, nutmeg, and cinnamon to the saucepan. Sauté the spices for about 3 minutes until their aromas blossom.
5. Thicken the Sauce: Sprinkle in the flour, stirring to combine for about 2 minutes. Gradually whisk in the coconut milk and add the salt, allowing the mixture to simmer and thicken for 3 to 5 minutes.
6. Assemble the Gratin: Layer the cauliflower slices with the curry cream in your prepared baking dish. Scatter the cumin seeds and breadcrumbs over the top.
7. Add the Finishing Touches: Drizzle the breadcrumbs with melted butter to ensure a crispy, golden finish. Bake for 25 to 30 minutes until the gratin is bubbling and golden brown.
8. Garnish and Serve: Once out of the oven, sprinkle the dish generously with fresh cilantro. Serve warm and enjoy!
A Family Memory:

Growing up, our family kitchen was the heart of the home, a place where stories were shared and recipes were passed down. I vividly remember one Sunday afternoon when my grandmother decided to teach me the secrets of her Curried Cauliflower Gratin. Her eyes would twinkle with joy as she recounted tales of her own mother, who had introduced her to the aromatic world of spices.


The moment the gratin hit the table, the room was filled with groans of delight, the creamy texture and complex flavors a testament to the love and care baked into every bite. To this day, every time I prepare this dish, I am reminded of those precious moments and the legacy of culinary tradition.


Difficulty Rating: 5/10
Classification: Main Dish

---


This Curried Cauliflower Gratin is a perfect marriage of tradition and taste, offering a unique spin on a classic comfort food. Whether you're sharing it with family or introducing it to friends, it’s a dish that's sure to leave an impression, sparking conversations and creating memories of your own.

Read more about Appetizers

Read more about Main Dishes

Read more about Desserts