Gluten-Free Tres Leches Cake | Made by Meaghan Moineau

Gluten-Free Tres Leches Cake | Made by Meaghan Moineau

A Taste of Tradition: Gluten-Free Tres Leches Cake Recipe


Description

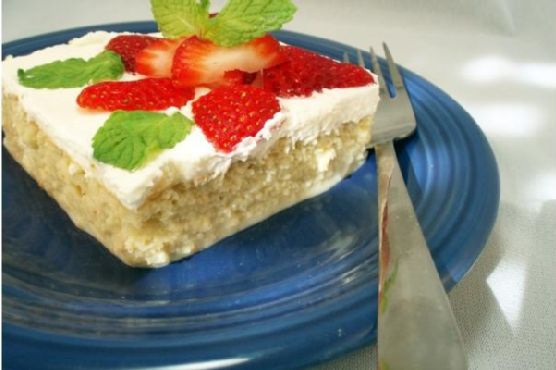
Dive into the rich, flavorful world of traditional Latin American desserts with a modern twist. This Gluten-Free Tres Leches Cake combines the best of both worlds—classic taste with a gluten-free update. With a moist, indulgent texture enhanced by a trio of luscious milks, this cake is topped with fresh strawberries and mint leaves for a refreshing finish. Perfect for any celebration or just a sweet treat, this dessert is sure to become a cherished family favorite.
Keywords: Gluten-Free Tres Leches Cake, gluten-free desserts, Latin American desserts, traditional recipes, family favorite

---


Ingredients

- 1 cup sugar, divided

- 5 large eggs, separated


- 1/2 cup butter, softened


- 1 teaspoon vanilla extract


- Zest of 1 orange


- 1 teaspoon ground cinnamon


- 1/2 cup sorghum flour


- 1/2 cup masa harina


- 1 tablespoon baking powder


- 1/2 teaspoon xanthan gum


- 1/2 cup milk


- 1/4 teaspoon cream of tartar


- 1 can (12 ounces) evaporated milk


- 1 can (14 ounces) sweetened condensed milk


- 1/2 cup half-and-half


- 1 cup whipping cream


- 2 tablespoons sugar


- Strawberries and mint leaves for garnish


Instructions


1. Preheat your oven to 350°F (175°C) and generously butter a 13x9-inch baking dish.


2. In a large bowl, beat 1/2 cup of sugar, egg yolks, and butter until light and fluffy, approximately 5 minutes.


3. Fold in the vanilla extract, orange zest, cinnamon, sorghum flour, masa harina, baking powder, xanthan gum, and milk.


4. In another large bowl, beat the egg whites until soft peaks form. Add the cream of tartar after about 20 seconds. Gradually add the remaining 1/2 cup of sugar and continue beating until the egg whites are glossy and firm, but not dry.


5. Gently fold the egg whites into the cake mixture. Pour the batter into the prepared baking dish, spreading it evenly.


6. Bake for about 25 minutes, or until the cake is golden and a toothpick inserted in the center comes out clean.


7. Once baked, pierce the cake all over with a toothpick.


8. In a separate bowl, whisk together the evaporated milk, sweetened condensed milk, and half-and-half. Pour this mixture evenly over the cake.


9. Allow the cake to cool slightly, then cover and refrigerate for at least 4 hours, or overnight.


10. Before serving, beat the whipping cream, sugar, and vanilla in a mixer bowl until stiff peaks form.


11. Spread the whipped cream over the cake and garnish with strawberries and mint leaves.


12. Chill in the refrigerator until ready to serve.


A Nostalgic Memory


Growing up, Tres Leches Cake was a staple at every family gathering. The anticipation would build as the sweet aroma filled the kitchen, signaling that something special was on the way. My grandmother would carefully craft each cake with love, her hands moving with the expertise of years spent perfecting the recipe. For her, it wasn't just about making a dessert; it was about creating a legacy of flavors that connected us all.


One summer, I remember sitting on the back porch with my cousins, watching the sunset while savoring bites of the cake, its milky sweetness mingling perfectly with the fresh strawberries. The laughter, the stories, and the shared moments over that Tres Leches Cake are memories I cherish deeply. Now, as I bake my own gluten-free version of this classic, I feel her spirit guiding me with each step, ensuring her tradition lives on in every bite.


Difficulty Rating: 6/10

Classification: Dessert


This Gluten-Free Tres Leches Cake is a delightful and rewarding endeavor. While it requires a bit of patience and technique, especially with the egg whites, the end result is a delicious dessert that's well worth the effort. Perfect for family gatherings, special occasions, or just because—this cake is a testament to the power of tradition, flavor, and love.

Read more about Appetizers

Read more about Main Dishes

Read more about Desserts

French Onion Marsala Soup | Made by Meaghan Moineau

French Onion Marsala Soup | Made by Meaghan Moineau

Title: A Hearty Bowl of Comfort: French Onion Marsala Soup
Description: Dive into a bowl of soul-warming French Onion Marsala Soup, a delightful twist on the classic French favorite. With the rich flavors of marsala wine and the savory depth of caramelized onions, this dish is perfect for cozy evenings. Discover the recipe that brings back cherished family memories while earning its place as a staple in your kitchen.

---


As the leaves begin to fall and the evenings grow chillier, there's nothing quite as comforting as a steaming bowl of soup. Today, I’m excited to share a recipe that holds a special place in my heart—French Onion Marsala Soup. This dish is an ode to tradition with a unique twist that elevates it to new heights.


Ingredients:

- 2 tablespoons butter


- 2 tablespoons olive oil


- 4 large onions, thinly sliced


- 6 cups canned beef broth


- 1 cup marsala wine


- 1 teaspoon dried thyme


- Salt and pepper to taste


- 1 teaspoon sugar


- Texas toast croutons


- 8 slices provolone cheese


- 1 cup diced swiss cheese


- 1/2 cup grated parmesan cheese


Instructions:

1. Begin by melting the butter with olive oil in a large pot over medium heat. Add the thinly sliced onions and stir continually until they turn translucent and start to caramelize.


2. Pour in the beef broth, marsala wine, and sprinkle in the dried thyme. Allow the soup to simmer gently for about 30 minutes, allowing the flavors to meld beautifully.


3. Stir in the sugar and season with salt and pepper, keeping a careful hand to avoid over-salting.


4. Ladle the aromatic soup into oven-safe bowls, placing a generous handful of Texas toast croutons in each.


5. Sprinkle the croutons with grated parmesan and diced swiss cheese, then lovingly layer two slices of provolone cheese on top.


6. Carefully transfer the bowls onto a cookie sheet and broil in a preheated oven until the cheese bubbles and turns a delightful golden brown.


A Nostalgic Family Memory:

This recipe brings back memories of Sunday evenings at my grandmother's house. Her kitchen was a haven of warmth and love, where the scent of caramelizing onions would waft through the air, signaling the start of our weekly family gathering. We would sit around her large, wooden dining table, eagerly awaiting the moment she’d bring out her signature French Onion Marsala Soup. The combination of flavors was magical, and the added touch of marsala wine gave it an unmistakable aroma that lingered in the air long after the meal was over. It was a dish that not only filled our bellies but also warmed our hearts, becoming a cherished family tradition passed down through the generations.


Difficulty: 5/10
Classification: Main Dish

This French Onion Marsala Soup is more than just a meal; it’s a journey back in time, a reminder of family bonds, and a testament to the joy of sharing food with loved ones. Give it a try, and let it become a part of your family’s culinary tradition, just as it is in mine.

Read more about Appetizers

Read more about Main Dishes

Read more about Desserts

Dutch Oven Paella | Made by Meaghan Moineau

Dutch Oven Paella | Made by Meaghan Moineau

Savoring Tradition: A Family Feast with Dutch Oven Paella


Description

Dive into the rich tapestry of flavors and family traditions with our Dutch Oven Paella recipe. This aromatic dish, brimming with succulent shrimp, savory chorizo, and tender chicken, encapsulates the warmth and comfort of cherished family gatherings. Perfectly balanced with saffron-infused arborio rice and vibrant vegetables, our paella transforms any meal into a celebration. Whether you're a seasoned cook or a kitchen novice, this main dish offers a delightful culinary adventure with a touch of nostalgia.

---


Ingredients

- Shrimp

- Salt and pepper


- Extra virgin olive oil


- Garlic cloves


- Lean, skinless, boneless chicken thighs


- Spanish chorizo sausage


- Red bell pepper


- Onion


- Diced canned tomatoes


- Arborio rice


- Low sodium chicken broth


- Dry white wine


- Saffron threads


- Bay leaf


- Frozen artichoke hearts


- Frozen peas


- Fresh flat-leaf parsley


- Lemon wedges


Instructions


1. Prepare Shrimp: In a medium bowl, toss shrimp with 1 teaspoon minced garlic, 1 tablespoon olive oil, 1/4 teaspoon salt, and 1/4 teaspoon pepper. Refrigerate until needed.
2. Season Chicken: Season chicken thighs with salt and pepper, then set aside.
3. Cook Vegetables: Heat 2 teaspoons of oil in a large Dutch oven over medium-high heat until shimmering. Add bell pepper, cooking and stirring occasionally until skins blister and brown, about 3-4 minutes. Remove and set aside.
4. Brown Chicken: Add 1 tablespoon more oil to the pot. Add chicken thighs and brown well, flipping once, about 3 minutes per side. Remove chicken to a bowl.
5. Cook Sausage: Reduce heat to medium, add sausage, and cook for 4-5 minutes, stirring frequently, until browned and fat starts to render. Add to bowl with chicken.
6. Sauté Aromatics: At medium heat, add enough oil to equal 2 tablespoons. Add onion, cooking and stirring frequently until tender, about 3 minutes. Add remaining garlic, cook for 1 minute.
7. Add Tomatoes and Rice: Add tomatoes, cooking and stirring until they thicken and darken slightly, about 3 minutes. Add rice, cook and stir for about 2 minutes.
8. Combine Ingredients: Add broth, wine, saffron, bay leaf, and 1/2 teaspoon salt to the pot. Return chicken and sausage to the pot.
9. Bake: Increase heat to medium-high, bring to a boil, stirring often. Cover pot and place in the oven. Bake for 15 minutes.
10. Add Final Ingredients: Remove pot from oven, nestle artichoke hearts into the rice, sprinkle shrimp over the top, then add peas and bell pepper strips. Cover and return to the oven for another 10 minutes or until shrimp are opaque.
11. Create Soccarat: Remove pot from oven, place on stove over medium-high heat, cook for 5 minutes to achieve a browned rice crust, rotating pot halfway through.
12. Rest and Serve: Remove from heat, let the paella rest, covered, for 5 minutes. Sprinkle with fresh parsley and serve with lemon wedges.

---


A Nostalgic Family Tradition


Growing up, paella was more than a meal; it was a family event. I vividly recall the bustling kitchen sounds, the clatter of pans, and the warm, enticing aroma that filled our home. My grandmother, the culinary matriarch, would orchestrate this feast with precision and love, her eyes dancing as she stirred the vibrant mix of ingredients in her cherished Dutch oven.


Every family gathering was a tapestry of stories and laughter, woven together by the promise of paella. As the dish simmered to perfection, we would gather around the table, sharing tales of past adventures and dreams for the future. The striking colors of the saffron-infused rice, adorned with shrimp and vegetables, mirrored the vibrant personalities of our family.


This dish is not just a recipe; it is a vessel of cherished memories, a reminder of the warmth and unity of family. Every time I prepare Dutch Oven Paella, I am transported back to those joyful gatherings, savoring not just the flavors, but the legacy of love and tradition.


Difficulty Rating

7 out of 10

Classification

Main Dish

Indulge in the flavors of tradition with our Dutch Oven Paella, a dish that promises to create not just a meal, but a memory.

Read more about Appetizers

Read more about Main Dishes

Read more about Desserts

Pork Carnitas Tacos | Made by Meaghan Moineau

Pork Carnitas Tacos | Made by Meaghan Moineau

Unforgettable Pork Carnitas Tacos: A Taste of Tradition and Togetherness


A Culinary Journey Down Memory Lane


There's something truly magical about the way food can evoke cherished memories and transport us back to special moments spent with loved ones. In our family, Pork Carnitas Tacos have always held a special place in our hearts. Not only is this dish a tantalizing blend of flavors and textures, but it also serves as a delicious reminder of countless family gatherings, where the kitchen buzzed with laughter and the air was filled with the irresistible aroma of simmering pork and fresh cilantro.


The Recipe: Pork Carnitas Tacos


Difficulty: 6/10
Category: Main Dish

Ingredients:

- 2 cups water

- 3 lbs lean pork butt


- 4 cloves garlic, minced


- Sea salt and ground pepper to taste


- 2 tablespoons olive oil


- 1 cup orange juice


- 1 cup milk


- Corn tortillas


- Salsa fresca


- 2 ripe avocados, sliced


- Fresh cilantro, chopped


- 1 onion, finely chopped


- 2 limes, sliced into wedges


Instructions:

1. Prepare the Pork:

In a large Dutch oven, combine the pork, garlic, sea salt, ground pepper, and water. Bring the mixture to a boil, then reduce the heat, cover, and let it simmer over medium-low heat for 45 minutes to one hour. This slow cooking process ensures the meat becomes tender and infused with the aromatic flavors of garlic and spices.


2. Shred and Brown the Pork:

Once cooked, drain the pork well. Allow it to cool until it's manageable, then shred the meat by hand or with the tines of a fork, discarding any remaining fat. Return the shredded pork to the Dutch oven, heating the olive oil over medium heat. Add the orange juice and milk, cooking until the liquid evaporates and the pork is beautifully browned. Season with additional salt and pepper to taste.


3. Prepare the Toppings:

Chop the onion and cilantro, and slice the avocado and limes. Place each in small individual bowls for an inviting serving presentation.


4. Assemble the Tacos:

Heat the corn tortillas in a dry frying pan to keep them warm and pliable. For each taco, stack two tortillas and layer them with warm carnitas. Top with chopped cilantro, onion, avocado slices, and a squeeze of fresh lime juice for that perfect burst of citrusy brightness.


A Nostalgic Family Memory


Growing up, weekends at Grandma's house were synonymous with the sizzle of carnitas on the stove. I remember sitting on a stool by the kitchen counter, watching in awe as she effortlessly transformed simple ingredients into a feast that brought us all together. The highlight of those afternoons was gathering around the table, each of us eagerly assembling our tacos, swapping stories, and savoring the rich, savory flavors that felt like a warm embrace.


Even as I recreate this dish today, I can almost hear the echoes of playful banter and feel the familial warmth that made those gatherings so special. Pork Carnitas Tacos are more than just a meal; they are a bridge to the past, a reminder of the joy that comes from shared moments and the love that binds us together.


Conclusion


Pork Carnitas Tacos are a delightful main dish that combines the heartiness of seasoned pork with the freshness of vibrant toppings. With a difficulty rating of 6/10, it's a recipe that balances simplicity with a touch of culinary finesse. Whether you're creating new memories or reliving cherished ones, these tacos promise to bring a touch of tradition and a whole lot of flavor to your table. So gather your loved ones, roll up your sleeves, and let the delicious journey begin!

Read more about Appetizers

Read more about Main Dishes

Read more about Desserts

Knishes – Potato Filling | Made by Meaghan Moineau

Knishes - Potato Filling | Made by Meaghan Moineau

Title: A Taste of Heritage: Crafting the Perfect Potato Knishes
Description: Dive into the rich tapestry of family tradition with our potato-filled knishes recipe. Discover the secrets behind this savory delight, steeped in nostalgia and bursting with flavor. Whether you're a seasoned chef or a kitchen novice, this guide will walk you through each step to create a dish that's truly a piece of culinary history.

---


There's something magical about the smell of onions browning in a pan, mingling with the richness of chicken fat. It's a scent that transports me back to my grandmother's cozy kitchen, where the aroma signaled the beginning of a cherished tradition: making potato knishes. These savory pastries, with their golden crust and fluffy filling, were more than just food; they were a symbol of our family's heritage, lovingly passed down through generations.


Ingredients:

- Chicken fat (or butter, if you prefer)


- 1 egg


- 2 large onions, finely chopped


- Freshly ground black pepper, to taste


- 4 medium potatoes, peeled and boiled


- Salt, to taste


Instructions:
1. Brown the Onions: Begin by heating the chicken fat in a large skillet over medium heat. Add the finely chopped onions and sauté until they are golden brown and caramelized, releasing their sweet, savory aroma.
2. Prepare the Filling: In a large mixing bowl, combine the boiled potatoes with the browned onions. Add in the egg, salt, and pepper. Using a fork or potato masher, beat the mixture until it's light and fluffy, ensuring that the flavors meld together beautifully.
3. Assemble the Knishes: Roll out your dough (store-bought or homemade) on a lightly floured surface. Cut the dough into squares or circles, depending on your preference. Place a generous spoonful of the potato mixture in the center of each piece. Fold the dough over the filling, sealing the edges to form a pocket.

Growing up, making knishes was a family affair. My siblings and I would gather around the kitchen table, eagerly watching our grandmother as she worked her magic with the dough. Her hands moved with a practiced grace, folding and sealing each knish with a loving touch. As we got older, she entrusted us with the task, guiding our clumsy fingers until we, too, could craft the perfect pastry.


For us, knishes were more than just an appetizer; they were a bridge to our past. Each bite was a reminder of the stories our grandmother told us—tales of her childhood, of family gatherings long before we were born. The knishes connected us to those who came before, to the traditions that shaped our family.


Difficulty Rating: 5/10

Crafting these knishes is a delightful blend of art and comfort. With a medium difficulty level, this dish is accessible to both budding cooks and seasoned chefs. It falls under the category of an appetizer, serving as a perfect prelude to a hearty meal.


Today, as I prepare knishes in my own kitchen, I feel a profound sense of gratitude. Gratitude for the recipes handed down, for the memories etched in my heart, and for the opportunity to share this piece of my heritage with my children. As they savor these warm, flaky pastries, I hope they, too, will feel the love and history that each knish embodies.

Read more about Appetizers

Read more about Main Dishes

Read more about Desserts

Cheesy Bacon Burger with Spicy Chipotle Aiolo Sauce | Made by Meaghan Moineau

Cheesy Bacon Burger with Spicy Chipotle Aiolo Sauce | Made by Meaghan Moineau

Title: The Ultimate Cheesy Bacon Burger with Spicy Chipotle Aioli: A Flavor Explosion to Remember
Description: Dive into the rich, savory world of the Cheesy Bacon Burger with Spicy Chipotle Aioli Sauce. This mouthwatering dish combines the smoky heat of chipotle with the creamy goodness of Laughing Cow cheese, all encased in a juicy burger. Perfect for summer cookouts or family gatherings, this burger is not just a meal but a memory in the making.

---


The Ultimate Cheesy Bacon Burger with Spicy Chipotle Aioli: A Flavor Explosion to Remember


When it comes to comfort food, few things can compete with a juicy burger fresh off the grill. The Cheesy Bacon Burger with Spicy Chipotle Aioli Sauce is a testament to this, marrying the rich, smoky flavors of chipotle chiles and turkey bacon with the creamy delight of Laughing Cow cheese. It's a dish that doesn't just satisfy your hunger but also evokes sweet family memories.


Ingredients You'll Need


- For the Burger:

- 8 oz lean ground beef


- 4 wedges of Laughing Cow Swiss cheese


- 4 slices of cooked turkey bacon


- 1 green bell pepper, diced


- 1 onion, diced


- 1 tsp garlic powder


- 1/2 tsp ground black pepper


- Whole wheat hamburger buns


- For the Spicy Chipotle Aioli Sauce:

- 2 chipotle chiles in adobo, minced


- 1/2 cup fat-free mayonnaise


- 1/4 cup Greek yogurt


- 1 clove garlic, minced


- 1 tbsp fresh lime juice


- 1/2 tsp ground cumin


Instructions


For the Burgers:
1. Prepare the Bacon and Veggies: In a pan, cook the turkey bacon according to the package instructions. Once done, set aside. In the same pan, add diced bell pepper and onion. Cook until tender, about 10 minutes.
2. Season the Beef: In a small bowl, combine the ground beef with garlic powder and black pepper, mixing well.
3. Form the Patties: Divide the seasoned beef into 8 equal pieces, approximately 2 oz each. Flatten each piece and place half a wedge of cheese on top. Cover with another piece of beef, sealing the edges to keep the cheese from oozing out.
4. Grill to Perfection: Place the burgers on the grill and cook for about 5 minutes on each side, or until done to your liking.
5. Assemble the Burger: Place the cooked burger on a whole wheat bun, top with turkey bacon, cooked peppers, onions, and a generous dollop of spicy chipotle aioli sauce.
For the Spicy Chipotle Aioli Sauce:
1. Mix It Up: In a small bowl, combine minced chipotle chiles, mayonnaise, Greek yogurt, minced garlic, lime juice, and ground cumin. Whisk until well blended. This yields about 3/4 cup or 12 tablespoons of sauce.

A Nostalgic Family Memory


As I prepare this delicious burger, I'm reminded of the summer barbecues at my grandmother's house. The smoky aroma of grilled meat mixed with the laughter of family filled the air. My father, the grill master, would always hand me the first sizzling burger, packed with cheese and topped with his secret spicy sauce. As a child, I would sit at the picnic table, eagerly awaiting that first bite, knowing it would be another cherished memory added to our family gatherings.


Difficulty Rating: 6/10


This flavorful burger is classified as a Main Dish. While the recipe involves several steps, from preparing the sauce to grilling the burgers, it is straightforward and highly rewarding. With a bit of preparation, even novice cooks can bring this delightful dish to life.

Dive into this recipe, and let it become a cherished memory for your family, just as it is for mine. Whether for a casual weeknight dinner or a lively family cookout, the Cheesy Bacon Burger with Spicy Chipotle Aioli is sure to be a hit. Enjoy the blend of flavors and the joy of good company around the table.

Read more about Appetizers

Read more about Main Dishes

Read more about Desserts

Chinese Potstickers | Made by Meaghan Moineau

Chinese Potstickers | Made by Meaghan Moineau

Deliciously Nostalgic: Crafting Perfect Chinese Potstickers at Home


Description

Dive into the rich flavors and textures of Chinese potstickers, a delightful culinary journey wrapped in a delicate dumpling. This detailed guide not only provides a step-by-step recipe but also shares a heartwarming family story that will inspire you to bring a taste of tradition to your kitchen. Perfect as an appetizer or a savory snack, these potstickers will soon become a family favorite.

---


A Taste of Tradition: Chinese Potstickers


The sizzling sound of dumplings hitting the hot pan, the aroma of sesame oil wafting through the kitchen, and the anticipation of that first bite—making Chinese potstickers is more than just preparing a meal; it's about creating memories. For me, these potstickers are a culinary heirloom passed down through generations, each fold and pleat crafted with love.


Ingredients


- 200g lean ground pork (or substitute with ground chicken)


- 100g canned water chestnuts, chopped (or substitute with spinach or cabbage)


- 1 teaspoon sea salt


- 1 teaspoon fine sugar


- 1/2 teaspoon black ground pepper


- 2 teaspoons light soy sauce


- 2 teaspoons sesame oil


- 1 tablespoon Shaoxing Huatiao wine


- 2-3 tablespoons finely chopped scallions


- Dumpling wrappers (thawed if frozen)


- Plain flour for dusting


- 2-3 tablespoons vegetable oil


- 1/3 cup water


Instructions


1. Prepare the Filling:

- In a large mixing bowl, combine the ground pork with sea salt, sugar, ground pepper, soy sauce, sesame oil, and Shaoxing Huatiao wine.


- Add the chopped water chestnuts to the mixture. For a twist, you can use spinach or cabbage instead.


- Stir in the finely chopped scallions and mix all ingredients well.


2. Assemble the Dumplings:

- Dust your working surface with flour. Carefully separate the dumpling wrappers and lay them out.


- Place about 1.5 teaspoons of the pork filling in the center of each wrapper.


- Lightly wet the edges of the wrapper with water. Bring the edges together and pinch at the center.


- Create pleats on one side of the dumpling, folding towards the center and pinching to seal. Repeat on the other side, ensuring three pleats per side.


3. Cooking the Potstickers:

- Heat vegetable oil in a frying pan over high heat.


- Place the dumplings flat-side down in the pan and fry until the bottoms are golden brown.


- Add water, cover the pan, and steam for 4-5 minutes. Remove the cover and let them crisp up for another minute.


4. Serving Suggestion:

- Serve the potstickers with a vinegar dip made of balsamic or black Chinese vinegar and thinly sliced ginger. Enhance the dip with soy sauce, chili oil, or sesame oil for extra flavor.


A Family Memory


Growing up, Sunday afternoons were reserved for dumpling-making in my grandmother's kitchen. Her nimble fingers would work magic, transforming simple ingredients into delectable bites. As children, my siblings and I would gather around the table, our hands dusted with flour, trying to mimic her expert pleats. Laughter and stories filled the room, each dumpling a testament to our shared love and heritage. These potstickers are more than a dish; they're a connection to those cherished days, a reminder that food has the power to bring families together.


Difficulty: 6/10

Classification: Appetizer


Creating Chinese potstickers is a rewarding experience that combines the art of cooking with the joy of tradition. Whether you're new to dumpling-making or a seasoned pro, this recipe promises delicious results that will delight your senses and bring a touch of nostalgia to your dining table. Enjoy!

Read more about Appetizers

Read more about Main Dishes

Read more about Desserts

chilli chicken | Made by Meaghan Moineau

chilli chicken | Made by Meaghan Moineau

Title: "Spicy Nostalgia: The Flavorful Journey of Chilli Chicken"
Description: Dive into the rich, aromatic world of Chilli Chicken—a dish that not only tantalizes your taste buds but also stirs heartwarming family memories. From the vibrant colors of bell peppers to the savory depth of soya sauce, learn how this dish has become a beloved staple at our family gatherings. Rated 6/10 in difficulty, this versatile delight can be served as an appetizer or a main dish. Discover a cherished family story intertwined with this recipe and find complete cooking instructions at Swasthi's Recipes.

---


Spicy Nostalgia: The Flavorful Journey of Chilli Chicken

There’s something magical about family recipes—they are time machines that transport you back to cherished moments, filled with warmth, laughter, and the comforting aroma of home-cooked meals. Chilli Chicken, with its spicy allure and vibrant colors, holds a special place in my heart, not just as a dish but as a treasured family memory.


A Burst of Flavors and Colors

The beauty of Chilli Chicken lies in its simplicity and the explosion of flavors it offers. The key ingredients—bell peppers, boneless chicken breast, and slit green chilies—create a colorful medley that is as pleasing to the eye as it is to the palate. The essential spices—red chili powder and pepper powder—bring a fiery kick, while garlic and onion add depth and aroma. The sticky, savory embrace of soya sauce, combined with the tangy notes of vinegar and the subtle sweetness of sugar, create a harmonious balance that is simply irresistible.


A Family Tradition

Every family gathering at our house was incomplete without a sizzling platter of Chilli Chicken. I vividly remember my grandmother bustling around the kitchen, her hands deftly working through the ingredients, her face lit with a loving smile. The air would fill with the intoxicating aroma of garlic sizzling in oil, mixing with the spicy scent of red chili powder. It was a sensory symphony that signaled the start of another memorable feast.


One particular instance stands out in my memory: a chilly winter evening when the entire family was gathered around the dining table, the warmth of laughter and stories enveloping us like a cozy blanket. My grandmother placed the dish in the center, and as the steam rose, so did our anticipation. With each bite of the tender chicken and crunchy bell peppers, we were transported to a world where flavors danced on our tongues and time seemed to stand still.


Creating Your Own Memories

While nostalgia adds a unique flavor to Chilli Chicken, creating your own memories with this dish is just as delightful. Rated 6/10 in difficulty, it’s accessible yet rewarding, making it perfect for a family dinner or a casual gathering with friends. Whether you choose to serve it as an appetizer or the main dish, Chilli Chicken promises to be the star of the meal.


For those looking to recreate this flavorful journey, detailed instructions can be found at Swasthi's Recipes. Embrace the joy of cooking as you experiment with the ingredients, perhaps adding your own twist to make it uniquely yours.


In the end, Chilli Chicken is more than just a dish; it's a connection to the past, a celebration of the present, and an invitation to create future memories. So, gather your loved ones, roll up your sleeves, and let the rich, spicy aroma of Chilli Chicken weave its magic into your family story.


---


Whether you're a seasoned cook or a culinary novice, Chilli Chicken is an adventure worth embarking on. So, why not dig in and let this dish become a delicious chapter in your own family’s story?

Read more about Appetizers

Read more about Main Dishes

Read more about Desserts

Pan Seared Lamb Loin With Chimichurri & Roasted Trio Squash Salad With Goat Cheese and Pinenuts | Made by Meaghan Moineau

Pan Seared Lamb Loin With Chimichurri & Roasted Trio Squash Salad With Goat Cheese and Pinenuts | Made by Meaghan Moineau

Title: Savoring Tradition: Pan-Seared Lamb Loin with Chimichurri & Roasted Trio Squash Salad
Description: Discover the rich flavors and comforting nostalgia of our Pan-Seared Lamb Loin with Chimichurri paired with a Roasted Trio Squash Salad adorned with Goat Cheese and Pine Nuts. This main dish not only tantalizes your taste buds but also carries the warmth of cherished family memories. Experience a culinary journey that brings together the zest of fresh herbs and the heartwarming glow of the holiday table.

---


When it comes to family gatherings, few dishes evoke the warmth and comfort of home like a beautifully prepared lamb loin. As the holiday season approaches, I find myself reminiscing about the countless family dinners centered around this delightful dish. The aroma of fresh herbs mingling with the rich, savory lamb was a staple at our holiday table, a tradition passed down through generations.


Ingredients:

- Cilantro


- Extra virgin olive oil


- Flat leaf parsley


- Garlic clove


- Black ground pepper


- Kosher salt and pepper


- Lamb loin chops


- Lemon


- Mint


- Pine nuts


- Red pepper flakes


- Shallot


Instructions:
1. Preheat Your Oven: Start by preheating your oven to 400°F, setting the stage for a dish that’s sure to impress.
2. Prepare the Chimichurri: In a large bowl, combine cilantro, flat leaf parsley, minced garlic, lemon juice, mint, and a hint of red pepper flakes. Blend with extra virgin olive oil until you achieve a smooth consistency. Season to taste with kosher salt and freshly ground black pepper.
3. Sear the Lamb: Heat a large, heavy-bottomed pan with a splash of olive oil until it begins to smoke. Season each side of the lamb loin chops with salt and pepper. Sear them for about 2 minutes per side to lock in those delicious juices.
4. Oven Finish: Transfer the seared lamb to the preheated oven.

- For rare, roast for 2-3 minutes.


- For medium rare, extend to 6-8 minutes.


- For medium, let it cook for 9-11 minutes.


- For well done, aim for 12-14 minutes.


Remember, the lamb continues to cook after it's out of the oven, so adjust your times accordingly.


5. Roasted Trio Squash Salad: As the lamb cooks, prepare a medley of roasted squash. Toss sliced squash with olive oil, salt, and pepper, then roast until tender. Finish with a sprinkle of goat cheese and toasted pine nuts for a delightful crunch.
A Nostalgic Twist:

This dish always brings me back to a particular winter evening at my grandmother's house. The fireplace crackled, casting a warm glow across the dining room. I remember watching her skillfully sear the lamb, her hands moving with the confidence of years of practice. As we sat around the table, the laughter of my cousins filled the room, and the scent of chimichurri and roasted squash wrapped us in a cozy embrace. These moments, filled with love and laughter, are the essence of why I cherish this dish.


Difficulty: 6/10
Classification: Main Dish

---


Whether you’re creating new memories or savoring the nostalgia of family traditions, this Pan-Seared Lamb Loin with Chimichurri and Roasted Trio Squash Salad is sure to become a beloved part of your culinary repertoire. Indulge in the symphony of flavors and share a meal that speaks the universal language of love and togetherness.

Read more about Appetizers

Read more about Main Dishes

Read more about Desserts

A Post Thanksgiving “sopa De Tortilla” | Made by Meaghan Moineau

A Post Thanksgiving “sopa De Tortilla” | Made by Meaghan Moineau

A Heartwarming Post-Thanksgiving Tradition: Sopa De Tortilla


Description:

Transform your Thanksgiving leftovers into a comforting and delicious Sopa De Tortilla. This flavorful Mexican-inspired dish is a wonderful way to make use of leftover turkey while warming the soul with its rich and aromatic broth. Perfect for chilly post-holiday days, this recipe will become a cherished family tradition.

---


As the last leaves fall and the vibrant hues of autumn begin to fade, our family gathers once more around the table, not for a grand feast, but for something even more special—a humble bowl of Sopa De Tortilla. This post-Thanksgiving tradition has been passed down through generations, a beloved ritual that warms not just our bodies but our hearts.


Ingredients:

- 1 whole turkey breast

- 1 avocado, cubed


- 2 large carrots, peeled and cubed


- 2 stalks of celery, chopped


- 1 bunch of cilantro (stems and leaves separated)


- 2 tablespoons olive oil


- 2 cloves garlic, quartered


- 1 large onion, quartered


- 1 roasted poblano pepper, peeled and deveined


- 1 8 oz. can organic stewed tomatoes


- 1 cup fried tortilla strips or good quality store-bought tortilla chips


- Ground cumin, to taste


- Salt, to taste


Instructions:


1. Prepare the Stock:

- In a large stockpot, drizzle 2 tablespoons of olive oil and add the quartered onion, garlic, and turkey breast.


- Add the carrot peels, and 2 stalks of celery, and cilantro stems.


- Fill the pot with water until it is three-quarters full. Cover and boil for 1-2 hours, ensuring the stock does not reduce to less than a quarter of the pot.


- Remove the turkey from the bone and reserve the meat. Discard the bone and vegetables. Strain the stock and set aside 1-2 cups per guest for the soup, freezing any leftovers for future use.


2. Make the Soup:

- In a blender, combine the stewed tomatoes, olive oil, a pinch of salt, and the roasted poblano pepper. Puree and set aside.


- Add cubed carrots and chopped celery to the stock and boil for 30 minutes until tender.


- Gradually add the pureed pepper-tomato mixture to the broth.


- Include 1/3 cup of turkey meat per cup of stock, allowing it to simmer.


- Adjust seasoning with salt and a pinch of ground cumin.


3. Serve:

- Ladle the soup into bowls, topping with additional turkey meat, tortilla strips, fresh cilantro, and cubed avocado.


Nostalgic Family Memory:


Every year, after the Thanksgiving festivities have quieted down, my grandmother would gather us in the kitchen and retell the story of how this Sopa De Tortilla became our family's tradition. It began decades ago when her parents, having immigrated from Mexico, found themselves facing their first American Thanksgiving. Not wanting to waste the leftover turkey, they decided to create a dish reminiscent of their homeland. This was how our family's version of Sopa De Tortilla was born—a fusion of cultures, flavors, and love.


As we sit around the table, savoring each spoonful, I'm reminded of the countless stories shared and the laughter that filled our home, year after year. This simple soup connects us to our roots and to each other, making every post-Thanksgiving gathering a cherished memory.


Difficulty: 5/10

Classification: Main Dish


---


This Sopa De Tortilla is more than just a meal; it's a celebration of family and tradition. May it bring warmth and joy to your home as it has to ours.

Read more about Appetizers

Read more about Main Dishes

Read more about Desserts

Trinidadian Chicken Potato Curry | Made by Meaghan Moineau

Trinidadian Chicken Potato Curry | Made by Meaghan Moineau

Title: Savoring Tradition: How Trinidadian Chicken Potato Curry Brings Family Memories to Life
Description:

Dive into the rich flavors and heartwarming memories with our Trinidadian Chicken Potato Curry. This main dish combines aromatic spices, tender chicken, and creamy potatoes, simmered to perfection. Learn how to create this culinary masterpiece while reminiscing about the family gatherings that make this dish a cherished tradition.


Blog Post:

In the vibrant tapestry of Trinidadian cuisine, there's a dish that stands out not only for its tantalizing flavors but also for its ability to bring families together: the Trinidadian Chicken Potato Curry. This main dish, with a difficulty rating of 7 out of 10, is a symphony of spices and textures, perfect for those who love to explore the culinary delights of the Caribbean.


A Nostalgic Journey:

Growing up in a bustling Trinidadian household, Sundays were always special. The air would dance with the aromas of coconut oil and curry powder, as my grandmother prepared her signature Chicken Potato Curry. It was more than just a meal; it was an event. Our family would gather in the kitchen, each member playing a part in the ritual of cooking. I remember sitting on a stool, watching with wide eyes as Grandma expertly tossed bone-in chicken thighs into a marinade, a blend of ginger, fresh thyme, and a dash of hot sauce.


She would often regale us with stories of her youth, of how she learned the recipe from her own mother. "Cooking is an expression of love," she would say, her eyes twinkling with the wisdom of generations past. As the chicken marinated, we'd chop onions and garlic, their pungent aroma mingling with the sweet scent of cilantro and scallions.


Crafting the Curry:

To recreate this family treasure, start by washing and patting dry your chicken thighs. In a sealable container, combine the marinade ingredients: yellow diced onion, garlic cloves, fresh thyme, hot sauce, and powdered ginger. Toss the chicken in this aromatic blend, cover, and let it rest in the refrigerator for at least two hours.


In a large Dutch oven, heat some vegetable oil over medium-high heat. Sauté diced yellow onions until they soften, then add more garlic, cooking until fragrant. Sprinkle the mixture with curry powder, stirring to ensure even coating. A splash of water helps bring out the spices, cooking them into a fragrant paste.


Introduce the marinated chicken to the pot, sautéing until lightly browned. If you desire a thicker curry, add the potatoes now; otherwise, set them aside for later. Sprinkle the chicken with amchar masala, cumin, and salt, tossing to coat thoroughly. Pour in a cup of water and bring the mixture to a boil. Reduce the heat, cover, and let it simmer for twenty minutes. If you reserved the potatoes, add them after this initial simmering period. Continue to cook for another twenty minutes, ensuring the chicken reaches an internal temperature of 165°F and the potatoes are perfectly tender.


The Final Touch:

As the curry simmers, the kitchen fills with a symphony of scents, each one a note in the melody of our family history. When the dish is done, it's served warm, the chicken tender and the potatoes creamy, all drenched in a spicy, flavorful sauce. Pair it with soft roti or fluffy rice, and you have a meal that is as much about the past as it is the present.


Conclusion:

The Trinidadian Chicken Potato Curry is more than a dish; it's a bridge to the past, a reminder of the love and laughter shared around the family table. As you embark on your own culinary journey, remember that each step is an opportunity to create memories that will last a lifetime. So, gather your loved ones, roll up your sleeves, and savor the tradition.

Read more about Appetizers

Read more about Main Dishes

Read more about Desserts

Almond Rainbow Cake | Made by Meaghan Moineau

Almond Rainbow Cake | Made by Meaghan Moineau

Title: Almond Rainbow Cake: A Sweet Slice of Nostalgia
Description: Dive into the delightful world of baking with our Almond Rainbow Cake recipe. This visually stunning and delicious dessert is more than just a treat; it's a canvas for cherished family memories. Discover the simple joys of creating a masterpiece that appeals to both the eyes and the palate.

---


Almond Rainbow Cake: A Sweet Slice of Nostalgia


In the world of desserts, few things capture the imagination quite like a beautifully layered cake. The Almond Rainbow Cake is a vibrant testament to the joys of baking, combining the delicate flavor of almond with the visual allure of rainbow hues. This cake isn't just a feast for the eyes and taste buds; it's a portal to cherished family memories that are as sweet as the cake itself.


Ingredients:


- 1 box of white cake mix


- 1 cup of all-purpose flour


- 1 cup of granulated sugar


- ¼ teaspoon of salt


- 1 ⅓ cups of water


- 2 tablespoons of vegetable oil


- 1 teaspoon of real vanilla extract


- 1 teaspoon of almond extract


- 1 cup of sour cream


- 4 large egg whites


Instructions:


1. Prepare the Dry Mix: In a large mixing bowl, combine the white cake mix, flour, granulated sugar, and salt. Stir these dry ingredients together using a wire whisk to ensure even distribution.
2. Blend the Batter: Add water, vegetable oil, vanilla extract, almond extract, sour cream, and egg whites to the dry mixture. Beat the batter for two minutes until smooth and well-combined.
3. Pour and Tap: Grease and flour your chosen cake pans. Pour the batter into the pans, filling each a little over half full. Lightly tap the pans on the counter to release any trapped air bubbles.
4. Bake to Perfection: Preheat your oven to 325°F. Bake the cakes until they are done, testing with a toothpick. The baking time will vary based on the size and depth of your pans, whether you're making cupcakes or a grand 14-inch round cake.

Rating and Classification:


- Difficulty: 5/10
- Classification: Dessert

A Slice of Family History


The Almond Rainbow Cake holds a special place in my heart, closely tied to the vibrant tapestry of my family’s culinary history. Every spring, my grandmother would gather us in her cozy kitchen, the air filled with the sweet aroma of almond and vanilla. As a child, I watched her deftly layer batter in pans of different sizes, her hands moving with the confidence that comes from years of practice.


She would recount stories of her own childhood while teaching us the art of baking. Each layer of the cake represented a family member, a splash of color and flavor that came together to create something beautiful and whole. The rainbow hues weren't just for show; they were a celebration of diversity and unity within our family.


As the cake baked, we would gather around the kitchen table, giggling and sharing stories. The anticipation was almost as delightful as the first bite. When the cake was finally ready, we’d all sit together, savoring each slice as if it were a slice of our shared history.


Conclusion


Baking the Almond Rainbow Cake is more than a culinary endeavor; it's an opportunity to create and relive memories with loved ones. Whether you're an experienced baker or a novice in the kitchen, this cake offers a delightful challenge that's as rewarding to make as it is to eat. Gather your ingredients, preheat your oven, and let the magic of the Almond Rainbow Cake transport you to moments of joy and togetherness.

Read more about Appetizers

Read more about Main Dishes

Read more about Desserts

Curried Cauliflower Gratin | Made by Meaghan Moineau

Curried Cauliflower Gratin | Made by Meaghan Moineau

Title: A Journey of Flavors: Curried Cauliflower Gratin
Description: Dive into the rich, aromatic world of Curried Cauliflower Gratin, a dish that combines the earthy essence of cauliflower with the warmth of exotic spices. Discover a family story that adds a touch of nostalgia to this delightful recipe, perfect as a main dish for any occasion. With a difficulty rating of 5 out of 10, this recipe promises a rewarding culinary adventure.

---


Curried Cauliflower Gratin: A Nostalgic Culinary Journey

There’s something inherently magical about the way certain dishes can transport us back to cherished moments in time. For me, Curried Cauliflower Gratin is more than just a delightful blend of flavors; it's a doorway to fond family gatherings where laughter echoed through the kitchen and the scent of spices filled the air.


Ingredients:

- 1 whole cauliflower


- 2 tablespoons peanut oil


- 1 shallot, finely chopped


- 2 cloves garlic, minced


- 1 tablespoon fresh ginger, grated


- 1 teaspoon ground cumin


- 1 teaspoon curry powder


- 1/2 teaspoon ground cardamom


- 1/2 teaspoon ground nutmeg


- 1/4 teaspoon cinnamon


- 1 teaspoon kosher salt


- 2 tablespoons flour


- 1 can (13.5 oz) coconut milk


- 1 tablespoon cumin seeds


- 1/2 cup breadcrumbs


- 2 tablespoons unsalted butter, melted


- Fresh cilantro, minced, for garnish


Instructions:
1. Prepare Your Workspace: Preheat the oven to 400°F. Butter an 8x8-inch baking dish and set it aside.
2. Steam the Cauliflower: Gently steam the whole cauliflower until it's tender but not overly soft—about 15 minutes. Once cooled, slice the cauliflower horizontally.
3. Create the Flavor Base: In a medium saucepan over medium heat, warm the peanut oil. Add the ginger, shallot, and garlic, and sauté for 3 to 4 minutes until fragrant and slightly golden.
4. Spice it Up: Introduce the ground cumin, curry powder, cardamom, nutmeg, and cinnamon to the saucepan. Sauté the spices for about 3 minutes until their aromas blossom.
5. Thicken the Sauce: Sprinkle in the flour, stirring to combine for about 2 minutes. Gradually whisk in the coconut milk and add the salt, allowing the mixture to simmer and thicken for 3 to 5 minutes.
6. Assemble the Gratin: Layer the cauliflower slices with the curry cream in your prepared baking dish. Scatter the cumin seeds and breadcrumbs over the top.
7. Add the Finishing Touches: Drizzle the breadcrumbs with melted butter to ensure a crispy, golden finish. Bake for 25 to 30 minutes until the gratin is bubbling and golden brown.
8. Garnish and Serve: Once out of the oven, sprinkle the dish generously with fresh cilantro. Serve warm and enjoy!
A Family Memory:

Growing up, our family kitchen was the heart of the home, a place where stories were shared and recipes were passed down. I vividly remember one Sunday afternoon when my grandmother decided to teach me the secrets of her Curried Cauliflower Gratin. Her eyes would twinkle with joy as she recounted tales of her own mother, who had introduced her to the aromatic world of spices.


The moment the gratin hit the table, the room was filled with groans of delight, the creamy texture and complex flavors a testament to the love and care baked into every bite. To this day, every time I prepare this dish, I am reminded of those precious moments and the legacy of culinary tradition.


Difficulty Rating: 5/10
Classification: Main Dish

---


This Curried Cauliflower Gratin is a perfect marriage of tradition and taste, offering a unique spin on a classic comfort food. Whether you're sharing it with family or introducing it to friends, it’s a dish that's sure to leave an impression, sparking conversations and creating memories of your own.

Read more about Appetizers

Read more about Main Dishes

Read more about Desserts

Zesty Lime Marinated Chicken with Homemade Watermelon Salsa | Made by Meaghan Moineau

Zesty Lime Marinated Chicken with Homemade Watermelon Salsa | Made by Meaghan Moineau

Title: Savor Summer: Zesty Lime Marinated Chicken with Homemade Watermelon Salsa
Description: Dive into the vibrant flavors of summer with our Zesty Lime Marinated Chicken topped with a refreshing Homemade Watermelon Salsa. This dish combines the tangy essence of lime with the sweet crunch of watermelon, creating a symphony of tastes that will transport you to sun-drenched days and warm family gatherings. Serve it with our Simple Garlic Toast for a meal that’s both delightful and memorable.

---


A Taste of Summer: Nostalgia on a Plate


Growing up, summers at my grandmother's house were the highlight of the year. Her backyard was a lush paradise of blooming flowers and the sweet scent of freshly cut grass. But what truly made those days unforgettable were the family barbecues. My uncle, the self-proclaimed grill master, would always bring his signature dish—Zesty Lime Marinated Chicken with Homemade Watermelon Salsa.


The preparation was a family affair. My grandmother would hand me a small paring knife, and together, we’d dice watermelon, cucumber, and sweet peppers, laughing at the mess we made in the process. My uncle would whisk together lime juice, honey, and a hint of Tabasco for the glaze, sneaking spoonfuls to taste, claiming he needed to "make sure it was just right."


As the chicken sizzled on the grill, the air filled with the zesty aroma of lime and garlic, mingling with the scent of watermelon salsa. Finally, when everything was ready, we'd gather around the table, diving into the vibrant, flavorful feast. Those meals were more than just food; they were a celebration of family, love, and the simple joys of summer.


Ingredients


- For the Salsa:

- Diced watermelon


- Diced cucumber


- Sweet fresh ear corn


- Fresh cilantro


- Yellow sweet diced orange pepper


- Red diced onion


- 1 cup fresh lime juice


- Honey


- Crushed red pepper flakes


- Salt


- For the Chicken:

- Skinless boneless chicken breasts


- 3 tablespoons fresh lime juice


- Garlic powder


- Fresh ground pepper


- Salt


- Extra virgin olive oil


- For the Honey Lime Glaze:

- 1 cup fresh lime juice


- 2 tablespoons honey


- Tabasco sauce


Instructions


1. To Make Salsa:

In a medium bowl, combine watermelon, cucumber, sweet pepper, corn, cilantro, and onion. In a small bowl, mix together lime juice, honey, red pepper flakes, and salt. Refrigerate for at least 1 hour before serving, to allow flavors to blend.


2. To Make Chicken:

In a shallow bowl, add the chicken, 3 tablespoons lime juice, and sprinkle with garlic powder, salt, and pepper. Marinate in the refrigerator for 30 minutes. Coat a large nonstick pan or a grill pan with olive oil spray, add olive oil, and heat. Add chicken, cover, and sauté over medium heat until browned on both sides and cooked through, about 10-12 minutes total. Remove the chicken from the pan.


3. To Make Honey Lime Glaze:

In a small bowl, mix together lime juice, honey, and Tabasco. Add the honey lime glaze to the same pan. Cook for about 30 seconds until melted. Return cooked chicken to the pan, flipping the chicken once to coat with the glaze. Remove from pan and plate each piece. Spoon watermelon salsa on top of each piece of chicken and serve with more salsa on the side.


4. Serve with Simple Garlic Toast:

Start with 4 slices of sourdough wheat bread. Cut each slice in half and toast all of them. Spread each half with 1 teaspoon reduced-fat butter or Smart Balance Light. Sprinkle each with a little garlic powder. Place all 8 halves on a plate and reheat in the microwave for about 15 seconds.


Difficulty: 5/10

Classification: Main Dish

---


This dish is not just a meal; it's an invitation to create your own memories. Whether you're hosting a backyard barbecue or enjoying a quiet evening with family, let the flavors of Zesty Lime Marinated Chicken with Homemade Watermelon Salsa bring a touch of nostalgia and warmth to your table.

Read more about Appetizers

Read more about Main Dishes

Read more about Desserts

Aromatic perch fillets | Made by Meaghan Moineau

Aromatic perch fillets | Made by Meaghan Moineau

A Taste of Home: Aromatic Perch Fillets with a Nostalgic Twist


Description:

Dive into the delightful world of Aromatic Perch Fillets, a dish that not only tantalizes your taste buds but also warms your heart with nostalgic family memories. This main dish, rated 6 out of 10 on the difficulty scale, combines the exquisite flavors of carefully selected spices and a light beer batter to create crispy, golden-brown fillets. Paired with crispy pancakes made from the same aromatic batter, and a side of potato salad, this recipe is bound to become a family favorite.

---


Ingredients:


- Fresh perch fillets
- Flour
- Corn flour
- Sea salt
- Ground pepper
- Light beer
- Peanut oil

Seasoning Mix:


- Bay leaves
- Black peppercorns
- Cardamom
- Cinnamon
- Garlic
- Ground nutmeg
- Sweet ground paprika

---


Instructions:


1. Prepare the Flour Mixture:

- In a bowl, mix together flour, corn flour, sea salt, and ground pepper.


2. Create the Seasoning Mix:

- Using a coffee mill or spice grinder, finely grind bay leaves, black peppercorns, cardamom, cinnamon, garlic, nutmeg, and paprika.


- Store the extra seasoning mix in an airtight glass bottle and refrigerate for future use.


3. Combine and Whisk:

- Add the freshly ground seasoning mix to the flour mixture and stir well.


- Slowly pour in the light beer, whisking constantly until the mixture reaches a smooth batter consistency.


4. Coat and Fry:

- Heat peanut oil in a frying pan over medium heat.


- Coat each perch fillet evenly with the batter.


- Fry the fillets for about 3 minutes on each side or until they turn a delicious golden brown.


- Once cooked, set the fillets aside in a warm place.


5. Create Pancake Accompaniments:

- With the remaining batter, form small pancakes and fry them in the same oil.


- These pancakes serve as a great accompaniment to the crisp perch fillets.


6. Serve:

- Serve the aromatic perch fillets immediately with a side of potato salad and the crispy pancakes.


---


A Nostalgic Family Memory:


Growing up, Sundays were always special in our household. My grandmother would gather the family around her old wooden table, a table that had witnessed several generations of shared meals and laughter. The centerpiece was often her famous Aromatic Perch Fillets, a recipe she had perfected over the years.


I remember the way she would meticulously prepare the seasoning, her hands moving with the grace and precision of years of practice. The air would fill with the warm, inviting scent of spices, creating an aroma that signaled the beginning of a cherished family ritual.


As children, my siblings and I would eagerly wait at the table, our eyes wide with anticipation as the golden fillets emerged from the kitchen. The sound of sizzling oil and the promise of a delicious meal brought us together, creating memories that would last a lifetime.


Even now, whenever I prepare Aromatic Perch Fillets, I'm transported back to those Sunday afternoons, surrounded by family and love. It's more than just a dish; it's a piece of our family's legacy, a reminder of the warmth and joy found in the simple act of sharing a meal.


---


Conclusion:


Aromatic Perch Fillets are not just a delicacy; they're a culinary journey back to cherished family moments. This recipe, with its blend of aromatic spices and crispy texture, serves as a reminder of the power of food to connect us to our past, our loved ones, and our shared traditions. Enjoy creating and sharing this dish with your family, and perhaps it will become a beloved part of your own family's history.

Read more about Appetizers

Read more about Main Dishes

Read more about Desserts

Blackened Cajun Chicken | Made by Meaghan Moineau

Blackened Cajun Chicken | Made by Meaghan Moineau

Spicing Up Family Gatherings: A Nostalgic Journey with Blackened Cajun Chicken


Description:

Discover the rich flavors and cherished memories behind our Blackened Cajun Chicken recipe. This main dish, rated a 6 out of 10 in difficulty, combines aromatic spices with tender chicken, creating a culinary masterpiece that is perfect for any family gathering. Join us as we delve into the heartwarming story that makes this dish a family favorite, and learn how to recreate it in your own kitchen.

---


A Trip Down Memory Lane


In the heart of our family kitchen, the aroma of spices would dance through the air, signaling the start of our cherished Sunday gatherings. My grandmother, the culinary matriarch of our family, had a talent for transforming simple ingredients into unforgettable meals. Her Blackened Cajun Chicken was no exception.


Every Sunday, as the sun began to set, our family would gather around the large oak table that had witnessed countless memories. The table, with its worn edges and a few inevitable scratches, was a symbol of unity. It was here that stories were shared, laughter echoed, and bonds were strengthened. The centerpiece of these gatherings was always my grandmother’s Blackened Cajun Chicken, a dish that encapsulated the spirit of our family.


The Secret to Flavorful Memories


The magic of this recipe lies in the carefully curated blend of spices. Each ingredient plays a crucial role in creating the symphony of flavors that define this dish. The combination of bay leaves, black pepper, brown sugar, cayenne pepper, dried rosemary, dried thyme, dry mustard, garlic powder, ground cumin, onion powder, paprika, and salt creates a seasoning mix that not only enhances the chicken but also tells a story of tradition and love.


Ingredients:

- Bay leaves

- Black pepper


- Brown sugar


- Cayenne pepper


- Dried rosemary


- Dried thyme


- Dry mustard


- Garlic powder


- Ground cumin


- Onion powder


- Paprika


- Salt


- Chicken


Instructions:

1. Prepare the Seasoning Mix: In a bowl, combine all the seasonings. This mix is enough for two chickens and can be made ahead and stored in an airtight container until needed.
2. Season the Chicken: Place the chicken in a 13- by 9- by 2-inch baking pan. Rub it generously with half of the seasoning mixture. Cover the pan and refrigerate overnight to let the flavors meld.
3. Grilling the Chicken: Preheat your grill and set it to medium heat. Grill the chicken, covered, over medium coals for 30 to 45 minutes, turning once, until the juices run clear. This process ensures the chicken is succulent and infused with the rich flavors of the spices.

A Culinary Legacy


As the years went by, the tradition of preparing Blackened Cajun Chicken was passed down to me. Each time I recreate this dish, I am transported back to those cherished Sunday evenings, surrounded by family and the warmth of shared stories. Today, I invite you to bring this tradition into your home and create your own memories with each flavorful bite.


Conclusion


Blackened Cajun Chicken is more than just a meal; it's a celebration of family, history, and the joy of cooking. Whether you're a seasoned chef or a novice in the kitchen, this recipe offers an opportunity to connect with loved ones over a dish that is as rich in flavor as it is in nostalgia. So, fire up the grill, gather your family, and create a legacy of your own with this timeless recipe.

Read more about Appetizers

Read more about Main Dishes

Read more about Desserts

Wildwood Ovens Bourbon Apple Glazed Cedar Plank Salmon | Made by Meaghan Moineau

Wildwood Ovens Bourbon Apple Glazed Cedar Plank Salmon | Made by Meaghan Moineau

Savory Memories: Wildwood Ovens Bourbon Apple Glazed Cedar Plank Salmon


Description

Discover the exquisite flavors of the Wildwood Ovens Bourbon Apple Glazed Cedar Plank Salmon—a dish that combines the sweetness of apple juice and brown sugar with the robust taste of bourbon whiskey. This recipe captures the essence of outdoor cooking, perfect for those who love a hint of nostalgia in their culinary adventures. Rated 7 out of 10 in difficulty, this main dish is ideal for impressing guests at your next gathering.

---


Ingredients

- Cedar plank

- Salmon filet


- 1 cup apple juice


- ½ cup brown sugar


- 2 cloves garlic, minced


- ¼ cup bourbon whiskey


- 1 tsp kosher salt


- 1 tsp freshly cracked black pepper


- Olive oil for brushing


Instructions


1. Prepare the Cedar Plank: Begin by soaking the cedar plank in water for at least 2 hours. This step is crucial to prevent the wood from burning and to infuse the salmon with a subtle smoky flavor.
2. Prepare the Salmon: Rinse the salmon under cold water and pat dry with paper towels. Season both sides with kosher salt and freshly cracked black pepper. Brush the skin side with olive oil to prevent sticking.
3. Make the Apple Bourbon Glaze:

- Place a medium saucepan over medium-high heat and carefully add the bourbon whiskey.


- Use caution, as the alcohol can ignite; never pour directly from the bottle.


- Once the alcohol is reduced to a small amount, add the apple juice, brown sugar, and minced garlic.


- Continue to cook over medium-high heat until the mixture reduces to about a third of its original volume, achieving a texture slightly thinner than syrup.


4. Cook the Salmon:

- Place the seasoned salmon on the cedar plank, skin side down.


- Set the cedar plank on a medium-high grill, or in a wood-fired oven pre-heated to 500°F, near the fire.


- Use a probe thermometer to check the internal temperature of the salmon after 10 minutes, and every 5 minutes thereafter.


- Once the salmon reaches an internal temperature of at least 100°F, begin brushing on the apple glaze. Repeat this step every few minutes.


- Cook until the salmon reaches desired doneness, typically around 145°F for medium-rare.


A Nostalgic Touch


Growing up, family gatherings were always centered around the grill in our backyard. My grandfather was the grill master, and his cedar plank salmon was legendary. I remember the anticipation as the smoke billowed, and the sweet aroma of the apple bourbon glaze filled the air. It was more than just a meal; it was a celebration of family and tradition.


One summer evening, as the sun dipped below the horizon, we gathered around the picnic table, eager to taste the masterpiece. My grandfather, with his usual twinkle in his eye, would recount stories of his own childhood, weaving tales that made us laugh and appreciate each bite even more. This recipe is a tribute to those cherished memories, a reminder of the love and warmth that food can bring.


Conclusion


The Wildwood Ovens Bourbon Apple Glazed Cedar Plank Salmon is more than just a dish; it's a culinary journey that captures the essence of family, tradition, and the joy of cooking. Whether you're a seasoned chef or an adventurous home cook, this recipe promises a delightful experience that will transport you to a place of nostalgia and flavor.


---


Try this recipe at your next gathering and create your own memories around the table. Let the flavors of bourbon and apple take you back to simpler times, and may your kitchen be filled with the warmth of family and the joy of good food.

Read more about Appetizers

Read more about Main Dishes

Read more about Desserts

Rack of Lamb With Parsley | Made by Meaghan Moineau

Rack of Lamb With Parsley | Made by Meaghan Moineau

Title: A Nostalgic Feast: Rack of Lamb with Parsley and Family Memories
Description: Dive into the rich flavors of our Rack of Lamb with Parsley recipe—a main dish destined to become a family favorite. Discover the warmth of shared memories and how this dish brings culinary delight to the table. Rated 6/10 in difficulty, it's a perfectly elegant addition to any dinner menu, ideal for both seasoned cooks and adventurous beginners.

---


When I think of home-cooked meals that bring the family together, my mind inevitably drifts to the aroma of a perfectly roasted Rack of Lamb with Parsley. This dish has been a staple in our family’s culinary repertoire for generations, and each time I prepare it, I am reminded of my grandmother's kitchen, where the warmth of the oven was only surpassed by her welcoming smile.


Ingredients:

- 1 rack of lamb


- 2 tablespoons peanut oil


- Salt and freshly ground pepper to taste


- 2 tablespoons Dijon mustard


- 2 slices white bread, crumbled


- 1 bunch fresh parsley, chopped


- 1 green garlic clove, minced


- 1 shallot, finely chopped


- 1 teaspoon herbes de Provence


- 2 tablespoons unsalted butter, melted


Instructions:

1. Preheat your oven to 400°F (200°C). Brush the rack with peanut oil, and sprinkle it generously with salt and freshly ground pepper.


2. Place the rack in a roasting pan and roast it in the preheated oven for 12 minutes. This initial roasting sets the stage for a beautifully tender lamb.


3. Remove the meat from the oven, and coat it evenly with Dijon mustard. Lower the oven temperature to 350°F (175°C) to ensure a delicate finish.


4. In a medium bowl, combine the bread crumbs, parsley, shallot, garlic, herbes de Provence, and melted butter. This mixture will form a flavorful crust that elevates the lamb to new heights.


5. Spread the bread crumb mixture over the top of the rack, pressing gently to adhere.


6. Return the rack to the 350°F oven, and roast for an additional 15 minutes. The result is a medium-rare lamb rack, with a crust that is both crispy and fragrant.


7. Remove the rack from the oven and let it rest for 10 minutes before carving it into chops.


This dish was the centerpiece of many family gatherings at my grandmother’s house. I remember the anticipation as the aroma filled the room, signaling that dinner was almost ready. My grandmother would regale us with stories from her youth, her voice as comforting as the meal she was preparing. There was something magical about how this simple yet elegant dish could transform an ordinary evening into a cherished memory.


Difficulty Rating: 6/10
Classification: Main Dish

There’s a certain art to preparing a rack of lamb, and while it may seem daunting at first, with a little patience and practice, it becomes a rewarding experience. Whether you’re hosting a dinner party or simply want to treat your family to something special, this Rack of Lamb with Parsley is sure to impress. As you carve into the tender meat and savor the herbaceous crust, you’re not just serving a meal—you’re creating memories that will be cherished for years to come.

Read more about Appetizers

Read more about Main Dishes

Read more about Desserts

Creamy Shrimp Bisque | Made by Meaghan Moineau

Creamy Shrimp Bisque | Made by Meaghan Moineau

Title: A Bowl of Comfort: Crafting the Perfect Creamy Shrimp Bisque
Description: Dive into the heartwarming flavors of our Creamy Shrimp Bisque, a dish that marries the ocean's bounty with rich, creamy indulgence. With a hint of nostalgia and a sprinkle of warmth, this bisque is not just a meal but a cherished memory in a bowl. Join us as we explore this delightful recipe, its roots, and how to make it a staple in your kitchen.

---


A Bowl of Comfort: Crafting the Perfect Creamy Shrimp Bisque

When the leaves start to turn and the air takes on that familiar crisp chill, there’s nothing quite like a steaming bowl of soup to bring comfort to the soul. For me, the Creamy Shrimp Bisque is more than just a dish—it’s a cherished family tradition, a memory wrapped in the aroma of sautéed onions and the gentle bubbling of a savory broth.


Ingredients:

- 2 celery stalks, chopped


- 4 green onions, sliced


- 4 tablespoons butter


- 3 cloves garlic, minced


- 1/4 cup flour


- 2 cups half & half


- 3 cups fish stock


- 2 tablespoons fresh parsley, chopped


- 1 pound cooked shrimp, peeled and deveined


- 1 cup diced potatoes


- 1/4 teaspoon cayenne pepper


- 1 teaspoon onion powder


- 1 teaspoon garlic powder


- 1 teaspoon Old Bay seasoning


- Salt & pepper to taste


Instructions:

1. In a medium saucepan, melt the butter over medium heat. Add the celery and green onions, stirring occasionally until tender, about 10 minutes.


2. Add the garlic and sauté for another 3-4 minutes until fragrant.


3. Stir in the flour, cooking for about 5 minutes to eliminate the raw flour taste.


4. Add the diced potatoes and half & half, allowing them to simmer over medium heat for another 5 minutes.


5. Stir in the fish stock, parsley, and all of the seasonings, letting the mixture cook for an additional 10 minutes until thick and bubbly.


6. Add the cooked shrimp, and let simmer for another 10 minutes.


7. Optional: Cook crispy bacon pieces and set aside. Use the bacon drippings to sauté the onion and celery for an added smoky flavor. Once the bisque is ladled into bowls, sprinkle the top with crispy bacon bits.


A Journey Through Time:

Every spoonful of this Creamy Shrimp Bisque transports me back to cozy winter evenings spent in my grandmother’s kitchen. The warmth from her stove enveloped us as she lovingly stirred her pot of bisque, the rich aroma filling the room and our hearts. It was a dish that always brought our family together—each bowl a testament to her culinary skill and the love she poured into every meal.


One particular winter, during a rare snowstorm, our family huddled around the fireplace, bowls of her bisque in hand, sharing stories and laughter. That night, the bisque was more than a meal; it was a reminder of the warmth of family and the simple joys of life. It was on that snowy night that my husband suggested adding crispy bacon, a twist that has since become a family favorite.


Difficulty Rating: 5/10
Classification: Main Dish

This Creamy Shrimp Bisque strikes the perfect balance between simplicity and elegance, making it an inviting main dish for any occasion. Whether you’re a seasoned chef or a home cook looking to impress, this recipe promises not only flavor but the creation of lasting memories around your dining table.


So, as you embark on this culinary journey, remember that each ingredient, each stir of the pot, is an opportunity to create your own cherished family traditions. Let this bisque be the canvas upon which you paint your own stories, one comforting spoonful at a time.

Read more about Appetizers

Read more about Main Dishes

Read more about Desserts

Masala-Tofu Burger | Made by Meaghan Moineau

Masala-Tofu Burger | Made by Meaghan Moineau

Title: Savor the Spice: A Journey with the Masala-Tofu Burger
Description: Uncover the vibrant flavors of Indian cuisine with our Masala-Tofu Burger recipe. Perfectly spiced and richly textured, this burger is a delightful fusion of tradition and modern culinary innovation. Join me as I share a cherished family memory associated with this dish, bringing warmth and nostalgia to your table.

---


There’s a certain magic in the kitchen when the smell of sizzling spices fills the air. My journey with the Masala-Tofu Burger is reminiscent of lazy Sunday afternoons spent in my grandmother's kitchen. The memories of those days are fragrant with the aroma of mustard seeds popping in hot oil and the earthy scent of cumin and turmeric wafting around us.


Growing up, my grandmother was a culinary artist in her own right. Her kitchen was a haven where spices were her paints, and the dishes she crafted were masterpieces that told stories of our rich cultural heritage. One particular afternoon stands out in my memory. It was a family gathering, a boisterous affair filled with laughter and the sound of clinking plates. She decided to surprise us all with her innovative twist on a classic dish: the Masala-Tofu Burger.


The Star Ingredient: Tofu
The foundation of this flavorful burger is tofu, a versatile ingredient that beautifully absorbs the spices. Before we dive into the preparation, let's gather our ingredients:

- White onion


- Diced red, orange, and green bell peppers


- Frozen peas and carrots mix


- Green chillies


- Tofu


- Diced boiled potato


- Garlic


- Black mustard seeds


- Curry leaves


- Hing


- Cumin powder


- Turmeric


- Lemon


- Salt


- Cilantro


- Indian breadcrumbs


- Vegetable oil


- PAM Original Flavor spray


- Red or white onion


- Beefsteak tomatoes


- Mint-cilantro chutney spread


- Portuguese rolls


A Flavorful Symphony: Cooking Instructions
1. Spice Infusion: In a large skillet over medium-high heat, spray a generous amount of PAM and add oil. Add mustard seeds and sauté for 30 seconds until you hear popping noises. Carefully add the curry leaves, as they tend to pop in hot oil.
2. Building the Base: Add onions and peppers, sweat for about 30 seconds. Introduce chopped garlic, chilies, and turmeric, sautéing for 5-7 minutes until the onions and peppers soften.
3. Vegetable Mix: Incorporate the peas and carrots mixture, cumin powder, and salt. Sauté for 7-10 minutes until all veggies are soft and cooked through.
4. Tofu Magic: In a small bowl, marinate cubed tofu with a pinch of turmeric, cumin powder, coarse black pepper, and optional cayenne pepper. Once the veggies are cooked, add the tofu to the skillet, sautéing until slightly brown and crumbly.
5. Flavor Balancing: Add juice from half a lemon and half of the chopped cilantro. Mix in the diced boiled potato, tossing until everything is well-coated. Taste for salt and spices.
6. Forming Patties: Mash the mixture until mushy and the veggies are small. Once cooled, mix in breadcrumbs until the mixture is firm enough to form into four thick patties. Wrap in plastic wrap until ready to use.
7. Cooking the Patties: In a small skillet sprayed with PAM over medium-high heat, cook each patty for about 2 minutes on each side until browned and crispy.
8. Assembling the Burger: Sauté thick slices of onion until charred and slightly soft. Spread a generous amount of mint-cilantro chutney on each side of the Portuguese rolls, place the burger, onions, tomato slices, and cilantro leaves on top. Serve with a slice of lemon and reduced-fat chips on the side.
A Bite of Nostalgia

As I took my first bite, I was transported back to that family gathering. The flavors were a symphony, each note perfectly played. This dish, rated a 6 out of 10 in difficulty, is a Main Dish that embodies both comfort and adventure. It's a celebration of family, culture, and the shared joy of creating something beautiful together.


Whether you are revisiting old memories or creating new ones, the Masala-Tofu Burger is a testament to the power of food to connect us to our roots and each other. Enjoy the journey of flavors and the stories they tell.

Read more about Appetizers

Read more about Main Dishes

Read more about Desserts