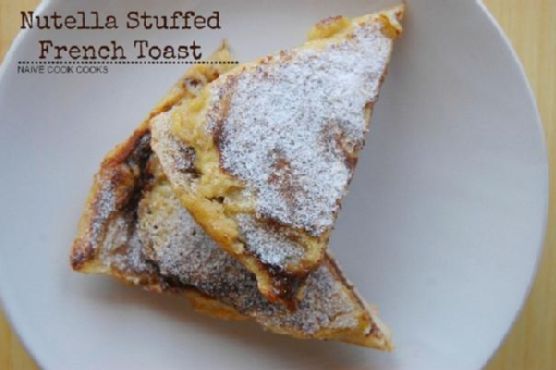
Nutella Stuffed French Toast | Made by Meaghan Moineau
Title: Indulge in Nostalgia with Nutella Stuffed French Toast
Description: Dive into a symphony of flavors with our Nutella Stuffed French Toast recipe. Perfectly balancing the creamy richness of Nutella and the warm, spiced notes of cinnamon, this dish is a delightful way to start your day or to savor as a sweet treat. Discover an easy recipe that captures the essence of comfort food and evokes heartwarming family memories.
---
Introduction
In the realm of breakfast indulgences, few dishes command as much attention as French toast. When you elevate this classic with a sumptuous Nutella filling, it becomes a culinary masterpiece that sings with nostalgia and warmth. Nutella Stuffed French Toast is not just a recipe; it's a heartfelt journey back to treasured family mornings.
A Nostalgic Family Memory
Growing up, Sunday mornings were a sacred ritual in our household. The aroma of cinnamon and sugar would waft through the air, guiding us like a beacon to the kitchen where my grandmother, with her gentle smile and knowing eyes, worked her magic. It was her special treat for us, a dish that spoke of love in every bite.
I remember sitting at the table, my feet dangling off the chair, eagerly watching as she prepared her famous Nutella Stuffed French Toast. She'd tell stories of her childhood in a small French village, where meals were a celebration of togetherness. It was during these moments that I learned that the secret ingredient was not just Nutella, but the love and care she folded into each slice.
Ingredients
- 2 large eggs
- 1/2 cup milk
- 2 tablespoons sugar
- 1 teaspoon cinnamon powder
- 4 slices of bread
- 4 tablespoons Nutella
- 2 tablespoons butter
- Powdered sugar for dusting
Instructions
1. Prepare the Egg Mixture: In a deep, large bowl, whisk together the eggs, milk, sugar, and cinnamon powder until well combined. Set aside to let the flavors meld.
2. Assemble the Toast: Generously spread Nutella on one side of two slices of bread. Top with the remaining slices, creating a Nutella sandwich.
3. Soak the Sandwich: Immerse the Nutella-stuffed sandwich into the egg mixture. Use a knife to gently press down, ensuring the bread is thoroughly coated. Allow it to soak for 3-5 minutes before flipping and repeating on the other side. Don’t forget to coat the edges!
4. Cook to Perfection: Preheat a pan over medium heat and melt the butter. Cook the soaked sandwiches for about 5 minutes on each side, or until they are golden brown and cooked through, being careful not to burn them.
5. Serve with Flair: Dust with powdered sugar before serving. This dish pairs beautifully with a strong cup of black coffee, just like my grandmother used to enjoy.
Conclusion
Nutella Stuffed French Toast is a dish that transcends mere sustenance, offering a taste of cherished memories and familial love. It's a testament to the power of food in connecting us to our past and nurturing our present. Whether enjoyed as a luxurious breakfast or a decadent dessert, this French toast is sure to create new memories for you and your loved ones.
Difficulty Rating: 3/10
Classification: Dessert
Embrace the comfort and joy of Nutella Stuffed French Toast, and let each bite transport you to a place where time slows down, and love fills every corner of your heart.