Cranberry Orange Biscotti | Made by Meaghan Moineau

Cranberry Orange Biscotti | Made by Meaghan Moineau

Title: "Cranberry Orange Biscotti: A Taste of Nostalgia and Citrus Delight"
Description: Dive into the delightful world of Cranberry Orange Biscotti, a perfect fusion of tart cranberries and zesty orange. This dessert not only serves as a delicious treat but also carries a nostalgic family memory, making it a cherished addition to any holiday gathering.

---


There's something magical about the aroma of freshly baked biscotti wafting through the house, especially when the flavors of cranberry and orange meld together in perfect harmony. This Cranberry Orange Biscotti recipe is more than just a delightful dessert; it's a journey back to cherished family memories and festive gatherings.


A Nostalgic Journey

Growing up, my grandmother's kitchen was the heart of every holiday season. The warmth of the oven and the vibrant scents of citrus and spices created an inviting atmosphere that drew everyone in. Every year, as the first cold snap of winter hinted at the approaching holidays, my grandmother would pull out her well-worn recipe card for Cranberry Orange Biscotti.


I remember sitting at the kitchen table, watching her expertly mix the ingredients—unsalted butter, sugar, and the zest of fresh oranges—while recounting stories of her childhood. She'd tell us how her mother, my great-grandmother, would bake these very biscotti during the festive season, using them as a means to bring the family together over laughter, stories, and the occasional cup of hot cocoa.


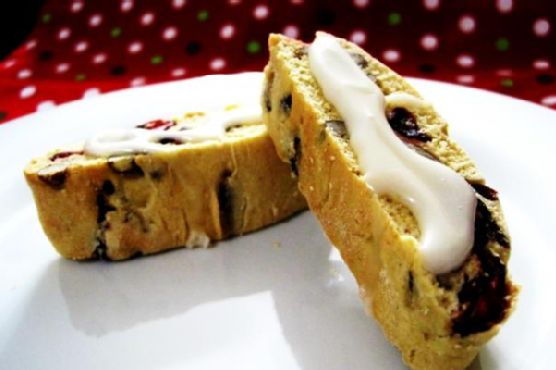
As a child, I was fascinated by the process. The transformation of simple ingredients like flour, whole wheat pastry flour, and baking powder into golden, slightly cracked logs seemed like magic. When she added the dried cranberries and pecans, I could hardly wait for the first taste. The tartness of the cranberries paired with the citrusy sweetness of the orange glaze was a combination that danced on the palate.


The Recipe

*Ingredients:*


- 1 tablespoon baking powder


- 1 cup confectioners' sugar


- 1 cup dried cranberries


- 3 large eggs


- 2 cups all-purpose flour


- 1/2 cup fresh orange juice


- 2 tablespoons orange zest


- 1 cup pecans, chopped


- 1/4 teaspoon salt


- 1 cup sugar


- 1/2 cup unsalted butter, softened


- 1 teaspoon vanilla extract


- 1 cup whole wheat pastry flour


*Instructions:*


1. Preheat the oven to 350°F (175°C), positioning racks in the upper and lower thirds. Line two baking sheets with parchment paper.


2. In a mixer, beat the butter and sugar until light. Add eggs one at a time, mixing well between each. Stir in orange zest and vanilla.


3. In a separate bowl, whisk together the flours, baking powder, and salt. Gradually add to the wet mixture, mixing until just combined. Fold in cranberries and pecans.


4. Transfer dough to a floured surface, divide into three pieces, and shape into 12-inch logs. Place on baking sheets.


5. Bake for 15-18 minutes, switching sheet positions halfway through. Let rest for 10 minutes. Reduce oven to 300°F (150°C).


6. Slice logs diagonally into 3/4-inch pieces. Lay slices on their sides and bake for 10-15 minutes until golden.


7. For the glaze, mix confectioners' sugar with orange juice to desired consistency. Drizzle over warm biscotti.


Difficulty: 6/10
Classification: Dessert

This biscotti is not just a treat but a tradition, a way to connect with loved ones both past and present. As I bake these biscotti today, I'm reminded of those cherished moments in my grandmother's kitchen, the stories shared, and the love that went into each batch. Every bite is a taste of nostalgia, bringing family and friends together, just as it always has.

Read more about Appetizers

Read more about Main Dishes

Read more about Desserts

Colcannon | Made by Meaghan Moineau

Colcannon | Made by Meaghan Moineau

A Taste of Tradition: Colcannon, A Hearty Irish Classic


Recreating Family Memories with Every Bite


Colcannon, a traditional Irish dish, is more than just a meal; it's a cherished piece of my family history. This comforting blend of creamy mashed potatoes and cabbage takes me back to my grandmother's kitchen, a place filled with laughter, storytelling, and the warmth of a hearty meal shared among loved ones.


Ingredients You'll Need:


- 2 rashers of optional bacon


- Butter


- 1 head of cabbage


- Stems of green onions


- Milk


- Fresh parsley


- Pepper


- Potatoes


- Salt


A Step-by-Step Guide to Making Colcannon:


1. Prepare the Cabbage: Start by cutting into the top of the cabbage, hollowing it out while leaving 3-4 outer leaves intact. Reserve the hollowed-out portion for later use.
2. Cook the Cabbage: Plunge the hollowed-out cabbage head into a large pot of boiling water. Let it simmer for about 5 minutes or until it is tender-crisp, ensuring it maintains its shape. Quickly cool it in cold water, then invert and drain.
3. Chop and Stir Fry: Chop the reserved cabbage pieces until you have about 1 1/2 cups. Stir fry them in butter along with the green onions until they are tender and set aside.
4. Mash the Potatoes: Boil the potatoes until tender, then mash them, incorporating milk, salt, and pepper to taste.
5. Combine: Stir in the sautéed cabbage mixture and add a sprinkle of fresh parsley for garnish.

A Dish Steeped in Nostalgia


I vividly remember the first time I helped my grandmother make Colcannon. The kitchen was filled with the savory aroma of butter and onions sizzling in the pan. My grandmother, with her gentle hands, showed me how to hollow out the cabbage, a task I found both fascinating and challenging. The kitchen was a flurry of activity, with my cousins setting the table and my grandfather recounting tales of his youth in Ireland.


As we sat down to enjoy the meal, I realized that Colcannon was not just food; it was a vessel of memories, stories, and traditions passed down through generations. Each bite was a reminder of who we were and where we came from, a connection to our roots and to each other.


Difficulty Rating: 4/10


Colcannon is a straightforward dish that even novice cooks can master with a bit of practice. The most challenging part might be hollowing out the cabbage, but with patience, it becomes an enjoyable task.


Classification: Main Dish


Colcannon is hearty and filling, making it a perfect main dish that embodies the essence of comfort food. It pairs beautifully with meats like ham or sausages, but it can also stand alone as a satisfying vegetarian meal.


Conclusion


Recreating this traditional Colcannon recipe allows me to honor my family's heritage while creating new memories in my own kitchen. Each time I prepare it, I am reminded of the love, warmth, and laughter that filled my grandmother's home. I hope this recipe brings the same joy and connection to your family table, creating new stories and memories for generations to come.

Read more about Appetizers

Read more about Main Dishes

Read more about Desserts

Berry & Ricotta Danishes | Made by Meaghan Moineau

Berry & Ricotta Danishes | Made by Meaghan Moineau

Sweet Nostalgia: Crafting Perfect Berry & Ricotta Danishes


A Delicious Journey Down Memory Lane


*Discover the magic of homemade Berry & Ricotta Danishes with this easy-to-follow recipe that brings a touch of nostalgia to your table. Perfect for dessert lovers and food enthusiasts alike, these delightful pastries are sure to become a family favorite.*


---


Ingredients


- Poached Berries: Blueberries, strawberries, and other berries of choice
- Glaze: Icing sugar, fresh lemon juice
- Ricotta Filling: Ricotta cheese, egg yolk, castor sugar, vanilla extract, lemon zest
- Pastry: Puff pastry, flour, water
- Optional Decorations: Additional poached berries, icing sugar
Difficulty: 4/10
Classification: Dessert

---


Instructions


1. Poach the Berries: Place a mix of your favorite berries in a saucepan over medium-low heat. Sprinkle with castor sugar and add a splash of water. Cover with a lid and gently shake to coat the berries. Poach for about 5 minutes until they soften but still hold their shape. Set aside to cool.
2. Preheat the Oven: Set your oven to 180°C (350°F) to prepare for baking.
3. Make the Ricotta Filling: In a mixing bowl, combine ricotta cheese, egg yolk, castor sugar, vanilla extract, and lemon zest. Mix well with a wooden spoon until thoroughly combined. Set aside.
4. Prepare the Glaze: In a small bowl, mix icing sugar and fresh lemon juice. Stir until smooth and set aside.
5. Prepare the Pastry: Remove puff pastry from the refrigerator. Cut into 10 rectangles, each measuring 8cm x 6cm (3" x 2.5"). Place 5 rectangles on a lined baking sheet, leaving space between them. Brush edges lightly with water.
6. Assemble the Danishes: Cut smaller rectangles from the remaining 5 pieces, leaving frames about 1.5cm (1/2") wide. Place these frames on top of the pastry bases. Fill the centers with 3-4 tablespoons of ricotta mixture and top with poached berries.
7. Bake: Bake in the preheated oven for 15 to 18 minutes, until the pastry puffs up and turns golden brown. Remove and cool on a wire rack.
8. Finish and Serve: Top with remaining poached berries and sprinkle with icing sugar just before serving.

---


A Sweet Family Memory


Growing up, Sunday afternoons at my grandmother's house were a cherished tradition, where the aroma of freshly baked pastries filled the air. Her kitchen was a haven of warmth and love, and her berry danishes were the highlight of our visits. I remember peeking into the oven, eagerly anticipating that first bite.


Grandma would let me help with the simpler tasks – arranging the berries and dusting the pastries with icing sugar. It was in those moments that I learned the power of food to bring people together, to create memories that last a lifetime. The sweet, tangy taste of the ricotta filling, combined with the juiciness of the berries, was something magical. Every time I bake these danishes, I’m transported back to those sunny afternoons, surrounded by family, laughter, and the smell of home.


---


Whether you're a seasoned baker or just starting out, these Berry & Ricotta Danishes offer a delightful experience. With their flaky puff pastry, creamy ricotta filling, and juicy berries, they are sure to enchant your taste buds and evoke the warmth of cherished family memories. Enjoy making them and, most importantly, enjoy sharing them with those you love.

Read more about Appetizers

Read more about Main Dishes

Read more about Desserts

Coffee-braised Short Ribs | Made by Meaghan Moineau

Coffee-braised Short Ribs | Made by Meaghan Moineau

Title: "Savory Memories: The Art of Coffee-Braised Short Ribs"


Description: Dive into the rich, aromatic world of Coffee-Braised Short Ribs—a dish that combines the warmth of family gatherings with the robust flavors of a unique culinary masterpiece. Perfectly tender ribs, braised to perfection with a hint of coffee and a medley of spices, this main dish is your ticket to a memorable dining experience.


---


Introduction


In the heart of every cherished family gathering lies a dish that brings everyone together, sparking joy and nostalgia with every bite. For my family, that dish has always been Coffee-Braised Short Ribs. The mere thought of it conjures images of bustling kitchens, cozy dining rooms, and laughter echoing through the house as we eagerly await the masterpiece emerging from the oven. In this blog post, I'll guide you through creating this heartwarming dish, sharing a piece of my family's history along the way.


A Family Memory


Growing up, Sunday afternoons were reserved for family dinners at my grandmother's house. The aroma of slow-cooked meals wafted through the air, promising a feast that would satisfy both the belly and the soul. My grandmother, a culinary magician in her own right, introduced us to Coffee-Braised Short Ribs one chilly autumn evening. The melding of savory and slightly sweet flavors, enriched by the depth of freshly brewed coffee, created a culinary symphony that left a lasting impression on all of us.


As we sat around the table, my grandmother regaled us with stories of her childhood, where she first learned to cook by her mother's side. Her eyes twinkled with a mix of nostalgia and pride as she recounted how this dish was a staple in their household—an ode to her heritage and a symbol of familial love. Each bite was a journey back in time, a connection to our roots, and a reminder of the warmth and comfort that family brings.


Recipe: Coffee-Braised Short Ribs


Ingredients:

- Short ribs


- Salt and pepper (to taste)


- Olive oil


- 1 yellow onion, chopped


- 1 red bell pepper, chopped


- 1 jalapeño, chopped


- 4 garlic cloves, minced


- 1 tablespoon ancho chile powder


- 1 tablespoon dried oregano


- 1 tablespoon ground cumin


- 1 cup strong freshly brewed coffee


- 1 can diced tomatoes with juice


- 2 tablespoons tomato paste


- 2 tablespoons dark brown sugar


- Fresh cilantro, chopped (for garnish)


Instructions:

1. Preheat your oven to 300°F (150°C).


2. Heat olive oil in a large heavy stockpot over medium-high heat.


3. Season the short ribs with salt and pepper. Add them to the pot in batches, browning each side for about 4 minutes. Transfer to a platter.


4. In the same pot, add onion, red bell pepper, and jalapeño. Reduce heat to medium, cover, and cook until the onion is tender, stirring occasionally (about 6 minutes).


5. Stir in garlic and sauté uncovered for 1 minute.


6. Add brown sugar, ancho chile powder, oregano, and cumin, stirring for 15 seconds.


7. Pour in the coffee, tomatoes with juice, and tomato paste, bringing the mixture to a boil while scraping up the browned bits.


8. Return the ribs and any juices to the pot, bring to a boil, then cover and bake in the oven until the meat is very tender, about 1 hour and 45 minutes.


9. Spoon off fat from the surface of the sauce. Season the sauce to taste with salt and pepper.


10. Transfer ribs to a platter and spoon the sauce over top. Sprinkle with chopped cilantro.


Conclusion


This Coffee-Braised Short Ribs recipe is more than just a meal; it's a journey through time, a celebration of family, and a testament to the power of food to connect us to our roots. With its deep, complex flavors and tender, succulent meat, this dish is sure to become a staple in your own family gatherings, creating new memories and traditions for years to come.


Difficulty Rating: 7/10

Classification: Main Dish


Whether you're creating new memories or revisiting old ones, this dish promises to be a highlight of any gathering. Enjoy, and may your home be filled with warmth, laughter, and the delightful aroma of Coffee-Braised Short Ribs.

Read more about Appetizers

Read more about Main Dishes

Read more about Desserts

Crumbled Feta Couscous Salad | Made by Meaghan Moineau

Crumbled Feta Couscous Salad | Made by Meaghan Moineau

**Title: A Taste of Nostalgia: Crumbled Feta Couscous Salad**


**Description: Discover the comforting flavors and heartwarming memories wrapped up in our Crumbled Feta Couscous Salad. This easy-to-make dish, packed with fresh ingredients and cherished family stories, will become a staple in your culinary repertoire.**


---


### A Taste of Nostalgia: Crumbled Feta Couscous Salad


In the bustling heart of Mediterranean cuisine lies a dish that marries simplicity with flavor—our beloved Crumbled Feta Couscous Salad. This delightful recipe, rated a 3 out of 10 on the difficulty scale, effortlessly serves as an elegant appetizer or a light main dish. With every bite, you'll be transported back to cherished family gatherings, where food and laughter were the bonds that held us together.


#### Ingredients:


- 1 cup couscous


- 1 ½ cups vegetable stock or water


- 2 tablespoons quality olive oil


- A pinch of salt


- 1 diced Roma tomato


- ½ red onion, finely chopped


- ¼ cup fresh mint, chopped


- ¼ cup fresh parsley, chopped


- 2 tablespoons white balsamic vinegar


- ½ cup crumbled feta cheese


#### Instructions:


1. In a medium saucepan, bring the vegetable stock or water to a boil. Add the couscous, stirring quickly to ensure even cooking.


2. Remove the saucepan from the heat and cover it with a lid. Allow the couscous to stand for 4-5 minutes, absorbing all the flavors of the stock.


3. Remove the lid and stir in the olive oil, adding a subtle richness to the dish.


4. Pour the cooked couscous into a large bowl and let it chill, stirring occasionally to cool evenly.


5. Once cooled, stir in the diced Roma tomato, red onion, mint, parsley, and white balsamic vinegar.


6. Finally, fold in the crumbled feta cheese, ensuring each bite is filled with creamy goodness.


7. Chill the salad completely before serving to allow the flavors to meld beautifully.


#### A Family Memory


As a child, I remember summers spent in my grandmother's kitchen, a place where time seemed to slow down, and every moment was filled with warmth and love. The Crumbled Feta Couscous Salad was a staple at our family gatherings, a dish that brought everyone to the table with its vibrant colors and fresh aroma.


I recall one particular summer afternoon when Grandma decided to teach me how to make this salad. She showed me how to properly chop the herbs, her fingers deftly moving with years of practice. "The secret," she whispered, "is in the freshness of the ingredients. The mint and parsley should always be from the garden, and the olive oil must be the finest you can find."


As we stirred the couscous together, she shared stories of her childhood, of how this recipe had been passed down through generations, each one adding a little something of their own. That day, I learned not only how to prepare a dish but how food could carry the essence of family history, connecting us to those who came before.


Even today, when I make this Crumbled Feta Couscous Salad, I am reminded of those sunny afternoons with Grandma, the laughter echoing through the house, and the sense of belonging that only comes from being with loved ones.


#### Conclusion


The Crumbled Feta Couscous Salad is more than just a dish; it's a bridge to the past, a reminder of the joy that comes from sharing meals with family. Easy to prepare and bursting with flavor, it's perfect for any occasion. So gather your ingredients, invite your family, and create memories that will last a lifetime.

Read more about Appetizers

Read more about Main Dishes

Read more about Desserts

Cherry Lime Mojito | Made by Meaghan Moineau

Cherry Lime Mojito | Made by Meaghan Moineau

# A Taste of Summer: The Cherry Lime Mojito that Brings Back Family Memories


## Description


Dive into the refreshing world of summer with our delightful Cherry Lime Mojito. This sparkling cocktail combines the sweetness of cherries with the tangy zest of lime and the coolness of mint, all perfectly balanced with a splash of white rum and bubbly carbonated water. This drink is not just a feast for your taste buds but also a journey down memory lane, evoking the warmth and joy of family gatherings. Whether you're hosting a summer soirée or simply relaxing on your porch, this mojito is the perfect companion. With a difficulty rating of 3 out of 10, this drink is a breeze to make and the ideal appetizer to kick off your evening.


---


### Ingredients:


- Fresh cherries


- Handful of mint leaves


- 1 fresh lime


- 2 teaspoons demerara sugar


- 2 ounces white rum


- Carbonated water


### Instructions:


1. **Prepare the Base**: In a tall glass, place a handful of fresh cherries, a few mint leaves, 2 teaspoons of demerara sugar, and juice from one lime.


2. **Muddle the Mixture**: Gently muddle these ingredients together at the bottom of the glass until the cherries are slightly crushed and the sugar begins to dissolve.


3. **Add the Spirit**: Drop in a few ice cubes and pour 2 ounces of white rum over the mixture.


4. **Finish with Fizz**: Fill the glass the rest of the way with carbonated water, giving it a gentle stir.


5. **Serve & Enjoy**: Garnish with a lime wedge or a sprig of mint and serve chilled.


---


### A Nostalgic Sip: Family Memories in a Glass


The Cherry Lime Mojito isn’t just a cocktail; for me, it’s a bottle of summer memories, shaken and stirred with love. Every time I take a sip, I'm transported back to those golden July afternoons in my grandmother’s backyard. The air was always filled with the scent of fresh mint and the laughter of family members gathered around the picnic table.


I remember my grandmother, her hands gentle and nimble, plucking cherries from the tree that stood as the backyard's centerpiece. She had a way of turning simple ingredients into something magical. As a child, I would watch her with awe, learning the art of muddling from the best. She’d always tell us stories—tales of her own youth, flavored with adventure and a hint of mischief—while she expertly crafted what she called her "signature summer potion."


Those afternoons taught me the true essence of family. It wasn’t about the grandeur of the gathering but the small, meaningful moments shared over a refreshing drink. Today, when I make this mojito, I feel her spirit guiding my hands, infusing each glass with love and nostalgia.


So, as you enjoy your Cherry Lime Mojito, take a moment to savor not just the flavors but the memories it might inspire. Here’s to family, to love, and to the timeless tradition of coming together over a perfect summer drink.


---


With its ease of preparation and the joy it brings, this Cherry Lime Mojito is more than just an appetizer. It's a celebration of flavors and family ties, making every sip a cherished memory.

Read more about Appetizers

Read more about Main Dishes

Read more about Desserts

The Pokémon Company and Honda have produced a life-sized motorbike based on a Pokemon – Video Games Chronicle | Analysis by Brian Moineau

The Pokémon Company and Honda have produced a life-sized motorbike based on a Pokemon - Video Games Chronicle | Analysis by Brian Moineau

**Revving Up Nostalgia: The Pokémon and Honda Collaboration**

In the realm of nostalgic crossovers, few partnerships can capture the imagination quite like The Pokémon Company and Honda teaming up to create a life-sized motorbike based on a beloved Pokémon. It's as if Pikachu and the Motor City had a brainstorming session and out popped this electrifying concept bike. Fans in Japan will get an exclusive sneak peek at this fantastical fusion this weekend, and the rest of us are left to marvel at the delightful absurdity of it all.

**A Ride Down Memory Lane**

For anyone who grew up in the late '90s and early 2000s, Pokémon was more than just a game; it was a phenomenon. From trading cards to animated TV shows, the franchise captured hearts and imaginations worldwide. Fast forward to today, Pokémon remains a cultural juggernaut, evolving with the times while staying true to its roots. This collaboration with Honda is not just a nod to the past but a testament to the enduring appeal of the Pokémon universe.

**The Power of Collaboration**

Honda, known for its innovative engineering and sleek designs, brings a unique expertise to this collaboration. The concept bike is not merely a marketing gimmick but a celebration of creativity and craftsmanship. It's a reminder that when two seemingly disparate worlds collide, magic can happen. This is reminiscent of other cross-industry collaborations, such as LEGO's partnership with iconic brands like NASA and Adidas, which have similarly sparked joy and inspiration.

**Cultural Connections**

The timing of this collaboration is particularly interesting, given the recent resurgence of interest in nostalgic brands and pop culture memorabilia. With the rise of platforms like TikTok, younger generations are rediscovering and reinventing the cultural touchstones of the past. This bike is a physical embodiment of that trend, a symbol of how the old and the new can coexist and thrive together.

**A Global Phenomenon**

While this particular event is happening in Japan, the global reach of both Honda and Pokémon ensures that fans worldwide are eagerly watching. Pokémon's international influence is undeniable, with Pokémon GO still encouraging millions to explore their neighborhoods in search of virtual creatures. Similarly, Honda's vehicles, from motorcycles to electric cars, continue to shape the future of transportation globally.

**Final Thought**

In a world that often feels increasingly divided, collaborations like this remind us of the simple joys of creativity and imagination. Whether you're a die-hard Pokémon fan, a motorcycle enthusiast, or just someone who appreciates a good crossover, there's something universally appealing about this concept bike. It's a happy reminder that in the vast universe of possibilities, sometimes the most delightful ideas come from the most unexpected places.

For those in Japan this weekend, do take the opportunity to witness this unique creation. For the rest of us, let's revel in the anticipation and perhaps daydream about what other fantastical collaborations the future might hold. Whether it's a Pikachu-powered scooter or a Charmander-inspired hoverboard, the possibilities are as endless as our imaginations.

Read more about AI in Business

Read more about Latest Sports Trends

Read more about Technology Innovations

Classic Pumpkin Pie | Made by Meaghan Moineau

Classic Pumpkin Pie | Made by Meaghan Moineau

Title: "A Slice of Nostalgia: The Timeless Allure of Classic Pumpkin Pie"


Description: Dive into the comforting embrace of fall with a Classic Pumpkin Pie recipe that not only tantalizes your taste buds but also warms your heart with a sprinkle of nostalgia.


---


As the crisp autumn air begins to weave its way through the trees, painting the landscape with hues of amber and gold, there's one classic dessert that captures the essence of the season like no other: Classic Pumpkin Pie. This timeless recipe combines the rich flavors of canned pumpkin, the warm spices of cinnamon, ginger, and nutmeg, and the creamy sweetness of condensed milk, all nestled within a tender, flaky pie crust. It's more than just a dessert; it's a culinary tradition that brings family and friends together around the table, year after year.


### Ingredients:


- 1 can of pumpkin


- 2 large eggs


- 1 teaspoon ground cinnamon


- 1/2 teaspoon ground ginger


- 1/4 teaspoon ground nutmeg


- 1/2 teaspoon salt


- 1 can sweetened condensed milk


- 1 unbaked pie crust


- Whipped cream for garnish


### Instructions:


1. **Preheat the Oven**: Begin by preheating your oven to 425 degrees F. This initial high temperature helps set the crust, ensuring it remains crisp and flaky.


2. **Mix the Filling**: In a medium bowl, whisk together the canned pumpkin, sweetened condensed milk, eggs, ground cinnamon, ginger, nutmeg, and salt. Stir until the mixture is smooth and well combined.


3. **Assemble the Pie**: Pour the pumpkin mixture into the unbaked pie crust, spreading it evenly with a spatula.


4. **Bake**: Place the pie in the oven and bake for 15 minutes. Then, reduce the oven temperature to 350 degrees F and continue baking for an additional 35 to 40 minutes. The pie is done when a knife inserted 1 inch from the crust comes out clean.


5. **Cool and Serve**: Allow the pie to cool completely before serving. Garnish with a generous dollop of whipped cream for the perfect finishing touch.


### Difficulty Rating: 4/10


### Classification: Dessert


**A Nostalgic Family Memory:**


Every Thanksgiving, as the fragrant aroma of pumpkin pie wafted through the house, it signaled the beginning of the holiday season for our family. I vividly remember my grandmother standing in her cozy kitchen, wearing her favorite apron, which was always dusted with a faint layer of flour. She would hum softly to herself as she whisked the pumpkin filling, a melody that echoed the warmth and love she poured into every dish she made.


Gathered around the dining table, with the pie taking center stage, we would share stories of the past and dreams for the future, laughter punctuating our conversations. As dessert was served, my grandmother would always insist on adding an extra swirl of whipped cream to each slice, a gesture that made every piece feel special.


This Classic Pumpkin Pie recipe is not just a dessert; it's a cherished tradition, a slice of nostalgia that connects us to our roots and reminds us of the simple joys of life. Whether you're a seasoned baker or a novice in the kitchen, this recipe offers a delightful journey back to those heartwarming moments that define the spirit of family gatherings.


As you take your first bite, may it transport you to a place of warmth, love, and cherished memories. Happy baking!

Read more about Appetizers

Read more about Main Dishes

Read more about Desserts

Easy Shrimp Scampi | Made by Meaghan Moineau

Easy Shrimp Scampi | Made by Meaghan Moineau

**Title: A Taste of Home: Easy Shrimp Scampi for the Soul**


**Description:** Dive into the heartwarming flavors of Easy Shrimp Scampi, a quick and delightful main dish that combines the rich taste of garlic, butter, and white wine with succulent shrimp. Perfect for a family dinner or a solo indulgence, this recipe is a nostalgic journey back to cherished family gatherings. Discover the simplicity and joy of cooking this classic dish, rated just 3 out of 10 in difficulty—ideal for both seasoned cooks and beginners alike.


---


There's something magical about the aroma of garlic sizzling in butter and olive oil, a fragrance that transports me back to my grandmother's cozy kitchen. Every Sunday, our family would gather around her wooden dining table, eagerly awaiting the feast she had prepared. Among her culinary masterpieces, her Shrimp Scampi was a standout—simple yet bursting with flavor.


**Ingredients:**


- 2 tablespoons butter


- 2 tablespoons olive oil


- 4 cloves garlic, minced


- 1/2 cup white wine


- 2 tablespoons lemon juice


- 1 pound shrimp, peeled and deveined


- 1/4 cup fresh parsley, chopped


- Salt and pepper to taste


**Instructions:**


1. In a large skillet, melt the butter and olive oil over medium heat. The kitchen fills with the comforting scent, reminiscent of those cherished Sunday gatherings.


2. Add the minced garlic and sauté for about 30 seconds, just until it begins to release its aromatic goodness.


3. Stir in the white wine and lemon juice, letting it simmer for a minute. This step always reminded me of my grandmother's gentle touch as she cooked, her love infusing every dish.


4. Add the shrimp, fresh parsley, salt, and pepper. Cooking over high heat, stir constantly for 2-3 minutes until the shrimp turn pink and are cooked through.


5. Serve immediately over a bed of pasta or rice, just like we did back then, when every bite was accompanied by laughter and stories from our week.


As I recreate this dish today, I remember a particular Sunday during a chilly autumn. The leaves were turning, painting the landscape in shades of gold and crimson. We were all gathered in my grandmother's warm kitchen, the windows fogged up from the heat of the stove. I watched as she moved gracefully, her hands a blur of practiced motions, creating magic with simple ingredients. Her Shrimp Scampi was always the highlight, a dish that brought us together and made us feel at home.


**Difficulty:** 3/10


**Classification:** Main Dish


With every bite of this Easy Shrimp Scampi, I'm reminded of those beautiful moments—an ode to simpler times, where food and family were the heart of our home. May this recipe bring a touch of that warmth and nostalgia to your table, too. Enjoy!

Read more about Appetizers

Read more about Main Dishes

Read more about Desserts

Delicious Rhubarb Custard Pie | Made by Meaghan Moineau

Delicious Rhubarb Custard Pie | Made by Meaghan Moineau

**Title: A Slice of Nostalgia: Crafting the Perfect Rhubarb Custard Pie**


**Description:** Dive into the world of baking with a timeless recipe that blends tradition and taste. Our Delicious Rhubarb Custard Pie combines tangy rhubarb with a creamy custard filling, all nestled in a perfectly baked crust. This dessert not only tantalizes your taste buds but also offers a slice of cherished family memories. Rated 5/10 in difficulty, this dessert is perfect for both novice and seasoned bakers alike.


---


### The Delightful Dance of Rhubarb and Custard


There's something magical about the combination of tangy rhubarb and creamy custard, a pairing that perfectly encapsulates both balance and indulgence. This Delicious Rhubarb Custard Pie is a testament to that harmony. With a hint of nutmeg and the buttery goodness enveloping each bite, it’s a dessert that promises satisfaction and nostalgia.


#### Ingredients:


- Butter


- Eggs


- Flour


- Nutmeg


- Prebaked pie crust


- Raw rhubarb


- Salt


#### Instructions:


1. **Prepare the Filling:** In a large bowl, combine flour, nutmeg, salt, and raw rhubarb. This mixture will become the heart of your pie, infusing every bite with a delightful tartness.


2. **Assemble the Pie:** Pour the rhubarb mixture into a pre-baked pie crust, ensuring it's evenly distributed.


3. **Add the Custard:** Beat the eggs and pour them over the rhubarb mixture, letting the custard seep through the vibrant reds and greens of the rhubarb.


4. **Drizzle with Butter:** Melt the butter and drizzle it over the top of the pie. This final touch ensures a rich, velvety texture.


5. **Baking:** Preheat your oven to 400°F (220°C). Place the pie in the center rack and bake for 50 minutes. To prevent the crust edges from over-browning, tent them with aluminum foil.


#### A Slice of Family Memory


Every time I bake this pie, I’m whisked back to my grandmother’s quaint kitchen. The aroma of rhubarb custard pie wafting through her house was a signal that something special was about to happen. It was a Sunday tradition, a staple at our family gatherings. We’d gather around the table, the pie still warm from the oven, and share stories of the week gone by.


My grandmother, with her kind eyes and gentle smile, always insisted on using fresh rhubarb from her garden. She said it was the secret ingredient, though I suspect it was her love that made each pie so memorable. As kids, my siblings and I would sneak into the garden, plucking rhubarb stalks, pretending to be little chefs. Those moments are etched in my heart, a testament to the power of food in bringing families together.


#### Dessert Rating: 5/10


This recipe, while not overly complicated, requires careful attention to detail to achieve the perfect balance of flavors. It's an intermediate-level dessert, ideal for those ready to expand their baking repertoire.


---


Embrace the tradition, savor the flavors, and let this Delicious Rhubarb Custard Pie become a cherished part of your family gatherings. As you bake, remember the stories that have brought this recipe to life, and perhaps, create new ones of your own.

Read more about Appetizers

Read more about Main Dishes

Read more about Desserts

Guacamole | Made by Meaghan Moineau

Guacamole | Made by Meaghan Moineau

**Title: A Taste of Tradition: Crafting the Perfect Guacamole**


**Description: Dive into the rich, flavorful world of homemade guacamole, a dish that not only tantalizes the taste buds but also evokes cherished family memories. Discover the simple yet exquisite recipe that has been a staple at our family gatherings and learn how to make it yourself.**


---


### A Taste of Tradition: Crafting the Perfect Guacamole


Guacamole is more than just a dish; it's a celebration of flavors that brings people together. Its creamy texture and vibrant taste have the power to transform any meal, making it an essential appetizer in many households. Today, I want to share not only a delightful guacamole recipe but also a heartwarming story of how this dish became a beloved tradition in my family.


#### Ingredients:


- 3 Haas avocados


- 1 small onion, finely chopped


- 1 jalapeño pepper, seeded and minced


- 2 tablespoons fresh cilantro, chopped


- 1 teaspoon salt


- 1/2 teaspoon black pepper


- 1 tablespoon fresh lime juice


- 1 tablespoon fresh basil, chopped


- 1 tablespoon fresh oregano, chopped


#### Instructions:


1. **Prepare the Avocados**: Begin by cutting the avocados in half lengthwise. Carefully drive a chef's knife into the large pit and twist to remove it. Scoop the avocado flesh from the skin into a mixing bowl.


2. **Mash and Mix**: Using a fork, gently mash the avocado to your desired consistency. Add in the finely chopped onion, minced jalapeño pepper, fresh cilantro, basil, and oregano. Mix well to incorporate all the ingredients.


3. **Season to Perfection**: Season the mixture with salt, black pepper, and fresh lime juice. Stir to combine, ensuring every bite is packed with flavor.


4. **Serve or Store**: Serve your guacamole immediately for the freshest taste. If you're not planning to enjoy it right away, press a plastic film wrap directly onto the surface of the guacamole to prevent browning, and store it in the refrigerator.


#### A Nostalgic Family Memory


Every summer, my family would gather at my grandparents' house for a weekend of laughter, storytelling, and, of course, food. The centerpiece of these gatherings was always my grandfather's famous guacamole. He had learned the recipe from his mother, who had brought it from her hometown in Mexico.


I remember as a child, standing on a stool beside him as he prepared the guacamole, eagerly waiting to be handed the fork to mash the avocados. He would tell stories of his childhood in the bustling markets of Guadalajara, where he first learned to select the perfect avocados. The kitchen would fill with the fresh aroma of cilantro and lime, a scent that still transports me back to those warm summer afternoons.


Guacamole was more than just an appetizer; it was a symbol of our family's heritage and love, a dish that connected us to our roots and to each other. Even now, as I prepare this recipe, I feel a sense of nostalgia and a deep appreciation for the family traditions that shape our lives.


#### Difficulty: 3/10


#### Classification: Appetizer


In conclusion, this guacamole recipe is not only simple and delicious but also a reminder of the power of food to evoke memories and bring people together. Whether you're hosting a family gathering or simply want a taste of tradition, this dish promises to delight your taste buds and warm your heart. Enjoy!

Read more about Appetizers

Read more about Main Dishes

Read more about Desserts

Captain America Shield Cookies | Made by Meaghan Moineau

Captain America Shield Cookies | Made by Meaghan Moineau

# Shielding Sweetness: Captain America Shield Cookies


**Description:** Unleash your inner superhero with these delightful and iconic Captain America Shield Cookies. Perfect for comic book fans and dessert lovers alike, these cookies not only capture the essence of a beloved superhero but also serve as a nostalgic treat that brings families together. With layers of vibrant fondant and a creamy buttercream finish, these cookies are bound to be the star of your next gathering.


---


## A Sweet Nostalgia: A Family Memory


Growing up, superhero movies were a staple in our household. Every summer, my siblings and I would gather around the TV, popcorn in hand, eagerly watching the latest superhero saga unfold. Captain America, with his unwavering sense of justice and iconic shield, was always a favorite. It wasn't just his strength or bravery that captivated us; it was the idea of protection and unity that resonated deeply.


One rainy afternoon, with no new comics to dive into, my mom came up with a brilliant idea to keep us entertained - baking Captain America Shield Cookies. As the aroma of freshly baked sugar cookies wafted through the air, our kitchen transformed into a workshop of creativity and laughter. My siblings and I took turns dipping the cookies in red candy melts, giggling as we tried to perfect the fondant stars.


The joy of creating these cookies was matched only by the delight of sharing them with family and friends. Each bite was a reminder of those cherished days, where superhero adventures and family bonds were seamlessly intertwined.


## Recipe


### Ingredients:


- Red candy melts


- Coconut oil


- Circular cookie cutters (various sizes)


- Star cookie cutter


- Cornstarch


- Blue cake fondant


- White cake fondant


- Pre-made sugar cookies


- Vanilla buttercream


### Instructions:


1. Line a baking sheet with wax paper.


2. Microwave the candy melts and coconut oil in 30-second intervals until completely melted, mixing thoroughly.


3. Using a fork, dip each sugar cookie into the melted candy and set it carefully on the lined baking sheet.


4. Allow to set in the refrigerator for about one hour.


5. Dust a clean working surface with cornstarch and roll out your fondant.


6. Cut your white fondant with the largest cookie cutter, then using the 1.5-inch cookie cutter, cut a hole in the middle.


7. Using the smallest circular cookie cutter, cut out blue fondant circles.


8. Cut star shapes from the white fondant and use buttercream to glue them onto your blue fondant circles.


9. Once the coated cookies are set, remove them from the fridge and start assembling. Using buttercream as the glue, place your large white circle, then the blue one (with the star).


10. Enjoy your superhero creation!


### Difficulty Rating:


**4/10** - This recipe is beginner-friendly and perfect for a fun family activity.


### Classification:


**Dessert**


---


Whether you're celebrating a superhero-themed party or simply indulging your sweet tooth, these Captain America Shield Cookies are more than just a treat. They're a delicious way to bring a slice of nostalgia and the spirit of heroism into your home. Assemble your team, don your aprons, and let the baking adventure begin!

Read more about Appetizers

Read more about Main Dishes

Read more about Desserts

PB Cup Stuffed Brownie Bites | Made by Meaghan Moineau

PB Cup Stuffed Brownie Bites | Made by Meaghan Moineau

**Title: Sweet Nostalgia: Indulge in PB Cup Stuffed Brownie Bites**


**Description: Discover the joy of baking with our delightful PB Cup Stuffed Brownie Bites! This easy-to-follow, mouthwatering dessert blends rich cocoa and creamy peanut butter for an irresistible treat that evokes cherished family memories.**


---


There's something about the aroma of freshly baked brownies that instantly transports me back to my grandmother's cozy kitchen. As a child, I remember spending countless weekends at her house, where the air was always thick with the scent of sugar and cocoa. My grandmother, with her flour-dusted apron and warm smile, had a knack for turning simple ingredients into extraordinary treats. One of my fondest memories was the day she introduced me to her unique twist on a classic brownie – the PB Cup Stuffed Brownie Bites.


**A Perfect Blend of Flavors**


These decadent bites are the epitome of comfort food, combining the rich, fudgy texture of a brownie with the creamy, nutty goodness of Reese's peanut butter cups. The secret lies in the simplicity of the ingredients, each playing a crucial role in creating a symphony of flavors:


- **Granulated Sugar**: Adds sweetness and enhances the cocoa flavor.


- **Flour**: Provides structure and stability.


- **Eggs**: Bind the ingredients, creating a moist, chewy texture.


- **Salt**: Balances the sweetness and enhances the chocolatey notes.


- **Vegetable Oil**: Keeps the brownies moist and tender.


- **Vanilla Extract**: Adds depth and warmth to the flavor profile.


- **Cocoa Powder**: The star of the show, imparting a rich, chocolatey essence.


- **Semi-Sweet Chocolate Chips**: Offer bursts of chocolate in every bite.


- **Reese's Peanut Butter Cups**: The pièce de résistance, adding a delightful surprise in the center.


**Step-by-Step Guide to Culinary Bliss**


1. **Mixing the Magic**: Begin by whisking together the granulated sugar, flour, eggs, salt, vegetable oil, vanilla, and cocoa powder until well combined. The transformation starts here, as these humble ingredients meld together to create a rich, chocolatey batter.


2. **Stir in the Surprise**: Gently fold in the semi-sweet chocolate chips, taking care not to overmix. This step ensures that each bite is studded with pockets of melted chocolate.


3. **Prepare and Preheat**: Lightly spray a mini muffin pan with cooking spray and preheat your oven to 350°F. This sets the stage for the magic to happen.


4. **Fill and Bake**: Scoop the batter into the prepared pan, filling each slot about three-quarters of the way up. This allows room for the brownie bites to rise and accommodate the peanut butter cup. Bake for 8-10 minutes, or until a toothpick inserted comes out almost clean. Remember, it's okay if they're slightly underdone – this is what makes them gooey and irresistible.


5. **The Grand Finale**: Once the brownies are baked, gently push a Reese's peanut butter cup into the center of each. The warmth of the brownie will slightly melt the peanut butter cup, creating a creamy center. Allow them to set in the pan for a couple of minutes before transferring them to a cooling rack.


**A Sweet Symphony of Memories**


Every time I take a bite of these PB Cup Stuffed Brownie Bites, I'm reminded of those cherished afternoons in my grandmother's kitchen. The laughter, the stories shared, and the sheer joy of creating something delicious together. These little treats are more than just a dessert; they are a testament to the power of food to connect us with our past and create new memories with our loved ones.


**Difficulty Rating: 3/10**


**Classification: Dessert**


Whether you're an experienced baker or a novice in the kitchen, this recipe is a delightful way to indulge in a bit of nostalgia while creating new moments of joy. So, preheat that oven, gather your ingredients, and let the sweet symphony of PB Cup Stuffed Brownie Bites fill your home with warmth and happiness.

Read more about Appetizers

Read more about Main Dishes

Read more about Desserts

Not Momofuku Ginger Scallion Noodles | Made by Meaghan Moineau

Not Momofuku Ginger Scallion Noodles | Made by Meaghan Moineau

**Title: A Taste of Nostalgia: Not Momofuku Ginger Scallion Noodles**


**Description:** Dive into the comforting embrace of Not Momofuku Ginger Scallion Noodles, a delightful dish packed with vibrant flavors and warm memories. This recipe is your gateway to a symphony of taste and nostalgia, blending simple ingredients into a soul-soothing experience. Perfect for a cozy dinner, this dish will transport you back to cherished family gatherings, making it a must-try for any home cook.


---


**Blog Post:**


There's something magical about a recipe that evokes cherished memories with every bite. For me, Not Momofuku Ginger Scallion Noodles is more than just a dish; it's a bridge to my past, a flavorful reminder of family gatherings filled with laughter, love, and of course, delightful aromas wafting from the kitchen.


**Ingredients:**


- Soba noodles


- 1/4 cup grapeseed oil


- 2 cups green onions, finely chopped


- 2 tablespoons ginger, minced


- 4 cloves garlic, minced


- 2 shallots, thinly sliced


- 2 tablespoons fish sauce


- 1 tablespoon sesame seed oil


- 1 tablespoon rice wine vinegar


- 2 tablespoons wheat-free tamari sauce


- 1 tablespoon honey


- 1 red chile pepper, crushed


- Himalayan salt, to taste


**Instructions:**


1. Heat the grapeseed oil in a saucepan over high heat until shimmering and hot, but not smoking. This is where the magic begins.


2. Carefully add the green onions, ginger, garlic, and shallots to the pan. Watch as the ingredients sizzle and the aroma fills your kitchen, instantly transforming the space into a fragrant haven. The onions will wilt and turn a vibrant green almost immediately.


3. Remove the pan from the heat and stir the mixture with a wooden spoon. Feel the warmth of the moment as you add the fish sauce, sesame seed oil, rice wine vinegar, tamari sauce, honey, crushed red chile pepper, and Himalayan salt. Allow the sauce to sit for 15 minutes, letting the flavors meld together.


4. Toss with your favorite noodles. While I used fresh Chinese egg noodles for a traditional touch, soba noodles offer a splendid alternative, absorbing the sauce beautifully.


**A Nostalgic Connection:**


This dish always takes me back to my grandmother's kitchen. As a child, I spent countless weekends there, perched on a stool, watching her deftly chop green onions and ginger while regaling me with stories of her own childhood. She had a way of making the simplest ingredients sing, turning every meal into an event. The aroma of sizzling onions and ginger would fill the house, drawing everyone to the kitchen like moths to a flame. Every bite of her noodles was a testament to her love; a warm, comforting embrace on a plate.


**Difficulty Rating: 3/10**


Classified as a **Main Dish**, Not Momofuku Ginger Scallion Noodles is surprisingly straightforward to prepare, making it an ideal choice for both novice cooks and seasoned chefs alike. Its simplicity is its strength, allowing each ingredient to shine while wrapping you in a blanket of nostalgia and flavor.


---


There's an undeniable comfort in recreating a recipe that has stood the test of time in your family. Not Momofuku Ginger Scallion Noodles is more than just a meal; it's a journey back to those precious moments spent with loved ones. Whether you're cooking for a crowd or just for yourself, this dish is sure to bring a smile to your face and warmth to your heart. So, gather your ingredients, ignite your stove, and let the magic of nostalgia fill your kitchen once more.

Read more about Appetizers

Read more about Main Dishes

Read more about Desserts

Easy Key Lime Pie | Made by Meaghan Moineau

Easy Key Lime Pie | Made by Meaghan Moineau

**Title: A Slice of Sunshine: Easy Key Lime Pie Recipe with a Dash of Family Nostalgia**


**Description:** Dive into the zestful world of Key Lime Pie with our easy-to-follow recipe. Perfect for dessert lovers, this pie combines tangy lime flavors with a buttery graham cracker crust. Join us as we explore not just the steps to create this delightful treat, but also a cherished family memory that makes this pie a staple in our home.


---


### A Slice of Sunshine: Easy Key Lime Pie Recipe with a Dash of Family Nostalgia


When the sun is high and the days are long, there's nothing quite like the refreshing bite of a Key Lime Pie to bring a little bit of sunshine to your table. This Easy Key Lime Pie recipe is a breeze to make, and it brings back fond memories of summer afternoons spent in my grandmother's kitchen, surrounded by the laughter of family and the sweet aroma of limes.


**Ingredients:**


- 1/4 cup butter, melted


- 1/4 cup sugar


- 1 1/2 cups crushed graham crackers


- 3 egg yolks


- 1 can (14 ounces) sweetened condensed milk


- 1/2 cup lime juice


- 1/4 cup water


- Whipped cream for topping


- A few drops of green food coloring (optional)


**Instructions:**


**1. Prepare the Crust:**


Start by melting the butter in a small saucepan. Once melted, stir in 1/4 cup of sugar until it's well combined. Add the crushed graham crackers to the mixture and toss until everything is mixed thoroughly.


Spread this mixture evenly into a 9-inch pie plate, pressing it firmly onto the bottom and sides to create a solid crust. Chill the crust for 1 hour or until firm. For a more robust flavor, you can also bake it in a 375-degree oven for 4-5 minutes and then let it cool before filling.


**2. Create the Filling:**


In a medium bowl, beat the egg yolks using a whisk or fork until they are smooth. Gradually whisk in the sweetened condensed milk, ensuring a creamy consistency. Next, add the lime juice and water, stirring the mixture until it begins to thicken. For a touch of color, you can add a few drops of green food coloring.


**3. Assemble and Bake:**


Spoon the lime filling into the prepared crust, spreading it evenly. Bake the pie in a 350-degree oven for 25 minutes. Once baked, allow it to cool for 1 hour before transferring it to the refrigerator to chill for an additional 3-4 hours.


**4. Serve:**


Top your pie with a generous dollop of whipped cream just before serving. Each bite is a perfect balance of creamy sweetness and tangy lime, a true testament to its reputation as a classic dessert.


**A Family Memory:**


Growing up, our family gatherings were never complete without my grandmother's famous Key Lime Pie. Every summer, she would host a picnic in her backyard, a tradition that brought together cousins from near and far. I remember watching her in the kitchen, her hands deftly working through the recipe as she hummed along to her favorite tunes.


The moment the pie emerged from the oven, a sense of anticipation filled the room. We'd gather around the table, each slice bringing with it not just a burst of lime flavor, but a flood of memories. My grandmother would share stories of her childhood in Florida, where Key Limes grew in abundance and pies like these were a staple of every family event.


Those afternoons taught me that food is more than just sustenance; it’s a bridge to the past, a vessel of tradition and love. Now, every time I make this pie, I'm reminded of those cherished moments, making it more than just a dessert, but a slice of family history.


**Difficulty Rating:** 4/10


**Category:** Dessert


---


Embrace the sunshine in every bite with this Easy Key Lime Pie recipe. Whether you're creating new memories or reliving old ones, this pie is sure to become a beloved dessert in your home. Enjoy!

Read more about Appetizers

Read more about Main Dishes

Read more about Desserts

Ginger Molasses Rounds | Made by Meaghan Moineau

Ginger Molasses Rounds | Made by Meaghan Moineau

**Title: The Timeless Delight of Ginger Molasses Rounds: A Nostalgic Treat**


**Description: Discover the sweet nostalgia of Ginger Molasses Rounds, a delicious dessert that brings warmth and memories to the heart and home. With a perfect blend of spices and a chewy texture, this recipe is simple yet rich with family tradition.**


---


### A Taste of Nostalgia: Ginger Molasses Rounds


As the autumn leaves begin to fall and the air grows crisp, there's nothing quite like the comforting aroma of freshly baked cookies wafting through the house. If there's one recipe that embodies the spirit of warmth and family togetherness, it's Ginger Molasses Rounds. These cookies, with their perfect chewiness and spice, have been a beloved tradition in my family for generations.


I vividly remember the first time I helped my grandmother bake these delightful rounds. Her kitchen, always a hub of laughter and the tantalizing scents of spices, was a place where magic happened. I was a curious child, always eager to learn, and my grandmother was a patient teacher. She would gently guide my small hands as I carefully measured out the ingredients — flour, salt, baking soda, and those aromatic spices: cinnamon and ground ginger. Each step was a lesson not just in baking, but in life, as she shared stories of her childhood and how her mother taught her the same recipe.


### The Recipe


#### Ingredients:


- 1 cup butter, softened


- 1 cup sugar


- 1 egg


- 1/4 cup molasses


- 2 cups all-purpose flour


- 2 teaspoons baking soda


- 1/4 teaspoon salt


- 1 teaspoon ground cinnamon


- 1 teaspoon ground ginger


- Additional granulated sugar for rolling


#### Instructions:


1. **Cream the Butter and Sugar:**


In a large bowl, cream together the butter and sugar until smooth and fluffy. This step is essential for that perfect cookie texture.


2. **Add Egg and Molasses:**


Beat in the egg and molasses until well combined. The molasses gives these cookies their rich color and deep flavor.


3. **Mix Dry Ingredients:**


In a separate bowl, whisk together the flour, baking soda, salt, cinnamon, and ground ginger. Gradually blend this dry mixture into the creamed ingredients.


4. **Shape and Roll:**


Shape the dough into small balls, about an inch in diameter. Roll each ball in additional granulated sugar to coat.


5. **Bake:**


Place the balls 2 inches apart on a baking sheet lined with parchment paper. Bake in a preheated 350-degree oven for 8-9 minutes, until the tops are just set and slightly cracked. Remember, they will be soft but will harden as they cool, achieving that perfect chewy texture.


### A Family Tradition


Each time I bake Ginger Molasses Rounds, I'm transported back to those cherished days in my grandmother's kitchen. The cookies not only serve as a sweet treat but as a reminder of the love and lessons passed down through generations. As my own children gather around, eager to help and hear stories of the past, I know this tradition will continue, weaving a tapestry of memories that will last a lifetime.


### Difficulty and Classification


Rated a 3 out of 10 on the difficulty scale, this recipe is both simple and rewarding, making it perfect for bakers of all levels. Classified as a dessert, these cookies are a delightful way to end a meal or share with friends and family over a cup of tea.


As you bake and enjoy these Ginger Molasses Rounds, may they bring warmth to your heart and home, just as they have to mine for so many years.

Read more about Appetizers

Read more about Main Dishes

Read more about Desserts

Peppermint White Chocolate Fudge | Made by Meaghan Moineau

Peppermint White Chocolate Fudge | Made by Meaghan Moineau

**Title: Peppermint White Chocolate Fudge: A Sweet Trip Down Memory Lane**


**Description:** Dive into the world of festive flavors with our Peppermint White Chocolate Fudge recipe. Easy to make, yet rich in taste and tradition, this dessert is perfect for the holiday season. Discover how this delightful treat not only satisfies your sweet tooth but also brings back cherished family memories.


---


The holiday season is a time for family gatherings, laughter, and, of course, indulgent treats that bring warmth and joy to our hearts. One such treat that has always held a special place in my family's holiday tradition is the Peppermint White Chocolate Fudge. This dessert isn't just a delightful blend of flavors; it's a sweet reminder of the love and joy shared in my grandmother's kitchen.


**Ingredients:**


- 2 cups white chocolate chips


- 1 container of vanilla frosting


- Red food coloring


- 1 teaspoon peppermint flavoring


- Fresh peppermint candies, crushed


**Instructions:**


1. Begin by lining an 8x8 pan with plastic wrap or wax paper, ensuring easy removal of the fudge later.


2. In a large microwave-safe bowl, melt the white chocolate chips. Microwave them in 30-second intervals, stirring between each session to ensure a smooth consistency.


3. Once melted, add the container of vanilla frosting to the bowl. Stir until the mixture is well combined.


4. Incorporate the peppermint flavoring, stirring thoroughly to distribute the flavor evenly. If the mixture begins to stiffen, reheat it for an additional 10 seconds to maintain a pourable consistency.


5. Pour the mixture into the prepared pan, spreading it evenly.


6. Place 6-8 drops of red food coloring on the surface of the warm fudge. Using a toothpick or knife, swirl the color into the top of the fudge to create a marbled effect.


7. Sprinkle the crushed peppermint candies over the top, adding a festive crunch to each bite.


8. Cool the fudge in the refrigerator until it hardens. Once firm, cut into squares and enjoy!


**Nostalgic Story:**


Every Christmas Eve, my grandmother would gather all the grandchildren around her worn, wooden kitchen table, the air filled with the sweet scent of vanilla and peppermint. We were her little helpers, eagerly waiting to swirl the red food coloring into the smooth, white canvas of fudge. As she gently guided our hands, she'd recount stories from her childhood—tales of snowy holidays and simple joys that seemed to dance around us like the snowflakes outside.


The swirling of red into white became more than just a step in a recipe; it was a ritual, a moment where time seemed to stand still, capturing the essence of family togetherness. The finished product, adorned with crushed peppermint candies, was not just a treat we shared, but a memory we cherished.


**Difficulty: 2/10**


**Classification: Dessert**


This Peppermint White Chocolate Fudge is an easy-to-make dessert that brings a bit of holiday magic to your table. With simple ingredients and fond memories infused in every bite, it's sure to become a cherished tradition in your home as well. Whether you're creating new memories or reliving old ones, this fudge is a testament to the sweetness of family and festive cheer.

Read more about Appetizers

Read more about Main Dishes

Read more about Desserts

Savory Olive & Goat Cheese Palmiers | Made by Meaghan Moineau

Savory Olive & Goat Cheese Palmiers | Made by Meaghan Moineau

**Title: A Taste of Nostalgia: Crafting Savory Olive & Goat Cheese Palmiers**


**Description:** Dive into the delightful world of Savory Olive & Goat Cheese Palmiers. This irresistible appetizer combines the perfect balance of flavors with a touch of nostalgia. Discover a cherished family memory and learn how to create this elegant dish with ease.


---


When I think back to the many family gatherings of my childhood, one dish always stands out in my memory: the delectable Savory Olive & Goat Cheese Palmiers. These delicate, flaky appetizers were a staple at our family reunions, bringing a taste of sophistication to our rustic backyard picnics. The aroma of baking puff pastry and the savory blend of olives and goat cheese would waft through the air, enticing us all to gather around the kitchen.


**Creating Savory Olive & Goat Cheese Palmiers**


**Ingredients:**


- Coarse salt


- Goat cheese


- Cooked olive tapenade


- Pine nuts


- Cooked puff pastry dough


**Instructions:**


1. **Thaw and Prepare:** Begin by allowing the puff pastry dough to thaw according to the package directions. This is a crucial step to ensure the dough is pliable and easy to work with.


2. **Roll Out the Dough:** Lightly flour a flat work surface to prevent sticking. Place one sheet of the dough on top of the other on the floured surface, and gently roll it out to a 9x12-inch shape that is about 1/4-inch thick. If you prefer, you can use each sheet of dough individually.


3. **Add the Filling:** Spread the olive tapenade evenly over the dough, followed by the crumbled goat cheese. The combination of these two ingredients creates a rich, savory flavor profile. Top it off with the toasted pine nuts for added crunch and nuttiness.


4. **Roll and Chill:** Start by rolling the short ends of the dough toward each other until they meet in the middle. Tightly wrap the rolled dough in plastic wrap and refrigerate for about 30 minutes. This helps the dough firm up, making it easier to slice.


5. **Bake to Perfection:** Preheat your oven to 425 degrees F and line a baking sheet with parchment paper or a silicone baking mat. Unwrap the chilled dough and use a serrated knife to slice the rolled dough into 1/4-inch slices. Arrange them on the baking sheet about 2 inches apart. Sprinkle the tops with coarse salt and bake for 12-14 minutes, or until they are just lightly golden. Serve warm for the best experience.


**A Family Memory:**


One summer, during our annual family reunion, my grandmother shared the story of how she first discovered this dish while traveling through France with my grandfather. They stumbled upon a quaint little bakery in Provence that sold the most delightful pastries. Inspired, she decided to recreate the palmiers with her own twist, incorporating her love for olives and goat cheese. That year, she taught me how to make them, and we spent a lovely afternoon in her sunlit kitchen, rolling dough and sharing stories of her adventures. To this day, each bite of these palmiers takes me back to that special summer and the warmth of my grandmother's love.


**Difficulty Rating:** 4/10


**Classification:** Appetizer


These Savory Olive & Goat Cheese Palmiers may seem sophisticated, but they are surprisingly easy to make. With minimal ingredients and a straightforward process, this appetizer is perfect for any occasion. Whether you're hosting a dinner party or simply want to indulge in a little nostalgia, these palmiers are sure to impress. Enjoy the timeless flavors and create new memories with this delightful dish.

Read more about Appetizers

Read more about Main Dishes

Read more about Desserts

Strawberry Cheesecake Chocolate Crepes | Made by Meaghan Moineau

Strawberry Cheesecake Chocolate Crepes | Made by Meaghan Moineau

**Title: Delighting in Decadence: A Nostalgic Journey with Strawberry Cheesecake Chocolate Crepes**


**Description: Uncover the blissful blend of strawberries, cream cheese, and chocolate in our Strawberry Cheesecake Chocolate Crepes. This dessert marries the richness of chocolate with the refreshing taste of strawberries, wrapped in a delicate crepe. Follow our step-by-step guide to recreate a family favorite and relive cherished memories.**


---


There's something inherently comforting about crepes. They're versatile, elegant, and carry a sense of nostalgia that transports me back to my childhood kitchen. It was a bustling place, a hub of aromas and laughter, where my family gathered to create and celebrate. Among the many dishes we cherished, the Strawberry Cheesecake Chocolate Crepes stood out—a testament to the magic that happens when simple ingredients come together to create something extraordinary.


**Ingredients:**


For the Strawberry Cream Cheese Filling:


- 1 cup cream cheese


- 1 cup diced strawberries


- 1 teaspoon vanilla extract


- 1 tablespoon lemon juice


- 2 tablespoons granulated sugar


For the Chocolate Crepes:


- 1 cup flour


- 1/4 cup granulated sugar


- 1/4 cup unsweetened cocoa powder


- 1/4 teaspoon kosher salt


- 3 eggs


- 1 1/2 cups milk


- 1/2 cup water


- 3 tablespoons unsalted butter, melted


- 1 teaspoon vanilla extract


**Instructions:**


**How to Make Strawberry Cream Cheese Filling:**


1. In a medium-sized mixing bowl, combine cream cheese, diced strawberries, vanilla extract, lemon juice, and granulated sugar.


2. Using a hand mixer, wooden spoon, or spatula, mix the ingredients until smooth. Set aside.


**How to Blend Chocolate Crepes Ingredients:**


1. Combine flour, sugar, cocoa powder, salt, and eggs in a food processor or blender.


2. If using a food processor, keep it running as you gradually add milk and water. Continue to pulse until well blended.


3. Pour in the melted butter and vanilla extract. Blend until smooth.


**How to Make Chocolate Crepes:**


1. Heat a crepe pan or an 8"-10" omelet pan over medium heat.


2. Pour 1/4 cup of batter into the middle of the pan and swirl to cover the bottom.


3. Cook the crepe for 2-3 minutes, or until the bottom is light brown and the edges are set.


4. Flip the crepe over and cook for an additional minute.


5. Transfer to a serving platter and repeat with the remaining batter.


**A Taste of Nostalgia:**


Every bite of these crepes takes me back to Sunday mornings at my grandmother's house. The kitchen was her domain, a place where she spun stories as easily as she did crepes. She'd regale us with tales of her youth, while we eagerly watched her pour the batter, her hands moving with practiced ease.


The scent of chocolate filled the air, mingling with the sweet tartness of strawberries. As we sat around the table, our family would savor each bite, conversations flowing as freely as the laughter. Those mornings were more than just about the food—they were about family, tradition, and the joy of shared experiences.


**Difficulty Rating: 6/10**


**Classification: Dessert**


Creating Strawberry Cheesecake Chocolate Crepes isn't just about following a recipe; it's about embracing a tradition, crafting memories, and delighting in the simple pleasures of life. So gather your loved ones, share stories, and let these crepes be the heart of your cherished family moments.

Read more about Appetizers

Read more about Main Dishes

Read more about Desserts

CoD: Black Ops 6 And Warzone Season 2 Reloaded Adds TMNT Event, Plus Splinter Included In Paid Pass – GameSpot | Analysis by Brian Moineau

CoD: Black Ops 6 And Warzone Season 2 Reloaded Adds TMNT Event, Plus Splinter Included In Paid Pass - GameSpot | Analysis by Brian Moineau

**Cowabunga, Call of Duty! TMNT Invade Black Ops 6 and Warzone Season 2 Reloaded**

In a crossover that marries nostalgia with modern-day gaming, "Call of Duty: Black Ops 6" and "Warzone Season 2 Reloaded" have dipped into the Teenage Mutant Ninja Turtles (TMNT) universe, bringing fan-favorite characters to the battlefield. This unexpected yet delightful mashup sees the heroes in a half shell making their debut in the gritty world of CoD, and it’s safe to say, gamers are in for a shell-shocking time.

### Turtle Power in the Warzone

The TMNT event introduces shop bundles for the iconic turtles—Leonardo, Michelangelo, Donatello, and Raphael—allowing players to bring a bit of that classic comic book flair to their gameplay. But the pièce de résistance of this crossover is the special event pass that includes Master Splinter and the notorious Foot Clan soldiers as rewards. Imagine sneaking through the shadows of Verdansk as the wise and stealthy Splinter or causing chaos as a member of the Foot Clan. It’s a tantalizing prospect for both CoD veterans and TMNT aficionados alike.

This crossover is not just a treat for the fans but a testament to the enduring popularity of the TMNT franchise. Since their inception in the 1980s, the Teenage Mutant Ninja Turtles have transcended their comic book origins, spawning animated series, blockbuster movies, and now, a place in one of the most popular video games of our time. The turtles' ability to adapt and remain relevant in various media formats is a nod to their timeless appeal and the nostalgic connection they hold with multiple generations.

### A World of Crossovers

This CoD and TMNT collaboration is part of a broader trend where gaming franchises are increasingly embracing crossovers to enhance player engagement. Just look at Fortnite, which has practically become a metaverse of pop culture, hosting characters from Marvel, Star Wars, and even music events featuring artists like Travis Scott and Ariana Grande. These crossovers not only refresh the gaming experience but also create a sense of unity among fans of different franchises.

Interestingly, the timing of this TMNT event coincides with a surge in retro and nostalgia-driven content across various entertainment platforms. The recent release of "Teenage Mutant Ninja Turtles: Shredder's Revenge," a game that harkens back to the classic beat 'em up style of the early '90s, has also been met with critical acclaim, further proving the turtles' staying power.

### Final Thoughts

As the lines between different entertainment mediums continue to blur, collaborations like the TMNT event in CoD are becoming more common, and players are all the better for it. These crossovers not only breathe new life into beloved franchises but also create a tapestry of shared experiences that connect fans across different interests and backgrounds.

So grab your controllers and prepare for some turtle-powered action. Whether you’re a die-hard CoD player or a TMNT devotee, this event promises a unique blend of nostalgia and adrenaline-pumping gameplay. After all, in the words of Michelangelo, it’s going to be totally tubular, dude!

Read more about AI in Business

Read more about Latest Sports Trends

Read more about Technology Innovations