Excellent No Fail and Easy Keto Zucchini Lasagna | Made by Meaghan Moineau

Excellent No Fail and Easy Keto Zucchini Lasagna | Made by Meaghan Moineau

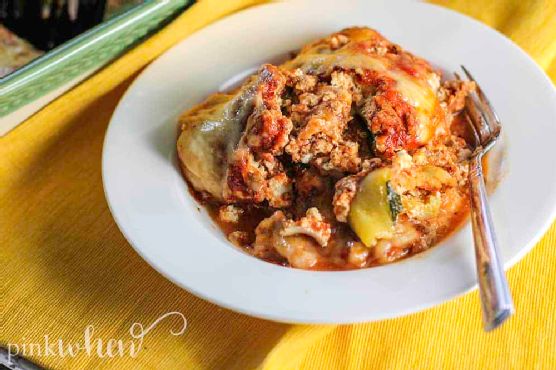
**Title: Savor the Simplicity: The No-Fail, Easy Keto Zucchini Lasagna Recipe**


**Description:** Dive into the comforting nostalgia of family dinners with our Excellent No-Fail and Easy Keto Zucchini Lasagna. This low-carb, nutrient-packed dish is not only a healthier alternative to traditional lasagna but also a delightful journey back to cherished family gatherings. With layers of savory flavors and creamy textures, this main dish promises to be a hit at your dinner table. Rated 3 out of 10 on the difficulty scale, it's perfect for both novice and experienced cooks looking to create something special without the hassle.


---


When I think back to my childhood, the kitchen was always the heart of our home. It was a place filled with laughter, warmth, and the tantalizing aroma of my grandma's cooking. One dish that stands out, evoking a flood of memories, is her famous zucchini lasagna. A healthier twist on the classic, she crafted this masterpiece long before keto became a household term.


I remember the excitement as I watched her expertly slice the zucchini, her hands steady with years of practice. She would hand me scraps of cheese to nibble on while regaling me with stories from her past—stories of growing up in a small town, where everyone knew everyone, and meals were a communal affair. Her zucchini lasagna wasn’t just food; it was a narrative that connected generations.


Now, inspired by her, I bring to you a rendition of this beloved family classic: the Excellent No-Fail and Easy Keto Zucchini Lasagna. It’s a dish that marries nostalgia with the modern-day quest for healthier living, and it’s surprisingly simple to make.


**Ingredients:**


- Fresh basil


- 1 medium bell pepper, diced


- 1 lb lean ground turkey


- 1 ½ cups shredded mozzarella cheese


- 1 medium onion, chopped


- ½ cup shredded parmesan


- Fresh parsley, chopped


- 1 medium red bell pepper, diced


- 1 cup ricotta cheese


- A pinch of sugar (optional)


- 2 cups tomato sauce


- ½ teaspoon white pepper


- 3 medium zucchinis, sliced lengthwise


**Instructions:**


1. **Prep the Zucchini:** Preheat your oven to 375°F. Slice the zucchinis lengthwise and lay them flat on a cookie sheet. Bake for 15 minutes to remove excess moisture—an essential step for avoiding a watery lasagna.


2. **Cook the Meat Sauce:** In a medium saucepan, sauté the onion and bell peppers until they are soft and fragrant. Add the ground turkey, cooking until browned. Stir in the tomato sauce, white pepper, and a pinch of sugar to balance the acidity. Let it simmer over low heat for 5 minutes.


3. **Prepare the Cheese Mixture:** In a bowl, combine ricotta cheese, shredded parmesan, and chopped basil. Mix well and set aside.


4. **Assemble the Lasagna:** In a 9x13 baking dish, begin with a layer of zucchini noodles. Spread a portion of the cheese mixture over the zucchini, followed by a layer of the savory meat sauce. Repeat these steps to form multiple layers, ending with a generous topping of mozzarella cheese.


5. **Bake to Perfection:** Cover the baking dish with foil and bake for 30 minutes. Remove the foil and bake for an additional 10 minutes to achieve a golden, bubbly top. Allow the lasagna to cool for 5 minutes before serving.


This zucchini lasagna is more than just a meal; it’s a tribute to the legacy of family gatherings and culinary traditions. Each bite is a reminder of those cozy nights spent around the table, sharing stories and laughter.


**Difficulty:** 3/10


**Classification:** Main Dish


Indulge in the wholesome goodness of this low-carb delight, and perhaps, like me, you’ll find yourself reminiscing about your own family’s cherished kitchen memories. Enjoy!

Read more about Appetizers

Read more about Main Dishes

Read more about Desserts

Triple Citrus Cake | Made by Meaghan Moineau

Triple Citrus Cake | Made by Meaghan Moineau

**Title: Zesty Delights: Crafting the Perfect Triple Citrus Cake**


**Description:** Dive into the refreshing world of citrus with our Triple Citrus Cake. This delightful dessert combines the vibrant flavors of lemon, lime, and orange, creating a symphony of taste that dances on your palate. Easy to make and even easier to enjoy, this cake is perfect for any occasion. Join us as we share the recipe, its heartwarming backstory, and tips to perfect your baking skills.


---


### Triple Citrus Cake: A Tangy Trip Down Memory Lane


When life gives you lemons, limes, and oranges, you make a Triple Citrus Cake! This dessert is more than just a sweet treat; it's a nostalgic trip to sunlit kitchens and family gatherings. The luscious combination of lemon zest, lime yogurt, and orange glaze offers a vibrant flavor profile that's both refreshing and satisfying.


#### Ingredients:


- 1 ½ cups all-purpose flour


- 1 ½ teaspoons baking powder


- ½ teaspoon salt


- 1 cup lime yogurt


- 3 large whole eggs


- 1 cup sugar


- 1 teaspoon vanilla extract


- ½ cup grapeseed oil


- 1 tablespoon lemon zest


- 1 cup powdered sugar


- 2 tablespoons orange juice


#### Instructions:


1. **Prepare Dry Ingredients:** Whisk together the flour, baking powder, and salt. Set aside.


2. **Mix Wet Ingredients:** In a large bowl, use an electric mixer to beat the lime yogurt, eggs, sugar, vanilla, grapeseed oil, and lemon zest until well combined.


3. **Combine Mixtures:** Gradually add the dry ingredients to the wet mixture, folding gently with a spatula until fully incorporated.


4. **Prepare the Pan:** Coat a 9 x 5-inch loaf pan with floured baking spray or line with parchment paper sprayed with baking spray.


5. **Bake:** Pour the batter into the prepared pan and smooth the top. Bake in a preheated oven at 350°F (175°C) for 40-50 minutes, or until a cake tester inserted in the center comes out clean.


6. **Cool:** Allow the cake to cool in the pan for at least an hour.


7. **Glaze:** Once cool, transfer the cake to a serving plate. Mix the powdered sugar and orange juice until smooth, then drizzle over the cake.


#### A Slice of Nostalgia


Every time I bake this Triple Citrus Cake, I'm transported back to sunny Sunday afternoons at my grandmother's house. As children, my siblings and I would eagerly wait in the kitchen, captivated by the zesty aroma wafting through the air. Grandma's kitchen was a sanctuary of love and laughter, where the magic of baking brought the family together.


The Triple Citrus Cake was a family favorite, especially during summer reunions. Grandma would slice generous pieces, serving them with a side of her famous homemade lemonade. Each bite was a burst of citrusy joy that perfectly complemented the warmth of family camaraderie. Those cherished memories of shared stories and laughter over slices of this cake are etched into my heart, making this recipe truly special.


#### Difficulty: 4/10


#### Classification: Dessert


Embrace the zest of life with this Triple Citrus Cake, a delightful dessert that promises to be the star of any gathering. With its easy-to-follow steps and a taste that transports you to sunlit family kitchens, this cake is a must-try for every dessert enthusiast. So gather your ingredients, channel your inner pastry chef, and create a nostalgic masterpiece that will surely delight your family and friends!

Read more about Appetizers

Read more about Main Dishes

Read more about Desserts

Lemon and pepper veal cutlets | Made by Meaghan Moineau

Lemon and pepper veal cutlets | Made by Meaghan Moineau

# Zesty Comfort: Lemon and Pepper Veal Cutlets


## A Family Classic with a Twist of Nostalgia


### Description


Dive into the delightful blend of tangy lemon and peppery zest with our mouth-watering Lemon and Pepper Veal Cutlets. This classic main dish, enriched with creamy rosemary-infused sauce, promises to tantalize your taste buds while evoking cherished family memories. Perfectly paired with pilaf and a fresh green salad, this recipe is a heartwarming reminder of Sunday dinners at grandma's house.


### Keyword-Rich Content


Whether you're a seasoned chef or a home cook looking to impress, these Lemon and Pepper Veal Cutlets are sure to become a favorite at your dining table. This recipe is straightforward yet sophisticated, offering a burst of flavors that are both comforting and refreshing. With keywords such as "veal cutlets," "lemon zest," "creamy sauce," and "family recipe," our guide will ensure your culinary adventure is a delicious success.


### Ingredients


- 4 veal cutlets


- 2 tablespoons corn flour


- Salt and black cracked pepper to taste


- 2 tablespoons butter


- 1 tablespoon olive oil


- 1 tablespoon lemon rind


- 2 tablespoons lemon juice


- 1/2 cup cream


- 1/4 cup sour cream


- 1 tablespoon fresh rosemary, chopped


- Pilaf and green salad, to serve


### Instructions


1. **Prepare the Veal**: Slightly flatten the veal cutlets using a meat mallet for even cooking. In a shallow dish, combine corn flour, salt, and pepper. Dredge each cutlet through the mixture, ensuring an even coat.


2. **Cook the Cutlets**: Heat butter and olive oil in a large pan over medium heat. Cook the cutlets for about 3 minutes on each side, or until browned and cooked to your liking. Remove the veal from the pan and set aside, covering them to keep warm.


3. **Make the Sauce**: In the same pan, add cream, sour cream, lemon rind, lemon juice, rosemary, salt, and additional black pepper. Mix well and bring to a boil. Lower the heat and let it simmer uncovered for about 5 minutes, allowing the sauce to thicken slightly.


4. **Combine and Serve**: Return the veal cutlets to the pan, gently coating them with the luscious sauce. Serve immediately with a side of pilaf and a crisp green salad for a complete meal.


### A Nostalgic Family Memory


Every time I prepare these Lemon and Pepper Veal Cutlets, I'm transported back to my grandmother's cozy kitchen. Sunday afternoons were a family affair, with everyone gathering around the large oak table, eagerly awaiting the fragrant dishes she prepared with love. Grandma would always say that the secret ingredient was a dash of nostalgia, and indeed, each bite brings back the warmth and laughter we shared. This dish is a tribute to those precious moments, capturing the essence of family and tradition in every savory bite.


### Difficulty Rating


This recipe is rated 6 out of 10 in difficulty. It's an approachable main dish that's perfect for cooks of all levels who are ready to create a flavorful, satisfying meal.


---


Embrace the blend of citrus and spice with our Lemon and Pepper Veal Cutlets, and create new family memories with this timeless recipe. Bon appétit!

Read more about Appetizers

Read more about Main Dishes

Read more about Desserts

Neoguri (Spicy Seafood Ramen) | Made by Meaghan Moineau

Neoguri (Spicy Seafood Ramen) | Made by Meaghan Moineau

**Title: Embracing the Spice: Crafting Neoguri Ramen with a Splash of Family Nostalgia**


**Description:** Dive into a steaming bowl of Neoguri Ramen, a spicy seafood delight that's as heartwarming as it is mouthwatering. Infused with rich broth and adorned with fresh mussels, scallions, and seaweed, this recipe will transport you to the vibrant kitchens of Korea. Discover the simple joy of creating this dish and the cherished memories it evokes.


---


### Neoguri Ramen: A Taste of Tradition and Love


In the heart of every family kitchen, there lies a recipe that transcends time—a dish that brings comfort, joy, and a sense of belonging. For me, that recipe is Neoguri Ramen. This spicy seafood ramen is more than just a meal; it's a connection to my roots and a cherished family memory.


**Ingredients:**


- 1 pack Neoguri ramen


- 1 egg


- A handful of fresh mussels


- 1 green scallion


- 1 sheet of gim (seaweed)


**Instructions:**


1. **Prepare the Broth:** Start by bringing a pot of water to a rolling boil. Add the mussels and the sauce packets from the Neoguri ramen. Allow the mussels to cook for about 5 minutes. If using fresh mussels, watch for them to open and discard any that remain closed. This step is crucial as it deepens the broth's flavor, enveloping your senses with the aroma of the sea.


2. **Cook the Noodles:** Introduce the ramen noodles to the pot and let them cook for 2 to 3 minutes. This is where the magic of Neoguri happens, as the noodles absorb the spicy broth, becoming a canvas of flavor.


3. **Add the Egg:** For a silky, flaky texture, beat the egg and stir it into the pot in a circular motion. If you prefer a poached egg, gently slide it into the pot off to the side, letting it poach in the spicy embrace of the broth.


4. **Garnish and Serve:** While the ramen finishes cooking, thinly slice the scallion and cut the gim sheet into strips. Once the ramen is ready, transfer it to a serving bowl and top with the fresh scallions and seaweed. The garnish adds a burst of freshness and a hint of the ocean, elevating the dish to new heights.


**Difficulty:** 4/10


**Classification:** Main Dish


### A Nostalgic Journey


Every time I prepare Neoguri Ramen, I am transported back to my grandmother's kitchen, where the air was always filled with laughter and the rich aroma of spices. I remember sitting on a wooden stool, watching her deft hands work magic with simple ingredients. Her secret? A pinch of love and stories from her childhood that she shared as we cooked together.


One chilly winter evening, we crafted this very dish. The warmth of the spicy broth was a perfect contrast to the cold air outside. As we slurped the noodles, she shared tales of her life by the sea, of gathering fresh mussels and seaweed with her siblings. That evening, the kitchen became a bridge between past and present, and the ramen was the catalyst for connection.


**Conclusion**


Neoguri Ramen is more than a spicy seafood dish—it's a symbol of tradition, family, and the simple joys of life. Whether you're a seasoned cook or a beginner, this recipe invites you to savor each moment, creating not just a meal, but a memory. So gather your ingredients, embrace the spice, and let this dish become a cherished part of your family story.

Read more about Appetizers

Read more about Main Dishes

Read more about Desserts

Tuna and Tofu Cold Dish | Made by Meaghan Moineau

Tuna and Tofu Cold Dish | Made by Meaghan Moineau

### A Taste of Nostalgia: Tuna and Tofu Cold Dish


**Description:** Dive into the delightful simplicity of our Tuna and Tofu Cold Dish, a refreshing appetizer that combines the delicate flavors of silken tofu, savory tuna, and fresh cherry tomatoes. Enhanced with a zesty sauce and subtle spices, this dish is not only easy to prepare but also a nostalgic nod to cherished family gatherings.


---


#### Ingredients:


- 1 block silken tofu


- 1 can tuna in water


- A handful of white cherry tomatoes, diced


- White pepper


- Extra virgin olive oil


- Vinegar


- Light Kikkoman soy sauce


- 1 clove garlic, minced


- Black pepper


- Toasted sesame seeds (for garnish)


- Diced spring onion (for garnish)


#### Instructions:


1. **Prepare the Tofu:** Begin by cutting the silken tofu into small, uniform blocks. Arrange these gently on a serving plate, being careful not to break them.


2. **Tuna Mixture:** Open the can of tuna and drain the water thoroughly. Slightly squash the tuna with a fork and mix in a dash of white pepper and a pinch of salt. This seasoning adds a subtle depth to the tuna, enhancing its natural flavor.


3. **Tomato Slices:** Thinly slice the white cherry tomatoes and scatter them over the tofu.


4. **Assemble the Dish:** Place the seasoned tuna over the tofu and tomatoes, ensuring an even distribution.


5. **Drizzle the Sauce:** In a small bowl, combine extra virgin olive oil, vinegar, light soy sauce, and minced garlic. Drizzle this mixture over the assembled tofu, tuna, and tomatoes.


6. **Garnish and Serve:** Sprinkle with toasted sesame seeds and diced spring onion for an added crunch and burst of flavor. Serve immediately to enjoy the freshness of this cold dish.


---


#### A Family Memory Revisited


As I prepare this Tuna and Tofu Cold Dish, I am transported back to my childhood summers spent at my grandmother's countryside home. Her kitchen was always filled with the comforting aroma of fresh ingredients and the sound of laughter. This dish, in particular, was a family favorite during our Sunday lunches in the garden, where the sun cast dappled shadows through the leaves of the old oak tree.


I remember sitting beside my grandmother, watching her deftly slice tofu and mix the tuna with a practiced hand. She would tell stories of her own childhood, weaving tales as she layered the ingredients with love and care. It was during these moments that I learned the true meaning of family and tradition—how a simple dish could bring us all together, bridging generations with each flavorful bite.


This Tuna and Tofu Cold Dish is more than just an appetizer; it's a connection to my past. Every time I recreate it, I feel a sense of warmth and continuity, knowing I am carrying on a family legacy that began long before my time.


---


#### Difficulty Rating: 3/10


**Classification:** Appetizer


With its minimal preparation and fresh ingredients, this Tuna and Tofu Cold Dish is an easy yet elegant appetizer perfect for summer gatherings or a light starter to any meal. Its simplicity is its charm, allowing the natural flavors to shine through and evoke memories of home and family with every bite.

Read more about Appetizers

Read more about Main Dishes

Read more about Desserts

Vegan Pumpkin Bundt Cake | Made by Meaghan Moineau

Vegan Pumpkin Bundt Cake | Made by Meaghan Moineau

**Title: Autumn Nostalgia: A Vegan Pumpkin Bundt Cake to Warm Your Heart**


**Description: Experience the flavors of fall with our Vegan Pumpkin Bundt Cake, a delightful dessert that captures the essence of autumn. With the earthy sweetness of pumpkin and the warming spices of cinnamon, cloves, and nutmeg, this cake is perfect for cozy gatherings or a quiet evening at home. Discover a family story that makes this dessert even more special.**


---


As the leaves begin to turn and the air grows crisp, there’s one recipe that always brings back the warmth of family gatherings and the comfort of home: Vegan Pumpkin Bundt Cake. This delightful dessert, with its rich blend of spices and the subtle sweetness of date sugar, is more than just a treat; it’s a cherished tradition.


I remember the first time my grandmother made this cake. It was a blustery October afternoon, and the scent of cinnamon and nutmeg wafted through the house as we gathered in the kitchen. My grandmother, with her apron dusted in flour, showed me how to carefully fold the pumpkin mixture into the dry ingredients, a technique she insisted was crucial to achieving the perfect texture.


The kitchen was filled with laughter and the sound of pecans being chopped, the occasional burst of storytelling punctuating the rhythm of our work. As the cake baked, Grandma shared tales of her childhood, of autumns spent in the countryside, where the harvest was celebrated with feasts that brought the community together. Her stories were as comforting as the cake itself, weaving a tapestry of family history that made every bite even more meaningful.


Creating this cake is a journey in itself, with each ingredient playing a vital role. The apple cider vinegar adds a subtle tang, while the maple syrup and date sugar provide a depth of sweetness that complements the spices perfectly. The golden raisins and toasted pecans add texture and bursts of flavor, making each slice a delightful surprise.


Here's how you can bring this slice of nostalgia into your own kitchen:


### Ingredients:


- 1 tablespoon apple cider vinegar


- 2 teaspoons baking powder


- 1 teaspoon baking soda


- 2 cups barley flour


- 1/2 cup canola oil


- 1 cup date sugar


- 1/2 cup golden raisins


- 1 teaspoon ground allspice


- 2 teaspoons ground cinnamon


- 1/2 teaspoon ground cloves


- 1 teaspoon ground ginger


- 1/4 cup maple syrup


- 1/2 teaspoon nutmeg


- 1 cup pecans


- 1 cup pumpkin puree


- 1/2 teaspoon salt


- 1 cup soymilk


- 1 teaspoon vanilla extract


### Instructions:


1. Preheat your oven to 350 degrees Fahrenheit. Oil a bundt pan and dust it lightly with flour.


2. Spread pecans on a baking sheet and toast for 10 minutes. Let them cool completely, then chop roughly.


3. Cover raisins with boiling water and soak for 25 minutes. Drain and set aside.


4. In a bowl, whisk together pumpkin puree, canola oil, maple syrup, soymilk, apple cider vinegar, and vanilla extract.


5. In a large bowl, mix date sugar, barley flour, baking soda, baking powder, ground spices, and salt with a clean whisk.


6. Using a rubber spatula, gently fold the pumpkin mixture into the dry ingredients. When the dry ingredients are halfway incorporated, add the raisins and chopped pecans.


7. Continue folding just until the mixture comes together; be careful not to overmix.


8. Pour the batter into the prepared bundt pan and smooth the top with a rubber spatula.


9. Bake for 45 minutes, rotating the cake from front to back after 20 minutes, or until a toothpick inserted into the center comes out clean.


10. Cool the cake in the pan for 15 minutes, then invert it onto a wire rack to continue cooling.


11. Transfer to a plate and dust with powdered sugar. Serve warm or at room temperature.


### Difficulty: 6/10


### Classification: Dessert


Whether served warm with a cup of herbal tea or enjoyed at room temperature, this Vegan Pumpkin Bundt Cake is a testament to the timeless joy of baking. It's not just about the delicious flavors but also about the memories and connections that come with it. So, gather your loved ones, share a slice of this cake, and create your own stories to pass down through the generations.

Read more about Appetizers

Read more about Main Dishes

Read more about Desserts

Rugelach | Made by Meaghan Moineau

Rugelach | Made by Meaghan Moineau

# Rugelach: A Sweet Taste of Tradition and Togetherness


## Description


Indulge in the delightful world of Rugelach, a classic pastry that brings warmth and nostalgia to any gathering. With a buttery, flaky dough filled with sweet fruit preserves and crunchy walnuts, these bite-sized treats are perfect for any occasion. This blog post not only walks you through the step-by-step process of making these delectable pastries but also shares a cherished family memory that makes Rugelach more than just a dessert—it's a slice of tradition. Whether you're a seasoned baker or a novice in the kitchen, this recipe is sure to become a family favorite.


---


### Ingredients


- 1 cup salted butter, softened


- 1 block of cream cheese, softened


- A pinch of salt


- 2.5 cups plain flour


- 2 large egg yolks


- 1 teaspoon vanilla extract


- 1/2 cup caster sugar (for dough)


- 1/2 cup fruit preserves (e.g., orange marmalade)


- 1/2 cup walnuts, finely chopped


- 50g butter, melted (for brushing)


- 1/4 cup caster sugar (for topping)


- 1 teaspoon ground cinnamon (for topping)


### Instructions


1. **Preparation**: Leave the butter and cream cheese in a warm place for a couple of hours to soften.


2. **Preheat Oven**: Set your oven to 180°C (350°F).


3. **Mix Dough**: In a large mixing bowl, beat the softened butter and cream cheese until light and fluffy. Add egg yolks, vanilla extract, 1/2 cup of caster sugar, salt, and plain flour. Mix until the dough comes together.


4. **Prepare Walnuts**: Finely chop the walnuts and set aside.


5. **Roll Dough**: Divide the dough into 4 equal pieces. Roll one piece into a thin circle and cut into 8 triangles.


6. **Fill and Roll**: Spread fruit preserves on each triangle, sprinkle with walnuts, and roll each piece into a crescent shape.


7. **Cinnamon-Sugar Coating**: Mix 1/4 cup caster sugar and cinnamon. Brush rugelachs with melted butter and coat with the cinnamon-sugar mixture.


8. **Bake**: Place rugelachs on a baking tray and bake for 35 minutes or until golden brown.


9. **Cool and Serve**: Allow to cool before storing or serving.


### A Taste of Nostalgia


Every holiday season, my grandmother would gather the family around her cozy kitchen to make Rugelach. The aroma of cinnamon and melting butter would fill the room, creating an atmosphere of warmth and love. As a child, I remember eagerly waiting for the moment when she would let me sprinkle the cinnamon sugar over the freshly rolled pastries, a simple task that felt monumental in my small hands. These moments of togetherness, laughter, and shared stories are etched in my memory, making Rugelach not just a dessert, but a symbol of family unity and joy.


### Difficulty Rating: 6/10


Rugelach is a moderately challenging recipe, perfect for those with some baking experience. The key is to ensure the dough is well-mixed and not overworked, allowing for a tender, flaky pastry.


### Classification: Dessert


With its sweet filling and delightful crunch, Rugelach is a perfect dessert to end any meal on a high note. Serve with a cup of tea or coffee for a truly satisfying treat.


---


Whether you’re baking for a special occasion or simply indulging in the joy of homemade pastries, Rugelach is a timeless classic that promises to delight. Embrace the tradition, share the love, and enjoy every sweet bite.

Read more about Appetizers

Read more about Main Dishes

Read more about Desserts

Seared Scallops With Wilted Greens | Made by Meaghan Moineau

Seared Scallops With Wilted Greens | Made by Meaghan Moineau

# A Taste of the Sea: Seared Scallops with Wilted Greens


## A Culinary Journey Through Time and Taste


Step into the kitchen and embrace the art of crafting a dish that combines the delicate flavors of the sea with robust, earthy greens. Our Seared Scallops with Wilted Greens are more than just a meal; they are a culinary experience that will transport you to a place where family memories and exquisite tastes blend seamlessly.


### The Ingredients of Nostalgia


- **Butter** - 2 tablespoons


- **Garlic** - 2 cloves, minced


- **Bunches of Kale** - 2, stems sliced thin, leaves in larger strips


- **Olive Oil** - 2 tablespoons


- **Red Wine Vinegar** - 1 tablespoon


- **Salt and Pepper** - to taste


- **Sea Scallops** - 12 large


- **Shallots** - 2, finely chopped


- **Soy Sauce** - 2 tablespoons


- **Thick-Cut Bacon** - 4 slices, cut into pieces


### A Recipe Etched in Memory


Growing up, our family gatherings were incomplete without a seafood dish that paid homage to our coastal roots. The aroma of sizzling bacon and the sight of scallops perfectly seared to a golden brown would fill the air, drawing everyone to the kitchen. My grandmother, the keeper of our family recipes, would orchestrate the meal with unmatched grace, her hands moving deftly as she coaxed flavors from simple ingredients.


The highlight was always the moment when she added the scallops to the hot iron skillet, a symphony of sizzle and steam ensued, captivating our senses and stirring a sense of nostalgia in all of us. As the butter melted and enveloped each scallop, she would regale us with stories of her childhood by the sea, where this dish first became a beloved family staple.


### Crafting the Dish


1. **Prepare the Kale**: Begin by slicing the kale stems into thin pieces and the leaves into larger strips. This step ensures both texture and flavor in every bite.


2. **Cook the Bacon and Shallots**: In a large, deep pan, heat to medium-high and add the bacon pieces. Cook for 3-4 minutes until they start to crisp. Add the chopped shallots and cook for another 3 minutes until soft.


3. **Add Garlic and Kale Stems**: Toss in the minced garlic and the sliced kale stems. Cook for 4-5 minutes, allowing the flavors to meld.


4. **Wilt the Kale Leaves**: Add the kale leaves, tossing them over the heat until wilted. Stir in the soy sauce and red wine vinegar, then season with salt and pepper to taste. Keep this kale mixture warm as you prepare the scallops.


5. **Sear the Scallops**: Heat an iron skillet to high. Pat the scallops dry thoroughly and season with salt and pepper. Add the olive oil to the pan and swirl it around. As soon as it begins to smoke, quickly place the scallops in the skillet. Sear for 1-2 minutes on each side.


6. **Finish with Butter**: Flip the scallops and add the butter to the pan. Baste the scallops with the melted butter for another 1-2 minutes, enhancing their flavor and ensuring a perfect sear.


7. **Serve**: Plate the warm wilted greens and place the seared scallops on top, allowing the flavors to mingle and create a dish that is both sophisticated and heartwarming.


### A Family Favorite: Difficulty and Classification


Rated at a 7 out of 10 in difficulty, this dish requires attention to detail and timing but rewards with a satisfying blend of flavors and textures. Classified as a **Main Dish**, Seared Scallops with Wilted Greens is perfect for a special occasion or a nostalgic family dinner.


Join us in the kitchen and let this recipe become part of your family’s culinary tradition, creating memories that will last a lifetime.

Read more about Appetizers

Read more about Main Dishes

Read more about Desserts

Rice Pudding | Made by Meaghan Moineau

Rice Pudding | Made by Meaghan Moineau

**Title: Nostalgia in a Bowl: The Comfort of Homemade Rice Pudding**


**Description:**


Indulge in the creamy, comforting embrace of homemade rice pudding—a classic dessert that effortlessly bridges the gap between past and present. This easy-to-follow recipe, rated at a 3 out of 10 on the difficulty scale, will not only satisfy your sweet tooth but also transport you back to the warm, nostalgic kitchens of yesteryear. Join me as I share a cherished family memory tied to this beloved dessert. Perfect for any occasion, this rice pudding is sure to become a staple in your dessert repertoire.


---


**A Journey Through Time: Reliving Childhood Memories with Rice Pudding**


There’s something magical about the aroma of vanilla and cinnamon wafting through the kitchen. It transports me back to my grandmother’s cozy home, where love was served by the spoonful. Rice pudding was not just a dessert; it was a ritual, a comforting constant amidst the whirlwind of childhood adventures.


Every Sunday afternoon, my family would gather around the kitchen table, eager to savor the sweet, creamy delight that was my grandmother’s signature rice pudding. She would always let me help, handing me a wooden spoon too big for my small hands and guiding me through the simple yet meticulous process.


“Patience is the secret ingredient,” she’d say, her eyes twinkling with the wisdom of countless desserts perfected over the years. As the rice simmered, she’d share stories from her own childhood, tales of family gatherings and festive occasions where rice pudding was the star of the dessert table.


Now, as an adult, I find myself recreating that same comforting dish in my own kitchen, savoring each spoonful and each memory that accompanies it. This recipe, with its creamy texture and delicate balance of flavors, is a testament to those cherished moments of family and tradition.


**The Recipe: A Step-by-Step Guide to Creamy Perfection**


**Ingredients:**


- 1 1/2 cups water


- 3/4 cup medium or short grain rice


- 1/4 teaspoon salt


- 2 cups whole milk, divided


- 1/3 cup sugar


- 1 large egg, beaten


- 1 tablespoon butter


- 1 teaspoon vanilla extract


- A pinch of cinnamon or nutmeg


**Instructions:**


1. **Prepare the Rice:**


In a medium saucepan, bring 1 1/2 cups of water to a boil. Add the rice and salt, stirring gently. Cover, reduce the heat, and let it simmer until the water is absorbed, approximately 15 minutes.


2. **Create the Creamy Base:**


In another saucepan, combine 1 1/2 cups of milk, sugar, and the cooked rice. Cook over medium heat, stirring constantly until the mixture becomes thick and creamy, about 15 to 20 minutes.


3. **Enrich with Egg and Milk:**


In a small bowl, mix the remaining 1/2 cup of milk with the beaten egg. Slowly add this mixture to the rice, stirring constantly. Continue cooking for 2 more minutes.


4. **Finishing Touches:**


Remove the saucepan from heat and stir in the butter and vanilla extract. Season with a pinch of cinnamon or nutmeg to enhance the flavors.


5. **Serve and Enjoy:**


Serve the rice pudding warm, and indulge in the sweet nostalgia that accompanies each bite.


**Conclusion:**


Rice pudding, with its simple ingredients and heartwarming memories, is more than just a dessert; it’s a bridge to the past, a reminder of the people and moments that shape us. Whether you’re creating new traditions or honoring old ones, this timeless dessert will always find a place at the table. So gather your loved ones, embrace the comforting aroma, and savor the joy of homemade rice pudding.

Read more about Appetizers

Read more about Main Dishes

Read more about Desserts

Apex Legends makes huge changes to shield, helmets and healing in Season 24 – Dexerto | Analysis by Brian Moineau

Apex Legends makes huge changes to shield, helmets and healing in Season 24 - Dexerto | Analysis by Brian Moineau

### Apex Legends Season 24: A New Era of Strategy and Survival

Season 24 of Apex Legends, aptly titled "Takeover," signals a seismic shift in the game's landscape. Unlike previous updates that introduced new Legends or flashy content, this season is all about refining the core gameplay mechanics. With substantial changes to shields, helmets, and healing, Respawn Entertainment is challenging players to adapt and rethink their strategies. This shift echoes broader trends in the gaming industry, where developers focus on balance and depth rather than sheer novelty.

The most intriguing aspect of this update is the comprehensive overhaul of shields, helmets, and healing dynamics. Historically, these elements have been the foundation of survival in Apex Legends, dictating the flow of battles and the outcomes of encounters. By reimagining these mechanics, Respawn is effectively pressing the reset button on the game's meta, urging players to explore new tactics and strategies.

### The Art of Balance in Gaming

This move by Respawn is reminiscent of the ongoing trend in the gaming industry where developers are prioritizing game balance over continuous content drops. Games like League of Legends and Dota 2 have long embraced the mantra of balance, frequently updating and adjusting their characters and mechanics to keep the competitive scene fair and engaging. Apex Legends' decision to focus on balance highlights the importance of a well-tuned game environment where player skill and strategy can truly shine.

### A Nod to the Past

Interestingly, this shift is not just about the present but also a nod to the past. Early iterations of competitive games often lacked the myriad of characters and content we see today. Instead, they relied on a solid set of mechanics that players could master. By returning to this philosophy, Apex Legends is embracing a nostalgia for a time when gameplay depth was king. This approach could also be seen as a response to community feedback, where players often express a desire for a more skill-based and less content-saturated experience.

### Connections to the Present

The focus on balance in Apex Legends' Season 24 comes at a time when the world at large is seeking stability. With global events prompting significant changes in how we live and interact, the desire for a balanced and fair playing field resonates beyond just gaming. It’s a reminder that sometimes, refining and perfecting what we have can be more rewarding than the constant pursuit of the new.

### A Final Thought

As players dive into Season 24's redefined battlegrounds, they will undoubtedly face challenges and opportunities to adapt. The changes to shields, helmets, and healing are not just tweaks; they are an invitation to rediscover the game. In a world where change is often met with resistance, Apex Legends is proving that sometimes, change is exactly what we need to elevate our experiences. Whether you're a seasoned veteran or a newcomer, "Takeover" promises a fresh perspective on what it means to be a champion in the Apex Games.

So, gear up, strategize, and embrace the new era of Apex Legends. The battlefield is yours to conquer, one balanced shield at a time.

Read more about AI in Business

Read more about Latest Sports Trends

Read more about Technology Innovations

Raw Vegan Chocolate and Raspberry Cake | Made by Meaghan Moineau

Raw Vegan Chocolate and Raspberry Cake | Made by Meaghan Moineau

**Title: Indulge in Nostalgia: A Raw Vegan Chocolate and Raspberry Cake to Remember**


**Description:** Dive into the delicious blend of raw vegan ingredients with our Chocolate and Raspberry Cake. Discover the story behind this decadent dessert that ties the past to the present, and find out why it has become a cherished family tradition. Perfect for satisfying sweet cravings while keeping it healthy, this dessert is a testament to the beauty of simple, wholesome ingredients.


---


There’s something undeniably magical about the flavors of chocolate and raspberries. They remind me of my grandmother’s kitchen, a place filled with warmth and the sweet aroma of freshly baked delights. Yet, among all her creations, it was her chocolate and raspberry cake that stood out—a dessert that was as much a treat for the soul as it was for the taste buds.


Fast forward to today, and I’ve embraced a raw vegan lifestyle. The challenge was to recreate this nostalgic dessert without compromising on taste. Enter the Raw Vegan Chocolate and Raspberry Cake, a modern twist on a beloved classic, perfect for celebrating cherished family moments.


**Ingredients:**


- **Crust:**


- Raw walnuts


- Raw cocoa or carob powder


- Sea salt


- Dates


- **Chocolate Cream:**


- Honey


- Bananas


- Cocoa or carob powder


- Fresh raspberries


- 85% dark chocolate flakes


For the full instructions on how to bring this cake to life, visit my blog: [Raw Vegan Chocolate and Raspberry Birthday Cake](http://gourmandelle.com/raw-vegan-chocolate-and-raspberry-birthday-cake/).


**A Family Memory**


Every year, on my grandmother’s birthday, the whole family would gather in her cozy kitchen. The air would be filled with laughter, stories, and the intoxicating smell of chocolate melting into something extraordinary. I remember the anticipation of that first bite—rich chocolate paired with the tartness of fresh raspberries, a symphony of flavors that danced on my tongue.


It was during one of these gatherings that I decided to recreate this cake with a healthier twist. My grandmother watched as I experimented with raw ingredients, and I could see a spark of curiosity in her eyes. When she took the first bite, her smile was all the validation I needed. “It’s different,” she said, “but it’s filled with love, just like mine.”


**Difficulty Rating: 6/10**


This cake is a delightful challenge for those new to raw vegan desserts but well worth the effort. The ingredients are simple, yet the flavors are complex and satisfying, making it a perfect project for a weekend indulgence.


**Classification: Dessert**


This Raw Vegan Chocolate and Raspberry Cake is the quintessential dessert. It’s a guilt-free indulgence that highlights the natural sweetness of fruits and nuts, ensuring that every bite is a celebration of healthy living.


Embrace the nostalgia and create new memories with this Raw Vegan Chocolate and Raspberry Cake. Whether it’s a birthday, an anniversary, or just a craving for something sweet, this dessert is sure to become a favorite in your family, just as it has in mine.

Read more about Appetizers

Read more about Main Dishes

Read more about Desserts

Maple & Curry Acorn Squash | Made by Meaghan Moineau

Maple & Curry Acorn Squash | Made by Meaghan Moineau

**Title: Savory Nostalgia: The Warm Embrace of Maple & Curry Acorn Squash**


**Description:** Dive into the comforting embrace of fall with our Maple & Curry Acorn Squash recipe. This delightful dish captures the essence of autumn with its fragrant spices and sweet maple undertones, making it a perfect addition to your seasonal menu. Rated 3/10 in difficulty, this dish is an ideal appetizer to start your culinary journey into the heart of cozy family gatherings.


---


As the leaves began to turn and the air took on a crisp edge, my family would often gather in the kitchen, enveloped by the aroma of spices and the promise of a meal that hinted at the changing seasons. One such dish that holds a special place in my heart is our Maple & Curry Acorn Squash. This recipe is not just a delightful blend of flavors but also a tapestry of cherished memories, woven together by the laughter and love of those family gatherings.


**Ingredients:**


- 1 acorn squash


- 1 tablespoon curry powder


- 2 tablespoons maple syrup


- 2 tablespoons olive oil


- 1 teaspoon salt


**Instructions:**


1. Preheat your oven to 400°F (200°C). Line a baking sheet with parchment paper or a silicone mat to prevent sticking.


2. Rinse the outside of the acorn squash thoroughly. Carefully chop it in half and remove the seeds, discarding them or saving them for roasting later. Trim off the stem and slice the squash into one-inch wedges, using the natural grooves as a guide for even thickness.


3. In a medium-sized bowl, combine the sliced acorn squash with curry powder, maple syrup, olive oil, and salt. Stir until the squash is well-coated with the mixture, ensuring every slice is infused with the flavorful blend.


4. Arrange the squash wedges in a single layer on the prepared baking sheet, cut side down. Bake in the preheated oven for about 15 minutes.


5. Flip the squash slices over to ensure both sides achieve a beautiful, caramelized brown. Continue baking for another 10 to 15 minutes, or until the squash is tender and can be easily pierced with a fork.


**A Family Memory:**


Every year, as autumn painted our little town in hues of gold and crimson, my grandmother would invite us over for what we affectionately called 'Squash Sundays'. The kitchen was her domain, a place where magic happened. I remember sitting on the high stool, watching her deft hands work through the ingredients, explaining each step with a twinkle in her eye.


The Maple & Curry Acorn Squash was always a centerpiece, its rich aroma wafting through the house, mingling with laughter and stories from days gone by. As we gathered around the table, this simple yet flavorful dish became a symbol of togetherness, a reminder that food has the power to not only nourish our bodies but also our souls.


**Difficulty Rating: 3/10**


**Classification: Appetizer**


This recipe, with its straightforward steps and minimal ingredients, is a testament to the beauty of simplicity. Whether you're a seasoned cook or a novice in the kitchen, the Maple & Curry Acorn Squash is sure to bring warmth and nostalgia to your table, inviting everyone to pause, savor, and reminisce.

Read more about Appetizers

Read more about Main Dishes

Read more about Desserts

Warm Lemon Poppy Seed Cake With Chocolate Ganache Center | Made by Meaghan Moineau

Warm Lemon Poppy Seed Cake With Chocolate Ganache Center | Made by Meaghan Moineau

**Title: Dive Into Decadence: Warm Lemon Poppy Seed Cake with a Chocolate Surprise**


**Description:** Discover the perfect blend of zesty lemon and rich chocolate in our Warm Lemon Poppy Seed Cake with Chocolate Ganache Center. This delightful dessert will transport you back to cherished family gatherings, creating new memories with each heavenly bite.


---


### A Slice of Nostalgia: Warm Lemon Poppy Seed Cake with Chocolate Ganache Center


There's something magical about the aroma of freshly baked goods wafting through the kitchen. It evokes memories of family, laughter, and the joy of sharing a meal together. One such memory that stands out vividly in my mind is the first time my grandmother introduced me to her special Warm Lemon Poppy Seed Cake with Chocolate Ganache Center. This dessert quickly became a family favorite, making appearances at every holiday gathering and special occasion.


#### Ingredients:


- 1 cup flour


- 2 tablespoons finely grated lemon rind


- 1 tablespoon poppy seeds


- 4 large egg yolks


- 1/2 cup granulated sugar


- 4 tablespoons unsalted butter, melted


- 4 large egg whites


- 6 ounces bittersweet chocolate, divided into 6 pieces


#### Instructions:


1. **Preheat and Prepare:** Begin by positioning a rack in the center of your oven and preheating it to 400°F (200°C). Lightly butter six 6-ounce ramekins, dust them with sugar, and place them on a baking sheet.


2. **Mix Dry Ingredients:** In a small bowl, whisk together the flour, lemon rind, and poppy seeds. Set this mixture aside.


3. **Whip Yolks and Sugar:** Using a heavy-duty electric mixer with a wire whip attachment, whip the egg yolks and granulated sugar until the mixture is pale and forms a ribbon when the whip is lifted.


4. **Beat Egg Whites:** In a separate, grease-free bowl, use a hand-held electric mixer to whip the egg whites to soft peaks.


5. **Combine Ingredients:** Carefully fold the flour mixture into the yolk and sugar mixture. Add the melted butter and gently mix until combined. Next, fold in the whipped egg whites until the batter is well incorporated.


6. **Fill and Bake:** Fill each prepared ramekin three-quarters full with the batter. Place a 1-ounce piece of chocolate in the center of each ramekin. Bake for 15 minutes, or until the cakes are firm.


7. **Cool and Serve:** Cool the cakes on a wire rack for 5 minutes. Gently invert each cake onto a dessert plate and serve warm.


#### A Family Tradition:


I remember vividly the first time I helped my grandmother prepare this cake. The kitchen was a hive of activity, with my siblings and cousins eagerly watching. My grandmother, in her gentle and patient manner, guided us through each step. As we dusted the ramekins with sugar and folded in the egg whites, she shared stories of her own childhood, connecting us to generations past.


The best part, of course, was when we placed the chocolate pieces in the center of each ramekin, knowing that a rich, molten surprise awaited us. As we gathered around the table, the first bite of that warm, citrusy cake with its gooey chocolate center was nothing short of bliss. It was a moment of pure joy, one that tasted of home and love.


#### Difficulty Rating: 5/10


#### Classification: Dessert


This Warm Lemon Poppy Seed Cake with a Chocolate Ganache Center is not only a delightful dessert but also a testament to the power of food in creating lasting memories. Whether you're introducing it to your family for the first time or continuing a cherished tradition, this cake is sure to become a favorite. So, gather your loved ones, roll up your sleeves, and create a new memory with this delectable treat.

Read more about Appetizers

Read more about Main Dishes

Read more about Desserts

Basil Marinated Grilled Chicken | Made by Meaghan Moineau

Basil Marinated Grilled Chicken | Made by Meaghan Moineau

**Title: Savor the Summer: Basil Marinated Grilled Chicken Recipe**


**Description: Experience the taste of summer with our Basil Marinated Grilled Chicken. This dish will transport you to sunny family gatherings with every bite. Easy to prepare and bursting with flavor, it's perfect for any occasion.**


---


When summer arrives, it brings with it the promise of long, lazy afternoons and evenings spent in the company of loved ones. There's something truly magical about gathering around a grill, the air filled with laughter and the tantalizing aroma of something delicious cooking away. For my family, one dish that encapsulates these joyful moments is the Basil Marinated Grilled Chicken.


**A Trip Down Memory Lane**


I remember vividly the summer weekends spent at my grandparents' house, nestled in the countryside. The backyard was our little paradise, with lush greenery and the comforting scent of fresh basil growing by the garden fence. It was there that my grandmother first introduced us to the Basil Marinated Grilled Chicken—a recipe that would become a family favorite for generations.


Every Saturday, she would meticulously prepare the marinade, her kitchen filled with the pungent aroma of garlic and the sweet, herbaceous scent of basil. As a child, I was always eager to help, watching in awe as she blended the ingredients in her trusty food processor. The anticipation was palpable as we waited for the chicken to soak in the vibrant, green marinade, allowing the flavors to meld beautifully.


When it was finally time to grill, we'd gather around, the sun casting a golden glow on our little corner of the world. The sizzling sound of chicken on the grill was music to our ears, and the first bite was always a revelation—succulent, aromatic, and utterly satisfying.


**The Recipe: Basil Marinated Grilled Chicken**


**Ingredients:**


- 3 cloves garlic


- 1 cup lightly packed basil leaves


- 1/4 cup extra virgin olive oil


- Salt to taste


- 4 dry boneless chicken breasts


**Instructions:**


1. Mince the garlic in a food processor.


2. Add the basil leaves and process until roughly chopped.


3. Drizzle in the extra virgin olive oil until a thin ketchup consistency is achieved.


4. Add a pinch of salt and whirl for 5 seconds to combine.


5. Place the chicken breasts in a baking dish and pour the marinade over them, turning the pieces to coat evenly.


6. Cover and refrigerate for 4 hours, allowing the flavors to meld.


7. Preheat your grill to medium-high heat.


8. Grill the chicken for about 8 minutes per side, or until cooked through and juices run clear.


**Nostalgia on a Plate**


This Basil Marinated Grilled Chicken is more than just a meal; it's a vessel for memories, a reminder of sun-kissed days and cherished family gatherings. Each bite transports me back to those carefree summers, surrounded by love, laughter, and the simple pleasure of good food.


**Difficulty Rating: 3/10**


**Classification: Main Dish**


Whether you're hosting a backyard barbecue or simply yearning for a taste of summer, this dish is sure to delight. Its simplicity and vibrant flavors make it a go-to recipe that you'll want to pass down through the generations—just as my grandmother did. So fire up the grill, gather your loved ones, and create your own beautiful memories with this timeless recipe.

Read more about Appetizers

Read more about Main Dishes

Read more about Desserts