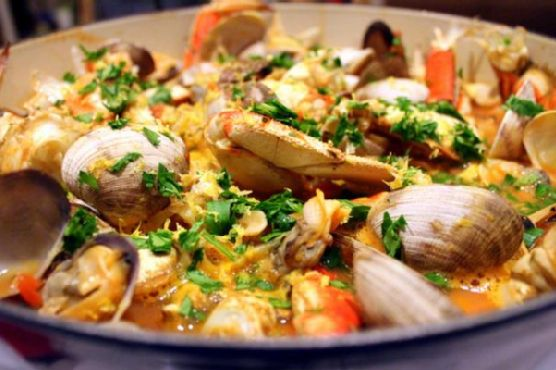
San Francisco Cioppino
Intro
There’s something magical about a bowl of seafood stew that can transport you straight to the bustling shores of San Francisco. Cioppino, a classic Italian-American dish, is a hearty seafood stew known for its rich tomato base and an array of fresh seafood. My first encounter with this delightful dish was during a family trip to the Bay Area when I was a child. I vividly remember savoring each bite while the cool ocean breeze brushed against my skin. Today, I’m excited to share this cherished recipe with you, so you can bring a taste of the San Francisco coast into your home.
Why You’ll Love It
Cioppino is more than just a meal; it’s an experience. Here’s why you’ll love it:
- Flavorful and Rich: The combination of fresh seafood and a tomato-based broth creates a symphony of flavors that dance on your palate.
- Easy to Make: Despite its gourmet appearance, cioppino is surprisingly simple to prepare, making it perfect for both weeknight meals and special occasions.
- Hearty and Nutritious: Packed with protein from a variety of seafood, this stew is both satisfying and nutritious.
- Customizable: You can easily adjust the ingredients to suit your taste or whatever seafood you have on hand.
Ingredients
- Fresh canned tomatoes
- Clams
- Dry white wine
- Cooked freshly Dungeness crabs
- White fresh fish
- Fresh basil
- Fresh parsley
- Garlic
- Black fresh ground pepper
- Olive oil
- Fresh oregano
- Raw shrimp
- Scallops
- Tomato paste
- Yellow onion
Instructions
- Remove the legs and claws from the crabs and break the body in half, reserving as much of the “crab butter” as possible (the yellow-colored center). Set crab pieces aside and force the crab butter through a sieve into a small bowl. Set aside.
- Place the clams in a pan, add 1 cup of wine, and steam, covered, over medium heat for 5 minutes or until clams open. Remove clams and discard any that do not open. Strain the stock through a cheesecloth and reserve.
- In an 8-quart saucepan, heat the oil. Add the onion and garlic and sauté over medium heat until soft, but not browned.
- Add tomatoes, tomato paste, and remaining 2 cups of wine, pepper, herbs, and clam stock. Partially cover and simmer for 20 minutes.
- Add the fish, scallops, shrimp, crab, and crab butter. Simmer for approximately 5 minutes or until all seafood is cooked; do not stir or the fish will break apart.
- Add the clams and heat for a scant 1 minute. Sprinkle with parsley and serve immediately from the pot.
Tips
Here are some tips to ensure your cioppino turns out perfectly:
- Use Fresh Seafood: The freshness of the seafood significantly impacts the flavor of the dish. If possible, buy your seafood on the day you plan to make the cioppino.
- Don’t Overcook the Seafood: Seafood cooks quickly, so be careful not to overcook it to prevent it from becoming tough.
- Wine Selection: Choose a dry white wine that you enjoy drinking, as it will impart flavor to the stew.
Variations & Substitutions
Cioppino is a versatile dish that can be adapted to your preferences:
- Seafood: Feel free to add mussels, squid, or lobster to the stew for a different seafood combination.
- Wine: If you prefer, you can use a light red wine instead of white wine for a deeper flavor.
- Herbs: Experiment with different herbs such as thyme or rosemary for a unique twist.
Storage
Leftover cioppino can be stored in an airtight container in the refrigerator for up to 2 days. Reheat gently on the stove over low heat, adding a splash of water or broth if needed to thin the stew. Freezing is not recommended as it can affect the texture of the seafood.
FAQ
Can I make cioppino ahead of time?
Yes, you can prepare the tomato base of the stew ahead of time and store it in the refrigerator for up to two days. Add the seafood just before serving to ensure it remains tender and fresh.
What should I serve with cioppino?
Cioppino is traditionally served with crusty bread, which is perfect for soaking up the flavorful broth. A simple green salad or steamed vegetables also complement the dish well.
Nutrition
Cioppino is a nutritious meal, high in protein and low in carbohydrates. The exact nutritional content will vary based on the specific seafood used, but this stew is an excellent source of omega-3 fatty acids, vitamins, and minerals.
Conclusion
Whether you’re reminiscing about a past visit to the San Francisco coast or simply looking to try something new, this cioppino recipe is sure to delight your senses. With its robust flavors and comforting warmth, it’s the perfect dish to share with family and friends. So gather your ingredients, don your apron, and embark on a culinary journey to the heart of San Francisco. Enjoy your homemade cioppino and the cherished memories it may inspire!
Related update: San Francisco Cioppino
Related update: Salmon In Banana Leaf