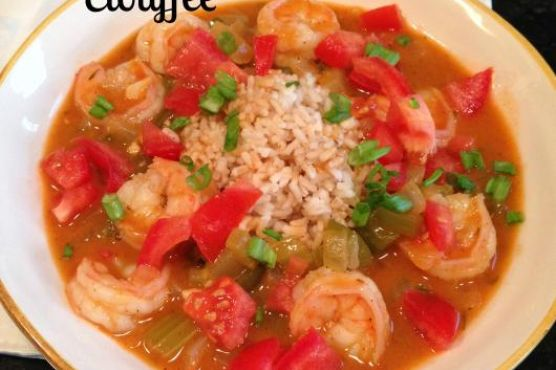
Mardi Gras Shrimp Étouffée
Intro
The vibrant celebration of Mardi Gras has always held a special place in my heart. Growing up in Louisiana, the anticipation of the parades, the music, and the lively colors filled the air with excitement. Yet, what truly made the experience unforgettable was gathering around the table with my family to enjoy a warm, hearty bowl of Shrimp Étouffée. The aroma of the simmering roux, mingling with the fresh seafood and spices, was enough to bring everyone into the kitchen, eagerly awaiting their first bite. Today, I’m thrilled to share this cherished recipe with you, hoping it brings the same joy and warmth to your home as it has to mine.
Why You’ll Love It
This Shrimp Étouffée is a celebration in a bowl. It combines the rich flavors of the Gulf Coast with a touch of spice, creating a dish that is both comforting and exciting. Whether you’re looking to bring a taste of Mardi Gras into your kitchen or simply want a cozy meal to share with loved ones, this recipe is sure to become a favorite. The silky roux, the succulent shrimp, and the aromatic vegetables come together harmoniously, offering a culinary experience that is both satisfying and delightful.
Ingredients
- 1/2 cup butter
- 1/2 cup flour
- 2 green bell peppers, diced
- 3 celery stalks, diced
- 1 large yellow onion, diced
- 3 garlic cloves, minced
- 1 teaspoon dried thyme
- 2 tablespoons tomato paste
- 1 tablespoon Worcestershire sauce
- 1 tablespoon creole seasoning
- 4 cups chicken broth
- 1 pound shrimp, peeled and deveined
- 1 tablespoon butter
- 2 scallions, sliced
- 1 fresh tomato, diced
- Cooked rice, for serving
Instructions
- Heat up a heavy pot over low heat. Add in the butter and cook for about 10-12 minutes until it turns a light golden brown. Stir occasionally to prevent burning.
- Whisk in the flour until smooth and continue cooking over low heat for about 8 minutes. The mixture should resemble a slightly loose peanut butter when ready.
- Add in the diced bell peppers, celery, and onion. Stir to coat the veggies with the roux and cook for another 10-15 minutes until the vegetables are softened.
- Stir in the minced garlic and dried thyme, cooking for about a minute until the garlic is fragrant.
- Add the tomato paste, Worcestershire sauce, creole seasoning, and chicken broth. Simmer on low for 30-40 minutes, stirring occasionally, until the sauce is slightly thickened.
- Stir in the shrimp, turn off the heat, and cover the pot with a lid. Allow the shrimp to cook in the residual heat for about 5-8 minutes, or until cooked through.
- Stir in a tablespoon of butter just before serving.
- Serve the Shrimp Étouffée over cooked rice and garnish with sliced scallions and fresh diced tomato.
Tips
Creating the perfect roux is key to this dish, so be patient and keep the heat low to avoid burning. Stir consistently and take your time. If you’re new to making roux, consider practicing with smaller batches to build confidence. Additionally, fresh ingredients make a difference, so opt for fresh shrimp and vegetables when possible.
Variations & Substitutions
If you’re looking to mix things up, consider using crab or crawfish instead of shrimp for a different take on this classic dish. For a spicier kick, add some cayenne pepper or hot sauce to taste. If you’re unable to find creole seasoning, you can make your own by combining paprika, garlic powder, onion powder, black pepper, white pepper, cayenne pepper, dried oregano, and dried thyme.
Storage
Store any leftovers in an airtight container in the refrigerator for up to 3 days. To reheat, warm gently on the stove over low heat, adding a splash of chicken broth if needed to loosen the sauce. Unfortunately, this dish doesn’t freeze well due to the delicate texture of the shrimp, so it’s best enjoyed fresh.
FAQ
Can I make this dish ahead of time?
Yes, you can prepare the sauce ahead of time and store it in the refrigerator. When ready to serve, simply reheat the sauce and add the shrimp just before serving to ensure they’re perfectly cooked.
Is this recipe gluten-free?
As written, this recipe is not gluten-free due to the flour used in the roux. However, you can substitute the flour with a gluten-free alternative such as rice flour or a gluten-free all-purpose blend to make it suitable for a gluten-free diet.
Nutrition
This Shrimp Étouffée is a hearty dish that’s rich in flavor and nutrients. While exact nutritional values can vary depending on the specific ingredients used, it is a good source of protein from the shrimp and vitamins from the vegetables. For those watching their calorie intake, consider reducing the amount of butter or serving it over cauliflower rice for a lighter option.
Conclusion
There’s something truly magical about gathering around the table to enjoy a dish that’s as rich in history and culture as it is in flavor. This Mardi Gras Shrimp Étouffée is more than just a meal; it’s an experience, a piece of New Orleans brought to life in your kitchen. Whether you’re celebrating Mardi Gras or simply craving a taste of the South, I hope this recipe brings joy and warmth to your home, just as it has to mine for many years. Bon appétit!
Related update: Mardi Gras Shrimp Étouffée
Related update: Soy Ginger Glazed Sea Scallops With Stir Fry Vegetables