Mixed Paella: A Hearty Feast for the Soul
Intro
Paella is more than just a dish; it’s a vibrant celebration of flavors and textures that brings people together. This Mixed Paella recipe has been a cherished staple in my family for generations, often making an appearance during our Sunday gatherings. I vividly recall the tantalizing aroma that filled my grandmother’s kitchen as she skillfully prepared the dish, her laughter mingling with the sizzle of chorizo in the pan. It’s a dish that carries with it the warmth and love of home, a culinary tradition I am thrilled to share with you today.
Why You’ll Love It
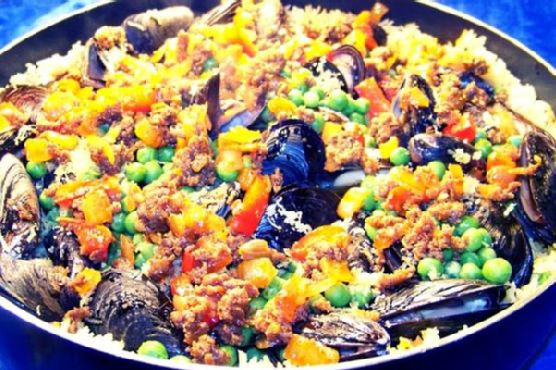
This Mixed Paella is a delightful medley of seafood, meat, and aromatic spices, making it a complete meal that is sure to satisfy. The harmonious blend of flavors from the saffron-infused rice, savory chorizo, and tender fish and shrimp creates a symphony on your palate. It’s a dish that’s both comforting and impressive, perfect for both casual family meals and special occasions. Plus, it’s a one-pan wonder that simplifies cleanup, allowing you more time to enjoy with your loved ones.
Ingredients
- 1 bay leaf
- 4 cups chicken broth
- 1 chorizo sausage
- 2 teaspoons extra virgin olive oil
- 1 white fish fillet
- 2 cloves garlic, minced
- 1 lemon, cut into wedges
- 1 teaspoon lemon zest
- 1 pound mussels, cleaned
- 1 Spanish onion, diced
- 1/4 cup fresh parsley, chopped
- 1/2 cup peas
- 1 red bell pepper, diced
- 1/2 teaspoon crushed red pepper flakes
- 2 cups dry rice
- 1/4 teaspoon saffron threads
- 1/2 pound shrimp, peeled and deveined
- 1 teaspoon thyme
Instructions
- In a very large non-stick skillet or paella pan preheated over medium-high heat, add 2 teaspoons of your oil (you will need more oil if you’re not using non-stick), garlic, red pepper flakes, and rice. Sauté for about 3 minutes.
- Add saffron, thyme, bay leaf, and chicken broth, then bring to a boil. Cover and reduce heat to a simmer. Leave covered, do not stir.
- In another non-stick skillet, heat to medium-high. Add chorizo and crumble as you sauté. When the sausage is cooked through, add red pepper and onion. Salt and pepper to taste if needed. Sauté until the onion is tender, then remove from heat and set aside.
- When the rice is nearly done (about 15 minutes), add fish and shrimp and press into rice. Add mussels, peas, and sprinkle with lemon zest. Cover and continue to simmer until the rice is done and the mussels have opened. Discard any mussels that do not open.
- Top with the chorizo mixture and parsley. Serve with lemon wedges and a crusty bread.
Tips
To ensure the perfect paella, resist the urge to stir the rice once the broth is added. This allows the rice to develop a crispy bottom layer known as “socarrat,” which is highly prized in traditional paella. Also, make sure to clean the mussels thoroughly and discard any that are cracked or do not close when tapped.
Variations & Substitutions
Feel free to customize your paella by swapping out ingredients based on your preferences or availability. You can use different types of seafood like clams or scallops, or substitute the chorizo with another type of sausage for a unique twist. For a vegetarian version, omit the meat and seafood entirely and add more vegetables like artichokes and green beans.
Storage
Leftover paella can be stored in an airtight container in the refrigerator for up to 3 days. To reheat, place it in a skillet over medium heat and add a splash of water or broth to retain moisture. Avoid using a microwave, as it may cause the seafood to become rubbery.
FAQ
Can I use brown rice instead of white rice?
Yes, you can use brown rice, but keep in mind that it has a longer cooking time compared to white rice. You’ll need to adjust the cooking time and possibly add more broth to ensure the rice is fully cooked.
Is it necessary to use saffron?
Saffron is a key ingredient in traditional paella, providing a unique flavor and vibrant color. However, if saffron is unavailable, you can substitute with turmeric, although the flavor will be different.
Can I freeze paella?
While it is possible to freeze paella, it’s not recommended as the texture of the seafood and rice may change upon thawing. It’s best enjoyed fresh or stored in the refrigerator for short-term use.
Nutrition
Mixed Paella is a balanced dish that combines proteins, carbohydrates, and healthy fats. With seafood providing omega-3 fatty acids and the addition of vegetables, it’s a nutritious option for a hearty meal. Adjust the portion size based on dietary needs and personal preferences.
Conclusion
This Mixed Paella recipe is a testament to the richness of Spanish cuisine, offering a delightful blend of flavors in every bite. Whether you’re sharing it with family or friends, it’s sure to be a crowd-pleaser. I hope this recipe becomes a treasured addition to your own culinary traditions, just as it has been in mine. Enjoy the process of cooking and savor the joyful moments it brings!
Related update: Mixed Paella
Related update: The Perfect Butter Beans Stew