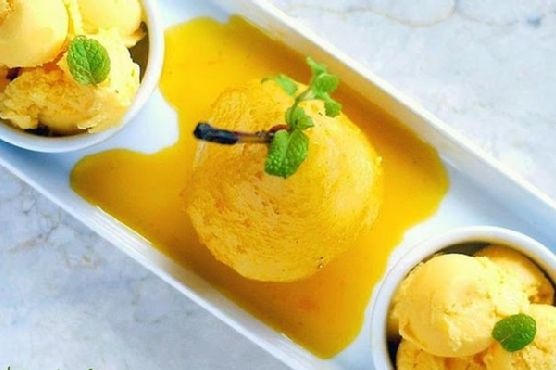
Chocolate Almond Bark | Made by Meaghan Moineau

Chocolate Almond Bark | Made by Meaghan Moineau

A Taste of Tradition: Chocolate Almond Bark Recipe


Description:

Indulge in the perfect blend of sweet and spicy with our Chocolate Almond Bark recipe. This easy-to-make dessert combines the rich flavor of candy-making chocolate with the subtle heat of cayenne pepper, creating a delectable treat that'll tantalize your taste buds. Whether you're a seasoned chef or a novice in the kitchen, this recipe is sure to impress. Dive into the story behind this family favorite and bring a touch of nostalgia to your dessert table.

---


Chocolate Almond Bark Recipe


Ingredients:

- 1 cup raw almonds, chopped

- 1 teaspoon cayenne pepper


- 10 oz candy-making chocolate


- 1 teaspoon sea salt, plus a pinch for topping


- 2 tablespoons Worcestershire sauce


Instructions:

1. Preheat your oven to 160 degrees.

2. In a medium bowl, combine the chopped almonds with Worcestershire sauce, cayenne pepper, and sea salt. Stir until the almonds are well coated.


3. Spread the almond mixture evenly on a baking sheet and roast in the oven for 20 minutes. Once done, allow the almonds to cool completely.


4. Melt the chocolate using a double boiler or microwave on low heat. Be sure to stir frequently to prevent scorching.


5. Mix the cooled almonds into the melted chocolate until well combined.


6. Spread the chocolate-almond mixture into an 8 x 8 inch pan lined with wax paper. Sprinkle a pinch of sea salt on top for added flavor.


7. Let the chocolate cool and set completely. Once firm, break into bite-sized pieces.


Difficulty Rating: 3/10


Classification: Dessert


---


A Sweet Nostalgia: The Story Behind the Chocolate Almond Bark


Every time I make Chocolate Almond Bark, I'm transported back to my grandmother's cozy kitchen during the festive holiday season. It's a recipe that's been passed down through generations, each family member adding their unique touch. For me, the smell of roasting almonds and melting chocolate brings back vivid memories of laughter and warmth shared around the kitchen table.


I remember one particular winter evening when the first snow began to fall, casting a magical glow over the neighborhood. My grandmother and I huddled in the kitchen, the windows fogged from the warmth inside. She showed me how to combine the ingredients with precision and care, her hands moving with practiced grace. As we waited for the almonds to cool, she shared stories of her childhood, of how her mother would make this very treat as a special surprise for the family.


The cayenne pepper was her secret ingredient, she whispered with a wink, adding just the right amount of unexpected heat to complement the sweetness of the chocolate. It was a combination that seemed odd at first, but one taste and I was hooked. The spiciness played off the chocolate in a way that was both surprising and delightful, making each bite an adventure.


Now, every holiday season, I make sure to carry on the tradition. I gather my own family in the kitchen, sharing stories and laughter as we create this exquisite dessert. It's more than just a recipe; it's a reminder of the love and joy that comes from sharing food and memories with those we hold dear.


So, as you embark on making this Chocolate Almond Bark, I hope you find your own moments of nostalgia and connection. May it become a cherished part of your family's traditions, just as it has in mine.

Read more about Appetizers

Read more about Main Dishes

Read more about Desserts

Moroccan Chicken Pitas | Made by Meaghan Moineau

Moroccan Chicken Pitas | Made by Meaghan Moineau

Title: Savoring Tradition: Moroccan Chicken Pitas and Family Memories

Description: Dive into the vibrant flavors of Moroccan cuisine with our recipe for Moroccan Chicken Pitas. This delightful dish combines aromatic spices and fresh ingredients to create a meal rich in tradition and taste. Join us as we explore the preparation of these flavorful pitas and share a nostalgic family story that makes this dish all the more special. Rated at a moderate difficulty of 6/10, this recipe serves as a delectable main dish for any occasion.


---


Moroccan Chicken Pitas: A Journey Through Flavor and Time


There's something truly special about preparing a meal that not only tantalizes the taste buds but also evokes cherished memories. Moroccan Chicken Pitas are one such dish, combining the vibrant spices of Morocco with the warmth of family tradition. This recipe, with its medley of flavors and textures, transports me back to joyful gatherings and lively conversations around the dinner table.


Ingredients:


- Pita bread


- Skinless boneless chicken breasts


- Paprika


- Coriander


- Cinnamon


- Cumin


- Cayenne pepper


- Garlic


- Ginger


- Salt


- Olive oil


- Fresh Italian parsley


- Cooked quinoa


- Canned diced petite tomatoes


- Yellow diced onion


- Lemon (juice)


- Diced Medjool dates


- Olive oil


- Sea salt


- Greek yogurt


- Diced cucumber


- Mint


- Lemon (juice)


Instructions:


1. Prepare the Spice Rub:

- In a small dish, combine paprika, coriander, cinnamon, cumin, cayenne pepper, garlic, ginger, and salt. Stir thoroughly.


2. Marinate the Chicken:

- Using a meat mallet, pound the chicken breasts until they're about 1/2 inch thick.


- Generously rub the spice mixture on all sides of the chicken breasts. Cover and refrigerate for about an hour.


3. Prepare the Tabbouleh:

- Combine cooked quinoa, canned diced petite tomatoes, yellow diced onion, lemon juice, diced Medjool dates, olive oil, and sea salt.


- Adjust salt and oil to taste. Cover and chill while the chicken is marinating. (Tip: Enjoy a handful of pita chips with a scoop of this refreshing mix!)


4. Grill the Chicken:

- Prepare the grill to medium heat.


- Grill the marinated chicken until thoroughly cooked, about 16 minutes. I prefer mine with a slight char for added flavor.


5. Assemble the Pitas:

- Half and split open the pita bread.


- Fill each half with slices of grilled chicken, tabbouleh, and a generous dollop of the yogurt sauce made from Greek yogurt, diced cucumber, mint, and lemon juice.


A Nostalgic Family Memory:


The aroma of Moroccan spices takes me back to my grandmother's kitchen, where the air was always filled with mouth-watering scents and laughter. Every Sunday, our family would gather for a feast, and my grandmother's Moroccan Chicken Pitas were always the star of the show. I remember her meticulously preparing the spices, her hands working with the ease and grace that only years of practice can bring.


As children, we would hover around the kitchen, eager for a taste. She would shoo us away with a playful smile, always making sure there was extra tabbouleh for us to nibble on with pita chips. These pitas were more than a meal; they were a celebration of our heritage and the love that bound us together. Each bite was a reminder of the warmth and joy that filled our family gatherings.


Difficulty Rating: 6/10


Classification: Main Dish


---


Whether you're looking to relive a cherished memory or create new ones, Moroccan Chicken Pitas offer a delicious journey through flavors and time. With its blend of spices and fresh ingredients, this dish is sure to impress at any gathering and bring a touch of Moroccan magic to your table.

Read more about Appetizers

Read more about Main Dishes

Read more about Desserts

Blackened Cajun Chicken | Made by Meaghan Moineau

Blackened Cajun Chicken | Made by Meaghan Moineau

Spicing Up Family Gatherings: A Nostalgic Journey with Blackened Cajun Chicken


Description:

Discover the rich flavors and cherished memories behind our Blackened Cajun Chicken recipe. This main dish, rated a 6 out of 10 in difficulty, combines aromatic spices with tender chicken, creating a culinary masterpiece that is perfect for any family gathering. Join us as we delve into the heartwarming story that makes this dish a family favorite, and learn how to recreate it in your own kitchen.

---


A Trip Down Memory Lane


In the heart of our family kitchen, the aroma of spices would dance through the air, signaling the start of our cherished Sunday gatherings. My grandmother, the culinary matriarch of our family, had a talent for transforming simple ingredients into unforgettable meals. Her Blackened Cajun Chicken was no exception.


Every Sunday, as the sun began to set, our family would gather around the large oak table that had witnessed countless memories. The table, with its worn edges and a few inevitable scratches, was a symbol of unity. It was here that stories were shared, laughter echoed, and bonds were strengthened. The centerpiece of these gatherings was always my grandmother’s Blackened Cajun Chicken, a dish that encapsulated the spirit of our family.


The Secret to Flavorful Memories


The magic of this recipe lies in the carefully curated blend of spices. Each ingredient plays a crucial role in creating the symphony of flavors that define this dish. The combination of bay leaves, black pepper, brown sugar, cayenne pepper, dried rosemary, dried thyme, dry mustard, garlic powder, ground cumin, onion powder, paprika, and salt creates a seasoning mix that not only enhances the chicken but also tells a story of tradition and love.


Ingredients:

- Bay leaves

- Black pepper


- Brown sugar


- Cayenne pepper


- Dried rosemary


- Dried thyme


- Dry mustard


- Garlic powder


- Ground cumin


- Onion powder


- Paprika


- Salt


- Chicken


Instructions:

1. Prepare the Seasoning Mix: In a bowl, combine all the seasonings. This mix is enough for two chickens and can be made ahead and stored in an airtight container until needed.
2. Season the Chicken: Place the chicken in a 13- by 9- by 2-inch baking pan. Rub it generously with half of the seasoning mixture. Cover the pan and refrigerate overnight to let the flavors meld.
3. Grilling the Chicken: Preheat your grill and set it to medium heat. Grill the chicken, covered, over medium coals for 30 to 45 minutes, turning once, until the juices run clear. This process ensures the chicken is succulent and infused with the rich flavors of the spices.

A Culinary Legacy


As the years went by, the tradition of preparing Blackened Cajun Chicken was passed down to me. Each time I recreate this dish, I am transported back to those cherished Sunday evenings, surrounded by family and the warmth of shared stories. Today, I invite you to bring this tradition into your home and create your own memories with each flavorful bite.


Conclusion


Blackened Cajun Chicken is more than just a meal; it's a celebration of family, history, and the joy of cooking. Whether you're a seasoned chef or a novice in the kitchen, this recipe offers an opportunity to connect with loved ones over a dish that is as rich in flavor as it is in nostalgia. So, fire up the grill, gather your family, and create a legacy of your own with this timeless recipe.

Read more about Appetizers

Read more about Main Dishes

Read more about Desserts

Spicy Cilantro Pesto | Made by Meaghan Moineau

Spicy Cilantro Pesto | Made by Meaghan Moineau

Title: A Zesty Twist on Tradition: Spicy Cilantro Pesto Recipe
Description: Dive into the vibrant flavors of our Spicy Cilantro Pesto, a modern twist on a classic favorite. This cilantro-based pesto, enriched with a hint of chili, is sure to awaken your taste buds. Perfect as an appetizer or a vibrant addition to your main dishes, this recipe is easy to make and packed with flavor.

---


A Zesty Twist on Tradition: Spicy Cilantro Pesto Recipe


If you've ever found yourself yearning for a dish that combines the freshness of herbs with a hint of heat, our Spicy Cilantro Pesto is exactly what you need. This versatile recipe brings a contemporary twist to the traditional basil pesto, infusing it with the lively flavors of cilantro and a subtle kick of chili. Whether you're a culinary novice or a seasoned chef, this dish is simple to prepare and offers an explosion of flavor with every bite.


Ingredients:

- Fresh cilantro

- 2 cloves garlic


- 1 teaspoon mild chili powder


- 1/4 cup pepitas (pumpkin seeds)


- 1/2 cup olive oil


- Sea salt to taste


Instructions:

1. Begin by placing fresh cilantro in a food processor. Pulse until finely chopped.

2. Add garlic, sea salt, pepitas, and mild chili powder to the processor. Chop until well blended.


3. Using an attachment for adding liquids, slowly incorporate olive oil drop by drop while the food processor is running. This will form a thick, aromatic paste.


4. Once combined, scoop the vibrant green pesto into pint jars.


5. Store in the refrigerator for regular use or freeze for long-term storage.


Nostalgic Family Memory:


This Spicy Cilantro Pesto always takes me back to the summers spent in my grandmother's garden. I remember the hours we spent picking fresh herbs, the sun warming our backs, and the air filled with the intoxicating scent of nature. My grandmother, an inspiring cook, used to prepare a similar pesto with whatever fresh ingredients she could find. Her kitchen was always alive with the sound of the food processor whirring and the smell of garlic mingling with herbs.


One summer night, we decided to experiment by adding a touch of mild chili powder, something my grandmother had never done before. The result was a pesto that had a delightful kick, a combination of her traditional recipe and our modern twist. It became a family favorite, a symbol of our culinary adventures together. Even now, as I prepare this dish, I feel her presence, guiding my hands, and hear her laughter echoing in the kitchen.


Difficulty: 3/10


Classification: Appetizer

This Spicy Cilantro Pesto is not just a dish; it's a journey back to cherished family moments and a testament to the joy of combining tradition with innovation. Whether spread over warm bread, tossed with pasta, or used as a zesty dip, it's bound to become a staple in your kitchen too. Enjoy the spicy, aromatic flavors and maybe create a few nostalgic memories of your own along the way.

Read more about Appetizers

Read more about Main Dishes

Read more about Desserts

Authentic Jamaican Curry Chicken | Made by Meaghan Moineau

Authentic Jamaican Curry Chicken | Made by Meaghan Moineau

**Title: Savoring Tradition: Crafting Authentic Jamaican Curry Chicken**


**Description:** Dive into the vibrant world of Jamaican cuisine with our Authentic Jamaican Curry Chicken recipe. Infused with rich spices and a touch of nostalgia, this dish captures the essence of Caribbean flavors. Perfect for a cozy family dinner, this main dish will transport your taste buds to the sun-drenched shores of Jamaica.


---


**A Taste of Home: Authentic Jamaican Curry Chicken**


In the heart of every Jamaican kitchen lies a pot of bubbling curry, a symphony of spices and aromas that tell tales of heritage and warmth. Among these beloved dishes is the legendary Jamaican Curry Chicken, a staple that not only tantalizes the senses but also carries cherished memories of family gatherings and laughter-filled evenings.


**Ingredients:**


- 2 lbs skinless chicken thighs


- 2 tablespoons allspice


- 3 tablespoons coconut oil


- 4 tablespoons curry powder


- 4 cloves garlic, minced


- 1 green bell pepper, chopped


- 1 onion, chopped


- Salt and black pepper to taste


- 3 scallions, chopped


- 1 scotch bonnet pepper, whole


- 2 large sweet potatoes, peeled and cubed


- 2 teaspoons fresh thyme


- 3 cups water


**Instructions:**


1. **Marinate:** Begin by seasoning the chicken with allspice, curry powder, garlic, green bell pepper, onion, salt, black pepper, and scallions. Let the flavors meld together by marinating the chicken for at least 2 hours, or for a more intense flavor, leave it overnight in the refrigerator.


2. **Sear the Chicken:** Heat coconut oil in a Dutch oven over high heat. Carefully add the marinated chicken pieces and fry until each side is golden brown and seared, approximately 10 minutes.


3. **Simmer:** Once the chicken is browned, add the remaining marinade, scotch bonnet pepper, and water to the pot. Cover and bring to a boil.


4. **Thicken the Stew:** Add the sweet potatoes to the pot, reduce the heat to a simmer, and let the stew cook for about an hour, or until it reaches a thick, hearty consistency.


**Difficulty:** 6/10


**Classification:** Main Dish


**A Nostalgic Note:**


Growing up, Sunday dinners were a sacred tradition in our household. The aroma of spices would waft through the air as my grandmother prepared her famous curry chicken, a recipe passed down from her own mother. Our small kitchen became a haven, filled with stories and laughter. My siblings and I would gather around the table, eagerly waiting for our plates to be filled with the vibrant curry. Each bite was a celebration of our heritage, a connection to our roots, and a reminder of the love that binds our family together.


To this day, whenever I prepare this dish, I am transported back to those cherished moments, the warmth of my grandmother’s smile, and the comforting embrace of my family. It is more than just a meal; it is a legacy of love and togetherness.


---


Embrace the rich flavors and history of Jamaican cuisine with this classic curry chicken recipe. Whether you're sharing it with family or savoring a quiet meal alone, it promises to bring a taste of the Caribbean to your table.

Read more about Appetizers

Read more about Main Dishes

Read more about Desserts

Mutton Rendang | Made by Meaghan Moineau

Mutton Rendang | Made by Meaghan Moineau

## The Art of Mutton Rendang: A Culinary Journey into Tradition


### Description:


Indulge in the rich flavors and aromatic spices of Mutton Rendang, a classic dish that transcends time and brings families together. Unravel the secrets of this beloved recipe, infused with cherished memories and traditional techniques. Perfect for a cozy family dinner or a festive celebration, Mutton Rendang is sure to captivate your taste buds and warm your heart.


---


### A Culinary Nostalgia: The Heartwarming Tale of Mutton Rendang


Cooking has always been more than just preparing food; it’s a journey into the heart of family traditions and shared memories. For me, Mutton Rendang is not just a dish; it’s a delicious reminder of my childhood, spent in my grandmother's warm kitchen. The air filled with the comforting aroma of spices sizzling in hot oil—a scent that, to this day, transports me back to those joyful days.


Every festive season, my family would gather at my grandmother's house. The centerpiece of our celebration was always her legendary Mutton Rendang. I remember watching her skillfully mix mutton pieces with turmeric powder and salt, a ritual that marked the beginning of a culinary masterpiece. She would then carefully cover the saucepan and place it on the stove, letting it boil until the meat was tender and flavorful.


As the meat simmered, my grandmother would blend a fragrant paste of dried chillis, shallots, onion, garlic, ginger, lemongrass, galangal, and fresh turmeric. The kitchen would come alive with the vibrant colors and tantalizing scents of these essential ingredients. The sound of cumin and fennel seeds crackling in hot oil signified the start of a magical transformation.


My grandmother always emphasized the importance of patience. "The longer you sauté the paste, the better the flavor," she would say with a twinkle in her eye. Her dedication to perfection was evident in every stir of the wok, every addition of thin coconut milk, dried tamarind, and turmeric leaf, and in the careful balance of salt. The final touch was the thick coconut milk, which enveloped the mutton in a creamy embrace, and the toasted coconut, adding a delightful texture and nutty aroma.


The result was a symphony of flavors—rich, spicy, and deeply satisfying. As we gathered around the dining table, each bite of Mutton Rendang was a taste of tradition, a spoonful of love passed down through generations. It was more than a meal; it was a celebration of family, heritage, and the art of cooking.


### Recipe Difficulty: 8/10


### Classification: Main Dish


Mutton Rendang is a dish that requires time, patience, and a love for authentic flavors. While the process may seem intricate, the reward is a delectable masterpiece that brings joy and togetherness to any meal. Whether you're a seasoned cook or a culinary enthusiast, this recipe invites you to experience the magic of traditional cooking and create lasting memories with your loved ones.

Read more about Appetizers

Read more about Main Dishes

Read more about Desserts

Masala-Tofu Burger | Made by Meaghan Moineau

Masala-Tofu Burger | Made by Meaghan Moineau

# Masala-Tofu Burger: A Flavorful Fusion Delight


## A Wholesome and Spicy Vegan Alternative


If you're looking to spice up your burger game with a healthy, vegan twist, the Masala-Tofu Burger is your answer. This vibrant dish combines the hearty goodness of tofu with the rich, aromatic spices of an Indian kitchen. Perfect for a weekend treat or a summer cookout, this burger is sure to impress family and friends alike. Let's dive into this culinary adventure that beautifully marries flavors and cultures.


### Ingredients You'll Need


- **White Onion:** Shopping list


- **Diced Red/Orange/Green Bell Pepper:** Shopping list


- **Frozen Peas-Carrots Mix:** Shopping list


- **Green Chilies:** Shopping list


- **Tofu:** Shopping list


- **Diced Potato:** Boiled


- **Garlic:** Shopping list


- **Black Mustard Seeds:** Shopping list


- **Curry Leaves:** Shopping list


- **Hing (Asafoetida):** Shopping list


- **Cumin Powder:** Shopping list


- **Turmeric:** Shopping list


- **Lemon:** Shopping list


- **Salt:** Shopping list


- **Cilantro:** Washed and finely chopped, shopping list


- **Indian Breadcrumbs:** Shopping list


- **Vegetable Oil:** Shopping list


- **PAM Original Flavor Spray:** Shopping list


- **Red/White Onion:** For garnish


- **Beefsteak Tomatoes:** Sliced for garnish


- **Mint-Cilantro Chutney Spread:** Shopping list


- **Portuguese Rolls:** Shopping list


### Cooking Instructions


1. **Prepare the Skillet:**


- In a large skillet over medium-high heat, spray a generous amount of PAM and add vegetable oil.


- Add black mustard seeds and sauté for 30 seconds until you hear popping noises.


- Carefully add curry leaves, as they will splatter in the hot oil.


2. **Cook the Vegetables:**


- Add diced onions and bell peppers; sweat them for about 30 seconds.


- Add chopped garlic, green chilies, and turmeric. Sauté for 5-7 minutes until onions and peppers are soft.


- Add the peas-carrots mix, cumin powder, and salt. Cook for another 7-10 minutes until all veggies are soft.


3. **Marinate the Tofu:**


- In a small bowl, combine cubed tofu with a pinch of turmeric, cumin powder, coarse black pepper, and cayenne pepper (optional). Set aside to marinate.


4. **Combine and Cook:**


- Add marinated tofu to the skillet and cook until slightly browned and crumbly.


- Squeeze juice from half a lemon and add half of the chopped cilantro. Mix well.


- Add diced boiled potatoes and toss until everything is coated. Taste for salt and spices.


- Mash the mixture until mushy and veggies are small. Set aside to cool.


5. **Form the Patties:**


- Once cooled, add breadcrumbs and mix with your hands.


- Form into four thick patties. If needed, add more breadcrumbs for consistency.


- Place patties on a plate and wrap with plastic wrap until ready to use.


6. **Cook the Patties:**


- In a small skillet sprayed with PAM over medium-high heat, cook each patty for about 2 minutes on each side until browned and crispy.


- Simultaneously, sauté thick slices of onion until charred and slightly soft.


7. **Assemble the Burger:**


- Spread a generous amount of mint-cilantro chutney on each side of the Portuguese rolls.


- Place the tofu patty, charred onions, tomato slices, and fresh cilantro leaves between the buns.


- Serve with a slice of lemon and reduced-fat chips on the side.


### A Nostalgic Family Memory


Growing up, Sundays were special in our family. My grandmother would gather us around her cozy kitchen, the air filled with a medley of spices and laughter. She had a knack for transforming simple ingredients into magical dishes, and her Masala-Tofu Burger was a family favorite. We would eagerly form an assembly line, each adding our own touch to the burgers. The final product was always met with cheers and anticipation, as we savored the deliciously spiced patty nestled between soft, fresh rolls. Even today, as I recreate this dish in my own kitchen, I am transported back to those cherished moments of family and flavor.


### Difficulty Level


- **Difficulty:** 6/10


- **Classification:** Main Dish


This Masala-Tofu Burger is a delightful blend of spices and textures, perfect for those looking to explore new culinary territories. Whether you're a seasoned cook or a beginner, this recipe offers a rewarding experience with every bite. Enjoy the memories and flavors that come with this unique twist on a classic favorite!

Read more about Appetizers

Read more about Main Dishes

Read more about Desserts

Jambalaya Stew | Made by Meaghan Moineau

Jambalaya Stew | Made by Meaghan Moineau

# A Hearty Bowl of Jambalaya Stew: A Taste of Tradition


**Description:** Dive into the rich flavors of New Orleans with our Jambalaya Stew, a delightful blend of savory chicken sausage, succulent shrimp, and vibrant vegetables. This hearty dish is perfect for family gatherings and a breeze to make. Join us as we explore the comforting nostalgia of this family favorite, with a sprinkle of history and a dash of spice.


---


## A Culinary Journey: Rediscovering Jambalaya Stew


There's something magical about a pot of Jambalaya simmering on the stove, the aroma of spices filling the kitchen, and the promise of a comforting meal waiting to be shared. This Jambalaya Stew is not just a recipe; it's a journey back to cherished family memories, a dish that brings loved ones together around the table.


### Ingredients You'll Need


- **4 cooked Italian sweet chicken sausage links**


- **1 can of diced tomatoes**


- **1 onion, chopped**


- **1 yellow and 1 green bell pepper, diced**


- **2 stalks of celery, chopped**


- **4 cups of low sodium chicken broth**


- **1 cup of brown rice**


- **3 cloves of garlic, minced**


- **2 tablespoons of Cajun seasoning**


- **A dash of hot sauce (or to taste)**


- **1 teaspoon of dried oregano**


- **1 teaspoon of dried thyme**


- **1 pound of raw shrimp, peeled and deveined**


### Cooking Instructions


1. **Combine Ingredients:** In a large pot, add all ingredients except the shrimp. Stir them together until well mixed.


2. **Bring to a Boil:** Heat the pot on the stove until it reaches a boil.


3. **Simmer:** Reduce the heat to medium-low. Cover the pot and let it simmer for about 35 minutes, or until the vegetables are tender and the rice is fluffy.


4. **Add Shrimp:** Stir in the shrimp, then re-cover the pot. Cook for an additional 6 minutes, or until the shrimp are tender and cooked through.


5. **Season to Taste:** If desired, add salt, black pepper, or more hot sauce to suit your taste.


6. **Serve and Enjoy:** Ladle the stew into bowls, serve hot, and enjoy the flavors of this traditional dish.


### A Nostalgic Family Tale


Growing up, Sundays were always a special day in our household. It was a time to slow down, gather the family, and enjoy a hearty meal together. My grandmother's Jambalaya Stew was the star of these Sunday gatherings. The kitchen would be a flurry of activity, with family members chopping vegetables, stirring pots, and sharing stories.


One particular Sunday stands out in my memory. It was a chilly afternoon, and as the stew simmered away on the stove, the warmth from the kitchen crept into every corner of the house. I remember my grandmother, her apron dusted with flour, telling tales of her own childhood in New Orleans, where Jambalaya was a staple at every family feast. Each spoonful of the stew was like a warm hug, a reminder of the love and care that went into every meal.


Even today, every time I make this Jambalaya Stew, I'm transported back to those cherished Sundays. It's more than just a dish—it's a celebration of family, tradition, and the simple joy of sharing a meal with those you love.


### Difficulty Rating and Classification


- **Difficulty:** 4/10 - This recipe is straightforward, making it perfect for both novice cooks and seasoned chefs.


- **Classification:** Main Dish - With its hearty ingredients and robust flavors, this Jambalaya Stew is sure to be the centerpiece of any meal.


Embrace the flavors of the South and create your own family memories with this Jambalaya Stew. Whether it's a casual weeknight dinner or a special family gathering, this dish is sure to warm hearts and fill bellies. Enjoy!

Read more about Appetizers

Read more about Main Dishes

Read more about Desserts

Spicy Salad with Kidney Beans, Cheddar, and Nuts | Made by Meaghan Moineau

Spicy Salad with Kidney Beans, Cheddar, and Nuts | Made by Meaghan Moineau

**Title: Zesty Delight: Spicy Salad with Kidney Beans, Cheddar, and Nuts**


**Description:** Dive into a symphony of flavors with our Spicy Salad featuring kidney beans, cheddar, and a medley of nuts. This vibrant dish is not just a treat for your taste buds but also a wholesome meal that can be whipped up in record time. Perfect for a quick lunch or a light dinner, this salad is both nutritious and satisfying, boasting a tantalizing mix of creamy, crunchy, and spicy elements. Join me as I share a cherished family memory that this delightful salad brings to mind.


---


**The Art of Quick and Healthy: Spicy Salad with Kidney Beans, Cheddar, and Nuts**


When it comes to preparing a meal that's both quick and nourishing, salads often take the spotlight. This Spicy Salad with Kidney Beans, Cheddar, and Nuts is a testament to how simple ingredients can come together to create a dish that's delicious and deeply satisfying. As a bonus, it's a meal that carries with it a personal story from my childhood that makes it even more special.


**Ingredients:**


- 1 cup cooked kidney beans, rinsed and drained


- 1/4 cup almonds


- 1 ripe avocado, sliced


- 2 tablespoons balsamic vinegar


- 1/2 cup cheddar cheese, torn into small pieces


- 4 cups mixed greens


- 2 tablespoons olive oil


- 1/4 cup salted roasted cashews


- 1/4 cup sundried tomatoes, cut into strips


- A dash of Tabasco


**Instructions:**


1. Begin by preparing your ingredients: Rinse and drain the kidney beans, cut the sundried tomatoes into strips, and tear the cheddar cheese into small, bite-sized pieces.


2. In a large salad bowl, lay down a bed of mixed greens. Top the greens with kidney beans, sundried tomatoes, cheddar cheese, almonds, and cashews.


3. In a small mixing bowl, combine olive oil, balsamic vinegar, and a dash of Tabasco sauce. Stir well to create a zesty dressing.


4. Drizzle the dressing over the salad, ensuring every ingredient gets a touch of that spicy, tangy goodness.


5. Give it a gentle toss, ensuring all the flavors meld together beautifully.


This salad is not just a wonderful mix of textures and flavors but also a slice of my family's culinary history. Growing up, Sundays were reserved for family picnics in our local park. My mother would pack a wicker basket with freshly prepared dishes, and this spicy salad was always a staple. I remember the vivid flavors of the kidney beans and cheddar mixing with the crunch of the nuts and the tangy kick from the Tabasco-laced dressing. It was the perfect meal to enjoy on a sunny afternoon, surrounded by laughter and the rustling of leaves.


**Difficulty:** 3/10


**Classification:** Main Dish


With its simple preparation and vibrant flavors, this salad is an excellent choice for anyone looking to enjoy a quick, healthy meal that's rich in protein and fiber. Whether you're reminiscing about family picnics or simply seeking a nutritious lunch option, this Spicy Salad with Kidney Beans, Cheddar, and Nuts is sure to become a favorite. Enjoy the journey of flavors and memories with every bite!

Read more about Appetizers

Read more about Main Dishes

Read more about Desserts

Spicy Seasoned Loaded Guacamole | Made by Meaghan Moineau

Spicy Seasoned Loaded Guacamole | Made by Meaghan Moineau

**Title: Unleashing Flavor: The Art of Crafting Spicy Seasoned Loaded Guacamole**


**Description:**


Dive into the vibrant world of flavors with our Spicy Seasoned Loaded Guacamole. This recipe transforms simple avocados into a fiesta of tastes with the perfect balance of heat and zest. Join me on a nostalgic journey as I share a cherished family memory linked to this beloved appetizer. With a difficulty rating of 3 out of 10, this dish is perfect for any occasion, whether you’re hosting a party or simply enjoying a cozy night in.


---


**Blog Post:**


When it comes to appetizers that steal the show, guacamole is undeniably a front-runner. There's something magical about the creamy texture of avocados enhanced by a medley of spices and fresh ingredients. Today, I invite you to experience a personal favorite: Spicy Seasoned Loaded Guacamole. This recipe not only excites the taste buds but also carries a piece of my family history, making it all the more special.


### A Nostalgic Journey


Growing up, Sunday afternoons were a sacred time in my family. It was a day dedicated to relaxation, laughter, and, most importantly, coming together over good food. My grandmother, a culinary wizard, always had the knack for taking simple ingredients and turning them into something extraordinary. Her guacamole was legendary, and I still remember the first time I watched her make it.


In her sunlit kitchen, the air was thick with anticipation. As she mashed the avocados with a well-loved fork, she would tell stories of her childhood in Mexico, where avocados were a staple at every meal. Her secret, she revealed with a wink, was a splash of white wine vinegar—a twist that added unexpected brightness to the dish.


The entire family would gather around the table, eagerly scooping up the guacamole with homemade tortilla chips. The conversation flowed as freely as the laughter, each bite a reminder of our shared heritage and the love that bound us together. Those afternoons left an indelible mark on my heart, and every time I make this guacamole, I feel my grandmother’s presence, guiding my hands and warming my spirit.


### Crafting the Perfect Guacamole


**Ingredients:**


- 2 ripe avocados


- 1 tablespoon lime juice


- 1 teaspoon white wine vinegar


- 1/4 cup finely chopped red onion


- 1 finely chopped serrano pepper (adjust for desired heat)


- 2 tablespoons chopped cilantro


- 1/2 cup diced Roma tomato


- Salt and black pepper to taste


- 1/2 teaspoon cumin


- 1/4 teaspoon garlic powder


**Instructions:**


1. In a medium bowl, begin by mashing the avocados until smooth yet chunky, achieving that perfect creamy consistency.


2. Mix in the lime juice and white wine vinegar, which not only enhance the flavor but also keep the guacamole vibrant and green.


3. Stir in the salt, black pepper, cumin, and garlic powder, ensuring each spice is evenly distributed to create a harmonious blend.


4. Incorporate the red onion, serrano pepper, cilantro, and diced Roma tomato, stirring gently to maintain the integrity of the ingredients.


5. Serve immediately for the freshest taste, or cover with plastic wrap directly on the surface to prevent browning if preparing ahead.


### Why You'll Love It


This Spicy Seasoned Loaded Guacamole is more than just an appetizer—it's an experience. The heat from the serrano pepper, the tang of vinegar and lime, and the aromatic spices come together in a dance of flavors that is as exciting as it is comforting. It’s a dish that invites you to slow down, savor each bite, and perhaps even create your own cherished memories around the table.


With a difficulty rating of 3 out of 10, this recipe is accessible to chefs of all levels, ensuring that anyone can recreate this family treasure. Whether you're hosting a lively gathering or enjoying a quiet evening, this guacamole is sure to impress.


So, next time you find yourself reaching for avocados at the market, remember this recipe and the warmth of shared stories and flavors. It’s a reminder that the simplest ingredients often hold the most profound connections. Enjoy!

Read more about Appetizers

Read more about Main Dishes

Read more about Desserts

Szechuan-Style Shirataki Noodles | Made by Meaghan Moineau

Szechuan-Style Shirataki Noodles | Made by Meaghan Moineau

# Spice Up Your Meals with Szechuan-Style Shirataki Noodles


Are you looking for an exciting twist to your weeknight dinners? Look no further! Our Szechuan-Style Shirataki Noodles are a flavorful, easy-to-make dish that will tantalize your taste buds and impress your family and friends. This recipe is packed with bold flavors and is the perfect combination of spicy, savory, and aromatic goodness. Plus, it’s a guilt-free indulgence, thanks to the low-calorie shirataki noodles. Get ready to dive into a delightful culinary adventure!


## A Family Tradition with a Twist


Growing up, family dinners were always a cherished time in our household. My mother, a culinary enthusiast, would often experiment with various global cuisines. One of my fondest memories is the first time she introduced us to Szechuan-style cooking. The spicy aroma that filled the kitchen was unlike anything I had ever smelled before. I remember sitting around the dining table, our eyes wide with anticipation, as she served us a dish that would soon become a family favorite.


Years later, I decided to recreate this dish with a modern twist by incorporating shirataki noodles. Not only did it bring back a flood of happy memories, but it also offered a healthier alternative without compromising on flavor. Sharing this dish with my own family has kept the tradition alive, and it’s now a staple in our home.


## Ingredients You’ll Need


- Shirataki noodles


- Protein of your choice (tofu, chicken, beef, or turkey)


- Soy sauce


- Dry rice wine


- Chili sauce


- Fresh ginger


- Green and white scallions


- Raw veggies (bell peppers, carrots, broccoli, etc.)


- Sesame oil


## Step-by-Step Instructions


1. **Prepare the Noodles**: Microwave the shirataki noodles for 1 minute on high. Drain them thoroughly, pat them dry, and set aside.


2. **Marinate the Protein**: In a bowl, combine soy sauce, rice wine, and chili sauce. Add your chosen protein and toss to coat. If using ground meat, mix thoroughly and set aside.


3. **Stir-Fry Magic**: Spray a non-stick skillet with vegetable oil and heat over high flame. Add fresh ginger and cook for about 30 seconds until fragrant. Add your raw veggies and stir-fry until they’re nearly al dente.


4. **Add Flavor and Protein**: Toss in the scallions and marinated protein. Continue to stir-fry until the protein is cooked through (1-2 minutes for tofu, soy, or turkey).


5. **Combine and Serve**: Add the shirataki noodles to the skillet, sprinkle with an additional 2 tsp. of soy sauce, and stir-fry for about 1 minute until heated through. Transfer to a serving bowl, drizzle with sesame oil, and toss.


## Dish Classification and Difficulty


- **Classification**: Main Dish


- **Difficulty**: 4/10


This delightful dish is not only easy to prepare but also offers a quick escape to the vibrant streets of Szechuan. Whether you’re a seasoned cook or a beginner, this recipe is straightforward and guaranteed to deliver a burst of flavor with every bite.


## Final Thoughts


Our Szechuan-Style Shirataki Noodles are more than just a meal—they’re a journey through family memories and culinary exploration. By combining traditional Szechuan flavors with the modern twist of shirataki noodles, this dish offers a perfect balance of health and taste. Gather your loved ones, share your own stories, and create new memories with this delightful recipe. Enjoy!

Read more about Appetizers

Read more about Main Dishes

Read more about Desserts

Neoguri (Spicy Seafood Ramen) | Made by Meaghan Moineau

Neoguri (Spicy Seafood Ramen) | Made by Meaghan Moineau

**Title: Embracing the Spice: Crafting Neoguri Ramen with a Splash of Family Nostalgia**


**Description:** Dive into a steaming bowl of Neoguri Ramen, a spicy seafood delight that's as heartwarming as it is mouthwatering. Infused with rich broth and adorned with fresh mussels, scallions, and seaweed, this recipe will transport you to the vibrant kitchens of Korea. Discover the simple joy of creating this dish and the cherished memories it evokes.


---


### Neoguri Ramen: A Taste of Tradition and Love


In the heart of every family kitchen, there lies a recipe that transcends time—a dish that brings comfort, joy, and a sense of belonging. For me, that recipe is Neoguri Ramen. This spicy seafood ramen is more than just a meal; it's a connection to my roots and a cherished family memory.


**Ingredients:**


- 1 pack Neoguri ramen


- 1 egg


- A handful of fresh mussels


- 1 green scallion


- 1 sheet of gim (seaweed)


**Instructions:**


1. **Prepare the Broth:** Start by bringing a pot of water to a rolling boil. Add the mussels and the sauce packets from the Neoguri ramen. Allow the mussels to cook for about 5 minutes. If using fresh mussels, watch for them to open and discard any that remain closed. This step is crucial as it deepens the broth's flavor, enveloping your senses with the aroma of the sea.


2. **Cook the Noodles:** Introduce the ramen noodles to the pot and let them cook for 2 to 3 minutes. This is where the magic of Neoguri happens, as the noodles absorb the spicy broth, becoming a canvas of flavor.


3. **Add the Egg:** For a silky, flaky texture, beat the egg and stir it into the pot in a circular motion. If you prefer a poached egg, gently slide it into the pot off to the side, letting it poach in the spicy embrace of the broth.


4. **Garnish and Serve:** While the ramen finishes cooking, thinly slice the scallion and cut the gim sheet into strips. Once the ramen is ready, transfer it to a serving bowl and top with the fresh scallions and seaweed. The garnish adds a burst of freshness and a hint of the ocean, elevating the dish to new heights.


**Difficulty:** 4/10


**Classification:** Main Dish


### A Nostalgic Journey


Every time I prepare Neoguri Ramen, I am transported back to my grandmother's kitchen, where the air was always filled with laughter and the rich aroma of spices. I remember sitting on a wooden stool, watching her deft hands work magic with simple ingredients. Her secret? A pinch of love and stories from her childhood that she shared as we cooked together.


One chilly winter evening, we crafted this very dish. The warmth of the spicy broth was a perfect contrast to the cold air outside. As we slurped the noodles, she shared tales of her life by the sea, of gathering fresh mussels and seaweed with her siblings. That evening, the kitchen became a bridge between past and present, and the ramen was the catalyst for connection.


**Conclusion**


Neoguri Ramen is more than a spicy seafood dish—it's a symbol of tradition, family, and the simple joys of life. Whether you're a seasoned cook or a beginner, this recipe invites you to savor each moment, creating not just a meal, but a memory. So gather your ingredients, embrace the spice, and let this dish become a cherished part of your family story.

Read more about Appetizers

Read more about Main Dishes

Read more about Desserts

Slow Cooker Spicy Hot Wings | Made by Meaghan Moineau

Slow Cooker Spicy Hot Wings | Made by Meaghan Moineau

**Title: "Slow Cooker Spicy Hot Wings: A Fiery Family Favorite"**


**Description: Discover the perfect blend of sweet and spicy with our Slow Cooker Spicy Hot Wings recipe. These wings are a crowd-pleaser, combining the heat of cayenne pepper and Louisiana hot sauce with the sweetness of brown sugar. Perfectly cooked in a slow cooker, they are then crisped to perfection under the broiler. Accompanied by a nostalgic family story, this dish is more than just an appetizer—it's a cherished memory on a plate.**


---


**Slow Cooker Spicy Hot Wings: A Fiery Family Favorite**


If you're a fan of bold flavors and effortless cooking, you're in for a treat with these Slow Cooker Spicy Hot Wings. This dish is a harmonious blend of heat and a hint of sweetness, perfectly balancing the fiery notes of cayenne pepper with the comforting sweetness of brown sugar. Rated a 4 out of 10 on the difficulty scale, this appetizer is not only easy to make but also promises to be a hit at any gathering.


**Ingredients**:


- 2 lbs regular chicken wings


- 1 cup Louisiana hot sauce


- 2 tablespoons brown sugar


- 2 teaspoons cayenne pepper


- 3 cloves garlic, crushed


- Cooking spray


**Instructions**:


1. In a medium mixing bowl, combine brown sugar, crushed garlic, hot sauce, and cayenne pepper. Mix well and set aside.


2. Spray the inside of your slow cooker and the chicken wings with cooking spray. This step ensures the wings remain juicy and packed with flavor.


3. Toss the wings in the bowl with the spice mixture, ensuring they are evenly coated.


4. Place the seasoned wings in the slow cooker and cook on low for 4 hours.


5. After the slow cooking is complete, carefully transfer the wings to a prepared cookie sheet.


6. Set your oven to the broiler setting and broil the wings for 4-6 minutes to achieve a crispy exterior.


7. Serve immediately with blue cheese dressing and celery for a classic pairing.


**A Nostalgic Wing Night**


Growing up, our family had a tradition of hosting "Wing Wednesdays." Every week, my mom would whip up a batch of her signature spicy hot wings, and the entire house would be filled with the tantalizing aroma of garlic and hot sauce. It was a night we all looked forward to, not just for the delicious wings but for the laughter and stories shared around the dinner table.


One particular evening stands out in my memory. It was a chilly winter night, and the snow had begun to pile up outside. The warmth of the kitchen, coupled with the spice of the wings, created a cozy haven. My brother, who had a notoriously low tolerance for spicy food, dared to try one of the wings. His face turned as red as the hot sauce, and we all erupted into laughter as he reached for a glass of milk. It became a running joke in our family, and to this day, every time we make these wings, we reminisce about that night.


These Slow Cooker Spicy Hot Wings are more than just an appetizer; they're a testament to family, warmth, and the simple joys of sharing a meal with loved ones. Whether you're hosting a game day or simply craving something spicy, this recipe is sure to bring people together. Enjoy the heat, savor the sweetness, and make your own memories around the table.

Read more about Appetizers

Read more about Main Dishes

Read more about Desserts

Fire-Breathing Dragon Pasta | Made by Meaghan Moineau

Fire-Breathing Dragon Pasta | Made by Meaghan Moineau

# Unleash the Heat: Mastering Fire-Breathing Dragon Pasta


### A Fiery Culinary Adventure with a Nostalgic Twist


If you’re on the hunt for a dish that combines bold flavors with a touch of nostalgia, look no further than Fire-Breathing Dragon Pasta. This vibrant recipe not only delivers a spicy kick but also warms the heart with memories of family gatherings and shared laughter. Dive into this culinary journey where robust ingredients come together to create a main dish that’s both memorable and mouth-watering.


### Ingredients for a Fiery Feast


- 1 yellow onion, diced


- 2 tablespoons olive oil


- Salt and pepper to taste


- 3 cloves garlic, minced


- 2 chipotles in adobo sauce


- 2 skinless boneless chicken breasts, cubed


- 1 teaspoon Italian seasoning


- 1 cup tomato sauce


- 1 teaspoon red pepper flakes


- ½ pound shrimp, peeled and deveined


- 1 cup whole heavy cream


- ½ cup sour cream


- 1 pound pasta (such as spaghetti)


- 2-3 red dried chile peppers


- Freshly grated Parmesan cheese


### Instructions: Igniting the Culinary Flame


1. **Prep the Base:** In a large, deep-sided skillet or medium-sized saucepan, heat two tablespoons of olive oil over medium heat. Add the diced onion and sauté until tender and translucent. Season with salt and pepper to taste.


2. **Build the Flavor:** Stir in the minced garlic and sauté until fragrant. Add the chipotles, cubed chicken, and Italian seasoning. Season again with salt and pepper, ensuring each piece of chicken is well-coated. Sauté, turning the chicken to sear on all sides.


3. **Simmer the Sauce:** Pour in the tomato sauce and sprinkle with red pepper flakes. Bring the mixture to a simmer and continue to cook for about ten minutes, or until the chicken is cooked through.


4. **Prepare the Pasta:** While the sauce simmers, cook the pasta to al dente according to package directions. Add the dried chiles to the boiling water with the spaghetti to infuse it with subtle heat.


5. **Complete the Dish:** Add the shrimp and heavy cream to the sauce, stirring gently. Slowly incorporate the sour cream, maintaining a slow simmer. Cook until the shrimp begin to curl, indicating they are perfectly done.


6. **Serve with Flair:** Remove the skillet from heat and serve the sauce over drained pasta (remember to remove the dried chiles). Finish with a generous sprinkle of freshly grated Parmesan cheese.


### A Nostalgic Flavor Journey


The inspiration for Fire-Breathing Dragon Pasta hails from family get-togethers in the heart of summer. I vividly recall the lively backyard barbecues where my uncle, a self-proclaimed spice aficionado, would challenge us with his fiery culinary creations. Each dish was a testament to his adventurous spirit and love for bold flavors. His signature pasta, which we lovingly nicknamed the "Fire-Breathing Dragon," became a family favorite, sparking laughter and a few teary eyes from the heat. Recreating this dish is like reliving those cherished moments, where the warmth of family and fiery flavors blend seamlessly.


### Recipe Difficulty & Classification


- **Difficulty:** 6/10


- **Classification:** Main Dish


Embrace the heat and nostalgia with Fire-Breathing Dragon Pasta. It’s a dish that not only tantalizes your taste buds but also brings a piece of cherished family history to your table. Perfect for those who dare to spice up their culinary repertoire, this recipe promises an unforgettable dining experience.

Read more about Appetizers

Read more about Main Dishes

Read more about Desserts

Blueberry-Lavender Sauce and Ginger Snap Ice Cream Cups | Made by Meaghan Moineau

Blueberry-Lavender Sauce and Ginger Snap Ice Cream Cups | Made by Meaghan Moineau

### Title: A Symphony of Flavors: Blueberry-Lavender Sauce & Ginger Snap Ice Cream Cups


#### Description:


Dive into the delightful world of culinary nostalgia with this exquisite dessert recipe. Discover how the harmonious blend of blueberry-lavender sauce and ginger snap ice cream cups can transport you to cherished family moments. With a difficulty level of 5 out of 10, this dessert is perfect for those looking to impress without the stress. Ideal for summer gatherings or a cozy evening treat, this dish will surely become a family favorite.


---


#### A Taste of Tradition: Blueberry-Lavender Sauce & Ginger Snap Ice Cream Cups


There's something extraordinarily comforting about the aroma of blueberries simmering on the stove, mingling with the floral notes of lavender. It's a scent that instantly transports me back to summer afternoons spent in my grandmother's kitchen. She had a knack for turning simple ingredients into magical creations, and her Blueberry-Lavender Sauce was no exception. Paired with the crunch of ginger snap ice cream cups, this dessert was a staple at our family gatherings.


##### Ingredients You'll Need:


- **For the Blueberry-Lavender Sauce:**


- Fresh blueberries


- Dried lavender buds


- Sugar


- Cornstarch


- Lemon juice


- Salt


- **For the Ginger Snap Ice Cream Cups:**


- Ginger snap cookies


- Butter


- Sugar


- Salt


- Your choice of ice cream (vanilla bean, lemon curd, or peach work beautifully)


##### Instructions:


1. **Make the Blueberry-Lavender Sauce:**


- In a small saucepan, bring the blueberries, lavender, sugar, and cornstarch to a boil.


- Lower the heat and let it simmer for about 5 minutes until the mixture thickens slightly.


- Remove from heat and stir in the lemon juice and a dash of salt.


- This versatile sauce is not only perfect for this dessert but also pairs wonderfully with pancakes, pound cake, or cheesecake.


2. **Prepare the Ginger Snap Ice Cream Cups:**


- Preheat your oven to 300°F (150°C).


- Grind the ginger snap cookies in a food processor. Alternatively, place them in a zip bag and crush them with a rolling pin.


- Mix the ground cookies with melted butter, sugar, and a pinch of salt.


- Lightly spray a muffin tin with non-stick spray.


- Scoop about 2 tablespoons of the cookie mixture into each muffin cup.


- Press each scoop with a small cup to shape them into mini cups.


- Bake for 12-15 minutes. Allow them to cool completely before gently lifting them out with your fingers or a small knife.


- Makes about 10 cups.


3. **Assemble the Dessert:**


- Place one scoop of your preferred ice cream in each ginger snap cup.


- Generously top with the blueberry-lavender sauce.


##### A Nostalgic Story:


Growing up, summer vacations meant one thing—spending time at my grandmother's house. Her backyard was a treasure trove of wildflowers and berry bushes. I remember running through the garden, my fingers stained with blueberry juice, as Grandma called us back to the kitchen. There, amidst the warmth and chatter, she would teach us the art of making her beloved blueberry-lavender sauce. The sweet, tangy aroma filled the air, making our mouths water in anticipation.


The ginger snap ice cream cups were a later addition, a recipe my mother introduced after discovering it in an old cookbook. Together, they created a symphony of flavors—sweet, spicy, and floral—that became synonymous with family gatherings. Each bite was a journey back in time, a reminder of those carefree days filled with laughter and love.


##### Difficulty Rating: 5/10


This dessert is straightforward to prepare, making it a great choice for both novice and experienced bakers. The key lies in balancing the flavors and not rushing the process.


##### Classification: Dessert


Perfect as a delightful conclusion to any meal, this dessert shines at both casual get-togethers and more formal occasions. Its unique blend of flavors will leave a lasting impression on your guests.


Embrace the nostalgia and create new memories with this delightful dessert. Your family and friends will thank you for it!

Read more about Appetizers

Read more about Main Dishes

Read more about Desserts