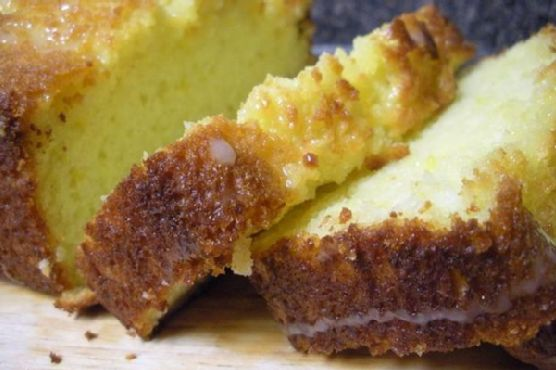
A few weekends ago, I had one of those mornings where you wake up craving something fresh and sunny to get your day going. It was gray and drizzly outside, and I wanted to bring a bit of brightness into the day. As I scanned my pantry, I spotted a forgotten lime yogurt, an orange rolling around with a couple of lemons in the fruit drawer, and a plan began to form. This Triple Citrus Cake is the kind of bake that feels like an instant mood-lifter. It’s got that perfect balance of tangy and sweet, and it’s way simpler than it sounds. Plus, it’s the kind of cake where you might already have most of the ingredients just hanging around. Every bite is like a little burst of sunshine, which sometimes is just what you need.
Jump to Recipe
What You’ll Need
Let me tell you, the best part about this ingredient list is that it’s the kind of thing you probably already have on hand. Here’s what you’ll need to create your own slice of citrusy heaven:
- 1 1/2 cups flour
- 2 teaspoons baking powder
- 1/2 teaspoon salt
- 3/4 cup lime yogurt
- 1 cup sugar
- 3 whole eggs
- 1 teaspoon vanilla extract
- 1/2 cup grapeseed oil
- Zest of 1 lemon
- 1/4 cup orange juice
- 1 cup powdered sugar
How to Make Triple Citrus Cake
- Preheat your oven to 350 degrees. You want it nice and warm, ready to give your cake a cozy bake.
- In a medium bowl, whisk together the flour, baking powder, and salt. This is your dry team; they’ll hang out together until called.
- Grab your electric mixer and in a larger bowl, beat together the lime yogurt, eggs, sugar, vanilla, oil, and lemon zest. It’ll look silky smooth and smell divine.
- Gently fold the dry ingredients into the wet mixture using a spatula. You’re aiming for a batter that’s just combined; over-mixing is a no-go here.
- Coat a 9 x 5 loaf pan with floured baking spray or line with parchment paper and spray. Pour the batter in, smoothing the top so it’s even.
- Bake for 40-50 minutes, or until a cake tester comes out clean. The top will be golden brown and your kitchen will smell like citrus heaven.
- Let the cake cool in the pan for at least an hour. Patience, my friend. The wait is worth it.
- Once cool, transfer to a serving plate. Mix the powdered sugar with orange juice until you have a smooth glaze, then drizzle it over the cake. Watch as it glistens invitingly.
Cook’s Notes
When it comes to baking, patience is key, especially in letting the cake cool before you apply the glaze. Trust me, you don’t want to rush it or you’ll end up with a soggy mess. The cake keeps well for 3-4 days if covered tightly and stored at room temperature, though I doubt it’ll last that long! If you’re planning to make it ahead, bake the cake and store the glaze separately. Glaze just before serving for the best texture.
Make It Your Own
Looking to switch things up? Here are a few ideas:
- Swap the lime yogurt for Greek yogurt and add a bit more lemon zest for an extra lemony punch.
- Replace grapeseed oil with melted coconut oil for a subtle coconut twist.
- Add a handful of poppy seeds to the batter for a delightful texture and a bit of visual flair.
- Use a mix of blood orange juice for the glaze if you want a richer color and slightly different taste.
If you try this, I’d love to hear how it turns out — drop a comment or tag me in your cake pics! It always makes my day to see your creations. Happy baking! 🍋🍊🍋
Related update: Triple Citrus Cake
Related update: Roasted Strawberry Coconut Milk Ice Cream
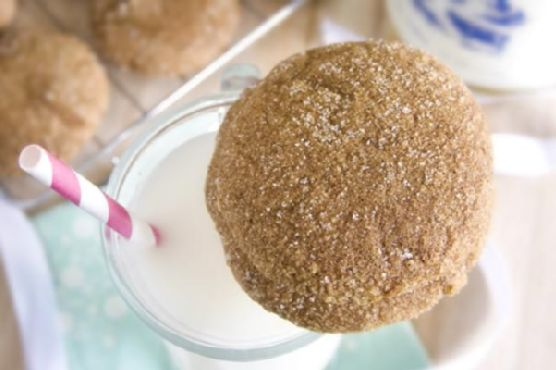
The other day, I found myself in one of those classic kitchen dilemmas. It was a chilly autumn afternoon, I was craving something warm and spicy, and I swear, every recipe I came across called for ingredients I didn’t have on hand. Determined not to let my sweet tooth win, I started rummaging through my pantry, and that’s when it hit me: fat-free gingerbread cookies! Yes, you read that right. These cookies are just what you need when you crave that cozy, ginger-spiced goodness but want to keep things light. Trust me, these cookies are packed with bold flavors, and you might already have most of these ingredients at home. Plus, they’re soft, chewy, and perfect for an afternoon treat or a holiday gathering.
Jump to Recipe
What You’ll Need
Okay, so these cookies are awesome because aside from being fat-free, they use simple ingredients that pack a punch. Here’s what you’ll need:
- All-purpose flour
- Whole wheat flour
- Baking soda
- Salt
- Ground ginger
- Cinnamon
- Ground cloves
- Black pepper
- Fresh ground nutmeg
- Ground allspice
- Dark brown sugar
- Blackstrap molasses
- Apple sauce
- Vanilla extract
- Maple extract
- Chai concentrate
- Egg whites
- Candied ginger
- Granulated sugar
- Cinnamon (for rolling)
How to Make Fat Free Gingerbread Cookies
- Start by sifting together the all-purpose flour, whole wheat flour, baking soda, salt, and all your spices. You’ll know it’s ready when the spices smell like a warm hug.
- In a large mixing bowl, combine the dark brown sugar, blackstrap molasses, apple sauce, vanilla extract, maple extract, and chai concentrate. Use an electric mixer and beat it for about four minutes until everything’s smooth and luscious.
- Add the egg whites into your molasses mixture. Beat for another minute until the whites are completely mixed in.
- Slowly incorporate your sifted dry ingredients into the wet mixture. Beat until everything is fully combined, creating a rich, aromatic dough. Stir in the candied ginger bits for that extra zing.
- Cover the dough and let it chill in the fridge for at least an hour. I personally prefer letting it chill overnight for a deeper flavor.
- When you’re ready to bake, preheat your oven to 350°F (175°C). Line a baking sheet with parchment paper or lightly grease it.
- Mix the granulated sugar with a dash of cinnamon in a shallow bowl. Scoop a tablespoon of dough, coat it in the cinnamon sugar, and shape it into a ball.
- Place each dough ball on the prepared baking sheet, leaving about three inches of space between them. They will spread out as they bake.
- Bake the cookies for 10-12 minutes until they’re beautifully puffed and you start to smell that delightful gingerbread aroma.
- Once out of the oven, transfer the cookies to a wire rack to cool. Trust me, waiting for them to cool is the hardest part!
Cook’s Notes
Baking these cookies is pretty straightforward, but here are a few tips to ensure they turn out perfect every time. First, don’t skip the chilling step. It helps the flavors meld together and keeps the dough from spreading too much. If you’re planning ahead, you can make the dough and keep it in the fridge for up to two days. Just remember to let it sit at room temperature for a few minutes if it’s too hard to scoop. For leftovers, these cookies stay fresh for about a week if kept in an airtight container. You can also freeze them for longer storage—just thaw before serving.
Make It Your Own
These cookies are versatile, so feel free to experiment with these ideas:
- Swap the candied ginger for chocolate chips if you’re feeling a chocolate craving coming on.
- Use pumpkin pie spice instead of the individual spices for a quicker spice mix.
- Replace the chai concentrate with a strong brewed tea of your choice for a subtle flavor twist.
- If you want a little crunch, add some finely chopped nuts like pecans or walnuts.
If you try this, I’d love to hear how it turns out—drop a comment or tag me! Baking is all about experimenting and having fun, so don’t be afraid to make these cookies your own. Enjoy every spicy, soft bite!
Related update: Fat Free Gingerbread Cookies
Related update: Triple Citrus Cake
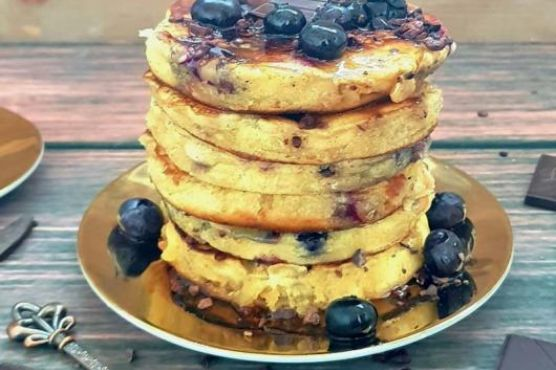
Last Tuesday morning was one of those days where I just needed a little something extra to kickstart the day. You know the ones — when your brain is stuck somewhere between sleep and waking, your mug of coffee is feeling more like a warm hug than a caffeine fix, and breakfast needs to be something special but not overly demanding. That’s when these Blueberry, Chocolate & Cacao Superfood Pancakes came to the rescue. They’re those perfect pancakes that feel like you’re treating yourself to something really indulgent, yet they’re totally guilt-free. Plus, they’re gluten-free, paleo, and vegan! It’s like a breakfast trifecta. Ready to dive in? Trust me, these are worth the short time it takes to whip them up.
Jump to Recipe
What You’ll Need
Here’s the best part: chances are you already have most of these goodies hanging out in your pantry. No need for a special trip to the store when the craving hits!
- Almond flour
- Coconut flour
- Tapioca or arrowroot flour
- Nut, hemp, or coconut milk
- Baking powder
- Vanilla bean paste or extract
- Himalayan sea salt
- Frozen blueberries
- Cacao nibs
- Dark chocolate
How to Make Blueberry, Chocolate & Cocao Superfood Pancakes – Gluten-Free/Paleo/Vegan
- Grab a mixing bowl and combine the almond flour, coconut flour, and tapioca or arrowroot flour with the baking powder and a pinch of Himalayan sea salt. Give it a good mix until everything is nicely blended.
- Pour in the nut, hemp, or coconut milk along with the vanilla bean paste or extract, and whisk it all together until you have a smooth, dreamy batter. Let this beauty sit for 10-15 minutes. It’s like letting the batter take a mini-vacation to thicken up.
- Heat a smidge of coconut oil in your favorite skillet over medium heat. Once it’s warm and cozy, pour just enough batter into the center to form a pancake.
- Cook until the edges start to brown and you see bubbles gracing the surface. This is your cue to sprinkle a few blueberries on the pancake.
- Flip the pancake with confidence, cook for another minute or two, then immediately sprinkle cacao nibs and dark chocolate on the top. Let them melt and meld into pure bliss.
- Remove the pancake once fully cooked and repeat with the rest of the batter. Stack them up, drizzle with a little agave if you’re feeling it, and savor the moment!
Cook’s Notes
These pancakes are wonderfully adaptable, so don’t stress if you’re missing an ingredient. You can even mix the dry ingredients the night before to save a few precious minutes in the morning rush. Storing leftovers? Just pop them in an airtight container in the fridge, and they’re good for a couple of days. Reheat in a skillet over low heat or simply enjoy them cold. Making a larger batch and freezing them is also an option; just layer parchment paper between each pancake to keep them from sticking together.
Make It Your Own
- Swap out the frozen blueberries for fresh raspberries or chopped strawberries for a berry twist.
- Substitute the cacao nibs with crushed pecans or walnuts for a nutty crunch.
- If you’re not strictly vegan, a spoonful of Greek yogurt with honey makes an unbeatable topping.
- For a tropical flair, toss in a handful of shredded coconut before flipping.
If you try this, I’d love to hear how it turns out — drop a comment or tag me! Enjoy every delicious bite of these pancakes, knowing you’re starting the day in the best way possible. 😊
Related update: Blueberry, Chocolate & Cocao Superfood Pancakes – Gluten-Free/Paleo/Vegan
Related update: Breakfast Biscuits and Gravy