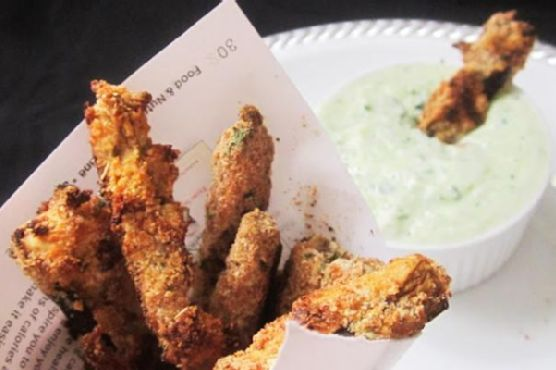
Picture this: it’s a lazy Sunday afternoon, and I’m in my kitchen staring down a couple of eggplants that have been lounging in my crisper drawer for a bit too long. It’s one of those days where I desperately want something crispy and satisfying, but without the guilt that comes with a giant bowl of fries. Enter: Eggplant Fries with Tzatziki Sauce. These little guys are a revelation—they’re crunchy, flavorful, and come with a cool, tangy dipping sauce that just hits the spot. The best part? They’re baked, not fried, so you get all the crunch with none of the extra oil. They’re also perfect for when you’re hosting friends and need an appetizer that’s impressively delicious yet deceptively simple to make. Seriously, your friends will be raving about these.
Jump to Recipe
What You’ll Need
What’s great about this recipe is that it’s likely you already have most of these ingredients lounging in your pantry. The secret is in the mix of spices and the creamy yogurt that coats the eggplant before it bakes to crispy perfection. Here’s the crew you’ll need:
- Eggplants – the star of the show!
- Italian seasoning mix – for that herby kick.
- Bread crumbs – to give our fries that crispy crunch.
- Low fat plain yogurt – adds creaminess and tang.
- Egg – helps bind everything together.
How to Make Eggplant Fries with Tzatziki Sauce
- Preheat your oven to 450°F. This is key for achieving that glorious crunchy exterior on the fries. Trust me, a hot oven is your best friend here.
- Mix together a pinch of salt, garlic powder, Italian seasonings, and a dash of paprika in a bowl. This mixture will become your flavor-packed coating.
- In another bowl, whisk together the yogurt and egg until you have a smooth mixture. This will act as the glue to hold those delicious breadcrumbs.
- Slice your eggplants into strips—think classic fry shape. Dunk each strip into the yogurt and egg mix, allowing any excess to drip off.
- Roll the coated eggplant strips in the breadcrumb mix, making sure each piece is covered well. This is what’s going to give you that irresistible crunch.
- Place the breaded eggplant strips onto a parchment-lined or greased baking pan, making sure they have some breathing room. You want them to bake, not steam.
- Pop them into the oven and bake for about 10-15 minutes, rotating once halfway through. They’re done when they’re slightly brown and smell absolutely divine.
Cook’s Notes
- Don’t overcrowd your baking sheet. The eggplant needs space to crisp up, so if you’re making a big batch, use two sheets or bake in batches.
- If you find your eggplant fries aren’t browning as much as you’d like, you can pop them under the broiler for a minute or two—just keep a close eye to prevent burning.
- These fries are best enjoyed fresh out of the oven, but if you have leftovers, they can be stored in an airtight container in the fridge for up to two days. To reheat, just pop them back into the oven at 400°F for a few minutes.
Make It Your Own
- Want to go gluten-free? Swap out the bread crumbs for a gluten-free variety, or try crushed cornflakes for an extra crunch.
- For a spicy twist, add a teaspoon of cayenne pepper to the breadcrumb mix. It’ll give your fries a nice kick.
- If you’re out of Italian seasoning, get creative with what you have on hand—oregano, thyme, or even a hint of rosemary can work wonders.
- No yogurt? No problem. Buttermilk or a splash of milk with a squeeze of lemon can substitute in a pinch.
If you try this, I’d love to hear how it turns out—drop a comment or tag me! Your kitchen adventures always make my day. Happy cooking, friends!
Related update: Eggplant Fries with Tzatziki Sauce
Related update: Breaded Shrimp and Spicy Mayo Appetizer

TL;DR
- Arne Slot’s Liverpool exit on May 30, 2026—after a 2024/25 title and a 2025/26 fifth-place slide—forces a tactical and payroll reset; the successor choice could swing eight-figure UEFA income and multiple careers. [2][3][4]
- The consensus centers on Andoni Iraola, whose high-press, wide-lane system would immediately reshape roles for Florian Wirtz, Jeremie Frimpong, and Milos Kerkez at Anfield. [1][5][6]
- The decisive edge won’t be “bounce” but system–squad fit: aligning Iraola’s vertical press with a roster assembled for Slot’s controlled build-up while protecting Champions League revenue margins. [1][3][4][5]
What the source said
Sports Illustrated casts Liverpool’s sacking of Arne Slot two years after his June 2024 start as a split dressing-room moment, naming Florian Wirtz, Curtis Jones, Milos Kerkez, and Jeremie Frimpong as “winners,” and Cody Gakpo and Ryan Gravenberch as “losers.” The piece cites 2025/26 outputs—Wirtz’s 15 goal involvements in 49 matches and Frimpong’s 3 in 35—as evidence that usage under Slot dulled certain profiles. It also places Andoni Iraola, coming off Bournemouth, as the near‑term favorite to take over at Liverpool in 2026. [1][8]
Why it matters
Fenway Sports Group’s football leadership—Michael Edwards (FSG CEO of Football) and Richard Hughes (sporting director)—must now hire a coach whose game model fits pieces acquired in 2024–26; after finishing fifth and 25 points behind Arsenal in 2025/26, Liverpool put Champions League qualification and its wage bill under immediate pressure. The wrong fit could suppress outputs for Wirtz and Frimpong and force discount exits in 2026/27. [3][9][2]
UEFA’s revamped distributions widen the financial cliff. The Champions League equal-share “starting fee” is about €18.62m per club, while the Europa League’s equal-share pot is €155m spread across 36 teams—around €4.31m per club—before performance, coefficient, and market/value pillars. That baseline delta is roughly €14.31m per season, excluding additional upside tied to results and historical ranking. [4][7]
Original analysis
Contrarian read
- Consensus: Iraola is the antidote to Slot’s slower, inside-channel build-up and will “free” Liverpool’s wide threats.
- Counter: the promise only materializes if Liverpool embrace his principles—press-first, wide-lane occupation, fast verticals, and full-backs as true overlap threats. Asking the current group to mimic Iraola-ball without retooling spacing and pressing triggers risks transition leaks more than chance creation. Iraola has publicly described the regain-to-nine immediacy and risk–reward of his model; it lives on field occupation and rest-defense starting positions. [5][6]
2×2: Fit vs. full-back role
- Axes: Manager pressing intensity (High vs. Moderate) x Full-back usage (Wide/overlap vs. Inverted/inside).
- Klopp 2018–22: High press + Wide/overlap; Trent Alexander-Arnold and Andy Robertson were primary chance creators from the sides.
- Slot 2024–26: Moderate-to-high press + More inverted/controlled build-up with full-backs stepping inside.
- Iraola 2023–26: High press + Wide/overlap with aggressive verticals and early diagonals. [2][5][6]
- Implication: If Iraola arrives in 2026, Frimpong and Kerkez should live on the outside lane again; Wirtz must receive between lines with overlaps outside him. That geometry echoes Klopp-era spacing more than Slot’s inside-out patterns—and it dictates recruitment for touchline wingers and overlap-heavy full-backs. [1][5][6]
Back-of-envelope money math
- UEFA Champions League equal-share: €18.62m per club. [4]
- UEFA Europa League equal-share: €155m/36 ≈ €4.31m per club. [7]
- Baseline delta: ≈ €14.31m per season, before performance, coefficient, and market/value pillars that add further millions. [4][7]
- Point: tactical fit isn’t aesthetic; it’s financial risk management tied to 2026/27 European qualification.
Named-stakeholder breakdown
- FSG (Michael Edwards/Richard Hughes): Their 2024 restructuring promised process discipline; a mis-hire now risks burning eight figures of UEFA distributions and devaluing key assets, while a good fit re-rates Wirtz/Frimpong/Kerkez on the balance sheet in 2026. [9][4][7]
- Andoni Iraola: A high-press teacher with proof at Rayo Vallecano (La Liga, Madrid) and Bournemouth (Dorset) from 2020–2026; Anfield will demand alignment on wide profiles and pressing triggers rather than miracles. [5][6]
- Florian Wirtz: He posted 11 goals and 11 assists for Bayer Leverkusen in 2023/24; he excels receiving between lines with overlaps outside. Park him wide and his per-90 output drops. [10]
- Jeremie Frimpong: As an overlapping RB/wing-back, he logged double-digit G/A seasons and 1,000+ sprints in the 2023/24 Bundesliga; conservative RB usage blunts his value. [1][10]
- Cody Gakpo: Slot gave him 52 appearances and 9 goals in 2025/26; with academy winger Rio Ngumoha emerging and a likely senior wide addition in 2026, his minutes compress unless he spikes early output. [1]
What others are missing
The non-negotiables of Iraola’s attack—not his name—drive outcomes in 2026/27: wide and high full-backs, relentless lane occupation, and immediate verticals into the No.9 within the first five seconds after regain. Those choices create central pockets for Wirtz and on-the-move receptions for Frimpong and Kerkez; Slot’s inside-channel, slower build-up produced different rest-defense and spacing trade-offs. If Edwards and Hughes back Iraola, they must restore touchline width from full-backs and accept a wider rest-defense shell to protect transitions. Skip that structural reset and Liverpool will strand two space-runners—Frimpong and Kerkez—who rarely receive in stride. [5][6][1]
What to watch next
- By June 15, 2026, Liverpool announce Andoni Iraola as head coach; if they do not, expect a tactical pivot away from high-press, wide-full-back principles. [3][8]
- By September 1, 2026, Liverpool either sell or loan Cody Gakpo, or start a newly signed senior winger in at least 3 of the first 5 Premier League matches of 2026/27—evidence of a reset in the wide rotation. [1]
- By December 31, 2026, Wirtz posts non-penalty goals+assists of ≥0.60 per 90 across ≥900 league minutes if used centrally with overlaps outside; failure to clear that mark signals continued misuse toward the ~0.30/90 tier cited under Slot. [1][10]
My take
I’d hire Iraola in 2026 only with a written mandate for his geometry: wide full-backs, fast vertical regains, and Wirtz as a between-lines hub with Frimpong/Kerkez attacking outside. That structure revives a Klopp-adjacent identity the Kop recognizes and protects a €14–25m annual European revenue swing tied to qualification and distributions. [4][7] Miss the structural piece and you get tired presses, stranded full-backs, and a multi‑million shortfall the accountants will notice in 2026/27. Fit beats slogans at Anfield.
Sources
- The Winners, Losers From Arne Slot’s Liverpool Departure — Sports Illustrated (https://www.si.com/soccer/winners-losers-arne-slot-liverpool-departure) — Names winners/losers, cites 2025/26 production (e.g., Wirtz 15 G/A in 49; Frimpong 3 in 35), and flags Iraola as likely successor.
- Liverpool closing in on new manager appointment after shock Arne Slot sack bombshell — FourFourTwo (https://www.fourfourtwo.com/person/coaches-managers/liverpool-closing-in-on-new-manager-appointment-after-shock-arne-slot-sack-bombshell) — Context on Slot’s dismissal plus first‑season title and 2025/26 slump.
- El Liverpool destituye a Arne Slot — El País (https://elpais.com/deportes/futbol/2026-05-30/el-liverpool-destituye-a-arne-slot.html) — Reports May 30, 2026 sacking, 25‑point gap to Arsenal, and UCL quarterfinals.
- Financial Report 2024/25 (UEFA) — UEFA.com (https://editorial.uefa.com/resources/02a1-1fcc539a26d9-78ac6793e755-1000/20260113_enclosure_04_financial_report_2024-25_en.pdf) — Sets 2024–27 distributions, including €18.62m UCL equal-share per club.
- Andoni Iraola explains the high-risk tactics behind his Bournemouth transformation — Sky Sports (https://www.skysports.com/football/news/11670/13235389/andoni-iraola-explains-the-high-risk-tactics-behind-his-bournemouth-transformation-before-arsenal-test) — Iraola’s own description of pressing and transition cues.
- Andoni Iraola tactics watch — The Coaches’ Voice (https://learning.coachesvoice.com/cv/andoni-iraola-tactics-bournemouth-vallecano/) — Independent breakdown of Iraola’s vertical press, rest-defense, and full-back roles.
- UEFA Circular No. 32/2025 and Europa League split — UEFA.com (https://editorial.uefa.com/resources/029a-1e0b5460b86d-31e6cad26358-1000/20250616_circular_2025_32_en.pdf) — Confirms UEL total (€565m) with 27.5% (€155m) as equal shares; ≈€4.31m per club across 36 teams.
- Arne Slot begins role as Liverpool FC head coach — Liverpool FC (https://www.liverpoolfc.com/news/arne-slot-begins-role-liverpool-fc-head-coach) — Official timing of Slot’s start in June 2024, anchoring the two‑season window.
- Richard Hughes appointed sporting director; Michael Edwards returns as FSG CEO of Football — ESPN (https://www.espn.com/soccer/story/_/id/39770016/liverpool-appoint-new-sporting-director-post-klopp-shake-up) — Confirms decision-makers shaping the 2026 hire and recruitment model.
- Bundesliga 2023/24 stats: Frimpong and Wirtz — Bundesliga.com (https://www.bundesliga.com/en/bundesliga/news/bayer-leverkusen-florian-wirtz-the-complete-midfielder-29628) — Documents Wirtz’s 11G+11A and Frimpong’s elite output in Leverkusen’s 2023/24 season.
Related update: We recently published an article that expands on this topic: read the latest post.
Related update: We recently published an article that expands on this topic: read the latest post.
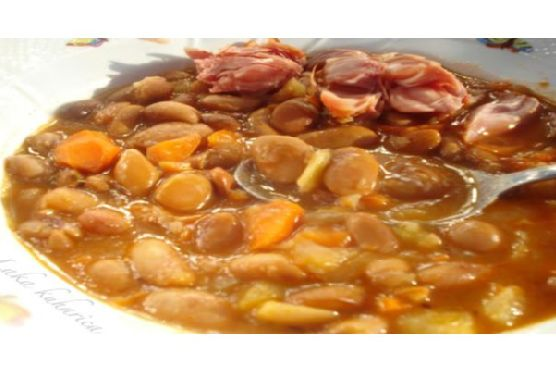
Picture this: It’s a chilly Tuesday evening, and the last thing you want to do is spend hours in the kitchen after a long day. But you’re craving something warm and fulfilling, something that feels like a hug in a bowl. Enter my Beans With Smoked Pork Hock — a dish I stumbled upon during a desperate weeknight scramble when all I had were pantry basics and a lonely smoked pork hock languishing in the freezer. This recipe is the hero of cozy weeknight dinners, rich with smoky depth and packed full of comforting flavors. The beauty of it lies in its simplicity; it’s the kind of meal that lets you put in minimal effort yet rewards you with a nourishing, soul-warming bowl of happiness.
Jump to Recipe
What You’ll Need
It’s likely you’ve got most of these hanging around your kitchen already. This shopping list is delightfully short and sweet, focusing on a few key ingredients that pack a punch.
- Smoked pork hock
- 1 onion
- 2 garlic cloves
- 1 bay leaf
- 2 cups dried beans, soaked overnight
- 1 vegetable cube
- 2 carrots
- Celery root
- Salt and pepper to taste
- A nice loaf of black bread
How to Make Beans With Smoked Pork Hock
- Start by soaking your beans the night before. Trust me, you’ll thank yourself tomorrow when the beans are perfectly plump and ready to soak up all that deliciousness.
- Rinse the smoked pork hock under cold water and remove the skin. This is where the magic begins — the smokiness of the pork hock will infuse everything with flavor.
- In a large pan, combine the onion, pork hock, beans, bay leaf, and garlic. Your kitchen should start smelling like the warm-up to a grand meal.
- Pour enough water to cover the beans and meat, then crumble in the vegetable cube. Bring everything to a gentle simmer.
- Let it all cook for a good 60 minutes on low heat, with the lid on. This is when you can kick back and relax, maybe with a glass of wine in hand.
- Fifteen minutes before the end, chop the carrots and celery root in a blender or roughly by hand if you like it chunkier. Add them to the pot and give everything a good stir.
- Once the beans are tender and the flavors have melded, fish out the pork hock. Tear it into smaller, bite-sized pieces — perfect for mingling with the beans.
- Don’t forget to remove the bay leaf. This little soldier has done its job.
- Season with salt and pepper to your liking. Serve the beans with those deliciously shredded pieces of pork and a hearty slice of black bread.
Cook’s Notes
Let’s chat about some practical tips. First, if you forget to soak the beans overnight (we’ve all been there), a quick soak method works too: boil them for 1-2 minutes, then let them sit off the heat for an hour. For storage, leftovers can be kept in the fridge for up to three days and they freeze beautifully. Just be sure to store the beans and meat separately for best results. When reheating, add a splash of water to loosen things up.
Make It Your Own
Here’s where you can play around and make this recipe truly yours:
- Swap the smoked pork hock for a smoked turkey leg if you’re feeling adventurous or simply want to switch up the protein.
- Try using kidney or black beans instead of your regular go-to beans for a different texture and color.
- Add a pinch of red pepper flakes for a bit of warmth and spice if you like a little kick.
- If you’re feeling extra, throw in some diced potatoes along with the carrots and celery for added heartiness.
If you give this recipe a whirl, I’d love to hear how it turns out for you! Drop a comment below or tag me in your culinary creations. Happy cooking, friends!
Related update: Beans With Smoked Pork Hock
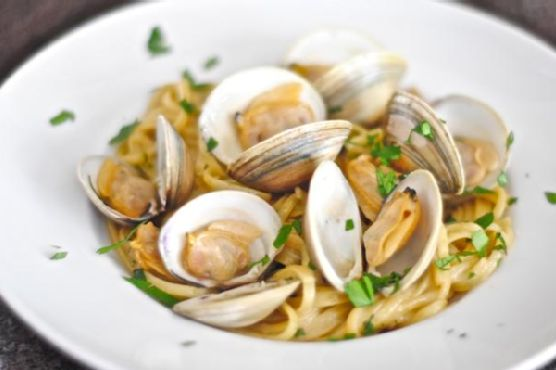
It was one of those weeknights when I opened the fridge and stared blankly, hoping dinner would magically appear. With only a few clams left from last weekend and some trusty linguine, I decided it was time to whip up my favorite Linguine with Clams in Garlic White Wine Sauce. It’s one of those dishes that sounds fancy—and tastes even fancier—but it’s surprisingly forgiving and quick to prepare, perfect for a midweek pick-me-up. By the time the pasta was perfectly al dente, my kitchen smelled like a cozy little Italian trattoria. My secret weapon? Loads of garlic and a splash of wine that turns simple ingredients into something special.
Jump to Recipe
What You’ll Need
I bet you have most of these ingredients hanging around already, and if not, they’re worth stocking up on for moments like this.
- 5 cloves of garlic
- 3 1/2 dozen little neck clams
- 1 cup dry white wine
- Pinch of red pepper flakes
- 1 pound linguine
- 4 tablespoons unsalted butter
- 1/4 cup fresh Italian parsley
- 1/4 cup fresh oregano leaves
- Parmigiano-Reggiano (optional)
- Kosher salt
How to Make Linguine and Clams In Garlic White Wine Sauce
- Coat a large sauté pan with olive oil and toss in 5 garlic cloves with a pinch of red pepper flakes. Crank the heat to medium-high until the garlic is golden brown and fragrant; this is when your kitchen begins to smell divine. If you’re like me and adore garlic, flip the cloves for extra flavor. Once golden, remove and discard them.
- Add the clams to the pan, pour in the white wine, and cover. Allow it to come to a boil over medium heat. Let it simmer until the clams open up, around 10 minutes. Use a slotted spoon to fish out the clams, reserving the cooking liquid.
- Boil a large pot of water for your linguine. Normally, I’d salt the water generously, but this time I skipped it because the clam juice added enough salty goodness.
- Mince the remaining garlic cloves. In the same sauté pan, drizzle more olive oil, add the minced garlic and another pinch of red pepper flakes. Cook until the garlic is just releasing its aroma, careful not to brown it.
- Add the raw clams and reserved clam juice back to the pan, checking the liquid for any sand or grit. A paper towel-lined sieve could help here to avoid any unwanted crunchiness in your dish.
- Cover and let the clams cook while you drop your linguine into the boiling water, aiming for very al dente—about a minute less than the box suggests.
- Once the clams have opened, set aside those in their shells to keep warm. Add butter and the clams removed from their shells back to the pan. Bring the liquid to a boil, then toss in the cooked pasta and fresh herbs.
- Cook everything together until the sauce coats the linguine. Kill the heat, then stir in grated Parmigiano-Reggiano if you’re using. Serve up the pasta, topping each dish with the clams in their shells and a sprinkle of fresh herbs.
Cook’s Notes
A few pearls of wisdom from my kitchen to yours: make sure to buy shellfish sold in mesh bags to avoid dead shellfish—plastic suffocates them. If you’re planning in advance, all the components can be prepped a few hours ahead, but cook them right before serving for optimal freshness. Leftovers, if you have any, can be refrigerated for up to two days. Just know that reheating clams can make them chewy, so enjoy it fresh if possible.
Make It Your Own
Switch it up with a few fun variations:
- Substitute the clams for crispy tofu for a plant-based twist.
- Use whole wheat or gluten-free pasta to suit dietary needs.
- Swap the white wine for vegetable broth if you’re steering clear of alcohol.
- Add a handful of cherry tomatoes for a pop of color and sweetness.
If you try this, I’d love to hear how it turns out—drop a comment or tag me! Cooking is all about sharing, so let’s keep this delicious conversation going.
Related update: Beans With Smoked Pork Hock
Related update: Greek Yogurt Chicken Salad