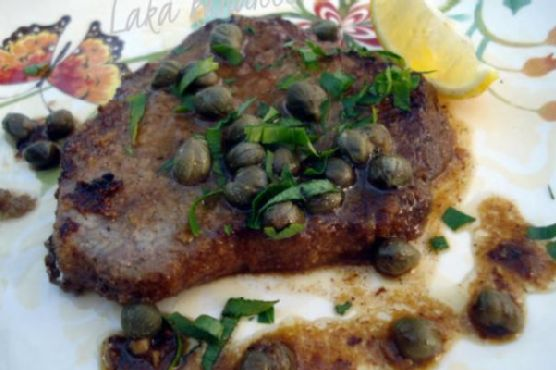
Steak with Lemon and Capers
Intro
There’s something magical about sharing a meal that transports you back to cherished memories. I remember sitting at my grandmother’s rustic wooden table, the aroma of a sizzling steak wafting through the air, mingling with the fresh scent of lemon and capers. It was a recipe she learned during her travels in the Mediterranean, a dish that quickly became a family favorite. Today, I’m thrilled to share this delightful recipe with you, hoping it becomes a beloved staple in your home as well.
Why You’ll Love It
This Steak with Lemon and Capers is a perfect blend of simplicity and sophistication. The tender, juicy steak paired with the tangy brightness of lemon and the unique, savory punch of capers creates a dish that’s both comforting and elegant. Whether you’re looking to impress guests or indulge in a special night in, this recipe is sure to deliver an unforgettable dining experience.
Ingredients
- Beef steak
- Butter
- Capers
- Dry white wine
- Flour
- Garlic
- Black ground pepper
- Lemon juice
- Lemon wedges
- Olive oil
- Parsley
- Salt
Instructions
- Flatten the steaks lightly with a meat mallet to ensure even cooking.
- In a shallow dish, combine flour, salt, and black ground pepper. Dip the steaks into the mixture, ensuring both sides are coated evenly.
- Heat a combination of butter and olive oil in a skillet over medium heat. Sauté the steaks for about 4 minutes on each side or until they reach your desired level of doneness.
- Remove the steaks from the pan and set them aside to rest.
- In the same pan, add the garlic and sauté for about 1 minute, stirring constantly to avoid burning.
- Pour in the dry white wine and lemon juice, stirring to combine. Allow the mixture to simmer for about 5 minutes to slightly reduce the liquid.
- Add the capers to the pan, stirring them into the sauce.
- Return the steaks to the pan, cover, and simmer over low heat for an additional 4 minutes to allow the flavors to meld.
- Garnish with fresh parsley and serve with lemon wedges for an extra burst of flavor.
Tips
For the best results, use a high-quality steak cut such as ribeye or strip loin. Make sure your pan is hot before adding the steaks to achieve a beautiful sear. Letting the steak rest after cooking allows the juices to redistribute, ensuring a juicy bite every time.
Variations & Substitutions
If you’re looking to change things up, consider substituting chicken breasts for the steak, adjusting the cooking time accordingly. For a non-alcoholic version, replace the white wine with chicken or beef broth. You can also add a tablespoon of mustard to the sauce for a tangy twist.
Storage
Store any leftovers in an airtight container in the refrigerator for up to three days. To reheat, gently warm the steak and sauce in a pan over low heat to avoid overcooking. Add a splash of water or broth if the sauce becomes too thick.
FAQ
Can I use a different type of meat for this recipe?
Absolutely! This recipe works beautifully with chicken or pork as well. Just keep in mind that cooking times will vary depending on the type and thickness of the meat.
What can I serve with Steak with Lemon and Capers?
This dish pairs wonderfully with a side of roasted vegetables or a simple green salad. For a heartier meal, consider serving it with mashed potatoes or a crusty loaf of bread to soak up the delicious sauce.
Is there a substitute for capers in this recipe?
If you don’t have capers on hand, olives can be a good substitute, providing a similar briny flavor. Just be sure to adjust the quantity to taste, as olives can be stronger in flavor.
Nutrition
While specific nutritional information will vary based on the cut and size of your steak, this dish is a great source of protein and vitamin C, thanks to the fresh lemon juice. The use of olive oil and butter provides healthy fats that contribute to the dish’s rich flavor.
Conclusion
This Steak with Lemon and Capers is more than just a meal; it’s a culinary journey that brings the vibrant flavors of the Mediterranean to your table. Whether you’re reminiscing about past travels or creating new memories in your kitchen, this dish is sure to delight and satisfy. I hope you enjoy this recipe as much as my family has over the years. Bon appétit!
Related update: Steak with lemon and capers
Related update: Traditional Garlic and Herb Crusted Prime Rib Roast