Spanakopita Cups: A Bite-Sized Greek Delight
Intro
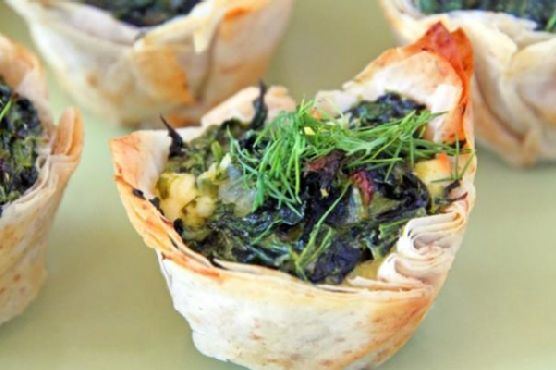
Spanakopita cups are a delightful twist on the traditional Greek spinach pie, Spanakopita. These bite-sized treats capture the essence of the Mediterranean, combining flaky phyllo dough with a rich and savory spinach filling. I remember my first encounter with Spanakopita during a family trip to Greece when I was a child. The bustling market stalls, filled with aromatic herbs and spices, captivated my senses. The moment I took a bite of the warm, flaky pastry, I was hooked. That trip ignited my love for Greek cuisine, and this recipe is a homage to those cherished memories. Now, I am thrilled to share this recipe with you, bringing a piece of Greece into your home.
Why You’ll Love It
Spanakopita cups are perfect for entertaining and make for a wonderful appetizer or snack. Here’s why you’ll love them:
- Easy to Make: Despite their elegant appearance, these cups are simple to prepare and require minimal ingredients.
- Flavorful and Satisfying: The combination of spinach, feta, and dill creates a savory filling that is full of flavor.
- Versatile: They can be served warm or at room temperature, making them ideal for parties or picnics.
- Kid-Friendly: The mini size makes them a hit with kids and adults alike.
Ingredients
- 2 tablespoons olive oil
- 1 cup chopped green white scallions
- 10 ounces frozen spinach, thawed and drained
- 2 tablespoons chopped fresh dill
- 3 large eggs, beaten
- 1 cup crumbled feta cheese
- Kosher salt, to taste
- Black pepper, to taste
- 1 package frozen phyllo dough, thawed
- 1/2 cup unsalted butter, melted
- 1/4 cup dry plain breadcrumbs
Instructions
- Preheat your oven to 400°F (200°C).
- Heat the olive oil in a pan over medium heat. Add the chopped scallions and cook for about 5 minutes until they are soft and fragrant.
- Squeeze most of the water out of the thawed spinach, then mix it with the cooked scallions, fresh dill, beaten eggs, and crumbled feta cheese. Season the mixture with kosher salt and black pepper to taste.
- Keep the phyllo dough sheets covered with a damp kitchen towel to prevent them from drying out.
- Unfold one sheet of the phyllo dough. Brush the sheet lightly with melted butter and sprinkle it with dry breadcrumbs.
- Repeat the process by laying a second sheet of phyllo dough over the first sheet, brushing it with melted butter and sprinkling with breadcrumbs. Continue this process until all four sheets have been used.
- Using a round cutter, cut circles out of the dough that will fit as a shell into mini muffin pans.
- Place the phyllo circles into the pan molds and fill each with the spinach mixture.
- Repeat until all the spinach mixture is used.
- Bake the spanakopita cups in the preheated oven for 17 minutes or until the phyllo pastry is golden brown and crispy.
Tips
- Ensure the spinach is well-drained to prevent the filling from becoming too watery.
- Keep the phyllo dough covered with a damp towel to maintain its pliability.
- Use a pastry brush for even butter distribution on the phyllo sheets.
Variations & Substitutions
Feel free to experiment with the ingredients to suit your taste preferences:
- Cheese: Swap feta for ricotta or goat cheese for a different flavor profile.
- Herbs: Add or substitute other herbs like parsley or mint for a fresh twist.
- Vegetables: Incorporate finely chopped mushrooms or bell peppers for added texture.
Storage
Store any leftover spanakopita cups in an airtight container in the refrigerator for up to 3 days. To reheat, place them in a preheated oven at 350°F (175°C) for about 10 minutes or until warmed through.
FAQ
Can I use fresh spinach instead of frozen?
Yes, you can use fresh spinach. Simply sauté the fresh spinach until wilted, then drain any excess moisture before combining it with the other filling ingredients.
How do I prevent the phyllo dough from drying out?
Keep the unused phyllo sheets covered with a damp kitchen towel while you work. This will keep the dough pliable and prevent it from cracking.
Nutrition
Each spanakopita cup is roughly 150 calories, containing healthy fats from olive oil and butter, and offering a good source of protein from the eggs and feta cheese. Spinach and dill add vitamins and minerals, making these cups not only delicious but also nutritious.
Conclusion
Spanakopita cups are a delightful and flavorful appetizer that brings a taste of Greece to your table. Their ease of preparation and versatile serving options make them a perfect choice for any occasion, from casual get-togethers to elegant parties. Whether you’re reminiscing about a past trip to Greece or simply looking to try something new, these spanakopita cups are sure to impress. Enjoy the warm, flaky goodness and share the joy of Greek cuisine with your loved ones!
Related update: Spanakopita Cups