Homemade Apple Almond Granola Bars | Made by Meaghan Moineau

Homemade Apple Almond Granola Bars | Made by Meaghan Moineau

Title: Crunchy Nostalgia: Homemade Apple Almond Granola Bars
Description: Dive into the comforting embrace of Homemade Apple Almond Granola Bars, a delightful concoction of wholesome ingredients that bring back the warmth of family gatherings. Easy to make and irresistibly tasty, these bars are perfect for breakfast on-the-go or a guilt-free snack.

---


Homemade Apple Almond Granola Bars: A Family Tradition


Growing up, my family always had a knack for turning simple moments into cherished memories. Among these, Saturday mornings were special. The smell of freshly baked goods wafting through the house was our gentle wake-up call, drawing us out of our slumber and into the kitchen where the magic happened.


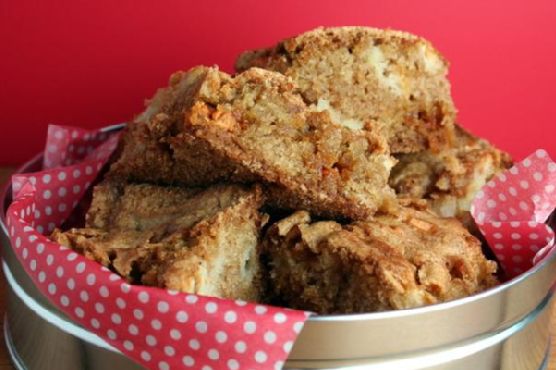
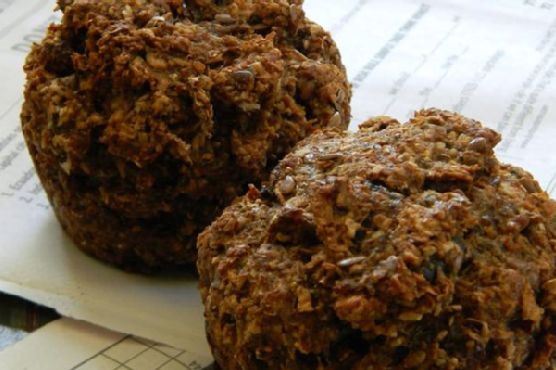
One of the most beloved recipes that graced our kitchen was the Homemade Apple Almond Granola Bars. These bars were more than just a treat; they were a symbol of togetherness and the perfect embodiment of autumn afternoons spent with family. The combination of rolled oats, sweet honey, and the crunch of almonds brought a comforting warmth that only a homemade recipe could provide.


Ingredients:


- 2 cups rolled oats


- 1/4 cup ground flax seed


- 1/4 cup oat bran


- 1/4 cup wheat bran


- 1/2 teaspoon salt


- 1 teaspoon baking powder


- 1 teaspoon ground cinnamon


- 1/4 cup sugar substitute


- 1/4 cup unsweetened coconut


- 1/2 cup non-fat milk


- 1/4 cup sweet honey


- 1 egg


- 1 teaspoon vanilla extract


- 1 apple, peeled and diced


- 1/2 cup almonds, chopped


Instructions:


1. Preheat your oven to 350°F (175°C) and spray a 9x13 pan with non-stick cooking spray.
2. Combine in a large bowl the oats, flax seed, oat bran, wheat bran, salt, baking powder, cinnamon, sugar substitute, and coconut. Mix until well combined.
3. Add the milk, honey, egg, and vanilla extract to the dry ingredients. Stir until everything is well incorporated.
4. Fold in the diced apple and chopped almonds, ensuring they are evenly distributed throughout the mixture.
5. Press the mixture firmly into the prepared pan, spreading it out evenly.
6. Bake for 15-20 minutes, or until the edges start to brown lightly.
7. Cool for 10 minutes before cutting into bars. Allow to cool completely before serving or storing.

These granola bars are a perfect example of how food can connect us to our roots and to each other. As we savored these bars, my siblings and I would reminisce about the little things that made our weekend mornings special—like the sound of crunching leaves outside or the laughter that filled the room as we enjoyed our breakfast together.


Difficulty: 3/10 - Easy


Classification: Dessert / Snack


Whether you're yearning for a quick snack or a healthy dessert option, these Homemade Apple Almond Granola Bars are sure to satisfy. They're not just a treat; they're a piece of nostalgia, a way to bring a little bit of my family's warmth into your own home.


So, gather your ingredients and invite your loved ones to the kitchen. Create new memories while indulging in the delightful flavors of this cherished family recipe. Enjoy the simple pleasure of homemade goodness, and perhaps, start a new tradition of your own.

Read more about Appetizers

Read more about Main Dishes

Read more about Desserts

Maple-Bacon Corn Muffins | Made by Meaghan Moineau

Maple-Bacon Corn Muffins | Made by Meaghan Moineau

Maple-Bacon Corn Muffins: A Sweet and Savory Delight


Description: Craving a unique twist on a classic comfort food? Our Maple-Bacon Corn Muffins combine the sweet allure of maple syrup with the smoky richness of bacon, creating a mouthwatering balance that captures the essence of home. Perfect as an appetizer or a brunch centerpiece, these muffins are sure to delight your taste buds and warm your heart.

---


A Nostalgic Journey: Family Memories of Maple-Bacon Corn Muffins


Growing up, Saturday mornings in our household were always special. The aroma of freshly brewed coffee would waft through the air, mingling with the irresistible scent of bacon sizzling on the stove. My siblings and I knew that it was time for our beloved family tradition—Maple-Bacon Corn Muffins. This dish holds a cherished place in our hearts, a recipe passed down from my grandmother who had a knack for combining flavors in the most delightful ways.


I remember the excitement of gathering in the kitchen, each of us assigned a task. My brother was in charge of chopping the bacon, my sister whisked the eggs and milk, and I was responsible for stirring the dry ingredients—a job I took very seriously. As we worked, stories flowed as freely as the maple syrup we eagerly poured into the mixture.


Once the muffins were in the oven, the anticipation was palpable. We'd peek through the oven window, watching the muffins rise and turn a perfect golden brown. When the timer chimed, we could hardly wait to liberate the muffins from their tin prisons. Served warm, the first bite was always the best—crispy bacon mingling with the soft, sweet cornmeal, underlined by the deep, rich flavor of maple.


Those mornings were a ritual, a time when our family came together, sharing not just food, but laughter, love, and stories. Even now, as I prepare this dish in my own kitchen, those memories flood back, adding an extra layer of warmth to each batch.


Today, I am thrilled to share this recipe with you, in hopes that it will bring a touch of nostalgia and a whole lot of flavor to your kitchen.


---


Ingredients


- Bacon


- Baking powder


- Butter (melted)


- Eggs


- Flour


- Maple syrup


- Milk


- Salt


- Sugar


- Yellow cornmeal


Instructions


1. Preheat your oven to 400°F.


2. Heat a skillet over medium-high heat. Chop the bacon and cook until slightly crispy. Remove with a slotted spoon and set the skillet aside.


3. In a large bowl, combine all dry ingredients: flour, cornmeal, baking powder, sugar, and salt.


4. Whisk in the milk and eggs until well combined.


5. Stir in the melted butter, maple syrup, and a cup of reserved bacon grease.


6. Add the bacon pieces back into the mixture and stir until evenly distributed.


7. Line a 12-cup muffin tin with muffin liners. Evenly divide the mixture among the liners.


8. Bake for 15 minutes until the muffins are golden brown.


9. Remove from the muffin tin and serve warm. Enjoy!


---


Difficulty: 4/10
Classification: Appetizer

These Maple-Bacon Corn Muffins are more than just a dish; they are a portal to cherished memories and a celebration of comforting flavors. Whether you're sharing them with family or enjoying a quiet morning alone, they promise to bring joy and warmth to any occasion.

Read more about Appetizers

Read more about Main Dishes

Read more about Desserts

chilli chicken | Made by Meaghan Moineau

chilli chicken | Made by Meaghan Moineau

Title: "Spicy Nostalgia: The Flavorful Journey of Chilli Chicken"
Description: Dive into the rich, aromatic world of Chilli Chicken—a dish that not only tantalizes your taste buds but also stirs heartwarming family memories. From the vibrant colors of bell peppers to the savory depth of soya sauce, learn how this dish has become a beloved staple at our family gatherings. Rated 6/10 in difficulty, this versatile delight can be served as an appetizer or a main dish. Discover a cherished family story intertwined with this recipe and find complete cooking instructions at Swasthi's Recipes.

---


Spicy Nostalgia: The Flavorful Journey of Chilli Chicken

There’s something magical about family recipes—they are time machines that transport you back to cherished moments, filled with warmth, laughter, and the comforting aroma of home-cooked meals. Chilli Chicken, with its spicy allure and vibrant colors, holds a special place in my heart, not just as a dish but as a treasured family memory.


A Burst of Flavors and Colors

The beauty of Chilli Chicken lies in its simplicity and the explosion of flavors it offers. The key ingredients—bell peppers, boneless chicken breast, and slit green chilies—create a colorful medley that is as pleasing to the eye as it is to the palate. The essential spices—red chili powder and pepper powder—bring a fiery kick, while garlic and onion add depth and aroma. The sticky, savory embrace of soya sauce, combined with the tangy notes of vinegar and the subtle sweetness of sugar, create a harmonious balance that is simply irresistible.


A Family Tradition

Every family gathering at our house was incomplete without a sizzling platter of Chilli Chicken. I vividly remember my grandmother bustling around the kitchen, her hands deftly working through the ingredients, her face lit with a loving smile. The air would fill with the intoxicating aroma of garlic sizzling in oil, mixing with the spicy scent of red chili powder. It was a sensory symphony that signaled the start of another memorable feast.


One particular instance stands out in my memory: a chilly winter evening when the entire family was gathered around the dining table, the warmth of laughter and stories enveloping us like a cozy blanket. My grandmother placed the dish in the center, and as the steam rose, so did our anticipation. With each bite of the tender chicken and crunchy bell peppers, we were transported to a world where flavors danced on our tongues and time seemed to stand still.


Creating Your Own Memories

While nostalgia adds a unique flavor to Chilli Chicken, creating your own memories with this dish is just as delightful. Rated 6/10 in difficulty, it’s accessible yet rewarding, making it perfect for a family dinner or a casual gathering with friends. Whether you choose to serve it as an appetizer or the main dish, Chilli Chicken promises to be the star of the meal.


For those looking to recreate this flavorful journey, detailed instructions can be found at Swasthi's Recipes. Embrace the joy of cooking as you experiment with the ingredients, perhaps adding your own twist to make it uniquely yours.


In the end, Chilli Chicken is more than just a dish; it's a connection to the past, a celebration of the present, and an invitation to create future memories. So, gather your loved ones, roll up your sleeves, and let the rich, spicy aroma of Chilli Chicken weave its magic into your family story.


---


Whether you're a seasoned cook or a culinary novice, Chilli Chicken is an adventure worth embarking on. So, why not dig in and let this dish become a delicious chapter in your own family’s story?

Read more about Appetizers

Read more about Main Dishes

Read more about Desserts

Sweet and Spicy Nuts | Made by Meaghan Moineau

Sweet and Spicy Nuts | Made by Meaghan Moineau

Title: Sweet and Spicy Nuts: A Family Tradition with a Fiery Twist
Description: Discover the delightful balance of sweet and spicy flavors in this easy-to-make Sweet and Spicy Nuts recipe. Perfect as an appetizer or a snack, this dish is sure to add a kick to your family gatherings. Reminisce with me as I share a cherished family memory tied to these delectable nuts. Difficulty: 3/10.

---


When I think of Sweet and Spicy Nuts, my mind drifts back to those delightful family gatherings at my grandmother's house. Tucked away in her cozy kitchen, the air was always filled with the comforting aroma of buttery spices, a scent that wrapped around us like a warm hug.


The recipe I'm about to share has become a staple in our family—a perfect blend of sweet and spicy that echoes the warmth of those cherished memories. It's a dish that brings smiles and a bit of nostalgia, as it reminds us of those lively conversations and laughter shared over a bowl of these flavorful nuts.


Sweet and Spicy Nuts Recipe
Ingredients:

- 2 tablespoons butter


- 1/2 teaspoon cayenne pepper


- 1/2 teaspoon ground cinnamon


- 1/2 teaspoon ground cumin


- 1/4 cup light brown sugar


- 2 cups mixed nuts (such as walnuts)


- 1 teaspoon salt


- 1 tablespoon water


Instructions:
1. Mix the Spices: In a small bowl, combine the ground cumin, cayenne pepper, ground cinnamon, and salt. Set aside for later use.
2. Toast the Nuts: Heat a dry skillet over medium heat. Add the mixed nuts and cook, stirring frequently, until they begin to toast, about 4 minutes. Transfer the nuts to a small bowl and set aside.
3. Create the Glaze: In the same hot skillet, add the butter, light brown sugar, water, and the spice mixture. Cook, stirring, until a smooth glaze forms, about 1 minute.
4. Coat the Nuts: Return the toasted nuts to the skillet. Toss them in the glaze, ensuring they are well-coated. Cook for an additional 1 to 2 minutes, or until the nuts are glazed and golden brown.
5. Cool and Store: Remove the skillet from the heat and transfer the glazed nuts to a baking sheet lined with aluminum foil. Use a fork to separate them. Allow the nuts to cool until the sugar hardens, about 10 minutes. Store in an airtight container.
A Nostalgic Note:

The tradition of making Sweet and Spicy Nuts started with my grandmother. She had a knack for turning simple ingredients into something magical. As kids, we would gather around her, eyes wide with anticipation, as she tossed the nuts in the sizzling glaze. The aroma was irresistible, and we eagerly waited for them to cool, often sneaking a few warm morsels when she wasn't looking.


These nuts have now become a symbol of our family's togetherness, a dish that travels with us through generations. Whether it's a holiday party or a casual Sunday afternoon, a bowl of Sweet and Spicy Nuts always makes its way to the table, sparking conversations and creating new memories.


Difficulty: 3/10
Category: Appetizer

---


Next time you're looking for a delightful appetizer to impress your guests or just a snack to enjoy on a cozy afternoon, give these Sweet and Spicy Nuts a try. They are sure to add a fiery twist to your gatherings and maybe even inspire a family tradition of your own.

Read more about Appetizers

Read more about Main Dishes

Read more about Desserts

Pink Grapefruit Slaw | Made by Meaghan Moineau

Pink Grapefruit Slaw | Made by Meaghan Moineau

Title: Refreshing Memories: The Joy of Pink Grapefruit Slaw
Description: Discover the vibrant flavors of Pink Grapefruit Slaw, a delightful mix of tangy and sweet that will transport you back to cherished family gatherings. This easy-to-make appetizer is perfect for adding a splash of color and nostalgia to your dining table.

---


A Nostalgic Journey with Pink Grapefruit Slaw

There’s something undeniably soothing about the familiar aroma of a dish that takes you back to simpler times—like the Pink Grapefruit Slaw my grandmother used to make during those long, sun-drenched summer afternoons. As a child, I remember eagerly watching her in the kitchen, marveling at how effortlessly she combined ingredients to create something magical.


The recipe was always a highlight at our family picnics, a beacon of freshness amidst the array of hearty dishes. My grandmother had a knack for infusing love into her cooking, and her Pink Grapefruit Slaw was no exception. The tangy sweetness of the grapefruit paired with the crunch of fresh cabbage and the subtle bite of red onion created a symphony of flavors that danced on our taste buds.


As the adults chatted and the children played, I would sneak into the kitchen to watch her skillfully zest the grapefruit, her hands moving with practiced precision. She would smile at me, her eyes twinkling with a secret only we shared—the joy of creating something beautiful together.


Recipe: Pink Grapefruit Slaw
Ingredients:

- Black pepper


- 1 pink grapefruit


- 2 cups green shredded cabbage


- 2 tablespoons light mayonnaise


- 1 small red onion, thinly sliced


- Salt


- 1-2 teaspoons sugar (to taste)


Instructions:

1. In a small bowl or measuring cup, combine 2 tablespoons of light mayonnaise, 3 tablespoons of fresh grapefruit juice (from just a segment or two), 1-2 teaspoons of sugar, 1 teaspoon of grapefruit zest, salt, and black pepper. Whisk the mixture until it's well blended.


2. In a large bowl, combine 2 cups of shredded green cabbage, the remaining sections of the pink grapefruit, and the thinly sliced red onion.


3. Pour the dressing over the cabbage mixture and toss everything together until it’s well coated.


4. Garnish with parsley if desired, and serve immediately to enjoy the flavors at their peak freshness.


Difficulty: 3/10
Classification: Appetizer

This Pink Grapefruit Slaw is a testament to the beauty of simple, fresh ingredients coming together to create a dish that’s both delicious and nostalgic. Whether you’re preparing it for a family gathering or a solo lunch, this slaw is sure to evoke fond memories and perhaps inspire new traditions for years to come.

Read more about Appetizers

Read more about Main Dishes

Read more about Desserts

Apple Pie Bars | Made by Meaghan Moineau

Apple Pie Bars | Made by Meaghan Moineau

Title: Apple Pie Bars: A Nostalgic Twist on a Timeless Classic
Description: Dive into the heartwarming world of Apple Pie Bars, where the comforting flavors of spiced apples meet the delightful crunch of butterscotch chips. Perfect as a dessert, this recipe is not just about satisfying your sweet tooth; it's about reliving cherished family memories. Rated 5/10 in difficulty, this recipe is accessible to both novice and experienced bakers alike.

---


There's something inherently magical about the scent of cinnamon and nutmeg wafting through the air. It’s a spell that pulls you back to simpler times, to a kitchen filled with laughter and the gentle hum of an electric mixer. For me, this enchanting aroma is synonymous with Apple Pie Bars—a recipe that has been passed down through generations in our family.


Ingredients:

- McIntosh apples


- Baking powder


- Baking soda


- Butterscotch chips


- Eggs


- Flour


- Ground cinnamon


- Ground nutmeg


- Salt


- Sugar


- Vegetable oil


Instructions:

1. Preheat your oven to a cozy 350 degrees F. Prepare a 9 by 13-inch baking dish by giving it a generous coat of cooking spray.


2. In the bowl of an electric mixer, combine the oil, eggs, and sugar until they form a harmonious blend.


3. In a separate bowl, sift together the flour, baking powder, salt, baking soda, ground cinnamon, and ground nutmeg. Gradually add this dry mixture to the oil mixture, allowing the mixer to work its magic until everything is thoroughly combined. Be prepared for a thick, luscious batter.


4. Switch to a sturdy spoon and lovingly fold in the apple pieces. Transfer this mixture into your prepared baking dish, smoothing it out to create an even layer.


5. Gently sprinkle the butterscotch chips over the top, pressing them lightly into the batter.


6. Bake in the preheated oven for 45 minutes to an hour, until golden brown and just beginning to pull away from the edges of the pan.


7. Allow the bars to cool thoroughly before cutting them into delightful squares.


A Walk Down Memory Lane

I remember the first time I helped my grandmother make these Apple Pie Bars. I was barely tall enough to see over the kitchen counter, standing on a little wooden stool she had pulled out just for me. The kitchen was alive with activity, a symphony of clinking bowls and the whirring of our old mixer.


Every autumn, as the leaves turned to shades of amber and gold, my family would gather at my grandmother's house for our annual apple-picking adventure. We would come back with baskets brimming with McIntosh apples, their sweet-tart flavor perfectly suited for baking. My grandmother, the matriarch of our family, would lead the charge in transforming these apples into her famous Apple Pie Bars.


I recall the warmth of the kitchen, the stories shared across generations. My grandmother would tell tales of her own childhood, of how these bars were a staple at every family gathering. Each bite was a bridge to the past, a connection to family members who had long since passed, yet whose spirits lingered in every crumb.


Difficulty: 5/10
Classification: Dessert

Creating these Apple Pie Bars is more than just baking; it’s about creating memories. So, gather your loved ones, don an apron, and let the nostalgic aroma of apples and spices fill your home. These bars are a testament to the enduring power of family traditions and the simple joys of baking together.

Read more about Appetizers

Read more about Main Dishes

Read more about Desserts

Pan Seared Lamb Loin With Chimichurri & Roasted Trio Squash Salad With Goat Cheese and Pinenuts | Made by Meaghan Moineau

Pan Seared Lamb Loin With Chimichurri & Roasted Trio Squash Salad With Goat Cheese and Pinenuts | Made by Meaghan Moineau

Title: Savoring Tradition: Pan-Seared Lamb Loin with Chimichurri & Roasted Trio Squash Salad
Description: Discover the rich flavors and comforting nostalgia of our Pan-Seared Lamb Loin with Chimichurri paired with a Roasted Trio Squash Salad adorned with Goat Cheese and Pine Nuts. This main dish not only tantalizes your taste buds but also carries the warmth of cherished family memories. Experience a culinary journey that brings together the zest of fresh herbs and the heartwarming glow of the holiday table.

---


When it comes to family gatherings, few dishes evoke the warmth and comfort of home like a beautifully prepared lamb loin. As the holiday season approaches, I find myself reminiscing about the countless family dinners centered around this delightful dish. The aroma of fresh herbs mingling with the rich, savory lamb was a staple at our holiday table, a tradition passed down through generations.


Ingredients:

- Cilantro


- Extra virgin olive oil


- Flat leaf parsley


- Garlic clove


- Black ground pepper


- Kosher salt and pepper


- Lamb loin chops


- Lemon


- Mint


- Pine nuts


- Red pepper flakes


- Shallot


Instructions:
1. Preheat Your Oven: Start by preheating your oven to 400°F, setting the stage for a dish that’s sure to impress.
2. Prepare the Chimichurri: In a large bowl, combine cilantro, flat leaf parsley, minced garlic, lemon juice, mint, and a hint of red pepper flakes. Blend with extra virgin olive oil until you achieve a smooth consistency. Season to taste with kosher salt and freshly ground black pepper.
3. Sear the Lamb: Heat a large, heavy-bottomed pan with a splash of olive oil until it begins to smoke. Season each side of the lamb loin chops with salt and pepper. Sear them for about 2 minutes per side to lock in those delicious juices.
4. Oven Finish: Transfer the seared lamb to the preheated oven.

- For rare, roast for 2-3 minutes.


- For medium rare, extend to 6-8 minutes.


- For medium, let it cook for 9-11 minutes.


- For well done, aim for 12-14 minutes.


Remember, the lamb continues to cook after it's out of the oven, so adjust your times accordingly.


5. Roasted Trio Squash Salad: As the lamb cooks, prepare a medley of roasted squash. Toss sliced squash with olive oil, salt, and pepper, then roast until tender. Finish with a sprinkle of goat cheese and toasted pine nuts for a delightful crunch.
A Nostalgic Twist:

This dish always brings me back to a particular winter evening at my grandmother's house. The fireplace crackled, casting a warm glow across the dining room. I remember watching her skillfully sear the lamb, her hands moving with the confidence of years of practice. As we sat around the table, the laughter of my cousins filled the room, and the scent of chimichurri and roasted squash wrapped us in a cozy embrace. These moments, filled with love and laughter, are the essence of why I cherish this dish.


Difficulty: 6/10
Classification: Main Dish

---


Whether you’re creating new memories or savoring the nostalgia of family traditions, this Pan-Seared Lamb Loin with Chimichurri and Roasted Trio Squash Salad is sure to become a beloved part of your culinary repertoire. Indulge in the symphony of flavors and share a meal that speaks the universal language of love and togetherness.

Read more about Appetizers

Read more about Main Dishes

Read more about Desserts

Cider-Braised Pork Shoulder With Caramelized Onion and Apple Confit | Made by Meaghan Moineau

Cider-Braised Pork Shoulder With Caramelized Onion and Apple Confit | Made by Meaghan Moineau

Title: A Taste of Autumn: Cider-Braised Pork Shoulder with Caramelized Onion and Apple Confit
Description:

Dive into the heartwarming flavors of fall with our Cider-Braised Pork Shoulder with Caramelized Onion and Apple Confit. This main dish, rated 7 out of 10 on the difficulty scale, beautifully marries the rich, savory notes of pork with the sweet, tangy essence of apples and onions. As you savor each bite, you'll be transported back to cherished family gatherings and the cozy warmth of a kitchen filled with laughter and love.


---


The Recipe for Nostalgia and Comfort

When the leaves start to turn and the air crisps with the promise of autumn, there's nothing quite like gathering around a table with loved ones to share a meal that encapsulates the essence of the season. Our Cider-Braised Pork Shoulder with Caramelized Onion and Apple Confit isn't just a dish; it's a journey back to those nostalgic family dinners that marked the change of seasons.


Ingredients:

- 1 tied pork shoulder


- Black salt and pepper, to taste


- Olive oil


- 2 large yellow onions, thinly sliced


- 1/4 cup Calvados brandy


- 2 Granny Smith apples, peeled and sliced


- 4 garlic cloves, minced


- 1 teaspoon fresh dried thyme


- 2 cups apple cider


- 1 cup chicken stock


- 2 tablespoons Dijon mustard


Instructions:
1. Preheat and Prepare:

Begin by preheating your oven to 400°F (200°C). Pat the pork shoulder dry with paper towels and generously season with black salt and pepper.


2. Sear the Pork:

Heat olive oil in a large ovenproof pot or Dutch oven over medium-high heat. Brown the pork on all sides, turning with tongs, for about 6-8 minutes per side to create a rich, savory crust. Transfer the pork to a plate.


3. Caramelize the Onions:

Pour off excess fat from the pot, leaving just enough to coat the bottom. Add the sliced onions and 1 teaspoon of salt. Sauté over medium heat, stirring occasionally, until the onions are soft and deeply golden brown, about 18-20 minutes.


4. Deglaze and Build Flavor:

Stir in the Calvados to deglaze the pan, scraping up any browned bits. Add the apple slices, minced garlic, and thyme, cooking for an additional 30 seconds until fragrant.


5. Braise the Pork:

Nestle the pork shoulder back into the pot, ensuring it's surrounded by the onion mixture. Pour in the apple cider and chicken stock. Cover the pot and place it in the oven, reducing the heat to 325°F (163°C). Braise until the pork is incredibly tender, about 2 1/2 to 3 hours.


6. Finish the Sauce:

Once cooked, transfer the pork to a cutting board and remove the kitchen strings. Boil the onion and apple mixture over high heat until the liquid is slightly reduced and thickened, about 2 minutes. Stir in the Dijon mustard and season to taste with additional salt and pepper.


7. Serve and Enjoy:

Slice the tender pork into serving pieces and arrange them on a platter or individual plates. Generously spoon the caramelized onion and apple confit over and around the meat, allowing the flavors to meld beautifully.


A Family Memory:

This dish always reminds me of the autumn evenings spent at my grandmother's house. The warmth of her kitchen, the aroma of apples and onions slowly caramelizing, and the sound of laughter echoing through the rooms. One particular fall, as the first snowflakes began to dance in the air, she taught me how to prepare this very dish. My small hands struggled to tie the pork, but her gentle guidance and the promise of a comforting meal kept me eager to learn. As we sat down to dinner, wrapped in the cozy embrace of family, I realized that this was more than just a recipe—it was a legacy of love and tradition.


Conclusion:

This Cider-Braised Pork Shoulder with Caramelized Onion and Apple Confit is more than a main dish; it's a celebration of the season and a testament to the power of food to bring us together. As you recreate this dish, may it fill your home with warmth and your heart with cherished memories.

Read more about Appetizers

Read more about Main Dishes

Read more about Desserts

Shrimp & Orzo | Made by Meaghan Moineau

Shrimp & Orzo | Made by Meaghan Moineau

Title: "Savoring Tradition: Shrimp & Orzo Delight with a Nostalgic Twist"
Description:

Embark on a culinary journey with our delectable Shrimp & Orzo recipe, a dish that beautifully marries the vibrant flavors of the Mediterranean with the comforting warmth of home-cooked meals. This main dish, rated a 7 out of 10 on the difficulty scale, is perfect for a cozy family dinner or a casual get-together with friends. Follow along as we not only guide you through creating this sumptuous dish but also share a cherished family memory that brings this recipe to life.


---


A Nostalgic Journey Through Shrimp & Orzo

Every family has a dish that stirs up a fond memory, and for mine, it’s the delightful Shrimp & Orzo. This dish isn’t just a meal; it’s a tapestry of flavors woven with the threads of family tradition and love.


I vividly remember the first time my grandmother introduced this recipe to our family table. It was a balmy summer evening, one of those nights where the air was thick with the scent of blooming jasmine and the distant sound of cicadas. Our family gathered in her sun-dappled kitchen, a place that felt like the heart of our home. The faint sizzle of olive oil hitting the hot Dutch oven announced the beginning of our culinary adventure.


As my grandmother stirred the diced onion and fennel bulb, she regaled us with stories from her childhood, tales of seaside summers where shrimp were abundant and laughter even more so. Those evenings were always special, the kitchen alive with laughter, the clinking of glasses, and the anticipation of yet another unforgettable meal.


---


Recipe: Shrimp & Orzo
Ingredients:

- 1 can diced tomatoes


- 1/2 cup dry white wine


- 1 fennel bulb, diced


- 1/2 cup crumbled feta cheese


- 2 tablespoons fresh parsley, divided


- 4 cloves of garlic, minced


- Lemon wedges for serving


- 2 cups low sodium chicken broth


- 2 tablespoons olive oil


- 1 diced onion


- 1 teaspoon dried oregano


- 1 1/2 cups orzo pasta


- 1/4 teaspoon crushed red pepper flakes


- Salt & pepper to taste


- 1 pound large shrimp, peeled and deveined


- 1/2 cup water


Instructions:

1. Preheat your oven to 400 degrees F. Season the shrimp with salt and pepper, then refrigerate until ready to use. Grease a 13x9-inch baking dish.


2. Heat the olive oil in a large Dutch oven over medium-high heat until shimmering. Add the onion, fennel bulb, and 1/2 teaspoon salt. Cook, stirring frequently, until the vegetables are softened and starting to brown around the edges, about 10 minutes.


3. Stir in the minced garlic and crushed red pepper flakes, and cook until the garlic becomes very fragrant, about 30 seconds.


4. Add the orzo to the vegetables, stirring to coat with oil. Continue cooking, stirring frequently, for about 4 minutes, until the orzo has a toasty aroma.


5. Pour in the white wine, cooking and stirring constantly, until the liquid evaporates, about 1 minute.


6. Add the chicken broth, water, and 1/4 teaspoon salt. Bring to a boil, then reduce the heat and simmer until the orzo is almost tender, about 12 minutes, stirring frequently to prevent sticking.


7. Remove from heat and stir in the shrimp, tomatoes, oregano, and 1 tablespoon of parsley.


8. Transfer the mixture to the prepared baking dish and sprinkle with feta cheese.


9. Bake for about 20 minutes, until the shrimp is cooked through and the feta is lightly browned.


10. Before serving, sprinkle with the remaining parsley and the reserved fennel fronds. Serve with lemon wedges.


---


Creating Shrimp & Orzo is more than just assembling ingredients; it's about reliving cherished memories and crafting new ones. Each bite is a tribute to family, tradition, and the joy of sharing a meal with the ones you love. So, gather around the table, share stories, and savor the exquisite flavors of this timeless dish.

Read more about Appetizers

Read more about Main Dishes

Read more about Desserts

Classic French Mussels | Made by Meaghan Moineau

Classic French Mussels | Made by Meaghan Moineau

Title: Unveiling the Elegance of Classic French Mussels: A Taste of Nostalgia
Description: Dive into the heart of French culinary tradition with our Classic French Mussels recipe. Perfectly blending delicate flavors and cultural richness, this dish offers a taste of nostalgia, transporting you to cherished family gatherings. With simple ingredients like dry white wine, fresh parsley, and garlic, this mussel recipe is a delightful appetizer rated 4 out of 10 in difficulty. Relish the harmony of taste and memory as you savor each bite.

---


There’s something inherently comforting about the ritual of preparing a beloved family dish. For me, Classic French Mussels brings back vivid memories of summer evenings spent at my grandmother’s quaint seaside cottage in Brittany, France. The air was always filled with the briny scent of the ocean, mingling with the aroma of garlic and shallots sizzling in olive oil—a sensory symphony that signaled the beginning of a cherished meal.


Ingredients:

- 2 lbs mussels


- 2 tablespoons olive oil


- 2 shallots, finely chopped


- 4 garlic cloves, minced


- 1 cup dry white wine


- 1/2 cup low-fat buttermilk


- 2 tablespoons unsalted light butter


- 1/4 cup fresh parsley, chopped


- Kosher salt to taste


Instructions:
1. Prepare the Mussels: Begin by scrubbing the mussels under cold water with a stiff brush. Discard any mussels that remain open or have broken shells. Soak them in cool, clean water for at least an hour to allow them to expel any sand.
2. Remove the Beards: Locate the small fibrous "beard" on each mussel and pull it out toward the hinge of the shell to avoid injuring the mussel.
3. Cook the Aromatics: In a large pot, heat the olive oil over medium-high heat. Add the shallots and garlic, cooking until soft and fragrant, approximately 5 minutes.
4. Combine Ingredients: Add the mussels to the pot, followed by the wine, buttermilk, butter, and parsley. Season generously with kosher salt. Stir well to combine all ingredients.
5. Steam the Mussels: Cover the pot and allow the mussels to cook for 10 to 15 minutes, or until they have opened and are cooked through.
6. Serve: Divide the mussels and the flavorful juices between two bowls. Serve immediately with crusty whole-grain bread to soak up the delectable sauce.

This dish, a testament to the simplicity and elegance of French cuisine, is the perfect appetizer for any occasion. It’s rated a 4 out of 10 in difficulty, making it accessible even for those new to cooking mussels.


As I watch the mussels gently open in the pot, I’m reminded of those magical evenings in Brittany, where laughter echoed around the dinner table, and the warmth of family togetherness was as nourishing as the meal itself. Today, I carry on this tradition, serving Classic French Mussels to my own family, creating new memories while honoring the old.


Savor the rich flavors and let this dish transport you to a place of warmth, love, and tradition. Bon appétit!

Read more about Appetizers

Read more about Main Dishes

Read more about Desserts

Big Batch Smoothie Bowl | Made by Meaghan Moineau

Big Batch Smoothie Bowl | Made by Meaghan Moineau

Title: Nourishing Nostalgia: The Big Batch Smoothie Bowl That Revives Family Memories
Description:

Step into a world where wholesome ingredients meet cherished family moments. Our Big Batch Smoothie Bowl is more than just a breakfast treat—it's a blend of flavors and memories, perfect for those who crave both nutrition and nostalgia.


---


The Big Batch Smoothie Bowl: A Wholesome Family Tradition

There's something magical about the clinking of spoons and the chatter of family gathered around the kitchen table. For me, the Big Batch Smoothie Bowl isn't just a delightful dish; it's a cherished family tradition that brings back vivid memories of sunlit mornings and joyous laughter.


Ingredients:

- Whey protein


- Frozen strawberries


- Frozen blueberries


- Bananas


- Pomegranate seeds


- Walnuts


- Pumpkin seeds


- Flaxseed


- Granola


Instructions:

1. Begin by blending the frozen strawberries and blueberries with creamy kefir and a scoop of whey protein. This step is best done ahead of time, allowing the mixture to rest until it reaches the perfect temperature—not too icy, just refreshingly cool.


2. Once your blend is ready, portion out each serving into inviting bowls. Top them with slices of ripe bananas, a generous sprinkle of pomegranate seeds, crunchy granola, and a dusting of ground walnuts and flaxseed. For an added burst of flavor and texture, scatter a few pumpkin seeds on top.


3. Gather your loved ones and savor each spoonful, enjoying not just the taste, but the moments shared together.


A Walk Down Memory Lane:

This smoothie bowl brings me back to summer mornings at my grandparents' house. I remember waking up to the aroma of ripe fruits and the soft hum of the blender. My grandmother would call us to the kitchen, her eyes twinkling with warmth and love.


As we sat around the table, each bowl was a masterpiece—vibrant colors of berries, the crunch of granola, and the subtle nuttiness of flaxseed. It wasn't just breakfast; it was a celebration of togetherness. My grandfather would share stories of his childhood, and we'd listen, captivated by tales of a simpler time.


Even now, as I prepare this dish for my own family, it's as if I'm honoring those memories, carrying forward a tradition that nourishes both body and soul. The Big Batch Smoothie Bowl is a testament to the power of food to connect generations, creating bonds that transcend time.


Difficulty Rating: 3/10

This recipe is as easy as it is delightful, with minimal preparation and maximum enjoyment.


Classification: Main Dish

While often enjoyed as a breakfast treat, the hearty ingredients make this smoothie bowl a satisfying main dish, perfect for starting the day on a healthy and happy note.


---


Embrace the blend of flavors and family memories with our Big Batch Smoothie Bowl. A dish that's as nourishing as it is nostalgic, allowing you to savor both the taste and the tradition, one spoonful at a time.

Read more about Appetizers

Read more about Main Dishes

Read more about Desserts

Corn Avocado Salsa | Made by Meaghan Moineau

Corn Avocado Salsa | Made by Meaghan Moineau

Title: A Taste of Summer: Corn Avocado Salsa with a Nostalgic Twist
Description: Dive into a vibrant blend of flavors with our Corn Avocado Salsa recipe. This appetizer is not only a feast for the senses but also a trip down memory lane, filled with family gatherings and summer nostalgia.

---


As the summer sun casts its golden glow over lush gardens and bustling farmers' markets, there's one dish that never fails to capture the essence of the season for me: Corn Avocado Salsa. This vibrant, flavorful appetizer is more than just a recipe; it's a cherished family tradition that brings back fond memories of sun-drenched days and laughter-filled evenings.


Ingredients:

- 1 ripe avocado


- 1 tablespoon balsamic vinegar


- 1 teaspoon cumin


- 1 can of frozen corn, drained


- 1 clove garlic, finely chopped


- 1 red bell pepper, finely chopped


- Olive oil spray


Instructions:

1. Preheat your oven to 375 degrees Fahrenheit.


2. Spread the drained corn evenly on a baking sheet and lightly spray with olive oil.


3. Roast the corn in the oven for about 8-10 minutes, ensuring it doesn't brown too much or burn. Once done, remove from heat and allow it to cool.


4. In a large bowl, combine the finely chopped red pepper and garlic.


5. Peel, coarsely chop the avocado, and add it to the bowl along with the cooled corn.


6. Sprinkle in the cumin and drizzle the balsamic vinegar over the mixture, blending well to ensure all ingredients are evenly coated.


Difficulty Rating: 3/10
Classification: Appetizer

---


The true magic of Corn Avocado Salsa lies not only in its exquisite taste but also in the memories it evokes. Every time I prepare this dish, I'm transported back to my grandmother's kitchen, where the aroma of roasting corn mingled with the laughter of cousins gathered around the table. Grandma always insisted on using the freshest ingredients, and her secret was roasting the corn just to the right point where it retained its sweetness without losing its crispness.


Our family would often gather in the backyard, surrounded by towering sunflowers and the melodious chirping of crickets. Grandma would bring out a large bowl of her famous salsa, and we'd snack on it with tortilla chips, savoring each bite as the sun dipped below the horizon. It was during these moments that I learned the importance of good food and even better company.


Today, I continue this tradition with my own family, and with every bite of Corn Avocado Salsa, I'm reminded of those warm, joyful gatherings. This recipe is more than just a culinary delight; it's an invitation to pause, savor, and create lasting memories with loved ones. So, as you prepare this dish, I hope it brings as much warmth and happiness to your table as it has to mine.


Whether you're hosting a summer barbecue or simply looking to indulge in a refreshing appetizer, Corn Avocado Salsa is sure to impress. Enjoy the blend of creamy avocado, sweet roasted corn, and the subtle kick of cumin, and let it transport you to your own cherished memories.

Read more about Appetizers

Read more about Main Dishes

Read more about Desserts

Penne with Goat Cheese and Basil | Made by Meaghan Moineau

Penne with Goat Cheese and Basil | Made by Meaghan Moineau

Title: A Taste of Home: Penne with Goat Cheese and Basil
Description: Dive into the delightful simplicity of Penne with Goat Cheese and Basil, a dish that promises to bring comfort and nostalgia to your dining table. This easy yet flavorful main dish is perfect for any occasion, whether you're a seasoned cook or a kitchen novice.

---


There's something magical about the aroma of fresh basil mingling with the creamy tang of goat cheese. It takes me back to warm summer evenings at my grandmother's house, where the air was always filled with laughter and the scent of herbs from her garden. This dish, Penne with Goat Cheese and Basil, is not only a nod to those cherished moments but also a testament to the power of simple ingredients to create something truly special.


Ingredients:

- Penne pasta


- Fresh basil leaves


- Goat cheese


- Olive oil


- Salt and pepper


Instructions:

1. Begin by cooking the penne pasta according to the package directions. The key is to achieve that perfect al dente texture, where each piece offers a slight bite yet is tender enough to soak up the flavors.


2. While the pasta cooks, take a generous bunch of basil leaves and arrange them in a neat stack. Roll them up tightly like a cigar and cut crosswise to create beautiful, fragrant ribbons using the classic chiffonade technique.


3. Once the pasta is cooked and drained, toss it with a drizzle of olive oil and crumbled goat cheese. Allow it to cool for a few minutes, letting the cheese melt slightly and coat the pasta in a creamy embrace.


4. Finally, add your basil chiffonade, a pinch of salt, and freshly cracked pepper. Toss everything together gently, ensuring each piece of penne is enveloped in the harmonious blend of flavors.


5. Serve immediately and savor each bite, perhaps with a glass of chilled white wine or a summery iced tea.


A Nostalgic Note:

This dish always takes me back to those family gatherings at grandma's. I remember the way she would wander through her garden, snipping fresh basil with a pair of well-used scissors, smiling as she handed me the fragrant leaves. We'd cook together, her guiding hands showing me the chiffonade technique, her voice blending with the sounds of the bustling kitchen. The simple act of preparing and sharing a meal was her way of teaching us about love and togetherness.


Difficulty Rating: 3/10
Classification: Main Dish

Whether you're looking to impress guests with minimal effort or simply want to treat yourself to a comforting meal, Penne with Goat Cheese and Basil is the perfect choice. Its simplicity is its strength, allowing the fresh, vibrant ingredients to shine. Give it a try, and perhaps you'll create a new memory of your own to cherish.

Read more about Appetizers

Read more about Main Dishes

Read more about Desserts

Roasted Strawberry Coconut Milk Ice Cream | Made by Meaghan Moineau

Roasted Strawberry Coconut Milk Ice Cream | Made by Meaghan Moineau

Title: Indulge in Nostalgia with Roasted Strawberry Coconut Milk Ice Cream
Description: Dive into a scoop of creamy nostalgia with our Roasted Strawberry Coconut Milk Ice Cream. This delightful dessert combines the lusciousness of coconut milk with the warm spice of cardamom and the sweet, tangy burst of roasted strawberries. Easy to make and even easier to enjoy, this ice cream is a perfect treat for any occasion.

---


Roasted Strawberry Coconut Milk Ice Cream


Difficulty: 4/10
Classification: Dessert

Ingredients:


- 1/2 cup raw cane sugar


- 2 cans full-fat coconut milk


- 1 teaspoon ground cardamom


- 1 pound strawberries


- 1 vanilla bean


Instructions:


1. Prepare the Coconut Milk Mixture: In a saucepan over medium heat, combine the coconut milk, 1/2 cup of raw cane sugar, and ground cardamom. Using a small knife, slice the vanilla bean lengthwise and scrape the seeds into the coconut milk mixture. Add the vanilla bean pod as well for extra flavor.
2. Roast the Strawberries: Preheat your oven to 375°F (190°C). Hull and slice the strawberries, then spread them out on a baking sheet lined with parchment paper. Sprinkle a tablespoon of raw cane sugar over the strawberries, and roast in the oven for about 20-25 minutes, or until the strawberries are soft and slightly caramelized.
3. Combine and Chill: Once the coconut milk mixture is warmed and the aroma is inviting, remove the vanilla bean pod. Allow the mixture to cool to room temperature. Once the strawberries have roasted, allow them to cool as well. Blend the roasted strawberries until smooth, then mix them into the coconut milk mixture. Chill the combined mixture in the refrigerator for at least 4 hours or overnight for best results.
4. Churn and Freeze: Pour the chilled mixture into an ice cream maker and churn according to the manufacturer's instructions. Once churned to a soft-serve consistency, transfer the ice cream to a lidded container and freeze for at least 2 hours, or until firm.
5. Serve and Enjoy: Scoop the ice cream into bowls or cones and enjoy the creamy, fruity flavors that bring back cherished memories.

---


A Sweet Memory


Growing up, summers at Grandma's house were synonymous with the delightful aroma of fresh strawberries roasting in the kitchen. Her kitchen was a haven of culinary wonders, but nothing could rival the excitement of homemade ice cream day. Grandma's secret ingredient was always a pinch of cardamom, which she claimed was a little bit of magic passed down from her mother.


The sweet, spicy aroma of cardamom wafting through the air was a signal that something extraordinary was happening. We'd gather around, eager to watch as she blended the roasted strawberries into the creamy coconut milk mixture, her hands deftly working the ice cream maker.


Those moments, spent with family, laughing and sharing stories while waiting for the ice cream to set, were the essence of summer. Each spoonful of ice cream was a taste of nostalgia, a reminder of the warmth and love that filled those sun-drenched days.


Now, as I recreate this recipe for my own family, I hope to pass on not just the flavors, but the cherished memories that come with it. This Roasted Strawberry Coconut Milk Ice Cream is more than just a dessert—it's a celebration of love, tradition, and the simple joys of life.


---


Indulge in this delightful dessert and let the flavors transport you to a place of warmth and nostalgia. Perfect for summer gatherings or a cozy evening treat, this ice cream is a delicious way to create new memories while honoring the old.

Read more about Appetizers

Read more about Main Dishes

Read more about Desserts

Chicken Piccata With Angel Hair Pasta | Made by Meaghan Moineau

Chicken Piccata With Angel Hair Pasta | Made by Meaghan Moineau

Zesty Chicken Piccata With Angel Hair Pasta: A Timeless Family Classic


Description


Discover the tangy and savory delight of Chicken Piccata with Angel Hair Pasta, a dish that balances bright citrus notes with the richness of a buttery sauce, all harmonized with tender chicken and delicate pasta. This main dish not only promises a burst of flavor but also serves as a nostalgic journey back to family gatherings marked by laughter, love, and unforgettable meals. Perfect for a weeknight dinner or a special occasion, this recipe is rated 6/10 in difficulty and will leave your taste buds dancing with joy.


---


A Walk Down Memory Lane


Growing up, Sunday dinners were a cherished tradition in our family. My grandmother would spend the afternoon bustling around the kitchen, her apron dusted with flour and a twinkle in her eye as she orchestrated the meal that would bring us all together. Chicken Piccata with Angel Hair Pasta was a staple, a dish that magically combined her Sicilian roots with a touch of modern flair.


I remember the way the kitchen smelled, the citrusy aroma of fresh lemons mingling with the savory scent of sautéed garlic and olive oil. As children, my cousins and I would gather around the table, eagerly awaiting the moment when she would place the steaming platter before us. Each bite was a revelation—the tangy capers popping against the tender chicken and the delicate strands of pasta soaking up the rich, buttery sauce.


Those evenings were filled with stories and laughter, the kind of moments that linger long after the plates have been cleared. To this day, every time I prepare this dish, I can almost hear my grandmother's gentle laughter and feel the warmth of those family gatherings. It's more than just a meal; it's a connection to the past, a way to keep those precious memories alive.


---


Ingredients


- 1 cup all-purpose flour


- 8 oz angel hair pasta


- 2 boneless chicken breasts


- 2 tablespoons capers


- 1 cup chicken broth


- Fresh basil, chopped


- 2 diced garlic cloves


- Black kosher salt and pepper to taste


- Zest and juice of 2 lemons


- 3 tablespoons olive oil, divided


- 1 teaspoon red chili flakes


- 2 diced Roma tomatoes


- 3 tablespoons unsalted butter


---


Instructions


1. Prepare the Chicken:

Place 1 cup of flour in a shallow dish. Using a sharp knife, slice each chicken breast in half. Cover each piece with wax paper and use a kitchen mallet to pound them to about ½ inch thick. Season the chicken generously with salt and pepper. Coat the chicken pieces in flour, shaking off any excess.


2. Cook the Chicken:

In a large skillet, heat 2 tablespoons of olive oil over medium heat. Add the chicken to the skillet and sauté each side until golden brown, about 3-4 minutes per side. Once cooked, transfer the chicken to a clean plate and cover with aluminum foil.


3. Boil the Pasta:

Begin boiling the angel hair pasta according to package instructions.


4. Make the Sauce:

Using the same skillet, add the remaining olive oil and sauté the garlic until aromatic, avoiding browning. Add red chili flakes, capers, lemon juice, lemon slices, zest, and chicken broth. Use a wooden spoon to scrape up any brown bits from the skillet. Increase heat to medium-high and allow the liquid to reduce by half.


5. Finish the Sauce:

In a small bowl, mash together 1 tablespoon of flour and the butter. Whisk into the reducing liquid, cooking for 1-2 minutes. Ensure the sauce is smooth and adjust seasoning with salt and pepper.


6. Combine Everything:

Drain the cooked pasta and toss it in the lemon caper sauce with tomatoes and basil, reserving a few spoonfuls of sauce. Adjust seasoning if needed.


7. Serve:

Plate the pasta and top each serving with a piece of chicken. Spoon the reserved lemon caper sauce over the chicken and pasta. Serve immediately.


---


Conclusion


Recreate this delicious Chicken Piccata with Angel Hair Pasta and transport yourself to a place where every meal becomes a memory worth savoring. Whether you're sharing it with family or enjoying a quiet evening at home, this dish promises to delight with its robust flavors and heartwarming nostalgia.

Read more about Appetizers

Read more about Main Dishes

Read more about Desserts

Broccoli Rabe and Breaded Veal Scallopini | Made by Meaghan Moineau

Broccoli Rabe and Breaded Veal Scallopini | Made by Meaghan Moineau

Title: "Savoring Heritage: Broccoli Rabe and Breaded Veal Scallopini"
Description:

Dive into the rich flavors of Broccoli Rabe and Breaded Veal Scallopini, a dish that marries tradition with taste. This main dish, rated 6 out of 10 in difficulty, offers a delightful culinary journey. Join us as we explore the steps to create this masterpiece, infused with a nostalgic family memory that brings warmth to every bite.


---


Broccoli Rabe and Breaded Veal Scallopini: A Taste of Tradition

In the heart of our family kitchen, where laughter mingled with the aroma of simmering dishes, Broccoli Rabe and Breaded Veal Scallopini took center stage. It was a dish that whispered stories of heritage, of Sundays spent around the table, and of the hands that lovingly prepared it. Today, I invite you to recreate this beloved recipe, a culinary heirloom that promises to enchant your taste buds and warm your soul.


Ingredients:

- Broccoli rabe


- Butter


- Egg


- Olive oil


- Salt and pepper


- Yellow onion


- Garlic clove


- Bread crumbs


- Veal scallopini


- Tomatoes


Instructions:
1. Prepare the Broccoli Rabe:

Begin by washing and steaming the broccoli rabe for a few minutes. This step can be done in a pressure cooker for efficiency. The vibrant greens are the perfect complement to the savory veal.


2. Sauté the Aromatics:

Thinly slice the yellow onion. Peel and halve the garlic clove, removing the stem. Heat 1-2 tablespoons of olive oil in a deep pan. Sauté the onion and garlic on medium heat until translucent, releasing their fragrant aroma.


3. Cook the Vegetables:

Add the steamed broccoli rabe to the pan, cover with a lid, and let it cook for a few more minutes. As the flavors meld together, cut the tomatoes into wedges and add them to the pan. Cook for several additional minutes, seasoning with salt and pepper to taste.


4. Prepare the Veal Scallopini:

Season each scallopini with salt and pepper. Dip them in beaten egg, ensuring an even coat. Follow by dipping them in bread crumbs, pressing down to cover evenly.


5. Pan Fry the Veal:

In another pan, melt a generous amount of butter. Pan fry the breaded veal scallopini over high heat, cooking for 1-2 minutes on each side. Add more butter before flipping, as the bread crumbs will absorb it, ensuring a golden, crispy finish.


A Nostalgic Family Memory:

As a child, Sundays meant gathering in my grandmother's cozy kitchen. The clatter of pots and pans was the soundtrack to our family stories, and Broccoli Rabe and Breaded Veal Scallopini was always the star of the meal. I remember my grandmother's skilled hands, dusted with flour, as she taught me the art of breading the veal, her stories weaving into the fabric of our family's culinary history. The dish was more than just food; it was a connection to our roots, a tapestry of flavors that told the story of our heritage.


Difficulty Rating: 6/10

This dish, while requiring attention to detail, is a rewarding culinary endeavor that even intermediate cooks can master. It stands proudly as a main dish, perfect for family gatherings or a special Sunday dinner.


Conclusion:

Broccoli Rabe and Breaded Veal Scallopini is more than just a recipe; it's a journey through time, a celebration of flavors that transcends generations. As you prepare this dish, may it bring you the same joy and nostalgia it has brought to our family table. Bon appétit!

Read more about Appetizers

Read more about Main Dishes

Read more about Desserts

Bacalhau Macau | Made by Meaghan Moineau

Bacalhau Macau | Made by Meaghan Moineau

Title: Rediscovering Bacalhau Macau: A Delectable Fusion of Flavors
Description: Dive into the heartwarming world of Bacalhau Macau, a delightful fusion of Portuguese and Macanese cuisines. This recipe, with its rich flavors and crispy textures, promises to transport you to a time when family gatherings were filled with laughter, stories, and the comforting aroma of home-cooked meals.

---


Bacalhau Macau: A Journey Through Flavor and Family Traditions

There's something inherently magical about dishes that have the power to evoke cherished memories, to transport us back to a simpler time when the world seemed a bit more connected, and every meal was a celebration of togetherness. Bacalhau Macau is one such dish, a testament to the rich culinary tapestry woven by the Portuguese and Macanese cultures. This recipe, with its crispy-on-the-outside, fluffy-on-the-inside fish cakes, is not just a meal but a gateway to nostalgia.


Ingredients:

- 2 salt cod fillets


- 2 russet (Idaho) potatoes, diced


- 2 tablespoons butter


- 2 green onions, chopped


- 1/4 cup chopped cilantro


- 1/4 cup oil-cured olives, chopped


- 1 egg white


- 1 tablespoon sesame oil


- 1 teaspoon salt


- 2 cloves garlic, minced


- 1 teaspoon grated ginger


- 1/2 teaspoon white pepper


- 1/2 cup whipping cream


- 1 egg


- 1 cup Japanese breadcrumbs


- Vegetable oil, for frying


Instructions:

1. Begin by placing the salt cod in a bowl and covering it with cold water. Allow it to soak for 6 to 8 hours, changing the water at least once or twice during this time. Once soaked, drain, rinse thoroughly, and pat dry. Carefully shred the fish with your fingers.


2. In a medium saucepan, bring 3 inches of water to a boil. Add the diced potatoes and cook until tender, about 10 to 12 minutes. Drain and briefly return the potatoes to the pan to evaporate any excess moisture. Mash the potatoes until smooth, then whisk in the butter.


3. Stir the shredded cod into the mashed potatoes, followed by the green onions, cilantro, olives, egg white, sesame oil, salt, garlic, ginger, and white pepper. Mix until well combined.


4. In a chilled bowl, whip the cream until soft peaks form. Gently fold the whipped cream into the cod mixture using a rubber spatula.


5. Using two large soup spoons, shape about 3 tablespoons of the cod-potato mixture into an oval fish cake. Continue shaping until all the mixture is used, setting each cod cake on a baking sheet as you go.


6. Spread the breadcrumbs on a plate. Beat the egg in a wide, shallow bowl. Dip each cod cake in the egg, allowing any excess to drip off, then roll it in breadcrumbs to coat all sides. Place the coated fish cakes on a baking sheet.


7. Heat a large skillet over medium heat and add 1/4 inch of vegetable oil. Once the oil is hot, add as many cod cakes as fit without touching. Cook, turning once, until golden brown, about 5 to 7 minutes. Remove with a slotted spoon and drain on paper towels. Repeat with any remaining cakes.


8. Serve the Bacalhau Macau warm, reveling in the delightful blend of flavors that have stood the test of time.


A Nostalgic Note:

Growing up, Bacalhau Macau was a staple at our family gatherings. My grandmother, a beacon of culinary wisdom, would often recount tales of her childhood in Macau as she meticulously prepared this dish. Her kitchen was a symphony of sizzling sounds and aromatic scents, a sensory feast that drew our family together like bees to honey. We would gather around the table, eagerly awaiting the first bite, and as the crispy exterior gave way to the savory, pillowy interior, stories of the past would flow, binding us in a shared history that was as rich and textured as the dish itself.


Difficulty Rating: 6/10
Classification: Main Dish

Bacalhau Macau is more than a meal; it's an experience, a testament to the enduring power of family and the timeless joy of sharing food and stories. Whether you're steeped in the tradition of this dish or discovering it for the first time, may it bring warmth and connection to your table as it has to ours.

Read more about Appetizers

Read more about Main Dishes

Read more about Desserts

Herbivoracious’ White Bean and Kale Soup | Made by Meaghan Moineau

Herbivoracious' White Bean and Kale Soup | Made by Meaghan Moineau

Savoring Simplicity: Herbivoracious' White Bean and Kale Soup Recipe


A Comforting Bowl of Nostalgia and Nutrition


In the hustle and bustle of modern life, it's often the simplest things that bring the most comfort. Herbivoracious' White Bean and Kale Soup is one of those treasured recipes that seamlessly blends heartiness with wholesomeness. Whether you're a seasoned chef or a culinary novice, this soup is your gateway to a world of flavors that marries nutrition with nostalgia.


Ingredients


- 2 tablespoons olive oil
- 1 medium onion, diced
- 3 cloves garlic, whole
- 2 carrots, diced
- 1 teaspoon kosher salt
- 2 bay leaves
- 1 tablespoon fresh rosemary leaves
- Choice of Parmesan rind, dried porcini, or broth powder
- 1 cup dried white navy beans
- 6 cups water
- 1 bunch dinosaur kale, chopped
- Juice of 1 lemon
- Extra-virgin olive oil for drizzling

Instructions


Pressure Cooker Method


1. Sauté the Vegetables: In the pressure cooker, heat olive oil over medium-high heat. Sauté the onion, garlic, carrot, and salt until the onion is translucent, about 4 minutes.
2. Add Aromatics and Beans: Stir in the bay leaves, rosemary, and your choice of Parmesan rind, dried porcini, or broth powder. Add the dried beans and water.
3. Pressure Cook: Seal the pressure cooker and bring to high pressure. Cook for 40 minutes, then allow the pressure to release naturally.
4. Finalize the Soup: Open the lid, remove the bay leaves and Parmesan rind. Add the kale and lemon juice, and simmer for 10 minutes until the kale is tender. Adjust seasoning to taste.
5. Serve: Garnish with a generous drizzle of extra-virgin olive oil before serving.

Stovetop Method


1. Prepare the Beans: Soak beans overnight in ample water. Drain and place them in a large saucepan with enough water to cover by 2 inches. Bring to a boil, then reduce heat and simmer until tender, about 1 ½ to 2 hours. Drain, reserving the broth.
2. Sauté the Vegetables: In a large saucepan, heat olive oil over medium-high heat. Sauté the onion, garlic, carrot, and salt until the onion is translucent, about 4 minutes.
3. Simmer the Soup Base: Add 4 cups of the reserved bean broth, bay leaves, rosemary, and your choice of Parmesan rind, dried porcini, or broth powder. Simmer for 30 minutes.
4. Complete the Soup: Remove bay leaves and Parmesan rind. Add the cooked beans, kale, and lemon juice, simmering for 10 minutes until the kale is tender.
5. Serve: Adjust seasoning and serve with a drizzle of extra-virgin olive oil.

A Nostalgic Taste of Home


Growing up, Sundays were a time for family gatherings, where stories were shared and laughter echoed through the house. My grandmother often made a version of this White Bean and Kale Soup, filling the kitchen with its irresistible aroma. I remember sitting at her worn wooden table, watching the steam rise from my bowl as she recounted tales from her childhood. This soup, with its rustic charm and hearty flavors, became a symbol of family love and togetherness. Even today, every spoonful takes me back to those cherished moments, reminding me of the warmth and comfort of home.


Difficulty Rating: 4/10


Herbivoracious' White Bean and Kale Soup is a delightful main dish that's simple to prepare, making it accessible to cooks of all skill levels. With a bit of patience and love, this recipe transforms basic ingredients into a nourishing meal that feeds both body and soul.


Embrace the culinary journey of creating this comforting dish, and allow it to become a staple in your family's collection of wholesome recipes. Whether you're gathering around the table with loved ones or seeking solitude with a good book, this soup is a testament to the power of simplicity and the joy of homemade goodness.

Read more about Appetizers

Read more about Main Dishes

Read more about Desserts

Moist Vegan Spelt Bran Muffins | Made by Meaghan Moineau

Moist Vegan Spelt Bran Muffins | Made by Meaghan Moineau

Unwrapping Memories: Moist Vegan Spelt Bran Muffins


Description


Delve into the heartwarming world of homemade goodness with our Moist Vegan Spelt Bran Muffins. Perfect for breakfast or a wholesome snack, these muffins are a delightful blend of healthy ingredients and nostalgic memories, making them a must-try for any baking enthusiast. With a difficulty rating of 4 out of 10, this dessert is approachable for both novice and experienced bakers alike.


---


A Taste of Yesteryears: Family Mornings with Spelt Bran Muffins


There’s a certain magic that envelops the kitchen when baking. The warm aroma of nutmeg and cinnamon swirling through the air, the sound of mixing bowls clattering, and the sight of ingredients coming together to create something special. For me, this enchanting scene is forever tied to memories of Sunday mornings spent with my grandmother.


Every Sunday, my family would gather at her cozy home, nestled in a quaint corner of our town. While the adults caught up over mugs of steaming coffee, we kids hovered around the kitchen, eagerly watching Grandma prepare her famous spelt bran muffins. She never used a written recipe, relying instead on her well-practiced hands and heart full of love to guide her.


Grandma’s secret was always in the preparation. She would whisk together ground flaxseed and hot water, letting it sit for those crucial ten minutes to achieve that perfect binding texture. As the flax transformed, she would regale us with stories from her own childhood, tales of her mother baking similar treats in a wood-fired oven.


The ingredients she used were simple yet wholesome, reflecting her philosophy of nourishing both body and soul. Wheat bran, spelt flakes, and whole spelt flour formed the foundation, while psyllium fibre husks and chia seeds added a modern twist. She would lovingly fold in plump raisins and chopped prunes, their sweetness a perfect counterbalance to the earthy spelt.


As the muffins baked, we’d gather around the oven, waiting with anticipation. The timer's ring signaled not just perfectly done muffins, but also the continuation of a cherished family tradition. Biting into those warm, moist muffins, with their delicate balance of spices and subtle sweetness, never failed to transport me back to those cherished mornings.


Now, as I prepare these muffins in my own kitchen, I feel a connection to those past generations. It’s a reminder that while ingredients and techniques might evolve, the love and warmth infused in family recipes remain timeless.


---


Recipe: Moist Vegan Spelt Bran Muffins


Ingredients


- 2 tablespoons ground flaxseed


- 6 tablespoons hot water


- 1 cup wheat bran


- 1 cup spelt bran


- 1 cup spelt flakes


- 1 cup whole spelt flour


- 2 tablespoons psyllium fibre husks


- 1 teaspoon stevia extract powder


- 2 tablespoons whole flaxseeds


- 2 tablespoons chia seeds


- 2 teaspoons baking soda


- 1 teaspoon sea salt


- 1 teaspoon nutmeg


- 2 teaspoons cinnamon


- 1 cup demerara sugar


- ½ cup agave nectar


- 1 cup applesauce


- 4 tablespoons Ener-G egg replacer (prepared as per package instructions)


- 1 ½ cups vegan milk (almond, soy, or oat)


- ½ cup canola oil


- 1 cup raisins (soaked and drained)


- 1 cup chopped prunes


Instructions


1. Preheat your oven to 400°F (200°C). Prepare 24 muffin cups by lining them with paper liners or greasing them well.


2. In a small bowl, whisk together the ground flaxseed and hot water. Allow the mixture to stand for 10 minutes, creating a flax "egg."


3. In a medium bowl, combine the wheat bran, spelt bran, spelt flakes, whole spelt flour, psyllium fibre husks, stevia extract, whole flaxseeds, chia seeds, baking soda, sea salt, nutmeg, and cinnamon. Whisk until well blended.


4. In a large mixing bowl, beat together the demerara sugar, agave nectar, applesauce, prepared Ener-G egg replacer, flax mixture, vegan milk, and canola oil until smooth and well incorporated.


5. Gradually add the dry ingredients to the wet ingredients, stirring just until combined. Fold in the raisins (along with their reserved liquid) and chopped prunes.


6. Spoon the batter into the prepared muffin cups, filling each about 2/3 full.


7. Bake in the preheated oven for 15-17 minutes, or until a toothpick inserted into the center of a muffin comes out clean.


8. Allow the muffins to cool in the pan for a few minutes before transferring them to a wire rack to cool completely.


---


These Moist Vegan Spelt Bran Muffins are not merely a recipe; they are a bridge to cherished memories and a testament to the enduring power of family traditions. Whether enjoyed fresh from the oven or packed for a midday snack, these muffins promise a taste of nostalgia and the comforting embrace of home.

Read more about Appetizers

Read more about Main Dishes

Read more about Desserts

Vietnamese Banh Mi | Made by Meaghan Moineau

Vietnamese Banh Mi | Made by Meaghan Moineau

Title: "Savory Memories: Crafting the Perfect Vietnamese Banh Mi"
Description: Dive into the delightful world of Vietnamese cuisine with our authentic Banh Mi recipe. Learn how to combine flavorful ingredients and create a sandwich that’s not just a meal, but a nostalgic journey. Perfectly balanced with tender pork, fresh herbs, and tangy pickles, this Banh Mi is rated 5/10 in difficulty and is a fulfilling main dish.

---


A Taste of Home: The Vietnamese Banh Mi


In the realm of Vietnamese cuisine, Banh Mi stands out as a testament to the country's rich culinary tapestry. This delightful sandwich, with its perfect balance of flavors and textures, has not only become a street food favorite but also a cherished dish in our family. Today, I’m excited to share both a beloved recipe and a heartwarming story that brings this dish to life.


Ingredients


- Rolls


- Pork loin, thinly sliced


- 2 cloves garlic, minced


- 3 tablespoons fish sauce


- 1 tablespoon sugar


- Freshly ground black pepper


- 1 small onion, sliced


- 2 tablespoons vegetable oil


- 1 teaspoon sesame seed oil


- Mayonnaise


- Fresh cilantro sprigs


- Pickled carrot and daikon


- Pâté


- Cucumber, sliced


- Jalapeño, sliced


Instructions


1. Marinate the Pork: In a large plastic bag, combine garlic, fish sauce, sugar, black pepper, onion, vegetable oil, and sesame seed oil. Mix well until the sugar dissolves completely. Add the thinly sliced pork loin to the marinade, ensuring each piece is well-coated. Seal the bag and let it marinate in the refrigerator for at least 1 hour to absorb all the flavors.
2. Cook the Pork: Heat a pan over medium heat. Remove the pork from the marinade and cook the slices in a single layer. Once one side is cooked, flip each piece to ensure even cooking on both sides. Once done, let the pork rest for 10 minutes before slicing into strips.
3. Assemble the Banh Mi: Slice the rolls in half and spread a generous layer of mayonnaise on one side. Add a layer of pâté on the other side. Carefully layer the pork strips, pickled carrot and daikon, cucumber slices, jalapeño, and cilantro sprigs inside the roll. Close the sandwich and serve immediately.

A Nostalgic Journey


Growing up, Banh Mi was more than just a meal; it was a symbol of home and togetherness. I vividly remember Sunday mornings bustling with activity in our kitchen. My grandmother, with her gentle hands and wise smile, would carefully prepare the marinade, a secret recipe she brought with her from Vietnam. As the pork sizzled on the pan, the aroma would fill our home, drawing everyone to the kitchen.


We would gather around the table, eagerly waiting to assemble our sandwiches. Each ingredient was a story, from the tart pickled vegetables representing the vibrant markets of Saigon, to the fresh cilantro, reminiscent of the herbs in our garden. The Banh Mi was not just a sandwich; it was a bridge to our heritage and a delicious reminder of the love that bound our family together.


Recipe Difficulty and Classification


This Vietnamese Banh Mi recipe is rated 5/10 in difficulty, making it accessible for home cooks while still providing a satisfying culinary challenge. Classified as a main dish, it offers a complete meal experience that is both filling and flavorful.


Whether you’re a seasoned chef or a home cook exploring new cuisines, this Banh Mi recipe invites you to savor not just a meal, but a memory. As you take your first bite, may it transport you to a place of warmth, nostalgia, and culinary delight. Enjoy!

Read more about Appetizers

Read more about Main Dishes

Read more about Desserts