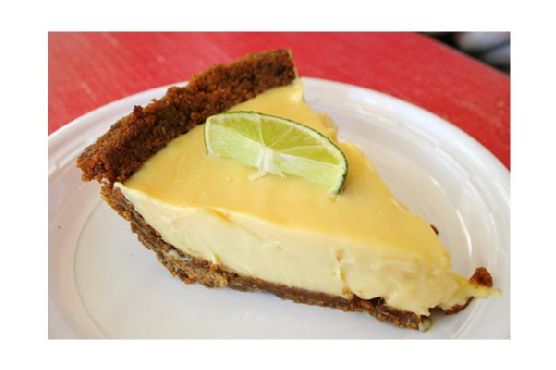
Easy Key Lime Pie | Made by Meaghan Moineau
**Title: A Slice of Sunshine: Easy Key Lime Pie Recipe with a Dash of Family Nostalgia**
**Description:** Dive into the zestful world of Key Lime Pie with our easy-to-follow recipe. Perfect for dessert lovers, this pie combines tangy lime flavors with a buttery graham cracker crust. Join us as we explore not just the steps to create this delightful treat, but also a cherished family memory that makes this pie a staple in our home.
---
### A Slice of Sunshine: Easy Key Lime Pie Recipe with a Dash of Family Nostalgia
When the sun is high and the days are long, there's nothing quite like the refreshing bite of a Key Lime Pie to bring a little bit of sunshine to your table. This Easy Key Lime Pie recipe is a breeze to make, and it brings back fond memories of summer afternoons spent in my grandmother's kitchen, surrounded by the laughter of family and the sweet aroma of limes.
**Ingredients:**
- 1/4 cup butter, melted
- 1/4 cup sugar
- 1 1/2 cups crushed graham crackers
- 3 egg yolks
- 1 can (14 ounces) sweetened condensed milk
- 1/2 cup lime juice
- 1/4 cup water
- Whipped cream for topping
- A few drops of green food coloring (optional)
**Instructions:**
**1. Prepare the Crust:**
Start by melting the butter in a small saucepan. Once melted, stir in 1/4 cup of sugar until it's well combined. Add the crushed graham crackers to the mixture and toss until everything is mixed thoroughly.
Spread this mixture evenly into a 9-inch pie plate, pressing it firmly onto the bottom and sides to create a solid crust. Chill the crust for 1 hour or until firm. For a more robust flavor, you can also bake it in a 375-degree oven for 4-5 minutes and then let it cool before filling.
**2. Create the Filling:**
In a medium bowl, beat the egg yolks using a whisk or fork until they are smooth. Gradually whisk in the sweetened condensed milk, ensuring a creamy consistency. Next, add the lime juice and water, stirring the mixture until it begins to thicken. For a touch of color, you can add a few drops of green food coloring.
**3. Assemble and Bake:**
Spoon the lime filling into the prepared crust, spreading it evenly. Bake the pie in a 350-degree oven for 25 minutes. Once baked, allow it to cool for 1 hour before transferring it to the refrigerator to chill for an additional 3-4 hours.
**4. Serve:**
Top your pie with a generous dollop of whipped cream just before serving. Each bite is a perfect balance of creamy sweetness and tangy lime, a true testament to its reputation as a classic dessert.
**A Family Memory:**
Growing up, our family gatherings were never complete without my grandmother's famous Key Lime Pie. Every summer, she would host a picnic in her backyard, a tradition that brought together cousins from near and far. I remember watching her in the kitchen, her hands deftly working through the recipe as she hummed along to her favorite tunes.
The moment the pie emerged from the oven, a sense of anticipation filled the room. We'd gather around the table, each slice bringing with it not just a burst of lime flavor, but a flood of memories. My grandmother would share stories of her childhood in Florida, where Key Limes grew in abundance and pies like these were a staple of every family event.
Those afternoons taught me that food is more than just sustenance; it’s a bridge to the past, a vessel of tradition and love. Now, every time I make this pie, I'm reminded of those cherished moments, making it more than just a dessert, but a slice of family history.
**Difficulty Rating:** 4/10
**Category:** Dessert
---
Embrace the sunshine in every bite with this Easy Key Lime Pie recipe. Whether you're creating new memories or reliving old ones, this pie is sure to become a beloved dessert in your home. Enjoy!