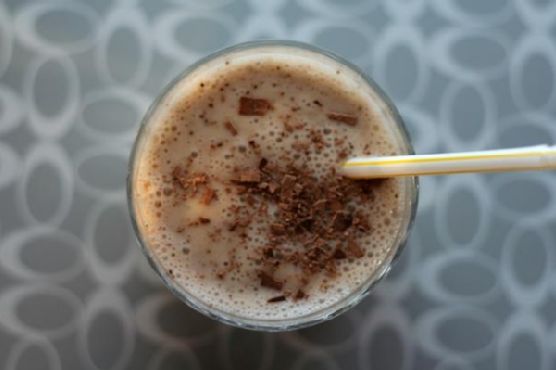
Banana Smoothie Boost
Intro
There’s something undeniably comforting about a banana smoothie. It takes me back to those golden summer mornings spent at my grandmother’s kitchen table. She would always have a fresh batch of smoothies ready for us kids, blending the perfect mix of delicious fruits and wholesome ingredients. Among these, my favorite was the banana smoothie. Today, I want to share with you a modern twist on this nostalgic beverage – the Banana Smoothie Boost. This delightful recipe combines the natural sweetness of bananas with the rich flavors of chocolate and coffee, creating a refreshing and invigorating drink that’s perfect for any time of the day. Whether you’re looking to kick-start your morning or re-energize in the afternoon, this smoothie is sure to hit the spot.
Why You’ll Love It
This Banana Smoothie Boost is the ultimate blend of taste and nutrition. The creamy texture of almond milk pairs perfectly with the frozen banana, creating a lusciously smooth base. The addition of coffee gives you that much-needed caffeine kick, while chocolate adds an indulgent touch. A hint of honey ties everything together with its natural sweetness. Whether you’re a busy bee needing a quick breakfast or a fitness enthusiast seeking a post-workout snack, this smoothie will fit seamlessly into your lifestyle. Plus, it’s incredibly easy to make and can be customized to suit your taste preferences.
Ingredients
- 1 cup almond milk
- 1 frozen banana
- 1 tablespoon chocolate (shaved for topping)
- 1/2 cup brewed coffee (cooled)
- 1 tablespoon honey
Instructions
- Gather all your ingredients. Ensure the coffee is brewed and cooled before use.
- In a blender, combine the almond milk, frozen banana, brewed coffee, and honey.
- Blend on high speed until the mixture is smooth and creamy.
- Pour the smoothie into a glass.
- Sprinkle the shaved chocolate on top for a delightful garnish.
- Serve immediately and enjoy your revitalizing Banana Smoothie Boost!
Tips
For an even creamier texture, consider using a high-power blender. If you prefer a thicker smoothie, you can add a few ice cubes or an extra half banana. For those who like a sweeter taste, a touch more honey can do the trick. To make the process quicker, prep your ingredients the night before, so all you have to do is blend them in the morning.
Variations & Substitutions
If you’re vegan or avoiding honey, agave syrup or maple syrup is a great alternative. For a nut-free version, substitute almond milk with oat milk or coconut milk. If you’re not a fan of coffee, omit it or replace it with a caffeine-free coffee substitute or a teaspoon of cocoa powder for a chocolatey flavor without the caffeine. You can also add a scoop of your favorite protein powder to turn this smoothie into a powerful post-workout drink.
Storage
While this Banana Smoothie Boost is best enjoyed fresh, you can store it in the refrigerator for up to 24 hours. Keep it in a tightly sealed jar or cup to maintain its freshness. Before drinking, give it a good shake or stir, as separation may occur. For those who like to plan ahead, consider freezing individual smoothie portions in airtight containers. Simply let them thaw in the fridge overnight before consuming.
FAQ
Can I use fresh bananas instead of frozen?
Yes, you can use fresh bananas, but keep in mind that frozen bananas contribute to the smoothie’s thick and cold texture. If using fresh bananas, you might want to add a few ice cubes to achieve a similar consistency.
Is it necessary to use cooled coffee?
Using cooled coffee is recommended to prevent the smoothie from becoming too warm. Hot coffee can also impact the texture of the smoothie. If you’re in a hurry, you can use cold brew coffee as a convenient alternative.
Can I prepare this smoothie the night before?
Yes, you can prepare the smoothie the night before, but for the best flavor and texture, it’s ideal to blend it fresh. If you do make it in advance, store it in the fridge and give it a good shake before drinking.
Nutrition
This smoothie is not only delicious but also packed with nutrients. The banana provides potassium and dietary fiber, while almond milk is a great source of calcium and vitamin E. Coffee offers antioxidants, and a touch of honey adds natural energy. Just be mindful of the chocolate topping if you’re watching your sugar intake.
Conclusion
The Banana Smoothie Boost is a delightful fusion of flavors that’s sure to become a staple in your drink repertoire. It combines the nostalgia of a classic banana smoothie with modern flavors, making it perfect for today’s busy lifestyle. Whether you’re reminiscing about childhood summers or simply in need of a tasty pick-me-up, this smoothie is here to brighten your day. Give it a try and let it transport you to a place of comfort and joy with every sip. Happy blending!
Related Recipes
Also try: Banana Smoothie Boost
Related update: Watermelon, Kiwi, Apple and Frozen Banana Smoothie