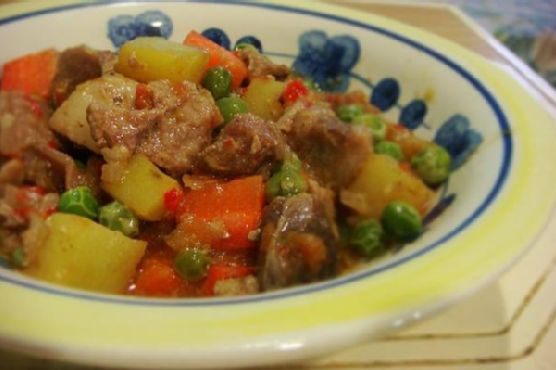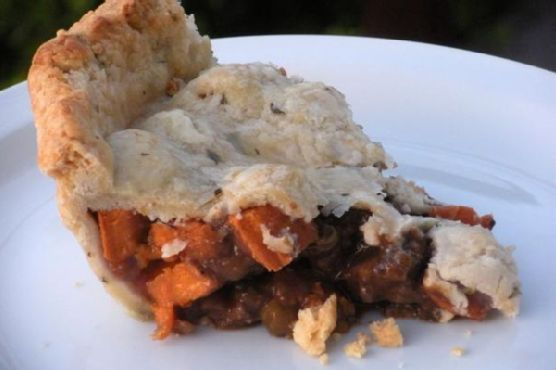
Lamb & Sweet Potato Pot Pie
Intro
There’s something uniquely comforting about a homemade pot pie, with its flaky crust and savory filling. Growing up, my grandmother’s kitchen was filled with the aroma of her famous lamb pot pie, a dish she lovingly prepared every Sunday. The laughter of family mingling with the smell of sweet potatoes and fresh herbs was the highlight of my childhood weekends. Today, I’m thrilled to share my own version of this classic recipe, adding a sweet twist with sweet potatoes and a fragrant blend of spices. Whether you’re a seasoned cook or new to the kitchen, this Lamb & Sweet Potato Pot Pie is sure to become a family favorite.
Why You’ll Love It
This pot pie brings together tender lamb, sweet potatoes, and a medley of herbs and spices, all wrapped in a buttery, flaky crust. It’s a complete meal in itself, offering a delightful mix of textures and flavors. The sweet potatoes add a unique sweetness that balances the savory richness of the lamb, while the herbs and spices provide a fragrant depth. Perfect for a cozy family dinner or a special occasion, this pot pie is both heartwarming and satisfying.
Ingredients
- 1 bay leaf
- Black pepper, to taste
- 1/2 cup butter, chilled
- 1 teaspoon caraway seeds
- 2 celery stalks, chopped
- 2 tablespoons cornstarch
- 1/2 cup demi glace
- 2 1/2 cups flour
- 1 tablespoon fresh rosemary, chopped
- 1 tablespoon fresh thyme, chopped
- 3 cloves garlic, minced
- 1/4 cup ice water
- 1 teaspoon kosher salt
- 1 1/2 pounds lamb, cut into cubes
- 1 teaspoon lemon zest
- 1/4 cup milk
- Olive oil, as needed
- 1 teaspoon orange zest
- 1 cup frozen peas
- Prepared pie crust (bottom and top)
- 1 red onion, diced
- 1/2 cup red wine
- Salt, to taste
- 1/4 cup shortening
- 1 tablespoon sugar
- 2 sweet potatoes, peeled and diced
- 1/2 cup water
Instructions
- Start with the crust. In a large bowl, combine flour, sugar, rosemary, thyme, and salt. Add chilled butter and use a pastry blender to mix until the mixture resembles coarse cornmeal.
- Add shortening and continue to combine until evenly distributed. Slowly add ice water by tablespoons, mixing well after each addition until the dough begins to stick together.
- Place the dough on a flat surface and divide into two even pieces. Roll into balls, dust lightly with flour, and wrap in plastic. Refrigerate for at least an hour.
- Toss lamb with salt, pepper, caraway seeds, garlic, and flour. Set aside.
- As the dough chills, heat olive oil in a wide, deep pan. When sizzling, add lamb pieces and cook on medium heat until just browned. Scoop onto a separate plate.
- If necessary, add more olive oil to the same pan. Scrape up all the drippings, then add onion and celery, cooking until they soften and become translucent.
- Pour in wine and demi glace, stirring well. Return lamb to the pan, followed by peas and the bay leaf. Cover, reduce to a simmer, and cook for about 15 minutes.
- Combine water and cornstarch, then pour into the lamb and vegetables. Mix well. Add sweet potatoes and cook for another 5-7 minutes. Remove from heat and allow to cool completely. Remove bay leaf.
- Once the filling has cooled, roll one ball of chilled dough on a floured surface for the bottom crust layer. Fit into a 9-inch pie dish and trim edges.
- Place in the fridge and roll the second piece of dough for the top. Remove the bottom crust layer from the fridge, pour in the filling, and top with the second layer. Trim edges if necessary, and roll the top crust edge over the bottom crust.
- Chill in the fridge or freezer for a quick chill (2-4 minutes) if the dough feels soft.
- Before baking, brush milk over the top crust. Bake in a preheated oven at 375°F for 45-50 minutes or until golden brown.
- For advance preparation, let the filling cool completely in the fridge before assembling the pie. Chill the assembled pie until ready to bake. This continuous chilling method ensures a flaky crust.
Tips
To ensure the perfect crust, always keep your ingredients cold. If the dough starts to warm up, give it a quick chill in the fridge or freezer. When rolling out the dough, use a light touch to avoid overworking it, which can lead to a tough crust. Pre-chill your pie dish to help the bottom crust bake evenly and avoid sogginess.
Variations & Substitutions
Feel free to experiment with different vegetables based on the season or your preferences. Carrots, parsnips, or mushrooms can be delightful additions. If you prefer a different protein, beef or chicken can be used in place of lamb. For a vegetarian version, omit the meat and add more vegetables, adjusting the seasoning as needed.
Storage
Store any leftovers in an airtight container in the refrigerator for up to 3 days. To reheat, cover with aluminum foil and warm in a preheated oven at 350°F until heated through. You can also freeze the unbaked pie after assembling. Wrap tightly in plastic wrap and aluminum foil, and freeze for up to 3 months. When ready to bake, add an extra 10-15 minutes to the cooking time.
FAQ
Can I make the crust ahead of time?
Yes, you can prepare the crust up to 2 days in advance. Keep it wrapped in plastic in the refrigerator until you’re ready to assemble the pie.
What if I don’t have demi glace?
If you don’t have demi glace, you can use beef or chicken stock as a substitute. Just reduce the quantity slightly to account for the liquid difference.
Can I use a store-bought crust?
Absolutely! A store-bought crust can save time and still deliver delicious results. Just make sure to keep it chilled until you’re ready to use it.
Nutrition
This pot pie is a hearty dish rich in protein from the lamb and packed with vitamins from the sweet potatoes and other vegetables. It’s a wholesome meal that provides a balance of carbohydrates, fats, and protein. For a lighter version, consider reducing the amount of butter or using a lower-fat milk for the crust.
Conclusion
Our Lamb & Sweet Potato Pot Pie is more than just a meal; it’s a comforting embrace that brings warmth and joy to any table. With its rich flavors and delightful textures, it’s perfect for gatherings or a satisfying family dinner. I hope this recipe becomes a cherished part of your culinary repertoire, just as it has been in my family. Enjoy every bite and the memories it brings!
Related update: Lamb & Sweet Potato Pot Pie
Related update: Breakfast Biscuits and Gravy