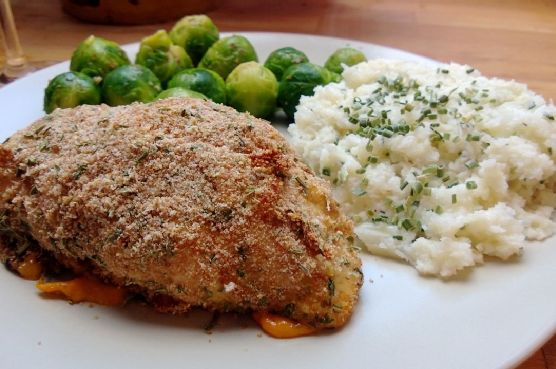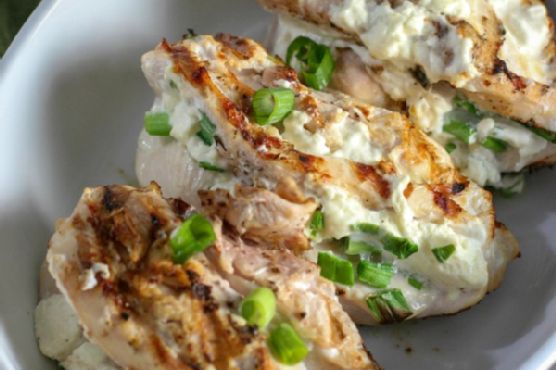
Stuffed Chicken Breast | Made by Meaghan Moineau
Title: A Taste of Home: Cream Cheese and Green Onion Stuffed Chicken BreastsDescription: Discover the joy of cooking with our Stuffed Chicken Breast recipe, featuring a delectable blend of cream cheese and green onions. This easy-to-follow dish transports you back to cherished family gatherings and promises to delight your taste buds. Rated 3/10 in difficulty, it's the perfect main dish for any occasion.
---
Growing up, the kitchen was always the heart of our family home. Every Sunday, the tantalizing aroma of my mom's cooking would waft through the house, drawing us all together. One of her signature dishes was the Stuffed Chicken Breast, a recipe passed down from my grandmother. It was a family favorite, and each bite was infused with the warmth and love of countless shared meals.
Ingredients:
- Skinless, boneless chicken breasts
- Cream cheese
- Green onions, finely chopped
- Your favorite chicken seasoning
- Olive oil-based cooking spray
Instructions:
1. Begin by washing and patting dry the chicken breasts. My grandmother would always say that the secret to a great dish is in the preparation—handle each ingredient with care.
2. Carefully cut each chicken breast lengthwise, ensuring you don't cut all the way through. This was always my favorite part as a kid, watching my mom skillfully create pockets in the chicken for the delicious filling.
3. In a small bowl, mix together the cream cheese and chopped green onions. This creamy concoction brings back memories of laughter and storytelling around the kitchen counter as we prepared the filling.
4. Generously stuff each chicken breast with the cream cheese mixture, pressing firmly to close. I remember my mom teaching me to be patient and precise—skills that have served me well beyond the kitchen.
5. Once stuffed, spray the chicken breasts with olive oil-based cooking spray. This step ensures a beautiful, golden-brown exterior. My mom's kitchen always had an olive oil sprayer handy, a little trick she learned from her mother.
6. Now, rub the chicken with your favorite seasoning. This is where you can make the recipe your own. I still use the same blend my grandmother did—a mix of garlic powder, paprika, salt, and pepper. The smell of it brings me back to those cherished Sundays.
7. Bake the chicken in a preheated oven at 375°F (190°C) for about 25-30 minutes, or until the chicken is cooked through and the cheese is melted and bubbly.
Memories on a Plate:
As the chicken bakes, the house is filled with the comforting aroma of a meal that has stood the test of time. Sitting down to eat, I'm reminded of our family gathered around the table, sharing stories and laughter. Each bite of the Stuffed Chicken Breast is a trip down memory lane—a reminder of the love and joy that comes from sharing food with those you care about.
Difficulty and Classification:
With a difficulty rating of 3/10, this Stuffed Chicken Breast recipe is both simple and satisfying, making it an ideal main dish for any occasion. Whether you're cooking for family or friends, this dish is sure to become a beloved staple in your kitchen, just as it has been in mine.
So, gather your ingredients, and embark on a culinary journey that celebrates tradition, family, and the timeless pleasure of a home-cooked meal.