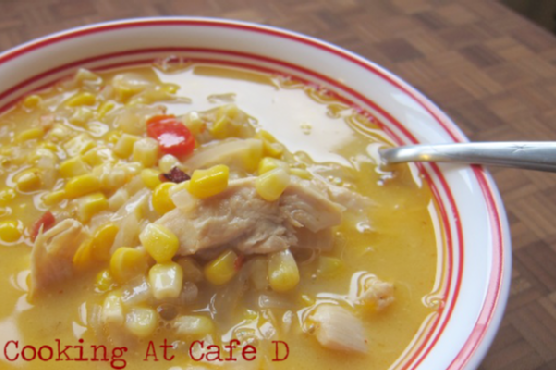
Quick and Easy Southwestern Corn Chowder | Made by Meaghan Moineau
Title: A Hearty Bowl of Comfort: Quick and Easy Southwestern Corn ChowderDescription: Dive into the warmth of Southwestern flavors with this Quick and Easy Corn Chowder. Perfect for busy weeknights, this delightful dish combines vibrant vegetables, tender chicken, and creamy cheese for a soul-satisfying experience. Join me as I share my personal family memories tied to this comforting meal.
---
As the leaves begin to turn and the air becomes crisp, there's nothing quite like a warm, hearty soup to bring comfort to both the body and soul. Our Quick and Easy Southwestern Corn Chowder is not just a dish; it's a bowl of memories, nostalgia, and love. This flavorful chowder combines the earthy sweetness of fresh corn with the gentle heat of chili flakes, making it a perfect companion for cozy evenings.
Nostalgic Family Memory:
Growing up, my family always gathered around the kitchen on Sunday evenings to prepare meals together. It was a sacred ritual, a time to connect after our busy weeks. My grandmother, with her worn-out apron and gentle smile, was the maestro of our kitchen symphony. She had an uncanny ability to turn simple ingredients into something magical, and her Southwestern Corn Chowder was no exception.
I fondly remember the aroma of onions and peppers gently sweating in the Dutch oven, filling the house with an inviting warmth. As a child, my job was to carefully measure the corn kernels, making sure not to spill any on our kitchen floor—a task I took very seriously. The heart of our chowder was always the fresh corn, harvested from our backyard garden, adding a touch of sweetness that only nature can provide.
As my grandmother stirred the pot, she would share stories of her childhood, tales of her family's own kitchen gatherings in the Southwest. Each spoonful of chowder was a journey back to those stories, a connection to our roots and a reminder of the love that bound us together. Now, every time I make this dish, I feel her presence in the kitchen, guiding me, just as she did all those years ago.
Recipe Details:
Ingredients:
- 2 tablespoons butter
- 1 cup cheddar cheese (optional)
- 1 teaspoon chili flakes
- 4 cups yellow fresh corn kernels
- 1 green bell pepper, diced
- 1 cup half and half
- 1 red bell pepper, diced
- Salt and pepper to taste
- 2 cups cooked shredded chicken
- 1 cup sweet onions, diced
- 4 cups vegetable stock
Instructions:
1. In a Dutch oven, melt the butter over medium heat. Add the diced sweet onions and bell peppers, along with a pinch of salt. Sweat the vegetables until the onions become translucent and fragrant.
2. Sprinkle in the chili flakes, allowing them to release their warmth into the mix.
3. Pour in the vegetable stock, followed by the fresh corn kernels and shredded chicken. Stir to combine and bring the mixture to a gentle simmer. Cover and let it simmer for about 10 minutes, allowing the flavors to meld.
4. Once the chowder has simmered, reduce the heat and stir in the half and half. If desired, add the cheddar cheese, stirring until melted and incorporated.
5. Season with salt and pepper to taste, adjusting to your preference.
6. Serve hot, garnished with additional cheese or fresh herbs if desired.
Difficulty Rating: 3/10
Classification: Main Dish
This Southwestern Corn Chowder is more than just a meal; it’s a tradition, a family heirloom passed down through generations, warming hearts and homes with its rich flavors and cherished memories. Enjoy this dish with your loved ones and create your own stories to share around the dinner table.
---
Let us know how this recipe turned out for you and share your own kitchen memories in the comments below!