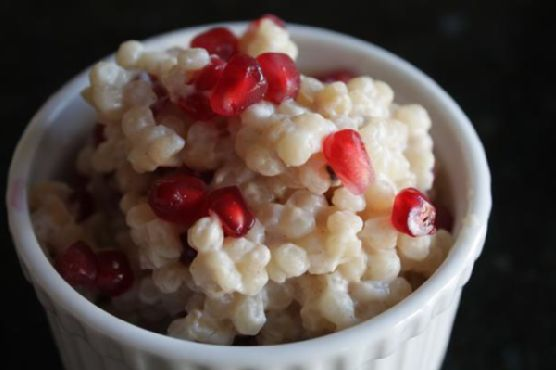
Avocado Egg Salad | Made by Meaghan Moineau

Avocado Egg Salad | Made by Meaghan Moineau

Title: Avocado Egg Salad: A Nostalgic Twist on a Classic Recipe
Description: Dive into the creamy, zesty world of Avocado Egg Salad, a delightful dish that combines wholesome ingredients with a touch of nostalgia. Perfect as an appetizer or a light main dish, this recipe is easy to prepare and bursting with flavor. Let's explore this culinary journey that’s not just about taste but also about cherished family memories.

---


When I think of Avocado Egg Salad, I am transported back to sunlit Sunday afternoons at my grandmother's house. The kitchen would be filled with laughter and the tantalizing aroma of freshly toasted whole wheat bread, a scent that promised comfort and warmth. Sundays were special, a day when our family would gather and share stories over meals that were simple yet profound in their ability to bring us all together.


One particular Sunday, when I was about ten years old, stands out vividly. It was the first time I was entrusted with helping make the Avocado Egg Salad, a dish my grandmother had perfected over the years. She believed in the magic of food, how it could evoke memories and strengthen bonds. As she handed me a ripe avocado, she shared stories of her childhood, of how avocados were a luxury during her time and how she would savor every bite.


The preparation began with boiling the eggs, a task I performed with great seriousness, knowing that these eggs would soon be transformed into something delicious. Once boiled, we immersed them in cold water to cool, a step that never failed to intrigue me with its simplicity and effectiveness.


Grandma's hands, though weathered with time, moved with grace and precision as she peeled the avocado and mashed it in a bowl, a task I eagerly took over. She taught me to squirt a bit of lemon over the mashed avocado, explaining that it not only enhanced the flavor but also kept the vibrant green color intact.


Together, we peeled and chopped the cooled eggs, mixing them gently with the avocado until they were well combined. The addition of black pepper, a crumbled seasoning cube, and a finely chopped scotch bonnet pepper added a kick that was both surprising and delightful. It was this unique blend of flavors that made the dish a family favorite.


As I toasted the whole wheat bread, Grandma showed me how to roll it out with a rolling pin, a trick she had learned from her mother. Cutting off the edges, we placed a generous serving of the avocado egg mixture on the bread, creating a simple yet elegant presentation.


These moments, filled with love and togetherness, are what make cooking such a treasured activity. The Avocado Egg Salad was more than just a meal; it was a symbol of our family's bond, a recipe passed down through generations, each with its own story to tell.


Difficulty Rating: 3/10
Classification: Appetizer/Main Dish

With its creamy texture and rich flavors, the Avocado Egg Salad is a dish that can easily transition from a light appetizer to a satisfying main course. It's a breeze to prepare, making it ideal for both novice cooks and seasoned chefs alike. Whether you're looking to recreate a cherished family memory or simply enjoy a nutritious and delicious meal, this recipe is sure to become a beloved staple in your kitchen.

Read more about Appetizers

Read more about Main Dishes

Read more about Desserts

Smokey Rainbow Chili | Made by Meaghan Moineau

Smokey Rainbow Chili | Made by Meaghan Moineau

Title: Warm Up Your Soul with Smokey Rainbow Chili
Description: Dive into the vibrant flavors of Smokey Rainbow Chili, a hearty and colorful dish that not only satisfies your taste buds but also warms your heart with a blend of spices and a nostalgic family story. This main dish, with a difficulty rating of 4 out of 10, is perfect for both novice and seasoned cooks. It brings together the rich tastes of smoked paprika, chili powder, and a medley of fresh vegetables to create a comforting meal that feels like a hug in a bowl.

---


A Nostalgic Family Feast: The Story Behind Smokey Rainbow Chili


As the leaves turned golden and the crisp autumn air settled in, Sunday afternoons at my grandmother’s house were a cherished tradition. The scent of her Smokey Rainbow Chili wafted through the halls, drawing everyone to the kitchen like bees to honey.


I remember the kitchen as a place of warmth and laughter, where the simmering pot of chili on the stove was the centerpiece of our family gatherings. Grandma would hum her favorite tune as she chopped the zucchini and bell peppers, each color more vibrant than the last. The vivid hues of the vegetables mirrored the autumn leaves outside, creating a rainbow both in the pot and on our plates.


The secret to her chili, she’d say with a twinkle in her eye, was in the spices. Smoked paprika and chili powder gave the dish its signature warmth and depth, while a hint of cayenne pepper provided just the right amount of kick. She would tell stories of how her mother taught her to cook, passing down not only the recipes but also the love and care that went into each meal.


As the chili simmered, we would gather around the table, sharing stories and laughter. Each spoonful was a taste of home, a blend of flavors that brought comfort and joy. Those afternoons taught me the true essence of cooking: it’s not just about feeding the body, but also nourishing the soul with memories and connection.


Recipe: Smokey Rainbow Chili


Ingredients:

- 2 tablespoons olive oil

- 1 zucchini, diced


- 1 red bell pepper, diced


- 1 orange bell pepper, diced


- 1 fresh jalapeno pepper, diced


- 3 cloves garlic, minced


- 1 onion, chopped


- 1 can (15 oz) stewed tomatoes, with liquid


- 1 can (6 oz) tomato paste


- 1 can (15 oz) black beans, drained and rinsed


- 1 can (15 oz) whole kernel corn, drained


- 1 can (15 oz) red kidney beans, drained and rinsed


- 1 tablespoon smoked paprika


- 1 tablespoon chili powder


- 1 teaspoon dried oregano


- 1 teaspoon black ground pepper


- 1/4 teaspoon cayenne pepper


Instructions:

1. Heat olive oil in a large pot over medium-high heat. If using meat, brown it well, remove, and set aside. Add the meat back after sautéing the veggies.

2. Stir in zucchini, red bell pepper, orange bell pepper, jalapeno, garlic, and onion. Cook for about 5 minutes, just until the vegetables are tender.


3. Add stewed tomatoes with their liquid, tomato paste, black beans, corn, and kidney beans into the pot.


4. Season with smoked paprika, chili powder, oregano, black pepper, and cayenne pepper.


5. Bring to a boil, then reduce heat to low and let simmer for 1 hour, stirring occasionally. Depending on the size of your vegetable cuts, you may want to let it simmer a little longer.


Smokey Rainbow Chili is more than just a dish; it's a celebration of flavors and family. Whether it's a chilly evening or a simple gathering of loved ones, this chili promises warmth and togetherness. Enjoy each spoonful and perhaps create your own cherished memories around the table.

Read more about Appetizers

Read more about Main Dishes

Read more about Desserts

Spicy Seasoned Loaded Guacamole | Made by Meaghan Moineau

Spicy Seasoned Loaded Guacamole | Made by Meaghan Moineau

Title: A Taste of Home: Spicy Seasoned Loaded Guacamole
Description: Dive into the vibrant and flavorful world of Spicy Seasoned Loaded Guacamole. This zesty appetizer, rich in texture and taste, combines fresh ingredients with a touch of nostalgia. Perfect for family gatherings or simply indulging your cravings, this guacamole is sure to be a hit. Discover the recipe that brings back cherished family memories and learn how to create this easy yet unforgettable dish.

---


There's something incredibly magical about the ability of food to transport us back in time. For me, Spicy Seasoned Loaded Guacamole is more than just a delightful appetizer; it's a bridge to countless summers spent in my grandparents' backyard. The mingling scents of fresh cilantro and sizzling peppers would waft through the air as preparations for our family barbecue commenced.


Ingredients:

- 3 ripe avocados


- 2 tablespoons lime juice


- 1 tablespoon white wine vinegar


- 1/4 cup finely chopped red onion


- 1 finely chopped serrano pepper (adjust to taste)


- 1/4 cup chopped fresh cilantro


- 1 diced Roma tomato


- 1 teaspoon salt


- 1/2 teaspoon black pepper


- 1/2 teaspoon cumin


- 1/2 teaspoon garlic powder


Instructions:

1. In a medium bowl, mash the avocados to your desired consistency. I prefer mine a little chunky, just like Grandma used to make them.


2. Mix in the lime juice and white wine vinegar, ensuring the avocado stays vibrant and green.


3. Stir in the salt, black pepper, cumin, and garlic powder. The aroma alone will transport you to a sunny afternoon.


4. Fold in the red onion, serrano pepper, cilantro, and diced Roma tomato. Each ingredient adds a layer of flavor and texture, creating a symphony of taste that dances on your palate.


A Nostalgic Family Memory:

Every family gathering at my grandparents' place was a feast for the senses. As the adults bustled around the grill, we kids would sneak into the kitchen, eager to help—or perhaps just to steal a taste of whatever was being prepared. My grandmother would always set aside the avocados for me, knowing how much I loved mashing them with a fork. Her secret, she claimed, lay in the perfect balance of lime and vinegar, ensuring the guacamole was both refreshing and tangy.


One summer, as the sun dipped below the horizon, I remember sitting on the porch with my grandfather. We shared a bowl of guacamole and tortilla chips while he told me stories of his own childhood in Mexico. Those moments, filled with laughter and familial warmth, have stayed with me. Each scoop of this Spicy Seasoned Loaded Guacamole brings back the joy and love of those evenings, making every bite a nostalgic journey.


Difficulty Rating: 3/10
Classification: Appetizer

Whether you're looking to impress at your next gathering or simply wish to indulge in a flavorful snack, this Spicy Seasoned Loaded Guacamole is your go-to recipe. With its easy preparation and rich taste, it's bound to become a staple in your culinary repertoire. So, grab those avocados and get ready to create a dish that not only delights the taste buds but also warms the heart.

Read more about Appetizers

Read more about Main Dishes

Read more about Desserts

Guacamole | Made by Meaghan Moineau

Guacamole | Made by Meaghan Moineau

Title: Savoring Family Moments: Crafting the Perfect Guacamole
Description: Dive into the delightful world of guacamole with this easy-to-follow recipe that combines traditional flavors with a nostalgic twist. Discover how this simple dish can serve as a bridge to cherished family memories, all while tantalizing your taste buds.

---


Guacamole has always been more than just a delicious appetizer in my family; it's a symbol of togetherness and cherished memories. As I share this recipe with you, I am taken back to countless summer gatherings at my grandmother's house, where the aroma of fresh avocados and herbs filled the air. This guacamole recipe captures those nostalgic moments with each creamy bite.


Ingredients:

- 3 ripe Haas avocados

- 1 small onion, finely chopped


- 1 jalapeño pepper, seeded and minced


- A handful of fresh cilantro, chopped


- 1 teaspoon salt


- 1/2 teaspoon black pepper


- Juice of 1 fresh lime


- Fresh basil, chopped (about 1 tablespoon)


- Fresh oregano, chopped (about 1 tablespoon)


Instructions:


1. Prepare the Avocados: Begin by cutting the avocados in half lengthwise. Carefully drive a chef's knife into the large pit and twist to remove it. Scoop the avocado flesh out from the skin into a mixing bowl.
2. Mash and Mix: Using a fork, gently mash the avocados to your desired consistency. I prefer my guacamole with a bit of texture rather than completely smooth. Add the finely chopped onion, jalapeño, cilantro, basil, and oregano into the bowl. Mix thoroughly to incorporate all the flavors.
3. Season to Perfection: Season the mixture to taste with salt, black pepper, and freshly squeezed lime juice. The lime juice not only adds a tangy zest but also helps to keep the guacamole vibrant green.
4. Serve or Store: For the best flavor, serve the guacamole immediately with your favorite tortilla chips or as a topping for tacos. If you need to store it, press a piece of plastic film wrap directly onto the surface of the guacamole to prevent browning, and refrigerate.

A Taste of Nostalgia


Every time I make this guacamole, I'm reminded of those warm summer days at grandma's house. The kitchen was always filled with laughter and the sounds of family catching up. My grandmother would show us how to carefully remove the avocado pit, a trick passed down through generations. We would gather around the table, each contributing to the guacamole-making process, and share stories of our day.


This guacamole recipe is rated a 3 out of 10 in difficulty, making it an easy yet rewarding appetizer that anyone can enjoy crafting. It's not just about the taste—although that's undeniably delicious—but about the joy of creating something together, a tradition I proudly pass on to the next generation.


Conclusion


Crafting the perfect guacamole is more than just mixing ingredients; it's about connecting with loved ones and reliving cherished memories. Whether you're a seasoned cook or a kitchen novice, this simple dish invites you to enjoy the flavors of tradition while creating new moments to remember. Enjoy your guacamole, and may it bring your family as much joy as it has brought mine.

Read more about Appetizers

Read more about Main Dishes

Read more about Desserts

Garlic & Spice Plantain Chips | Made by Meaghan Moineau

Garlic & Spice Plantain Chips | Made by Meaghan Moineau

Title: Crispy and Flavorful: Garlic & Spice Plantain Chips for Every Occasion
Description: Discover the irresistible blend of spices in our Garlic & Spice Plantain Chips recipe. With just a few simple ingredients and steps, you can create a delicious and nostalgic appetizer that brings a taste of home to any gathering.

---


Garlic & Spice Plantain Chips: A Nostalgic Crunch at Your Fingertips


When it comes to comfort food, few things compare to the crisp, aromatic delight of plantain chips. Growing up in a bustling household, plantain chips held a special place in our family gatherings. I vividly remember my grandmother's kitchen, filled with the inviting aroma of spices, as she skillfully prepared these chips with love. This Garlic & Spice Plantain Chips recipe not only brings those cherished memories to life but also adds a modern twist with its bold flavors.


Ingredients:

- 2 large plantains

- 2 tablespoons olive oil


- 1 teaspoon garlic powder


- 1 teaspoon paprika


- 1/2 teaspoon cumin


- 1/4 teaspoon cayenne pepper (adjust to taste)


- 1/2 teaspoon salt


Instructions:

1. Preheat the Oven: Begin by preheating your oven to 400°F (200°C). Line a baking sheet with parchment paper or silicone mats to prevent sticking.
2. Prepare the Plantains: Cut off both ends of the plantains. Make a lengthwise slit along the skin and peel it off. Slice each plantain into thin, even pieces. Don't worry if they aren't perfect; rustic is charming!
3. Season the Slices: In a medium-sized bowl, toss the plantain slices with olive oil, garlic powder, paprika, cumin, cayenne pepper, and salt. Stir well to ensure each slice is coated with the flavorful mix.
4. Bake to Perfection: Arrange the seasoned plantain slices in a single layer on the prepared baking sheets. Bake for 15-20 minutes, flipping them at the 8- or 9-minute mark for even crispiness. For optimal results, swap the baking sheets between the top and bottom racks halfway through the baking time.
5. Golden Goodness: Remove the chips from the oven once the edges turn a lovely golden brown. Allow them to cool slightly before serving.

A Taste of Home


Every bite of these plantain chips transports me back to my grandmother's kitchen, where laughter echoed and stories were shared over bowls of crispy snacks. Her gentle hands would guide mine as we sliced plantains together, teaching me not just a recipe, but a tradition. These moments, filled with warmth and love, are what make food truly special.


Difficulty Rating: 3/10


This recipe is straightforward and ideal for cooks of all skill levels. The hardest part might be peeling and slicing the plantains, but the reward is well worth it.


Perfect for Any Occasion


Classified as an appetizer, these Garlic & Spice Plantain Chips are perfect for any gathering—whether as a side dish at a family dinner or a snack at a lively party. Their nostalgic flavor and crunchy texture make them an irresistible treat that everyone will love.


Explore the magic of simple, flavorful ingredients and create your own cherished memories with this delightful recipe. Enjoy the journey of taste and tradition with every crunch!

Read more about Appetizers

Read more about Main Dishes

Read more about Desserts

Radish and Watercress Salad | Made by Meaghan Moineau

Radish and Watercress Salad | Made by Meaghan Moineau

Title: "A Refreshing Bite of Nostalgia: Radish and Watercress Salad Recipe"
Description: Dive into a delightful blend of crisp radishes and peppery watercress, brought to life by a tangy homemade dressing. This simple yet elegant salad is not just a treat for the taste buds; it’s a journey back to cherished family gatherings. Discover the story behind this beloved dish and learn how to make it yourself.

---


Growing up, family gatherings were a cornerstone of my childhood. Every summer, my grandparents would host a reunion at their countryside home, nestled between lush green hills and vibrant fields. It was the perfect setting for laughter, games, and, most importantly, food that brought everyone together.


One dish that always stood out on the long, wooden picnic table was my grandmother’s Radish and Watercress Salad. Its vibrant colors were a feast for the eyes, while the fresh, crisp flavors were a testament to the simplicity and beauty of fresh ingredients. This salad was more than just a dish; it was a symbol of our family’s bond and the joy of sharing meals together.


Ingredients:

- Salt


- Garlic powder


- Dijon mustard


- Red wine vinegar


- Olive oil


- Lemon juice


- Watercress


- Red radishes


Instructions:

1. In a screw-top jar, combine salt, garlic powder, Dijon mustard, red wine vinegar, olive oil, and lemon juice. Secure the lid and shake vigorously until well blended.


2. Place the watercress and sliced red radishes in a large salad bowl.


3. Pour the dressing over the salad.


4. Toss gently to ensure the ingredients are well-coated and blend harmoniously.


A Nostalgic Family Memory:

Every year, as the sun dipped below the horizon, casting a golden hue across the fields, my grandmother would call us inside. With a chuckle, she'd say, "Time to leave the games and come enjoy the real prize." The Radish and Watercress Salad, with its refreshing crunch and peppery bite, was her secret weapon. It was the first dish to disappear from the table, leaving only empty plates and satisfied smiles.


I remember my grandfather teasingly asking her what magic she put into the salad, to which she would wink and say, "Just a sprinkle of love and a dash of sunshine."


As I recreate this salad today, I feel connected to those warm summer evenings and the laughter that echoed through the hills. This dish isn't just a recipe; it's a cherished memory on a plate.


Recipe Difficulty: 3/10
Classification: Appetizer

This Radish and Watercress Salad is a testament to the idea that sometimes the simplest dishes are the most memorable. Perfect as a refreshing appetizer, it sets the tone for any meal with its vibrant flavors and nostalgic charm. Whether you're creating new memories or reminiscing old ones, this salad is sure to be a delightful addition to your table.

Read more about Appetizers

Read more about Main Dishes

Read more about Desserts

Green Tea Fruit Medley Smoothie | Made by Meaghan Moineau

Green Tea Fruit Medley Smoothie | Made by Meaghan Moineau

Title: Sipping on Memories: The Green Tea Fruit Medley Smoothie
Description: Dive into the vibrant, refreshing world of the Green Tea Fruit Medley Smoothie, a delightful blend that not only tantalizes your taste buds but also warms your heart with nostalgia. Discover how this smoothie, steeped in family tradition, can become a staple in your kitchen. Easy to make and bursting with flavor, this smoothie is perfect for breakfast, as a midday pick-me-up, or a light dessert.

---


In the hustle and bustle of our daily lives, it's often the simplest of pleasures that bring us the greatest joy. For me, the Green Tea Fruit Medley Smoothie is much more than just a refreshing drink; it’s a cherished family tradition that has been lovingly passed down through the generations.


A Trip Down Memory Lane

Growing up, summers at my grandmother's house were a kaleidoscope of colorful memories. Her backyard, a sprawling canvas of greenery and fresh blooms, was our playground. But what I remember most vividly is the scent of freshly brewed green tea wafting through the open kitchen window, mingling with the sweet, tangy aroma of ripe berries.


Every afternoon, my grandmother would prepare what she affectionately called her "secret elixir" — a concoction she swore was the secret to her youthful energy and radiant smile. It was the Green Tea Fruit Medley Smoothie, a harmonious blend of robust green tea, succulent fresh berries, and the tropical sweetness of pineapple juice, all swirled together with creamy vanilla yogurt.


As children, my siblings and I would gather around the kitchen counter, eagerly watching as she steeped the green tea bags in a pot of boiling water. The anticipation was palpable as she squeezed out the tea bags, releasing every last drop of flavor before discarding them. With a twinkle in her eye, she would pour the fragrant tea into the blender, adding generous handfuls of vibrant berries and a splash of pineapple juice. The final touch was a dollop of vanilla yogurt and a few ice cubes to create a perfectly chilled treat.


With the press of a button, the blender would roar to life, transforming the disparate ingredients into a smooth, frothy masterpiece. We would clink our glasses together, savoring each sip as we laughed and shared stories under the summer sun.


Crafting Your Own Smoothie Magic
Creating this delightful smoothie is as easy as it is rewarding, making it a perfect addition to any meal. Here’s how you can bring a taste of my family’s tradition into your home:
Ingredients:

- 1 cup boiling water


- 3 Bigelow Green Tea bags


- 1 cup fresh berries (your choice of strawberries, blueberries, or raspberries)


- 1/2 cup pineapple juice


- 1/2 cup vanilla yogurt


- 1 cup ice cubes


Instructions:

1. Begin by preparing the tea. Steep 3 Bigelow Green Tea bags in 1 cup of boiling water for 5 minutes.


2. Carefully squeeze out the tea bags to extract all the flavor, then discard them.


3. In a blender, combine the freshly brewed tea, fresh berries, pineapple juice, vanilla yogurt, and ice cubes.


4. Blend until smooth, ensuring all ingredients are well incorporated.


5. Pour the smoothie into glasses and enjoy!


Simplicity at Its Best

With a difficulty rating of 3 out of 10, this smoothie is accessible to everyone, from novice cooks to kitchen aficionados. Whether you enjoy it as a vibrant appetizer, a refreshing main dish, or a light dessert, the Green Tea Fruit Medley Smoothie is sure to become a beloved part of your culinary repertoire.


So, next time you find yourself longing for a taste of something special, remember the Green Tea Fruit Medley Smoothie — a drink that’s as much about celebrating life’s simple pleasures as it is about savoring the delightful flavors of nature’s bounty.

Read more about Appetizers

Read more about Main Dishes

Read more about Desserts

Lemony Greek Lentil Soup | Made by Meaghan Moineau

Lemony Greek Lentil Soup | Made by Meaghan Moineau

Lemony Greek Lentil Soup: A Hearty Bowl of Comfort and Tradition


Description


Dive into the rich flavors of the Mediterranean with our Lemony Greek Lentil Soup. This hearty, tangy dish is a beautiful blend of earthy lentils, fresh herbs, and zesty lemon juice. Perfect for chilly evenings or as a comforting main dish, this soup is a delightful journey into Greek culinary tradition. Whether you're a seasoned chef or a kitchen novice, this recipe is rated a manageable 5 out of 10 in difficulty and promises to fill your home with warmth and your heart with nostalgia.


---


Ingredients


- 1 cup brown lentils
- 8 cups water
- 1 carrot, chopped
- 1 teaspoon dried thyme
- 2 tablespoons lemon juice
- 1 teaspoon dried basil
- 1 tablespoon fresh thyme
- 1 teaspoon dried oregano
- Salt and black pepper, to taste
- 1 onion, chopped
- 3 cloves garlic, minced
- 2 tablespoons olive oil
- 1 can (28 ounces) whole canned tomatoes

- Crusty bread and soft cheese like St. Andre or Cambazola for serving


Instructions


1. Initial Cooking: In an 8-quart stockpot, combine the lentils, water, carrot, and 1 teaspoon of dried thyme. Cover and set over medium heat. Allow the mixture to cook for 15 minutes, then lower the heat slightly and let it simmer gently for about 30 minutes more.
2. Resting Phase: Once the lentils reach boiling point, turn off the burner and let the soup sit covered for 1 hour to allow the flavors to meld.
3. Flavor Infusion: After an hour, bring the soup back to a simmer. Stir in the lemon juice, dried basil, fresh thyme, oregano, salt, and black pepper. Let it simmer for another hour.
4. Sauté Aromatics: In a separate pan, slowly sauté the chopped onion and minced garlic in olive oil until the onion is tender and translucent.
5. Tomato Addition: Coarsely chop the canned tomatoes directly in the can using kitchen scissors. Add the tomatoes and the onion-garlic mixture to the soup. Adjust the salt to taste.
6. Final Simmer: Bring everything back to a boil, then reduce to a simmer for another hour. Keep the burner on its lowest setting, and let the soup sit with its lid slightly ajar until you're ready to serve.
7. Serving Suggestion: Serve hot with crusty bread and a side of soft cheese like St. Andre or Cambazola.

---


A Taste of Family Tradition


Growing up, my grandmother's kitchen was a haven of enticing aromas and laughter. Each autumn, as the leaves turned golden and the air grew crisp, she would prepare her signature Lemony Greek Lentil Soup. The recipe was passed down through generations, a cherished family heirloom that connected us to our Greek roots.


I remember the warmth of her kitchen, the chatter of family gathered around the table, and the comforting smell of thyme and oregano wafting through the air. We would sit, savoring each spoonful, as stories of our ancestors unfolded – tales of life in a small Greek village, where this simple yet flavorful dish symbolized sustenance and love.


Even today, as I prepare this soup, I am transported back to those cherished family gatherings. It's more than just a meal; it's a celebration of heritage, a reminder of loved ones, and a bowl of comfort that transcends time and place.


---


Conclusion


Our Lemony Greek Lentil Soup is more than just a dish; it's a journey into the heart of Greek culinary tradition, a nod to family memories, and a testament to the power of food to bring people together. With its rich, tangy flavors and hearty ingredients, this soup is an ideal main dish for any occasion. Enjoy it as part of your own family tradition, and let the nostalgic flavors carry you to a place of warmth and connection.

Read more about Appetizers

Read more about Main Dishes

Read more about Desserts

Basic Hummus | Made by Meaghan Moineau

Basic Hummus | Made by Meaghan Moineau

Title: "A Taste of Tradition: Mastering the Art of Basic Hummus"
Description: Discover the simplicity and flavor of homemade hummus with our easy-to-follow recipe. This classic dish, rich in Middle Eastern tradition, is perfect for gatherings or a cozy night in. Learn how to create a creamy, flavorful hummus and enjoy a nostalgic family story that brings this recipe to life. Rated at a 3/10 for difficulty, this appetizer will become a staple in your kitchen.

---


A Taste of Tradition: Mastering the Art of Basic Hummus

Hummus is more than just a dip; it's a journey back to the comforting embrace of family gatherings and the warmth of shared meals. This simple yet flavorful dish has been a staple in my family for generations, bringing us together around the table, sharing stories and laughter.


Ingredients:

- 1 can of chickpeas, drained and rinsed


- 2 tablespoons of olive oil, plus extra for garnish


- Juice of 1 lemon


- 2 cloves of garlic, peeled


- ¼ cup of tahini


- 2-4 tablespoons of water


- 1 teaspoon of ground cumin


- Salt to taste


- Paprika for garnish


- Whole chickpeas and extra virgin olive oil for topping


Instructions:
1. Begin with the Tahini: Start by pureeing the tahini in a food processor for about a minute until it transforms into a smooth paste. This step is crucial for achieving that creamy texture hummus is known for.
2. Incorporate the Flavors: Add olive oil, garlic, lemon juice, cumin, and salt. Pulse until the ingredients are well incorporated, forming a smooth base.
3. Chickpeas in Stages: Add the chickpeas in two batches. Wait until the first batch is completely smooth before adding the second. This ensures a creamy consistency and allows each chickpea to blend seamlessly.
4. Adjust to Taste: If you prefer a smoother hummus, feel free to add more lemon juice or water until you reach your desired consistency. Taste and adjust the seasoning as needed.
5. Presentation: Pour the hummus into a serving bowl. Garnish with a few whole chickpeas in the center, sprinkle with paprika, and drizzle your best extra virgin olive oil on top. Serve with warm, whole wheat pita bread for an authentic touch.
A Family Memory:

Every summer, my family would gather at my grandmother's house for a reunion. The air was always filled with the scent of blooming jasmine and the sound of children playing. However, the highlight was the long table laden with dishes that told stories of our heritage. Among them, a bowl of hummus always stood out.


I remember watching my grandmother in the kitchen, her hands skillfully combining ingredients, turning simple chickpeas into a velvety hummus that everyone adored. She would let me taste it, asking if it needed more lemon or salt—a secret way of teaching me the art of cooking by feel rather than measurement. The hummus was always a hit, disappearing quickly as we scooped it up with pieces of warm pita.


Those memories are etched in my mind, a reminder of the love and tradition that food brings to our lives. Making hummus today is like revisiting those cherished moments, connecting with my roots through the flavors and aromas that once filled my grandmother's kitchen.


Difficulty Rating: 3/10
Classification: Appetizer

This basic hummus recipe is a delightful way to bring a taste of tradition to your table. Whether you're a seasoned cook or a kitchen novice, this dish offers a simple yet satisfying culinary experience. Enjoy crafting this classic recipe, and let it become a part of your own family story.

Read more about Appetizers

Read more about Main Dishes

Read more about Desserts

Mediterranean Orzo Salad | Made by Meaghan Moineau

Mediterranean Orzo Salad | Made by Meaghan Moineau

Title: Savoring Tradition: A Mediterranean Orzo Salad That Brings Family Together
Description: Dive into the flavors of the Mediterranean with our vibrant and refreshing Orzo Salad recipe. Infused with the zest of lemon, the crunch of fresh vegetables, and the creamy tang of feta cheese, this salad is the perfect dish to transport you to a sunny coastal escape. Rated 4 out of 10 in difficulty, this dish is an ideal appetizer or light main dish for any gathering. Discover how this recipe became a cherished family tradition.

---


A Journey of Flavors: Mediterranean Orzo Salad


There's something undeniably special about a dish that transcends mere ingredients and becomes a bridge to cherished memories. Our Mediterranean Orzo Salad is one such recipe—a symphony of flavors that not only delights the palate but also stirs the heart with nostalgia.


Ingredients:


- 1 cup orzo


- Kosher salt


- 1/4 cup pine nuts


- 8 tablespoons extra virgin olive oil (EVOO), divided


- 3 green onions, chopped


- 1/4 cup Italian parsley, chopped


- Zest and juice of 1 lemon


- 1 diced cucumber


- 1 green bell pepper, diced


- 1 cup cherry tomatoes, halved


- 1/4 cup red onion, finely chopped


- 1/4 cup pepperoncinis, sliced


- 1/2 cup feta cheese, crumbled


- 2 tablespoons red wine vinegar


Instructions:


1. Cooking the Orzo: Begin by bringing a pot of water to a rapid boil. Generously salt the water and add orzo, cooking until tender, approximately 7-9 minutes. Drain and set aside.
2. Toasting the Pine Nuts: While the orzo is cooking, spread pine nuts on a baking sheet and toast lightly in an oven preheated to 400 degrees Fahrenheit. Remove from oven and set aside.
3. Sautéing for Flavor: Heat two tablespoons of EVOO over medium heat in a non-stick pan. Sauté the chopped green onions for about 2 minutes. Add parsley, lemon juice, lemon zest, toasted pine nuts, and cooked orzo. Sauté for an additional 3-4 minutes, allowing the flavors to meld and absorb into the orzo. Remove from heat.
4. Combining Ingredients: In a large mixing bowl, combine the cucumber, green bell pepper, cherry tomatoes, red onion, and pepperoncinis with the orzo mixture. Add crumbled feta cheese, red wine vinegar, and the remaining six tablespoons of EVOO. Mix well until all ingredients are evenly coated.
5. Serving Suggestions: This salad can be refrigerated for later enjoyment or served immediately for a fresh and vibrant appetizer or light main dish.

A Taste of Tradition


Every time I prepare this Mediterranean Orzo Salad, I'm transported back to a sun-drenched summer afternoon at my grandmother's house. Her kitchen, filled with the fragrant aroma of fresh herbs and the warmth of family laughter, was the heart of our gatherings. She would meticulously prepare this salad, her hands deftly chopping vibrant vegetables and crumbling feta with care.


We would gather around her large wooden table, a motley crew of aunts, uncles, and cousins, eagerly anticipating the first bite. The salad, with its blend of tangy, crunchy, and creamy elements, was always the star of our meals, a testament to the simple yet profound joy of sharing food with loved ones.


This recipe, passed down through generations, remains a cherished symbol of our family heritage, a reminder of those joyful days spent together. It’s more than just a dish; it’s a celebration of tradition, love, and the enduring power of food to bring people together.


---


Difficulty: 4/10
Classification: Appetizer / Light Main Dish

Embrace the warmth of Mediterranean flavors and create new memories with this beloved Orzo Salad—a timeless dish sure to delight both your taste buds and your heart.

Read more about Appetizers

Read more about Main Dishes

Read more about Desserts

Broccoli Tartar | Made by Meaghan Moineau

Broccoli Tartar | Made by Meaghan Moineau

A Taste of Memories: Crafting the Perfect Broccoli Tartar


Description: Dive into the vibrant world of Broccoli Tartar, a colorful and nutritious appetizer that brings together the essence of fresh vegetables and aromatic herbs. This delightful dish not only pleases the palate but also rekindles cherished family memories, making it a perfect starter for any gathering.

---


Ingredients


- 1 head of broccoli


- 2 medium tomatoes, peeled


- 1 red bell pepper


- 1 small onion


- 1 tablespoon apple vinegar


- 2 tablespoons olive oil


- 1 tablespoon soy sauce


- 1 tablespoon fresh parsley, chopped


- 1 teaspoon herbs de Provence


- 1 teaspoon red chili powder


- Sea salt, to taste


- 2 tablespoons sesame seeds, toasted


- 1/4 cup soaked arame seaweed


- Fresh vegetables for serving


---


Instructions


1. Preparation: Begin by soaking the arame seaweed in a bowl of pure water. Meanwhile, bring a pot of water to a boil with a pinch of sea salt.
2. Vegetable Prep: Wash the broccoli, red bell pepper, parsley, and tomatoes. Carve a cross on the bottom of each tomato and halve the bell pepper to remove the seeds.
3. Blanching: Once the water is boiling, immerse the tomatoes for a quick blanch, then shock them in cold water to easily remove the skins. Next, let the broccoli swim in the boiling water for 6 minutes. Refresh under cold water to maintain their vibrant green color.
4. Roasting: Place the bell pepper under the grill until its skin is charred. Let it cool before peeling.
5. Blending: In a long narrow bowl, blend the cooled broccoli with a hand blender, adding olive oil, apple vinegar, and sea salt to taste. Incorporate half of the chopped parsley to achieve a smooth puree.
6. Mixing: Dice the peeled tomatoes and roasted bell pepper into tiny pieces. Finely chop the onion and mix all the vegetables with the broccoli puree. Season with soy sauce, a hint of red chili powder, and herbs de Provence.
7. Finishing Touch: Drain and finely chop the soaked arame seaweed, gently folding it into the mixture. Shape the tartar into small balls with an ice cream scoop and garnish with toasted sesame seeds.
8. Serving: Serve the Broccoli Tartar on a bed of fresh vegetables. Bon appétit!

---


Nostalgic Family Memory


Growing up, Sunday afternoons at my grandmother's house were always special. Her kitchen was a haven of delightful aromas and heartfelt laughter. Among her many culinary masterpieces, Broccoli Tartar held a unique place. It was a dish that brought us together, a vibrant green bowl of goodness that perfectly mirrored her love and care.


I remember sitting at the kitchen table, watching her nimble fingers expertly peel tomatoes and chop parsley. She would hum softly, a tune that resonated with warmth and comfort. The tartar was always the first dish to disappear at family dinners, a testament to its simple yet captivating taste.


Every time I prepare this dish, I'm transported back to those cherished Sundays, surrounded by family, sharing stories and creating memories. It's not just a recipe; it's a legacy of love, passed down through generations.


---


Difficulty Rating


- Difficulty: 6/10
- Classification: Appetizer

---


Broccoli Tartar is more than just a dish; it's a sensory journey that celebrates the harmony of fresh ingredients and nostalgic flavors. Perfect for any occasion, it invites you to create lasting memories with every bite.

Read more about Appetizers

Read more about Main Dishes

Read more about Desserts

Quinoa and Chickpea Salad with Sun-Dried Tomatoes and Dried Cherries | Made by Meaghan Moineau

Quinoa and Chickpea Salad with Sun-Dried Tomatoes and Dried Cherries | Made by Meaghan Moineau

A Taste of Tradition: Quinoa and Chickpea Salad with Sun-Dried Tomatoes and Dried Cherries


Discover the Perfect Blend of Flavors and Memories


In today's fast-paced world, there's something heartwarming about a dish that brings together family, flavors, and memories. Our Quinoa and Chickpea Salad with Sun-Dried Tomatoes and Dried Cherries is a delightful concoction that not only tantalizes your taste buds but also takes you on a nostalgic journey back to family gatherings filled with laughter and love.


Ingredients that Tell a Story


This recipe is a symphony of diverse ingredients, each adding its own unique note to the melody:
- Raw whole cashews: Toasted to perfection for a nutty crunch.
- Dried cherries: Sweet and tangy, reminiscent of childhood summers spent picking cherries with my grandmother.
- Cooked dried chickpeas: Creamy and satisfying, these legumes are the heart of the dish.
- Dried thyme and ground cumin: Aromatic spices that elevate the salad with their earthy warmth.
- Honey and fresh orange juice: A sweet, citrusy dressing that ties the ingredients together.
- Olive oil and red wine vinegar: Classic elements that add depth and richness.
- Cooked dried quinoa: A protein-packed grain that serves as the foundation.
- Sun-dried tomatoes: Bursting with intense flavor, like the sun-kissed tomatoes from my mother's garden.
- Turmeric: A golden spice that adds a hint of exotic warmth.
- Black sea-salt: To taste, adding a touch of the sea’s mystery.

A Step-by-Step Culinary Journey


1. Prep the Quinoa: Begin by rinsing the quinoa and soaking it overnight in 2 cups of water. This step is reminiscent of the patience my father always taught me in the kitchen.
2. Cook the Chickpeas: Similarly, rinse the chickpeas and soak them overnight in several inches of water. The next day, simmer them until they reach a buttery softness, much like the ones my aunt used to make during family picnics.
3. Infuse the Sun-Dried Tomatoes: While the chickpeas are cooking, soak the sun-dried tomatoes in hot water for 30 minutes, then chop them into bite-sized pieces.
4. Cook the Quinoa: Bring the soaked quinoa to a boil, then reduce heat and let it simmer until all the water is absorbed. This is the waiting game my cousins and I used to play, betting on whose quinoa would be fluffiest.
5. Toast the Cashews: In a dry skillet, toast the cashews until browned, filling the kitchen with a nutty aroma that reminds me of holiday kitchens bustling with family.
6. Combine the Ingredients: In a large mixing bowl, combine the chickpeas, quinoa, sun-dried tomatoes, cashews, and dried cherries. This step always feels like a family reunion, each ingredient playing its part.
7. Whisk and Dress: Mix the dressing ingredients — honey, orange juice, olive oil, red wine vinegar, thyme, cumin, turmeric, and black sea-salt — and pour them over the salad. Stir to combine and serve at room temperature or chilled.

A Nostalgic Note


This dish takes me back to a summer afternoon at my grandmother's house. The family was gathered around the long wooden table in her backyard, the sun dappling through the old oak tree. Each bite of the salad was a burst of flavor, a fusion of my grandmother’s love for fresh produce and my father’s passion for spices. It was a meal that brought us all closer, a reminder of the simple joys of being together.


Difficulty: 4/10


This dish is as easy to prepare as it is delightful to eat, making it a perfect choice for both novice cooks and seasoned chefs. Its simplicity belies the complexity of flavors it offers, and its vibrant ingredients make it a feast for the eyes as well.


Classification: Main Dish


Perfect as a hearty main dish, this salad offers a balanced mix of proteins, grains, and flavors that can stand alone or complement other dishes beautifully.


Indulge in the rich tapestry of flavors and memories woven into this dish. Whether you're creating new memories or reliving cherished ones, this Quinoa and Chickpea Salad with Sun-Dried Tomatoes and Dried Cherries is sure to become a beloved staple in your culinary repertoire.

Read more about Appetizers

Read more about Main Dishes

Read more about Desserts

Berry Fruit Crumble | Made by Meaghan Moineau

Berry Fruit Crumble | Made by Meaghan Moineau

Title: A Taste of Nostalgia: Indulging in a Classic Berry Fruit Crumble
Description: Dive into the warmth and comfort of a classic Berry Fruit Crumble, a dessert that not only delights the palate but also stirs cherished family memories. With its perfect blend of fresh berries and crunchy oatmeal topping, this recipe is an easy and delightful end to any meal.

---


There's something inherently comforting about a dessert that combines the vibrant flavors of fresh berries with the warm, crunchy goodness of an oatmeal topping. Our Berry Fruit Crumble is a delightful dessert, easy to make yet rich in flavor—a perfect way to end any meal on a sweet note.


Ingredients:

- Fresh mixed berries


- Maple syrup


- Old-fashioned oatmeal


- Almond meal


- Brown sugar


- Ground cinnamon


- Light margarine


Instructions:

1. Preheat your oven to 350°F (175°C).


2. In a baking dish, combine the fresh mixed berries with a generous drizzle of maple syrup. Give it a light stir and set aside.


3. In a small bowl, mix together the oatmeal, almond meal, brown sugar, and ground cinnamon.


4. Add the light margarine and crumble the mixture together using a fork until it resembles coarse crumbs.


5. Evenly sprinkle the oatmeal topping over the berry mixture in the baking dish.


6. Place in the oven and bake for 30 minutes, or until the top is a light golden brown.


*Note: If you don't have almond meal, simply grind some almonds in a food processor until they are crumbly, but be cautious not to process them too long, or you’ll end up with almond butter! Alternatively, whole wheat flour can be used as a substitute.*


Nutritional Information (per serving):

- Calories: 165


- Fat: 6.2g


- Cholesterol: 0mg


- Sodium: 32mg


- Potassium: 35mg


- Carbs: 24g


- Fiber: 6.5g


- Sugar: 10g


- Protein: 4g


Difficulty Rating: 3/10
Classification: Dessert

---


A Nostalgic Family Memory:

I remember the first time I made this Berry Fruit Crumble, vividly etched in my memory during a summer family reunion at my grandmother's country home. The air was filled with laughter, the sun casting a golden hue over the fields, and the unmistakable aroma of freshly baked crumble wafting through the kitchen.


My grandmother, ever the culinary maestro, would enlist the help of all her grandchildren in the kitchen. I was tasked with picking the ripest berries from her sprawling garden, a task I took on with an eager heart and berry-stained fingers. As I watched her combine the ingredients with practiced ease, I realized that this dish was more than just food; it was a love letter to our family, a tradition that brought us together.


When the crumble finally emerged from the oven, its golden top crackling enticingly, we gathered around the table, spoons in hand, ready to dive into the delicious treat. Each bite was a burst of sweet and tangy flavors, a perfect harmony of textures that danced on our taste buds. It was a dish that transcended time, a dessert that, even years later, still evokes the warmth and love of those summer days.


Creating this Berry Fruit Crumble has become a cherished ritual in my own home, a way to share a piece of family history with my loved ones. It's more than just a dessert; it's a flavorful journey back to the days of laughter and togetherness, a reminder that some of life's sweetest moments are best shared over a warm crumble.

Read more about Appetizers

Read more about Main Dishes

Read more about Desserts

Cottage pie with Quorn mince | Made by Meaghan Moineau

Cottage pie with Quorn mince | Made by Meaghan Moineau

Title: A Hearty Twist on a Classic: Savory Cottage Pie with Quorn Mince
Description:

Experience the warmth and comfort of a beloved classic with a modern twist: Cottage Pie with Quorn Mince. Dive into layers of creamy mashed potatoes and flavorful Quorn mince, spiced with a hint of cumin and green chillies. Perfect for a cozy family dinner, this recipe is a delightful main dish that blends tradition with contemporary flavors. Rated 6 out of 10 for difficulty, it’s a dish that invites you to share stories and create memories around the dining table.


---


A Hearty Twist on a Classic: Savory Cottage Pie with Quorn Mince

When I think of Cottage Pie, my mind drifts back to Sunday afternoons at my grandmother's house. The kitchen would be filled with the comforting aroma of potatoes and rich, savory mince, intermingled with the laughter and chatter of family members gathered around the table. Those afternoons were moments of warmth, where stories were shared as easily as the meal itself.


Today, I've reimagined this beloved classic with a modern twist: Cottage Pie with Quorn Mince. This dish maintains the essence of tradition while offering a fresh, meat-free alternative that’s both hearty and fulfilling. Whether you're serving it to a crowd or enjoying a quiet dinner at home, this recipe is a testament to the enduring power of food to bring us together.


Ingredients:

- Potatoes


- Butter


- Milk


- Dried parsley


- Quorn mince


- Onion


- Bay leaf


- Carrots


- Garlic cloves


- Green chillies


- Cumin powder


- Fresh rosemary


- Canned tomatoes


- Water


- Canned vegetable stock cube


- Egg


- Salt and pepper


- Oil


Instructions:
1. Prepare the Stock and Potatoes:

- Dissolve the vegetable stock cube in 200 ml of boiling water and set aside.


- In a saucepan, bring water to a boil and add the potatoes. Cook until tender, about 15 to 20 minutes. Drain and return them to the saucepan. Mash until smooth, then mix in the butter, parsley, and milk. Adjust the milk for desired consistency.


2. Preheat the Oven:

- Set your oven to 200°C (392°F).


3. Cook the Filling:

- In a large frying pan, heat a tablespoon of oil over medium heat. Sauté the onion, carrots, garlic, green chillies, and bay leaf for 4-5 minutes.


- Add the Quorn mince and cumin powder, cooking for another 5 minutes.


- Stir in the canned tomatoes, chopped rosemary, and prepared stock. Bring the mixture to a boil, then remove from heat. Discard the bay leaf.


4. Assemble the Pie:

- Transfer the Quorn mince mixture into an oven-proof dish, spreading it out in a single layer.


- Top with the mashed potatoes, using a fork to fluff the surface.


- Lightly brush the top with a beaten egg for a golden finish. (Alternatively, you can add a layer of grated cheese and skip the egg.)


5. Bake:

- Place in the preheated oven and bake for 20-25 minutes until the top is golden and crisp.


Serving Suggestions:

Serve this Cottage Pie hot, with a side of seasonal greens or a fresh salad. As you savor each bite, let the flavors transport you to a place of comfort and nostalgia, where family stories and delicious meals create lasting bonds.


Difficulty: 6/10
Classification: Main Dish

This Cottage Pie with Quorn Mince is more than just a meal; it's an invitation to relive those cherished family moments and create new memories with every savory bite.

Read more about Appetizers

Read more about Main Dishes

Read more about Desserts

My Sister’s Soup: Creamy Curried Squash and Cauliflower Soup | Made by Meaghan Moineau

My Sister's Soup: Creamy Curried Squash and Cauliflower Soup | Made by Meaghan Moineau

Title: A Bowl of Memories: My Sister's Creamy Curried Squash and Cauliflower Soup
Description: Discover the heartwarming blend of flavors and nostalgia in my sister's Creamy Curried Squash and Cauliflower Soup. This delightful recipe, rated a 4 out of 10 in difficulty, is perfect as a comforting main dish for those chilly evenings. Dive into a family story that adds a dash of warmth to every spoonful.

---


Growing up, the kitchen was the heart of our home—a place where stories were shared, laughter echoed, and the aroma of delicious meals filled the air. Among the many recipes that emerged from that cozy space, my sister's Creamy Curried Squash and Cauliflower Soup holds a special place in my heart. It embodies not just the flavors of fall, but also the essence of cherished family moments.


A Nostalgic Tale:

I vividly remember the first time my sister crafted this soup. It was a crisp autumn evening, and the leaves had turned into shades of gold and crimson. We had just returned from a day of raking leaves and jumping into the piles with reckless abandon. Our cheeks were rosy from the chill, and our stomachs rumbled with hunger.


In the warmth of the kitchen, my sister, always the culinary adventurer, decided to experiment with the squash we'd picked up from the local farmer's market. I watched as she methodically sliced the butternut and delicata squash, her hands steady and sure. The scent of roasting squash soon mingled with the fragrance of sautéed onions and garlic, creating an inviting aroma that filled every corner of our home.


As the soup simmered, we gathered around the table, sharing stories and laughter. My sister ladled the rich, creamy soup into bowls, each serving topped with a dollop of sour cream that melted into a swirl of golden goodness. With the first spoonful, I was enveloped in warmth—both from the flavors of the soup and the love that went into making it.


The Recipe:
Ingredients:

- 1 butternut squash


- 1 delicata squash


- 1 head of cauliflower, chopped


- 4 cups vegetable stock


- 1 yellow onion, diced


- 2 cloves fresh garlic, minced


- 1 tablespoon curry powder


- 2 tablespoons butter


- Dashes of cayenne pepper


- Salt and pepper to taste


- Sour cream, for serving


Instructions:
1. Preheat your oven to 375°F (190°C). Slice the butternut and delicata squash lengthwise and place them face down in a casserole dish with about 1/4" of water at the bottom.
2. Bake for about 30 minutes or until the squash is tender. Allow them to cool slightly. Once cool enough to handle, scoop out the seeds and set them aside. Scoop the squash flesh into a bowl.
3. In a large stock pot, heat the butter over low-to-medium heat. Sauté the diced onions until they become translucent.

4. Add the minced garlic, curry powder, cayenne pepper, salt, and pepper to the onions, stirring to combine.


5. Add the squash and chopped cauliflower to the pot along with the vegetable stock. Simmer for about 20 minutes until the vegetables are tender.
6. Puree the mixture in batches in a blender until smooth. If the soup is too thick, add more stock a little at a time.
7. Serve the soup hot in bowls with a generous dollop of sour cream on top.

This dish, rated a 4 out of 10 in difficulty, primarily serves as a satisfying main dish. It's a recipe that invites everyone to gather, savor, and reminisce about the simple joys of life.


Every time I make this soup, it takes me back to that autumn evening, reminding me of the warmth of family and the delicious magic that happens when loved ones come together over food. Whether you're making it for the first time or the hundredth, may this soup bring a slice of nostalgia to your table.

Read more about Appetizers

Read more about Main Dishes

Read more about Desserts

Raspberry Walnut Coffee Cake | Made by Meaghan Moineau

Raspberry Walnut Coffee Cake | Made by Meaghan Moineau

Title: A Slice of Nostalgia: Raspberry Walnut Coffee Cake Recipe
Description: Dive into a delightful blend of raspberries and walnuts with this easy-to-make coffee cake. Perfect for brunch or dessert, this recipe is not only delicious but also brings back cherished family memories.

---


A Slice of Nostalgia: Raspberry Walnut Coffee Cake Recipe

When the sun peeked through the kitchen window on lazy Sunday mornings, the air would soon be filled with the comforting aroma of baking. My grandmother, with her soft hands and warm smile, would guide me as we prepared her famous Raspberry Walnut Coffee Cake. This wasn’t just a dessert; it was a ritual, a cherished connection to family and tradition.


Ingredients:

- Almond milk


- 1 tablespoon ground flaxseed


- 1 teaspoon vanilla extract


- 1/2 cup maple syrup


- 2 tablespoons oil (vegetable or coconut)


- 1 teaspoon baking soda


- 1 teaspoon cinnamon


- 1/2 teaspoon salt


- 1 cup oat flour


- Raspberry jam


- 1/2 cup walnuts


- 1/4 cup turbinado sugar


- Rolled oats (optional for topping)


Instructions:

1. Preheat your oven to 375°F (190°C) and grease an 8x8-inch baking pan.


2. In a mixing bowl, combine all wet ingredients: almond milk, ground flaxseed, vanilla extract, maple syrup, and oil. Let this mixture stand while you prepare the walnuts.


3. Grind the walnuts in a food processor until they resemble a coarse meal.


4. In another bowl, whisk together the oat flour, baking soda, cinnamon, and salt. Add the ground walnuts to this mixture.


5. Pour half of the batter into the prepared pan. Using a spoon, dollop lines of raspberry jam across the batter. Use a knife to swirl the jam into the batter gently.


6. Pour the rest of the batter on top.


7. For the crumble topping, place walnuts in a bag and crush them into pea-sized crumbs. Combine with oat flour, cinnamon, turbinado sugar, and rolled oats if using. Mix in the oil until the mixture becomes crumbly.


8. Sprinkle the topping evenly over the batter.


9. Bake for 25 minutes, or until the top is browned and springs back slightly when touched. Serve warm.


A Sweet Memory

Every time I bake this cake, I am transported back to those mornings in my grandmother’s kitchen. The laughter, the stories, and the simple joy of creating something together are memories I hold dear. This Raspberry Walnut Coffee Cake is more than just a treat; it's a piece of my family’s heart, shared through generations.


Difficulty Rating: 4/10
Classification: Dessert

This delightful Raspberry Walnut Coffee Cake is a perfect blend of nostalgia and flavor. Whether you’re looking for a sweet start to your day or a comforting dessert to share with loved ones, this recipe promises to bring smiles and warm memories to your table.

Read more about Appetizers

Read more about Main Dishes

Read more about Desserts

Eggplant Curry | Made by Meaghan Moineau

Eggplant Curry | Made by Meaghan Moineau

Title: A Heartwarming Bowl: Eggplant Curry with a Family Twist
Description: Dive into the rich, aromatic world of Eggplant Curry, a dish that marries bold spices with creamy coconut milk for a comforting meal reminiscent of family gatherings. This main dish is not just a feast for the senses but a journey down memory lane, capturing the essence of familial warmth and tradition. Rated 6/10 in difficulty, this recipe is perfect for those looking to create a delicious, heartwarming meal with a touch of nostalgia.

---


A Family Tradition: The Story Behind the Eggplant Curry


There's something magical about the way certain dishes can transport you back to cherished family moments. For me, Eggplant Curry is one such dish. Every time I prepare it, I'm instantly reminded of the bustling kitchen in my grandmother's house, where the air was always thick with the scent of spices and laughter.


My grandmother was a culinary wizard in her own right, and her Eggplant Curry was legendary within our family. She would spend hours meticulously preparing the ingredients, her hands expertly working with the eggplants, onions, and spices. Her kitchen was a symphony of sizzling sounds and vibrant colors, with diced heirloom tomatoes and golden turmeric setting the stage for a meal that was as beautiful as it was delicious.


As a child, I would sit at the kitchen table, watching her every move with eager anticipation. She would often let me stir the spices together—a task I took very seriously. The highlight was always the moment she would let me taste the rich, coconut-infused sauce, a tradition that has stayed with me to this day.


This Eggplant Curry recipe, adapted from my grandmother's version, captures the essence of those family gatherings. With every bite, I'm reminded of the warmth and love that filled those days, and it's my hope that it brings a similar joy to your table.


Ingredients:


- 1 cup coconut milk (divided)


- 2 yellow onions, diced


- 3 cloves garlic, minced


- 2 eggplants, cubed


- 4 cups diced heirloom tomatoes


- 1 tablespoon ground cumin


- 1 tablespoon ground coriander


- 1 teaspoon cayenne pepper


- 1 teaspoon turmeric


- 1 teaspoon crushed red pepper flakes


- 1 tablespoon fresh ginger, grated


- Salt to taste


- 1 cup Greek yogurt (plus more for serving)


Instructions:


1. Sauté the Aromatics: In a large skillet, heat ½ cup of coconut milk over medium heat. Add the diced onions and minced garlic, sautéing until they become soft and golden brown, about 12 minutes.
2. Prepare the Crockpot: Place the cubed eggplants and diced heirloom tomatoes into a 6-quart or larger crockpot.
3. Mix the Spices: In a small bowl, combine the ground cumin, ground coriander, cayenne pepper, turmeric, crushed red pepper flakes, and salt. Stir them together until well blended.
4. Assemble the Curry: Pour the remaining coconut milk, spice mixture, and grated ginger into the crockpot. Once the onion and garlic are finished sautéing, add them to the crockpot and mix everything together until well combined.
5. Cook the Curry: Set the crockpot to high and allow the curry to cook for 6 to 8 hours, stirring periodically to ensure even cooking.
6. Add the Yogurt: About 30 minutes before serving, stir in the Greek yogurt, mixing it well into the curry. Allow it to cook for an additional 30 minutes.
7. Prepare the Quinoa: Follow the directions on the back of your quinoa package. Typically, a 2:1 water to quinoa ratio works well. Simmer for about 30 minutes until the quinoa is fluffy and tender.
8. Serve: Serve the curry over a bed of quinoa, garnishing each bowl with a dollop of Greek yogurt for added creaminess.

Bringing It All Together


This Eggplant Curry is more than just a meal—it's a connection to the past and a celebration of the present. Whether you're sharing it with family or enjoying it on your own, may it bring warmth to your heart and deliciousness to your table.

Read more about Appetizers

Read more about Main Dishes

Read more about Desserts

Couscous Salad With Roasted Vegetables | Made by Meaghan Moineau

Couscous Salad With Roasted Vegetables | Made by Meaghan Moineau

Title: "Savoring Summer: Couscous Salad with Roasted Vegetables"
Description: Dive into a vibrant and wholesome dish that captures the essence of summer with every bite. Our Couscous Salad with Roasted Vegetables is not only a feast for the senses but also a cherished family tradition. Perfect as a main dish, this recipe is bursting with flavors and memories, rated at an easy 5 out of 10 on the difficulty scale.

---


A Taste of Tradition: Couscous Salad with Roasted Vegetables


As the sun begins to dip into the horizon, casting a golden hue over our backyard, I am reminded of the countless summer evenings spent gathered around the family table. The aroma of roasted vegetables mingling with the fragrant notes of basil pesto would waft through the air, a prelude to the delicious meal ahead. My grandmother, the culinary artist of our family, would orchestrate these gatherings with a dish that has since become a treasured family tradition: Couscous Salad with Roasted Vegetables.


Ingredients:


- 1 cup regular couscous


- 2 cups chicken stock


- 3 tablespoons olive oil


- 1/4 cup sun-dried tomatoes, chopped


- 2 tablespoons basil pesto


- 2 tablespoons balsamic vinegar


- Salt and pepper, to taste


- 1/2 cup feta cheese, crumbled


- 2 medium-sized zucchinis


- 3 yellow squashes


- 1 red bell pepper


- 1 cup brown mushrooms, sliced


- 3 garlic cloves, minced


- 1 small butternut squash, cubed


- 2 red onions, sliced


- 1 bunch asparagus, trimmed


Instructions:


1. Prepare the Couscous: In a pot, add the couscous and pour over the hot chicken stock. Simmer for 15 to 20 minutes until the stock is fully absorbed. This step infuses the couscous with a savory depth, a secret my grandmother swore by.
2. Roast the Vegetables: Preheat your oven to 400°F. Grease an ovenproof dish with non-stick spray. Arrange zucchinis, yellow squash, red bell pepper, mushrooms, garlic, butternut squash, and red onions in a single layer. Drizzle with olive oil and roast for about 20 to 25 minutes. Add the asparagus after the first 10 minutes and gently stir. Once done, drizzle with a touch of balsamic vinegar.
3. Mix the Salad: Stir in the extra-virgin olive oil, sun-dried tomatoes, and basil pesto into the cooked couscous, making it moist and fragrant. Season with balsamic vinegar, salt, and pepper. Add the roasted vegetables and mix well. Finally, sprinkle with feta cheese and gently fold everything together.
4. Serve: This salad can be enjoyed warm or cooled to room temperature. It pairs beautifully with grilled beef or chicken, making it a versatile addition to any meal.

A Nostalgic Touch:


Every bite of this salad takes me back to those balmy evenings in my grandmother's garden, where laughter was as abundant as the food on our plates. She would tell stories of her childhood, where the simple joys of life were celebrated with food that nourished both body and soul. The Couscous Salad with Roasted Vegetables was her way of bringing us together, a dish that transcended generations and became a staple at our family gatherings.


So, the next time you’re looking for a dish that is both nourishing and heartwarming, try this Couscous Salad with Roasted Vegetables. Let it be more than just a meal; let it be a bridge to cherished memories and the creation of new ones.


Difficulty: 5/10
Classification: Main Dish

---


Whether it's a family reunion or a quiet dinner at home, this Couscous Salad with Roasted Vegetables is sure to become a beloved part of your culinary repertoire. Enjoy the vibrant flavors and the warm memories it brings to your table.

Read more about Appetizers

Read more about Main Dishes

Read more about Desserts

Roasted Beet Hummus | Made by Meaghan Moineau

Roasted Beet Hummus | Made by Meaghan Moineau

Title: A Vibrant Twist on Tradition: Roasted Beet Hummus
Description: Dive into the colorful world of Roasted Beet Hummus, a delightful fusion of earthy beets and creamy chickpeas. Discover a nostalgic family story that brings this dish to life, while learning how to create this flavorful appetizer in your own kitchen.

---


A Vibrant Twist on Tradition: Roasted Beet Hummus


In the heart of many family gatherings, food often takes center stage, binding loved ones together with its warmth and flavors. One dish that has become a beloved staple in my family is Roasted Beet Hummus. This vibrant, flavorful dip is more than just a treat for the taste buds—it's a journey down memory lane, rich with the colors and textures that make every get-together special.


A Family Memory: The Beetroot Legacy


Growing up, the sweet and earthy aroma of roasted beets often wafted through my grandmother's kitchen. She had an affinity for adding a pop of color to her dishes, and beets were her secret weapon. I remember sitting on a stool, watching her expertly peel and slice the beets, her hands stained a vivid magenta—a testament to her culinary expertise and love for vibrant, natural ingredients.


One summer, she decided to blend her love for traditional hummus with her beetroot obsession. The result was a stunning Roasted Beet Hummus that became an instant family favorite. I vividly recall the excitement and curiosity as she unveiled the bright pink dip, its color as bold as its flavor. We gathered around the table, dipping warm pita bread into the hummus, each bite a harmonious blend of earthy beets and creamy chickpeas, with a hint of lemon and garlic.


This dish quickly became a family tradition, gracing every gathering with its presence and reminding us of those joyful summer days. Even now, making Roasted Beet Hummus brings back memories of laughter, love, and the vibrant spirit of my grandmother.


The Recipe: Roasted Beet Hummus


Ingredients:

- 2 medium red roasted beets, peeled and chopped


- 1 can (15 oz) cooked chickpeas, drained and rinsed


- 2 cloves garlic, minced


- 1 teaspoon ground cumin


- Juice of 1 lemon


- 2 tablespoons tahini sesame seed paste


- 3 tablespoons olive oil (plus more for consistency)


- Salt to taste


Instructions:

1. In a food processor or blender, combine the roasted beets, garlic, cumin, lemon juice, tahini, and salt. Pulse until well blended.


2. Add the chickpeas and olive oil to the mixture. Pulse until just incorporated.


3. If the hummus is too thick, gradually add more olive oil, blending until you reach the desired consistency.


4. Serve with warm pita or flatbread, and enjoy a taste of tradition with a colorful twist.


Difficulty Rating: 3/10


This recipe is delightfully simple, making it accessible for even novice cooks while promising a delicious and visually stunning result. It's the perfect appetizer for any occasion, offering a unique twist on a classic favorite.


---


Roasted Beet Hummus is more than just a dish; it's a celebration of tradition, family, and the joy of sharing something beautiful and delicious with those you love. Whether you're creating new memories or reliving cherished ones, this vibrant hummus is sure to be a hit at your next gathering.

Read more about Appetizers

Read more about Main Dishes

Read more about Desserts

Tomato Stack Salad | Made by Meaghan Moineau

Tomato Stack Salad | Made by Meaghan Moineau

Title: "Tomato Stack Salad: A Taste of Summer Nostalgia"
Description: Dive into the freshness of summer with our Tomato Stack Salad, a delightful appetizer that brings together the vibrant flavors of ripe tomatoes, creamy goat cheese, and aromatic herbs. Rated an easy 3 out of 10 on the difficulty scale, this dish is perfect for beginners and seasoned cooks alike. Join us as we explore this simple yet elegant recipe, infused with the warmth of family memories.

---


Tomato Stack Salad: A Taste of Summer Nostalgia


As the sun casts its golden hue over the garden, the vibrant colors of ripe tomatoes become the centerpiece of summer meals. The Tomato Stack Salad, with its simple elegance, is more than just a dish; it's a cherished family tradition that brings back memories of warm gatherings and laughter-filled afternoons.


Ingredients:


- 4 ripe tomatoes


- 4 oz goat cheese


- A handful of fresh herbs (such as basil, parsley, or chives)


- Salt, to taste


- Balsamic vinegar, for drizzling


Instructions:


1. Prepare the Goat Cheese: Begin by mixing the fresh herbs into the goat cheese until well combined. The herbs add a burst of flavor, turning the cheese into a creamy, aromatic spread.
2. Slice the Tomatoes: Carefully slice each tomato into four thick rounds. Choose tomatoes that are firm yet ripe, ensuring they hold their shape when stacked.
3. Season the Tomatoes: Sprinkle each tomato slice lightly with salt to enhance its natural sweetness.
4. Assemble the Salad: Gently slather each tomato round with the herbed goat cheese. Stack the rounds to reassemble each tomato, creating a tower of alternating red and white layers.
5. Finish with Balsamic Vinegar: Drizzle the stacked tomatoes with balsamic vinegar, allowing it to cascade down the layers, adding a tangy contrast to the creamy cheese.

A Nostalgic Family Memory


This Tomato Stack Salad takes me back to my grandmother's kitchen, where the air was always filled with the aroma of fresh herbs. Every summer, my family would gather at her house, a quaint cottage surrounded by a lush garden. My siblings and I would help her pick the ripest tomatoes, our fingers stained with their juicy red hues.


Grandma had a way with simple ingredients, turning them into something magical. As she showed us how to mix the herbs into the goat cheese, her stories of summers past would unfold, each tale woven with laughter and a touch of nostalgia. The kitchen was our haven, a place where time slowed, and the outside world faded away.


The Tomato Stack Salad was always the highlight of our meal, a dish that captured the essence of summer in each bite. Even now, as I recreate this recipe, I can almost hear Grandma's voice, her laughter echoing through the years. This salad is more than just a recipe; it's a bridge to cherished memories and a testament to the power of family traditions.


Conclusion


The Tomato Stack Salad is a delightful appetizer that captures the essence of summer. With a difficulty rating of just 3 out of 10, it's an inviting dish for cooks of all levels. As you savor the flavors of fresh tomatoes, creamy goat cheese, and tangy balsamic vinegar, may you also find a connection to the warmth of family memories and the simple joys of sharing a meal together.


---


Embrace the simplicity and nostalgia of the Tomato Stack Salad, and let it become a cherished part of your summer gatherings.

Read more about Appetizers

Read more about Main Dishes

Read more about Desserts