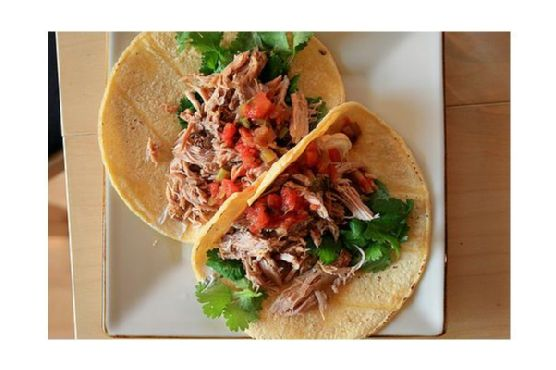
Turkey BLT with Creamy Dijon Mustard | Made by Meaghan Moineau

Delicious Turkey BLT with Creamy Dijon Mustard

Intro

There’s something magical about a classic sandwich; it brings back memories of family picnics, lazy Saturday afternoons, and the delightful crunch of fresh ingredients coming together in perfect harmony. When I was a child, my family would often gather in the backyard, a picnic blanket spread out under the warm sun, and my mother would bring out a platter full of freshly made sandwiches. One of my favorites was the Turkey BLT, filled with crisp turkey bacon, juicy tomatoes, and the perfect slice of cheese. Today, I’m excited to share my take on this classic sandwich, elevated with a touch of creamy Dijon mustard to bring a tangy twist to the beloved Turkey BLT.

Why You’ll Love It

This Turkey BLT with Creamy Dijon Mustard is not just a sandwich; it’s a symphony of flavors and textures that will leave your taste buds dancing with joy. Here’s why you’ll fall in love with it:

  • Flavorful Combination: The creamy Dijon mustard adds a tangy depth that complements the savory turkey bacon and fresh vegetables perfectly.
  • Crunchy and Satisfying: With crispy turkey bacon and toasted Italian bread, every bite is a delightful crunch.
  • Quick and Easy: This recipe is perfect for a quick lunch or dinner, requiring minimal prep and cooking time.
  • Healthy Twist: Using turkey bacon instead of regular bacon reduces the fat content without sacrificing flavor.
  • Versatile: Easily adaptable to suit your taste or dietary needs.

Ingredients

  • Dijon mustard
  • Italian fresh bread
  • Olive oil
  • Romaine heart leaves
  • Salad dressing
  • Swiss cheese
  • Tomatoes
  • Turkey bacon
  • Vidalia onion

Instructions

  1. Preheat your oven to 350 degrees Fahrenheit.
  2. Cook the turkey bacon in a skillet on the stovetop until crispy. Set aside.
  3. Slice the Italian bread into 8 even slices.
  4. In a small bowl, mix together the Dijon mustard and salad dressing to create a creamy spread.
  5. Spread a thin layer of creamy Dijon mustard on one side of each slice of bread.
  6. On one slice of bread, layer 2 pieces of Swiss cheese, 2 romaine leaves, 2 slices of tomato, 1 slice of Vidalia onion, and 4 slices of turkey bacon.
  7. Top with another slice of bread, mustard side down.
  8. Drizzle olive oil on the top of the sandwich and place on a baking sheet.
  9. Bake in the oven, turning halfway through, until each side of the bread is toasted and the cheese is melted (approximately 4-5 minutes per side).

Tips

For the best results, use fresh ingredients and high-quality bread. If you prefer a more robust flavor, consider adding a pinch of black pepper or a few slices of avocado for creaminess. Remember to watch the sandwiches closely while toasting to prevent burning.

Variations & Substitutions

If you’re looking to switch things up, consider these variations:

  • Panini Maker: Instead of toasting in the oven, use a panini maker for a perfectly pressed sandwich.
  • Stovetop Skillet: Alternatively, toast the sandwich in a skillet on the stovetop for a more hands-on approach.
  • Cheese Options: Substitute Swiss cheese with cheddar or provolone for a different flavor profile.
  • Vegetarian Option: Replace turkey bacon with a plant-based alternative to make it vegetarian-friendly.

Storage

If you have leftovers, wrap the sandwiches in aluminum foil and store them in the refrigerator. They are best consumed within 1-2 days. To reheat, place them in the oven or toaster oven to maintain the crispy texture.

FAQ

Can I make this sandwich gluten-free?

Yes, simply substitute the Italian bread with your favorite gluten-free bread. Ensure all other ingredients, like salad dressing and mustard, are also gluten-free.

What can I serve with this Turkey BLT?

This sandwich pairs wonderfully with a side of sweet potato fries, a fresh green salad, or a bowl of soup for a complete meal.

Nutrition

While the exact nutritional content will depend on the specific brands and quantities used, a typical Turkey BLT with Creamy Dijon Mustard is a balanced meal providing protein from the turkey bacon, fiber from the vegetables, and healthy fats from olive oil. For a more detailed breakdown, consider using a nutrition calculator.

Conclusion

This Turkey BLT with Creamy Dijon Mustard is more than just a meal; it’s a cherished experience that brings together the warmth of nostalgia and the joy of discovering new flavors. Whether you’re making it for a quick lunch or a special family gathering, this sandwich is sure to impress. Enjoy every bite, and may it bring you as much joy as those sunny picnics did in my childhood.

Related update: Turkey BLT with Creamy Dijon Mustard

Related update: Mardi Gras Shrimp Étouffée

Neoguri (Spicy Seafood Ramen) | Made by Meaghan Moineau

Neoguri (Spicy Seafood Ramen) Recipe

Intro

When I was a child, my family would often gather around the kitchen table on chilly evenings, excitedly waiting for a steaming bowl of my grandmother’s homemade ramen. The rich, savory aroma would fill the room, making our mouths water in anticipation. My grandmother, originally from a small coastal town in Korea, had a knack for turning simple ingredients into a feast for the senses. Among her creations, her spicy seafood ramen was legendary—the perfect blend of heat, umami, and comfort. Even now, the taste of spicy seafood ramen takes me back to those cherished family memories, and I’m thrilled to share a version of this recipe with you today. Let’s dive into creating a delicious bowl of Neoguri (Spicy Seafood Ramen) that warms the heart and soul.

Why You’ll Love It

This Neoguri (Spicy Seafood Ramen) recipe is more than just a quick meal; it’s a culinary experience. Here’s why you’ll adore it:

  • Quick and Easy: With just a few ingredients and simple steps, you can whip up a satisfying meal in under 20 minutes.
  • Rich in Flavor: The combination of spicy broth, seafood, and umami-packed seaweed creates a depth of flavor that’s hard to beat.
  • Customizable: This recipe is versatile and can be adjusted to suit your taste preferences or dietary needs.
  • Comforting: Perfect for a cozy night in, this ramen is sure to warm you up from the inside out.

Ingredients

  • 1 egg
  • 1 cup mussels (fresh or frozen)
  • 1 pack Neoguri ramen
  • 1 green scallion
  • 1 sheet seaweed (gim)

Instructions

  1. Bring a pot of water to a boil. Add mussels and sauce packets from the Neoguri ramen package into the boiling water. Allow it to boil for about 5 minutes to cook the mussels and deepen the broth. If using fresh mussels, wait until they open and discard any that remain closed.
  2. Include the noodles in the boiling pot and cook for 2 to 3 minutes, or until they reach your desired texture.
  3. In a small bowl, beat the egg. Gradually add the beaten egg into the pot while stirring the noodles in a circular motion for even, flaky egg drops. For a poached egg, carefully add the egg off to the side of the pot.
  4. While the noodles are cooking, thinly slice the green scallion and gim (seaweed) sheet.
  5. Transfer the cooked ramen to a serving bowl and garnish with the sliced scallions and seaweed. Serve hot and enjoy!

Tips

  • For extra heat, add a dash of chili flakes or Sriracha to the broth.
  • If you prefer a milder flavor, use only half of the Neoguri ramen sauce packet.
  • Ensure mussels are thoroughly cleaned and de-bearded before cooking to avoid any grit in your broth.
  • Use a high-quality seaweed sheet for the best flavor and texture.

Variations & Substitutions

This recipe is wonderfully adaptable. Here are some ideas to make it your own:

  • Vegetarian Option: Skip the mussels and add tofu or mushrooms for a protein boost while keeping it vegetarian.
  • Extra Veggies: Add sliced carrots, bok choy, or bean sprouts for added nutrients and texture.
  • Seafood Mix: Use a mix of seafood like shrimp, clams, and squid along with the mussels for a more diverse taste.
  • Noodle Swap: If you can’t find Neoguri ramen, any instant ramen with a spicy flavor profile will work in a pinch.

Storage

For the best taste and texture, it’s best to enjoy Neoguri (Spicy Seafood Ramen) fresh. However, if you have leftovers, store them in an airtight container in the refrigerator for up to two days. When reheating, add a splash of water or broth to loosen the noodles and ensure even warming. Be cautious, as the seafood flavor may intensify over time.

FAQ

Can I use frozen mussels instead of fresh?

Yes, frozen mussels are a convenient option and work well in this recipe. Just make sure to thaw them before adding them to the boiling water.

Is it possible to make this ramen less spicy?

Absolutely! You can control the spice level by using only half of the sauce packet or adding more water to dilute the broth. Adjust the spice to your preference.

Nutrition

This Neoguri (Spicy Seafood Ramen) offers a balanced meal with protein from mussels and egg, carbohydrates from noodles, and nutrients from scallions and seaweed. Mussels are a great source of omega-3 fatty acids, while seaweed provides iodine, an essential mineral. Adjust portion sizes to fit your dietary needs.

Conclusion

There’s something incredibly comforting about a bowl of steaming Neoguri (Spicy Seafood Ramen). It’s more than just a meal; it’s a connection to cherished memories and a celebration of flavors. This recipe brings warmth and satisfaction to any table, from its spicy seafood broth to the tender noodles and vibrant garnishes. I hope this dish becomes a beloved staple in your kitchen, just as it has been in mine. Enjoy the delightful complexity of flavors with each spoonful and share the joy with others around you. Happy cooking!

Related update: Neoguri (Spicy Seafood Ramen)

Related update: Turkey BLT with Creamy Dijon Mustard

Ditalini with peas | Made by Meaghan Moineau

Ditalini with Peas: A Cozy Italian Classic

Intro

Growing up, Sundays at my grandmother’s house were a time of laughter, family, and, most importantly, the comforting aroma of her hearty Italian cooking. Among the delightful array of dishes she would prepare, Ditalini with Peas was my absolute favorite. This simple yet flavorful pasta dish, dotted with sweet peas and enriched with creamy ricotta, brings back fond memories of sitting at her rustic kitchen table, eagerly awaiting my bowl of goodness. Today, I am thrilled to share this cherished recipe with you, hoping it brings warmth and joy to your family meals just as it has to mine.

Why You’ll Love It

This Ditalini with Peas recipe is a beautiful blend of flavors and textures that makes it irresistible. You’ll love it because:

  • Simple Ingredients: You don’t need a long list of fancy ingredients to create something delicious.
  • Quick and Easy: Perfect for a weeknight dinner, this dish comes together in under 30 minutes.
  • Family-Friendly: Its mild flavors and creamy texture make it a hit with both kids and adults.
  • Customizable: Easily adaptable to suit dietary preferences or ingredient availability.

Ingredients

  • Coarse sea salt
  • Ditalini pasta
  • Freshly ground black pepper
  • Ham, diced
  • 2 tablespoons olive oil
  • 1 medium onion, finely chopped
  • Pancetta, diced
  • Parmesan or Grana Padano cheese, grated
  • Ricotta cheese
  • 1 teaspoon turmeric in 2 ladles of water
  • 1 cup peas (fresh or frozen)

Instructions

  1. In a large sauté pan, place the chopped onion in cold olive oil. Soften the onion without letting it color by adding a teaspoon of water occasionally. Cook until the onion becomes wilted and opaque, about 10 minutes.
  2. Add the peas to the pan and pour in enough water to just cover them. Season with coarse sea salt and freshly ground black pepper. Cook until the peas are tender, approximately 5 to 15 minutes for fresh peas, depending on their freshness and size, or 10 minutes for frozen peas.
  3. Just before the peas are fully cooked, add the diced pancetta and ham. Stir everything together and then turn off the heat.
  4. Stir in the turmeric water and incorporate the ricotta cheese by sieving it through a colander. Allow the ricotta to melt into the cooking liquids, creating a golden sauce. Keep the mixture warm until the pasta is ready.
  5. Meanwhile, cook the ditalini pasta according to the manufacturer’s instructions. Drain the pasta, reserving some of the cooking water.
  6. Immediately toss the cooked pasta in the sauté pan, ensuring it is thoroughly coated with the sauce. If the sauce seems dry, add a bit of the reserved pasta cooking water to loosen it.
  7. Serve immediately, topped with grated Parmesan or Grana Padano cheese.

Tips

  • Use fresh peas: If possible, try to use fresh peas for the best texture and flavor. However, frozen peas work well too.
  • Adjust seasoning: Taste the sauce before serving and adjust the salt and pepper to your preference.
  • Don’t overcook the pasta: Ditalini should be cooked al dente to avoid a mushy texture when mixed with the sauce.

Variations & Substitutions

This Ditalini with Peas recipe is versatile! Here are some variations and substitutions you might enjoy:

  • Vegetarian Option: Omit the pancetta and ham for a meat-free version. Add sliced mushrooms or sun-dried tomatoes for extra flavor.
  • Spicy Twist: Add a pinch of red pepper flakes or a dash of hot sauce for a subtle kick.
  • Cheese Lovers: For an extra cheesy version, mix in some mozzarella or fontina cheese before serving.
  • Gluten-Free: Use your favorite gluten-free pasta instead of traditional ditalini.

Storage

Leftover Ditalini with Peas can be stored in an airtight container in the refrigerator for up to three days. To reheat, add a splash of water or broth to loosen the sauce before microwaving or warming on the stove. For best results, avoid freezing as the texture of the pasta and peas may change.

FAQ

Can I make this dish in advance?

Yes, you can prepare the sauce in advance and store it in the refrigerator for up to two days. When ready to serve, cook the pasta and toss it with the reheated sauce.

What can I use instead of ditalini pasta?

Any small pasta shape, such as macaroni or orzo, can be used as a substitute for ditalini in this recipe. Choose a pasta type that will hold the sauce well.

How can I make this dish more flavorful?

For added depth of flavor, try using chicken or vegetable broth instead of water when cooking the peas. You can also add a splash of white wine to the onion and olive oil mixture for a more robust taste.

Nutrition

This dish is a comforting blend of carbohydrates, protein, and fats. With its moderate portion of cheese and meats, it’s a satisfying meal that can be part of a balanced diet. To lighten it up, consider using low-fat ricotta and reducing the amount of cheese.

Conclusion

Ditalini with Peas is a heartwarming dish that brings people together around the table, much like it did in my grandmother’s kitchen. Its simplicity and rich flavors make it a timeless classic perfect for any occasion. I hope you enjoy making and sharing this recipe with your loved ones, creating your own cherished memories along the way. Buon appetito!

Related update: Ditalini with peas

Related update: Neoguri (Spicy Seafood Ramen)

Related update: Colcannon

Red Velvet Cupcake | Made by Meaghan Moineau

Red Velvet Cupcake Recipe

Intro

There’s something magical about a batch of red velvet cupcakes, with their rich, velvety texture and striking color. Growing up, my grandmother would often bake these delightful treats for special occasions, and the aroma of vanilla and cocoa would fill her cozy kitchen. It was a time when the whole family would gather around, eagerly waiting to taste the first cupcake, topped with a generous swirl of cream cheese frosting. Today, I’m excited to share this cherished recipe with you, so you can create your own sweet memories.

Why You’ll Love It

These red velvet cupcakes are not just beautiful to look at, but they also offer a perfect balance of flavors. The subtle hint of cocoa, combined with the tanginess of the buttermilk and cream cheese frosting, creates a taste that is both unique and irresistible. They’re perfect for any celebration or just a cozy afternoon tea. Plus, the recipe is simple enough for even novice bakers to master.

Ingredients

  • Baking soda
  • ¾ cup unsalted butter
  • Buttermilk
  • Cake flour
  • Cider vinegar
  • Cream cheese
  • Eggs
  • Powdered sugar
  • Red food coloring
  • Salt
  • Sugar
  • Unsalted butter
  • Unsweetened cocoa
  • Vanilla
  • Vanilla extract

Instructions

  1. Preheat your oven to 350°F (175°C). Grease and lightly flour two cupcake pans to make 24 cupcakes.
  2. In a small bowl, sift the cake flour and set it aside.
  3. In a large bowl, use the medium speed of an electric mixer to cream the butter and sugar until very light and fluffy, about 5 minutes.
  4. Add the eggs, one at a time, beating well after each addition.
  5. In a small bowl, whisk together the red food coloring, cocoa, and vanilla. Add this mixture to the batter and beat well.
  6. In a measuring cup, stir the salt into the buttermilk. Add this to the batter in three parts, alternating with the flour. With each addition, beat until the ingredients are incorporated, but do not overbeat.
  7. In a small bowl, stir together the cider vinegar and baking soda. Add this to the batter and mix well.
  8. Using a rubber spatula, scrape down the batter in the bowl, ensuring the ingredients are well blended and the batter is smooth.
  9. Divide the batter among the prepared pans.
  10. Arrange the oven racks in the upper and lower thirds of the oven. Bake the cupcakes, switching positions of the pans halfway through baking, until a tester comes out clean, about 20 minutes.
  11. Cool the cupcakes in the pan for 10 minutes, then remove them from the pan and cool completely on a rack before icing.
  12. To make the frosting, combine butter, salt, and cream cheese in a mixer and beat on medium speed for 2-3 minutes. Add sugar until just incorporated. Do not over mix. It should be thick but not fluffy. Add vanilla. If necessary, add milk to thin.
  13. To ice, mound about a cup of frosting on top of each cupcake and use an icing spatula to make a swirl on top. If desired, decorate with colored sprinkles.

Tips

For the best results, ensure all your ingredients are at room temperature before starting. This helps them blend more smoothly. Also, be gentle when mixing the batter to keep the cupcakes light and fluffy. Finally, don’t skip the step of switching the pans halfway through baking; it ensures even cooking.

Variations & Substitutions

If you’re looking to make these cupcakes a tad healthier, consider using whole wheat pastry flour in place of cake flour. For a fun twist, you can add a teaspoon of orange zest to the batter for a citrusy kick. If you prefer a less sweet frosting, reduce the powdered sugar by half and add a splash of lemon juice for a tangy flavor.

Storage

These cupcakes are best enjoyed fresh, but they can be stored in an airtight container at room temperature for up to two days. If you need to keep them longer, store them in the fridge for up to a week. Just bring them to room temperature before serving for the best texture and flavor. You can also freeze them without frosting for up to three months.

FAQ

Can I use all-purpose flour instead of cake flour?

While cake flour gives these cupcakes their tender crumb, you can substitute all-purpose flour if needed. Just be sure to measure carefully and sift it to ensure a light texture.

What can I use instead of buttermilk?

If you don’t have buttermilk on hand, you can make a quick substitute by adding one tablespoon of lemon juice or vinegar to one cup of milk. Let it sit for about 5 minutes before using it in the recipe.

How do I know when the cupcakes are done?

The cupcakes are done when a toothpick inserted into the center comes out clean or with just a few moist crumbs. If the toothpick is wet with batter, give them a few more minutes.

Nutrition

Each red velvet cupcake is approximately 250 calories, with 12g of fat, 33g of carbohydrates, and 3g of protein. These values can vary slightly based on specific ingredients used and portion sizes.

Conclusion

Red velvet cupcakes are a classic treat that never fails to impress. Whether you’re baking them for a special occasion or just because, they’re sure to bring smiles to everyone who tastes them. I hope this recipe brings as much joy to your kitchen as it has to mine. Happy baking!

Related update: Red Velvet Cupcake

Related update: Red Velvet Cupcake

Chimichurri Skirt Steak with Grilled Asparagus | Made by Meaghan Moineau

Chimichurri Skirt Steak with Grilled Asparagus

Intro

There’s something magical about the first whiff of a grill heating up on a warm summer evening. It takes me back to childhood summers spent in my grandparents’ backyard, where my grandfather would be at the helm of an old, well-loved grill, flipping steaks with an effortless grace. Those memories inspire me to recreate similar moments for my own family, and one of our favorite recipes is Chimichurri Skirt Steak with Grilled Asparagus. This dish is not just a meal; it’s an experience, a reminder of cherished times, and an invitation to gather around the table for laughter and love.

Why You’ll Love It

This recipe for Chimichurri Skirt Steak with Grilled Asparagus is perfect for so many reasons. First, it’s incredibly flavorful. The chimichurri sauce, with its fresh herbs and hint of spice, perfectly complements the rich, tender skirt steak. Second, it’s an impressive dish that’s surprisingly easy to prepare, making it ideal for both weeknight dinners and special occasions. The grilled asparagus adds a healthy, crunchy side that rounds out the meal beautifully. Plus, grilling keeps the mess to a minimum and the flavor to the max!

Ingredients

  • 1 bunch green asparagus
  • 1 bunch white asparagus
  • 1 teaspoon chili pepper flakes
  • 1 cup flat leaf parsley
  • 1/2 cup fresh mint leaves
  • 4 to 5 garlic cloves
  • 1 tablespoon kosher salt
  • 2 tablespoons lemon juice
  • 1 cup olive oil, divided
  • 1/4 cup fresh oregano leaves
  • 1 teaspoon freshly cracked black pepper
  • 1/4 cup red wine vinegar
  • 1 shallot, roughly chopped
  • 2 skirt steaks

Instructions

  1. Place all chimichurri sauce ingredients except for the olive oil in a food processor and pulse until well chopped.
  2. While the food processor is going, slowly pour the olive oil into the mixture until blended. Reserve half of the sauce to serve on the side with the meal.
  3. Season skirt steaks with salt and pepper on both sides.
  4. Spoon the remaining chimichurri sauce over the steaks and let marinate for 30 minutes up to overnight.
  5. Preheat the grill to 350 to 400°F.
  6. In a plastic resealable bag, add asparagus, olive oil, garlic, salt, and pepper. Shake to coat and place in a grill basket.
  7. Place the steak and grill basket of asparagus directly over a hot grill.
  8. Gently toss the asparagus for even grilling and baste with garlic, olive oil mixture. Grill for about 10 minutes.
  9. Grill the skirt steak to desired temperature, about 5 to 8 minutes per side.
  10. Remove from grill and let steak rest for 10 minutes before slicing into long strips.
  11. Spoon reserved chimichurri sauce over steak and serve with asparagus on the side.

Tips

  • To ensure even cooking, let your steaks come to room temperature before grilling.
  • If you prefer a less spicy chimichurri, reduce the amount of chili pepper flakes.
  • Use a meat thermometer to ensure your steak is cooked to your desired doneness.

Variations & Substitutions

Feel free to get creative with this recipe! You can substitute the skirt steak with flank steak or even chicken breasts if you prefer. If fresh herbs are not available, dried herbs can be used, but remember to use them sparingly as they have a more concentrated flavor. For a different twist, try adding a splash of balsamic vinegar to the chimichurri for a slightly sweeter flavor profile.

Storage

Leftovers can be stored in an airtight container in the refrigerator for up to three days. The chimichurri sauce can be kept in a separate container for up to a week. When reheating the steak, be sure not to overcook it to maintain its tenderness. The asparagus is best enjoyed fresh but can be reheated in a skillet over medium heat.

FAQ

Can I make the chimichurri sauce in advance?

Yes, the chimichurri sauce can be made up to two days in advance. Store it in an airtight container in the refrigerator and give it a good stir before using.

What can I do if I don’t have a grill?

If you don’t have a grill, you can use a grill pan on the stove or broil the steak and asparagus in the oven. Just keep an eye on them to prevent overcooking.

Is skirt steak the same as flank steak?

While skirt steak and flank steak are both long, flat cuts of beef, they come from different parts of the cow and have slightly different textures. Skirt steak is more marbled and has a more intense flavor, while flank steak is leaner.

Conclusion

Chimichurri Skirt Steak with Grilled Asparagus is a delightful dish that brings people together, whether for a casual family dinner or a festive summer gathering. The combination of vibrant chimichurri and perfectly grilled steak and asparagus creates a meal that’s both nourishing and exciting. As you take that first bite, you’ll be reminded of the simple joys of good food and good company. Enjoy this recipe and create your own cherished memories around the grill!

Related update: Chimichurri Skirt Steak with Grilled Asparagus

Related update: Ditalini with peas

Authentic Bolognese Sauce | Made by Meaghan Moineau

Authentic Bolognese Sauce

Intro

There’s something deeply comforting about a simmering pot of Bolognese sauce on the stove, its rich aromas filling the kitchen and evoking memories of family dinners. Growing up, weekends were synonymous with my grandmother’s Bolognese—an authentic recipe passed down through generations. I fondly recall sitting at the kitchen table, my eyes barely peeking over the edge, watching her expertly chop vegetables and stir the sauce with love and dedication. Today, I’m thrilled to share this cherished recipe with you, hoping it brings warmth to your table and creates new memories with your loved ones.

Why You’ll Love It

This Authentic Bolognese Sauce is a labor of love, but it’s worth every minute of simmering. Here’s why you’ll adore making and eating this classic Italian sauce:

  • Rich Flavor: The combination of pancetta, beef, and aromatic vegetables creates a depth of flavor that is both hearty and inviting.
  • Versatile: While traditionally served with tagliatelle, this sauce pairs beautifully with any pasta, lasagna, or even as a topping for polenta.
  • Family Tradition: It’s a recipe that invites you to slow down, enjoy the cooking process, and share a meal steeped in cultural heritage.

Ingredients

  • 1 carrot, diced
  • 1 celery stalk, diced
  • 1/2 cup dry white wine
  • 2 garlic cloves, minced
  • 1 pound regular ground beef
  • 2 tablespoons olive oil
  • 1 diced onion
  • 4 ounces pancetta, diced
  • 1/2 teaspoon pepper
  • 1 teaspoon salt
  • 2 tablespoons tomato paste
  • 1 cup whole milk

Instructions

  1. In a large skillet, heat the olive oil over medium heat.
  2. Add the pancetta, onion, carrot, celery, and garlic. Cook until the vegetables are soft, about 10-15 minutes, stirring occasionally.
  3. Add the ground beef to the skillet. Cook until it is no longer pink, breaking it up with a wooden spoon as it cooks.
  4. Stir in the dry white wine, allowing it to simmer for about 2 minutes.
  5. Add the whole milk and tomato paste, stirring well to combine.
  6. Season with salt and pepper to taste.
  7. Reduce the heat to low and let the sauce simmer uncovered for 1 hour, or until most of the liquid has been absorbed, stirring occasionally.
  8. Once the sauce has thickened, taste and adjust seasoning if necessary before serving.

Tips

  • Take your time: This sauce benefits from a slow simmer, allowing the flavors to meld beautifully. Resist the urge to rush.
  • Quality ingredients: Use the best quality ingredients you can find, especially when it comes to the wine and beef.
  • Stir occasionally: Make sure to stir the sauce every now and then to prevent it from sticking to the bottom of the skillet.

Variations & Substitutions

While this recipe strives to stay true to its authentic roots, there are always ways to make it your own:

  • Vegetarian Bolognese: Substitute the beef and pancetta with lentils and mushrooms for a hearty vegetarian version.
  • Different Meats: Feel free to use a mix of ground pork and beef for a slightly different flavor profile.
  • Herbs and Spices: Add a bay leaf or a pinch of nutmeg for additional depth.

Storage

Allow the Bolognese sauce to cool completely before storing. Transfer it to an airtight container and refrigerate for up to 3 days. For longer storage, freeze the sauce in airtight containers or freezer bags for up to 3 months. Thaw in the refrigerator overnight before reheating.

FAQ

Can I make this sauce ahead of time?

Absolutely! In fact, Bolognese sauce often tastes even better the next day as the flavors have time to develop further. Simply reheat gently on the stove before serving.

What type of pasta pairs best with Bolognese sauce?

Traditionally, Bolognese sauce is served with tagliatelle, a wide, flat pasta that holds the sauce beautifully. However, it also pairs well with pappardelle, fettuccine, or any pasta you have on hand.

Can I use red wine instead of white?

While white wine is traditional in Bolognese, red wine can be used for a slightly different, richer flavor. Just ensure it’s a dry variety to maintain the sauce’s balance.

Nutrition

This recipe serves approximately 6 people. Each serving contains:

  • Calories: 320
  • Protein: 20g
  • Carbohydrates: 12g
  • Fat: 22g
  • Fiber: 2g

Conclusion

Authentic Bolognese Sauce is more than just a meal—it’s a celebration of tradition, flavor, and the joy of cooking. Whether you’re recreating cherished family memories or crafting new ones, this dish brings warmth and togetherness to any table. I hope this recipe becomes a beloved staple in your home, infusing your kitchen with the same love and care my grandmother infused into hers. Buon appetito!

Related update: Authentic Bolognese Sauce

Related update: Chimichurri Skirt Steak with Grilled Asparagus

Related update: Walnut Pesto

Thick, Fudgy, One Bowl Brownies | Made by Meaghan Moineau

Thick, Fudgy, One Bowl Brownies

Intro

There’s a certain magic in the smell of brownies baking that instantly transports me back to my grandmother’s kitchen. As a child, I would sit perched on a stool, eagerly watching her skillfully mix and pour, the sweet aroma enveloping the room. Those moments were pure bliss, punctuated by the heavenly taste of a freshly baked brownie, still warm and gooey from the oven. It’s this nostalgic memory that inspired me to create my own version of thick, fudgy, one bowl brownies—a recipe that’s as simple as it is delicious.

Why You’ll Love It

These brownies are everything a chocolate lover dreams of—rich, fudgy, and oh-so-chocolatey. Made in just one bowl, this recipe is perfect for those who crave indulgence without the fuss. Whether you’re a seasoned baker or a novice in the kitchen, these brownies will win you over with their simplicity and decadence. Plus, they’re versatile enough for any occasion, from a cozy night in to an elegant dinner party dessert. You’ll love how quickly they come together and the pure satisfaction they bring with every bite.

Ingredients

  • Semi-sweet chocolate
  • Unsweetened chocolate
  • Unsalted butter
  • Cocoa powder
  • Eggs
  • Vanilla extract
  • Table salt
  • Flour

Instructions

  1. Adjust an oven rack to the lower-middle position and heat the oven to 350°F.
  2. Line an 8-inch square baking pan with two pieces of foil and spray with vegetable oil spray.
  3. Melt the semi-sweet and unsweetened chocolate and butter in a large heatproof bowl set over a saucepan of barely simmering water, stirring occasionally with a spatula or wooden spoon until smooth.
  4. Remove the bowl from heat and stir in the cocoa powder until smooth. Set aside to cool.
  5. Once the mixture has cooled, stir in the eggs, sugar, vanilla, and salt until combined.
  6. Add flour, stirring until just combined.
  7. Transfer the batter to the prepared pan; spread the batter into the corners and smooth the surface using your spatula.
  8. Bake until slightly puffed and a toothpick or wooden skewer inserted into the center of the brownies comes out with a few moist crumbs attached, about 35-40 minutes.
  9. Cool the brownies on a wire rack to room temperature. If you’re impatient like me, even 5 minutes is enough to satisfy a chocolate craving!
  10. Loosen the edges with a paring knife and lift the brownies from the pan using the foil extensions. Cut the brownies into 1-inch squares and serve.

Tips

For the best results, use high-quality chocolate and cocoa powder. This will enhance the flavor and texture of your brownies. Make sure not to overmix the batter once the flour is added; this can result in a tougher brownie. Also, resist the temptation to cut the brownies too soon after baking; allowing them to cool helps them set properly, making them easier to slice.

Variations & Substitutions

Feel free to customize these brownies to suit your taste. You can add a handful of chopped nuts, such as walnuts or pecans, for some crunch. If you prefer a more intense chocolate flavor, sprinkle some chocolate chips into the batter. For a different twist, try adding a teaspoon of espresso powder to enhance the chocolate flavor. For those who need a gluten-free option, substitute the flour with a gluten-free baking mix.

Storage

Store your brownies in an airtight container at room temperature for up to 4 days. If you want to keep them longer, they can be frozen for up to 3 months. Simply wrap them tightly in plastic wrap and place them in a freezer-safe bag. Thaw at room temperature before serving.

FAQ

Can I double this recipe?

Yes, you can easily double the recipe and bake it in a 9×13-inch pan. Just be sure to adjust the baking time accordingly, checking for doneness around the 45-minute mark.

Can I use milk chocolate instead of semi-sweet?

While you can use milk chocolate, it will result in a sweeter brownie. If you prefer a balanced sweetness, stick with semi-sweet chocolate or adjust the sugar content to taste.

Nutrition

Each serving of these brownies (based on 16 servings) contains approximately:

  • Calories: 200
  • Fat: 12g
  • Saturated Fat: 7g
  • Carbohydrates: 24g
  • Sugar: 18g
  • Protein: 3g

Conclusion

Baking these thick, fudgy, one bowl brownies is not just about indulging in a sweet treat; it’s about creating memories and savoring the joys of homemade comfort food. Whether you’re sharing them with loved ones or enjoying a quiet moment alone, these brownies are sure to bring a smile to your face. So gather your ingredients, roll up your sleeves, and let the magic of baking bring a little warmth to your day.

Related update: Thick, Fudgy, One Bowl Brownies

Kunna (A Delicious Chinioti Dish, Punjab, Pakistan) | Made by Meaghan Moineau

Kunna: A Delicious Chinioti Dish from Punjab, Pakistan

Intro

There’s something magical about the aroma of traditional dishes wafting through the house, especially during family gatherings. I vividly remember visiting my grandmother’s place in Chiniot as a child. The entire family would come together, sharing stories and laughter, while the comforting scent of Kunna cooking in an earthenware pot would fill the air. This dish, rich in flavor and history, has always been a staple at our family dinners, bringing with it a sense of warmth and togetherness. Today, I’m thrilled to share this beloved recipe with you, hoping it brings the same joy to your table as it has to ours over the years.

Why You’ll Love It

Kunna is not just a dish; it’s an experience. The slow-cooked mutton, infused with aromatic spices, creates a flavor profile that is both rich and satisfying. It’s perfect for those who appreciate traditional cooking methods and the depth of flavor they bring. This dish is hearty, comforting, and sure to impress your guests, making it ideal for special occasions or a cozy family meal.

Ingredients

  • 1 garlic pod
  • 1 ginger pod
  • Oil
  • 2 onions
  • Spices:
    • 1 teaspoon paprika powder
    • 1 teaspoon garam masala
    • Caraway seeds
  • 1 teaspoon wheat flour
  • 1 kg mutton
  • 1/4 cup water

Instructions

  1. In a large earthenware pot (Handi Matti ki) or any metallic pot, add the mutton, garlic, and ginger. Cook for 1-3 minutes to let the flavors infuse.
  2. Add 1/4 cup of water, onions, and the spices except for the wheat flour, caraway seeds, and garam masala. Cook on low heat until the meat is tender.
  3. Once the meat is tender, add oil and stir-fry to enhance the flavors.
  4. Mix the wheat flour in 1/4 cup of water and add it to the pot. Cook on low flame for an additional 10-15 minutes to thicken the sauce.
  5. Finally, sprinkle the caraway seeds and garam masala over the dish and let it simmer for 5-10 minutes.
  6. Your delicious Kunna is ready! Serve it with Naan, Roti (Pakistani Bread), or fried rice for a complete meal.

Tips

For the best results, use fresh mutton and ensure it is of high quality. Cooking in an earthenware pot can enhance the flavor, but if unavailable, a heavy-bottomed metallic pot works just fine. Always cook on low heat to ensure the meat becomes tender and absorbs the spices fully.

Variations & Substitutions

If you prefer a milder flavor, adjust the amount of paprika powder. For those who enjoy a bit of heat, consider adding a pinch of red chili flakes. You can substitute mutton with beef or chicken, but the cooking time may vary. For a vegetarian version, replace the meat with hearty vegetables like eggplants or potatoes.

Storage

Kunna can be stored in an airtight container in the refrigerator for up to 3 days. Reheat it on the stove over low heat, adding a splash of water if needed to maintain the desired consistency.

FAQ

Can I use a slow cooker for this recipe?

Yes, a slow cooker can be used to make Kunna. Follow the same instructions, but instead of cooking on the stove, transfer everything to a slow cooker and cook on low for 6-8 hours or until the meat is tender.

What can I serve with Kunna?

Kunna pairs wonderfully with traditional Pakistani breads like Naan or Roti. It can also be served with steamed or fried rice for a more filling meal.

Is there a vegetarian version of Kunna?

While Kunna is traditionally made with mutton, you can create a vegetarian version by using hearty vegetables such as eggplants or potatoes. The spices and cooking method remain the same.

Nutrition

The nutritional content of Kunna will vary based on the specific ingredients and portion sizes used. Generally, mutton is a good source of protein and iron, while the spices contribute antioxidants and other health benefits. Be mindful of portion sizes if you’re watching your calorie intake.

Conclusion

Kunna is more than just a meal; it’s a culinary tradition that has been passed down through generations. Its rich flavors and comforting aroma make it a favorite in many households. Whether you’re making it for a special occasion or simply to enjoy a taste of Punjab, this dish is sure to delight your taste buds and warm your heart. I hope this recipe brings as much joy to your family as it has to mine. Happy cooking!

Related update: Kunna (A Delicious Chinioti Dish, Punjab, Pakistan)

Related update: Authentic Bolognese Sauce

Three-Cup Chicken | Made by Meaghan Moineau

Three-Cup Chicken: A Flavorful Taiwanese Classic

Intro

Ah, Three-Cup Chicken, a dish that always takes me back to my grandmother’s bustling kitchen. The aroma of aromatic garlic and ginger sizzling in sesame oil wafting through the air, the clamor of family members eagerly awaiting a meal, and the comforting warmth of a home-cooked feast. I remember watching her with wide eyes, captivated by the magic she created with just a handful of ingredients. This dish is more than just a meal; it’s a cherished family tradition passed down through generations, bringing with it a sense of nostalgia and love.

Why You’ll Love It

Three-Cup Chicken is the epitome of simplicity and flavor. With its roots in Taiwanese cuisine, this dish is named after its three main ingredients: soy sauce, sesame oil, and rice wine. It’s a dish that balances savory, sweet, and aromatic flavors perfectly. Whether you’re a seasoned cook or a beginner, you’ll appreciate how easy it is to prepare, yet how impressively delicious and aromatic it turns out. The caramelized chicken, infused with the bold flavors of garlic and ginger, will make your taste buds dance with joy.

Ingredients

  • 1 whole chicken, cut into pieces
  • 1 bulb of garlic, cloves peeled
  • Old ginger, sliced
  • 1 cup of rice wine
  • 1 cup of sesame oil
  • 1 cup of soy sauce
  • Spring onions, chopped
  • 2 tablespoons of sugar
  • A handful of fresh basil leaves

Instructions

  1. Marinate the chicken pieces with the soy sauce, sesame oil, and rice wine. Allow it to marinate for at least 6 hours, although overnight is best for maximum flavor.
  2. Before cooking, take the chicken out of the refrigerator to bring it to room temperature.
  3. Heat up some sesame oil in a wok or claypot until it is sizzling hot.
  4. Add the garlic, ginger, and spring onions to the wok. Fry briefly until they become fragrant.
  5. Add the marinated chicken to the wok and sear it until it is browned on all sides.
  6. Keep stir-frying and then pour in the marinade liquid along with the sugar.
  7. Continue to cook on medium heat until the mixture comes to a rolling boil.
  8. Cover the wok or claypot and let it simmer over a low flame until all the liquid has evaporated and the chicken is on the cusp of burning.
  9. Ensure that there is hardly any gravy left and that the chicken is caramelized (slightly charred in parts).
  10. Garnish with fresh basil leaves before serving.

Tips

To ensure the best taste, always use fresh ingredients. The quality of your soy sauce, sesame oil, and rice wine will greatly influence the flavor of the dish. Don’t rush the marinating process; it’s key to achieving a deep, rich flavor. Finally, keep a close eye towards the end of cooking, as the chicken can quickly go from caramelized to burnt.

Variations & Substitutions

While the traditional recipe calls for a whole chicken, you can use chicken thighs or drumsticks if you prefer. If you’re looking for a non-alcoholic version, substitute the rice wine with chicken broth. For a spicier kick, add some red chili peppers during the stir-frying step. Vegetarians can substitute tofu or eggplant for chicken, though the cooking time will need to be adjusted.

Storage

Three-Cup Chicken can be stored in an airtight container in the refrigerator for up to three days. To reheat, simply place it in a pan over low heat until warmed through. Avoid using the microwave, as it can alter the texture of the chicken.

FAQ

Can I make Three-Cup Chicken in advance?

Absolutely! This dish can be prepared a day ahead. In fact, the flavors develop even further when left to sit overnight. Simply reheat before serving.

What should I serve with Three-Cup Chicken?

Three-Cup Chicken pairs wonderfully with steamed jasmine rice or a side of sautéed greens. The rice will soak up the flavorful juices, making every bite irresistible.

Is this dish gluten-free?

To make Three-Cup Chicken gluten-free, use a gluten-free soy sauce. Always check the labels of your ingredients to ensure they meet your dietary needs.

Nutrition

While exact nutritional values can vary based on specific ingredients and quantities, Three-Cup Chicken is generally high in protein and rich in flavors thanks to the sesame oil and soy sauce. It’s a dish best enjoyed in moderation, particularly if you’re watching your sodium intake.

Conclusion

Three-Cup Chicken is a dish that not only delights the palate but also brings with it a sense of tradition and warmth. It’s perfect for family dinners, gatherings with friends, or even a quiet night at home. I hope this recipe brings as much joy to your table as it has to mine. Happy cooking!

Related update: Three-Cup Chicken

Related update: Kunna (A Delicious Chinioti Dish, Punjab, Pakistan)

Lemon and Strawberry Loaf | Made by Meaghan Moineau

Lemon and Strawberry Loaf

Intro

There’s something truly magical about the aroma of freshly baked goods wafting through the house. It takes me back to my childhood, spending weekends at my grandmother’s house. I would watch her bake, my tiny hands eagerly helping sprinkle flour on the countertop. One of my favorite recipes from those days is this delightful Lemon and Strawberry Loaf. Not only is it a beautiful marriage of tangy and sweet, but it also brings back warm memories of those precious moments spent baking alongside my grandmother.

Why You’ll Love It

This Lemon and Strawberry Loaf is a delightful treat for any occasion. The tartness of the lemon perfectly complements the sweetness of the strawberries, creating a balanced flavor profile that is both refreshing and comforting. The addition of dessicated coconut adds a subtle nuttiness and texture that elevates the loaf to a new level. Whether you’re enjoying a slice with your morning coffee or serving it as a dessert at a dinner party, this loaf is sure to impress.

Ingredients

  • 125g butter, softened
  • 200g sugar
  • 2 eggs
  • 250g self-raising flour
  • 50g dessicated coconut
  • 150ml natural yoghurt
  • 1 lemon, juice and rind
  • 150g fresh strawberries, chopped

Instructions

  1. Preheat the oven to 180°C (350°F).
  2. Line a 23cm x 12cm loaf tin with baking paper.
  3. In a mixing bowl, beat the butter and sugar until pale and creamy.
  4. Add the eggs, one at a time, beating well after each addition.
  5. Mix in the lemon rind and juice.
  6. Using a rubber spatula, stir in the flour, dessicated coconut, yoghurt, and strawberries until just combined.
  7. Pour the mixture into the prepared loaf tin and smooth the top with the spatula.
  8. Bake for 50-60 minutes or until a skewer inserted in the center comes out clean.
  9. Allow the loaf to cool in the tin for 10 minutes, then turn out onto a wire rack to cool completely.

Tips

To ensure your loaf is moist and fluffy, make sure all your ingredients are at room temperature before you begin. This helps them blend together more smoothly. Additionally, be careful not to overmix the batter, as this can result in a dense loaf. When folding in the strawberries, do so gently to avoid crushing them and turning the batter pink.

Variations & Substitutions

If you’re feeling adventurous, there are several ways you can tweak this recipe to suit your taste. You could substitute the strawberries with raspberries or blueberries for a different berry flavor. For a dairy-free version, replace the butter with a dairy-free spread and the yoghurt with a coconut-based alternative. You can also add a handful of chopped nuts, like almonds or walnuts, for some extra crunch.

Storage

This Lemon and Strawberry Loaf is best enjoyed fresh, but it can be stored for later enjoyment as well. Keep the loaf in an airtight container at room temperature for up to three days. If you’d like to store it for longer, wrap it tightly in plastic wrap and store it in the refrigerator for up to a week. For even longer storage, you can freeze the loaf for up to three months. Simply slice it before freezing so you can defrost individual pieces as needed.

FAQ

Can I use frozen strawberries instead of fresh?

Yes, you can use frozen strawberries if fresh ones are not available. Just be sure to thaw them completely and drain any excess liquid before adding them to the batter to prevent it from becoming too runny.

What can I use if I don’t have self-raising flour?

If you don’t have self-raising flour, you can make your own by combining 2 cups of all-purpose flour with 3 teaspoons of baking powder and 1/2 teaspoon of salt. This will give you the same effect as self-raising flour.

Can I make this loaf gluten-free?

Absolutely! You can substitute the self-raising flour with a gluten-free flour blend. Just make sure it includes a binding agent like xanthan gum to help maintain the structure of the loaf.

Nutrition

This loaf is not only delicious but also contains some nutritional benefits. The strawberries provide a good source of vitamin C and antioxidants, while the lemon juice offers an additional boost of vitamin C. The inclusion of natural yoghurt adds a dose of protein and calcium.

Conclusion

Baking this Lemon and Strawberry Loaf brings a piece of nostalgia into the modern kitchen. It’s a simple recipe that delivers a burst of flavor and warmth with every bite. Whether you’re baking it for a special occasion, as a sweet treat for your family, or simply to enjoy a moment of peace with a slice of homemade goodness, this loaf is sure to become a beloved addition to your recipe collection. Happy baking!

Related update: Lemon and Strawberry Loaf

Baked Chicken Thighs with Satay Sauce and Tomato Salad | Made by Meaghan Moineau

Baked Chicken Thighs with Satay Sauce and Tomato Salad

Intro

There’s something incredibly comforting about the aroma of spices wafting through the kitchen, taking me back to my childhood when family gatherings were centered around food. My grandmother had a knack for transforming simple ingredients into a feast, and her love for cooking was infectious. It was during one of those warm summer afternoons, with the sun streaming through the kitchen window, that I first tasted the magic of satay sauce. Today’s recipe for Baked Chicken Thighs with Satay Sauce and Tomato Salad is a tribute to those cherished moments, combining the rich flavors of the East with a fresh, vibrant salad that sings of summer.

Why You’ll Love It

This recipe is both a feast for the senses and a breeze to prepare. You’ll love the way the creamy satay sauce clings to the juicy chicken thighs, each bite offering a perfect balance of savory and spicy. The accompanying tomato salad provides a crisp, refreshing contrast, making this dish a perfect harmony of flavors and textures. Whether you’re cooking for family, hosting a dinner party, or simply treating yourself, this recipe will undoubtedly become a favorite.

Ingredients

  • 4-6 chicken thighs
  • Salt and pepper to taste
  • Cayenne pepper to taste
  • 2 tablespoons light soy sauce
  • 1 tablespoon apple cider vinegar
  • 2 tablespoons peanut butter
  • 1 teaspoon sesame oil
  • 4 tablespoons satay sauce
  • 1/4 cup chopped walnuts
  • 1 tablespoon grated ginger
  • 2 cloves garlic, minced
  • 1/4 cup water
  • 1 tablespoon smooth peanut butter
  • 1 tablespoon honey
  • 2 cups diced tomatoes
  • 1/4 cup celery leaves, chopped
  • 1 tablespoon mirin
  • 2 tablespoons olive oil

Instructions

  1. In a large bowl, combine the soy sauce, apple cider vinegar, peanut butter, sesame oil, satay sauce, chopped walnuts, grated ginger, minced garlic, water, smooth peanut butter, and honey. Mix until smooth.
  2. Add the chicken thighs to the bowl, ensuring they are evenly coated with the marinade. Season with salt, pepper, and a pinch of cayenne pepper to taste.
  3. Cover the bowl and let the chicken marinate for at least 15 minutes. For best results, refrigerate and marinate overnight.
  4. Preheat your oven to 180°C (356°F).
  5. Lay the chicken thighs on a baking rack placed over a baking pan. Cover the pan with foil to keep the moisture in.
  6. Bake in the preheated oven for 45 minutes to one hour, or until the chicken is fully cooked and the juices run clear.
  7. While the chicken is baking, prepare the tomato salad by combining the diced tomatoes, celery leaves, mirin, and olive oil in a bowl. Toss gently to combine.
  8. Once the chicken is done, serve warm with the tomato salad on the side. Enjoy!

Tips

To enhance the flavors, consider toasting the walnuts lightly before adding them to the marinade. This will bring out their natural oils and add an extra depth to the sauce. Additionally, if you prefer a spicier kick, increase the amount of cayenne pepper or add a dash of chili flakes to the marinade.

Variations & Substitutions

If you prefer, you can substitute chicken thighs with chicken breasts, though they may require a slightly shorter cooking time to prevent drying out. For a nut-free version, replace peanut butter with sunflower seed butter and omit the walnuts. The tomato salad can also be varied by adding cucumbers or avocados for extra creaminess.

Storage

Leftover chicken thighs can be stored in an airtight container in the refrigerator for up to 3 days. Reheat in the oven at 160°C (320°F) until warmed through. The tomato salad is best consumed fresh but can be stored separately in the fridge for up to 1 day.

FAQ

Can I make this recipe in advance?

Absolutely! You can marinate the chicken up to a day in advance, which will only deepen the flavors. Prepare the tomato salad just before serving to ensure it remains fresh and crisp.

Is this recipe gluten-free?

To make this recipe gluten-free, ensure you use gluten-free soy sauce. All other ingredients are naturally gluten-free.

Can I use store-bought satay sauce?

Yes, store-bought satay sauce works perfectly in this recipe. However, if you have the time and ingredients, making your own can add a personal touch and allow you to adjust the flavors to your liking.

Nutrition

This dish provides a balanced meal with protein from the chicken and healthy fats from peanut butter and walnuts. The tomato salad offers a good dose of vitamins and antioxidants, making this not only a delicious but also a nutritious option for lunch or dinner.

Conclusion

Baked Chicken Thighs with Satay Sauce and Tomato Salad is more than just a meal; it’s a celebration of flavors that tells a story of tradition and innovation. It’s a dish that invites you to share in the joy of cooking and savor the warmth of home-cooked goodness. I hope this recipe brings as much joy to your table as it does to mine. Happy cooking!

Related update: Baked Chicken Thighs with Satay Sauce and Tomato Salad

Related update: Three-Cup Chicken

Flemish Style Asparagus Side Dish | Made by Meaghan Moineau

Flemish Style Asparagus Side Dish

Intro

There’s something magical about the way a simple dish can transport you back to a moment in time, like a well-loved book opening to your favorite chapter. For me, that moment is a sun-dappled afternoon at my grandmother’s table. She was a woman of few words but abundant warmth, and her Flemish Style Asparagus was a dish that spoke volumes. The tender asparagus, draped in a velvety sauce of butter, lemon, and eggs, was always the centerpiece of our springtime meals. As I learned to make it myself, I realized that this dish was more than just a recipe; it was a bridge to my heritage, a celebration of simple, fresh ingredients that come alive on the plate.

Why You’ll Love It

This Flemish Style Asparagus Side Dish is a tribute to the beauty of simplicity. It’s a testament to how a handful of fresh ingredients can create a symphony of flavors that delight the palate. You’ll love how quick and easy it is to prepare, making it perfect for both elegant dinner parties and casual family meals. The combination of buttery richness, a hint of lemony brightness, and the earthiness of asparagus will have you coming back for more.

Ingredients

  • Green and white fresh asparagus
  • Butter
  • 3 hardboiled eggs
  • Italian flat parsley
  • Juice from 1/2 lemon
  • Salt and pepper to taste

Instructions

  1. Peel the asparagus at its ends, avoiding the heads.
  2. Place the asparagus in a large saucepan and fill with boiling water to cover the veggies completely. Add a pinch of salt.
  3. Cook the asparagus until tender, about 3 to 4 minutes.
  4. Chop some flat parsley into fine bits and set aside.
  5. Boil 3 eggs until hard, then peel them.
  6. Use a fork to mash the eggs until they resemble fine crumbs. Set aside.
  7. Melt butter in a saucepan and add the juice from 1/2 a lemon. Whisk the mixture constantly and let it simmer gently for a couple of minutes.
  8. Stir in the mashed eggs and chopped parsley, combining well.
  9. Plate the dish by laying a few stalks of cooked asparagus on a plate and drizzling the sauce over the stalk ends.
  10. Season with salt and pepper. Serve warm.

Tips

For the best results, choose asparagus spears that are firm and vibrant in color. Avoid overcooking them to maintain their delightful crunch. The sauce can be made ahead of time and gently reheated before serving. This dish pairs wonderfully with roasted meats or fish.

Variations & Substitutions

If you prefer a richer sauce, consider adding a splash of cream to the butter-lemon mixture. For a tangier kick, experiment with adding a little Dijon mustard. You can also substitute dill or chives for the parsley if you want to try a different herb.

Storage

Store any leftovers in an airtight container in the refrigerator for up to two days. To reheat, gently warm the asparagus and sauce on the stove over low heat to avoid separating the butter.

FAQ

Can I use only green or only white asparagus?

Absolutely! While a mix of both adds a delightful visual contrast and varied flavor, using one type will work just as well. Just ensure they are fresh for the best taste.

Can I prepare this dish in advance?

Yes, you can prepare the sauce ahead of time and store it in the refrigerator. Reheat it gently on the stove while cooking the asparagus just before serving.

What can I serve with this dish?

This asparagus dish is versatile and pairs well with roasted chicken, grilled salmon, or even a hearty steak. It also complements a variety of vegetarian main courses.

Nutrition

This dish is not only delicious but also nutritious. Asparagus is packed with vitamins A, C, E, and K, and is a great source of fiber. The eggs provide protein, while the parsley adds a boost of antioxidants.

Conclusion

Flemish Style Asparagus is more than just a side dish; it’s a celebration of simplicity and flavor. Whether you’re sharing it with family or serving it at a special gathering, it’s sure to be a hit. Just like a cherished memory, this recipe will pull you back to the comfort of home, one delicious bite at a time.

Related update: Flemish Style Asparagus Side Dish

Grilled Portabella and Poblano Tacos | Made by Meaghan Moineau

Grilled Portabella and Poblano Tacos

Intro

There’s something magical about the aroma of fresh ingredients sizzling on a grill. Every time I make these grilled portabella and poblano tacos, I’m transported back to a summer evening at my grandmother’s house. She would fire up the grill, and we’d gather around, eagerly awaiting the feast to come. The smoky scent of chiles and mushrooms would fill the air, mixing with laughter and stories shared as we enjoyed each other’s company. This recipe is a tribute to those cherished memories, and I hope it brings the same joy and warmth to your table as it always has to mine.

Why You’ll Love It

These grilled portabella and poblano tacos are a delightful twist on classic taco fare. They’re perfect for vegetarians and meat-lovers alike, offering a robust and smoky flavor that’s entirely satisfying. The combination of earthy portabellas and spicy poblanos, complemented by the freshness of pico de gallo and creamy guacamole, creates a symphony of tastes and textures. Plus, they’re easy to customize, making them a hit for family dinners or casual gatherings with friends.

Ingredients

  • Canola oil
  • Chipotle powder
  • Cilantro, chopped
  • Cilantro sprigs for garnish
  • Corn tortillas
  • 2 cloves garlic, minced
  • Guacamole
  • 2 tablespoons lime juice
  • Lime wedges for serving
  • Olive oil
  • 1 whole poblano chile
  • 2 whole portabella mushrooms
  • 1 red onion, roughly chopped
  • 2 diced roma tomatoes
  • Salt
  • Salt and pepper
  • Shredded cheddar cheese

Instructions

  1. Preheat a lightly oiled grill on medium-high heat.
  2. While the grill is heating up, prepare the pico de gallo. In a small mixing bowl, combine tomatoes, onion, cilantro, garlic, salt, and lime juice. Set aside.
  3. Next, prepare the grilled portabella filling. Remove the stems from the portabellas, and discard. Using a spoon, scrape out the dark gills from the underside of the mushroom caps.
  4. Lightly brush the portabellas and the onions on both sides with canola oil, and sprinkle generously with salt and pepper.
  5. Arrange the mushrooms, onion, and poblano on the hot grill, and cook for 5-6 minutes per side or until the mushrooms are softened and the onion is lightly charred. Remove from heat and transfer to a cutting board.
  6. Remove the stem and seeds from the poblano, and discard. Cut the poblano and the portabellas into thin strips, and roughly chop the onion. Transfer to a mixing bowl and toss with lime juice and chipotle powder until well coated.
  7. To assemble, arrange 2 tortillas per plate, and divide the mushroom filling evenly between them.
  8. Serve with pico de gallo and bowls of the different toppings so that everyone can garnish their tacos as they please.

Tips

  • Make sure your grill is preheated to ensure a good sear on the vegetables.
  • For a spicier kick, leave a few seeds in the poblano before grilling.
  • Use fresh tortillas if possible; they really make a difference in flavor and texture.

Variations & Substitutions

If you want to switch things up, try using different types of mushrooms like cremini or shiitake for a different flavor profile. You can also substitute the poblano with bell peppers for a milder taste. For a vegan version, skip the cheese or use a plant-based alternative.

Storage

These tacos are best enjoyed fresh, but if you have leftovers, store the grilled vegetable mixture in an airtight container in the refrigerator for up to 3 days. Reheat gently on the stovetop or in the microwave before serving. Assemble the tacos just before eating to keep the tortillas from becoming soggy.

FAQ

Can I make these tacos in advance?

Yes, you can prepare the pico de gallo and grill the vegetables ahead of time. Store them separately in the fridge and assemble the tacos just before serving for the best texture and flavor.

What can I serve with these tacos?

These tacos pair well with a side of Mexican rice, refried beans, or a light salad. A refreshing beverage like a margarita or agua fresca can also complement the meal beautifully.

Nutrition

While the exact nutritional content will vary based on specific brands and quantities used, these tacos are a great source of vitamins and fiber, thanks to the vegetables. They’re also relatively low in calories and can be made even healthier by using whole wheat tortillas and reducing the cheese.

Conclusion

Grilled portabella and poblano tacos are a delightful way to enjoy the vibrant flavors of summer grilling. Whether you’re recreating cherished family memories or starting new traditions, these tacos are sure to become a favorite. Gather your loved ones, fire up the grill, and savor the rich, smoky flavors of this delicious and versatile dish. Enjoy!

Related update: Grilled Portabella and Poblano Tacos

Related update: Baked Chicken Thighs with Satay Sauce and Tomato Salad

Peppermint Patties | Made by Meaghan Moineau

Peppermint Patties: A Refreshing Homemade Delight

Intro

There’s something magical about biting into a cool, minty peppermint patty. For me, it takes me back to snowy winter days spent with my grandmother in her cozy kitchen. She would always have a batch of homemade peppermint patties on hand, especially during the festive season. The invigorating taste of peppermint combined with smooth chocolate was the perfect treat after a day of building snowmen and sipping hot cocoa. Today, I’m excited to share this cherished recipe with you, so you can create your own delicious memories.

Why You’ll Love It

This peppermint patty recipe is a classic treat that brings a burst of refreshing flavor with every bite. Here’s why you’ll fall in love with these delightful candies:

  • Easy to Make: With just a few simple steps, you can whip up a batch of peppermint patties that rival any store-bought version.
  • Perfect for Gifting: These patties make a wonderful homemade gift for friends and family, especially during the holidays.
  • Refreshing and Delicious: The combination of creamy mint filling and rich chocolate coating is simply irresistible.
  • Customizable: You can easily adjust the recipe to suit your taste preferences or dietary needs.

Ingredients

  • Butter
  • Confectioners sugar
  • Evaporated milk
  • Peppermint extract
  • Semi-sweet chocolate chips
  • Shortening
  • Vanilla extract

Instructions

  1. In a bowl, combine confectioners sugar, softened butter, peppermint extract, and vanilla extract. Mix until smooth.
  2. Gradually add evaporated milk, stirring continuously until a dough-like consistency forms.
  3. Roll the mixture into 1-inch balls and place them onto cookie sheets lined with waxed paper.
  4. Chill the balls in the refrigerator for about 20 minutes to firm them up.
  5. After chilling, gently flatten each ball with the bottom of a glass to about 1/4 inch thick. Return them to the refrigerator for another 20-30 minutes.
  6. In a microwave-safe bowl, melt the shortening and semi-sweet chocolate chips on high for about 1 minute. Stir until smooth.
  7. Dip each peppermint patty into the melted chocolate, ensuring it is evenly coated, and place them back on the waxed paper-lined sheets to harden.

Tips

  • Ensure your butter is at room temperature to make mixing easier.
  • If the dough is too sticky, add a little more confectioners sugar to achieve the desired consistency.
  • Use a fork to dip the patties into the chocolate for easier handling and to allow excess chocolate to drip off.
  • For an extra touch, sprinkle crushed peppermint candies on top before the chocolate hardens.

Variations & Substitutions

Feel free to get creative with this recipe. Here are some ideas to consider:

  • Dark Chocolate: Swap semi-sweet chocolate chips for dark chocolate to create a richer flavor.
  • White Chocolate: Use white chocolate for a sweeter, creamier coating.
  • Dairy-Free: Substitute regular butter and milk with dairy-free alternatives for a vegan version.
  • Mint Varieties: Try using different mint extracts, such as spearmint, for a unique twist.

Storage

Store your peppermint patties in an airtight container in the refrigerator. They should stay fresh for up to two weeks. For longer storage, you can freeze them for up to three months. Just be sure to separate layers with waxed paper to prevent sticking.

FAQ

Can I use fresh mint leaves instead of peppermint extract?

While fresh mint leaves can provide a natural flavor, they may not be concentrated enough for this recipe. If you prefer using fresh mint, make sure to finely chop the leaves and steep them in a bit of milk to infuse the flavor before adding to the mixture.

What if I don’t have a microwave to melt the chocolate?

No worries! You can melt the chocolate and shortening using a double boiler on the stove. Simply place a heat-safe bowl over a pot of simmering water, ensuring the bottom of the bowl doesn’t touch the water, and stir until melted.

Are there any toppings I can add to the patties?

Absolutely! You can sprinkle crushed peppermint candies, sea salt, or even drizzle white chocolate over the top for added texture and flavor.

Nutrition

While these peppermint patties are a delightful treat, it’s important to enjoy them in moderation. Here’s a rough estimate of the nutritional content per patty:

  • Calories: 120
  • Total Fat: 6g
  • Saturated Fat: 3.5g
  • Cholesterol: 5mg
  • Sodium: 2mg
  • Total Carbohydrates: 16g
  • Dietary Fiber: 1g
  • Sugars: 14g
  • Protein: 1g

Conclusion

Making homemade peppermint patties is a rewarding experience that brings joy to both the creator and the lucky recipients. The combination of refreshing mint and rich chocolate is unbeatable, making it a perfect treat for any occasion. Whether you’re gifting them during the holidays or savoring them as a personal indulgence, these peppermint patties are sure to delight. Enjoy creating these little bites of happiness, and may they become a cherished part of your culinary traditions, just as they are in mine.

Related update: Peppermint Patties

Related update: Thick, Fudgy, One Bowl Brownies

A Post Thanksgiving “sopa De Tortilla” | Made by Meaghan Moineau

A Post Thanksgiving “Sopa De Tortilla”

Intro

There’s something truly magical about the day after Thanksgiving. The hustle and bustle of the holiday has subsided, leaving behind a tranquil warmth in the home. As a child, I remember waking up to the aroma of simmering broth, a comforting scent that signaled my mother’s tradition of transforming leftover turkey into a delicious, heartwarming “Sopa De Tortilla.” This soup is more than just a meal; it’s a delightful reminder of family gatherings, laughter, and the joy of savoring a moment of quietude with a bowl of something nourishing. Today, I’m excited to share this cherished recipe with you, so you too can create new memories with your loved ones.

Why You’ll Love It

This “Sopa De Tortilla” is the perfect way to give new life to your Thanksgiving leftovers. It’s a savory, aromatic, and satisfying dish that brings comfort with every spoonful. You’ll love the way the flavors meld together—the rich turkey broth, the subtle heat from the poblano peppers, and the fresh finish from the cilantro and avocado. Plus, it’s a versatile dish that you can tweak to suit your preferences, making it a staple in your post-holiday repertoire.

Ingredients

  • 1 avocado, diced
  • 2 carrots, peeled and cubed
  • 2 celery stalks, chopped
  • A handful of cilantro, leaves reserved
  • 1 teaspoon ground cumin
  • 2 cloves garlic, whole
  • 3 tablespoons olive oil, divided
  • 1 onion, quartered
  • 1 poblano pepper
  • 1 8 oz. can of organic stewed tomatoes
  • Fried tortilla strips or good quality store-bought tortilla chips
  • 1 whole turkey breast, cooked

Instructions

  1. Drizzle 2 tablespoons of olive oil in the bottom of a large stock pot. Add the quartered onion, 2 cloves of garlic, 2 stalks of celery, and the turkey breast.
  2. Peel two carrots and add the peels to the stock pot along with the remaining whole carrots and celery stalks. Reserve two carrots and two celery stalks for later use.
  3. Cut the stems off your cilantro bunch and add them to the stock pot. Reserve the leaves.
  4. Fill the pot with water until it is 3/4 full. Cover and boil for at least 1 hour, preferably 2 hours. Set a timer to check on your stock. Do not add salt before you have reduced your stock. Ensure that the stock does not reduce to less than one quarter of your pot.
  5. Remove the turkey from the bone, reserving the meat, and discard the bone.
  6. Strain the soup using a colander over another stock pot and discard the vegetables. Set aside the stock you will use for the soup (1 to 2 cups per guest) and pour the rest into ice cube trays for later use.
  7. In a blender, add the can of organic stewed tomatoes, 1 tablespoon of olive oil, a pinch of salt, and puree with the roasted poblano pepper (see roasting instructions below). Set aside for later use.
  8. Add the cubed carrots and chopped celery to the stock. Cover and boil for 30 minutes until the vegetables are tender.
  9. Add the pureed pepper-tomato mixture in 1/4 cup increments to your broth. Add 1/3 cup of turkey meat per cup of stock and allow it to simmer.
  10. Taste for salt and finish with a pinch of ground cumin.
  11. Ladle the soup into bowls and add extra turkey meat. Top with strips of fried corn tortillas or good quality store-bought tortilla chips. Garnish with fresh cilantro and cubes of avocado.
  12. To roast the poblano pepper, place it on a stovetop or in your oven until charred and tender. Peel and devein the poblano pepper before using.

Tips

For an extra depth of flavor, try roasting the turkey bones before boiling them. This will add a rich, savory taste to your stock. If you prefer a spicier soup, feel free to add a jalapeño pepper when blending your tomato mixture. Don’t forget to taste the soup before serving and adjust the seasoning as needed.

Variations & Substitutions

Feel free to substitute chicken for turkey if that’s what you have on hand. You can also add other vegetables like corn or bell peppers for added texture and flavor. For a vegetarian version, replace the turkey with beans and use vegetable broth instead of turkey stock.

Storage

This soup stores beautifully in the refrigerator for up to 3 days. Simply let it cool to room temperature and store in an airtight container. It also freezes well for up to 2 months. To reheat, simply warm on the stove over medium heat until heated through.

FAQ

Can I make the stock in advance?

Absolutely! You can prepare the stock a day or two in advance. Simply strain and store it in the refrigerator or freeze it in portions for later use.

What can I do if the soup is too spicy?

If your soup ends up being too spicy, you can balance the heat by adding a dollop of sour cream or a splash of cream to each serving. This will mellow the spice and add a creamy texture to the soup.

Nutrition

This hearty soup is a nutritious option packed with protein, vitamins, and minerals. The turkey provides lean protein while the vegetables add essential nutrients and fiber. Avocado offers healthy fats, making this soup not only delicious but also nourishing.

Conclusion

There’s nothing quite like a bowl of “Sopa De Tortilla” to bring warmth and comfort to your table, especially in the days following a festive Thanksgiving feast. This recipe is a wonderful way to make the most of your leftovers, turning them into something extraordinary. Whether you’re sharing it with family or savoring a quiet moment alone, may this soup fill you with warmth and joy. Happy cooking!

Related update: A Post Thanksgiving “sopa De Tortilla”

Related update: Grilled Portabella and Poblano Tacos

Chapchae (Korean Stir-Fried Noodles) | Made by Meaghan Moineau

Chapchae (Korean Stir-Fried Noodles)

Intro

Chapchae, or Korean stir-fried noodles, has always been a beloved dish in our family. I remember as a child, watching my grandmother expertly toss the noodles with colorful vegetables in her large wok, the aroma of sesame oil and soy sauce filling the kitchen. It was a dish we often enjoyed during family gatherings and special occasions, a symbol of celebration and togetherness. The combination of sweet potato vermicelli noodles, fresh vegetables, and savory flavors makes it a comforting and satisfying meal. Whether you’re new to Korean cuisine or a seasoned enthusiast, Chapchae is sure to become a favorite in your household as well.

Why You’ll Love It

This Chapchae recipe is not only delicious but also incredibly versatile. It’s a perfect balance of sweet and savory, with a delightful mix of textures from the chewy noodles and crisp-tender vegetables. You’ll love how easy it is to customize with your favorite vegetables or protein, making it adaptable to your taste preferences and dietary needs. Plus, it’s a fantastic make-ahead dish that tastes even better the next day as the flavors meld together.

Ingredients

  • 200g sweet potato vermicelli noodles
  • 1 sweet onion, thinly sliced
  • 2 cloves garlic, minced
  • 2 cups baby spinach
  • 1 carrot, julienned
  • 2 scallions, sliced
  • 1 cup mushrooms, sliced
  • 1 zucchini, julienned
  • 2 tablespoons olive oil
  • 2 tablespoons sesame oil, divided
  • 3 tablespoons soy sauce
  • 1 tablespoon sugar
  • Salt, to taste

Instructions

  1. Cook the sweet potato vermicelli noodles according to the package directions. Drain and set aside.
  2. In a large pan or wok over medium heat, heat the olive oil and 1 tablespoon of sesame oil.
  3. Add the onion slices and minced garlic, sautéing for about 1 minute until fragrant.
  4. Add the rest of the vegetables: spinach, carrots, scallions, mushrooms, and zucchini. Cook for 4-5 minutes, until the vegetables are half-cooked and still a bit crispy.
  5. Turn the heat to low and add the cooked noodles, soy sauce, sugar, and the remaining sesame oil to the pan.
  6. Mix everything to combine and cook for another 2 minutes, allowing the flavors to meld.
  7. Season with salt or more soy sauce if needed. If you prefer a slightly sweeter taste, add a touch more sugar.
  8. If using sesame seeds, sprinkle them on top just before serving.

Tips

To ensure your Chapchae is a success, here are a few tips:

  • Use high-quality sesame oil and soy sauce for the best flavor.
  • Don’t overcook the vegetables; they should remain slightly crisp for the best texture.
  • If you’re adding protein, such as beef or chicken, cook it separately before adding it to the noodles.
  • For an authentic touch, garnish with sesame seeds and a sprinkle of sliced red chili for a bit of heat.

Variations & Substitutions

Chapchae is highly adaptable, so feel free to make it your own:

  • Vegetables: Use any vegetables you have on hand, such as bell peppers, broccoli, or bok choy.
  • Protein: Add beef, chicken, or tofu for extra protein. Simply cook it separately before mixing it with the noodles.
  • Sauce: For a gluten-free version, use tamari instead of soy sauce. You can also add a splash of rice vinegar for a tangy twist.

Storage

Chapchae can be stored in an airtight container in the refrigerator for up to 3 days. To reheat, simply warm it in a pan over medium heat, adding a splash of water or soy sauce if needed to prevent sticking. It’s an excellent option for meal prep, as the flavors continue to develop over time.

FAQ

Can I make Chapchae ahead of time?

Absolutely! Chapchae is a fantastic make-ahead dish. Prepare it up to a day in advance and store it in the refrigerator. Reheat gently before serving, and enjoy the enhanced flavors.

What can I serve with Chapchae?

Chapchae can be a standalone dish, but it also pairs well with other Korean dishes like kimchi, Korean BBQ, or a simple side salad. It’s versatile enough to complement a variety of meals.

Nutrition

Chapchae is a nutritious dish rich in fiber from the vegetables and sweet potato noodles. It’s naturally gluten-free when using gluten-free soy sauce and can be easily adapted to be vegan or vegetarian. The sesame and olive oils provide healthy fats, making it a well-rounded meal.

Conclusion

Chapchae is a delightful dish that brings a taste of Korean cuisine to your table. With its colorful array of vegetables and the unique texture of sweet potato noodles, it’s sure to impress family and friends alike. Whether you’re making it for a special occasion or a simple weeknight dinner, Chapchae is a versatile and delicious option. Give this recipe a try, and let it become a cherished part of your culinary repertoire, just as it has in mine.

Related update: Chapchae (Korean Stir-Fried Noodles)

Related update: A Post Thanksgiving “sopa De Tortilla”

Related update: Flemish Style Asparagus Side Dish

Tzadziki | Made by Meaghan Moineau

Tzatziki: A Creamy, Refreshing Mediterranean Delight

Intro

There’s something truly magical about family gatherings. For me, those memories often revolve around the kitchen table, surrounded by laughter, stories, and an array of delicious dishes. One staple that always graced our table was Tzatziki, a creamy and refreshing dip that has been a beloved part of my family’s culinary tradition for generations. Every time I make it, I’m transported back to those warm summer afternoons in my grandmother’s garden, where the scent of fresh herbs mingled with the sun-drenched air. Tzatziki was the star of those meals, cooling our palates and bringing us together in a shared love for simple, flavorful food.

Why You’ll Love It

Tzatziki is more than just a dip; it’s a versatile condiment that can elevate any meal. Whether you’re using it as a spread on sandwiches, a sauce for grilled meats, or simply as a dip for fresh vegetables, its creamy texture and refreshing taste make it a crowd favorite. It’s easy to make, requires only a few ingredients, and can be prepared in advance, making it perfect for entertaining. Plus, it’s a healthier alternative to many creamy dips, thanks to its yogurt base, which is rich in probiotics.

Ingredients

  • 2 large cucumbers
  • 1 teaspoon sea salt
  • 1 cup Greek yogurt
  • 1/2 cup sour cream
  • 2 tablespoons olive oil
  • 1 tablespoon vinegar
  • 2 cloves garlic, minced
  • 1/4 teaspoon white pepper
  • 1 tablespoon fresh dill, chopped (or 1 teaspoon dried dill)

Instructions

  1. Peel and grate the cucumbers. Lightly salt them, mix, and set aside for 5 minutes to help release the water.
  2. To remove as much water as possible from the grated cucumber, squeeze it in small quantities with your hands. This step is crucial to avoid a watery dip.
  3. In a medium bowl, mix together the yogurt, sour cream, olive oil, vinegar, garlic, and white pepper until smooth and well combined.
  4. Add the squeezed cucumbers and dill to the yogurt mixture. Mix thoroughly to combine all ingredients.
  5. Taste and adjust the seasoning as needed, adding more salt or white pepper to your preference.
  6. Chill the Tzatziki in the refrigerator for at least two hours before serving. This allows the flavors to meld beautifully.

Tips

For the best results, use full-fat Greek yogurt, which lends a rich creaminess to the dip. If you’re short on time, you can prepare the Tzatziki a day ahead; in fact, it often tastes even better the next day as the flavors develop further. When grating the cucumbers, use the large holes of a box grater to achieve the perfect texture.

Variations & Substitutions

If you’re looking to switch things up, consider adding a bit of lemon zest for a citrusy twist. You can also substitute the fresh dill with mint or parsley for a different flavor profile. For a vegan option, replace the yogurt and sour cream with coconut yogurt or a similar plant-based alternative. Experimenting with different herbs and spices can lead to delightful new versions of this classic dip.

Storage

Store any leftover Tzatziki in an airtight container in the refrigerator for up to 3 days. Stir well before serving, as some separation may occur. While Tzatziki is best enjoyed fresh, it can be stored in the freezer for up to a month. However, freezing may alter the texture, so it’s ideal to enjoy it fresh or refrigerated.

FAQ

Can I use a different type of yogurt?

While Greek yogurt is traditional and provides the creamy texture Tzatziki is known for, you can use regular yogurt if necessary. However, be sure to strain it through a cheesecloth to remove excess liquid and achieve a thicker consistency.

What can I serve with Tzatziki?

Tzatziki pairs wonderfully with a variety of dishes. Serve it with grilled meats like lamb or chicken, use it as a dip for fresh vegetables or pita bread, or spread it on sandwiches and wraps for an added burst of flavor.

Nutrition

Tzatziki is a nutritious addition to your meals, offering a good source of protein and probiotics from the yogurt. It’s also low in calories, making it a guilt-free option for those watching their intake. The healthy fats from olive oil and the freshness of cucumbers and herbs contribute to a well-rounded, wholesome dish.

Conclusion

Tzatziki is more than just a recipe; it’s a connection to tradition, family, and the vibrant flavors of the Mediterranean. Whether you’re recreating cherished memories or starting new traditions, this creamy dip is sure to become a staple in your culinary repertoire. Its simplicity and adaptability make it a delight to prepare and share. So gather your ingredients, invite some friends over, and enjoy the refreshing taste of homemade Tzatziki!

Related update: Tzadziki

Related update: Summer Rolls

Yorkshire Pudding | Made by Meaghan Moineau

Yorkshire Pudding: A Classic British Side Dish

Intro

There’s something magical about the aroma of Yorkshire pudding wafting through the house on a Sunday afternoon. This classic British side dish has been a staple in my family for generations, a recipe passed down from my grandmother who would make it every time we gathered around for our traditional Sunday roast. I still remember sitting in her cozy kitchen, eagerly watching her expertly whisk the batter, her movements so fluid and practiced. Now, I’m excited to share this beloved recipe with you, hoping it will become as cherished in your home as it is in ours.

Why You’ll Love It

Yorkshire pudding is the quintessential comfort food, a perfect companion to roast beef and gravy. Its golden-brown exterior and soft, airy interior make it a delightful addition to any meal. Not only is it delicious, but it’s also incredibly simple to make with just a few pantry staples. Whether you’re a seasoned cook or a beginner, you’ll find this recipe both accessible and rewarding. The best part? Watching your puddings rise to perfection in the oven, a sight that’s as satisfying as the taste.

Ingredients

  • 3 large eggs
  • 1 cup all-purpose flour
  • 1 cup milk
  • Pan drippings from roast beef (preferably)
  • 1/2 teaspoon salt

Instructions

  1. Preheat your oven to 400-450°F (200-230°C). The exact temperature can vary depending on your oven, so you may need to adjust slightly after making these a few times.
  2. Sift the flour and salt together, ensuring there are no lumps.
  3. In a separate bowl, beat the eggs and milk together until well combined.
  4. Slowly combine the wet ingredients with the dry ingredients, whisking until you have a smooth batter.
  5. Pour the beef drippings into a Yorkshire pudding tray or a muffin/cupcake tray, and place it in the oven to heat the oil until it’s sizzling hot.
  6. Carefully remove the tray from the oven and spoon a couple of tablespoons of the batter into each section of the pan.
  7. Return the tray to the oven and bake for about 20 minutes, or until the puddings are puffed and golden brown. Do not open the oven during baking, as this will cause your puddings to deflate.

Tips

For the best Yorkshire puddings, always ensure your ingredients are at room temperature before you start. This helps the batter to rise better. Additionally, using beef drippings adds a rich flavor, but if you’re in a pinch, vegetable oil is a suitable substitute. Just be sure that whatever fat you use is piping hot before adding the batter.

Variations & Substitutions

While traditional Yorkshire pudding is made with beef drippings, you can experiment with different fats like duck fat or even butter for varying flavors. For a vegetarian version, use a high-smoking point oil such as sunflower or canola. You can also add herbs like rosemary or thyme to the batter for an aromatic twist.

Storage

If you have leftovers, Yorkshire puddings can be stored in an airtight container in the fridge for up to two days. To reheat, simply pop them in a preheated oven at 350°F (175°C) for about 5-10 minutes until warmed through. Avoid using a microwave as it can make them soggy.

FAQ

Why aren’t my Yorkshire puddings rising?

There are a few reasons why Yorkshire puddings might not rise. Ensure your oven is properly preheated and that your batter is at room temperature. Also, make sure the oil in your pan is very hot before adding the batter. Opening the oven during cooking can also cause them to deflate.

Can I make the batter ahead of time?

Yes, you can prepare the batter a few hours in advance. Just cover it and leave it at room temperature. Giving the batter a bit of rest can actually help improve the texture of the puddings.

What should I serve with Yorkshire pudding?

Yorkshire pudding is traditionally served with roast beef and gravy, but it also pairs well with other roasted meats or even a rich vegetable stew. Some enjoy them with sweet toppings like jam for a unique twist!

Nutrition

Yorkshire pudding is relatively low in calories per serving, with about 150-200 calories per pudding depending on the size and ingredients used. It is a good source of protein from the eggs but should be enjoyed in moderation due to the fat content from the drippings.

Conclusion

Yorkshire pudding is not just a side dish; it’s a piece of culinary heritage that evokes warmth and nostalgia. By following this recipe, you’ll not only create a delicious addition to your roast dinners but also carry on a tradition that has delighted families for generations. I hope this recipe brings as much joy to your table as it does to ours. Happy cooking!

Related update: Yorkshire Pudding

Watching What I Eat: Peanut Butter Banana Oat Breakfast Cookies with Carob / Chocolate Chips | Made by Meaghan Moineau

Watching What I Eat: Peanut Butter Banana Oat Breakfast Cookies with Carob / Chocolate Chips

Intro

There’s a special kind of comfort in the aroma of freshly baked cookies wafting through the house. It takes me back to Sunday mornings at my grandmother’s kitchen. She had a way of using the simplest ingredients to create the most magical treats that brought the family together. Today, I’m sharing a recipe that combines my love for those nostalgic flavors with a modern twist: Peanut Butter Banana Oat Breakfast Cookies with Carob or Chocolate Chips. These cookies are not only delicious but also packed with wholesome ingredients, making them a perfect start to your day or a delightful snack anytime.

Why You’ll Love It

These breakfast cookies are a wonderful blend of flavors and textures. The creamy peanut butter and ripe bananas create a rich, moist base, while the oats add a hearty texture. Whether you choose chocolate or carob chips, you’ll get a burst of sweetness that complements the nuttiness perfectly. Plus, these cookies are easy to make and require just one bowl, making cleanup a breeze. They’re also versatile, allowing you to customize them to your taste and dietary needs. You’ll love how they are both satisfying and nourishing, giving you a delicious way to fuel your day.

Ingredients

  • 2 ripe bananas, mashed
  • 1/4 cup butter flavor shortening
  • 1/2 cup chocolate chips or carob chips
  • 1/2 cup creamy peanut butter
  • 1/4 cup chopped nuts (optional)
  • 1 1/2 cups oatmeal
  • 1/4 cup unsweetened applesauce
  • 1 teaspoon vanilla extract
  • 1/4 cup vanilla protein powder

Instructions

  1. Preheat your oven to 350 degrees Fahrenheit.
  2. In a large bowl, mix the mashed bananas and peanut butter until completely combined.
  3. Add in the applesauce, vanilla protein powder, and vanilla extract. Mix until all ingredients are fully incorporated.
  4. Add the oatmeal and nuts to the banana mixture and combine thoroughly.
  5. If you want the carob or chocolate chips mixed throughout, add them now. Let the dough rest for 10 minutes.
  6. Drop the cookie dough by spoonfuls onto a parchment paper-lined cookie sheet and flatten them into circles. If you prefer the chips on top, add them now.
  7. Bake the cookies for 20-30 minutes, depending on your preference for texture, until they are golden brown and done.
  8. Remove from the oven and let them rest on the cookie sheet for 5 minutes, then transfer to a cooling rack.
  9. If you want traditional fork marks, use a pizza cutter or sharp knife to score the tops while they’re still warm.
  10. Once completely cool, store in a covered container. Enjoy them on their own or with a cup of tea.

Tips

For best results, use ripe bananas as they will be sweeter and easier to mash. Letting the dough rest allows the oats to absorb some of the moisture, which helps with texture. If you’re using chocolate chips, consider high-quality dark chocolate for added depth of flavor. And remember, baking times can vary depending on your oven, so keep an eye on the cookies to achieve your desired level of doneness.

Variations & Substitutions

If you’re looking to switch things up, try using almond butter instead of peanut butter for a different flavor profile. You can also swap out the nuts for seeds like sunflower or pumpkin seeds if you have nut allergies. For a vegan option, use plant-based butter and ensure your chocolate chips are dairy-free. Feel free to experiment with different types of oats, such as steel-cut or rolled oats, to find the texture you like best.

Storage

These cookies are best stored in an airtight container at room temperature, where they will stay fresh for up to a week. For longer storage, you can refrigerate them for up to two weeks or freeze them for up to three months. To enjoy frozen cookies, simply let them thaw at room temperature or give them a quick warm-up in the microwave.

FAQ

Can I make these cookies gluten-free?

Absolutely! To make these cookies gluten-free, use certified gluten-free oats. This will ensure that your cookies are safe for those with gluten sensitivities or celiac disease.

What can I use instead of vanilla protein powder?

If you don’t have vanilla protein powder, you can substitute it with an equal amount of flour or almond meal. Alternatively, you can omit it entirely, though this may slightly alter the texture of the cookies.

Are these cookies suitable for kids?

Yes, these cookies are a great treat for kids! They are made with wholesome ingredients and can be a fun and nutritious way to satisfy their sweet tooth. Just be sure to adjust the nuts and chocolate based on your child’s dietary needs and preferences.

Nutrition

Each cookie is approximately 120 calories, with 5 grams of protein, 15 grams of carbohydrates, and 6 grams of fat. These values may vary based on the specific brands of ingredients you use. Remember, they are a treat, so enjoy them in moderation as part of a balanced diet.

Conclusion

These Peanut Butter Banana Oat Breakfast Cookies are a delightful blend of nostalgia and nutrition, offering a perfect balance of flavors and textures that are sure to please. Whether you’re enjoying them fresh out of the oven or as a quick grab-and-go breakfast, they’re a testament to the fact that eating well doesn’t have to mean sacrificing taste. I hope these cookies bring a little bit of warmth and joy to your mornings, just as they do to mine. Happy baking!

Related update: Watching What I Eat: Peanut Butter Banana Oat Breakfast Cookies with Carob / Chocolate Chips

Related update: Peppermint Patties

Related update: Easy Cheesy Scrambled Eggs

chettinad egg curry | Made by Meaghan Moineau

Chettinad Egg Curry: A Flavorful South Indian Delight

Intro

There’s something truly comforting about a dish that brings together the warmth of home and the rich tapestry of cultural flavors. Growing up, Chettinad Egg Curry was a staple at our family gatherings. I vividly remember the savory aroma wafting through the air as my grandmother stirred the pot, her bangles tinkling with every move. This dish, with its robust spices and creamy texture, is more than just food; it’s a piece of my heritage, a culinary journey back to those cherished moments spent in a bustling kitchen filled with laughter and love.

Why You’ll Love It

This Chettinad Egg Curry is a celebration of spices and tradition. Known for its aromatic and spicy flavors, Chettinad cuisine comes from the Chettinad region of Tamil Nadu in South India. What sets this egg curry apart is its unique blend of spices and coconut, which lends a rich and creamy texture to the dish. Whether you’re a spice enthusiast or a comfort food lover, there’s plenty to adore about this recipe:

  • Authentic Taste: Experience the true essence of South Indian cuisine with every bite.
  • Easy to Prepare: Despite its complex flavors, this curry is surprisingly simple to make.
  • Versatile: Perfect for a weeknight dinner or a special occasion.

Ingredients

  • 3-4 green cardamoms (elaichi)
  • 4-5 red chilies
  • 1 cinnamon stick
  • 1/2 cup grated coconut
  • 2 tablespoons coriander seeds
  • 1 teaspoon cumin seeds
  • A sprig of curry leaves
  • 6 cooked eggs
  • Handful of coriander leaves, chopped
  • 1 tablespoon ginger garlic paste
  • 2 tablespoons oil
  • 1 large onion, finely chopped
  • 1 teaspoon black pepper
  • 1 tablespoon poppy seeds
  • Salt to taste
  • 2 tomatoes, chopped

Instructions

  1. In a dry pan, roast the cardamoms, red chilies, cinnamon, coriander seeds, cumin seeds, and poppy seeds until fragrant. Allow them to cool and grind to a fine powder.
  2. Heat oil in a pan, add the curry leaves and chopped onions. Sauté until the onions turn golden brown.
  3. Add the ginger garlic paste and sauté until the raw smell disappears.
  4. Add the chopped tomatoes and cook until they turn soft and the oil begins to separate.
  5. Stir in the ground spice mix and grated coconut. Sauté for a few minutes to blend the flavors.
  6. Add the cooked eggs and gently mix to coat them with the masala.
  7. Pour in some water to achieve the desired consistency and let it simmer for 5-10 minutes.
  8. Season with salt and black pepper, adjusting to your taste.
  9. Garnish with chopped coriander leaves and serve hot with rice or rotis.

Tips

  • Roast the spices on low heat to prevent burning and to extract maximum flavor.
  • Use fresh coconut for a more authentic taste; however, desiccated coconut can work in a pinch.
  • Adjust the number of red chilies according to your heat preference.

Variations & Substitutions

Chettinad Egg Curry is quite adaptable. Here are some variations you can try:

  • Vegetarian Option: Swap eggs with paneer or tofu for a vegetarian version.
  • Protein Boost: Add cooked chicken or prawns for a non-vegetarian twist.
  • Creamy Touch: Stir in a bit of coconut milk for a richer, creamier texture.

Storage

This curry stores well in the refrigerator for up to 3 days. Simply transfer it to an airtight container once it has cooled, and reheat on the stove or in the microwave before serving. For longer storage, you can freeze it for up to a month; however, the texture may slightly change upon thawing.

FAQ

Can I make this curry less spicy?

Absolutely! You can reduce the number of red chilies or use milder varieties to tone down the heat. Additionally, adding a splash of coconut milk can also mellow the spiciness.

What is the best way to cook the eggs?

For this recipe, hard-boiled eggs work best. You can boil them in advance and store them in the refrigerator until you’re ready to use them. Simply peel and add them to the curry as instructed.

Can I prepare the spice mix in advance?

Yes, you can roast and grind the spices ahead of time. Store the spice mix in an airtight container in a cool, dark place for up to a month. This not only saves time but also ensures you have a ready-to-use spice mix for quick meal preparations.

Nutrition

This Chettinad Egg Curry is not only flavorful but also packed with protein from the eggs and a variety of nutrients from the spices. Here’s a rough estimate per serving:

  • Calories: 250-300
  • Protein: 12-15g
  • Fat: 18-20g
  • Carbohydrates: 10-15g

Please note that these values can vary based on specific ingredients used and portion sizes.

Conclusion

Chettinad Egg Curry is more than just a dish; it’s a culinary experience that brings a taste of South India to your table. Whether you’re preparing it for your family or sharing it with friends, the rich and spicy flavors are sure to be a hit. I hope this recipe brings you the same warmth and joy it has brought to my family over the years. Enjoy each bite, savor the spices, and create your own cherished memories with this delightful curry.

Related update: chettinad egg curry

Related update: Chapchae (Korean Stir-Fried Noodles)