Shrimp & Orzo: A Delightful Mediterranean Dish
Intro
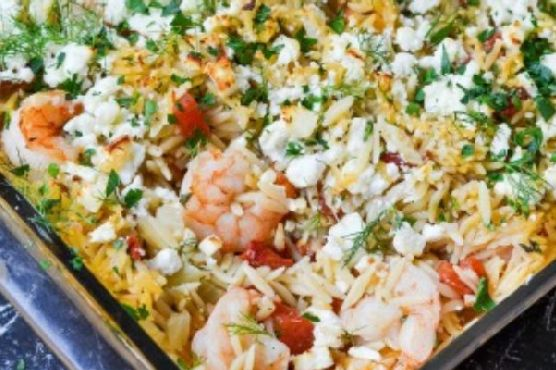
There’s something magical about the aroma of simmering herbs and the salty sea breeze that instantly transports me back to my childhood summers spent on the Mediterranean coast. My grandmother used to prepare a similar dish, filling the kitchen with warmth and love. Today, I’m excited to share my version of this nostalgic recipe, Shrimp & Orzo, a flavorful blend of tender shrimp, aromatic vegetables, and creamy feta cheese, perfect for a cozy family dinner or a special occasion.
Why You’ll Love It
This Shrimp & Orzo recipe is a delightful combination of flavors and textures. The savory taste of shrimp blends beautifully with the earthy fennel and the tangy notes of feta cheese, creating a symphony of flavors in every bite. It’s a one-pan meal, making it easy to prepare and perfect for busy weeknights. Plus, it’s a wholesome dish that can be enjoyed by everyone, with plenty of room for customization.
Ingredients
- 1 can diced tomatoes
- 1/2 cup dry white wine
- 1 fennel bulb, diced
- 4 ounces feta cheese, crumbled
- 1/4 cup fresh parsley, chopped
- 4 cloves of garlic, minced
- Lemon wedges, for serving
- 2 cups low sodium chicken broth
- 2 tablespoons olive oil
- 1 large onion, diced
- 1 teaspoon dried oregano
- 1 cup orzo pasta
- 1/2 teaspoon crushed red pepper flakes
- Salt & pepper, to taste
- 1 pound shrimp, peeled and deveined
- 1 cup water
Instructions
- Preheat your oven to 400°F (200°C).
- Season the shrimp with salt and pepper, and refrigerate until ready to use.
- Grease a 13×9-inch baking dish and set aside.
- In a large Dutch oven, heat the olive oil over medium-high heat until shimmering.
- Add the diced onion, fennel bulb, and 1/2 teaspoon of salt. Cook, stirring frequently, until the vegetables are softened and start to brown around the edges, about 10 minutes.
- Add the minced garlic and crushed red pepper flakes. Cook and stir until the garlic becomes very fragrant, about 30 seconds.
- Add the orzo to the vegetables, stirring to coat the orzo with oil. Continue cooking and stirring for about 4 minutes, until the orzo has a toasty aroma.
- Add the white wine, cooking and stirring constantly until the liquid evaporates, about 1 minute.
- Pour in the chicken broth, water, and 1/4 teaspoon salt. Bring the mixture to a boil, then reduce the heat and simmer until the orzo is almost tender, about 12 minutes. Stir fairly constantly to prevent sticking, adjusting the heat as necessary to maintain a lively simmer.
- Remove the pot from heat and stir in the seasoned shrimp, diced tomatoes, oregano, and 1 tablespoon of parsley.
- Transfer the mixture to the prepared baking dish and sprinkle with crumbled feta cheese.
- Bake for about 20 minutes, until the shrimp is cooked through and the feta is lightly browned.
- Before serving, sprinkle with the remaining parsley and reserved fennel fronds. Serve with lemon wedges on the side.
Tips
To ensure the shrimp is perfectly cooked, keep an eye on them in the oven. They should be pink and opaque, which usually takes about 20 minutes. Also, feel free to adjust the level of crushed red pepper flakes to suit your spice preference.
Variations & Substitutions
If you don’t have fennel on hand, you can substitute it with celery for a milder flavor. For a dairy-free version, simply omit the feta cheese or replace it with a dairy-free alternative. If you prefer a vegetarian dish, swap the shrimp for chickpeas or artichoke hearts, and use vegetable broth instead of chicken broth.
Storage
Store any leftovers in an airtight container in the refrigerator for up to three days. To reheat, place the desired portion in a baking dish and warm in the oven at 350°F (175°C) for about 10-15 minutes, or until heated through. You can also reheat in the microwave, though the texture may vary slightly.
FAQ
Can I use frozen shrimp for this recipe?
Yes, you can use frozen shrimp. Just make sure to thaw them completely and pat them dry before seasoning and adding them to the dish.
What type of white wine should I use?
A dry white wine such as Sauvignon Blanc or Pinot Grigio works best for this recipe, adding a subtle depth of flavor without overpowering the dish.
Is it possible to make this dish gluten-free?
Absolutely! Simply substitute the orzo with a gluten-free pasta option of your choice, and ensure that all other ingredients are certified gluten-free.
Nutrition
This Shrimp & Orzo dish is packed with protein from the shrimp, healthy fats from the olive oil, and essential vitamins and minerals from the vegetables and herbs. It’s a balanced meal that can fit into a healthy diet. For a more detailed nutritional breakdown, consider using a nutrition calculator based on the specific brands and quantities you use.
Conclusion
Whether you’re reminiscing about sun-soaked Mediterranean vacations or simply looking for a comforting yet elegant meal, this Shrimp & Orzo recipe is sure to satisfy. It’s a dish that brings together the essence of the sea and the earth, with a hint of nostalgia in every bite. I hope it becomes a cherished part of your meal repertoire, just as it has in mine. Enjoy!
Related update: Shrimp & Orzo
Related update: Turkey Enchilada Bake