Bacalhau Macau | Made by Meaghan Moineau

Bacalhau Macau | Made by Meaghan Moineau

Title: Rediscovering Bacalhau Macau: A Delectable Fusion of Flavors
Description: Dive into the heartwarming world of Bacalhau Macau, a delightful fusion of Portuguese and Macanese cuisines. This recipe, with its rich flavors and crispy textures, promises to transport you to a time when family gatherings were filled with laughter, stories, and the comforting aroma of home-cooked meals.

---


Bacalhau Macau: A Journey Through Flavor and Family Traditions

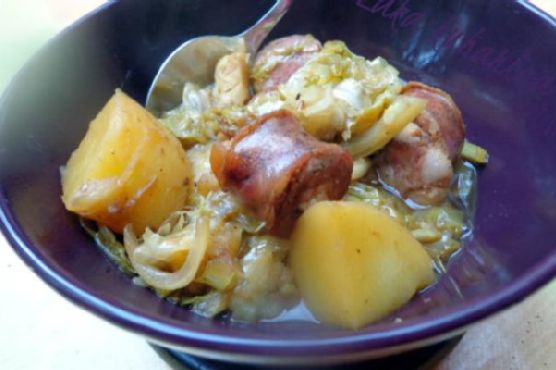
There's something inherently magical about dishes that have the power to evoke cherished memories, to transport us back to a simpler time when the world seemed a bit more connected, and every meal was a celebration of togetherness. Bacalhau Macau is one such dish, a testament to the rich culinary tapestry woven by the Portuguese and Macanese cultures. This recipe, with its crispy-on-the-outside, fluffy-on-the-inside fish cakes, is not just a meal but a gateway to nostalgia.


Ingredients:

- 2 salt cod fillets


- 2 russet (Idaho) potatoes, diced


- 2 tablespoons butter


- 2 green onions, chopped


- 1/4 cup chopped cilantro


- 1/4 cup oil-cured olives, chopped


- 1 egg white


- 1 tablespoon sesame oil


- 1 teaspoon salt


- 2 cloves garlic, minced


- 1 teaspoon grated ginger


- 1/2 teaspoon white pepper


- 1/2 cup whipping cream


- 1 egg


- 1 cup Japanese breadcrumbs


- Vegetable oil, for frying


Instructions:

1. Begin by placing the salt cod in a bowl and covering it with cold water. Allow it to soak for 6 to 8 hours, changing the water at least once or twice during this time. Once soaked, drain, rinse thoroughly, and pat dry. Carefully shred the fish with your fingers.


2. In a medium saucepan, bring 3 inches of water to a boil. Add the diced potatoes and cook until tender, about 10 to 12 minutes. Drain and briefly return the potatoes to the pan to evaporate any excess moisture. Mash the potatoes until smooth, then whisk in the butter.


3. Stir the shredded cod into the mashed potatoes, followed by the green onions, cilantro, olives, egg white, sesame oil, salt, garlic, ginger, and white pepper. Mix until well combined.


4. In a chilled bowl, whip the cream until soft peaks form. Gently fold the whipped cream into the cod mixture using a rubber spatula.


5. Using two large soup spoons, shape about 3 tablespoons of the cod-potato mixture into an oval fish cake. Continue shaping until all the mixture is used, setting each cod cake on a baking sheet as you go.


6. Spread the breadcrumbs on a plate. Beat the egg in a wide, shallow bowl. Dip each cod cake in the egg, allowing any excess to drip off, then roll it in breadcrumbs to coat all sides. Place the coated fish cakes on a baking sheet.


7. Heat a large skillet over medium heat and add 1/4 inch of vegetable oil. Once the oil is hot, add as many cod cakes as fit without touching. Cook, turning once, until golden brown, about 5 to 7 minutes. Remove with a slotted spoon and drain on paper towels. Repeat with any remaining cakes.


8. Serve the Bacalhau Macau warm, reveling in the delightful blend of flavors that have stood the test of time.


A Nostalgic Note:

Growing up, Bacalhau Macau was a staple at our family gatherings. My grandmother, a beacon of culinary wisdom, would often recount tales of her childhood in Macau as she meticulously prepared this dish. Her kitchen was a symphony of sizzling sounds and aromatic scents, a sensory feast that drew our family together like bees to honey. We would gather around the table, eagerly awaiting the first bite, and as the crispy exterior gave way to the savory, pillowy interior, stories of the past would flow, binding us in a shared history that was as rich and textured as the dish itself.


Difficulty Rating: 6/10
Classification: Main Dish

Bacalhau Macau is more than a meal; it's an experience, a testament to the enduring power of family and the timeless joy of sharing food and stories. Whether you're steeped in the tradition of this dish or discovering it for the first time, may it bring warmth and connection to your table as it has to ours.

Read more about Appetizers

Read more about Main Dishes

Read more about Desserts

Vietnamese Banh Mi | Made by Meaghan Moineau

Vietnamese Banh Mi | Made by Meaghan Moineau

Title: "Savory Memories: Crafting the Perfect Vietnamese Banh Mi"
Description: Dive into the delightful world of Vietnamese cuisine with our authentic Banh Mi recipe. Learn how to combine flavorful ingredients and create a sandwich that’s not just a meal, but a nostalgic journey. Perfectly balanced with tender pork, fresh herbs, and tangy pickles, this Banh Mi is rated 5/10 in difficulty and is a fulfilling main dish.

---


A Taste of Home: The Vietnamese Banh Mi


In the realm of Vietnamese cuisine, Banh Mi stands out as a testament to the country's rich culinary tapestry. This delightful sandwich, with its perfect balance of flavors and textures, has not only become a street food favorite but also a cherished dish in our family. Today, I’m excited to share both a beloved recipe and a heartwarming story that brings this dish to life.


Ingredients


- Rolls


- Pork loin, thinly sliced


- 2 cloves garlic, minced


- 3 tablespoons fish sauce


- 1 tablespoon sugar


- Freshly ground black pepper


- 1 small onion, sliced


- 2 tablespoons vegetable oil


- 1 teaspoon sesame seed oil


- Mayonnaise


- Fresh cilantro sprigs


- Pickled carrot and daikon


- Pâté


- Cucumber, sliced


- Jalapeño, sliced


Instructions


1. Marinate the Pork: In a large plastic bag, combine garlic, fish sauce, sugar, black pepper, onion, vegetable oil, and sesame seed oil. Mix well until the sugar dissolves completely. Add the thinly sliced pork loin to the marinade, ensuring each piece is well-coated. Seal the bag and let it marinate in the refrigerator for at least 1 hour to absorb all the flavors.
2. Cook the Pork: Heat a pan over medium heat. Remove the pork from the marinade and cook the slices in a single layer. Once one side is cooked, flip each piece to ensure even cooking on both sides. Once done, let the pork rest for 10 minutes before slicing into strips.
3. Assemble the Banh Mi: Slice the rolls in half and spread a generous layer of mayonnaise on one side. Add a layer of pâté on the other side. Carefully layer the pork strips, pickled carrot and daikon, cucumber slices, jalapeño, and cilantro sprigs inside the roll. Close the sandwich and serve immediately.

A Nostalgic Journey


Growing up, Banh Mi was more than just a meal; it was a symbol of home and togetherness. I vividly remember Sunday mornings bustling with activity in our kitchen. My grandmother, with her gentle hands and wise smile, would carefully prepare the marinade, a secret recipe she brought with her from Vietnam. As the pork sizzled on the pan, the aroma would fill our home, drawing everyone to the kitchen.


We would gather around the table, eagerly waiting to assemble our sandwiches. Each ingredient was a story, from the tart pickled vegetables representing the vibrant markets of Saigon, to the fresh cilantro, reminiscent of the herbs in our garden. The Banh Mi was not just a sandwich; it was a bridge to our heritage and a delicious reminder of the love that bound our family together.


Recipe Difficulty and Classification


This Vietnamese Banh Mi recipe is rated 5/10 in difficulty, making it accessible for home cooks while still providing a satisfying culinary challenge. Classified as a main dish, it offers a complete meal experience that is both filling and flavorful.


Whether you’re a seasoned chef or a home cook exploring new cuisines, this Banh Mi recipe invites you to savor not just a meal, but a memory. As you take your first bite, may it transport you to a place of warmth, nostalgia, and culinary delight. Enjoy!

Read more about Appetizers

Read more about Main Dishes

Read more about Desserts

Roasted Acorn Squash Stuffed with spicy Biryani (Veg/vegan) | Made by Meaghan Moineau

Roasted Acorn Squash Stuffed with spicy Biryani (Veg/vegan) | Made by Meaghan Moineau

Title: A Flavorful Journey: Roasted Acorn Squash Stuffed with Spicy Biryani
Description: Discover the aromatic allure of Roasted Acorn Squash Stuffed with Spicy Biryani, a delightful vegan dish that marries the nutty sweetness of squash with the rich, spicy flavors of biryani. Explore a heartwarming family memory tied to this dish, learn step-by-step instructions, and find out why this recipe is a show-stopping main dish perfect for any occasion.

---


A Flavorful Journey: Roasted Acorn Squash Stuffed with Spicy Biryani


The kitchen was always the heart of our home, especially during the vibrant chaos of family gatherings. I vividly remember the aromatic symphony of spices wafting through the air as my grandmother prepared her signature dish: Roasted Acorn Squash Stuffed with Spicy Biryani. This dish was more than just a meal; it was a celebration of flavors and memories woven together, bringing everyone closer with each bite.


Ingredients


- 2 acorn squashes, halved and seeds removed


- 1 cup basmati rice, soaked in water


- 1 cup water


- 1-2 tbsp garam masala


- 1 red onion, diced


- 1 cup sweet peppers, diced


- A handful of cashew nuts


- A pinch of saffron


- A bunch of cilantro, chopped


- 1 tbsp biryani paste (recipe below)


- 1 onion, sliced into rounds


- Salt, to taste


- Black coarse pepper, to taste


- PAM Original Flavor spray


- 2 tbsp vegetable oil


- 1 white onion, diced


- 1 beefsteak tomato, diced


- 3 cloves garlic, minced


- 1 inch ginger, grated


- 1 tsp chili powder


Biryani Paste Recipe:

- 2 tbsp vegetable oil


- 1 onion, finely chopped


- 2 cloves garlic, minced


- 1 inch ginger, grated


- 1 tsp chili powder


- Salt, to taste


Instructions


1. Preheat and Roast:

Preheat the oven to 400°F (200°C). On a baking sheet, place the acorn squash halves cut side up. Spray lightly with PAM and sprinkle with garam masala. Broil until tender and charred, about 10-15 minutes.


2. Prepare Filling:

While the squashes are roasting, heat a large skillet over medium heat. Spray with PAM and add vegetable oil. Sauté the cashews until fragrant and slightly darkened. Add the red onion and sweet peppers, sprinkle with black pepper, and cook until soft, about 5-7 minutes.


3. Toast the Rice:

Drain the soaked basmati rice and add it to the skillet. Sauté for 5-7 minutes to toast the rice.


4. Cook the Rice:

Remove the squash from the oven and let it cool for a few minutes. Score the flesh into small cubes, avoiding cutting through the skin. Scoop out the cubes into a bowl and set aside. Keep the squash shells for later use.


5. Combine Ingredients:

Add 1 cup of water and a pinch of saffron to the rice. Cover and cook on medium-low heat for about 15 minutes until the rice is cooked through. Add the cubed squash and biryani paste, tossing gently. Mix in 3/4 of the chopped cilantro and taste for salt and flavor.


6. Prepare Onion Topping:

In a small skillet, spray with PAM and set over medium-high heat. Add the onion slices and sauté until golden brown, about 4-5 minutes.


7. Assemble and Serve:

Fill each squash shell with the rice mixture, mounding it slightly over the top. Top each with a sautéed onion round and sprinkle with the remaining cilantro. Serve with yogurt or raita for a cooling contrast.


A Nostalgic Memory


Each time I prepare this dish, I'm transported back to my grandmother's kitchen. The way she meticulously balanced spices, the laughter echoing through the house, and the joy of sharing a meal with loved ones are memories that linger with every bite. This dish, like a warm embrace, brings our family together, weaving a tapestry of tradition and flavor that transcends generations.


Difficulty Rating


Difficulty: 6/10
Classification: Main Dish

Roasted Acorn Squash Stuffed with Spicy Biryani is an inviting main dish that combines the warmth of family traditions with the vibrant flavors of Indian cuisine. Its moderate difficulty level makes it an achievable yet impressive addition to any dinner table. Enjoy this culinary journey that will surely create new memories alongside cherished old ones.

Read more about Appetizers

Read more about Main Dishes

Read more about Desserts

Chicken Sausage, White Bean and Cabbage Soup | Made by Meaghan Moineau

Chicken Sausage, White Bean and Cabbage Soup | Made by Meaghan Moineau

Title: A Hearty Hug in a Bowl: Chicken Sausage, White Bean, and Cabbage Soup
Description: Discover the comforting flavors of our Chicken Sausage, White Bean, and Cabbage Soup—a perfect blend of savory and wholesome ingredients. This easy-to-make, one-pot wonder is ideal for chilly nights and family gatherings. With a touch of nostalgia and warmth in every spoonful, this recipe is a must-try for anyone seeking a delicious and nourishing meal.

---


As the leaves turn golden and the air gets crisp, there’s nothing quite like a steaming bowl of soup to bring warmth and comfort to your soul. Our Chicken Sausage, White Bean, and Cabbage Soup is more than just a dish—it's a heartfelt embrace, a reminder of cozy family dinners, and a delicious way to celebrate the flavors of the season.


Ingredients


- Olive oil


- 1 white onion, chopped


- 2 diced carrots


- Salt and black pepper to taste


- 3 cloves garlic, minced


- 1/2 teaspoon crushed red pepper flakes


- 1 pound Italian mild chicken sausage


- 6 cups low sodium vegetable stock


- 2 cans white beans, drained and rinsed


- 1 small green cabbage, thinly sliced


Instructions


1. Start with Sautéing: In a large pot, heat olive oil over medium heat. Add chopped onions and sauté until tender, about 8 minutes.
2. Add Vegetables: Toss in diced carrots and continue cooking for another 5 minutes. Season with salt, pepper, garlic, and red pepper flakes; cook for another minute.
3. Cook the Sausage: Remove the sausage from its casing and break it into small chunks in the pot. Toss with vegetables to brown the meat, cooking for another 8-10 minutes.
4. Simmer the Soup: Pour in the vegetable stock, enough to cover all ingredients, and bring to a gentle simmer.
5. Incorporate Beans and Cabbage: Add the white beans and cabbage, stirring to combine. Simmer, covered, until the cabbage is wilted but not mushy, about 10 minutes. Taste and adjust seasoning with more salt or pepper if needed.

A Nostalgic Note


This soup takes me back to my grandmother's kitchen, where I spent countless chilly afternoons enveloped in the warmth of her loving care. The aroma of sautéed onions and garlic would drift through the house, a sign that something truly special was being prepared. As a child, I loved watching her add each ingredient with precision and care, taking the time to let the flavors meld into something magical. Her secret ingredient wasn't in the spice rack but rather in the love and joy she infused into every meal. Each bite was a reminder of her nurturing spirit and the cherished family memories we created around her table.


Difficulty and Classification


Difficulty: 3/10 - This soup is straightforward and perfect for beginners and seasoned cooks alike, offering a hassle-free cooking experience.
Classification: Main Dish - Packed with protein and hearty vegetables, this soup is a fulfilling main dish that holds its own as a complete and satisfying meal.

Whether you're looking to recreate a piece of nostalgia or simply enjoy a flavorful and hearty meal, this Chicken Sausage, White Bean, and Cabbage Soup is sure to become a beloved favorite in your home. Gather your loved ones and savor the simple joys of cooking and sharing a meal together.

Read more about Appetizers

Read more about Main Dishes

Read more about Desserts

Butter-Bread | Made by Meaghan Moineau

Butter-Bread | Made by Meaghan Moineau

Title: The Nostalgic Aroma of Butter-Bread: A Journey Back to Family Gatherings
Description: Dive into the heartwarming world of homemade Butter-Bread, a delightful recipe that bridges generations with its rich, buttery aroma and crusty exterior. This blog post not only walks you through creating this culinary masterpiece but also shares a cherished family memory that makes this bread truly special. With an easy-to-follow guide and heartfelt storytelling, discover why this bread is more than just a dish—it's a slice of family history.

---


Butter-Bread: A Taste of Home and Heritage


Few things evoke the warmth of family like the aroma of freshly baked bread wafting through the house. Butter-Bread, with its rich, golden crust and soft, buttery interior, is not just a recipe—it's a tradition, a connection to family gatherings from my childhood.


Ingredients:


- 500g white strong bread flour


- 100g butter, softened


- 15g fresh yeast


- 1 tablespoon liquid malt extract


- 10g salt


- 2 tablespoons sunflower oil


- 300ml water


- Additional 100ml water for mixing


Instructions:


1. Prepare the Starter Dough:

- The night before, mix 100g flour, 100ml water, and 5g yeast. Cover and refrigerate overnight.


2. Bring Ingredients to Room Temperature:

- Remove the butter and starter dough from the fridge one hour before beginning.


3. Mix the Dough:

- Dissolve the remaining yeast with the malt extract and 200ml water until smooth.


- Add in the remaining flour, salt, softened butter, and sunflower oil. Mix well.


- Incorporate the starter dough into the mixture and knead for 10 minutes using a food processor with a dough hook (5 minutes slow, then 5 minutes fast).


4. First Rise:

- Turn the dough onto a floured surface, dust generously with flour, cover, and let it rise for 30 minutes.


- Every 10 minutes, punch down the dough, stretch, fold, and turn it over.


5. Shape and Second Rise:

- Grease a loaf tin. Shape the dough into a loaf, place it in the tin, and cover. Let it rise for another 30 minutes.


- After 10 minutes, score a 2 cm line down the center.


6. Bake:

- Preheat the oven to 230°C. Place the bread on the middle shelf, spraying water to create steam.


- Bake for 45 minutes. After 15 minutes, spray again and reduce the temperature to 200°C.


- The bread is ready when a skewer comes out clean. Let it cool completely on a wire rack before slicing.


A Family Memory


As I knead the dough, memories of my grandmother's kitchen flood back. Every Sunday, her small, sunlit kitchen became the heart of our family gatherings. I remember the anticipation as we watched her skillfully work the dough for Butter-Bread, her hands moving with practiced ease. The smell of baking bread would fill the house, mingling with laughter and stories exchanged around the table.


My grandmother would always save the first slice for me, slathered with homemade butter. That first bite was a revelation—a simple pleasure that lingered long after the meal had ended. Today, as I bake Butter-Bread for my own family, I feel her presence with each fold and stretch of the dough, each rise and bake, connecting past and present in a single loaf.


Difficulty: 6/10


This recipe, rated at a moderate difficulty level, requires some patience and practice, especially with its sticky dough. However, the steps are straightforward, and the result is well worth the effort.


Classification: Main Dish


Butter-Bread, with its rich, satisfying flavor, pairs beautifully with soups and stews, making it a perfect main dish accompaniment for any meal.


---


Embrace the tradition and warmth of Butter-Bread in your own kitchen. This recipe is more than just a bread—it's a testament to cherished family moments and the timeless joy of homemade comforts.

Read more about Appetizers

Read more about Main Dishes

Read more about Desserts

Hard-Boiled Egg Gratin In A Bechamel Sauce | Made by Meaghan Moineau

Hard-Boiled Egg Gratin In A Bechamel Sauce | Made by Meaghan Moineau

A Nostalgic Twist on Comfort Food: Hard-Boiled Egg Gratin in a Bechamel Sauce


Discover the Heartwarming Delight of a Family Favorite


In the world of culinary delights, few dishes evoke a sense of nostalgia quite like a good old-fashioned gratin. Today, we're diving into a recipe that has stood the test of time in my family: Hard-Boiled Egg Gratin in a Bechamel Sauce. This comforting, flavorful dish is not only a feast for the taste buds but also a journey down memory lane. With its creamy bechamel sauce, rich gruyère cheese, and perfectly hard-boiled eggs, this recipe is sure to become a staple in your home as it is in mine.


Ingredients


- Butter


- Eggs


- Flour


- Gruyère cheese


- Milk


- Nutmeg


- Onion


- White salt and pepper


Instructions


1. Hard-Boil the Eggs: Start by bringing a saucepan of salted water to a boil. Gently add the eggs, reduce the heat, and let them simmer for 10 minutes. Once done, transfer the eggs to cold water until they are just cool enough to handle. This makes peeling them a breeze. A little trick I learned from my grandmother: roll the eggs with the palm of your hand on a hard surface to crack the shell, then peel them under a slow stream of running water. Reserve the eggs in a bowl of warm water.
2. Cook the Onion: Melt some butter in a saucepan or small frying pan over low heat. Add the onion and cook, stirring frequently, until it's tender but not colored.
3. Prepare the Bechamel Sauce: In a medium heavy-bottomed saucepan, melt the butter over low heat. Add the flour and whisk for about 2 minutes, being careful not to let it color. Gradually whisk in the milk and bring to a boil, whisking constantly to prevent lumps. Season with nutmeg, salt, and pepper to taste. Reduce the heat and simmer for 10 minutes, whisking constantly and scraping the bottom and sides of the pan to keep the sauce smooth. Stir in the cooked onions and let it cook for an additional 5 minutes.
4. Assemble the Gratin: Preheat your grill. Slice the eggs into 1 cm (0.4 inch) thick slices. Spread a thin layer of the bechamel sauce over the bottom of your gratin dish. Layer the egg slices over the sauce and coat them with the remaining sauce. Sprinkle with grated gruyère cheese, then grill, turning the dish if necessary to ensure an evenly golden-brown top. Serve immediately.

A Family Memory


This dish always takes me back to Sunday afternoons at my grandmother's house. She would prepare her kitchen with the aroma of melted butter and onions, a scent that still makes me feel at home. My siblings and I would gather around, watching her every move, eager to learn the secrets of her cooking. The moment she pulled the gratin from the oven, with its golden-brown crust and bubbling cheese, we knew we were in for a treat. Sharing this meal brought us closer, and each bite was a reminder of the warmth of family and tradition.


Difficulty: 6/10


Classification: Main Dish


Hard-Boiled Egg Gratin in a Bechamel Sauce is more than just a meal—it's a journey back to simpler times, a celebration of comfort and family. Whether you're looking for a hearty main dish or a nostalgic culinary adventure, this recipe is sure to delight both the palate and the heart. So, gather your loved ones, roll up your sleeves, and create your own cherished memories with this timeless classic.

Read more about Appetizers

Read more about Main Dishes

Read more about Desserts

Frittata with Mushrooms, Thyme, and Parmigiano Cheese | Made by Meaghan Moineau

Frittata with Mushrooms, Thyme, and Parmigiano Cheese | Made by Meaghan Moineau

Title: Savoring Sunday Mornings: Frittata with Mushrooms, Thyme, and Parmigiano Cheese
Description: Discover the comforting flavors of a classic frittata with mushrooms, thyme, and Parmigiano cheese. This delicious and easy-to-make dish is perfect for breakfast, brunch, or a light dinner. Immerse yourself in a nostalgic family memory that adds a personal touch to this tasty recipe. Rated 4 out of 10 in difficulty, this main dish will surely become a family favorite.

---


Frittata with Mushrooms, Thyme, and Parmigiano Cheese

Sunday mornings have always had a special place in my heart. Growing up, they were synonymous with family gatherings around the kitchen table, the warmth of the sun streaming through the windows, and the irresistible aroma of a frittata cooking in the oven. This recipe for Frittata with Mushrooms, Thyme, and Parmigiano Cheese brings back those cherished memories and is a delightful way to start any day.


Ingredients:

- 3 eggs


- 2 egg replacements


- 1 cup trimmed fresh mushrooms


- 1 tablespoon fresh thyme leaves


- 2 green onions, sliced


- Freshly ground black pepper


- 1/2 cup canned whole half and half


- 1/2 cup freshly grated Parmigiano cheese


- Salt to taste


- Cooking spray or butter for the pan


Instructions:

1. Preheat your oven to 350 degrees Fahrenheit. Later, you'll switch it to "Broil."


2. Heat an 8-inch ovenproof skillet over medium-high heat and coat it with cooking spray or butter.


3. Add the mushrooms and green onions to the pan; sauté for about 12 minutes or until the mushrooms are nicely browned.


4. In a medium bowl, combine the eggs and egg replacement with the half and half, Parmesan cheese, thyme, salt, and pepper. Whisk everything together until thoroughly mixed.


5. Pour the egg and cheese mixture into the same pan with the sautéed mushrooms and green onions.


6. Cover the pan and cook over medium heat for about 6 minutes, or until the mixture is just a little liquid-y/runny on top.


7. Transfer the pan to the oven and bake at 350 degrees for another 5-10 minutes, until the frittata is completely set.


8. Change the oven setting to "Broil." Place the pan on the lowest rack and broil for about 2 minutes, or until the top is a golden brown color.


I remember sitting at the kitchen table, watching my grandmother skillfully prepare this dish. She would tell us stories of her childhood, her voice weaving tales of family traditions and the importance of sharing meals together. The frittata, infused with the earthy flavors of mushrooms and thyme, was always a highlight of our Sunday brunches, bringing everyone together and creating lasting memories.


Difficulty: 4/10
Classification: Main Dish

This frittata recipe, with its rich flavors and simple preparation, is a testament to the power of food to connect us to our past and to each other. Whether you’re sharing it with family or enjoying it on your own, it's sure to become a beloved staple in your culinary repertoire. So, gather your loved ones and savor the experience of making and enjoying this delightful dish.

Read more about Appetizers

Read more about Main Dishes

Read more about Desserts

Farro & Leek Soup | Made by Meaghan Moineau

Farro & Leek Soup | Made by Meaghan Moineau

Title:

Hearty Comfort in a Bowl: The Timeless Allure of Farro & Leek Soup


Description:

Dive into the nourishing warmth of Farro & Leek Soup, a dish that marries the rustic charm of ancient grains with the delicate flavors of leeks and herbs. This blog post takes you on a culinary journey, complete with a heartwarming family memory, and offers a simple yet flavorful recipe that’s perfect for any season. Discover why this soup is not just a meal, but a cherished tradition.


---


A Nostalgic Journey with Farro & Leek Soup

There's something deeply comforting about a bowl of soup. It’s warmth, aroma, and the memories it evokes. For me, Farro & Leek Soup is a gateway to cherished family moments. Growing up, our kitchen was the heart of the home, especially during the chilly months when my grandmother would lovingly prepare this hearty soup. The scent of leeks and herbs wafting through the house was the signal that warmth and love were soon to embrace us.


The Secret to a Simple Yet Flavorful Soup
What makes Farro & Leek Soup so special is its simplicity. With just a few humble ingredients, you can create a dish that is not only satisfying but also deeply nourishing. Here's how you can recreate this classic family favorite:
Ingredients:

- 2 tablespoons olive oil


- 3 white leeks, thinly sliced


- 200 grams farro


- 2 stalks of celery, diced


- 2 carrots, diced


- 1 onion, diced


- 4 cups meat stock (homemade is best, no bouillon cubes)


- 1 sprig of thyme


- 1 bay leaf


- Parmesan cheese, for garnish


- Salt & pepper, to taste


Instructions:
1. Prepare the Base: In a heavy-bottomed pot, heat the olive oil over medium-low heat. Add the leeks, celery, carrots, and onion. Sweat the vegetables until they become translucent and soft, ensuring they do not brown. If they start to stick, reduce the heat and add a spoonful of water.
2. Incorporate the Farro: Add the farro to the pot, toasting it with the vegetables for 1-2 minutes to enhance its nutty flavor.
3. Simmer with Stock and Herbs: Introduce the thyme, bay leaf, and meat stock to the mix. Season with salt and pepper to your preference. Bring the soup to a low simmer and let it cook for 30-40 minutes until the farro is tender, stirring occasionally.
4. Adjust the Consistency: Depending on your preference, you can adjust the consistency of the soup. For a stew-like texture, hold back some of the stock. For a more soupy consistency, feel free to add more stock.
5. Finish and Serve: Drizzle with extra virgin olive oil, sprinkle with freshly grated Parmesan cheese, and serve hot with a side of toasty bread.
A Dish Beyond the Kitchen

Every spoonful of this soup takes me back to my grandmother's kitchen, where laughter mingled with the aroma of cooking. It was a place where stories were shared, and bonds were strengthened. Today, as I prepare Farro & Leek Soup for my own family, I am reminded of the timeless nature of food and its power to connect generations.


Difficulty Level: 4/10
Classification: Main Dish

With its rich flavors and wholesome ingredients, Farro & Leek Soup is more than just a meal; it is a tradition, a memory, a hug in a bowl. Whether you're seeking comfort on a cold day or a light yet satisfying main dish, this soup is sure to become a cherished favorite in your home, just as it has in mine.

Read more about Appetizers

Read more about Main Dishes

Read more about Desserts

Caribbean black bean and sweet potato soup | Made by Meaghan Moineau

Caribbean black bean and sweet potato soup | Made by Meaghan Moineau

Title: A Warm Caribbean Hug in a Bowl: Black Bean and Sweet Potato Soup
Description: Dive into a heartwarming journey with our Caribbean Black Bean and Sweet Potato Soup. Infused with aromatic spices and enriched with sweet potatoes, this delightful dish is a symphony of flavors that will transport you to the sun-kissed beaches of the Caribbean. Join us as we explore this comforting recipe, perfect for any season, and share a nostalgic family memory that makes this dish truly special.

---


A Taste of the Caribbean: Black Bean and Sweet Potato Soup


As the leaves begin to fall and the air turns crisp, there's nothing quite like a steaming bowl of soup to warm the soul. This Caribbean Black Bean and Sweet Potato Soup is more than just a meal; it's a memory, a tradition, and a comforting embrace from the past.


Ingredients:

- 1 cup dry black turtle beans

- 2 tablespoons coconut oil


- 1 yellow sweet onion, diced


- 2 jalapenos, seeded and chopped


- 1 teaspoon ground ginger


- 1/2 teaspoon ground allspice


- 1 teaspoon thyme


- 1 teaspoon coarse sea salt


- 6 cups vegetable broth


- 2 large sweet potatoes, peeled and diced


- 2 tablespoons brown sugar


- 2 green onions, chopped


- 1/4 cup fresh cilantro, chopped


- Salt and pepper to taste


Instructions:

1. Prepare the Beans: Rinse the black turtle beans and place them in a large bowl. Cover with 4 inches of water and soak overnight, or for at least 8 hours. After soaking, strain and rinse the beans.
2. Sauté the Aromatics: In a large soup pot, heat the coconut oil over medium heat. Add the diced onion and chopped jalapenos, sautéing for about 10 minutes until they become soft and fragrant.
3. Simmer the Soup: Add the rinsed beans and vegetable broth to the pot. Stir in the ground ginger, allspice, thyme, and coarse sea salt. Bring the mixture to a boil, then reduce the heat and let it simmer gently for 1 hour and 30 minutes.
4. Add Sweetness and Texture: Introduce the diced sweet potatoes and brown sugar into the pot, allowing the soup to simmer for an additional 30 minutes. This will ensure the beans and sweet potatoes are tender and packed with flavor.
5. Blend for Creaminess: Carefully puree 1 cup of the soup in a blender, then return it to the pot. This step enhances the soup's texture, making it creamy while still maintaining its hearty character.
6. Garnish and Serve: Stir in the chopped green onions and fresh cilantro. Adjust the seasoning with salt and pepper to suit your taste. Serve hot and enjoy!

A Nostalgic Memory


This soup is a beloved family tradition, taking me back to my grandmother's cozy kitchen. I remember the warmth of the stove mingling with the rich aroma of spices, as we gathered around the table for our Sunday family dinner. My grandmother, with her gentle hands, would prepare this soup with love, weaving tales of her own childhood in the Caribbean. Each spoonful was a reminder of those cherished moments, where laughter and stories filled the air, and the soup brought us all closer together.


Difficulty Rating: 5/10


This recipe is moderately challenging, perfect for home cooks looking to expand their culinary repertoire with a dish that is both satisfying and impressive.


Classification: Main Dish


This Caribbean Black Bean and Sweet Potato Soup stands out as a hearty main dish, perfect for a comforting dinner or a cozy lunch. Experience the warmth and flavors of the Caribbean with every delightful bite.

Read more about Appetizers

Read more about Main Dishes

Read more about Desserts

A Post Thanksgiving “sopa De Tortilla” | Made by Meaghan Moineau

A Post Thanksgiving “sopa De Tortilla” | Made by Meaghan Moineau

A Heartwarming Post-Thanksgiving Tradition: Sopa De Tortilla


Description:

Transform your Thanksgiving leftovers into a comforting and delicious Sopa De Tortilla. This flavorful Mexican-inspired dish is a wonderful way to make use of leftover turkey while warming the soul with its rich and aromatic broth. Perfect for chilly post-holiday days, this recipe will become a cherished family tradition.

---


As the last leaves fall and the vibrant hues of autumn begin to fade, our family gathers once more around the table, not for a grand feast, but for something even more special—a humble bowl of Sopa De Tortilla. This post-Thanksgiving tradition has been passed down through generations, a beloved ritual that warms not just our bodies but our hearts.


Ingredients:

- 1 whole turkey breast

- 1 avocado, cubed


- 2 large carrots, peeled and cubed


- 2 stalks of celery, chopped


- 1 bunch of cilantro (stems and leaves separated)


- 2 tablespoons olive oil


- 2 cloves garlic, quartered


- 1 large onion, quartered


- 1 roasted poblano pepper, peeled and deveined


- 1 8 oz. can organic stewed tomatoes


- 1 cup fried tortilla strips or good quality store-bought tortilla chips


- Ground cumin, to taste


- Salt, to taste


Instructions:


1. Prepare the Stock:

- In a large stockpot, drizzle 2 tablespoons of olive oil and add the quartered onion, garlic, and turkey breast.


- Add the carrot peels, and 2 stalks of celery, and cilantro stems.


- Fill the pot with water until it is three-quarters full. Cover and boil for 1-2 hours, ensuring the stock does not reduce to less than a quarter of the pot.


- Remove the turkey from the bone and reserve the meat. Discard the bone and vegetables. Strain the stock and set aside 1-2 cups per guest for the soup, freezing any leftovers for future use.


2. Make the Soup:

- In a blender, combine the stewed tomatoes, olive oil, a pinch of salt, and the roasted poblano pepper. Puree and set aside.


- Add cubed carrots and chopped celery to the stock and boil for 30 minutes until tender.


- Gradually add the pureed pepper-tomato mixture to the broth.


- Include 1/3 cup of turkey meat per cup of stock, allowing it to simmer.


- Adjust seasoning with salt and a pinch of ground cumin.


3. Serve:

- Ladle the soup into bowls, topping with additional turkey meat, tortilla strips, fresh cilantro, and cubed avocado.


Nostalgic Family Memory:


Every year, after the Thanksgiving festivities have quieted down, my grandmother would gather us in the kitchen and retell the story of how this Sopa De Tortilla became our family's tradition. It began decades ago when her parents, having immigrated from Mexico, found themselves facing their first American Thanksgiving. Not wanting to waste the leftover turkey, they decided to create a dish reminiscent of their homeland. This was how our family's version of Sopa De Tortilla was born—a fusion of cultures, flavors, and love.


As we sit around the table, savoring each spoonful, I'm reminded of the countless stories shared and the laughter that filled our home, year after year. This simple soup connects us to our roots and to each other, making every post-Thanksgiving gathering a cherished memory.


Difficulty: 5/10

Classification: Main Dish


---


This Sopa De Tortilla is more than just a meal; it's a celebration of family and tradition. May it bring warmth and joy to your home as it has to ours.

Read more about Appetizers

Read more about Main Dishes

Read more about Desserts

Instant Pot Chicken Tacos | Made by Meaghan Moineau

Instant Pot Chicken Tacos | Made by Meaghan Moineau

Instant Pot Chicken Tacos: A Quick, Flavorful Feast for the Whole Family


Description


Discover the magic of Instant Pot Chicken Tacos, a delicious and easy meal that brings families together. With simple ingredients like chicken breasts, purple onion, and canned salsa, this dish transforms into a mouthwatering main course that's sure to please. Perfect for busy weeknights or a casual dinner party, these tacos capture the essence of home-cooked comfort food in a fraction of the time. Dive into this recipe and enjoy a taste of nostalgia with every bite.


A Nostalgic Family Memory


Growing up, Taco Tuesdays were a cherished tradition in our household. As the sun dipped below the horizon, casting a warm glow over our kitchen, my siblings and I would gather around the table, eagerly awaiting the sizzling sounds and tantalizing aromas that filled the air. Mom would always make her signature chicken tacos, a recipe passed down from her grandmother. The kitchen buzzed with laughter and stories as we chopped fresh onions and seasoned the chicken with care.


One particular Tuesday stands out in my memory. It was a chilly autumn evening, and the first hint of winter's bite was in the air. Mom had recently received an Instant Pot as a gift, and she was eager to try it out with our beloved taco recipe. We were skeptical at first—could this new gadget really recreate the flavors we held so dear?


As the Instant Pot worked its magic, we shared stories of past family adventures and dreamed of future ones. The smell of seasoned chicken and salsa wafted through the room, and our mouths watered in anticipation. When the timer finally beeped, signaling the end of the cooking process, we gathered around as Mom carefully lifted the lid.


The result was nothing short of spectacular. The chicken was tender and infused with the rich flavors of taco seasoning and salsa. As we bit into our tacos, the familiar taste of lime juice and savory chicken transported us back to a simpler time. That evening, we realized that while the method had changed, the heart of our family tradition remained unchanged.


Recipe


Ingredients


- 2 chicken breasts


- Black pepper


- 1 tablespoon taco seasoning


- 1 purple onion, sliced


- 1 cup canned salsa


- 2 tablespoons lime juice


Instructions


1. Season both sides of the chicken breasts with black pepper and taco seasoning.


2. Place the seasoned chicken into the bottom of the Instant Pot.


3. Top the chicken with sliced purple onion and canned salsa.


4. Secure the Instant Pot lid into the lock position.


5. Select the Poultry setting and set the timer for 12 minutes.


6. Once cooking is complete, allow the Instant Pot to naturally release pressure for 20 minutes.


7. Carefully remove the chicken from the Instant Pot and shred it using two forks.


8. Sprinkle the shredded chicken with lime juice for added zest.


9. Serve over rice or with warm tortillas for a delightful taco experience.


Difficulty Rating


This recipe is rated a 3 out of 10 for difficulty, making it an ideal choice for cooks of all skill levels. Its simplicity and efficiency make it a fantastic option for those new to using an Instant Pot or anyone looking for a quick, satisfying meal.


Classification


Instant Pot Chicken Tacos are classified as a Main Dish, perfect for family dinners or entertaining guests with minimal fuss.


---


Embrace the ease and flavor of Instant Pot Chicken Tacos, and create new family memories with this delightful dish. Whether you're a seasoned cook or just starting out, this recipe is sure to become a beloved staple in your culinary repertoire.

Read more about Appetizers

Read more about Main Dishes

Read more about Desserts

Cabbage and sausages in beer | Made by Meaghan Moineau

Cabbage and sausages in beer | Made by Meaghan Moineau

Title: A Heartwarming Bowl: Cabbage and Sausages in Beer
Description: Dive into a comfort food classic with our Cabbage and Sausages in Beer recipe. This simple yet flavorful main dish combines savory smoked sausages with the earthy goodness of cabbage and the subtle sweetness of beer. Perfect for a cozy family dinner, this dish will fill your kitchen with mouthwatering aromas and your heart with nostalgia.

---


There are certain dishes that transport us back in time, evoking memories that are as rich and comforting as the flavors themselves. Our Cabbage and Sausages in Beer recipe is one such culinary time machine, whisking me back to countless family gatherings in my grandmother's warm, bustling kitchen.


A Stroll Down Memory Lane


Growing up, Sunday dinners at Grandma's house were a cherished ritual. The savory aroma of smoked sausages simmering in beer would greet us at the door, mingling with the laughter of cousins and the comforting hum of adult conversation. The centerpiece of our family feast was always a heaping bowl of cabbage and sausages, tender and steaming, served with a side of thick, crusty bread.


Grandma had a knack for turning simple ingredients into something magical. She would melt a generous pat of butter in her well-loved pot, adding diced onions that would sizzle and turn golden, filling the room with a sweet, caramelized scent. A sprinkle of sugar and salt would follow, her wooden spoon working its way around the pan with the precision of years of practice.


Next came the beer—a splash of golden liquid that bubbled and hissed as it hit the pan, its malty aroma inviting everyone to gather around. The sausages were nestled in among the cabbage and potatoes, their smoky essence infusing the entire dish. The pot, brimming with promise, would simmer gently, allowing the flavors to meld into a comforting symphony.


Creating Your Own Memories


To recreate this dish, start by melting butter in a large pan over medium-low heat. Add the onions, a pinch of sugar, and a dash of salt. Stir frequently, watching as the onions transform into a golden hue, about 5-8 minutes. Pour in the beer, scraping up any flavorful bits clinging to the bottom of the pan.


Introduce the smoked sausages, green cabbage, and potatoes into this aromatic mix. Let the dish simmer, covered, for 20 minutes or until the vegetables are tender and full of flavor. Serve the sausages and veggies in big bowls, ensuring each serving is accompanied by plenty of the rich cooking liquid. A sprinkle of freshly cracked pepper adds the final touch.


A Dish for Every Occasion


This recipe, with its simple ingredients and deep, satisfying flavors, makes for a perfect main dish. It's a 3 out of 10 on the difficulty scale, making it accessible for cooks of all skill levels. Whether you're looking to create new family traditions or simply need a hearty meal for a chilly evening, this Cabbage and Sausages in Beer will not disappoint.


As you savor each bite, let the comforting flavors remind you of the warmth of family and the simple joys of a meal shared with loved ones. Here's to creating your own cherished memories around the dining table. Enjoy!

Read more about Appetizers

Read more about Main Dishes

Read more about Desserts

Broccoli Cheddar Soup, A Panera Bread Co. Copycat | Made by Meaghan Moineau

Broccoli Cheddar Soup, A Panera Bread Co. Copycat | Made by Meaghan Moineau

Title: Savor the Comfort: A Panera Bread Co. Copycat Broccoli Cheddar Soup Recipe
Description: Dive into the heartwarming nostalgia of a family favorite with this Broccoli Cheddar Soup, inspired by Panera Bread Co. Relive cherished memories as you create a bowl of creamy, cheesy delight. Perfect as a main dish, this recipe is a 6 out of 10 on the difficulty scale, making it a delightful challenge for home chefs.

---


There’s something undeniably comforting about a bowl of Broccoli Cheddar Soup. For me, it's a dish that instantly transports me back to chilly Sunday afternoons spent with my family. The kitchen would fill with warmth and the rich aroma of simmering cheese, as my mom and I prepared our own version of Panera Bread Co.'s famous soup. It was our little tradition, a perfect blend of laughter, stories, and, of course, great food.


Ingredients:

- 4 tablespoons butter


- 1 onion, diced


- 1/4 cup flour


- 2 cups half-and-half


- 3 cups low sodium chicken broth


- 2 bay leaves


- A pinch of nutmeg


- Salt and pepper to taste


- 4 cups broccoli florets


- 2 carrots, diced


- 2 1/2 cups shredded yellow and white sharp cheddar cheese


- Sourdough bread boules, for serving


Instructions:
1. Sauté the Aromatics: Begin by melting the butter in a large Dutch oven or pot over medium heat. Add the diced onion and cook until tender, about 5 minutes. This step always reminds me of my mom’s gentle stirring, ensuring the onions never browned too quickly.
2. Create the Base: Whisk in the flour and cook until golden, 3 to 4 minutes. Gradually whisk in the half-and-half until smooth. The creamy texture swirling in the pot often sparked conversations about school and friends.
3. Simmer the Soup: Add the chicken broth, bay leaves, and nutmeg. Season with salt and pepper, and bring the soup to a simmer. Reduce the heat to medium-low and cook, uncovered, for about 20 minutes, allowing the flavors to meld together.
4. Prepare the Bread Bowls: While the soup simmers, use a sharp knife to cut a circle into the top of each sourdough loaf, leaving a 1-inch border. Hollow out the middle, creating a perfect vessel for the soup. This was always my favorite part, as I loved nibbling on the soft bread innards.
5. Add the Vegetables: Stir in the broccoli and carrot to the broth mixture and simmer until tender, about 20 minutes. Discard the bay leaves afterwards.
6. Blend to Perfection: Puree the soup in batches in a blender until smooth, leaving some flecks of carrot and broccoli visible. Alternatively, you can use an immersion blender directly in the pot.
7. Incorporate the Cheese: Return the soup to the pot and add the shredded cheese, whisking over medium heat until melted. If the soup seems too thick, add up to 3/4 cup water.
8. Serve and Enjoy: Ladle the soup into the prepared bread bowls. Garnish with additional cheese if desired. Each bite is a delicious reminder of family gatherings and shared stories.
Nostalgic Story:

One particular memory stands out vividly. It was a snowy day, and the world outside was a blanket of white. My siblings and I had spent hours playing in the snow, our cheeks red from the cold. As we stumbled inside, the inviting smell of broccoli cheddar soup greeted us. We gathered around the kitchen table, still in our mittens and scarves, as my mom ladled the soup into freshly prepared bread bowls. We laughed, shared our day's adventures, and savored each warm, cheesy bite. That day, the soup was more than just a meal; it was the essence of home.


Difficulty: 6/10
Classification: Main Dish

This Broccoli Cheddar Soup not only fills your belly but also warms your soul, bringing a touch of nostalgia with every ladle. Whether you're recreating family memories or starting new traditions, this recipe is sure to become a beloved favorite.

Read more about Appetizers

Read more about Main Dishes

Read more about Desserts

Thick, Fudgy, One Bowl Brownies | Made by Meaghan Moineau

Thick, Fudgy, One Bowl Brownies | Made by Meaghan Moineau

Title: A Journey Back in Time with Thick, Fudgy, One Bowl Brownies
Description: Dive into the comforting embrace of these Thick, Fudgy, One Bowl Brownies, a timeless dessert that promises both simplicity and indulgence. With a rich blend of semi-sweet and unsweetened chocolate, these brownies are as delightful to make as they are to eat. Join me as I share a cherished family memory that makes this recipe truly special.

---


There's something undeniably magical about the aroma of chocolate wafting through the house. It's the kind of scent that transports you back in time, evoking a swirl of cherished memories. For me, that memory is Saturday afternoons in my grandmother's kitchen, where the world seemed to slow down as we baked her famous brownies.


A Sweet Family Tradition

Growing up, weekends were synonymous with family gatherings, and no gathering was complete without Grandma's brownies. Her secret? A recipe that was as straightforward as it was delicious. Thick, fudgy, and requiring just one bowl, these brownies are a testament to the idea that simplicity is often the key to perfection.


As a child, I would perch on a stool, eyes wide with anticipation, watching Grandma melt chocolate in a large, heatproof bowl set over simmering water. The semi-sweet and unsweetened chocolate, combined with unsalted butter, would slowly transform into a smooth, glossy mixture. This was my favorite part—the moment when the kitchen filled with the rich, intoxicating scent of chocolate.


Once cooled, Grandma would let me stir in the cocoa powder, eggs, sugar, vanilla, and salt. Her gentle guidance made the process feel like a grand adventure. The final step was my sacred duty—carefully adding the flour and ensuring it was just combined. Grandma always said that overmixing was the enemy of a perfect brownie.


The Magic of Baking

After spreading the batter into a foil-lined baking pan, we'd slide it into the oven. Those 35 to 40 minutes felt like an eternity to a chocolate-loving child. But the wait was worth it. The brownies emerged slightly puffed, with a toothpick inserted into the center revealing the perfect balance between gooey and set.


Though the recipe suggested cooling them to room temperature, patience was never my strong suit. Five minutes was usually all I could manage before cutting into them. To this day, the first bite of those warm, fudgy brownies takes me back to those precious afternoons.


A Dessert to Cherish

Rated a 3 out of 10 for difficulty, this dessert is not only easy to make but also a delightful way to create lasting memories with loved ones. Whether you're a seasoned baker or a novice, these Thick, Fudgy, One Bowl Brownies are a must-try.


So, gather your ingredients—semi-sweet chocolate, unsweetened chocolate, unsalted butter, cocoa powder, eggs, vanilla extract, table salt, and flour—and embark on a nostalgic baking journey. This simple, yet indulgent treat is perfect for any occasion, but most importantly, it's a reminder that the best recipes are those that bring people together.


Conclusion

In a world that often feels hurried and complex, these brownies offer a moment of pause, a chance to savor the simple joys of life. Whether you're sharing them with family, indulging alone, or gifting them to a friend, these thick, fudgy brownies are sure to warm hearts and create sweet memories.

Read more about Appetizers

Read more about Main Dishes

Read more about Desserts

Easy Gluten Free Vegetarian Pasta Salad | Made by Meaghan Moineau

Easy Gluten Free Vegetarian Pasta Salad | Made by Meaghan Moineau

Title: A Taste of Summer: Easy Gluten-Free Vegetarian Pasta Salad
Description: Discover the fresh and vibrant flavors of our Easy Gluten-Free Vegetarian Pasta Salad. This delightful dish combines the zesty tang of oranges with the sweetness of fresh grapes, creating a refreshing and healthy meal perfect for any occasion. Join us as we explore the simplicity of this recipe and share a cherished family memory that makes this salad truly special.

---


A Taste of Summer: Easy Gluten-Free Vegetarian Pasta Salad

There’s something nostalgically comforting about a good pasta salad, especially when it’s easy to prepare and packed with flavor. Our Easy Gluten-Free Vegetarian Pasta Salad is a celebration of simple, wholesome ingredients that come together in perfect harmony. With gluten-free pasta as its base, this dish is perfect for those with dietary restrictions without compromising on taste.


Ingredients:

- Gluten-free pasta


- Plain Greek yogurt


- Orange zest


- Fresh orange juice


- Olive oil


- Fresh grapes


- Fresh cilantro


- Sea salt


- Black pepper


Instructions:

1. Cook the gluten-free pasta according to package directions. Drain and set aside to cool for 10 minutes.


2. In a large bowl, combine all ingredients; gently toss to combine.


3. Transfer pasta salad to four serving bowls.


4. Serve chilled.


Difficulty Rating: 3/10
Classification: Main Dish

---


A Nostalgic Family Memory

Every summer, my family would gather at my grandmother’s house for a weekend of laughter, games, and of course, delicious food. The backyard was always buzzing with the playful sounds of cousins chasing each other, while the adults lounged under the shade of the old oak tree, sharing stories and reminiscing about days gone by.


Among the array of dishes that adorned the picnic table, my grandmother’s pasta salad was always a standout. Her secret? A splash of fresh orange juice and a sprinkle of orange zest, which she believed added a bit of sunshine to each bite.


This recipe is my tribute to those cherished summer afternoons. As I prepare the salad, I’m reminded of the joy and warmth that filled those days, the citrusy aroma of oranges mingling with the fresh scent of cilantro, and the sweet taste of grapes bursting with flavor.


Each bite of this salad takes me back to those sunlit afternoons, with the gentle rustle of leaves in the breeze and the comforting presence of family by my side. It’s a reminder that the simplest dishes, made with love and shared with those we hold dear, often become the most memorable.


Whether you’re hosting a summer gathering or simply craving a light and refreshing meal, this Easy Gluten-Free Vegetarian Pasta Salad is sure to delight. It’s a dish that not only satisfies the palate but also nourishes the soul with its simplicity and the memories it evokes.


Enjoy this delightful salad chilled, and let each bite transport you to a place of warmth, joy, and togetherness.

Read more about Appetizers

Read more about Main Dishes

Read more about Desserts

Grilled Ham and Cheese French Toast For A Quick Weeknight Dinner | Made by Meaghan Moineau

Grilled Ham and Cheese French Toast For A Quick Weeknight Dinner | Made by Meaghan Moineau

Title: Quick and Delicious: Grilled Ham and Cheese French Toast for a Weeknight Treat
Description: Discover the comfort of a Grilled Ham and Cheese French Toast that’s perfect for those busy weeknights. Made with wholesome ingredients like low-fat Jarlsberg cheese, lean turkey ham, and hearty wheat bread, this dish combines the savory satisfaction of a classic sandwich with the sweet nostalgia of French toast. Easy to prepare and packed with flavor, this meal is sure to become a family favorite.

---


A Taste of Childhood: Grilled Ham and Cheese French Toast


There’s something inherently comforting about a grilled cheese sandwich. The golden, crispy bread and gooey, melted cheese transport many of us back to simpler times. This Grilled Ham and Cheese French Toast elevates that classic comfort, combining it with the delightful flavors of French toast for a meal that’s both nostalgic and novel.


Ingredients:


- Buttermilk: Adds a tangy richness to the French toast coating.
- Egg Whites: Helps bind the ingredients and provides a light texture.
- Dijon Mustard: Infuses the bread with a subtle kick.
- Wheat Bread: Offers a wholesome base for the sandwich.
- Low Fat Jarlsberg Cheese: Melts beautifully and imparts a nutty flavor.
- Lean Turkey Ham: A healthier alternative to traditional ham.
- Dill Pickles: Adds a crunchy, tangy contrast.
- Low Fat Light Smart Balance Heart Right: Ensures a buttery crust without the extra calories.

Instructions:


1. Preheat the Oven: Set it to 350 degrees to keep the sandwiches warm.
2. Prepare the Coating: In a shallow bowl, whisk together buttermilk and egg whites, then set aside.
3. Assemble the Sandwiches: Spread mustard on each slice of bread. Top half with cheese, ham, and pickles, then complete with remaining slices.
4. Cook the Sandwiches: Melt reduced-fat butter in a nonstick pan over medium heat. Dip sandwiches in the buttermilk mixture, ensuring they’re lightly coated. Cook covered for 3-5 minutes, flip and press, then cook uncovered for another 2-3 minutes until golden.
5. Keep Warm: Place cooked sandwiches on a baking sheet in the oven while repeating with the remaining sandwiches.
6. Serve: Slice each sandwich in half and enjoy with a fork and knife.

A Slice of Family Memory


Growing up, my family had a tradition of spending Friday nights together, sharing stories over a comforting meal. My grandmother, a culinary enthusiast, often surprised us with creative twists on classic dishes. One memorable evening, she introduced us to her version of Grilled Ham and Cheese French Toast. As we gathered around the table, the air filled with the aroma of melting cheese and sizzling butter, we knew we were in for a treat.


This dish, with its crispy edges and soft, cheesy center, quickly became a family favorite. Every bite was a delightful blend of flavors and textures, reminiscent of lazy Sunday mornings and bustling family gatherings. Even today, preparing this meal brings back those cherished memories, turning any weeknight dinner into a warm family occasion.


Difficulty Rating: 3/10


This Grilled Ham and Cheese French Toast is simple to prepare, making it a perfect choice for a quick and satisfying weeknight dinner. With minimal ingredients and straightforward instructions, even a novice cook can master this dish. Enjoy the fusion of flavors and the joy of creating a meal that’s both nostalgic and delicious.


Classification: Main Dish

---


Embrace the nostalgia and savor every bite of this Grilled Ham and Cheese French Toast. It’s more than just a meal; it’s a journey back to the warmth of family gatherings and the joy of sharing good food with loved ones.

Read more about Appetizers

Read more about Main Dishes

Read more about Desserts

Quick and Easy Southwestern Corn Chowder | Made by Meaghan Moineau

Quick and Easy Southwestern Corn Chowder | Made by Meaghan Moineau

Title: A Hearty Bowl of Comfort: Quick and Easy Southwestern Corn Chowder
Description: Dive into the warmth of Southwestern flavors with this Quick and Easy Corn Chowder. Perfect for busy weeknights, this delightful dish combines vibrant vegetables, tender chicken, and creamy cheese for a soul-satisfying experience. Join me as I share my personal family memories tied to this comforting meal.

---


As the leaves begin to turn and the air becomes crisp, there's nothing quite like a warm, hearty soup to bring comfort to both the body and soul. Our Quick and Easy Southwestern Corn Chowder is not just a dish; it's a bowl of memories, nostalgia, and love. This flavorful chowder combines the earthy sweetness of fresh corn with the gentle heat of chili flakes, making it a perfect companion for cozy evenings.


Nostalgic Family Memory:

Growing up, my family always gathered around the kitchen on Sunday evenings to prepare meals together. It was a sacred ritual, a time to connect after our busy weeks. My grandmother, with her worn-out apron and gentle smile, was the maestro of our kitchen symphony. She had an uncanny ability to turn simple ingredients into something magical, and her Southwestern Corn Chowder was no exception.


I fondly remember the aroma of onions and peppers gently sweating in the Dutch oven, filling the house with an inviting warmth. As a child, my job was to carefully measure the corn kernels, making sure not to spill any on our kitchen floor—a task I took very seriously. The heart of our chowder was always the fresh corn, harvested from our backyard garden, adding a touch of sweetness that only nature can provide.


As my grandmother stirred the pot, she would share stories of her childhood, tales of her family's own kitchen gatherings in the Southwest. Each spoonful of chowder was a journey back to those stories, a connection to our roots and a reminder of the love that bound us together. Now, every time I make this dish, I feel her presence in the kitchen, guiding me, just as she did all those years ago.


Recipe Details:
Ingredients:

- 2 tablespoons butter


- 1 cup cheddar cheese (optional)


- 1 teaspoon chili flakes


- 4 cups yellow fresh corn kernels


- 1 green bell pepper, diced


- 1 cup half and half


- 1 red bell pepper, diced


- Salt and pepper to taste


- 2 cups cooked shredded chicken


- 1 cup sweet onions, diced


- 4 cups vegetable stock


Instructions:

1. In a Dutch oven, melt the butter over medium heat. Add the diced sweet onions and bell peppers, along with a pinch of salt. Sweat the vegetables until the onions become translucent and fragrant.


2. Sprinkle in the chili flakes, allowing them to release their warmth into the mix.


3. Pour in the vegetable stock, followed by the fresh corn kernels and shredded chicken. Stir to combine and bring the mixture to a gentle simmer. Cover and let it simmer for about 10 minutes, allowing the flavors to meld.


4. Once the chowder has simmered, reduce the heat and stir in the half and half. If desired, add the cheddar cheese, stirring until melted and incorporated.


5. Season with salt and pepper to taste, adjusting to your preference.


6. Serve hot, garnished with additional cheese or fresh herbs if desired.


Difficulty Rating: 3/10
Classification: Main Dish

This Southwestern Corn Chowder is more than just a meal; it’s a tradition, a family heirloom passed down through generations, warming hearts and homes with its rich flavors and cherished memories. Enjoy this dish with your loved ones and create your own stories to share around the dinner table.


---


Let us know how this recipe turned out for you and share your own kitchen memories in the comments below!

Read more about Appetizers

Read more about Main Dishes

Read more about Desserts

Chicken Piccata with Artichokes | Made by Meaghan Moineau

Chicken Piccata with Artichokes | Made by Meaghan Moineau

Title: Discover the Magic of Chicken Piccata with Artichokes: A Nostalgic Family Favorite
Description: Dive into the heartwarming flavors of Chicken Piccata with Artichokes, a delightful main dish that brings family memories to life. With the perfect blend of savory and tangy notes, this recipe is a culinary journey you won’t want to miss. Rated 4 out of 10 for difficulty, it's approachable for home cooks of all levels.

---


The Magic of Chicken Piccata with Artichokes: A Family Tradition

There’s something about the aroma of a lovingly prepared meal that transports us back to cherished moments shared around the family table. For me, Chicken Piccata with Artichokes is more than just a dish—it's a portal to Sunday dinners at my grandmother’s house.


Every Sunday, my grandmother would don her favorite apron and set to work in her cozy kitchen, filling the air with the mouthwatering scent of sautéing chicken and fresh herbs. The heart of our gatherings, her signature Chicken Piccata with Artichokes, was a dish that brought smiles to everyone’s faces, transcending the ordinary and creating a feast of flavors and memories.


This recipe, with its combination of tender boneless chicken breasts and the unique tang of artichokes and capers, is a tribute to my grandmother’s culinary wisdom. It’s a dish that’s as much about the experience of making it as it is about the enjoyment of eating it.


Ingredients:

- 4 boneless chicken breasts


- Salt and pepper to taste


- 1/2 cup flour for dredging


- 3 tablespoons extra virgin olive oil


- 1/2 cup reduced sodium chicken broth


- 1/4 cup freshly squeezed lemon juice


- 1/4 cup capers, drained


- 1 can artichoke hearts, drained and halved


- 1/4 cup chopped flat leaf parsley


- 1/2 cup freshly grated parmesan cheese


- 1 lb cooked penne rigate


Instructions:

1. In a large bowl, combine the chicken with a generous pinch of salt and pepper. Lightly dredge the chicken in flour, shaking off excess.


2. Heat the extra virgin olive oil in a large skillet over medium heat. Add the chicken breasts, cooking until browned and the juices run clear, approximately 12 minutes.


3. Stir in the chicken broth, lemon juice, capers, and artichokes, allowing the mixture to cook for about 3 minutes. The combination of these ingredients creates a tantalizing sauce that perfectly complements the chicken.


4. Reduce the heat to a simmer for an additional 3 minutes, letting the flavors meld together.


5. Stir in the cooked penne rigate until fully combined, absorbing the delicious sauce.


6. Add the chopped parsley, infusing the dish with freshness, and transfer to a serving bowl. Finish with a generous sprinkle of parmesan cheese for a savory touch.


A Culinary Journey

Each bite of this Chicken Piccata with Artichokes is a step back in time, recalling laughter-filled evenings and the comfort of family bonds. As a main dish, it’s perfect for gathering loved ones and creating new memories, just as my grandmother did every Sunday.


With a difficulty rating of 4 out of 10, this recipe is accessible for novice cooks, yet sophisticated enough to impress seasoned chefs. Its versatility makes it a staple for any home cook’s repertoire—a dish that truly embodies the warmth of home cooking and the joy of shared meals.


So next time you’re looking to evoke a sense of nostalgia while satisfying your culinary cravings, try this Chicken Piccata with Artichokes. It’s more than just a meal; it’s a celebration of family, flavor, and the timeless tradition of gathering around the table.

Read more about Appetizers

Read more about Main Dishes

Read more about Desserts

5-Minute Rocky Road Fudge | Made by Meaghan Moineau

5-Minute Rocky Road Fudge | Made by Meaghan Moineau

Title: The Sweet Simplicity of 5-Minute Rocky Road Fudge
Description: Discover the joy of creating a delightful dessert in just five minutes with our 5-Minute Rocky Road Fudge recipe. This easy-to-make treat combines rich chocolate, fluffy marshmallows, and crunchy walnuts for a nostalgic flavor that brings back fond family memories. Perfect for any occasion, this fudge is a sweet reminder of the simple pleasures in life.

---


A Journey Down Memory Lane: The Sweet Simplicity of 5-Minute Rocky Road Fudge


There’s something magical about the combination of chocolate, marshmallows, and nuts. For me, it’s a taste that instantly transports me back to the cozy warmth of my grandmother's kitchen. Her 5-Minute Rocky Road Fudge was more than just a dessert; it was a symbol of love and the centerpiece of many cherished family gatherings.


Ingredients:


- 2 cups semi-sweet chocolate chips


- 1 can (14 ounces) sweetened condensed milk


- 1 teaspoon vanilla extract


- 1/4 teaspoon salt


- 2 cups mini-marshmallows


- 1 cup chopped walnuts


Instructions:


1. Prepare Your Pan: Line a 13x9-inch pan with foil and lightly spray it with cooking spray. This step ensures your fudge releases effortlessly, preserving each perfect square.
2. Melt the Chocolate: In a large, microwave-safe bowl, combine the semi-sweet chocolate chips and sweetened condensed milk. Microwave for about 40 seconds, stirring until the chips are just melted. If necessary, continue microwaving in 15-second increments, being careful not to overcook.
3. Add Flavor: Stir in the vanilla extract and salt, infusing the melted chocolate with a hint of warmth and depth.
4. Fold in the Fun: Gently fold in the mini-marshmallows and walnuts, ensuring they are evenly distributed throughout the chocolate mixture.
5. Set the Fudge: Quickly spread and press the fudge into the prepared pan. Refrigerate until set and completely cooled.
6. Serve and Enjoy: Once cooled, cut into squares and serve. Watch as smiles spread across faces with each delightful bite.

A Taste of Nostalgia:


I remember the first time I made this fudge with my grandmother. The kitchen was filled with laughter as we melted chocolate and sneaked marshmallows when we thought no one was looking. The smell of chocolate mixed with vanilla wafted through the air, wrapping us in a comforting embrace. Each piece of fudge was a testament to our shared moments, a delicious reminder of afternoons spent together, filled with stories and love.


This fudge was always the star at family gatherings, disappearing almost as quickly as it was made. It was the perfect treat to share, a bite-sized piece of happiness that brought everyone together. Even now, as I make this fudge with my own children, I’m reminded of those precious times, and I hope to pass on the tradition to the next generation.


Difficulty Rating: 2/10


This recipe is incredibly simple, making it the perfect dessert for both novice and experienced cooks. With minimal ingredients and just a microwave needed, it’s an easy yet impressive addition to any occasion.


Classification: Dessert

Indulge in the sweet simplicity of 5-Minute Rocky Road Fudge. Whether you're creating new memories or reliving old ones, this delightful dessert is sure to bring joy to your table.

Read more about Appetizers

Read more about Main Dishes

Read more about Desserts

Glazed pork chops | Made by Meaghan Moineau

Glazed pork chops | Made by Meaghan Moineau

Title: A Taste of Home: Glazed Pork Chops with a Nostalgic Twist
Description: Dive into a culinary journey with our Glazed Pork Chops recipe, perfectly balanced with honey, soy sauce, and balsamic vinegar. This main dish not only promises a delightful dining experience but also brings back cherished family memories. Discover how to transform simple ingredients into a meal that speaks to the heart and soul. Rated a 5/10 on the difficulty scale, this dish is accessible yet impressive, perfect for any home cook eager to bring a touch of nostalgia to the dinner table.

---


Glazed Pork Chops: A Recipe Steeped in Family Tradition


In the heart of every family kitchen, there exists a dish that holds the power to transport us back to simpler times. For my family, that dish is Glazed Pork Chops. The aroma of sizzling pork, mingling with the sweet and tangy glaze, evokes memories of Sunday dinners at my grandmother's house where laughter and love were the main courses.


Growing up, Sundays were sacred. The whole family would gather around Grandma’s large oak dining table, eager to share stories and enjoy the feast she had lovingly prepared. Among all the delightful dishes, it was her Glazed Pork Chops that stole the show. Tender, juicy, and perfectly seasoned, they were the highlight of our meals.


As I recreate this dish today, I am reminded of my grandmother's kitchen, a place filled with warmth and the comforting hum of conversations. The secret to her unforgettable pork chops lay not only in the ingredients but in the love she infused into each step of the process.


Ingredients:


- Lean boneless pork chops


- Black pepper


- 2 tablespoons butter


- 2 garlic cloves, minced


- 1/4 cup honey


- 2 tablespoons soy sauce


- 1 tablespoon balsamic vinegar


- 1 tablespoon cornstarch


- Fresh green onions, chopped


Instructions:


1. Prepare the Pork Chops: Start by pressing one side of each pork chop into cracked black pepper. This step is crucial for infusing the meat with a peppery kick that complements the sweet glaze.
2. Cook the Pork Chops: Heat a nonstick grill skillet until hot. Add the pork chops, pepper side down, and cook for about 4 minutes or until browned. Reduce the heat to medium, flip the pork chops, and continue cooking for 6-8 minutes. Once done, remove the skillet from the heat, cover the pork chops, and set aside.
3. Prepare the Glaze: In a separate bowl, mix honey, soy sauce, balsamic vinegar, and cornstarch until smooth. Add a pinch of black pepper and stir well.
4. Make the Sauce: Melt butter in a small pan over medium heat. Add minced garlic and cook for 30 seconds, stirring constantly to prevent burning. Stir in the honey mixture, bring to a boil, and cook for 1 minute, stirring continuously until the sauce thickens.
5. Serve: Spoon the luscious glaze over the pork chops and sprinkle with fresh green onions. For a complete meal, serve alongside creamy polenta and a fresh green salad.

A Dish for Every Occasion


Rated 5/10 on the difficulty scale, this main dish is perfect for both novice cooks and seasoned chefs looking to add a nostalgic twist to their repertoire. The balance of flavors, from the robust pepper to the sweet and tangy glaze, creates a symphony of taste that leaves a lasting impression.


As I prepare this dish today, I am enveloped in a sense of nostalgia, remembering the joy and unity that this meal brought to my family. I hope that, in sharing this recipe, you too can create new memories while honoring the old. Embrace the simplicity, savor the flavors, and let each bite transport you to a place where love, laughter, and delicious food reign supreme.

Read more about Appetizers

Read more about Main Dishes

Read more about Desserts